
BC5CSKL26 - Air Conditioning Be Cool - Free user manual and instructions
Find the device manual for free BC5CSKL26 Be Cool in PDF.

| Brand | Be Cool |
| Model | BC5CSKL26 |
| Product Type | Split mobile air conditioner for caravans and motorhomes |
| Cooling Power | 5,000 BTU/h (1,465 W) |
| Maximum Power Consumption | 560 W |
| Supply Voltage | 220–240 V, 50 Hz |
| Refrigerant | R290, 130 g (flammable gas) |
| Dehumidification | 0.5 l/h |
| Energy Efficiency | EER 2.6, class A |
| Airflow Rate | 200 m³/h |
| Sound Level (Acoustic Power) | 63 dB(A) |
| Total Weight | 22.5 kg |
| Indoor Unit Dimensions | 454 x 298 x 170 mm |
| Outdoor Unit Dimensions | 445 x 353 x 205 mm |
| Operating Modes | Cooling, ventilation, dehumidification |
| Timer | Programmable (on/off) |
| Sleep Mode | Yes, with display shutdown |
| Swing Function | Yes (activated by speed + sleep buttons) |
| Built-in WiFi | Yes, 2.4 GHz, Smart Life app |
| Voice Assistant Compatibility | Amazon Alexa, Google Assistant |
| Air Filter | Washable, weekly cleaning recommended |
| Installation | In caravan/motorhome window, mounting kit included |
| Warranty | 2 years (current conditions) |
Frequently Asked Questions - BC5CSKL26 Be Cool
User questions about BC5CSKL26 Be Cool
0 question about this device. Answer the ones you know or ask your own.
Ask a new question about this device
Download the instructions for your Air Conditioning in PDF format for free! Find your manual BC5CSKL26 - Be Cool and take your electronic device back in hand. On this page are published all the documents necessary for the use of your device. BC5CSKL26 by Be Cool.
USER MANUAL BC5CSKL26 Be Cool
natural_image
Technical line drawing of a mechanical component with no visible text or symbolsHERZLICHEN GLÜCKWUNSCH!
natural_image
Technical line drawing of a portable air conditioner unit with mesh grille and handle (no text or symbols)natural_image
Technical line drawing of a mechanical device before and after assembly (no text or symbols)natural_image
Technical line drawing of a mechanical device with attached tubing and a mesh panel (no text or symbols)BE COOL
natural_image
Line drawing of a portable air conditioner unit with cooling fins and wheels (no text or symbols)
natural_image
Line drawing of a desktop computer with monitor and keyboard (no text or symbols)natural_image
Line drawing of a portable air conditioner unit with grille and front panel (no text or symbols)
natural_image
Simple line drawing of a 3x4 grid layout with no text, numbers, or symbolsScan QR code
Registrierung

BE COOL


WORKS WITH
amazon alexa

works with the Google Assistant
BE COOL
natural_image
Technical line drawing of a portable electronic device with ventilation grilles and a top-mounted fan (no text or symbols)FÉLICITATIONS! MERCI D'AVOIR CHOISI UN PRODUIT BE COOL.

VEUILLEZ LIRE ATTENTIVEMENT LE MANUEL D'UTILISATION AVANT DE COMMENCER LE MONTAGE, L'INSTALLATION, L'UTILISATION OU LA MAINTENANCE. PROTÉGEZ-VOUS ET PROTÉGEZ LES AUTRES EN SUIVANT LES CONSIGNES DE SÉCURITÉ. LE NON- RESPECT DES INSTRUCTIONS PEUT ENTRAÎNER DES BLESSURES ET/OU DES DOMMAGES MATÉRIELS ET/OU LA PERTE DE LA GARANTIE !
natural_image
Technical line drawing of a portable air conditioner unit with mesh grille and handle (no text or symbols)natural_image
Technical line drawing of a mechanical device before and after assembly, showing internal components and mounting points (no text or symbols)BE COOL
natural_image
Technical line drawing of a mechanical device with attached tubing and a mesh chamber (no text or symbols)natural_image
Line drawing of a portable air conditioner unit with cooling fins and wheels (no text or symbols)
natural_image
Line drawing of a portable electronic device with a front panel and internal circuitry (no text or symbols)ENTRETIEN ET NETTOYAGE
natural_image
Line drawing of a portable air conditioner unit with ventilation grilles and control panel (no text or symbols)
natural_image
Simple line drawing of a 3x3 grid layout with no text, numbers, or symbolsScan QR code
Inscription

BE COOL


WORKS WITH amazon alexa

works with the Google Assistant
BE COOL
natural_image
Technical line drawing of a mechanical component with no visible text or symbolsCONGRATULAZIONI! GRAZIE PER AVER SCELTO UN PRODOTTO BE COOL.

LEGGERE ATTENTAMENTE IL MANUALE D'USO PRIMA DI INIZIARE IL MONTAGGIO, L'INSTALLAZIONE, L'UTILIZZO O LA MANUTENZIONE. PROTEGGERE SE STESSI E GLI ALTRI SEGUENDO LE ISTRUZIONI DI SICUREZZA. LA MANCATA OSSERVANZA DELLE ISTRUZIONI POTREBBE CAUSARE LESIONI PERSONALI E/O DANNI MATERIALI E/O LA PERDITA DEL DIRITTO ALLA GARANZIA!
natural_image
Technical line drawing of a portable air conditioner unit with mesh grille and handle (no text or symbols)flowchart
graph TD
    A["Ammortizzatori"] --> B["Arrow"]
    B --> C["Ammortizzatori"]
    C --> D["Oval representation of mechanical component with internal components"]
natural_image
Technical line drawing of a mechanical device before and after assembly (no text or symbols)BE COOL
natural_image
Technical line drawing of a mechanical device with attached wiring and a mesh panel (no text or symbols)natural_image
Line drawing of a portable air conditioner unit with cooling fins and wheels (no text or symbols)
natural_image
Line drawing of a desktop computer with monitor and tower (no text or symbols)natural_image
Line drawing of a portable air conditioner unit with ventilation grilles and control panel (no text or symbols)
natural_image
Simple line drawing of a 3x3 grid layout with no text, numbers, or symbolsScan QR code
Registrazione

BE COOL


WORKS WITH
amazon alexa

works with the Google Assistant
BE COOL
natural_image
Technical line drawing of a portable electronic device with ventilation grilles and a top-mounted fan (no text or symbols)FELICITĂRI! VĂ MULȚUMIM CĂ AȚI ALEAS UN PRODUS BE COOL.

CITIȚI CU ATENȚIE MANUALUL DE UTILIZARE ÎNAINTE DE A ÎNCEPE MONTAREA, INSTALAREA, UTILIZAREA SAU ÎNTREȚINEREA. PROTJAȚI-VĂ PE VOI ÎNȘIVĂ ȘI PE CEILALȚI RESPECTÂND INSTRUCTIUNILE DE SIGURANȚĂ. NERESPECTAREA INSTRUCTIUNILOR POATE DUCE LA VĂTĂMĂRI CORPORALE ȘI/SAU DAUNE MATERIALE ȘI/SAU LA PIERDEREA DREPTULUI LA GARANȚIE!
natural_image
Technical line drawing of a portable air conditioner unit with mesh grille and handle (no text or symbols)- Mâner de transport
- Furtun
- Admisie aer
BE COOL
flowchart
graph TD
    A["Amortizoare"] --> B["Arrow"]
    B --> C["Amortizoare"]
    C --> D["Oval Box with Internal Components"]
natural_image
Technical line drawing of a mechanical device before and after assembly (no text or symbols)BE COOL
natural_image
Technical line drawing of a mechanical device with attached components and a vertical panel (no text or symbols)natural_image
Line drawing of a portable air conditioner unit with cooling fins and wheels (no text or symbols)
natural_image
Line drawing of a portable electronic device with a front panel and internal circuitry (no text or symbols)natural_image
Line drawing of a portable air conditioner unit with ventilation grilles and control panel (no text or symbols)
natural_image
Simple line drawing of a 3x3 grid layout with no text, numbers, or symbolsScan QR code
Înregistrare


BE COOL


WORKS WITH
amazon alexa

works with the Google Assistant
BE COOL
natural_image
Technical line drawing of a portable electronic device with ventilation grilles and a top-mounted fan (no text or symbols)ČESTITAMO! HVALA, DA STE SE ODLOČILI ZA IZDELEK BE COOL.

Aktualna navodila za uporabo in drugi jeziki
PREDEN ZAČNETE Z MONTAŽO, NAMESTITVIJO, UPORABO ALI VZDRŽEVANJEM, POZORNO PREBERITE NAVODILA ZA UPORABO. ZUPRAVITE SEBI IN DRUGIM, TAKO DA UPOSTEVAJTE VARNOSTNE NAVODILA. NEUPOŠTEVANJE NAVODIL LAHKO PRIPELJE DO POŠKODB OSEB IN/ALI PREMOŽENJA IN/ALI IZGUBE GARANCIJSKIH PRAVIC!
natural_image
Technical line drawing of a portable air conditioner unit with mesh grille and handle (no text or symbols)flowchart
graph TD
    A["Amortizerji"] --> B["Arrow"]
    B --> C["Amortizerji"]
    C --> D["Oval Box with circular features and dots"]
- Sestavite nosilec v skladu s spodnjo sliko. Notranjo in zunanjo enoto pritrdite na nosilec, da povežete oba dela. V predvidene luknje vstavite vijake in podložke, ki so priloženi v paketu, in jih zategnite, da napravi varno pritrdite na nosilec.
natural_image
Technical line drawing of a mechanical device before and after assembly, showing internal components and mounting points (no text or symbols)BE COOL
natural_image
Technical line drawing of a mechanical device with attached wiring and a mesh panel (no text or symbols)- Vstavite celotno enoto v okno prikolice in pritrdite nosilec, da se vamo pritrdi.
BE COOL

natural_image
Line drawing of a portable air conditioner unit with cooling fins and wheels (no text or symbols)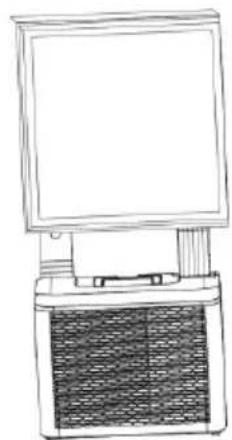
natural_image
Line drawing of a portable electronic device with a front panel and internal circuitry (no text or symbols)VZDRŽEVANJE IN ČIŠČENJE
natural_image
Line drawing of a portable air conditioner unit with ventilation grilles and control panel (no text or symbols)
natural_image
Simple line drawing of a 3x3 grid layout with no text, numbers, or symbolsČiščenje površine naprave
- Najprej površino obrišite z nevtralnim čistilom in vlažno krpo.
• Nato napravo temeljito osušite s suho krpo. - Poskrbite, da voda ali čistilo ne pridejo v notranjost naprave.
- Za čiščenje klimatske naprave ne uporabljajte agresivnih čistil ali bencina.
Shranjevanje
Scan QR code
Registracija
BE COOL

Samodejno dodajanje naprave


WORKS WITH
amazon alexa

works with the Google Assistant
BE COOL
| Tehnični podatki WiFi | |
| Brezžična tehnologija: | Wifi (WLAN) |
| Frekvenca brezžičnega delovanja | 2412 MHz–2472 MHz |
| BLE-frekvenca delovanja | 2402 MHz–2480 MHz |
| Tip modulacije | 802.11b: DSSS802.11g: OFDM802.11n (20 MHz): OFDM |
| Programska oprema s fiksno frekvenco | SecureCRT.exe |
| Ojačitev antene | 2,5 dBi |
| Tip antene | PCB |
| Prenosna moč | :520 dBm |
natural_image
Technical line drawing of a portable electronic device with ventilation grilles and a top-mounted fan (no text or symbols)ČESTITAMO! HVALA VAM ŠTO STE ODABRALI PROIZVOD TVRTKE BE COOL.
Trenutni korisnički priručnici i drugi jezici
Prije početka montaže, instalacije, rada ili održavanja pažljivo pročitajte upute za uporabu. Zaštitite sebe i druge slijedeći sigurnosne upute. Nepoštivanje uputa može uzrokovati tjelesne ozljede i/ili materijalnu štetu i/ili poništavanje jamstva!
BE COOL
1. Postavljanje i rad
natural_image
Technical line drawing of a portable air conditioner unit with mesh grille and handle (no text or symbols)natural_image
Technical line drawing of a mechanical device before and after assembly (no text or symbols)- Pričvrstite unutamju jedinicu na nosač i čvrsto je pritegnite vijkom s palcem (vidi ilustraciju dolje).
BE COOL
natural_image
Technical line drawing of a mechanical device with attached tubing and a mesh panel (no text or symbols)- Umetnite cijelu jedinicu u prozor kamp-kućice i pričvrstite je nosačem.
BE COOL

natural_image
Line drawing of a portable air conditioner unit with cooling fins and wheels (no text or symbols)
natural_image
Line drawing of a portable electronic device with a front panel and internal circuitry (no text or symbols)ODRŽAVANJE I ČIŠĆENJE
natural_image
Line drawing of a portable air conditioner unit with ventilation grilles and control panel (no text or symbols)
natural_image
Simple line drawing of a 3x3 grid layout with no text, numbers, or symbolsScan QR code
Registracija
BE COOL


WORKS WITH
amazon alexa

works with the Google Assistant
BE COOL
| Tehničke specifikacije WiFi-ja | |
| Bežična tehnologija: | Wi-Fi (WLAN) |
| Radna frekvencija radija | 2412 MHz - 2472 MHz |
| Radna frekvencija BLE-a | 2402 MHz - 2480 MHz |
| Vrsta modulacije | 802.11b: DSSS802.11g: OFDM802.11n (20 MHz) : OFDM |
| Softver s fiksnom frekvencijom | SecureCRT.exe |
| Pojačanje antene | 2,5 dBi |
| Vrsta antene | PCB |
| prijenosna snaga | 520 dBm |
| Tehničke informacije | |
| Broj artikla | BC5CSKL26 |
| Kapacitet hlađenja | 5.000 BTU/h |
| 1465 vata | |
| Maksimalna potrošnja energije | 560 vata |
| Stopa odvlaživanja | 0,5 l/h |
| Ulazni napon | 220 – 240 V |
| frekvencija | 50 Hz |
| Frekvencija WiFi prijenosa: | 2,4 GHz |
| Prijenosna snaga: | maks. 100 mW |
| Rashladno sredstvo/punjenje | R290, 130 g |
| EER energije | 2.6 |
| Razred energetske učinkovitosti | A |
| cirkulacija zraka | 200 m^3 / h |
| Razina buke (zvučna snaga) | 63 dB(A) |
| Težina | 22,5 kg |
| Dimenzije unutarnje jedinice | 454x298x170 mm |
| Dimenzije vanjske jedinice | 445 x353x205 mm |
| Kontaktna adresa proizvođača za daljnje informacije | Schuss Home Electronic GmbH,Scheringgasse 3, A-1140 Beč, Tel: +43(1) 97 0 21 – 0Servisna linija: +43 (1) 97 0 21 – 502www.becool.atFB broj: 236974 t / FB sud: Beč |
BE COOL
| Zahtjev za informacijama za jednocijevne i dvocijevne klima uređaje | P | ||
| Detalji za identifikaciju modela na koje se informacije odnose: | |||
| Opis | simbol | Vrijednost | Jedinica |
| Nominalni kapacitet hlađenja | P_nazivna vrijednost za hlađenje | 1.472 | kW |
| Nazivna snaga za grijanje | P_nazivna vrijednost za grijanje | - | kW |
| Nazivna potrošnja energije za hlađenje | P_EER | 0,546 | kW |
| Nazivna potrošnja energije za grijanje | P_COP | - | kW |
| Nominalni omjer energetske učinkovitosti | EER_d | 2.696 | - |
| Nominalni koeficijent snage | COP_d | - | - |
| Podaci za identifikaciju modela na koje se podaci odnose: | |||
| Opis | simbol | Vrijednost | Jedinica |
| Potrošnja energije u načinu rada s isključenim termostatom | P_TO | - | W |
| Potrošnja energije u stanju pripravnosti P | P_SB | 2.0 | W |
| Potrošnja energije uređaja s jednim ili dva kanala (zasebno navesti za hlađenje i grijanje) | Q_SD | SD: 0,546(Hlađenje) | kWh/h |
| Razina zvučne snage | L_WA | 63 | dB(A) |
| Potencijal globalnog zagrijavanja | GWP | 3 | kgCO2 eq. |
| Kontaktni podaci za daljnje informacije | Schuss Home Electronic GmbHScheringgasse 31140 Beč, AustrijaTel.: +43 (1) 97 0 21 – 0www.becool.at | ||
BE COOL
JAMČITI
natural_image
Technical line drawing of a portable electronic device with ventilation grilles and a top-mounted fan (no text or symbols)CONGRATULATIONS! THANK YOU FOR CHOOSING A BE COOL PRODUCT.

Current user manuals and other languages
Download the latest operating instructions in various languages via the link www.becool.at/ or scan the QR code shown. Follow the instructions on the website.

PLEASE READ THE OPERATING INSTRUCTIONS CAREFULLY BEFORE STARTING ASSEMBLY, INSTALLATION, OPERATION, OR MAINTENANCE. PROTECT YOURSELF AND OTHERS BY FOLLOWING THE SAFETY INSTRUCTIONS. FAILURE TO FOLLOW THE INSTRUCTIONS COULD RESULT IN PERSONAL INJURY AND/OR PROPERTY DAMAGE AND/OR VOID THE WARRANTY!
Caution: Air conditioners should always be stored and transported in an upright position to prevent damage to the compressor. If the unit has been moved to a different position during transport, we recommend that you allow it to rest for at least 24 hours after installation before putting it into operation. This will ensure that the refrigerant in the system stabilizes and that smooth operation is guaranteed.
BE COOL
IMPORTANT INFORMATION ON SAFETY, LOCATION, AND ELECTRICAL CONNECTION.

1. Installation and operation
○ Always place the unit on a firm, level surface. The air conditioner must not be tilted or inclined during operation.
- This air conditioner is only intended for use in a caravan or motorhome and must not be used outdoors.
○ Always keep the unit in an upright position, both during storage and transport, to protect the compressor.
- Avoid placing the unit near strong heat sources, flammable or explosive gases, or chemicals.
- Ensure that the air conditioner's inlets and outlets are unobstructed to ensure optimal air circulation.
Do not use the air conditioner in dusty or particularly dirty environments, as this can clog the filters more quickly and reduce efficiency.
- Ensure that the unit is not exposed to direct sunlight, as this can impair its performance and lead to overheating.
2. Electrical connection
○ Only use the unit in well-grounded sockets and check the suitability of the socket beforehand.
BE COOL
- Do not use extension cords or multiple sockets, as this can lead to overheating and fires.
- Ensure that the power cord is not twisted or kinked. Do not pull on the cord to disconnect the device from the power supply—always use the plug.
- Avoid using the device in areas with frequent power outages or where voltage fluctuations are common, as this can damage the electronics.
- Avoid dripping or spilling liquids on the device. If water gets into the device, disconnect it from the power supply immediately and contact an authorized service center.
3. Handling and use
Do not expose the device to extreme conditions such as high humidity or water. Avoid using it in damp rooms such as basements or near swimming pools.
- Do not touch the device or the plug with wet hands to avoid electric shock.
○ Make sure that no objects, such as fingers or hard objects, get into the air outlet or ventilation grille, as this can cause damage and injury.
4. Child and user safety
Children under 8 years of age and persons with limited physical, sensory, or mental abilities may only use the device under supervision.
BE COOL
- Keep packaging material out of the reach of children – risk of suffocation!
- Do not allow children to play with the device.
5. Maintenance and cleaning
- Unplug the device before cleaning or servicing it.
- Clean the air filter at least once a week to ensure optimum performance.
- Store the device in a safe, dry place out of the reach of children when not in use.
- Do not use chemical cleaning agents or tools that could damage the device.
6. Storage and transport
- Store the device in an upright position in a dry, cool place when not in use.
Before transporting the device, empty the condensation container and allow the device to rest for at least one hour after transport before switching it back on.
- If the device is not used for a long period of time, empty the condensation container completely and clean the device before storing it.
7. Emergency measures
○ If you notice any unusual noises, smells, or smoke, switch off the device immediately, unplug it, and do not use the air conditioner any further. Contact an authorized service center.
BE COOL
Important note: If you are unsure or need repairs, please contact a service center authorized by the manufacturer to ensure warranty coverage and safety.
SPECIFIC INFORMATION ABOUT THE REFRIGERANT R290
- R290 is a refrigerant that complies with EC environmental regulations.
- The refrigerant is odorless.
- The device must be set up in a room where there are no sources of ignition during operation (e.g., open flames, gas and electrical appliances in operation with open heat sources).
- Do not perforate or burn the air conditioner.
- Care must be taken to ensure that the cooling circuit is not drilled into.
- Unventilated rooms in which the unit is installed, operated, or stored must be constructed in such a way that any refrigerant leaks do not accumulate. This prevents the risk of fire or explosion caused by the refrigerant igniting due to electric ovens, stoves, or other sources of ignition.
- The device must be stored in such a way that no mechanical damage can occur.
- Persons working on or intervening in a refrigeration circuit must be in possession of a valid certificate issued by an authorized authority, which certifies their expertise in handling refrigerants through an assessment specification recognized by industry associations.
- Repairs must be carried out in accordance with the instructions of the device manufacturer. Repairs and maintenance work that require the involvement of additional specialist personnel must be carried out under the supervision of the specialist responsible for handling flammable refrigerants.
BE COOL
Recycling, disposal, declaration of conformity
 | RECYCLINGThe packaging materials can be recycled. It is therefore recommended that they be disposed of in sorted waste. |
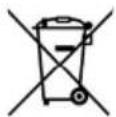
 | DISPOSALThe symbol "crossed-out wheelie bin" requires the separate disposal of waste electrical and electronic equipment (WEEE). Electrical and electronic equipment may contain hazardous and environmentally harmful substances. Therefore, do not dispose of it in unsorted residual waste, but at a designated collection point for waste electrical and electronic equipment. In this way, you contribute to the protection of resources and the environment. For further information, please contact your dealer or local authorities. Directive 2012/19/EU |
 | BATTERY DISPOSALIn accordance with the current legislation on batteries, accumulators, and related waste, the symbol of a crossed-out wheelie bin on the battery indicates that it is prohibited to dispose of used batteries in household waste. Batteries and accumulators contain substances that are highly harmful to the environment. The user is obliged to dispose of used batteries at municipal collection points or in the appropriate containers. This service is free of charge. This ensures compliance with legal requirements and protects the environment.You will find these symbols on batteries:Li = Battery contains lithiumAl = Battery contains alkaliMn = Battery contains manganeseCR 2025 (Li); AA (Al, Mn); AAA (Al, Mn) |
 | DECLARATION OF CONFORMITYWe hereby confirm that this item complies with the basic requirements, regulations, and directives of the EU. You can view the detailed declaration of conformity at any time at the following link:https://www.schuss-home.at/downloads |
Errors and technical changes excepted.
BE COOL
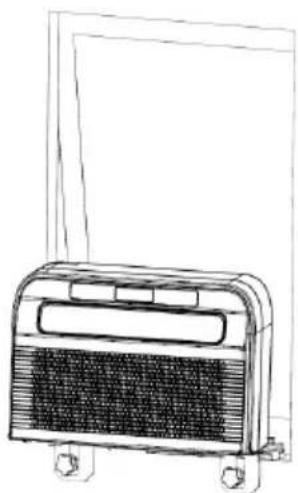
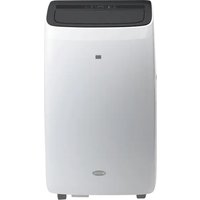
DESCRIPTION OF THE DEVICE AND SCOPE OF DELIVERY
SCOPE OF DELIVERY
The BE COOL air conditioner comes with the following items:
- 1x indoor unit
- 1x outdoor unit
- 1x Drain hose
• 2x Outdoor brackets -
2x indoor brackets
-
2x Shock absorbers
- 2x Hand screws
- 12x screws
- 12x washers
- Hose protective cover
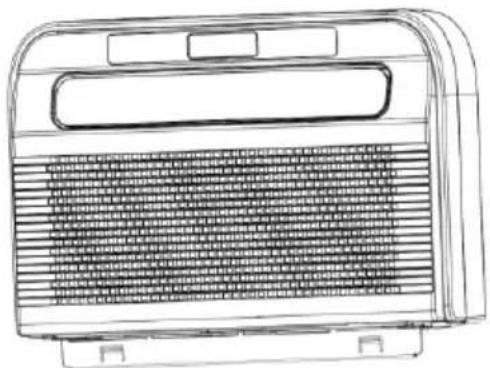
DESCRIPTION
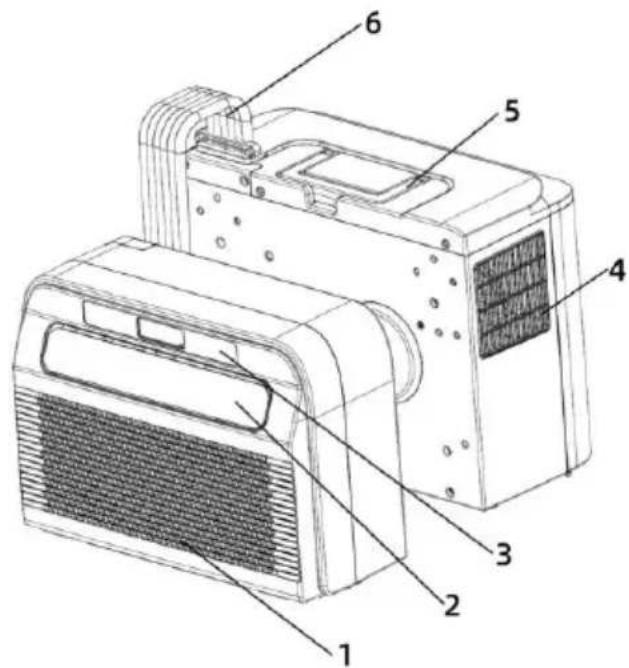
- Air inlet and filter
- Exhaust air opening
- Control panel
- Air outlet
natural_image
Technical line drawing of a portable air conditioner unit with mesh grille and handle (no text or symbols)- Carrying handle
- Hose
- Air inlet
BE COOL
Control panel
1. On/Off switch
Press this button to turn the air conditioner on or off. When switched on, the temperature is set to 22^ by default. The temperature sensor detects the current room temperature. If the room temperature exceeds 22^ , the outdoor unit starts to lower the temperature. However, if the room temperature is already below 22^ , the outdoor unit remains inactive.
2. Mode
Press this button to switch between cooling, ventilation, and dehumidification modes.
BE COOL
In standby or powered-on mode, press and hold this button for 3 seconds to activate or deactivate the timer.
3. Up/Down button
In cooling mode, you can use this button to set the temperature; the range is between 16 and 30 °C.
In timer mode, use this button to set the device's switch-on and switch-off times.
Press the up and down buttons simultaneously to switch between °C and °F.
4. Speed button
Press the button to choose between low and high wind speed.
5. Sleep mode
Press this button to turn sleep mode on or off. After 20 seconds, all lights and the digital display will turn off and the air conditioner will switch to sleep mode. The indoor unit fan will continue to run at a reduced wind speed.
Press any button on the control panel and the air conditioner will return to its original operating mode.
6. Digital display
The digital display on the caravan air conditioner shows important information such as the current temperature and timer settings. It allows you to set the temperature in cooling mode to the desired value, with a temperature range between 16^ and 30^ . In addition, the display can be used to check the timer settings, which is convenient for turning the unit on or off at specific times. During operation, symbols for the selected modes, such as cooling, ventilation, or dehumidification, are also shown on the display so that users can quickly identify the current mode of the unit.
7. Swivel function
Press the speed and sleep mode buttons simultaneously to activate or deactivate the activate or deactivate the swing function.
BE COOL
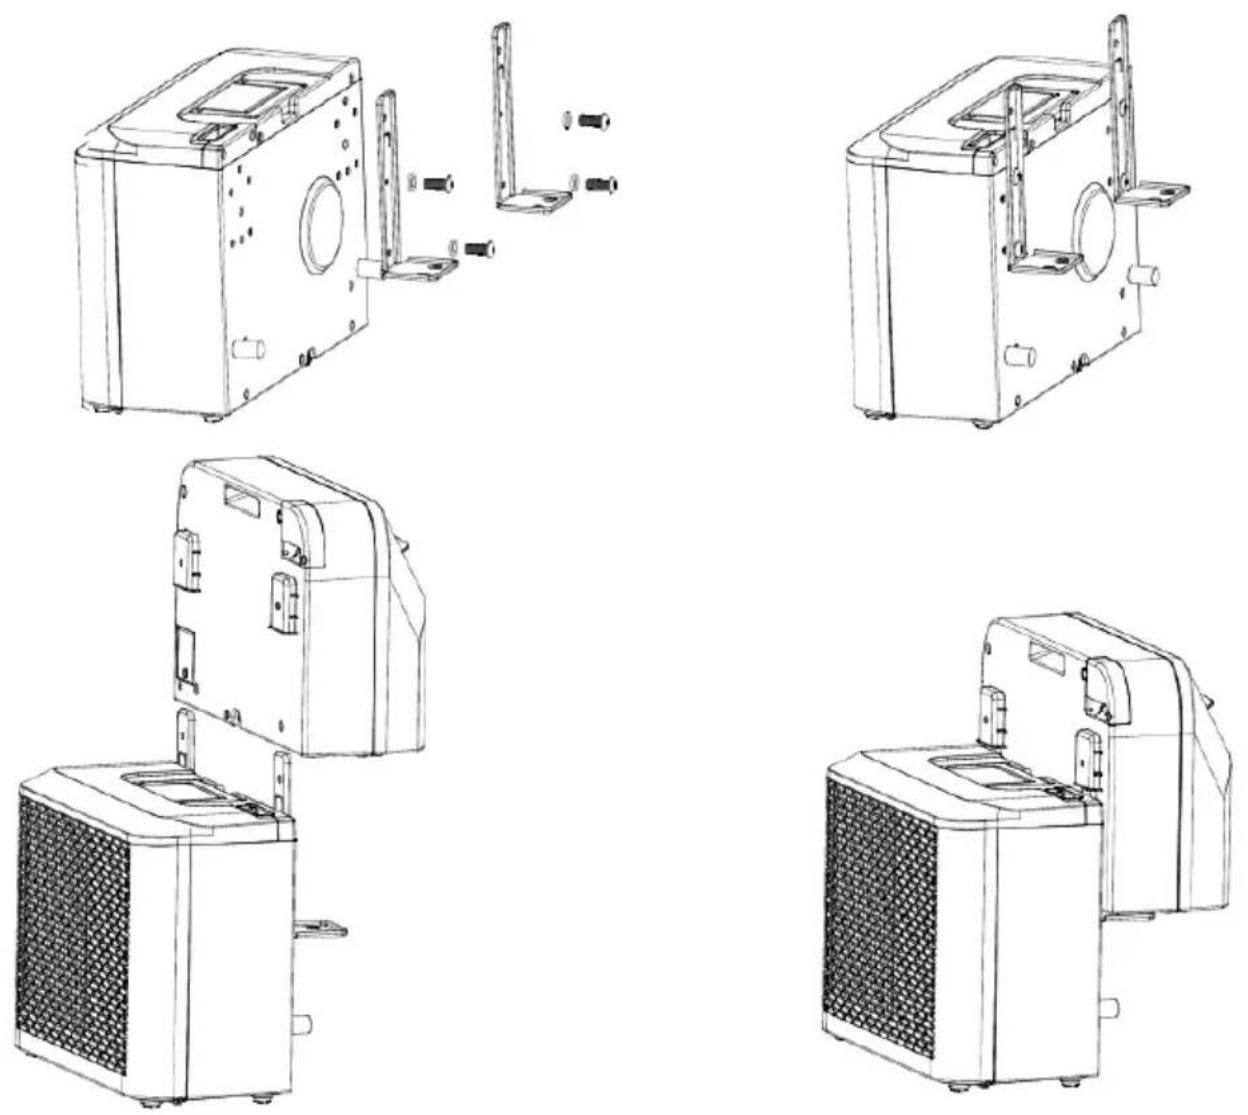
INSTALLATION
IMPORTANT!
Leave the unit standing upright for at least 24 hours before using it for the first time.
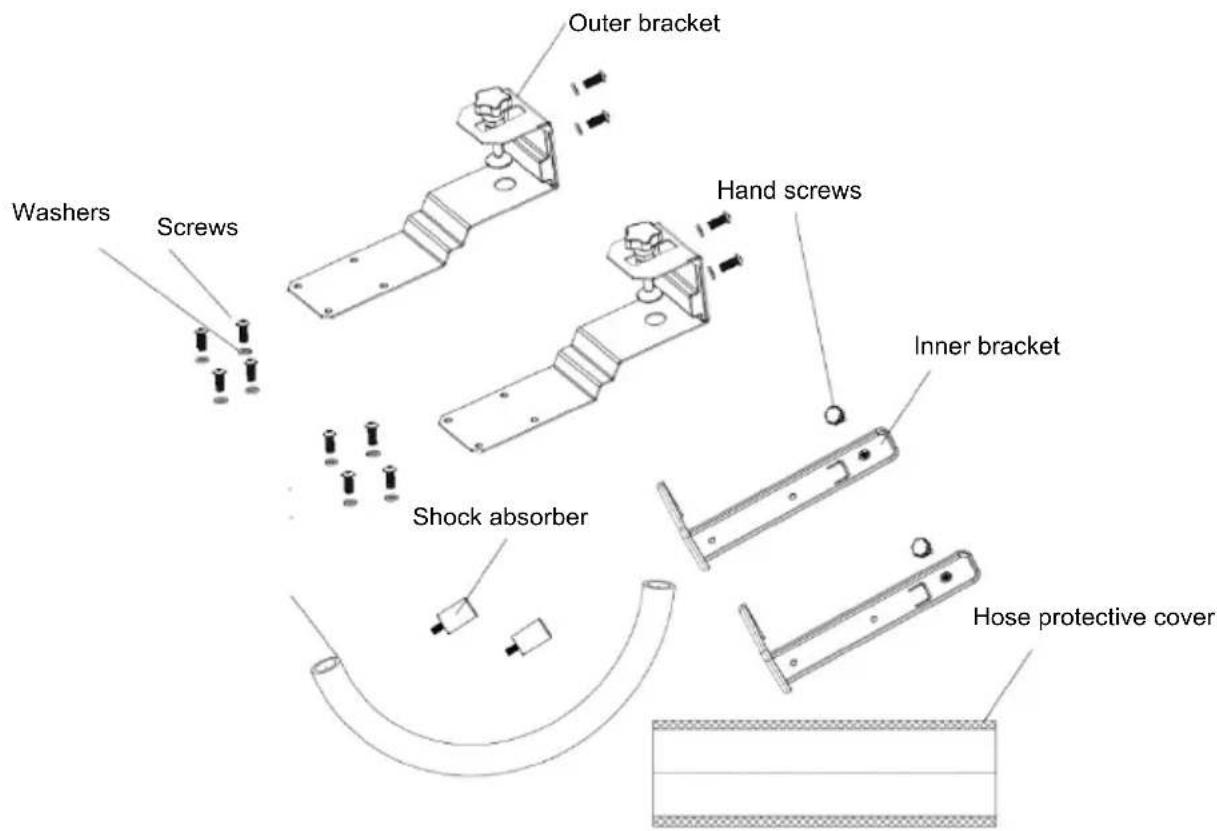
- Unpack the device and accessories and check that the hose between the indoor and outdoor units is properly connected. Also make sure that the condensation drain is closed with a rubber cover. Finally, check that all accessories are present.
- Assemble the accessories as shown in the illustration.
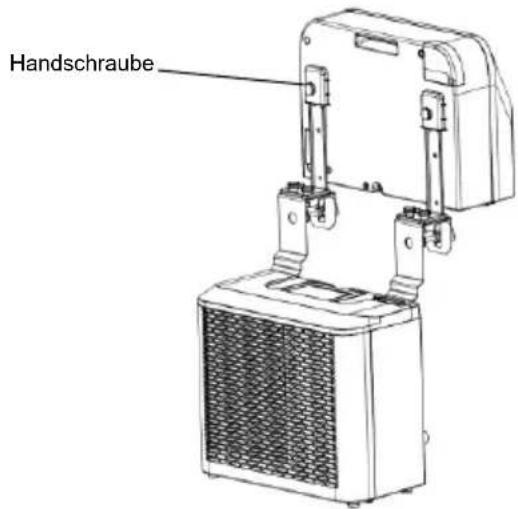
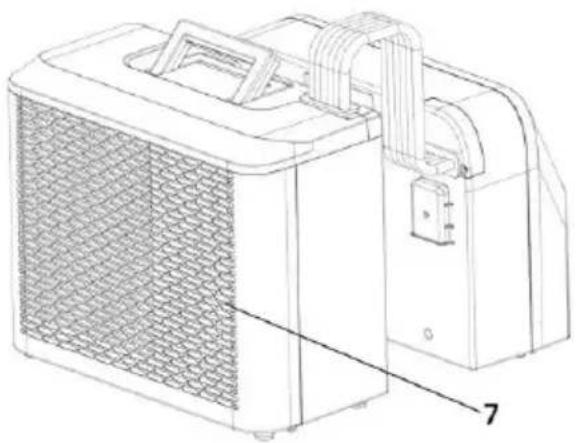
Attach the outer bracket to the support block and the inner bracket by tightening the screws and washers supplied. - Attach the shock absorbers to the rear of the outdoor unit as shown in the illustration.
flowchart
graph LR
    A["Shock absorbers"] --> B["Arrow"]
    B --> C["Shock absorbers"]
    C --> D["Oval diagram with circular and dot patterns"]
- Assemble the bracket as shown in the illustration below. Attach the indoor and outdoor units to the bracket to connect the two parts. Tighten the screws and washers supplied in the holes provided to secure the units to the bracket.
natural_image
Technical line drawing of a mechanical device before and after assembly (no text or symbols)BE COOL
- Attach the indoor unit to the bracket and tighten it securely with the hand screw. (see illustration below).
- Place the hose protection cover over the hose between the indoor and outdoor units.

natural_image
Technical line drawing of a mechanical device with attached components and a vertical panel (no text or symbols)- Insert the complete unit into the window of the caravan and tighten the bracket to secure it in place.
BE COOL
natural_image
Line drawing of a portable air conditioner unit with cooling fins and wheels (no text or symbols)
natural_image
Line drawing of a desktop computer with monitor and tower (no text or symbols)MAINTENANCE AND CLEANING
- Ensure that the device is disconnected from the power supply before performing any maintenance work.
- Do not use chemical cleaning agents such as gasoline to clean the device.
- Do not clean the device directly under running water.
- If the air conditioner is damaged, please contact the dealer or a specialist workshop.
Cleaning
Caution: Before cleaning or performing maintenance, unplug the power cord from the power outlet.
Cleaning the air filter
- Regularly remove dust from the filter to ensure optimal performance.
- Remove the filter as shown in the illustration below.
- Clean the filter with tap water and/or a vacuum cleaner to remove dirt.
- Do not use water above 40 °C for cleaning and do not expose the filter to direct sunlight.
- Ensure that the filter is completely dry before reinserting it into the air conditioner.
BE COOL
natural_image
Line drawing of a portable air conditioner unit with ventilation grilles and control panel (no text or symbols)
natural_image
Simple line drawing of a 3x3 grid layout with no text, numbers, or symbolsCleaning the device surface
- First wipe the surface with a neutral cleaning agent and a damp cloth.
- Then dry the unit thoroughly with a dry cloth.
- Make sure that no water or cleaning agent gets inside the device.
- Do not use aggressive cleaning agents or gasoline to clean the air conditioner.
Storage
If the unit is not going to be used for a long period of time, remove the covers from the drain openings on the bottom of the indoor and outdoor units so that all condensation can drain away in a suitable place.
- Remove the unit from its installation location.
- Remove the rubber seal from the indoor and outdoor units and drain the condensation water.
- Run the fan to dry the inside of the unit.
- Switch off the air conditioner and unplug it.
- Clean the filter and reinsert it.
- Remove all brackets from the air conditioner, mount the brackets of the indoor unit on the outdoor unit as shown in the illustration below, and then place the unit against a wall.
- Store the air conditioner in a cool, dry place.
- It is recommended to store the unit in its original packaging to protect it from dust and dirt.
BE COOL
CHECKS AT THE START OF THE SEASON
- Check that the power supply cable and socket are in good condition and that the grounding is working properly.
- Ensure that the plug is carefully inserted into the condensation drain and that the filters are in place.
- Follow the installation and safety instructions carefully.
TROUBLESHOOTING
If the device does not work or only works to a limited extent:
Check whether an error code appears on the display and look up in the code table to find a solution. If no error code is displayed, refer to the error table to find a possible solution.
BE COOL
| Code table | ||
| LF | Water tank full | Remove the rubber plug and drain the water. |
| E | System temperature sensor defective | Replace the system temperature sensor. Contact your dealer or our service department. |
| E2 | Room temperature sensor malfunction | Replace the room temperature sensor. Contact your dealer or our service department. |
| FE | Indoor unit motor has failed | Replace the motor. |
| E0 | Communication error | Contact your dealer or our service department. |
| Ec | System protection | It is recommended to restart the device after 10 minutes. |
| Eb | Fluorine deficiency | Contact your dealer or our service department. |
| E4 | Frost protection activated | Ensure that the air outlet is clear and keep the air deflector open. |
| Error table | ||
| Problem | Cause | Solution |
| Device cannot be switched on | No power | Activate power supply |
| Damaged power outlet | Turn off the power supply and check the socket or have it repaired | |
| Unknown reason | Contact dealer/service | |
| Low air flow or insufficient cooling | Lowest fan speed set | Increase fan speed |
| Air filter is dirty | Check and clean the filter | |
BE COOL
| Supply air or exhaust air of the indoor unit blocked | Check whether the unit is blocked and remove any obstacles if necessary | |
| Ambient temperature too low or too high | The ambient temperature should be between 18 °C and 40 °C | |
| Insufficient mains voltage | Contact an electrician or use a different power connection | |
| No cooling effect, only air circulation | Device is running in fan mode | Select cooling mode (A/C) |
| Cooling mode has just switched off automatically | Wait about 3–5 minutes until the thermostat starts up again | |
| Unusual noises or vibrations | Brackets not correctly attached to the vehicle or mounting screws loose | Check the brackets and ensure that the fastening screws are tightened securely. |
| Water leaking from the indoor unit | Rubber plug on the underside of the indoor unit is missing or not seated firmly enough in the opening | Check or replace the rubber plug |
| Unit is hanging at an angle | The unit must be mounted horizontally (maximum angle of inclination <3 °C) | |
| Unit emits an unusual odor | There is a serious problem | Switch off the device immediately and contact the dealer |
BE COOL
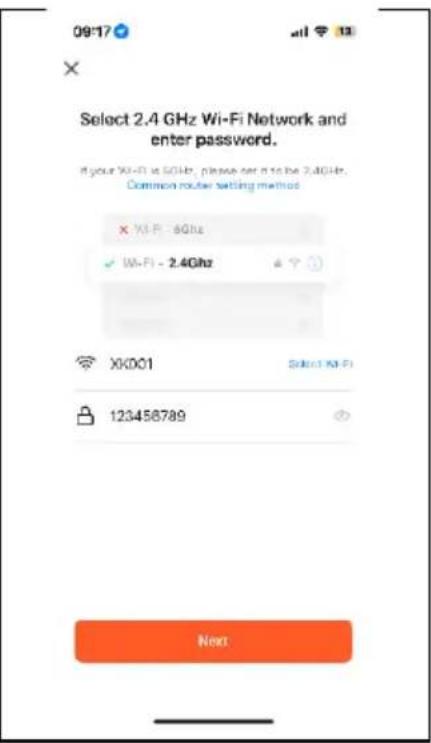
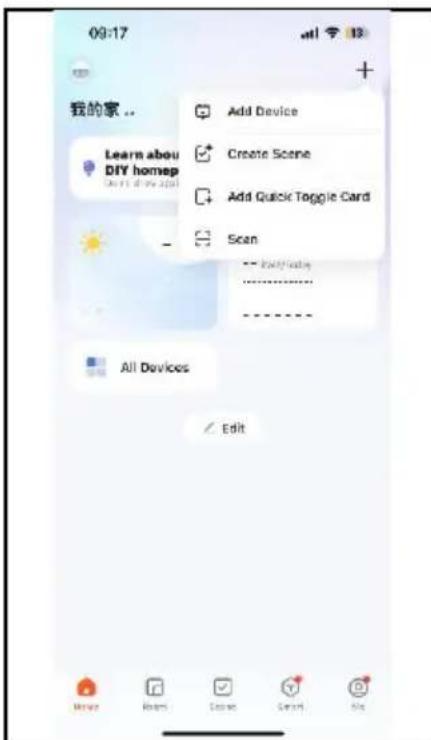
Smart Home Wi-Fi connection instructions
IMPORTANT
Please note that only 2.4GHz networks are supported!
Transmission power: max. 100mW
App installation
Download the "Smart life" app from the Play Store (Android) or the App Store (iOS). The following QR code will take you directly to the app download:

Scan QR code
Registration
If you do not yet have a Smart Life account, you can register or log in with a verification code that will be sent to you via SMS.
To register:
- Navigate to the registration area in the app.
- The system will automatically detect your country or region. You also have the option of selecting the country code manually. Enter your mobile phone number or email address and tap "Continue."
- If you select the mobile phone number option, enter the verification code you received via SMS. Then set a password and tap "Confirm" to complete the registration.
BE COOL
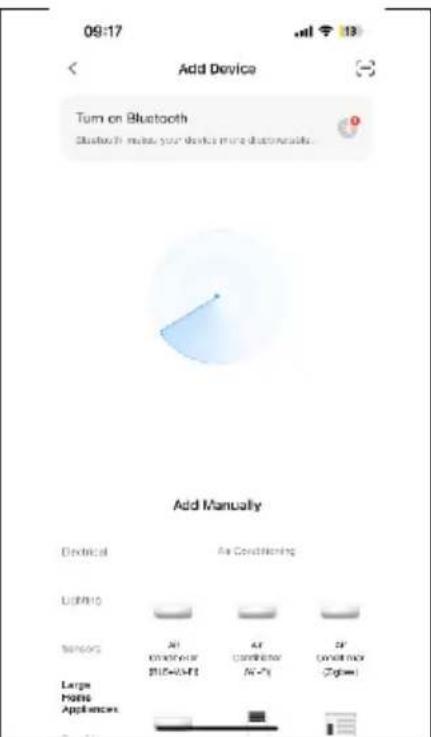
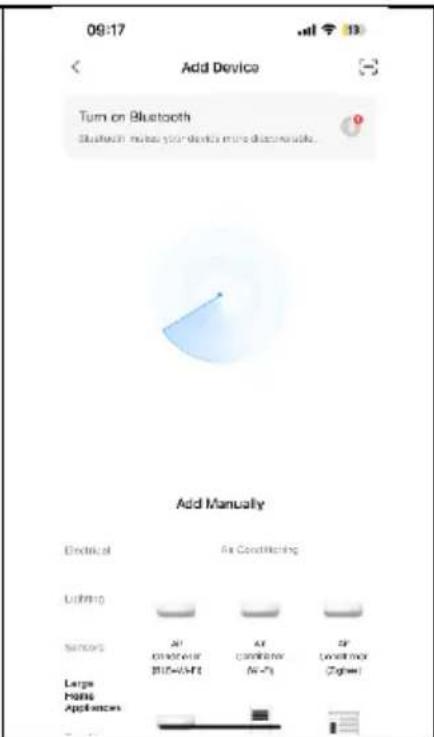
Adding a device manually:
- When the air conditioner is in standby mode, press and hold the speed button on the control panel for 3 seconds to switch to Wi-Fi connection mode. The Wi-Fi signal light will start flashing.
- Open the Smart Home app and tap "+" in the upper right corner to add a new device via the network.
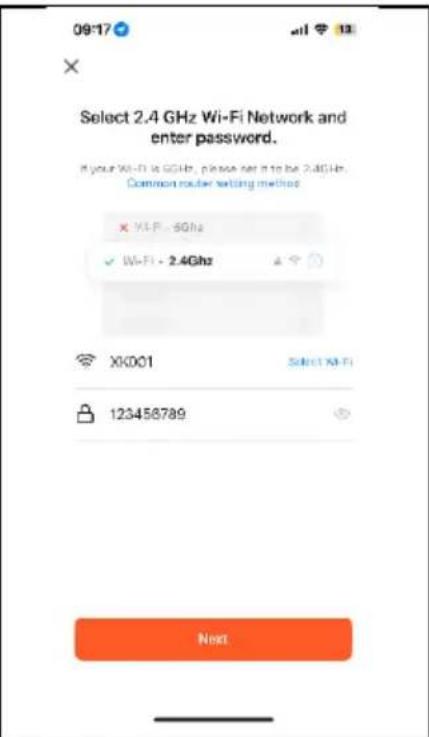
- Make sure the operating light is flashing, tap "Confirm" that the light is flashing, and follow the instructions on the screen.
- Select the Wi-Fi network (note: the network must be in the 2.4 GHz band) and enter the password. The device will start the pairing process and connect to the app.
- Once the device has been successfully configured, the air conditioner will be displayed on the Smart Home page. Tap on it to access the device controls.
BE COOL

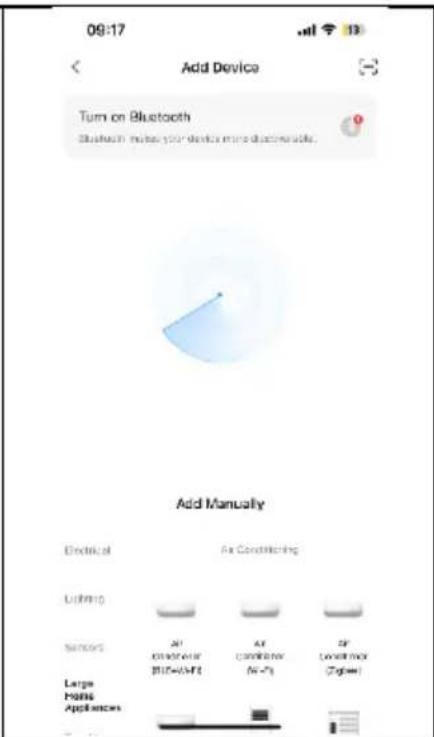
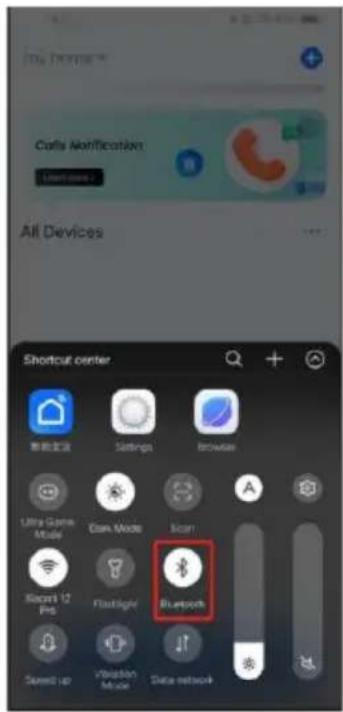
Adding a device automatically
- Make sure the device is in standby mode before connecting.
- Press the speed button for 3 seconds to switch to Wi-Fi connection mode, and the Wi-Fi signal light will start flashing.
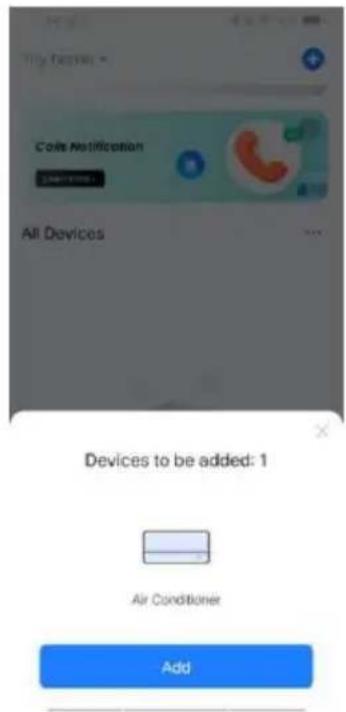
■ Activate Bluetooth on your phone. - Open the app and wait a moment until the device is automatically detected and displayed.
- Click the "Add" button to connect.
- Enter the WiFi SSID (WiFi connection name), enter the WiFi password, and click "Next" to continue with the setup. (Note: The network must be in the 2.4 GHz band.)
- When the progress bar is complete, the device pairing interface will be displayed and the device will be successfully connected.
- Click the "Done" button to go to the device control interface.
BE COOL


The application also works with Amazon Alexa and Google Assistant.

WORKS WITH amazon alexa

works with the Google Assistant
BE COOL
| Technical Specifications WiFi | |
| Wireless technology: | WiFi (WLAN) |
| Radio operating frequency | 2412MHz-2472MHz |
| BLE operating frequency | 2402 MHz–2480 MHz |
| Modulation type | 802.11b: DSSS802.11g: OFDM802.11n (20 MHz): OFDM |
| Fixed frequency software | SecureCRT.exe |
| Antenna gain | 2.5 dBi |
| Antenna type | PCB |
| Transmission power | :520dBm |
| Technical information | |
| Item number | BC5CSKL26 |
| Cooling capacity | 5,000 BTU/h |
| 1,465 watts | |
| Max. power consumption | 560 watts |
| Dehumidification rate | 0.5L/h |
| Input voltage | 220–240 V |
| Frequency | 50 Hz |
| WIFI transmission frequency: | 2.4 GHz |
| Transmission power: | max. 100 mW |
| Refrigerant/Filling | R290, 130 g |
| Energy efficiency EER | 2.6 |
| Energy efficiency class | A |
| Air circulation | 200m3/h |
| Noise level (sound power) | 63 dB(A) |
| Weight | 22.5 kg |
| Indoor unit dimensions | 454x298x170 mm |
| Dimensions of outdoor unit | 445x353x205 mm |
| Manufacturer contact address for further information | Schuss Home Electronic GmbHScheringgasse 3, A-1140 ViennaTel:Service line: +43 (1) 97 0 21 – 502www.becool.atFB No.: 236974 t / FB Court: Vienna |
BE COOL
| Information request for single-pipe and double-pipe air conditioning units | P | ||
| Information for identifying the model(s) to which the information relates: | |||
| Description | Symbol | Value | Unit |
| Rated cooling capacity | Prated for cooling | 1.472 | kW |
| Rated capacity for heating | Prated for heating | - | KW |
| Rated power consumption for cooling | PEER | 0.546 | kW |
| Nominal power consumption for heating | PCOP | - | kW |
| Nominal energy efficiency ratio | EERd | 2.696 | - |
| Nominal coefficient of performance | COPd | - | - |
| Information identifying the model(s) to which the information relates: | |||
| Description | Symbol | Value | Unit |
| Power consumption in thermostat off mode | PTO | - | W |
| Power consumption in standby P mode | PSB | 2.0 | W |
| Power consumption of devices with one or two channels (specify separately for cooling and heating) | QSD | SD: 0.546 (cooling) | kWh/h |
| Sound power level | LWA | 63 | dB(A) |
| Global warming potential | GWP | 3 | kgCO2 eq. |
| Contact details for further information | Schuss Home Electronic GmbHScheringgasse 31140 Vienna, AustriaTel.: +43 (1) 97 0 21 - 0www.becool.at | ||
BE COOL
WARRANTY
By choosing this quality product from BE COOL, you have made a decision in favor of innovation, durability, and reliability.
We provide a 2-year warranty for this BE COOL device, valid in Austria from the date of purchase!
If, contrary to expectations, your device requires servicing during this period, we hereby guarantee free repair (spare parts and labor) or (at the discretion of Schuss) replacement of the product. If neither repair nor replacement is possible for economic reasons, we reserve the right to issue a credit note for the current value.
In the case of air conditioners, please contact the customer hotline (see sticker on the device or cover page of the instruction manual) as a first step. For fans, please contact your specialist dealer or us directly. Please note that repair work not carried out by an authorized repair shop in Austria will immediately void this warranty.
This warranty does not cover:
• Repair or replacement of parts due to normal wear and tear
- Damage due to failure to observe the operating instructions
• Devices that are used commercially, even if only partially
• Devices that have been mechanically damaged by external influences (falls, impacts, breakage, improper use, etc.) as well as signs of wear and tear of an aesthetic nature.
• Devices that have been handled improperly
• Devices that have not been opened by our authorized service workshop.
- Damage caused by improperly closed condensation drain valves on air conditioning units or incorrectly installed water containers.
• Unmet consumer expectations.
- Damage caused by force majeure, water, lightning, or power surges.
• Devices on which the type designation and/or serial number has been changed, deleted, made illegible, or removed.
- Services outside our authorized repair shops, transport costs to an authorized repair shop or to us and back, and the associated risks.
We expressly point out that within the warranty period, a flat fee of €60 (indexed based on CPI 2015, June 2020) will be charged in the event of operating errors or if no fault is found.
The provision of a warranty service (repair or replacement of the device) does not extend the absolute warranty period of 2 years from the date of purchase.
The 2-year warranty is only valid upon presentation of the proof of purchase (must include the name and address of the dealer and the complete device description) and the corresponding warranty certificate, on which the device type and serial number (visible on the box and on the back or bottom of the device) must be noted! Without presentation of the warranty certificate, only the statutory warranty applies!
We expressly point out that the statutory warranty rights are not affected by this warranty and remain in full force and effect.
Schuss Home Electronic GmbH and its vicarious agents shall only be liable for damages in cases of gross negligence or intent. In any case, liability for lost profits, expected but unrealized savings, consequential damages, and damages arising from third-party claims is excluded. Damage to or for recorded data is always excluded from the liability for damages.
Congratulations on your purchase. We hope you enjoy your BE COOL device!
ADDRESS
Schuss Home Electronic GmbH
1140 Vienna, Scheringgasse 3
Tel.: +43 (0)1/ 970 21
Type designation:
Serial number:......
In the event of a warranty claim, this warranty certificate must be presented together with the device to the authorized service center or dealer from whom you purchased the device!
BE COOL
WICHTIG!
These instructions are only for the BE COOL-Service center!

A Service or repairing of the device must only be performed by a qualified technician who is allowed to handle the R290 refrigerant.
Do not attempt to repair or open the case of the air conditioner yourself, this leads to the immediate loss oft he warranty.
INSTRUCTIONS FOR REPAIRING APPLIANCES CONTAINING R290
1 GENERAL INSTRUCTIONS
1.1 Checks to the area
Prior to beginning work on systems containing flammable refrigerants, safety checks are necessary to ensure that the risk of ignition is minimized. For repair to the refrigerating system, the following precautions shall be complied with prior to conducting work on the system.
1.2 Work procedure
Work shall be undertaken under a controlled procedure so as to minimize the risk of a flammable gas or vapor being present while the work is being performed.
1.3 General work area
All maintenance staff and others working in the local area shall be instructed on the nature of work being carried out. Work in confined spaces shall be avoided. The
BE COOL
area around the workspace shall be sectioned off. Ensure that the conditions within the area have been made safe by control of flammable material.
1.4 Checking for presence of refrigerant
The area shall be checked with an appropriate refrigerant detector prior to and during work, to ensure the technician is aware of potentially flammable atmospheres. Ensure that the leak section equipment being used is suitable for use with flammable refrigerants, i.e. non sparking, adequately sealed or intrinsically safe.
1.5 Presence of fire extinguisher
If any hot work is to be conducted on the refrigeration equipment or any associated parts, appropriate fire extinguishing equipment shall be available to hand. Have a dry powder or CO 2 fire extinguisher adjacent to the charging area.
1.6 No ignition sources
No person carrying out work in relation to a refrigeration system which involves exposing any pipe work that contains or has contained flammable refrigerant shall use any sources of ignition in such a manner that it may lead to the risk of fire or explosion. All possible ignition sources, including ecigarette smoking, should be kept sufficiently far away from the site of installation, repairing, removing and disposal, during which flammable refrigerant can possibly be released to the surrounding space. Prior to work taking place, the area around the equipment is to be surveyed to make sure that there are no flammable hazards or ignition risks. “No Smoking” signs shall be displayed.
1.7 Ventilated area
Ensure that the area is in the open or that it is adequately ventilated before breaking into the system or conducting any hot work. A degree of ventilation shall continue during the period that the work is carried out. The ventilation should safely disperse any released refrigerant and preferably expel it externally into the atmosphere.
1.8 Checks to the refrigeration equipment
Where electrical components are being changed, they shall be fit for the purpose and to the correct specification. At all times the manufacturer's maintenance and service guidelines shall be followed. If in doubt consult the manufacturer's technical department for assistance. The following checks shall be applied to installations using flammable refrigerants: the charge size is in accordance with the room size within which the refrigerant containing parts are installed; the ventilation machinery and outlets are operating adequately and are not obstructed; if an indirect refrigerating circuit is being used, the secondary circuit shall be checked for the presence of refrigerant; marking to the equipment continues to be visible and legible. Markings and signs that are illegible shall be corrected; refrigeration pipe or components are installed in a position where they are unlikely to be exposed to any substance which may corrode refrigerant containing components, unless the
BE COOL
components are constructed of materials which are inherently resistant to being corroded or are suitably protected against being so corroded.
1.9 Checks to electrical devices
Repair and maintenance to electrical components shall include initial safety checks and component inspection procedures. If a fault exists that could compromise safety, then no electrical supply shall be connected to the circuit until it is satisfactorily dealt with. If the fault cannot be corrected immediately but it is necessary to continue operation, an adequate temporary solution shall be used. This shall be reported to the owner of the equipment so all parties are advised. Initial safety checks shall include: Those capacitors are discharged: this shall be done in a safe manner to avoid possibility of sparking; that there no live electrical components and wiring are exposed while charging, recovering or purging the system; that there is continuity of earth bonding.
2 REPAIRS TO SEALED COMPONENTS
2.1 During repairs to sealed components, all electrical supplies shall be disconnected from the equipment being worked upon prior to any removal of sealed covers, etc. If it is absolutely necessary to have an electrical supply to equipment during servicing, then a permanently operating form of leak detection shall be located at the most critical point to warn of a potentially hazardous situation.
2.2 Particular attention shall be paid to the following to ensure that by working on electrical components, the casing is not altered in such a way that the level of protection is affected.
This shall include damage to cables, excessive number of connections, terminals not made to original specification, damage to seals, incorrect fitting of glands, etc. Ensure that apparatus is mounted securely. Ensure that seals or sealing materials have not degraded such that they no longer serve the purpose of preventing the ingress of flammable atmospheres. Replacement parts shall be in accordance with the manufacturer's specifications.
NOTE The use of silicon sealant may inhibit the effectiveness of some types of leak detection equipment. Intrinsically safe components do not have to be isolated prior to working on them.
3 REPAIR TO INTRINSICALLY SAFE COMPONENTS
Do not apply any permanent inductive or capacitance loads to the circuit without ensuring that this will not exceed the permissible voltage and current permitted for the equipment in use.
Intrinsically safe components are the only types that can be worked on while live in the presence of a flammable atmosphere. The test apparatus shall be at the correct rating.
BE COOL
Replace components only with parts specified by the manufacturer. Other parts may result in the ignition of refrigerant in the atmosphere from a leak.
4 CABLING
Check that cabling will not be subject to wear, corrosion, excessive pressure, vibration, sharp edges or any other adverse environmental effects. The check shall also take into account the effects of aging or continual vibration from sources such as compressors or fans.
5 DETECTION OF FLAMMABLE REFRIGERANTS
Under no circumstances shall potential sources of ignition be used in the searching for or detection of refrigerant leaks. A halide torch (or any other detector using a naked flame) shall not be used.
6 LEAK DETECTION METHODS
The following leak detection methods are deemed acceptable for systems containing flammable refrigerants. Electronic leak detectors shall be used to detect flammable refrigerants, but the sensitivity may not be adequate, or may need recalibration. (Detection equipment shall be calibrated in a refrigerant-free area.) Ensure that the detector is not a potential source of ignition and is suitable for the refrigerant used. Leak detection equipment shall be set at a percentage of the LFL of the refrigerant and shall be calibrated to the refrigerant employed and the appropriate percentage of gas (25 % maximum) is confirmed. Leak detection fluids are suitable for use with most refrigerants but the use of detergents containing chlorine shall be avoided as the chlorine may react with the refrigerant and corrode the copper pipe-work. If a leak is suspected, all naked flames shall be removed/extinguished. If a leakage of refrigerant is found which requires brazing, all of the refrigerant shall be recovered from the system, or isolated (by means of shut off valves) in a part of the system remote from the leak. Oxygen free nitrogen (OFN) shall then be purged through the system both before and during the brazing process.
7 REMOVAL AND EVACUATION
When breaking into the refrigerant circuit to make repairs – or for any other purpose – conventional procedures shall be used. However, it is important that best practice is followed since flammability is a consideration. The following procedure shall be a dhered to: remove refrigerant; purge the circuit with inert gas; evacuate; purge again with inert gas; open the circuit by cutting or brazing. The refrigerant charge shall be recovered into the correct recovery cylinders. The system shall be “flushed” with OFN to render the unit safe. This process may need to be repeated several times. Compressed air or oxygen shall not be used for this task. Flushing shall be achieved by breaking the vacuum in the system with OFN and continuing to fill until the working pressure is achieved, then venting to atmosphere, and finally pulling down to a vacuum. This process shall be repeated until no refrigerant is within the system. When the final OFN charge is used, the system shall be vented down to atmospheric pressure to enable work to take place. This operation is absolutely vital if brazing operations on the pipework are to take place.
Ensure that the outlet for the vacuum pump is not close to any ignition sources and there is ventilation available.
BE COOL
8 CHARGING PROCEDURES
In addition to conventional charging procedures, the following requirements shall be followed.
- Ensure that contamination of different refrigerants does not occur when using charging equipment. Hoses or lines shall be as short as possible to minimize the amount of refrigerant contained in them.
• Cylinders shall be kept upright. - Ensure that the refrigeration system is earthed prior to charging the system with refrigerant.
- Label the system when charging is complete (if not already).
• Extreme care shall be taken not to overfill the refrigeration system. - Prior to recharging the system it shall be pressure tested with OFN. The system shall be leak Tested on completion of charging but prior to commissioning. A follow up leak test shall be Carried out prior to leaving the site.
9 DECOMMISSIONING
Before carrying out this procedure, it is essential that the technician is completely familiar with the equipment and all its detail. It is recommended good practice that all refrigerants are recovered safely. Prior to the task being carried out, an oil and refrigerant sample shall be taken in case analysis is required prior to re-use of reclaimed refrigerant. It is essential that electrical power is available before the task is commenced.
- Become familiar with the equipment and its operation.
- Isolate system electrically.
- Before attempting the procedure ensure that: mechanical handling equipment is available, if required, for handling refrigerant cylinders; all personal protective equipment is available and being used correctly; the recovery process is supervised at all times by a competent person; recovery equipment and cylinders conform to the appropriate standards.
- Pump down refrigerant system, if possible.
- If a vacuum is not possible, make a manifold so that refrigerant can be removed from various parts of the system.
- Make sure that cylinder is situated on the scales before recovery takes place.
- Start the recovery machine and operate in accordance with manufacturer's instructions.
- Do not overfill cylinders. (No more than 80 % volume liquid charge).
- Do not exceed the maximum working pressure of the cylinder, even temporarily.
- When the cylinders have been filled correctly and the process completed, make sure 11. that the cylinders and the equipment are removed from site promptly and all isolation
- valves on the equipment are closed off.
- Recovered refrigerant shall not be charged into another refrigeration system

BE COOL
Information about the explosion potential of flammable refrigerants to show that flammables may be dangerous when handled without care.
Information about potential ignition sources, especially those that are not obvious, such as lighters, light switches, vacuum cleaners, electric heaters.
Information about the different safety concepts:
Unventilated – (see Clause GG.2) Safety of the appliance does not depend on ventilation of the housing. Switching off the appliance or opening of the housing has no significant effect on the safety. Nevertheless, it is possible that leaking refrigerant may accumulate inside the enclosure and flammable atmosphere will be released when the enclosure is opened.
Ventilated enclosure – (see Clause GG.4) Safety of the appliance depends on ventilation of the housing. Switching off the appliance or opening of the enclosure has a significant effect on the safety. Care should be taken to ensure a sufficient ventilation before.
Ventilated room – (see Clause GG.5) Safety of the appliance depends on the ventilation of the room. Switching off the appliance or opening of the housing has no significant effect on the safety. The ventilation of the room shall not be switched off during repair procedures.
Information about the concept of sealed components and sealed enclosures according to IEC 60079-15:2010.
Information about the correct working procedures:
1. Commissioning
o Ensure that the floor area is sufficient for the refrigerant charge or that the ventilation duct is assembled in a correct manner.
o Connect the pipes and carry out a leak test before charging with refrigerant. o Check safety equipment before putting into service.
2. Maintenance
o Portable equipment shall be repaired outside or in a workshop specially equipped for servicing units with flammable refrigerants.
o Ensure sufficient ventilation at the repair place.
o Be aware that malfunction of the equipment may be caused by refrigerant loss and a refrigerant leak is possible.
o Discharge capacitors in a way that won't cause any spark. The standard procedure to short circuit the capacitor terminals usually creates sparks.
o Reassemble sealed enclosures accurately. If seals are worn, replace them.
o Check safety equipment before putting into service.
- Repair o Portable equipment shall be repaired outside or in a workshop specially equipped for servicing units with flammable refrigerants.
o Ensure sufficient ventilation at the repair place.
o Be aware that malfunction of the equipment may be caused by refrigerant loss and a refrigerant leak is possible.
o Discharge capacitors in a way that won't cause any spark.
When brazing is required, the following procedures shall be carried out in the right order:
BE COOL
- Remove the refrigerant. If the recovery is not required by national regulations, drain the refrigerant to the outside. Take care that the drained refrigerant will not cause any danger. In doubt, one person should guard the outlet. Take special care that drained refrigerant will not float back into the building.
• Evacuate the refrigerant circuit.
• Purge the refrigerant circuit with nitrogen for 5 min.
- Evacuate again.
- Remove parts to be replaced by cutting, not by flame.
• Purge the braze point with nitrogen during the brazing procedure.
- Carry out a leak test before charging with refrigerant.
• Reassemble sealed enclosures accurately. If seals are worn, replace them.
• Check safety equipment before putting into service.
- Decommissioning o If the safety is affected when the equipment is putted out of service, the refrigerant charge shall be removed before decommissioning.
o Ensure sufficient ventilation at the equipment location.
o Be aware that malfunction of the equipment may be caused by refrigerant loss and a refrigerant leak is possible.
o Discharge capacitors in a way that won't cause any spark.
o Remove the refrigerant. If the recovery is not required by national regulations, drain the refrigerant to the outside. Take care that the drained refrigerant will not cause any danger. In doubt, one person should guard the outlet. Take special care that drained refrigerant will not float back into the building.
o Evacuate the refrigerant circuit.
o Purge the refrigerant circuit with nitrogen for 5 min.
o Evacuate again.
o Fill with nitrogen up to atmospheric pressure.
o Put a label on the equipment that the refrigerant is removed.
- Disposal o Ensure sufficient ventilation at the working place.
o Remove the refrigerant. If the recovery is not required by national regulations, drain the refrigerant to the outside. Take care that the drained refrigerant will not cause any danger. In doubt, one person should guard the outlet. Take special care that drained refrigerant will not float back into the building.
o Evacuate the refrigerant circuit.
o Purge the refrigerant circuit with nitrogen for 5 min.
o Evacuate again.
o Cut out the compressor and drain the oil.
Transportation, marking and storage for units that employ flammable refrigerants Transport of equipment containing flammable refrigerants
Attention is drawn to the fact that additional transportation regulations may exist with respect to equipment containing flammable gas. The maximum number of pieces of
BE COOL
equipment or the configuration of the equipment, permitted to be transported together will be determined by the applicable transport regulations.
Marking of equipment using signs
Signs for similar appliances used in a work area generally are addressed by local regulations and give the minimum requirements for the provision of safety and/or health signs for a work location.
All required signs are to be maintained and employers should ensure that employees receive suitable and sufficient instruction and training on the meaning of appropriate safety signs and the actions that need to be taken in connection with these signs.
The effectiveness of signs should not be diminished by too many signs being placed together. Any pictograms used should be as simple as possible and contain only essential details.
Disposal of equipment using flammable refrigerants See national regulations.
Storage of equipment/appliances
The storage of equipment should be in accordance with the manufacturer's instructions. Storage of packed (unsold) equipment Storage package protection should be constructed such that mechanical damage to the equipment inside the package will not cause a leak of the refrigerant charge. The maximum number of pieces of equipment permitted to be stored together will be determined by local regulations.
BE COOL
EU-DECLARATION OF CONFORMITY
This declaration of conformity is issued under the sole responsibility of the manufacturer.
(1)
Schuss Home Electronic GmbH
Scheringgasse 3
1140 Wien, AUSTRIA
Declares, that the product
Manufacturer
Designation
Hersteller
Bezeichnung
is conformity with following directives, norms and/or regulations:
(III)
DIRECTIVE 2014/53/EU OF THE EUROPEAN PARLIAMENT AND OF THE COUNCIL of 16 April 2014
on the harmonisation of the laws of the Member States relating to the making available on the market of radio equipment and repealing Directive 1999/5/EC EU L 153/62 22.5.2014
EN 300 328 V2.2.2
EN IEC 62311:2020
EMC Directive (EMC): 2014/30/EU Directive of the European Parliament and of the Council of 26 February 2014 on the
harmonisation of the laws of the Member States relating to electromagnetic compatibility; Official Journal of the EU L96, 29/03/2014, p. 79–106
EN 61000-3-3:2013 + A1:2019 + A2:2021
EN IEC 55014-1:2021
EN IEC 61000-3-2:2019 + A1:2021
EN IEC 55014-2:2021
EN 301 489-1 V2.2.3
EN 301 489-17 V3.2.4
Low Voltage Directive (LVD):2014/35/EU Directive of the European Parliament and of the Council of 26 February 2014 on the
harmonisation of the laws of the Member States relating to the making available on the market of electrical equipment designed for use within certain voltage limits; Official Journal of the EU L96, 29/03/2014, p. 357–374
EN 60335-1:2012 + A11:2014 + A13:2017 + A1:2019 + A14:2019 + A2:2019 + A15:2021
EN 60335-2-40:2003 + A11:2004 + A12:2005 + A1:2006 + A2:2009 + A13:2012
BE COOL
Ökodesign-Richtlinie Energy-Related-Products-Directive (ErP)2009/125/EC;
Official Journal EU L285/10-35 (31.10.2009) and associated regulation 2015/1188
RoHS Directive: 2011/65/EU Directive of the European Parliament and of the Council of 8 June 2011 on the restriction of the use of certain hazardous substances in electrical and electronic equipment; Official Journal of the EU L174, 1/07/2011, p. 88–110
Reach SVHC(EC)NO. 1907/2006 Schuss Home Electronic GmbH hereby confirms that in the products we supply, there are no substances of very high concern (SVHC) in the candidate list (last ECHA update from June 14, 2023, 235 substances) above 0.1% in accordance with Article 33 of the REACH Regulation (EC) No .1907/2006 are included.
Place and date of issue:
Vienna, 2025-11-17
Scharl, Alexander
Senior product and purchasing manager i.V..
Unterschrift / signature
Declaration reference:
SCHUSS HOME ELECTRONIC GMBH
Scheringgasse 3, 1140 Wien, AUSTRIA
- HERZLICHEN GLÜCKWUNSCH!
- BE COOL
- Registrierung
- ENTRETIEN ET NETTOYAGE
- Inscription
- Registrazione
- Înregistrare
- Aktualna navodila za uporabo in drugi jeziki
- VZDRŽEVANJE IN ČIŠČENJE
- Čiščenje površine naprave
- Shranjevanje
- Registracija
- Samodejno dodajanje naprave
- Trenutni korisnički priručnici i drugi jezici
- Postavljanje i rad
- ODRŽAVANJE I ČIŠĆENJE
- JAMČITI
- Current user manuals and other languages
- Installation and operation
- Electrical connection
- Handling and use
- Child and user safety
- Maintenance and cleaning
- Storage and transport
- Emergency measures
- SPECIFIC INFORMATION ABOUT THE REFRIGERANT R290
- Recycling, disposal, declaration of conformity
- DESCRIPTION OF THE DEVICE AND SCOPE OF DELIVERY
- SCOPE OF DELIVERY
- DESCRIPTION
- Control panel
- On/Off switch
- Mode
- Up/Down button
- Speed button
- Sleep mode
- Digital display
- Swivel function
- INSTALLATION
- IMPORTANT!
- MAINTENANCE AND CLEANING
- Cleaning
- Cleaning the air filter
- Cleaning the device surface
- Storage
- CHECKS AT THE START OF THE SEASON
- TROUBLESHOOTING
- Smart Home Wi-Fi connection instructions
- IMPORTANT
- App installation
- Registration
- To register:
- Adding a device manually:
- Adding a device automatically
- WARRANTY
- We provide a 2-year warranty for this BE COOL device, valid in Austria from the date of purchase!
- This warranty does not cover:
- ADDRESS
- WICHTIG!
- GENERAL INSTRUCTIONS
- Checks to the area
- Work procedure
- General work area
- Checking for presence of refrigerant
- Presence of fire extinguisher
- No ignition sources
- Ventilated area
- Checks to the refrigeration equipment
- Checks to electrical devices
- REPAIRS TO SEALED COMPONENTS
- REPAIR TO INTRINSICALLY SAFE COMPONENTS
- CABLING
- DETECTION OF FLAMMABLE REFRIGERANTS
- LEAK DETECTION METHODS
- REMOVAL AND EVACUATION
- CHARGING PROCEDURES
- DECOMMISSIONING
- Commissioning
- Maintenance
- EU-DECLARATION OF CONFORMITY
- Schuss Home Electronic GmbH
Brand : Be Cool
Model : BC5CSKL26
Category : Air Conditioning