
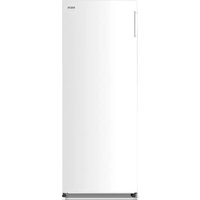
CB3126NFSD - Fridge FAR - Free user manual and instructions
Find the device manual for free CB3126NFSD FAR in PDF.

| Product Type | Refrigerator-Freezer |
| Brand | FAR |
| Model | CB3126NFSD |
| Power Supply | 220-240 V ~, 50-60 Hz, 1.4 A |
| Refrigerant | R600a (isobutane, 47 g) |
| Insulation Foam | Cyclopentane |
| Climate Class | SN/N/ST (10°C to 38°C) |
| Protection Class | I (grounded) |
| Lighting | LED (replacement by service) |
| Temperature Control | Electronic with digital display |
| Special Functions | Super Cool, Super Freeze, Vacation, Variable Zone (Fresh 0°C / Vegetables) |
| Refrigerator Capacity | Not specified in the manual |
| Freezer Capacity | Not specified in the manual |
| Freezer Star Rating | 4 stars (recommended -18°C) |
| Door Reversal | Possible, tools provided |
| Adjustable Feet | Yes, for leveling |
| Maintenance and Cleaning | Monthly cleaning with mild detergent; manual defrosting |
| Spare Parts Available | Yes, for 10 years after purchase |
| Legal Warranty | 2 years (conformity) |
| After-Sales Service | Conforama: 09 69 32 05 05 |
| Regulatory Information | EPREL registration: https://eprel.ec.europa.eu/qr/2447940 |
Frequently Asked Questions - CB3126NFSD FAR
Important: two people are required.
User questions about CB3126NFSD FAR
0 question about this device. Answer the ones you know or ask your own.
Ask a new question about this device
Download the instructions for your Fridge in PDF format for free! Find your manual CB3126NFSD - FAR and take your electronic device back in hand. On this page are published all the documents necessary for the use of your device. CB3126NFSD by FAR.
USER MANUAL CB3126NFSD FAR
natural_image
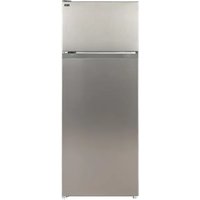
Front view of a refrigerator with no visible text or symbols on the door or sideCB3126NFSD
MANUEL D'INSTRUCTIONS
natural_image
Simple line drawing of a mechanical lever with a fulcrum and a downward arrow indicating motion (no text or symbols)natural_image
Technical line drawing of a sewing machine needle stitching a slotted fabric (no text or symbols)natural_image
Pure mechanical diagram showing a lever mechanism with no text or symbolsnatural_image
Pure technical line drawing of a mechanical component with no text or symbolsnatural_image
Technical line drawing of a mechanical lever assembly with inset detail (no text or symbols)natural_image
Pure technical line drawing of a mechanical component with no text or symbolsnatural_image
Technical line drawing of a mechanical clamp assembly with two circular insets showing close-ups of components (no text or symbols)natural_image
Technical line drawing of a mechanical bracket assembly with two circular insets showing close-up views (no text or symbols)natural_image
Simple line drawing of a basketball court with an oval cutout showing player positions (no text or symbols)natural_image
Simple line drawing of a cabinet or storage unit with no text or symbolsnatural_image
Pure technical line drawing of a mechanical assembly without any text, numbers, or symbolsnatural_image
Technical line drawing of a mechanical assembly with a circular inset showing a rotating component (no text or symbols)natural_image
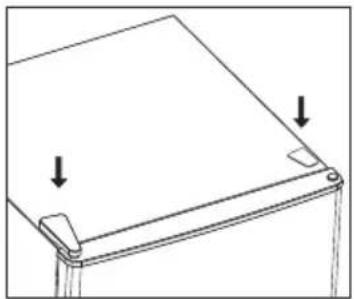
Simple line drawing of a rectangular object with two downward arrows indicating measurement or alignment (no text or symbols)INSTRUCTION A UTILISER
Nettoyage
natural_image
Symbol of a trash bin crossed with no text or numbers, representing waste sorting or disposal (no text present)Thank you for choosing FAR quality. This product has been developed by our team of professional and according to European regulations. In order to get the most out of your new appliance, we recommend that you read this instruction manual carefully and keep it for future reference.
TABLE OF CONTENTS
| Safety instructions | - 35 - |
| Product overview | - 41 - |
| Installing your refrigerator | - 42 - |
| Temperature control | - 43 - |
| Storage of food | - 47 - |
| Reversing the door | - 53 - |
| Instructions to use | - 57 - |
| Trouble shooting | - 59 - |
| Maintaining your refrigerator | - 61 - |
| Technical specifications | - 62 - |
| Customer service | - 63 - |
| Disposal of the appliance | - 64 - |
| Correct disposal of this product | - 65 - |
SAFETY INSTRUCTIONS
- IMPORTANT SAFETY INSTRUCTIONS: READ CAREFULLY AND KEEP FOR FUTURE REFERENCE.
- This appliance is intended to be used in household and similar applications such as:
- staff kitchen areas in shops, offices and other working environments.
- farm houses and by clients in hotels, motels and other residential type environments.
- bed and breakfast type environments.
- catering and similar non-retail applications.
- WARNING: Keep ventilation openings, in the appliance enclosure or in the built-in structure clear of obstruction.
- WARNING: Do not use mechanical devices or other means to accelerate the defrosting process, other than those recommended by the manufacturer.
- WARNING: Do not damage the refrigerant circuit.
- If the refrigerant circuit is damaged:
- Avoid naked flames and sources of ignition.
-
Thoroughly ventilate the room in which the appliance is situated.
-
WARNING: Do not use electrical appliances inside the food storage compartments of the appliance, unless they are of the type recommended by the manufacturer.
- Children aged from 3 to 8 years are allowed to load and unload refrigerating appliances.
- This appliance can be used by children aged from 8 years and above and persons with reduced physical, sensory or mental capabilities or lack of experience and knowledge if they have been given supervision or instruction concerning use of the appliance in a safe way and understand the hazards involved.
- Children shall not play with the appliance.
- Cleaning and user maintenance shall not be made by children without supervision.
- WARNING: When positioning the appliance. ensure the supply cord is not trapped or damaged.
- If the supply cord is damaged, it must be replaced by the manufacturer, its service agent or similarly qualified persons in order to avoid a hazard.
-
WARNING: Do not locate multiple portable socket-outlets or portable power supplies at the rear of the appliance.
-
WARNING: To avoid a hazard due to instability of the appliance, it must be fixed in accordance with the instructions.
- Do not store explosive substances such as aerosol cans with a flammable propellant in this appliance.
- WARNING: fill the ice-maker with potable water only.
- For information on the installation, handling, maintenance and disposal of the device, and the method of replacing the lamp, please refer to the following paragraphs of this manual.
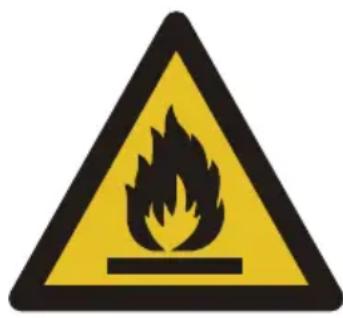
- Gas warning: risk of fire /flammable materials Please keep the product far away fire source during using, service and disposal. There are flammable materials at the back of the appliance.
Please according to local regulations regarding disposal of the appliance for its flammable blowing gas, Before you scrap the appliance, please take off the doors to prevent children trapped.
- To avoid contamination of food, please respect the following instructions:
- Opening the door for long periods can cause a significant increase of the temperature in the compartments of the appliance.
- Clean regularly surfaces that can come in contact with food and accessible drainage systems.
- Store raw meat and fish in suitable containers in the refrigerator, so that it is not in contact with or drip onto other food.
- Two-star frozen-food compartments are suitable for storing pre-frozen food, storing or making ice-cream and making ice cubes.
One-, two- and three-star compartments are not suitable for the freezing of fresh food.
-If the refrigerating appliance is left empty for long periods, switch off, defrost, clean, dry, and leave the door open to prevent mould developing within the appliance.
WARNINGS
-
If you are discarding an old freezer or refrigerator with a lock/ catch fitted to the door, ensure that it is left in a disabled condition to prevent the entrapment of young children when playing.
-
Unplug the appliance from the mains socket when not in operation and before cleaning. Remove food before cleaning the appliance.
- Do not insert oversized food as this could cause incorrect operation.
- Extreme caution must be used when moving an appliance.
- Do not give children ice-cream and water ices direct from the freezer as the low temperature may cause ‘freezer burns’ on the lips.
- The appliance must be installed on the ground, on a flat, horizontal surface, making sure that the ventilation openings are completely clear.
- Never try to replace or repair any part or component of the appliance yourself; seek the assistance of professional, qualified personnel, if need be.
- This refrigerating appliance is not intended to be used as a built-in appliance.
-
In order to improve efficiency of the cooling system and save energy, it is necessary to maintain good ventilation around the appliance for the dissipation of heat. For this reason, sufficient clear space should be available around the refrigerator.
-
To save energy, please avoid keeping the door open for a longtime when using the appliance.
- Replacing certain parts of your household electrical appliance may lead to a danger. Please ensure that you have the necessary skills and own all tools required to carry out the self-repair operations safely. Otherwise, please contact a qualified professional.
- Regarding the information pertaining to the installation, handling, servicing and disposal of the appli ance, thanks to refer to the below paragraph of the manual.
- As old refrigeration equipment may contain CFC's which will damage the ozone layer, when disposing of any refrigeration equipment please contact your local waste disposal department for advice on the correct method of disposal.
- Please according to local regulations regarding disposal of the appliance for its flammable blowing gas. Before you scrap the appliance, please take off the doors to prevent children trapped.
PRODUCT OVERVIEW
Make sure all parts are included in the device packaging. If you have a problem with your device or parts, contact a local service center or the store where you purchased the product.
- Front view
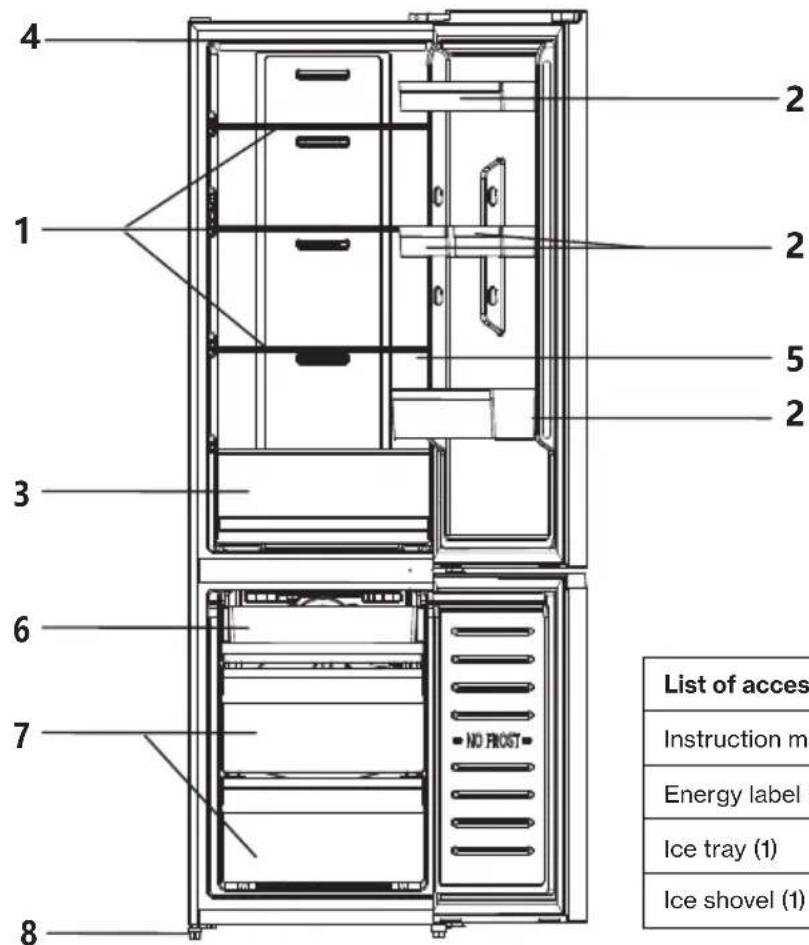
| List of accessories for the product |
| Instruction manual (1) |
| Energy label (1) |
| Ice tray (1) |
| Ice shovel (1) |
- Refrigerator shelf
- Bottle rack
- Vegetable crisper
-
Refrigerated ceiling light
-
Control panel
- Freezing tray
- Freezing drawer
- Adjuster foot
Note: The glass shelves and the crisper can be removed and inserted for cleaning and storing of food according to the appliance.
INSTALLING YOUR REFRIGERATOR
The user should take out the door handle in the plastic bag, and install it onto the door. Then take out the two handle stopper and cover the installed screws with them. The handle stopper and screw stopper in the plastic bag can be used when the user wants the door to be opened from left.
UNPACKING YOUR REFRIGERATOR
WARNING: Two or more people are required to move the refrigerator.
- Remove all the tapes and labels from your refrigerator before use (except the rating label).
To remove any remaining tape or glue, rub the area briskly with your thumb.
Tape or glue residue can also be easily removed by rubbing a small amount of liquid dish soap over the adhesive with your fingers. Wipe with warm water and dry.
- Do not use sharp instruments, rubbing alcohol, flammable fluids, or abrasive cleaners to remove tape or glue. These products can damage the surface of your refrigerator.
- When moving the refrigerator, do not tilt the refrigerator beyond 45^ from the upright position.
CLEANING BEFORE USE
After you remove all of the packaging materials, (in particular, the foam between the outside condenser and compartment should be taken off) clean the inside of your refrigerator before using it.
SPACE REQUIREMENTS
WARNING: Keep flammable materials such as petrol and vapours away from the refrigerator. Failure to do so may result in death, explosion, poisoning or burns.
- To ensure proper ventilation for your refrigerator, allow for a 200mm space on each side between walls, a 100mm space between the back of your refrigerator and the wall, and a 300mm space between the countertop and the roof or ceiling.
- If you are installing your refrigerator next to a fixed wall, leave sufficient space on the hinge side to allow for the door to swing open.
- Never install your refrigerator near a heat source or in direct sunlight.
ELECTRICAL REQUIREMENT
WARNING: DO NOT REMOVE GROUND PRONG.
DO NOT USE AN ADAPTOR.
DO NOT USE EXTENSION CORD.
Failure to follow these instructions can result in death, fire or electrical shock. Before you move your refrigerator into its final location, it is important to make sure you have the proper electrical connection.
RECOMMENDED EARTHING METHOD
A 220\~240 Volt / 50-60 Hz AC only 10 ampere fused and properly earthed electrical supply is required. It is recommended that a separate circuit serving only this appliance be provided. Use a receptacle which cannot be turned off with a switch or pull chain. Do not use an extension cord.
NOTE: Before performing any type of installation, cleaning, or removing a light bulb, turn the refrigerator control to OFF and then disconnect the refrigerator from the electrical source. When finished, connect the refrigerator to the electrical source and reset the control to the desired setting.
LEVELING
If the refrigerator is not leveled during installation. The doors may not close or seal properly, causing cooling, frost, or moisture problems. It is very important of the refrigerator to be level in order to function properly.
To level your refrigerator, you may either turn the adjustable foot clockwise to raise the side of the refrigerator or turn counter – clockwise to lower that side.
NOTE: Having someone push against the top of the refrigerator to take some weight off the leveling leg makes it easier to adjust the leg makes.
TEMPERATURE CONTROL
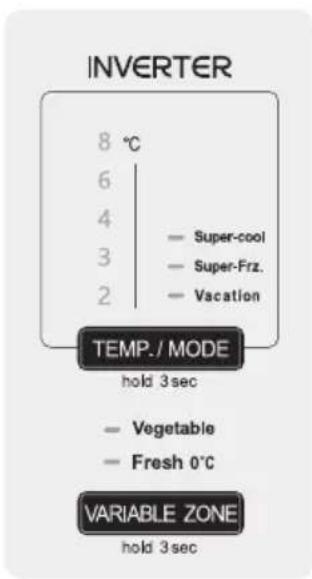
1. Temperature setting for refrigeration room (Default: 3°C)
Press the TEMP.MODE button once to change in the order of 4 6 8 2 3 4 .
2. MODE setting(Default : Off)
1) Method of input: Press the TEMP/MODE button for 3 seconds (After entering the mode, select Super cool as Default).
2) Mode selection method: After entering the mode, press the TEMP/MODE button once to change in the order of Super Frz → Vacation → Fast cool.
3) Release method: After activating the function, press the TEMP/MODE button for 3 seconds (Super Cool, Super Frz, Vacation are all released).
3. VARIABLE ZONE setting(Default : Vegetable)
Mode selection method: After entering the mode, press the VARIABLE button for 3 seconds to change in the order of Fresh → Vegetable → Fresh.
4. Power saving function
After the door is closed, if there is no action for 30 seconds, the display panel will turn off.
5. Super-Cool:
Press and hold the TEMP./MODE button for 3 seconds. The Super-Cool indicator will light up, indicating that the function is activated. In this mode, the refrigerator operates at setting 2°C, and the setting cannot be changed. This function is useful when you need to quickly cool food or when a large amount of food is placed in the refrigerator. To cancel this function, press and hold the TEMP./MODE button for 3 seconds again, or the Super-Cool function will automatically end after 5 hours.
6. Super-Freeze:
Press and hold the TEMP./MODE button for 3 seconds, then press the TEMP./MODE button again. The Super-Freeze indicator will light up, indicating that the function is activated. In this mode, the freezer setting cannot be changed. This function is useful when you need to quickly freeze food or when a large amount of food is placed in the freezer. To cancel this function, press and hold the TEMP./MODE button for 3 seconds again, or the Super-Freeze function will automatically end after 50 hours.
7. Vacation:
Press and hold the TEMP./MODE button for 3 seconds, then press the TEMP./MODE button twice consecutively. The Vacation indicator will light up, indicating that the function is activated. In this mode, the refrigerator setting cannot be changed. This function is ideal when you are away on vacation and there is only a small amount of food in the refrigerator. In this mode, the refrigerator temperature is controlled between 10°C and 15°C, making it more energy-efficient. To cancel this function, press and hold the TEMP./MODE button for 3 seconds again.
Note: When the refrigerated temperature does not meet your needs, please confirm whether this function is enabled.
8. Vegetable:
After the refrigerator is powered on, the ‘Vegetable’ indicator will light up, indicating that this function is activated by default. In this mode, the temperature in the variable-temperature compartment is controlled between approximately 1^ C and 4^ C. Fruits and vegetables can be stored at this temperature.
Note: When storing fruits or vegetables in this mode, it is recommended to set the refrigerator to setting 4 or higher.
ENGLISH
9. Fresh 0°C:
In Vegetable mode, press and hold the VARIABLE ZONE button for 3 seconds. The 'Fresh 0°C' indicator will light up, indicating that the function is activated. In this mode, the temperature in the variable-temperature compartment is controlled between approximately -3°C and 0°C. At this temperature, you can temporarily store meat products for easier and quicker preparation when consuming.
Note: Do not store fruits or vegetables in this mode to avoid freezing damage. Additionally, any meat products stored in this mode must be consumed within 12 hours or moved back to the freezer.
STORAGE OF FOOD
Your appliance has the accessories as the "Structure illustration" showed in general, with this part instruction you can have the right way to store your food. The glass shelves and crisper can be removed to store food if needed.
Note: Food should not come into direct contact with any surfaces inside the appliance. It has to be wrapped separately in aluminum foil, cellophane or in airtight plastic containers.
Storing food in the refrigerator compartment
The refrigerator compartment helps to extend the storage time of fresh, perishable foods.
Fresh food care for best results:
- Store foods that are very fresh and of good quality.
- Ensure that food is well wrapped or covered before it is stored. This will prevent food from dehydrating, deteriorating in colour or losing taste and will help maintain freshness. It will also prevent odour transfer. Vegetables and fruits may not need to be wrapped if they are stored in the vegetable container of the refrigerator compartment.
- Ensure that strong-smelling foods are wrapped or covered and stored away from foods such as butter, milk and cream which can be tainted by strong odours.
- Cool hot foods down to room temperature before placing them in the refrigerator compartment.
Dairy foods and eggs
- Most pre-packaged dairy foods have a recommended ‘user by/best before/best by’ date stamped on them. Store them in the refrigerator compartment and use within the recommended time.
- Butter can become tainted by strong-smelling foods so it is best to be stored in a sealed container.
- Eggs should be stored in the refrigerator compartment.
Red meat
- Place fresh red meat on a plate and loosely cover with waxed paper, plastic wrap or foil.
- Store cooked and raw meat on separate plates. This will prevent any juice lost from the raw meat from contaminating the cooked product.
Poultry
- Fresh whole birds should be rinsed inside and out with cold running water, dried and placed on a plate. Cover loosely with plastic wrap or foil.
- Poultry pieces should also be stored in this way. Whole poultry should never be stuffed until just before cooking, otherwise food poisoning may may occur.
Fish and seafood
- Whole fish and fillets should be used on the day of purchase.
Until required, refrigerate on a plate loosely covered with plastic wrap, waxed paper or foil. - If storing fish overnight or for an extended period of time, it is essential to select fresh fish. to remove any loose scales and dirt and then patted dry with paper towels. Place the whole fish or fillets in a sealed plastic bag.
- Keep shellfish chilled at all times. Use within 1-2 days.
Precooked foods and leftovers
• These foods should be stored in appropriate covered containers to prevent the food from drying out.
- Keep for only 1-2 days.
- Reheat leftovers only once and until steaming hot.
Vegetable container
- The vegetable container is the optimum storage location for fresh fruit and vegetables.
Take care not to store the following at temperatures lower than 7^ C for long periods: Citrus fruits, melons, aborigines, pineapples, papayas, curettes, passion fruits, cucumbers, peppers, tomatoes.
Undesirable changes will occur at low temperatures, such as softening of the flesh, browning and/or accelerated decay.
Do not refrigerate avocados (until they are ripe), bananas and mangoes.
Refrigerated food
For optimized storage, please refer to the storage time shown in the table below.
| Food | Location | Storage time |
| Butter, cheese | Upper door rack | 3 days |
| Eggs | Door rack | 3 days |
| Fruits, vegetables, salad | Crisper | 1 week |
| Meat, sausage, cheese, milk | Lower area (lowest shelf / crisper cover) | 1 week |
| Dairy products, canned food, cans | Upper area or door rack | 3 days |
| Drinks, bottles, tubes | Door rack | 3 days |
Freezing and storing food in the freezer compartment
• To store deep-frozen food.
- To make ice cubes.
- To freeze food.
Note: Ensure that the freezer compartment door has been closed properly.
Purchasing frozen food
- Packaging must not be damaged.
- Use by the ‘user by/best before/best by’ date.
- If possible, transport deep-frozen food in an insulated bag and place it quickly in the freezer compartment.
Storing frozen food
Store at -18^ C or a lower temperature. Avoid opening the freezer compartment door unnecessarily.
Freezing fresh food
Freeze fresh and undamaged food only.
Vegetables should be blanched before freezing to retain their nutritional value, flavour and colour.
Aubergines, peppers, zucchini and asparagus do not require blanching.
Note: Keep food to be frozen away from food that has already been frozen.
- The following foods are suitable for freezing:
Cakes and pastries, fish and seafood, meat, game, poultry, vegetables, fruit, herbs, eggs without shells, dairy products such as cheese and butter, ready meals and leftovers such as soups, stews, cooked meat and fish, potato dishes, souffles and desserts.
- The following foods are not suitable for freezing:
Types of vegetables, which are usually consumed raw, such as lettuce or radishes, eggs in shells, grapes, whole apples, pears and peaches, hard-boiled eggs, yoghurt, soured milk, sour cream, and mayonnaise.
Packing frozen food
To prevent food from losing its flavor or drying out, place food in airtight packaging.
- Place food in packaging.
- Remove air.
- Seal the wrapping.
- Label packaging with contents and dates of freezing. Suitable packaging:
Plastic film, tubular film made of polyethylene, aluminum foil. These products are available from specialist retailer.
Recommended storage times of frozen food in the freezer compartment
These times vary according to the type of food. Foods that you freeze can be kept for 1 to 12 months (at least at -18°C).
| Food | Storage time |
| Bacon, casseroles, milk 1 month | |
| Bread, ice cream, sausages, pies, prepared shellfish, oily fish | 2 months |
| Non-oilyfish, shellfish, pizza, scones and muffins | 3 months |
| Ham, cakes, biscuits, beef and lamb chops, poultry pieces | 4 months |
| Butter, vegetables (blanched), eggs whole and yolks, cooked crayfish, minced meat (raw), pork (raw) | 6 months |
| Fruit (dry or in syrup), egg whites, beef (raw), whole chicken, lamb (raw), fruit cakes | 12 months |
Never forget:
- If you are freezing fresh food with a 'use by /best before/best by/" date, you must freeze it before this date expires.
- Check that the food has not already been frozen. Indeed, frozen food that has has completely thawed should not be refrozen.
TEMPERATURE SETTING TIPS
Correct temperature settings help minimize food waste and keep food fresh for as long as possible. The recommended temperature for the fresh compartment is 2^ C to 4^ C, and the freezer should be set at -18^ C.
If the temperature setting is too high (fresh compartment above 4^ C or freezer above -18^ C), the storage life of foods such as meat and bean products is shortened, leading to food waste.
If the temperature is too low (fresh compartment lower than 2^ C), vegetables or fruits may freeze and spoil, resulting in unnecessary food disposal.
ENERGY-SAVING TIPS
Install the fridge or freezer in a cool place out of direct sunlight and away from cookers, heaters, dishwashers or any heat-emitting items.
Do not set the fridge and freezer temperatures lower than necessary. For example, set the internal temperature within the correct range, such as adjusting the thermostat to the middle position for 4^ C in the fresh compartment and -18^ C in the freezer compartment. Let pre-cooked foods cool down before placing them in the fridge or freezer. This will prevent the internal temperature of the fridge rising. Try not to open the door too often, especially when the weather is humid and hot. Once you open the door, close it as soon as possible. Keep your fridge full but not overcrowded. This helps reduce the loss of cold air. Meanwhile, avoid overloading the fridge or freezer. Try to leave about 20% free space for air circulation.
When returning from shopping, sort foods to be kept in your fridge before opening the door. Only open the door to put food in or take it out.
Make sure the door seal is clean and in good condition.
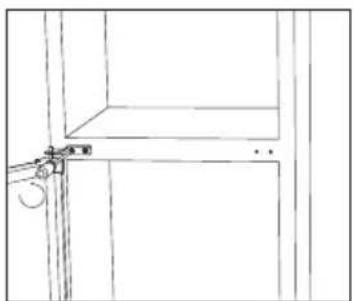
REVERSING THE DOOR
Tool required: Philips screwdriver, Flat bladed screwdriver, Hexagonal spanner.
- Ensure the unit is unplugged and empty.
- To take the door off, it is necessary to tilt the unit backwards. You should rest the unit on something solid so that it will not slip during the door reversing process.
- All parts removed must be saved to do the reinstallation of the door.
- Do not lay the unit flat as this may damage the coolant system.
-
It's better that 2 people handle the unit during assembly.
-
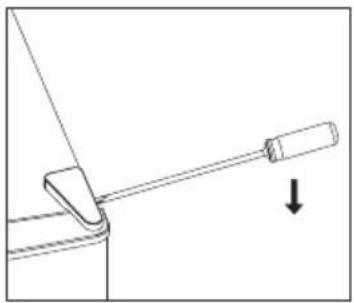
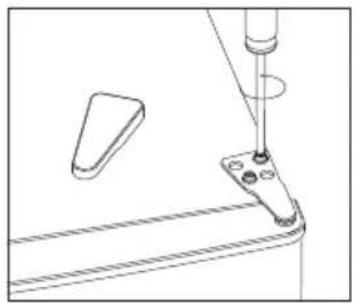
Carefully remove the top hinge cover with a flat screw driver.
natural_image
Simple line drawing of a mechanical lever with a downward arrow indicating motion (no text or symbols)- Unscrew the top hinge with a philipha screw driver.
natural_image
Technical line drawing of a mechanical assembly with a tool and component (no text or symbols)- Remove the hole cover with a flat screw driver.
natural_image
Pure mechanical diagram showing a lever mechanism with no text or symbols- Move the core cover from left side to right side. And then lift the upper door and place it on a padded surface to prevent it from scratching.
natural_image
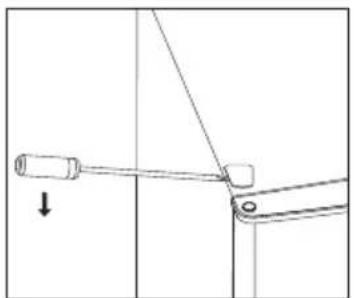
Pure geometric diagram showing a 3D rectangular prism with internal lines and marked points (no text or symbols)- Unscrew the middle hinge and then lift the bottom door and put it on a soft pad to avoid scratch.
natural_image
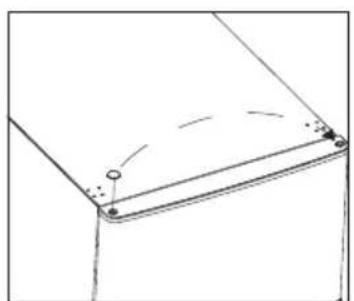
Technical line drawing of a mechanical lever assembly with inset detail (no text or symbols)- Move two middle hole covers from left to right.
natural_image
Pure technical line drawing of a mechanical component with no text or symbols- Lie down the rear of cabinet on a soft pad. And unscrew the bottom hinge and leveling foot.
natural_image
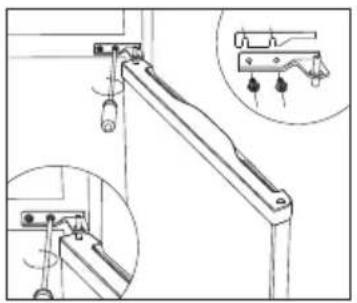
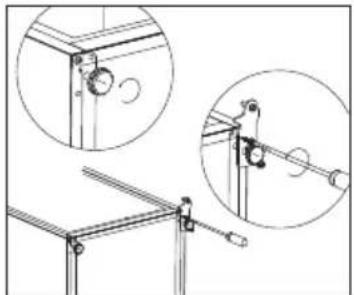
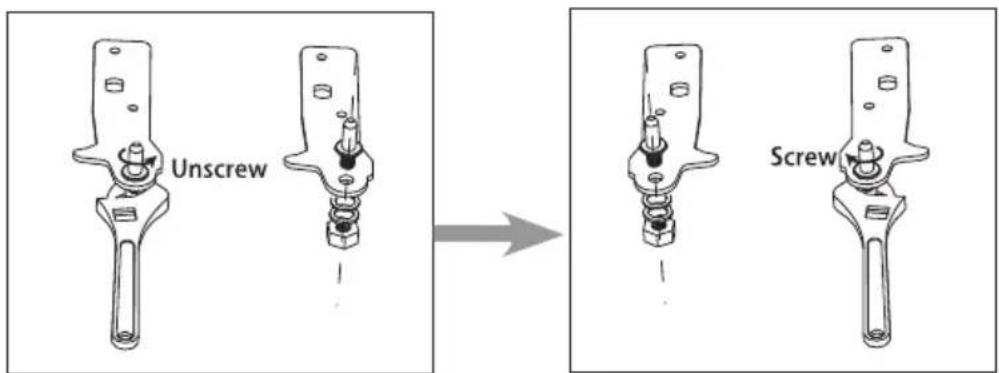
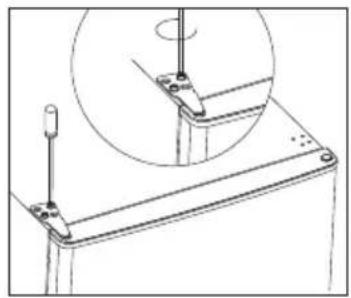
Technical line drawing of a mechanical assembly with two views (top and side), no visible text or symbols- Unscrew and remove the bottom hinge pin, turn the bracket over and replace it.
- Install the hinge at left side and foot base at right side. Then screw two leveling feet with! heir original parts.
natural_image
Technical line drawing of a mechanical linkage assembly with two circular insets showing close-ups of components (no text or symbols)- Move two middle hole covers from left to right.
natural_image
Pure technical line drawing of a mechanical component with no text or symbols- Stand up the unit and put the door on the bottom hinge. Maka sure! he bottom hinge core is inserted in the door hole. Then move the hinge hole cover of bottom door from left side lo right side.
natural_image
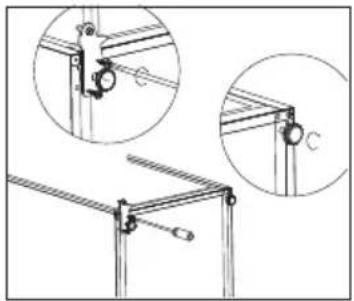
Simple line drawing of a cabinet or shelf with no text, numbers, or symbols- Install the middle hinge.
natural_image
Pure technical line drawing of a mechanical assembly without any text, numbers, or symbols- Install the upper door with the upper hinge.
natural_image
Technical line drawing of a mechanical assembly with a circular inset showing a rotating component (no text or symbols)- Clap in the hinge cover and hole cover on the top of unit.
natural_image
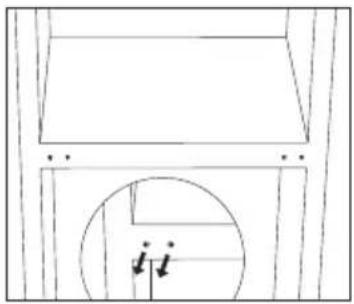
Simple line drawing of a rectangular object with two downward arrows indicating force or movement (no text or symbols)INSTRUCTIONS TO USE
Start-up
With the appliance properly installed, it is recommended to clean the inside with lukewarm, mild soapy water (washing-up liquid). Do not use any abrasive or scouring powders that could damage the finish.
Use
Household refrigerators are intended only for the domestic preservation of fresh food and drinks as well as for the short-term preservation of frozen products.
Temperature indicator
The storage area is maintained at an average temperature ≤ 4°C.
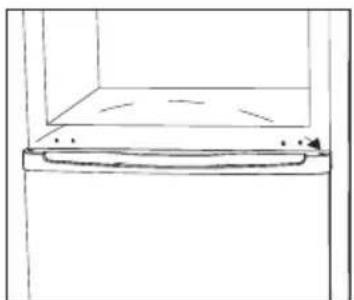
The coldest area of the refrigerator
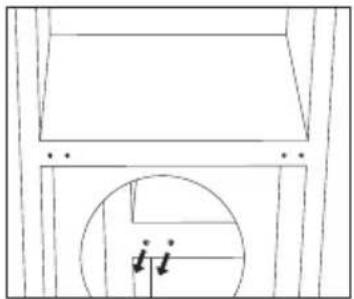
This symbol below indicates the location of the coldest zone in your refrigerator. This zone is near the fan, and delineated at the top by the symbol or shelves positioned at the same height.

To maintain temperatures in this area, be careful not to change the position of this shelf.
Installing the temperature indicator
To help you adjust your refrigerator, it is equipped with a temperature indicator (delivered in the package of the manual) that will control the average temperature in the coldest zone.
WARNING: This indicator is only intended to be used with your refrigerator. Please do not use it in another refrigerator (the coldest zone is not the same), or for other purpose.
Checking the temperature in the coldest zone
Once the temperature indicator is installed, you can check regularly if the temperature of the coldest zone is correct. If necessary, adjust the thermostat accordingly as described above. The internal temperature of the refrigerator is influenced by several factors such as the ambient temperature of the room, the amount of food stored and the frequency of door openings. Take these factors into account when adjusting the temperature.
For the proper storage of your refrigerator commodities, including those in the coldest area, make sure the temperature indicator appears "OK".

If "OK" does not appear, the zone temperature is too high. Set the thermostat to a higher position. Wait for 12 hours before adjusting the thermostat. It is normal that the word "OK" does not appear in the temperature indicator after loading fresh food into the appliance or after opening the door repeatedly (or for an extended period).
TROUBLE SHOOTING
In case of malfunction, you can solve many common problems easily.
- Your refrigerator isn't working...Check if:
- The power supply cord is unplugged.
- The thermostat knob is set to OFF position.
- The light does not work...Check if:
- The power supply cord is unplugged.
- A household fuse or circuit breaker has tripped.
- A light bulb is loose in the socket.
-
A light bulb has burned out.
-
The refrigerator has an odor:
-
Odorous foods shall be tightly wrapped.
- Check whether there is any rotten food.
-
Clean the inside of the refrigerator.
-
Food in the refrigerator compartment is not cooling sufficiently ...Check if:
-
The air vents are blocked in the compartment. This prevents the movement of cold air.
- The door(s) are opened too often or do not close properly.
- A large amount of food has just been added to the refrigerator or refrigerator compartment.
-
The thermostat is not set to a low temperature.
-
Melted frost leaks into the compartment or onto the floor... Check if:
- The drain-off mouth entrance is blocked.
- Evaporator tray is in place.
-
The refrigerator seems to make unusual noise...Check if:
-
The refrigerator is leveled on the floor.
- The body of the refrigerator touches the wall.
-
The drip tray is not placed properly.
-
There is interior moisture buildup...Check if:
-
The air vents are blocked in the refrigerator.
- The door is opened often.
- The room is humid.
- The food is not packaged correctly.
-
The control is not set correctly for the surrounding conditions.
-
The doors will not close completely...Check if:
-
The shelves are out of position
- The gaskets are dirty.
- The fridge is not level.
REQUESTING ASSISTANCE OR SERVICE
If the problem is not due to one of the items listed in Troubleshooting, Contact the dealer or authorized Service Company.
Replacing the LED light
Please contact after-sales service and do not replace it by user.
MAINTAINING YOUR REFRIGERATOR
The refrigerator should be cleaned at least once a month to prevent odors form building up. Wipe up spills immediately.
To clean your refrigerator
- Remove all movable parts from inside, such as shelves and crisp-er.
- Use a clean sponge or soft cloth and a mild detergent in lukewarm water. Do not use abrasive or harsh cleaners.
- Hand wash, rinse and dry all surfaces thoroughly.
- Do not use cleaning waxes, concentrated detergents, bleaches or cleaners containing petroleum on plastics and rubber parts.
- Never use paper towels, window sprays, scouring cleansers or flammable fluids on plastic parts as these can scratch or damage materials.
- Clean the inside and outside walls with a clean sponge or soft cloth using warm water or 1 teaspoon of bicarbonate of soda to 1.2 liters of water.
- If the appliance is not going to be used for a long period of time, it is recommended to remove all the food, clean the inside of the appliance, and leave the door open to allow air circulation, thus avoiding unpleasant odors.
- When the refrigerator is in daily use, clean the water tray of the refrigerator regularly and clean the drainage hole of the refrigerator. Clean the internal condensate and water from the water tray regularly and keep the refrigerator dry. This method reduces the risk of frost in the refrigerator.
Power Interruptions
If the electricity in your house goes off for a shorter period, keep both doors closed to help foods stay cold and frozen.
If the power will be out for a longer period, remove foods from the refrigerator and store it in a frozen food locker.
TECHNICAL SPECIFICATIONS
Flash the QR code on the energy label or below to access its main information.
| Model Website | QR Code | |
| CB3126NFSD https://eprel.ec.europa.eu/qr/2447940 |  | |
| Reference: | CB3126NFSD |
| Rated voltage: | 220-240V~ |
| Ampere: | 1.4A |
| Rated frequency: | 50-60Hz |
| Climate class: | SN/N/ST |
| Refrigerant: | R600a(47g) |
| Protection against electrical shock: | I |
| Insulation foam: | CYCLOPENTANE |
Climate class:
- Subnormal(SN): 'this refrigerating appliance is intended to be used at ambient temperatures ranging from 10°C to 32°C';
- Temperate(N): 'this refrigerating appliance is intended to be used at ambient temperatures ranging from 16°C to 32°C';
- Subtropical(ST): 'this refrigerating appliance is intended to be used at ambient temperatures ranging from 16°C to 38°C';
Customer service
Customer service We decline liability for any damage or accident derived from any use of this appliance which is not in conformity with the instructions contained in this manual.
Duration of availability of spare parts: 10 years.
In accordance with Article L. 217 of the Consumer Code, your product benefits from a legal guarantee of conformity of 2 years.
This instruction book is also available on our website: www.conforama.fr If you have a problem with your product, before going to your Conforama store, please get in touch with our aftersales services for electrical household appliances:
http://sav-client.conforama.fr/
or call :09 69 32 05 05 from Monday to Saturday, 08:30 to 19:00 price of a local call.
DISPOSAL OF THE APPLIANCE
It is prohibited to dispose of this appliance in domestic household waste.
There are several methods of disposal:
a) The municipality has established collection systems where electronic waste can be disposed of free of charge to the user.
b) The manufacturer will take back the old appliance for disposal at least free of charge to the user.
c) As old products contain recyclable materials, they can be sold to metal scrap dealers. Wild disposal of waste in open fields, forests or natural environments endangers your health when hazardous substances leak into groundwater and find their way into the food chain.
The refrigerating gas contained in the circuit of this appliance is isobutane (r600a); it causes a low level of pollution and is flammable.
Please contact your local disposal department for advice on the correct method of disposal.
CORRECT DISPOSAL OF THIS PRODUCT
natural_image
Symbol of a trash bin crossed with a diagonal line, no text or numbers presentEuropean directive 2012/19/EU on Waste from Electrical and Electronic Equipment (WEEE), requires that used household appliances are not thrown into the normal municipal waste stream. Used appliances must be collected separately
in order to optimize the rate of recovery and recycling of materials that compose them, and to reduce the impact on human health and on the environment. The crossed bin symbol is affixed to all the products to remind you of the obligations of separated collection.
We decline liability for any damage or accident derived from any use of this product which is not in conformity with the instructions contained in this booklet.
CONFORAMA FRANCE
- MANUEL D'INSTRUCTIONS
- INSTRUCTION A UTILISER
- Nettoyage
- SAFETY INSTRUCTIONS
- WARNINGS
- PRODUCT OVERVIEW
- INSTALLING YOUR REFRIGERATOR
- UNPACKING YOUR REFRIGERATOR
- CLEANING BEFORE USE
- SPACE REQUIREMENTS
- ELECTRICAL REQUIREMENT
- RECOMMENDED EARTHING METHOD
- LEVELING
- TEMPERATURE CONTROL
- Temperature setting for refrigeration room (Default: 3°C)
- MODE setting(Default : Off)
- VARIABLE ZONE setting(Default : Vegetable)
- Power saving function
- Super-Cool:
- Super-Freeze:
- Vacation:
- Vegetable:
- ENGLISH
- Fresh 0°C:
- STORAGE OF FOOD
- Storing food in the refrigerator compartment
- Dairy foods and eggs
- Red meat
- Poultry
- Fish and seafood
- Precooked foods and leftovers
- Vegetable container
- Refrigerated food
- Freezing and storing food in the freezer compartment
- Purchasing frozen food
- Storing frozen food
- Freezing fresh food
- Packing frozen food
- Recommended storage times of frozen food in the freezer compartment
- Never forget:
- TEMPERATURE SETTING TIPS
- ENERGY-SAVING TIPS
- REVERSING THE DOOR
- INSTRUCTIONS TO USE
- Start-up
- Use
- Temperature indicator
- The coldest area of the refrigerator
- Installing the temperature indicator
- Checking the temperature in the coldest zone
- TROUBLE SHOOTING
- REQUESTING ASSISTANCE OR SERVICE
- Replacing the LED light
- MAINTAINING YOUR REFRIGERATOR
- To clean your refrigerator
- Power Interruptions
- TECHNICAL SPECIFICATIONS
- Climate class:
- Customer service
- DISPOSAL OF THE APPLIANCE
- CORRECT DISPOSAL OF THIS PRODUCT
- CONFORAMA FRANCE
Brand : FAR
Model : CB3126NFSD
Category : Fridge