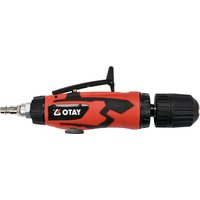
YT-09695 - Drill Yato - Free user manual and instructions
Find the device manual for free YT-09695 Yato in PDF.


| Product type | Pneumatic drill |
| Brand | Yato |
| Model | YT-09695 |
| Weight | 0.66 kg |
| Air connection diameter | 6.3 mm (PT 1/4") |
| Inner diameter of air inlet hose | 10 mm |
| No-load speed | 20,000 min⁻¹ |
| Maximum drilling capacity | 10 mm |
| Maximum working pressure | 0.63 MPa (6.3 bar) |
| Required air flow (at 0.63 MPa) | 141 L/min |
| Sound pressure level (ISO 15744) | 86 dB(A) ±3 dB |
| Sound power level (ISO 15744) | 97 dB(A) ±3 dB |
| Vibration level (ISO 28927-5) | 1.925 m/s² ±1.5 m/s² |
| Power supply | Compressed air |
| Chuck type | Keyed chuck |
| Materials that can be drilled | Metals, wood, plastics |
| Maintenance | Regular lubrication with SAE 10 oil or WD-40 |
| Safety | Wear safety goggles and ear protection |
| Spare parts | Available at www.toya.pl |
Frequently Asked Questions - YT-09695 Yato
User questions about YT-09695 Yato
0 question about this device. Answer the ones you know or ask your own.
Ask a new question about this device
Download the instructions for your Drill in PDF format for free! Find your manual YT-09695 - Yato and take your electronic device back in hand. On this page are published all the documents necessary for the use of your device. YT-09695 by Yato.
USER MANUAL YT-09695 Yato
PL DE RU UA LT LV CZ SK HU RO ES FR IT NL GR

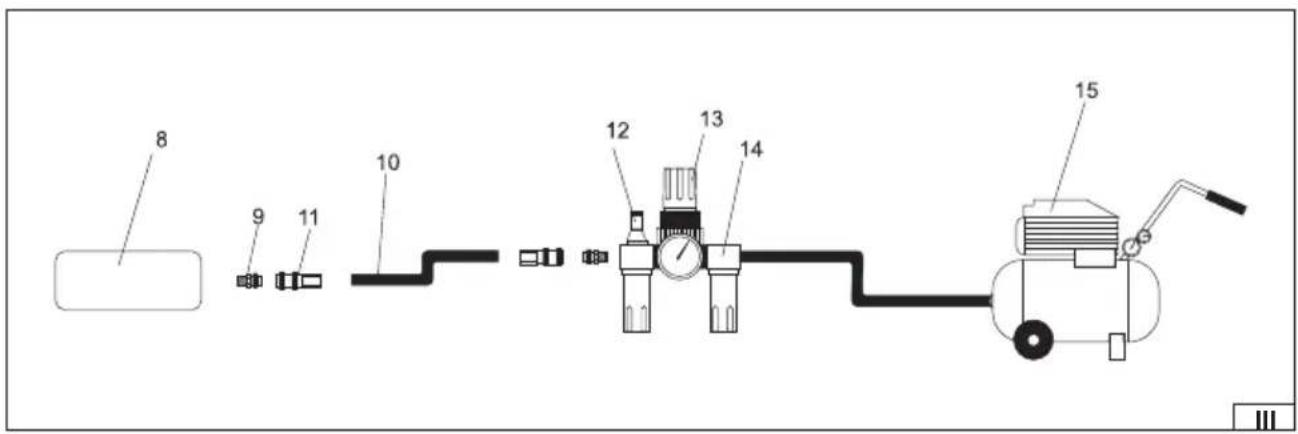
- air inlet
- air inlet coupler
- switch lever
- switch lever lock
- chuck
- pressure adjustment
- tool
- air hose socket
- air hose
- air hose coupler
- oiler
- regulator
- fi lter
- compressor
DE
Read the operating instruction
Wear protective goggles
Schutzbrille tragen
Wear hearing protectors
Gehörschutz tragen
Maximum air pressure
Max. Betriebsdruck
Air connection diameter
Pneumatic drill is a tool powered by a stream of compressed air under appropriate pressure. Using drill bits in the chuck allows drilling in metals, wood, plastics and wherever drilling without impact is required. The tools are designed to operate indoors and should not be exposed it to moisture and precipitation. Correct, reliable, and safe operation of the tool is dependent on its proper use, therefore:
Before working with the tool, read all instructions and keep for further reference.
For any damage or injuries caused by the tool misuse, failure to comply with safety regulations and instructions in this manual, the supplier will not be responsible. Using the tool contrary to its intended purpose also results in the loss of the user's rights resulting from the warranty as well as for non-compliance with the contract.
EQUIPMENT
The pneumatic drill is equipped with a coupler to connect it to the pneumatic system. The equipment also has a key to link the working tool in the chuck.
TECHNICAL DATA
| Item Measurement unit Value | ||
| Catalogue number YT-09695 | ||
| Weight [kg] 0,66 | ||
| Air Inlet diameter [mm / ”] 6,3 / 1/4 | ||
| Air inlet hose diameter (internal) [mm / ”] 10 / 3/8 | ||
| Rotations [min] | -] 20 000 | |
| The maximum drill diameter [mm] | 10 | |
| The maximum operating pressure | [MPa] | 0,63 |
| Required air flow (of around 0,63 MPa) | [l/min] | 141 |
| Sound pressure (ISO 15744) | [dB(A)] | 86,0 ± 3,0 |
| Sound power (ISO 15744) | [dB(A)] | 97,0 ± 3,0 |
| Vibration (ISO 28927-5) | [m/s2] | 1,925 ± 1,5 |
GENERAL SAFETY CONDITIONS
WARNING! While working with the pneumatic tool, it is always advisable to follow the basic safety rules, including those below, in order to reduce the risk of fire, avoid the electric shock and injuries.
Before attempting to use the tool, read all instructions and keep for further reference.
NOTE! Read all instructions below. Failure to comply with them can lead to electrical shock, fire or personal injury. The definition of "pneumatic tool", which is used in the instructions, refers to all tools, which are driven by an air compressed stream at the appropriate pressure.
COMPLY WITH THE FOLLOWING INSTRUCTIONS
General safety rules
Before starting to install, work, repair, maintain or change accessories, or while working near a pneumatic tool due to many hazards, it's necessary to read and understand the safety instructions. If the above mentioned steps are not taken, it may result in serious injury. The installation, assembling or adjustment of pneumatic tools may only be performed by qualified and trained staff. Do not modify the pneumatic tool. Modifications can reduce the efficiency and level of safety, and increase the risk for a tool operator. Do not dispose of safety instructions, but forward it to the tool operator. Do not use the pneumatic tool if it is damaged. The tool should be subject to periodic inspections for visibility of the data required by ISO 11148. The employer / user should contact the manufacturer for replacement of a rating plate whenever it is necessary.
Hazards associated with disposed parts.
Disconnect the tool from the power supply before changing the insertion tool or accessory. The damage to the workpiece, accessories or even the inserted tool can cause the ejection of parts at high speed. Always wear eye protection (goggles) - resistant to impact. Degree of protection should be selected depending on the work that needs to be done. While working with the tool over your head, use a protective helmet. You should also take into account the risk to bystanders. Make sure that the workpiece is securely fastened. Do not work with the tool without ensuring that, the insertion tool stop has been installed. To avoid injury,
EN
replace the stop when it is worn, cracked or distorted. Securely apply the insertion tool into the work surface before starting work.
Hazards associated with the work.
Using the tool can expose the operator's hands to hazards such as: crushing, impact, cutting, abrasion and heat. It's necessary to wear the appropriate gloves to protect the hands. The tool operator and maintenance personnel should be physically able to cope with the quantity of the tools and their power. Hold the tool properly. Keep balance and to ensure the safe feet positioning. It's necessary to relase the pressure on the start and stop device in the case of interruption in the power supply. Use only the lubricants, which are recommended by the manufacturer. Avoid direct contact with the insertion tool during or immediately after work, cause it may be hot. Wear protective goggles, it's recommended to use tight gloves and protective clothing.
Hazards associated with repetitive movements
Using a pneumatic tool while work associated with repetitive movements, the operator is exposed to the discomfort of hands, arms, shoulders, neck or other parts of the body. While using the pneumatic tool, the operator should take a comfortable posture for correct feet positioning and should avoid postures, which are strange or not providing the balance. The operator should change his posture during long work, it will help to avoid discomfort and fatigue. If the operator experiences symptoms such as: permanent or repeated discomfort, pain, throbbing pain, tingling, numbness, burning or stiffness -. He should not ignore them, he should inform the employer and consult a doctor.
Hazards associated with accessories
Disconnect the tool from the power supply before changing the insertion tool or accessory. Use accessories and consumables only in sizes and types recommended by the manufacturer. In case of the hammers, if applicable, never use any chisels as hand tools. It have been specially designed and heat-treated for use only in non-rotating impact tools. In case of the hammers and crushers, never use blunt chisels, as applicable, because they are subjected to heavy loads and may break due to material fatigue. Using a blunt tool can increase vibrations and therefore sharpened tools should always be used. In case of the hammers, as applicable, never cool hot insertion tools in water, this may result in brittleness and premature wear. In case of the hammers, as applicable, damage or breakage of the tool may result from improper use of the tool as a lever, for example while lifting. It's better to work by removing smaller fragments to avoid jams. Avoid direct contact with the insertion tool during or immediately after work, cause it may be hot or sharp.
Hazards associated with the workplace
Slips, trips and falls are the main causes of injuries. Beware of slippery surfaces caused by the use of the tool, as well as the hazards of tripping caused by the air supply system. Proceed with care in an unknown environment. There may be hidden threats such as electricity or other utility lines. Pneumatic tool is not intended for use in potentially explosive atmospheres and is not isolated from contact with electricity. Ensure that there are no electrical cords, gas pipes, etc. that can be dangerous in case of the damage by using the tool.
Hazards associated with vapours and dust
Dust and vapours generated by the use of a pneumatic tool can cause poor health or health problems (for example cancer, birth defects, asthma and / or dermatitis), necessary are: risk assessment and implementation of an appropriate control measures for these hazards. The risk assessment should include the impact of dust created by using the tools and the possibility of excitation of the existing dust. The air outlet should be pointed so as to minimize dust excitation in a dusty environment. There, where dust or fumes are generated, the priority should be to control them at the source of emission. All integrated functions and equipment to collect, extract or reduce dust or smoke should be properly used and maintained in accordance with the manufacturer's instructions. Use the respiratory protection in accordance with the instructions of employer and in accordance with the hygiene and safety requirements. The service and maintenance of the pneumatic tool should be carried out in accordance with the user manual, it will minimize fumes and dust emissions. Select, maintain and replace an insertion tools in accordance with the instructions to prevent the growth of vapours and dust.
Hazards associated with noise.
Exposure to high noise levels without the protection can cause permanent and irreversible hearing loss and other problems such as tinnitus (ringing, buzzing, hissing, chirping, whistling or humming in the ears). Necessary are: risk assessment and implementation of an appropriate control measures regarding to these hazards. The appropriate inspections, performed in order to reduce the risk, may include activities such as: use of insulation materials to prevent the "ringing" of the workpiece. Utilize hearing protectors in accordance with the instructions of employer and in accordance with the hygiene and safety requirements. The service and maintenance of the pneumatic tool should be carried out in accordance with the user manual, avoiding an unnecessary increase of noise level. If the pneumatic tool is fitted with a silencer, always make sure that it is correctly assembled while using the tool. Select, maintain and replace worn tools in accordance with the instructions. It will allow to avoid unnecessary increase of noise level.
Hazards associated with vibrations
Exposure to vibration may cause, permanent nerve damage and hands and arms blood flow damage - blood vessels and joints of the hand, wrist and arm. It's necessary to wear warm clothing while working at low temperatures and it's needed to keep the
EN
hands warm and dry. In case of numbness, tingling, pain or whitening of the skin in the fingers and hands, it's necessary to stop using the pneumatic tool, then inform the employer and consult a doctor. The service and maintenance of the pneumatic tool should be carried out in accordance with the user manual, will allow to avoid an unnecessary increase of vibration level. Do not hold an insertion tool with your free hand, this increases the vibration exposure. Hold the tool with a light but firm grip, taking into account the required reaction forces, because the risk from vibrations is usually greater when the grip strength is higher. Keep the additional holders from the central position and avoid pressing the holder until it stops. In case of the crushers, remove smaller pieces of concrete to prevent wedging of the tool.. In case of the crushers, move the tool every few seconds. During movement, the tool must be stopped because vibrations reach a high level if an insertion tool does not overlap the workpiece.
Additional safety instructions for pneumatic tools
Air under pressure can cause serious injury:
- always cut off the air supply, empty the hose from the air pressure and disconnect the tool from the air supply when: it is not used, before changing accessories or while performing repairs;
- never point an air stream at yourself or anyone else.
Hit by hose can cause serious injury. Always check the hoses and fittings for wear and or damage, for any leakes. Cold air should be pointed away from the hands.
Whenever universal screw connections i.e. twist coupling are used (claw couplings), safety pins and safety connectors must be used to prevent damage to the connectors between the hoses and between the hose and the tool. Do not exceed the maximum air pressure specified for the tool.
Never carry the tool by holding the hose.
OPERATING CONDITIONS
It's necessary to ensure that, the source of compressed air allows to create the proper working pressure and it provides the required air flow. In the case of a too high air pressure, a reducer should be used together with a safety valve. The pneumatic tool must be powered by filter system and lubricator.
It will ensure, at the same time, the air which is pure and moistured by oil. The condition of the filter and lubricator should be checked before each use, and possibly clean the filter or to top up the shortage of oil in the lubricator. It will ensure proper operation of the tool and will extend its normal service life.
In case of heavy loads always use an additional holder.
If the drill stops, for example due to jamming or when passing through the material being drilled, large rotational forces acting on the tool can be triggered. It's necessary to adopt such a posture, to be able to effectively counteract such forces.
An unexpected tool movement or breaking of the drill may cause injuries.
In case of the using additional holders or supporting stands, ensure that the tool is correctly and securely fastened.
It's necessary to adopt such a posture, which will allow effectively counteract the normal or unexpected movement of the tool caused by the torque.
Keep body parts and clothes away from the rotating holder and drill. There is a risk of being drawn or caught. Always ensure that all keys and tools used to adjust and assemble other insertion tools in the drill have been removed before drilling.
USE OF THE TOOL
Before each use of the tool, ensure that no parts of the pneumatic system are damaged. If any damage is observed, immediately replace it with new undamaged system components.
Before each use of the the pneumatic system, you should dry the condensed moisture inside the tool, compressor and other parts.
Connecting the tool to pneumatic system
The figure shows the recommended method of connecting of the tool to the pneumatic system. The method shown will ensure the most effective use of the tool and will extend the its normal service life.
Let a few drops of oil with viscosity SAE 10 into the air inlet.
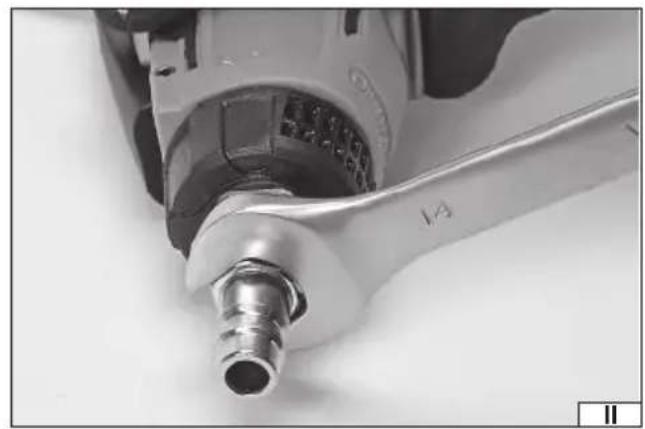
To the air inlet thread securely and firmly tighten screw an appropriate bit to connect the air hose. (II)
On the tool driver mount an appropriate bit. While working with pneumatic tools it should be used only equipment designed to work with the impact tools.
There, where it's possible, adjust the pressure (torque).
Connect the tool to pneumatic system using the hose with an inner diameter of 10 mm / 3/8". Ensure that the hose has a strength of at least 1,38MPa. (III)
Start the tool for a few seconds making sure that no suspicious sounds or vibrations come from it.
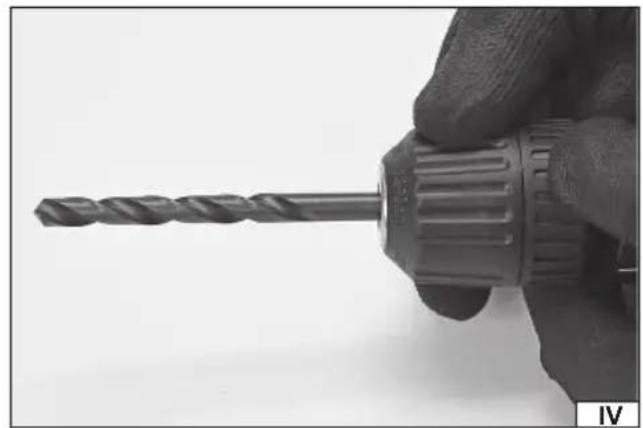
Fixing the drill in the holder (IV)
Select a drill with roller grip proper for specific job. Insert the drill bit into the chuck and then holding the back of the chuck rotate the front part of the chuck, so that the drill is fixed in the chuck tightly and reliably.
EN
Starting and stopping the tool
Caution! Before starting the pneumatic tool, make sure that the mounted inserted tool does not come into contact with any object or any body part.
The tool is operated by means of a lever which opens the air valve and thus ensures the supply of compressed air to the tool drive. If the lever is equipped with a lock that prevents the lever from being accidentally pressed. Turn the lock, so that it is parallel to the lever, and then pull the lever towards the tool housing. This will start the tool. Allow the tool to reach its rated speed and only then start working.
The tool stops when the pressure on the lever is released. The lever automatically returns to the rest position and the lock secures the lever. Please note that the inserted tool can still move for some time after. Do not put the tool away until the inserted tool has come to a complete standstill.
Drilling
Adjust the pressure in the pneumatic system so that it does not exceed the maximum value for the tool.
Fit a suitable drill bit in the holder.
Connect the drill to pneumatic system.
Press the switch and check that the drill / bit does not show excessive axial run out. If necessary, disconnect the drill from the source of compressed air power, then replace the drill /bit with a new one.
Insert an appropriate drill bit to the area designated for the opening.
Gradually press the trigger of the tool.
To make it easier to take the drill bit out of the hole, release the pressure on the switch, wait for the drill bit to come to a complete stop. Change the direction of rotation to opposite and tap the trigger gently. Take the drill bit out of the hole carefully.
After finished work, dismantle the pneumatic system and preserve the tool.
MAINTENANCE
Never use gasoline, solvent or other flammable liquid to clean the tool. The vapours can be ignited, may result the tool explosion and serious injury.
Solvents, used to clean the tool holder and the body, can result softening of seals. Thoroughly dry out the tool before starting your work.
In case of any irregularities in the tool operation, the tool should be immediately disconnected from the pneumatic system. All the components of the pneumatic system must be protected against contamination. Any contamination which enters the pneumatic system can damage the tool and other components of the pneumatic system.
Tool maintenance before each use.
Disconnect the tool from the pneumatic system.
Before each use, let a few drops of preservative fluid WD-40 through the air inlet.
Connect the tool to the pneumatic system and run for about 30 seconds. It will allow to distribute the preservative fluid inside the tool and clean it.
Disconnect the tool from the pneumatic system again.
Let a few drops of oil with viscosity SAE 10 inside the tool, through the air inlet and special designed openings for this purpose.
It's recommended to use oil SAE 10 intended for maintenance of pneumatic tools. Connect the tool and run it for the short time. Note! WD-40 may not be used as an appropriate lubricating oil.
Wipe away excess oil, which has leaked out through the outlets. The oil, which has been leave may damage the tool seals.
Other maintenance operations
Before each use of the tool, check that no signs of damage are visible on the tool. Tool drivers, holders and the spindles must be kept clean.
Every 6 months or after 100 hours of operation, it's necessary to hand over the tool for reviewing by the qualified personnel in the repair workshop. If the tool was used without the use of a recommended air supply system, it's necessary to increase the frequency for reviewing of the tool.
Troubleshooting
It's necessary to stop using the tool immediately, if the tool is found to be defective. Using a defective tool can cause injury. All repairs or replacements of the tool components should be carried out by qualified personnel at an authorized repair workshop.
| Defect Possible solutions | |
| Tool is running too slowly or does not start. | Let a few drops of preservative fluid WD-40 through the air inlet. Run the tool for about few seconds. The blades may stick to the rotor. Run the tool for about 30 seconds. Lubricate the tool with small amount of oil. Note! The excess of oil can cause a decrease in power of tool. In this case, it's necessary to clean the drive. |
EN
| Defect Possible solutions | |
| The tool starts and then releases. | The compressor does not provide the correct air supply. The tool operates by the air collected in the compressor tank. As the tank gets emptier, the compressor has not kept pace with the refilling of air shortages. Connect the tool to a more efficient compressor. |
| Insuffi cient power | Ensure that the hoses have an internal diameter of at least such as specified in the table in point 3. Check the set point of pressure, whether it's set to the maximum value. Ensure that the tool is properly cleaned and lubricated. In case a lack of results, forward the tool for repair. |
Spare parts
For a detailed list of spare parts for the appliance go to the "Download" section in the Product tab on the TOYA SA website: www.toya.pl.
After finishing work, the casing, ventilation slots, switches, additional holder and covers should be cleaned, for example, with a stream of air (at a pressure not exceeding 0.3 MPa), with a brush or a dry cloth without the use of chemicals and cleaning liquids. Clean tools and holders with a dry, clean cloth. Used tools are secondary raw materials - do not dispose of it in household waste containers because it contains hazardous substances to human health or the environment! We ask for active help in the economical management of natural resources and protection of the natural environment by forwarding the worn tools to the point of storage of worn equipment. To reduce the amount of disposed waste it's necessary to re-use them, recycle or recover in another form.
MERKMALE DES WERKZEUGES
DEKLARACJA ZGODNOŚCI DECLARATION OF CONFORMITY DECLARATIE DE CONFORMITATE
1025/YT-09695/EC/2025
We declare and guarantee with full responsibility that the following products:
meet requirements of the following European Standards / Technical Specifications:
and fulfill requirements of the following European Directives:
2006/42/EC Machinery and safety elements
Serial number: concern all serials numbers of item(s) mentioned in this declaration
The person authorized to compile the technical file:


- DE
- EQUIPMENT
- GENERAL SAFETY CONDITIONS
- GENERAL SAFETY RULES
- HAZARDS ASSOCIATED WITH DISPOSED PARTS
- EN
- HAZARDS ASSOCIATED WITH THE WORK
- HAZARDS ASSOCIATED WITH REPETITIVE MOVEMENTS
- HAZARDS ASSOCIATED WITH ACCESSORIES
- HAZARDS ASSOCIATED WITH THE WORKPLACE
- HAZARDS ASSOCIATED WITH VAPOURS AND DUST
- HAZARDS ASSOCIATED WITH NOISE
- HAZARDS ASSOCIATED WITH VIBRATIONS
- OPERATING CONDITIONS
- USE OF THE TOOL
- STARTING AND STOPPING THE TOOL
- DRILLING
- MAINTENANCE
- TOOL MAINTENANCE BEFORE EACH USE
- OTHER MAINTENANCE OPERATIONS
- TROUBLESHOOTING
- SPARE PARTS
- MERKMALE DES WERKZEUGES
- DEKLARACJA ZGODNOŚCI DECLARATION OF CONFORMITY DECLARATIE DE CONFORMITATE
Brand : Yato
Model : YT-09695
Category : Drill