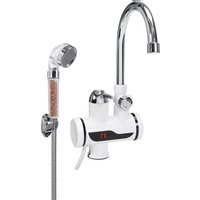
75923 - Instant electric water heater Fala - Free user manual and instructions
Find the device manual for free 75923 Fala in PDF.


| Product type | Instant electric water heater |
| Brand | Fala |
| Model | 75923 |
| Rated voltage | 220-240 V~ |
| Rated frequency | 50 Hz |
| Rated power | 3000-3600 W |
| Insulation class | I |
| Protection rating | IPX4 |
| Inlet water pressure | 0.04 – 0.6 MPa |
| Weight | 1.14 kg |
| Water connection | G 1/2 |
| Mounting | Vertical, on a worktop or wall |
| Display | Water temperature |
| Operation | Instant heating, automatic start and stop |
| Safety | Overcurrent protection (16 A), do not use without water, risk of burns |
| Maintenance | Clean with a soft cloth and non-abrasive detergent; descale the strainer and aerator |
| Package contents | Heating body, gooseneck spout, handheld shower, diverter, aerator, gaskets, nuts, power cord |
Frequently Asked Questions - 75923 Fala
User questions about 75923 Fala
0 question about this device. Answer the ones you know or ask your own.
Ask a new question about this device
Download the instructions for your Instant electric water heater in PDF format for free! Find your manual 75923 - Fala and take your electronic device back in hand. On this page are published all the documents necessary for the use of your device. 75923 by Fala.
USER MANUAL 75923 Fala
natural_image
Four identical chrome water pumps with black valves, arranged in a row (no text or symbols visible on the pumps themselves)PL EN DE RU UA LT LV CZ SK H RO ES FR IT NL GR BG
natural_image
Close-up of a showerhead with metallic fittings and a chrome handle (no text or symbols visible)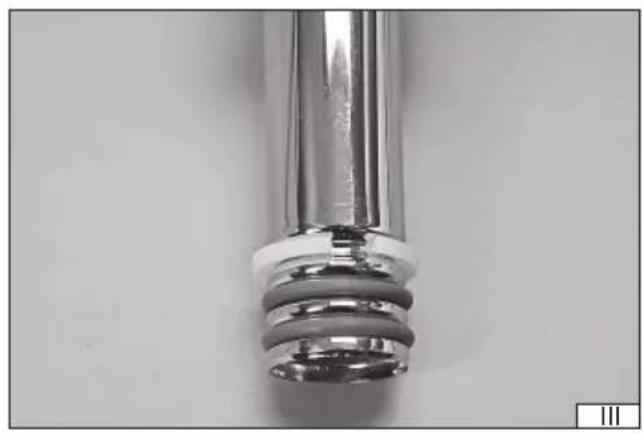
natural_image
Close-up of a metallic cylindrical component with a coiled spring and cap (no text or symbols visible)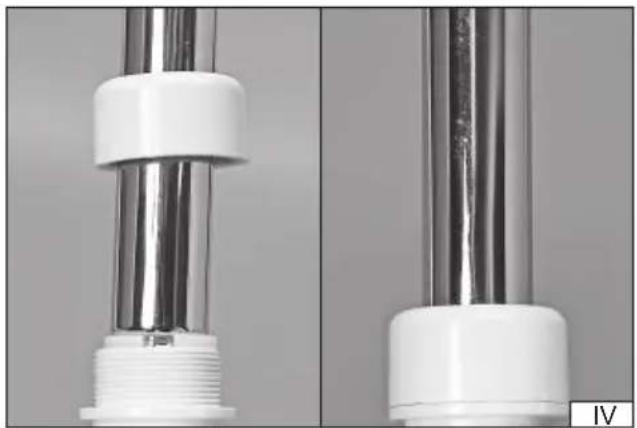
natural_image
Close-up of two white plastic shower tube fittings with threaded ends, shown from different angles (no text or symbols visible)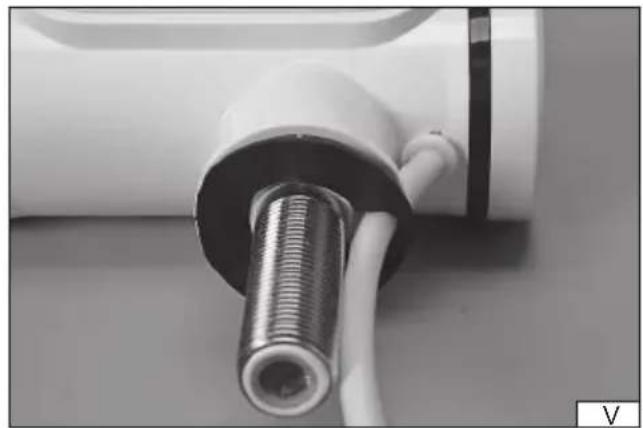
natural_image
Close-up of a white electric shaver with a metallic threaded end and cable, no visible text or symbols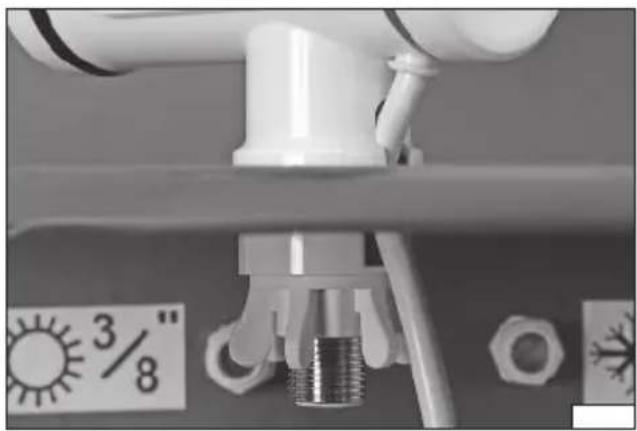
natural_image
Close-up of a white plumbing pipe fitting with a threaded component, no visible text or symbols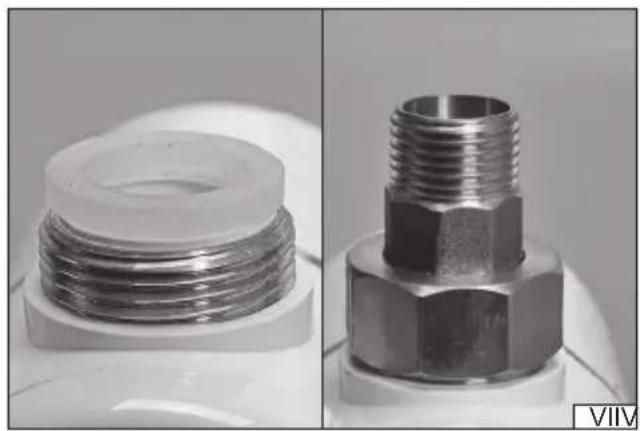
natural_image
Close-up of two metallic threaded connectors, one with a flanged plastic housing and the other with hexagonal bolted base (no text or symbols visible)natural_image
Close-up of a metallic pipe fitting with a coiled hose and a temperature scale showing 3/8 (no text or symbols on the main subject)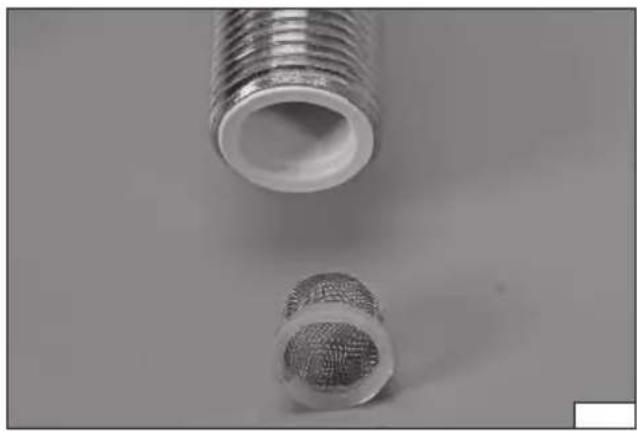
natural_image
Close-up of two metallic connectors, one with threaded top and one with textured bottom, against a plain background (no text or symbols)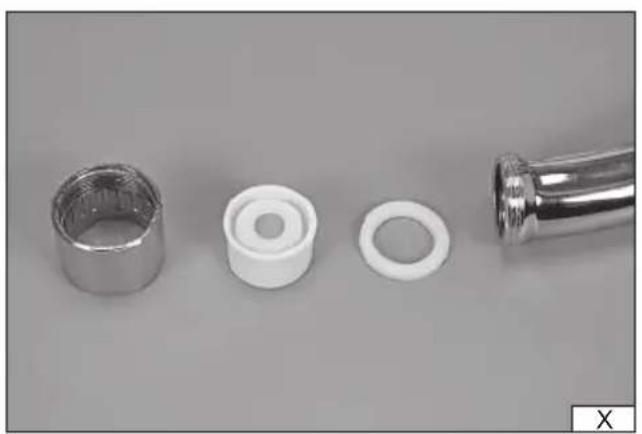
natural_image
Four white plastic components arranged on a gray surface: a cylindrical ring, a hollow cylindrical part, a hollow ring, and a metallic tool (no text or symbols visible)PL
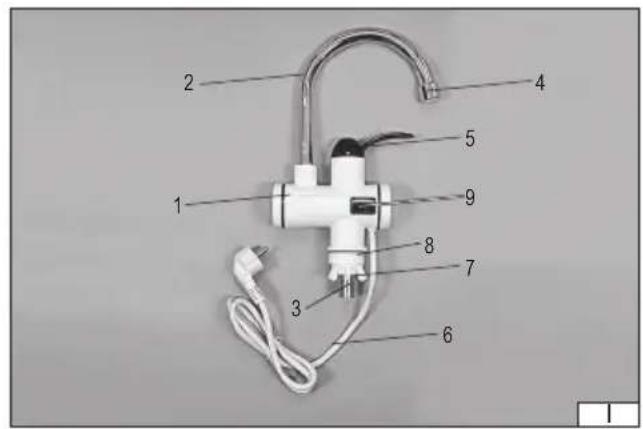
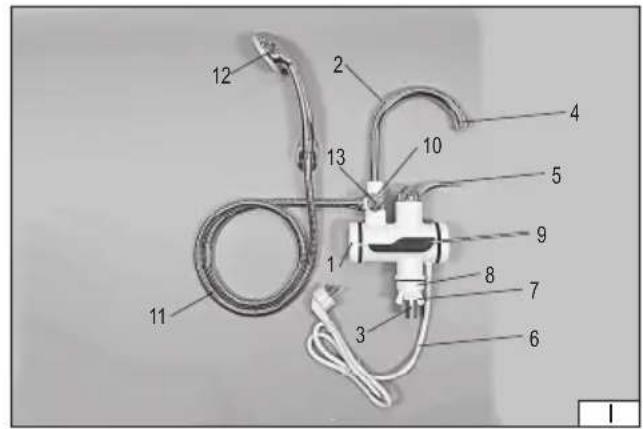
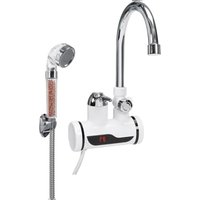
- water heater body
- spout
- water inlet
- aerator
- water heater valve
- power cord with plug
- fi xing nut
- grade ring
- display
- manifold
- shower hose
- hand-held shower head
- water direction switch
DE
Read the operating instruction
This symbol indicates that waste electrical and electronic equipment (including batteries and storage cells) cannot be disposed of with other types of waste. Waste equipment should be collected and handed over separately to a collection point for recycling and recovery, in order to reduce the amount of waste and the use of natural resources. Uncontrolled release of hazardous components contained in electrical and electronic equipment may pose a risk to human health and have adverse effects for the environment. The household plays an important role in contributing to reuse and recovery, including recycling of waste equipment. For more information about the appropriate recycling methods, contact your local authority or retailer.
PRODUCT CHARACTERISTICS
Instantaneous water heater with battery provides access to hot, running water everywhere, where there is no other possibility of water heating. Simply bring the running cold water, and due to the built-in electric heating element, you can get hot water.
Prior to working with the product, you should read all the instruction and keep it around.
For any damage caused by failure to comply with safety regulations and instructions of this manual, the supplier is not responsible.
EQUIPMENT
The product is supplied in a complete state but it requires the installation steps, which are described later in this manual. With the product, there is supplied a battery spout and water connection.
SAFETY INSTRUCTIONS
Attention! The product is characterized by high power consumption. Before connecting the product to mains, you should make sure, that the mains parameters will be sufficient to supply the product. Before connecting the product to mains, you should make sure that voltage, the frequency and the performance of the mains correspond to the values on the rating plate of the product. Power cable plug must fit into the mains socket. It is forbidden to alter the plug. The product must be connected directly to a single wall mains socket. it is forbidden to use extension cables, splitters, and double sockets. Circuit power supply network must be equipped with a grounding conductor and protection for 16 A. Avoid contact of the power cable with sharp edges and hot objects and surfaces. When the product is working, the power cable must always be fully unwinding, and its location should be set so, it would be no obstacle during the operation of the product. Placing the power cable can cause a tripping hazard. The power outlet should be located in such a place, that there would be always possible to quickly disconnect the power cable plug. The socket should be located possibly far away from water outlet. When disconnecting the power cable plug, you should always pull by the plug housing, never by the cable. If the power cable or plug are damaged, you should immediately disconnect them from the mains and contact authorized service of the manufacturer for replacement. Do not use the product with a damaged cable or plug. The power cable or plug can not be repaired, in the event of a failure of these elements they should be replaced with new ones, free from defects. Before connecting the product to mains, you should make sure, that the water pressure is within the range specified in the table technical data and on the rating plate of the product. It is recommended that the product connection to the water supply will be performed by a qualified personnel. The product designed for only an indoors installation. The product should be not mounted at places, where the temperature will fall to the level which would cause freezing of water. Frozen water increases its volume, which can lead to a damage of the product. If you noticed any damage to the product, it is prohibited to use it. All damage must be removed before resuming use of the product. This device must not be used by children. Children should not play with the device. Children left unattended should not be allowed to perform the cleaning and maintenance of the device. This device may be used by persons with reduced physical, mental abilities and persons with no experience or knowledge of the device, if supervised or instructed on its safe use so that the risks associated with it are understood. Due to the high electrical power consumption, the device should be connected to a separate power supply line.
EN
The cross-section of the wires of the line supplying the device should not be less than 2.5 mm^2 . It is recommended that the person preparing the line for supplying the device is appropriately qualified. The mains circuit should be equipped with a protective conductor and a B16-type 16 A overcurrent protection device. Before connecting the device to the power supply, electrical tests of the power supply circuit should be carried out to verify that proper protection against electric shocks has been provided. The connection of the device to the general electrical network may be limited by local regulations.
PRODUCT ASSEMBLY
Caution! First, connect the product to the water source, check leaktightness of water connections and then connect the appliance to the power supply. It is forbidden to assemble the product when it is connected to the power supply.
Caution! The product is intended for vertical assembly only. Do not assemble the product in any other position.
Caution! Before connecting to the power supply, bleed the device. Open the valve so that cold water flows through the faucet for approx. 1-2 minutes. The bleed procedure should be carried out each time the water flow through the faucet stops, e.g. due to a water supply failure.
Warning! Do not leave the faucet unattended if water is flowing through it; any irregularities in operation should result in immediate disconnection of the device from the power supply.
Warning! The water inlet of this water heater must not be connected to water supplied from any other water heating system.
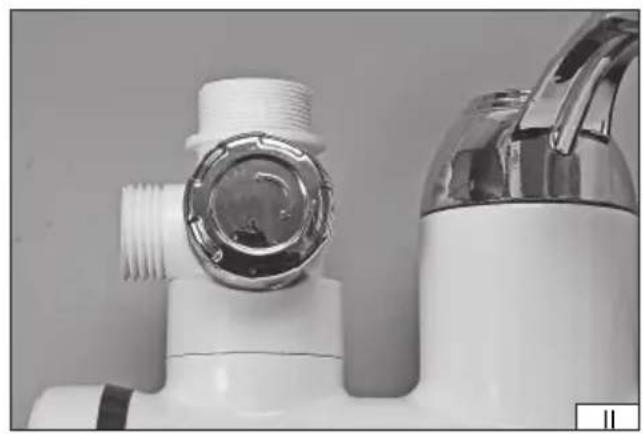
Begin with mounting the drain spout to the water heater body. If the faucet is equipped with a manifold allowing for connection of a hand-held shower head, first screw the manifold onto the outlet opening of the body (II). The manifold must be screwed on so that the water direction switch is at the front. Do not use any tools to screw the manifold on.
Before mounting the spout, check that all gaskets and the grade ring are in the cavity of the spout mounting (III). Then, not using any tools, screw the fixing ring on the water heater body thread (IV).
Properly mounted drain spout should rotate smoothly in the range of 360 degrees, with a slight noticeable resistance.
Depending on the faucet model, the body is to be mounted to the worktop or directly to the water outlet in the wall. Mount the body of the water heater in a hole near the sink or washbasin so that water can enter the drain of the sewage system without obstruction.
Assembly on worktop
The body mounting has a cut-out that allows for passing the power cord when the mains outlet is located under the top on which the faucet body will be mounted. In this case, put the rubber gasket through the plug of the power cord (V). Place a rubber pad under the body to protect the mounting space from damage. Mount the body of the water heater by screwing the fixing nut under which the spacer ring (VI) has been placed. It is recommended to tighten the fixing nut without tools, but if this does not ensure a stable mounting of the water heater body, a wrench can be used to tighten it. Be careful when tightening the nut with a wrench; it is made of plastic and may be damaged by excessive force.
Wall assembly
The product comes with a coupling consisting of a nut, a threaded bushing with a flange and a gasket. Place a nut on the bushing and then screw the bushing thread into the water connection thread in the wall. Seal the connection with a gasket, PTFE tape or hemp tow. Mount the supplied gasket to the water inlet of the faucet and tighten the coupling nut to the faucet water inlet (VII). Do not use too much force to tighten in order to avoid damaging the gasket.
Connecting to the water source
Caution! Make sure that the water supply is closed before connecting the product to the hydraulic system.
Mount the water supply with sealing and nut to the water inlet e.g. with a flexible hose (VIII).
Make sure that the water heater valve is in a closed position. When rotating the valve handle, the ratchet mechanism sounds and the valve itself shows increased resistance during rotation. Then open the water supply to the water heater. Make sure that the water supply does not show signs of leakage and open the water heater valve by rotating the valve to the left or right. Water should come out of the spout outlet. Check that the connections of the spout and the body of the water heater do not show any signs of leakage.
If any leaks are detected, close the water supply to the water heater, then remove the cause of the leaks and re-check the water connections for leaktightness.
Once the water connections are fully tight, the heater can be connected to the power supply.
EN
Make sure that the faucet valve is closed and no water comes out from the spout outlet, then plug the power cord plug into an electrical outlet. Open the valve of the water heater by rotating it to the left; hot water should come out of the water outlet. At the same time, the display on the body will show the water temperature.
For models equipped with a water jet switch, rotating the water jet clockwise as far as it will go switches the water jet to the spout and rotating it counterclockwise as far as it will go switches the water jet to the hand-held shower head.
PRODUCT USE
Caution! The heater can produce water at a very high temperature, which is higher than the normal hot water temperature in the water supply system. Be careful not to burn oneself when using the water heater.
The valve opening degree regulates the intensity of the water jet. The more open the valve, the closer the lever is to the extreme position, the more intensive water flow out of the spout outlet. However, since it is easier to heat a less intense water jet, the more intense the jet, the lower the water temperature.
The water heater is switched on automatically after opening the water heater valve and rotating it upwards. The heater is switched off automatically when the valve is closed. When the valve is rotated down, the heater does not start.
WARNING! Even a very small water flow (caused by the valve not being fully closed) can lead to an excessive increase in temperature, because the heater heating element will still be on. This can result in the water boiling and the creation of dangerous steam pressure, which may damage or even explode the heater.
Always make sure that the heater valve is fully closed after water is drawn off to prevent dangerous situations.
Caution! In case of not using the faucet for a long period of time, disconnect it from the power supply. Pull the plug out of the mains outlet.
PRODUCT MAINTENANCE
Caution! All maintenance works must be carried out with the water heater disconnected from the power supply. Pull the plug out of the mains outlet.
Clean the body of the water heater and other plastic parts with a soft cloth and cleaning agents intended for the maintenance of plastics. Chrome-plated parts should be cleaned similarly to plastics, but with suitable cleaning agents. Slightly soak the cloth in a cleaning agent and then clean the product surface. After cleaning, wipe with a soft cloth soaked in water and then dry or allow to dry. It is forbidden to use aggressive detergents for the product maintenance. Do not use abrasives, cleaning agents containing alcohols, acids (except 2% solution of vinegar with water) and solvents.
The water supplying the faucet must be cleaned of any mechanical or chemical contaminants. The manufacturer does not take responsibility for damage to the faucet caused by water contamination.
However, if the intensity of the water jet decreases, the water inlet to the faucet or the outlet from the spout may become blocked.
Caution! Close the water supply to the heater before starting the following maintenance operations.
To clear the water inlet to the faucet, unscrew the inlet hose and carefully remove the sieve (IX).
Clean the sieve with a jet of running water and install in reverse order to disassembly. Perform a leaktightness check of the water connections before connecting the product to the power supply.
In order to clear the outlet of water from the spout, unscrew the aerator (X) and check its patency. Check the condition of the gasket and clean both components with a jet of running water if necessary. Then install the seal and screw in the aerator without tools. Perform a leaktightness check of the water connections before connecting the product to the power supply.
TECHNICAL DATA
| Parameter Unit Value | |||||
| Catalog number 75921 75922 75923 75924 | |||||
| Rated voltage [V~] 220-240 | |||||
| Rated frequency [Hz] 50 | |||||
| Rated power [W] 3000-3600 | |||||
| Degree of isolation | I | ||||
| Supply water pressure | [MPa] | 0,04 – 0,6 | |||
| Degree of protection | IPX4 | ||||
| Weight: | [kg] | 0,76 | 0,78 | 1,14 | 1,16 |
| Diameter of the water connection | G 1/2 | ||||
CHARAKTERISTIK DES PRODUKTES
PRODUKTA RAKSTUROJUMS
CARACTERISTIQUES DU PRODUIT
ASSEMBLAGE DU PRODUIT
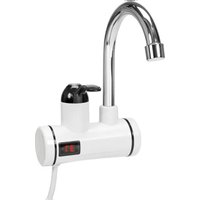
Brand : Fala
Model : 75923
Category : Instant electric water heater