CEMO25UX - Microwave Oven CONTINENTAL EDISON - Free user manual and instructions
Find the device manual for free CEMO25UX CONTINENTAL EDISON in PDF.

| Product type | Microwave oven |
| Brand | Continental Edison |
| Model | CEMO25UX |
| Rated voltage | 230 V ~ 50 Hz |
| Rated power | 1450 W |
| Standby power consumption | 0.8 W |
| Capacity | 25 L |
| Installation type | Freestanding on a cabinet (not built-in) |
| Cavity material | Painted steel |
| Turntable | Yes, glass |
| Main functions | Microwave cooking, weight and time defrost, quick cooking, auto menu (8 programs), kitchen timer, child lock |
| Number of power levels | 5 (10%, 30%, 50%, 80%, 100%) |
| Display | Digital LED |
| Dimensions (W x D x H) | Approximately 49 x 35 x 28 cm |
| Net weight | Approximately 11 kg |
| Cleaning | Clean the cavity with a damp cloth, do not use abrasive products, steam cleaning with lemon possible |
| Safety | Child lock, door safety system, automatic stop in case of smoke |
| Warranty | 2 years legal warranty of conformity |
| Repairability | Repairs by an approved professional only, spare parts available on request |
| Repairability index | Not provided |
Frequently Asked Questions - CEMO25UX CONTINENTAL EDISON
User questions about CEMO25UX CONTINENTAL EDISON
0 question about this device. Answer the ones you know or ask your own.
Ask a new question about this device
Download the instructions for your Microwave Oven in PDF format for free! Find your manual CEMO25UX - CONTINENTAL EDISON and take your electronic device back in hand. On this page are published all the documents necessary for the use of your device. CEMO25UX by CONTINENTAL EDISON.
USER MANUAL CEMO25UX CONTINENTAL EDISON
natural_image
Abstract geometric shapes resembling partial quotation marks (no text or symbols)Continental Edison
natural_image
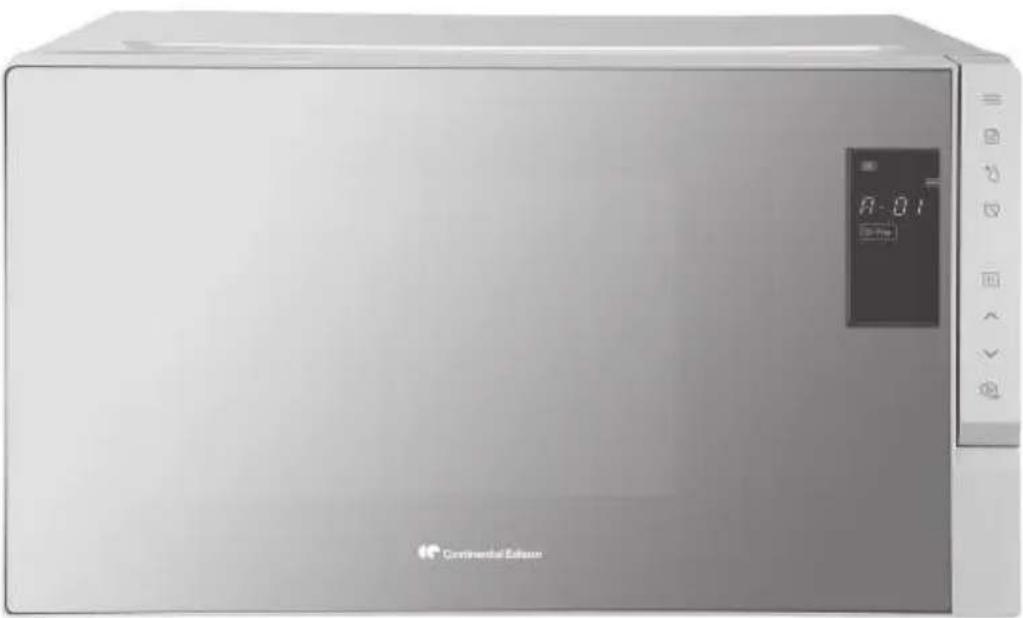
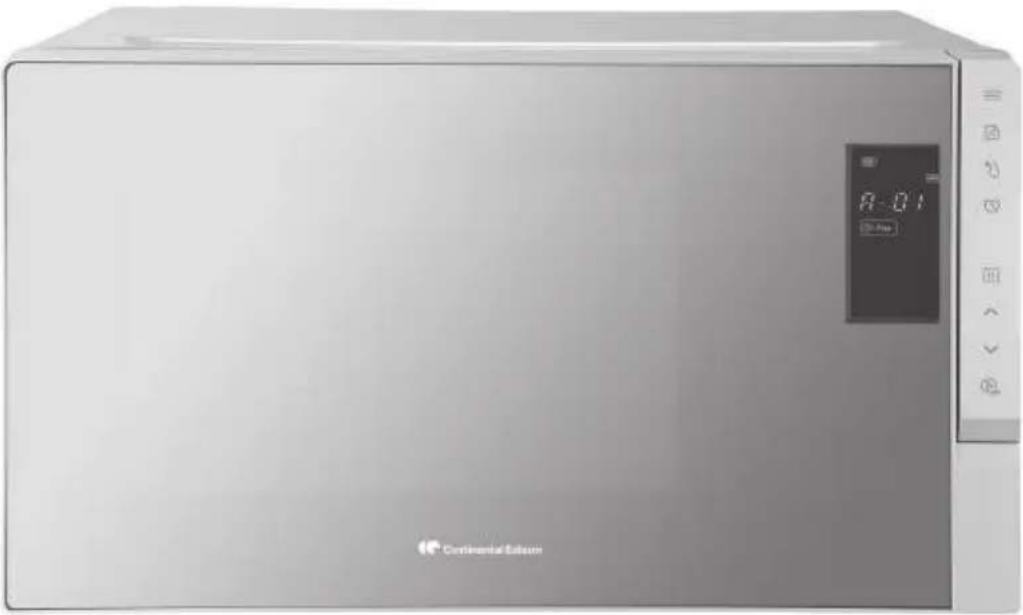
Exterior view of a modern microwave oven with control panel and display (no visible text or symbols)CEMO25UX
FOUR À MICRO-ONDES / M ICROWAVE OVEN
LIRE AVEC ATTENTION ET A CONSERVER EN VUE DE REFERENCE FUTURE
- FR (version originale)
- EN (translated from the original)
natural_image
Simple line drawing of a circular tray with four small objects on each side (no text or symbols)Plateau en verre
natural_image
Technical line drawing of a mechanical component with a spiral arrow indicating rotation (no text or symbols)1) Plateau en verre
natural_image
Line drawing of a microwave oven with a lid and fan, showing open door and interior (no text or symbols)Remarques:
APERÇU DES FONCTIONS DES BOUTONS
natural_image
Abstract geometric shapes resembling partial arcs or quotation marks, rendered in grayscale with no text or symbols.Continental Edison
natural_image
Exterior view of a Continental Edison microwave oven (no visible text or symbols on the device body)CEMO25UX
MICROWAVE OVEN
SAVE THESE INSTRUCTIONS CAREFULLY

THIS PRODUCT IS FOR HOUSEHOLD USE ONLY!
Please read these instructions carefully before the first use of this product and save this manual for your future reference.
PRECAUTIONS TO AVOID POSSIBLE EXPOSURE TO EXCESSIVE MICROWAVE ENERGY
(a) Do not attempt to operate this oven with the door open since this can result in harmful exposure to microwave energy. It is important not to break or tamper with the safety interlocks.
(b) Do not place any object between the oven front face and the door or allow soil or cleaner residue to accumulate on sealing surfaces.
(c) WARNING: If the door or door seals are damaged, the oven must not be operated until it has been repaired by a competent person.
ADDENDUM
If the apparatus is not maintained in a good state of cleanliness, its surface could be degraded and affect the lifespan of the apparatus and lead to a dangerous situation.
AVERTISSEMENTS ET CONSEILS DE SECURITE IMPORTANTS
Important Safety Instructions Read carefully and keep for future reference:
- Read all instructions before using.
-
Make sure the voltage in your living area corresponding to the one shown on the rating label of the appliance. And the wall socket is properly grounded.
-
To reduce the risk of fire in the oven cavity:
a. Do not overcook the food.
b. Remove wire twist -ties from paper or plastic bags before placing bags in the oven.
c. Do not heat oil or fat for deep drying as the temperature of oil cannot be controlled.
d. If smoke is observed, switch off or unplug the appliance and keep the door closed in order to stifle any flames.
e. When heating food in plastic or paper containers, keep an eye on the oven due to the possibility of ignition.
- To reduce the risk of explosion and sudden boiling:
a. WARNING: Liquids and other foods must not be heated in sealed container since they are liable to explode; Baby bottles fitted with a screw cap or teat are considered to be sealed containers.
b. Microwave heating of beverages can result in delayed eruptive boiling, therefore care must be taken when handling the container.
EN
c. Potatos, sausage and chestnut should be peeled or pierced before cooking. Eggs in their shell, whole hard - boiled eggs should not be heated in microwave ovens since they may explode, even after microwave heating has ended.
d. The Contents of feeding bottles and baby food jars are to be stirred or shaken and the temperature is to be checked before consumption, in order to avoid burns.
5) Warning: if one of the following occurs:
The door is damaged, or The door seal is damaged, or Furnace failure
It shall not be put into use without repair by qualified personnel.
6) If the supply cord is damaged, it must be replaced by the manufacturer or its services agent or a qualified technician in order to avoid a shock hazard.
7) After cooking, the container is very hot. Using gloves to take out the food and avoid steam burns by directing steam away from the face and hands.
8) If the plate is covered or covered with microwave film, lift the other side slightly to release the burning steam jet; This can avoid scalding your hands or face. If it's popcorn or baking bag, gently open it and take the opening away from you.
9) To prevent the trunctable from breaking, let the trunctable cool down before cleaning.
EN
10) Make sure the utensils do not touch the interior walls during cooking.
11) Only use utensils that are suitable for use in microwave ovens.
12) Do not store food or any other things inside the oven.
13) Do not operate the oven without any liquid or food inside the oven. This would do damage the oven.
14) This appliance can be used by children aged from 8 years and above and persons with reduced physical, sensory or mental capabilities or lack of experience and knowledge if they have been given supervision or instruction concerning use of the appliance in a safe way and understand the hazards involved. Children shall not play with the appliance. Cleaning and user maintenance shall not be made by children without supervision.
15) Keep the appliance and its cord out of reach of children less than 8 years.
16) Any accessories not recommended by the manufacture may cause injuries to persons.
17) Do not use outdoors.
18) The appliances are not intended to be opearted by means of an external timer or separate remote-control system.
19) The lamp of microwave oven is not intended for other purposes.
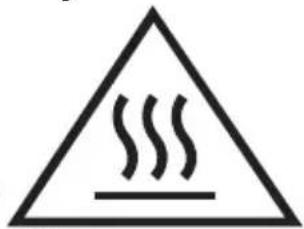
20) WARNING: Accessible parts may become hot during use. Young children should be kept away.
EN
21) The microwave oven must not be placed in a cabinet. The microwave oven is intended to be used freestanding. The microwave oven is not intended to be used build-in.
22) To ensure sufficient ventilation the free distance above the top surface at least 20 cm.
23) WARNING: It is hazardous for anyone other than a competent person to carry out any service or repair operation, which involves the removal of any cover, which gives protection against exposure to microwave energy.
24) Remove the power cord from the wall outlet before cleaning.
25) Failure to maintain the oven in a clean condition could lead to deterioration of the surface that could adversely affect the life of the appliance and possibly result in a hazardous situation.
26) The oven should be cleaned regularly and any food deposits removed.
27) Never use hard detergent, gasoline, abrasive powder or metal brush to clean any part of the appliance.
28) Do not remove the waveguide cover.
29) For detailed information on how to clean door gaskets, cavities and adjacent parts, refer to the "CLEANING AND MAINTENANCE" section.
30) The microwave oven is intended for heating food and beverages. Drying of food or clothing and heating of warming pads, slippers, sponges, damp cloth and similar may lead to risk of injury, ignition or fire.
EN
31) This appliance is intended to be used in household and similar applications such as:
- staff kitchen areas in shops, offices and others working environments;
- farm houses;
- by clients in hotels, motels and other residential type environments;
- bed and breakfast type environments.
32) Group 2 Class B appliance
This appliance is group 2 as it intentionally generate radio-frequency energy for heating food or stuff.
Class B equipment is equipment suitable for use in domestic establishments and in establishments directly connected to a low voltage power supply network which supplies buildings used for domestic purposes.
33) The appliance shall not be cleaned with a steam cleaner.
34) Metallic containers for food and beverages are not allowed during microwave cooking.
35) When the equipment is working, hot or external surfaces can be not added.
36) When the equipment becomes hot, care should be taken to avoid touching the heating elements in the furnace.
37) During use, the surface may get hot.
READ CAREFULLY AND KEEP FOR FUTURE REFERENCE
TO REDUCE THE RISK OF INJURY TO PERSONS GROUNDING INSTALLATION
DANGER
Electric Shock Hazard
Touching some of the internal components can cause serious personal injury or death.
Do not disassemble this appliance.
WARNING
Electric Shock Hazard
Improper use of the grounding can result in electric shock.
Do not plug into an outlet until appliance is properly installed and grounded.
This appliance must be grounded. In the event of an electrical short circuit, grounding reduces the risk of electric shock by providing an escape wire for the electric current.
This appliance is equipped with a cord having a grounding wire with a grounding plug.
The plug must be plugged into an outlet that is properly installed and grounded.
Consult a qualified electrician or serviceman if the grounding instructions are not completely understood or if doubt exists as to whether the appliance is properly grounded.
If it is necessary to use an extension cord, use only a 3-wire extension cord.
EN
- A short power-supply cord is provided to reduce the risks resulting from becoming entangled in or tripping over a longer cord.
- If a long cord set or extension cord is used:
1) The marked electrical rating of the cord set or extension cord should be at least as great as the electrical rating of the appliance.
2) The extension cord must be a grounding-type 3-wire cord.
3) The long cord should be arranged so that it will not drape over the counter top or tabletop where it can be pulled on by children or tripped over unintentionally.
UTENSILS
CAUTION
Personal Injury Hazard
It is hazardous for anyone other than a competent person to carry out any service or repair operation that involves the removal of a cover which gives protection against exposure to microwave energy.
See the instructions on "Materials you can use in microwave oven or to be avoided in microwave oven."
There may be certain non-metallic utensils that are not safe to use for microwaving.
If in doubt, you can test the utensil in question following the procedure below.
Utensil Test:
- Fill a microwave-safe container with 1 cup of cold water (250ml) along with the utensil in question.
- Cook on maximum power for 1 minute.
- Carefully feel the utensil. If the empty utensil is warm, do not use it for microwave cooking.
- Do not exceed 1 minute cooking time.
Materials you can use in microwave oven
| Utensils Remarks | |
| Browning dish Follow manufacturer's instructions. The bottom of browning dish must be at least 3/16 inch (5mm) above the turntable.Incorrect usage may cause the turntable to break. | |
| Dinnerware Microwave-safe only. Follow manufacturer's instructions.Do not use cracked or chipped dishes. | |
| Glass jars Always remove lid. Use only to heat food until just warm.Most glass jars are not heat resistant and may break. | |
| Glassware Heat-resistant oven glassware only. Make sure there is no metallic trim.Do not use cracked or chipped dishes. | |
| Oven cooking bags | Follow manufacturer's instructions. Do not close with metal tie.Make slits to allow steam to escape. |
| Paper plates and cups | Use for short-term cooking/warming only.Do not leave oven unattended while cooking. |
| Paper towels Use to cover food for reheating and absorbing fat.Use with supervision for a short-term cooking only. | |
| Parchment paper | Use as a cover to prevent splattering or a wrap for steaming. |
| Plastic Microwave-safe only. Follow the manufacturer's instructions.Should be labeled "Microwave Safe". Some plastic containers soften, as the food inside gets hot. "Boiling bags" and tightly closed plastic bags should be slit, pierced or vented as directed by package. | |
| Plastic wrap Microwave-safe only. Use to cover food during cooking to retain moisture.Do not allow plastic wrap to touch food. | |
| Thermometers Microwave-safe only (meat and candy thermometers). | |
| Wax paper Use as a cover to prevent splattering and retain moisture. | |
Materials to be avoided in microwave oven
| Utensils Remarks | |
| Aluminum tray May cause arcing. Transfer food into microwave-safe dish. | |
| Food carton with metal handle | May cause arcing. Transfer food into microwave-safe dish. |
| Metal or metal -trimmed utensils | Metal shields the food from microwave energy. Metal trim may cause arcing. |
| Metal twist ties May cause arcing and could cause a fire in the oven. | |
| Paper bags May cause a fire in the oven. | |
| Plastic foam Plastic foam may melt or contaminate the liquid inside when exposed to high temperature. | |
| Wood Wood will dry out when used in the microwave oven and may split or crack. | |
NAMES OF OVEN PARTS AND ACCESSORIES
(In case of any differences between the appliance and the pictures in this manual, the product shall prevail.)
Remove the oven and all materials from the carton and oven cavity. Your oven comes with the following accessories:
natural_image
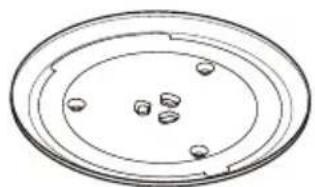
Simple line drawing of a circular tray with four small objects on each side (no text or symbols)Glass Tray
natural_image
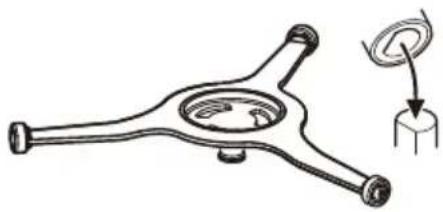
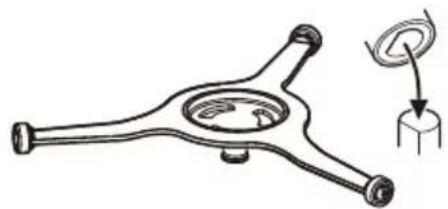
Mechanical component diagram showing a lever mechanism with a spiral and base mount (no text or symbols)Turntable Ring Assembly

Instruction Manual
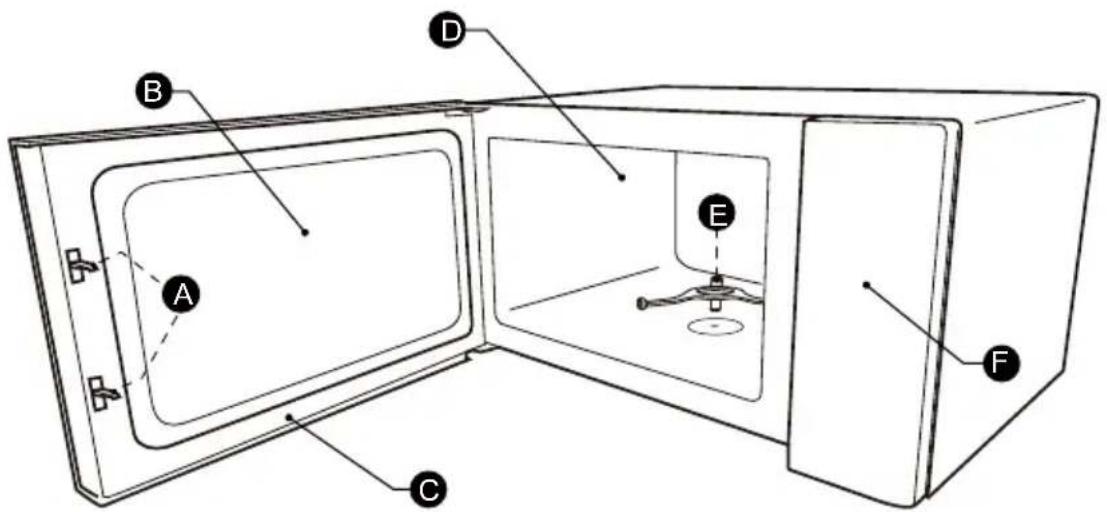
A) Safety interlock system
B) Observation window
C) Door assembly
D) Oven cavity
E) Turntable ring assembly
F) Control panel
NAMES OF OVEN PARTS AND ACCESSORIES
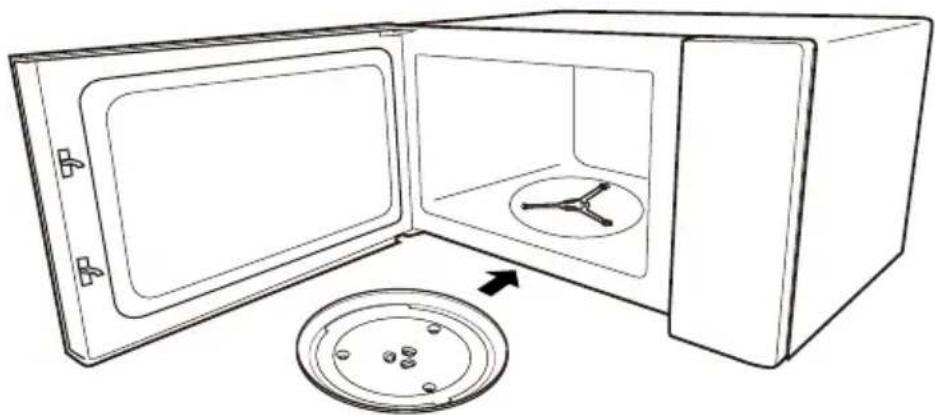
Cleaning the cooking compartment and putting the turntable in place. For new installations, make sure all packaging and shipping tape has been removed. Before using the appliance to prepare food for the first time, you will need to put the turntable in place correctly. You must clean the cooking compartment and accessories.
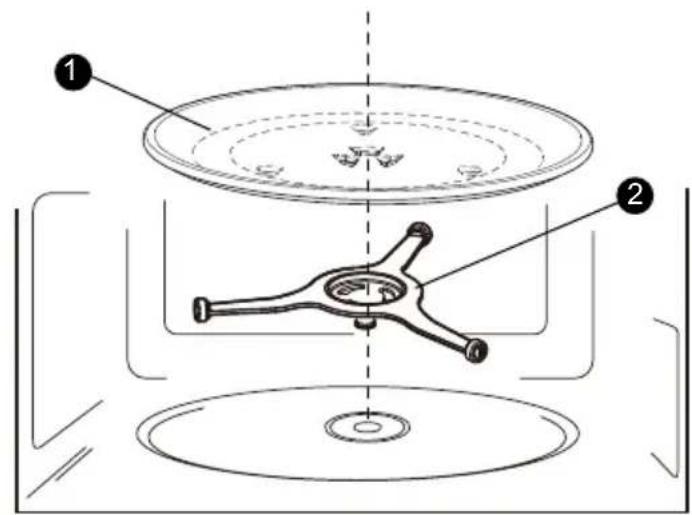
1) Glass Tray
2) Turntable Ring Assembly
natural_image
Line drawing of a microwave oven with a lid and fan, showing open door and interior (no text or symbols)Notes :
- Never use the appliance without the turntable. Make sure that it is properly engaged. The turntable can turn clockwise or anti-clockwise.
- Never place the glass tray upside down. The glass tray should never be restricted.
- Both glass tray and turntable ring assembly must always be used during cooking.
- All food and containers of food are always placed on the glass tray for cooking.
- Never restrict the movement of the turntable.
- If glass tray or turntable ring assembly cracks or breaks, contact your nearest authorized service center.
Installation
Remove all packing material and accessories. Examine the oven for any damage such as dents or broken door. Do not install if oven is damaged.
Cabinet: Remove any protective film found on the microwave oven cabinet surface. Do not remove the light brown Mica cover that is attached to the oven cavity to protect the magnetron.
- Select a level surface that provide enough open space for the intake and/or outlet vents.
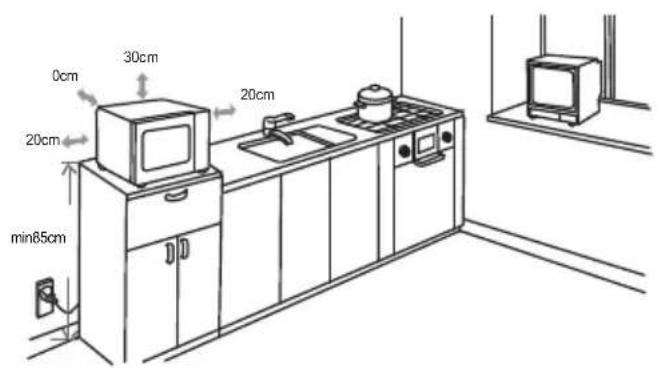
(1) The minimum installation height is 85cm.
(2) The rear surface of appliance shall be placed against a wall.
Leave a minimum clearance of 30cm above the oven, a minimum clearance of 20cm is required between the oven and any adjacent walls.
(3) Do not remove the legs from the bottom of the oven.
(4) Blocking the intake and/or outlet openings can damage the oven.
(5) Place the oven as far away from radios and TV as possible. Operation of microwave oven may cause interference to your radio or TV reception.
2. Plug your oven into a standard household outlet. Be sure the voltage and the frequency is the same as the voltage and the frequency on the rating label.
WARNING: Do not install oven over a range cooktop or other heat-producing appliance. If installed near or over a heat source, the oven could be damaged and the warranty would be
void.
The accessible surface may be hot during open
CONTROL PANEL

BUTTON FUNCTION OVERVIEW
| Button | Description |
 | Set power level for microwave operation |
 | Auto menu with preset programs by weight |
 | Quickly defrost frozen foods based on the selected weight or time |
 | Set time of day / Countdown timer |
 | Pause active cooking cycle / Cancels current operation / Lock function for children |
 | Adjust parameters (e.g., time, power level, weight, auto menu) / “^”: Enter auto menu / “√”: Enter speedy cooking |
 | Start speedy cooking for 30 seconds / Confirm input / Start operation / Add 30 seconds |
OPERATION
1. Setting the Clock
After connecting the oven to the power, the display shows "0:00", the buzzer sounds, and the oven enters standby mode.
(1) Touch “ ” once and then “00:00” will display.
(2) Touch “ ∧ ”, “ ∨ ” to set the hour figures.
(3) Touch “ ” to confirm.
(4) Touch “ ∧ ”, “ ∨ ” to set the minute figures.
(5) Touch “ ” to confirm. The clock is set.
Notes:
(1) To reset the clock, please repeat step 1 to step 5.
(2) The clock is a 24-hour display. If the clock is not set, it will not work when powered.
2. Setting the Kitchen Timer
(1) Touch “ ” twice and then “00:00” will display.
(2) Touch “^”, “∨” to set the desired time. The maximum time value is “95:00”.
(3) Touch “+30S” to confirm. The timer starts counting down.
Note: The kitchen timer is a timer.
3. Microwave Cooking
The 5 power levels are available.
| Microwave Power | 80% 50% 3 | 30% 10%100% | ||
| Display | P100 P80 | P50 P30 P10 |
(1) Touch “\~\~\~\~” once and then “P100” will display.
(2) Touch “ ” repeatedly or touch “ ^ ”, “ ∨ ” to set the
power level. The 5 power levels are available.
(3) Touch “+30S” to confirm the power level.
(4) Touch “^”, “∨” to set the cooking time. The maximum time value is “95:00”.
(5) Touch “ +30S ” to start cooking.
4. Defrost By Weight
(1) Touch “*” once and then the screen will display “dEF1”.
(2) Touch “ +30S ” to confirm.
(3) Touch “^”, “∨” to set the weight of the food. The range of weight is 100 to 2000g.
(4) Touch “+30S” to start defrosting.
Note: The buzzer will sound to remind you to turn the food over during defrosting. If no operation, the oven will continue working.
5. Defrost By Time
(1) Touch “*” twice and then the screen will display “dEF2”.
(2) Touch “+30S” to confirm.
(3) Touch “^”, “∨” to set the desired defrosting time. The maximum time value is “95:00”.
(4) Touch “+30S” to start defrosting.
Notes:
(1) The buzzer will sound to remind you to turn the food over during defrosting. If no operation, the oven will continue working.
(2) The default power level is P30 and it cannot be changed.
6. Speedy Cooking
(1) In standby mode, touch “ √ ” once to set a cooking time at 100% power level, continue to touch “ ^ ”, “ √ ” to adjust the cooking time. And then touch “ ▶ +30S ” to start cooking. The maximum time value is “95:00”.
(2) In standby mode, touch “+30S” once to cook food at 100% power level for 30 seconds. Each touch on the same key can increase 30 seconds and the maximum time value is “95:00”.
Note: In the microwave and defrost by time cooking state, touching “^”, “∨”, or “+30S” can change the cooking time (except the defrost by weight and auto menu).
7. Lock Function for Children
You can use this function to disable the screen buttons and prevent your child from accidentally turning the oven on.
To activate the lock:
In standby mode, touch and hold “ ” for three seconds. A beep sounds, and the locked icon will display.
To deactivate the lock:
In the locked state, touch and hold “ Ⅱ ” for three seconds. A beep sounds.
8. Inquiring Function
(1) If the clock has been set, the current time will display for three seconds by touching

" in the cooking state.
(2) In the microwave cooking state, touch “ ≈ ≈ ” to inquire about the power level.
It will display for three seconds.
9. Multi-Stage Cooking
Notes: (1) Two cooking stages can be set in multi-stage cooking.
(2) If you set the defrost function, it will work automatically in the first stage.
(3) The kitchen timer and auto menu cannot be set as one of the multi-stage.
Example: Defrost food for 500g and then cook with 80% microwave power for 7 minutes.
(1) Touch “*” once and then the screen will display “dEF1”.
(2) Touch " ▶+30S " to confirm.
(3) Touch “^”, “∨” to set the weight of the food to 500g.
(4) Touch “ ≈ ≈ ” once and then “P100” will display.
(5) Touch “ ” repeatedly or touch “^”, “∨” to set the power level to P80.
(6) Touch “+30S” to confirm the microwave power.
(7) Touch “^”, “∨” to set the cooking time to 7 minutes.
(8) Touch “ ▶+30S ” to start cooking.
10. Auto Menu
(1) In standby mode, Touch “ ” once or first touch “ ^ ” once and then “A-01” will display.
(2) Touch “^”, “∨”, or “≡” to choose the menu you need. The 8 auto menus are available.
(3) Touch " ▶+30S " to confirm.
(4) Touch “ ∧ ”, “ ∨ ” to set the weight of the food.
(5) Touch “ +30S ” to start cooking.
Auto Menu Chart
| Menu | Weight | Display Power | |
| A-01 Pizza | 200g | 200g | P100 |
| 400g | 400g | ||
| A-02 Meat | 250g | 250g | P100 |
| 350g | 350g | ||
| 450g | 450g | ||
| A-03 Fresh Vegetable | 200g | 200g | P100 |
| 300g | 300g | ||
| 400g | 400g | ||
| A-04 Pasta | 50g (with 450g cold water) | 50g | P80 |
| 100g (with 800g cold water) | 100g | ||
| A-05 Potato | 1 (230g) | 1 | P100 |
| 2 (460g) | 2 | ||
| 3 (690g) | 3 | ||
| A-06 Fish | 250g | 250g | P80 |
| 350g | 350g | ||
| 450g | 450g | ||
| A-07 Beverage | 1 cup (120ml) | 1 | P100 |
| 2 cups (240ml) | 2 | ||
| 3 cups (360ml) | 3 | ||
| A-08 Popcorn | 50g | 50g | P100 |
| 100g | 100g |
CLEANING
Be sure to unplug the appliance from the power supply.
- Clean the cavity of the oven after using with a slightly damp cloth.
- Clean the accessories in the usual way in soapy water.
-
The door frame and seal and neighbouring parts must be cleaned carefully with a damp cloth when they are dirty.
-
Do not use harsh abrasive cleaners or sharp metal scrapers to clean the oven door glass since they can scratch the surface, which may result in shattering of the glass.
-
Cleaning Tip---For easier cleaning of the cavity walls that the food cooked can touch: Place half a lemon in a bowl, add 300ml (1/2 pint) water and heat on 100% microwave power for 10 minutes. Wipe the oven clean using a soft, dry cloth.
SPECIFICATIONS
| Ref | CEMO25UX |
| Model | TM9P022EE-P00E |
| Rated Voltage | 230 V~ 50 Hz |
| Microwave Input | 1450 W |
ENERGY CONSUMPTION
Product information for power consumption and maximum time to reach applicable low power mode.
Standby mode 0,8 W
The maximum time needed for the microwave oven to automatically reach the applicable low power mode or condition.
20 minutes
Troubleshooting
Before calling for service
Malfunctions can occur in all electrical appliances. This does not necessarily mean there is a defect in the appliance. For this reason, please check the tables to see if you can correct the malfunction. Read the troubleshooting information before contacting after-sales service. This will avoid unnecessary repair costs. If you cannot solve it by yourself, please contact your nearest brand authorized service center.

WARNING-Risk of injury!
Improper repairs are dangerous
Repairs to the appliance should only be carried out by professional technician.
If the appliance is defective, call Customer Service.
Never try to repair a defective or suspected defective appliance by yourself.
| COMMON PROBLEM | POSSIBLE CAUSE POSSIBLE REMEDY | |
| The appliance is not working. | The mains plug of the power cord is not plugged in. | Unplug, then plug again tightly. |
| There has been a power cut. | Check whether the lighting in your kitchen or other appliances are working. | |
| The door is not fully closed. | Check whether food remains or foreign material are trapped in the door, and make sure the door is properly closed. | |
| No heating | The door is not closed well. | Make sure the door is properly closed. |
| Noise | Microwave ovens make noise while working, but if the noise becomes unusually loud or unusual, it may be due to the turntable was not placed in the correct position. (For the model with a turntable.) | Place the turntable in the correct position. |
Troubleshooting
| COMMON PROBLEM | POSSIBLE CAUSE POSSIBLE REMEDY | |
| Improper defrosting | The microwave power setting is set to lower. The food is colder than usual. | - |
| Materials to be avoided were used. | Use microwave-safe cookware only. | |
| The cooking time, and power level is not suitable. | Use correct the cooking time, and power level. | |
| The food is not turned over or stirred. | Turn over or stir the food. | |
| Unevenly cooked foods; Undercooked foods | The microwave power setting is set to lower. | - |
| Materials to be avoided were used. | Use microwave-safe cookware only. | |
| The food is not defrosted completely. | Completely defrost food. | |
| The cooking time, and power level is not suitable. | Use correct the cooking time, and power level. | |
| The food is not turned or stirred. | Turn or stir the food from time to time during cooking. | |
| Overcooked foods | The microwave power setting is set to higher. The cooking time, and power level is not suitable. | Use correct the cooking time, and power level. |
| The microwave is sparking, and arcing occurs. | Materials to be avoided were used. | Use microwave-safe cookware only. |
| The oven is operated with no food in it. | It is forbidden to run the oven without any food inside. It is very dangerous. | |
| Spilled food remains in the cavity. | Clean the cavity with a wet towel. | |
CORRECT DISPOSAL OF THIS PRODUCT

European directive 2012/19/EU on Waste from Electrical and Electronic Equipment (WEEE), requires that. used household appliances are not thrown into the normal municipal waste stream. Used appliances must be collected separately in order to optimize the rate of recovery and recycling of materials that compose them, and to reduce the impact on human health and on the environment. The crossed bin symbol is affixed to all the products to remind you of the obligations of separated collection.
We decline liability for any damage or accident derived from any use of this product which is not in conformity with the instructions contained in this booklet.
In accordance with Article L. 217 of the Consumer Code, your product benefits from a legal guarantee of conformity of 2 years.