
CEMO26GEFB - Microwave Oven CONTINENTAL EDISON - Free user manual and instructions
Find the device manual for free CEMO26GEFB CONTINENTAL EDISON in PDF.

| Brand | Continental Edison |
| Model | CEMO26GEFB |
| Product type | Built-in microwave oven |
| Power supply | 230 V ~ 50 Hz |
| Microwave power (output) | 900 W |
| Grill power | 1000 W |
| Capacity | 26 liters |
| Approximate weight | 15 kg |
| Cooking functions | Microwave, Grill, Combination (2 modes), Weight and time defrost, Quick cook, Auto menu (8 programs), Clock, Timer |
| Microwave power levels | 5 (100%, 80%, 50%, 30%, 10%) |
| Display type | LED digital display |
| Controls | Touch and slide controls |
| Safety | Child lock, automatic stop when door is opened, overheat protection |
| Included accessories | Glass turntable, metal rack, guide ring, instruction manual |
| Care and cleaning | Clean exterior and door with a damp cloth; turntable washable with soapy water; do not use steam cleaner |
| Standby consumption | 0.8 W |
| Time to reach low power mode | 20 minutes |
| After-sales service | Continental Edison, 120/126 Quai de Bacalan, 33000 Bordeaux, France Email: securiteproduits@continentaledison.fr |
| Repairability | Must be repaired by a qualified technician; contact after-sales service |
Frequently Asked Questions - CEMO26GEFB CONTINENTAL EDISON
User questions about CEMO26GEFB CONTINENTAL EDISON
0 question about this device. Answer the ones you know or ask your own.
Ask a new question about this device
Download the instructions for your Microwave Oven in PDF format for free! Find your manual CEMO26GEFB - CONTINENTAL EDISON and take your electronic device back in hand. On this page are published all the documents necessary for the use of your device. CEMO26GEFB by CONTINENTAL EDISON.
USER MANUAL CEMO26GEFB CONTINENTAL EDISON
natural_image
Abstract geometric design with two overlapping gray semicircles (no text or symbols)Continental Edison
natural_image
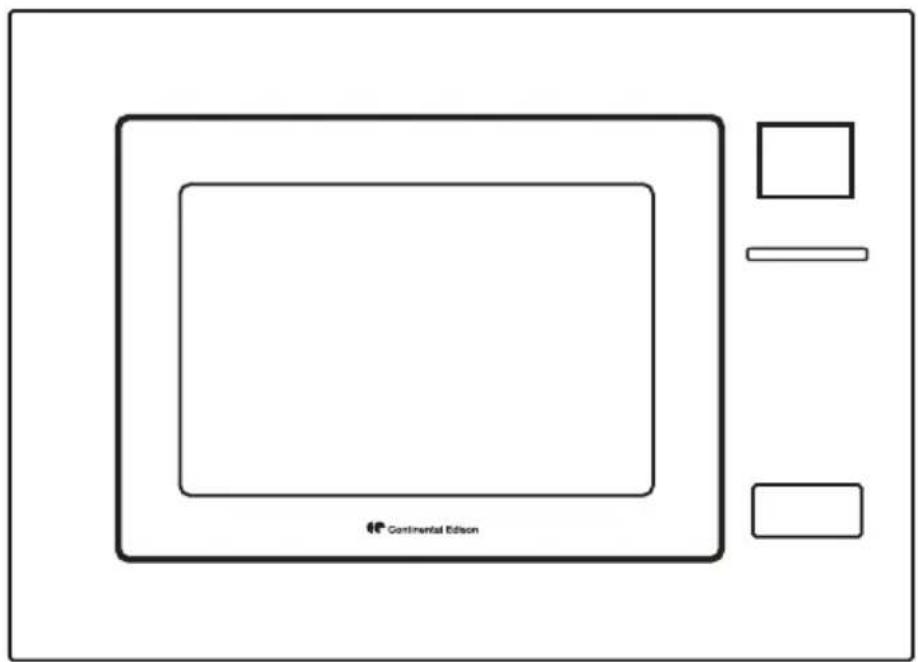
Simple line drawing of a microwave oven with two blank chambers and three smaller rectangular buttons (no text or symbols)CEMO26GEFB
FOUR À MICRO-ONDES-MICROWAVE OVEN
natural_image
Simple line drawing of a metal grate with four vertical supports and a central vertical line (no text or symbols)natural_image
Technical line drawing of a cabinet or oven with internal compartments and ventilation slots (no text or symbols)Remarques:
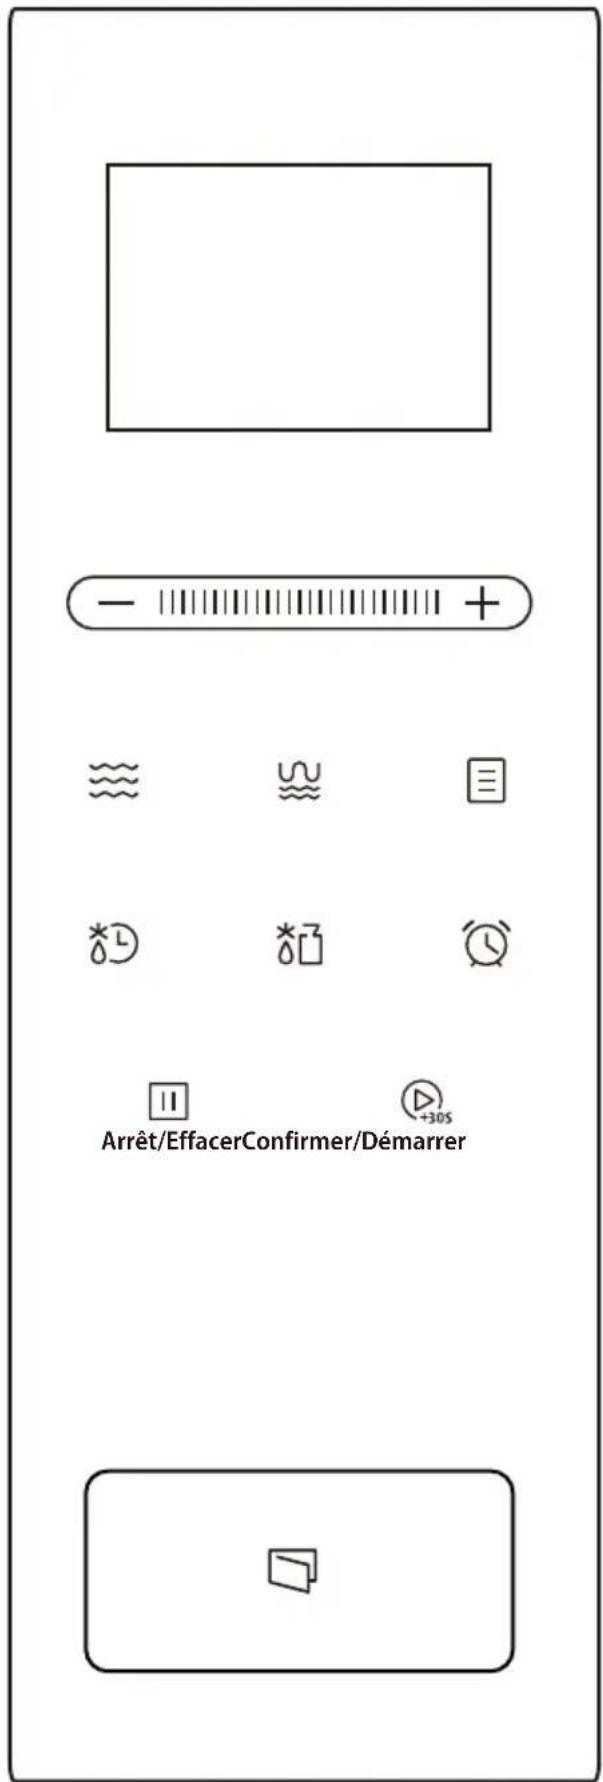
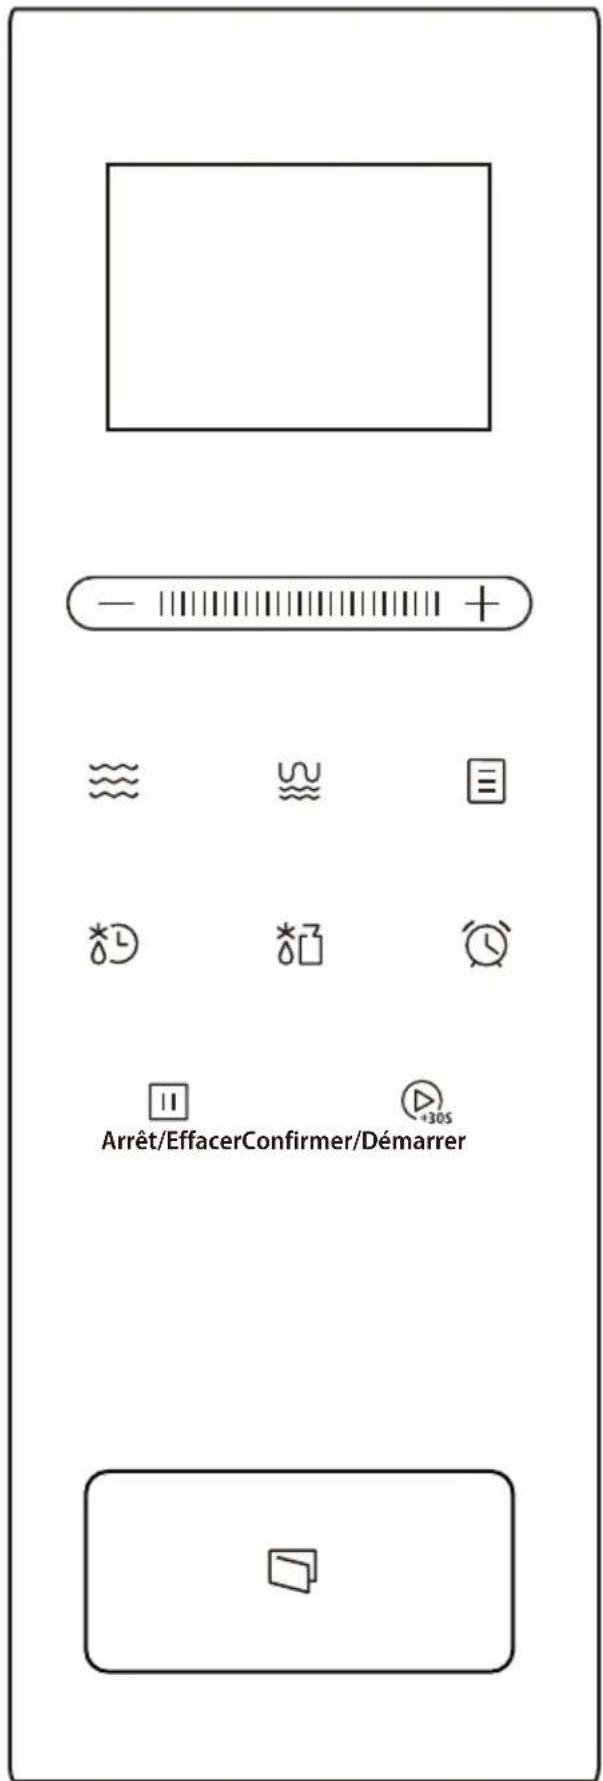
Panneau de contrôle
FR-13
natural_image
Technical line drawing of a closed industrial oven or enclosure with internal structure and ventilation duct (no text or symbols)C. Installez le four
natural_image
Line drawing of a closed oven with lid open, showing internal structure (no text or symbols)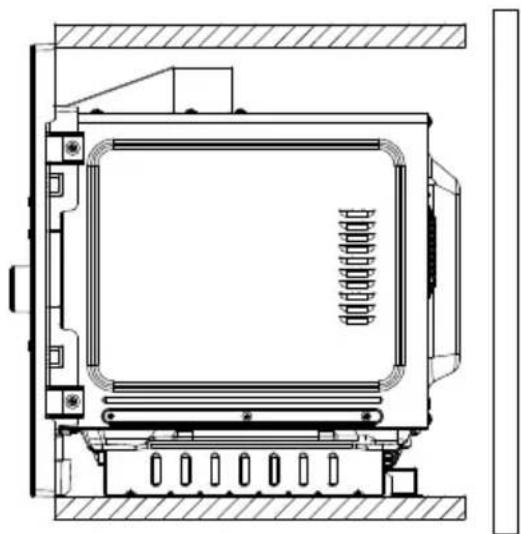
natural_image
Technical line drawing of a mechanical or electrical component with no visible text or symbolsnatural_image
Symbol of a trash bin crossed out by two crossed lines, with no text or numbers present.Read these instructions carefully before using your microwave oven, and keep it carefully.
If you follow the instructions, your oven will provide you with many years of good service.
SAVE THESE INSTRUCTIONS CAREFULLY
Important Safety Instructions
To reduce the risk of fire, electric shock, personal injury and excessive exposure to microwave energy when using the device, observe a number of basic precautions, including which:
-
WARNING: Liquids and other foods must not be heated in sealed containers since they are liable to explode.
-
Warning: For safety reasons, any maintenance or repairs requiring removal of a part providing protection against microwave energy must always be performed by a qualified person.
-
This appliance can be used by children aged from 8 years and above and persons with reduced physical; sensory or mental capabilities or lack of experience and knowledge if thy have been given supervision or instruction concerning use of the application in a safe way and understand the hazards involved. Children shall not play with the appliance.
Cleaning and user maintenance shall not be made by children unless they are aged from 8 years and above and supervised.
- Make sure the device and the power cable are out of reach of children under 8 years.
- Do not use utensils other than those adapted to the microwave oven.
- The oven should be cleaned regularly and any deposit of food should be eliminated.
- Please read and follow these instructions: "PRECAUTIONS TO AVOID EXCESSIVE EXPOSURE TO MICROWAVE ENERGY".
- When heating food in plastic or paper containers, keep an eye on the oven due to the possibility of ignition.
- If smoke is emitted, switch off or unplug the appliance and keep the door closed in order to stifle any flames.
-
Do not overcook food.
-
Do not use the oven for storing food or containers. Do not store food (such as bread, cookies, etc.) in the oven.
- Remove all fasteners and metal handles of the bags / containers of paper or plastic before placing them in the oven.
- Install or position the oven respecting mandatory installation instructions. Refer to the section "Installation" on page - 6.13 1
- The boiled eggs and raw eggs should in no case be heated in a microwave oven with their shell since they may explode, even after heating in microwave oven is completed.
- This device is intended solely for home use.
- If the power cable is damaged, it must be replaced by an authorized service center or a similarly qualified person to avoid any accident.
-
Do not use and do not store the device outdoors.
-
Do not use this oven near a plac e where there is water, in a wet basement or near a swimming pool.
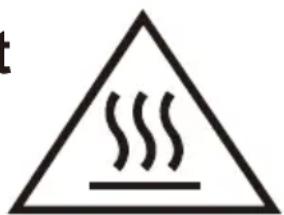
- Accessible surfaces can be subjected to high temperatures during operation. The surfaces may become hot during use.
- Do not leave the cable hanging from one edge of table or counter.
- The oven should be cleaned regularly and any food deposits removed.
- To avoid burns, baby bottles and baby jars should absolutely be mixed or shaken after heating in a microwave oven, and the contents of the temperature should be checked before consumption.
- Heated liquids in microwave waves can boil suddenly after being baked. Handle containers with care.
-
The device is not designed for use with an external timer or a separate remote-control system.
-
Accessible parts may be subjected to high temperatures during operation. The young children must be kept away.
- Do not use a steam cleaner for cleaning the microwave oven.
- The unit is heated to a high temperature during operation. Be careful not to touch the resistors located inside the oven.
- WARNING: The appliance and its accessible parts become hot during use. Care should be taken to avoid touching the heating elements. Children under 8 must be kept away sound if they are constantly monitored.
- The back of the device must be placed against a wall.
-
The microwave oven should not be installed in a closet.
-
The microwave oven is designed to heat food and drinks. Dry food, dry clothes, heat, heaters, slippers, sponges, wet tissues and all related uses can cause a risk of injury, burning and fire.
-
Metal containers for food and beverages should not be used in the microwave oven.
-
If the power cord is damaged, it must be replaced by the manufacturer, its service agent or qualified persons to avoid a hazard.
-
This product is intended for indoor use only and domestic.
-
WARNING: If the door or door seals are damaged, the oven must not be operated until it has been repaired by a competent person.
-
WARNING: it is hazardous for anyone other than a competent person to carry out any service or repair operation that involves the removal of a cover which give protection against expose to microwave energy.
-
Microwave heating of beverages can result in delayed eruptive boiling; therefore, care must be taken when handling the container.
-
The contents of feeding bottles and baby food jars shall be stirred or shaken and the temperature checked before consumption, in order to avoid burns.
-
Failure to maintain the oven in a clean condition could lead to deterioration of the surface that could adversely affect the life of the appliance and possibly result in a hazardous situation.
-
This appliance is intended to be used in household and similar applications such as:
-staff kitchen areas in shops, offices and other working environments;
-by clients in hotels, motels and other residential type environments;
-farm houses;
-bed and breakfast type environments.
READ CAREFULLY AND SAVE THESE INSTRUCTIONS FOR FUTURE REFERENCE.
WARNING: The oven should not be used if the door or door seals are damaged.
Do it repaired by a qualified person. The unit must not be cleaned with a water jet. This product is a Group 2 ISM equipment class B. Group 2 includes all equipment ISM (Industrial, Scientific and Medical) in which radio frequency energy is intentionally generated and / or used in the form of electromagnetic radiation for the treatment materials and equipment EDM. Class B includes the appropriate equipment for use in domestic establishments and in establishments directly connected to a low voltage power supply network that supplies domestic premises.
Description of your Product
(In case of any differences between the appliance and the pictures in this manual, the product shall prevail.)
Remove the oven and all materials from the carton and oven cavity.
Your oven comes with the following accessories:
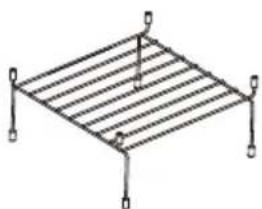
natural_image
Simple line drawing of a metal grate with four vertical supports and a central vertical line (no text or symbols)Grill Rack (Can not be used in microwave function and must be placed on the bottom plate center of cavity.)
Instruction Manual
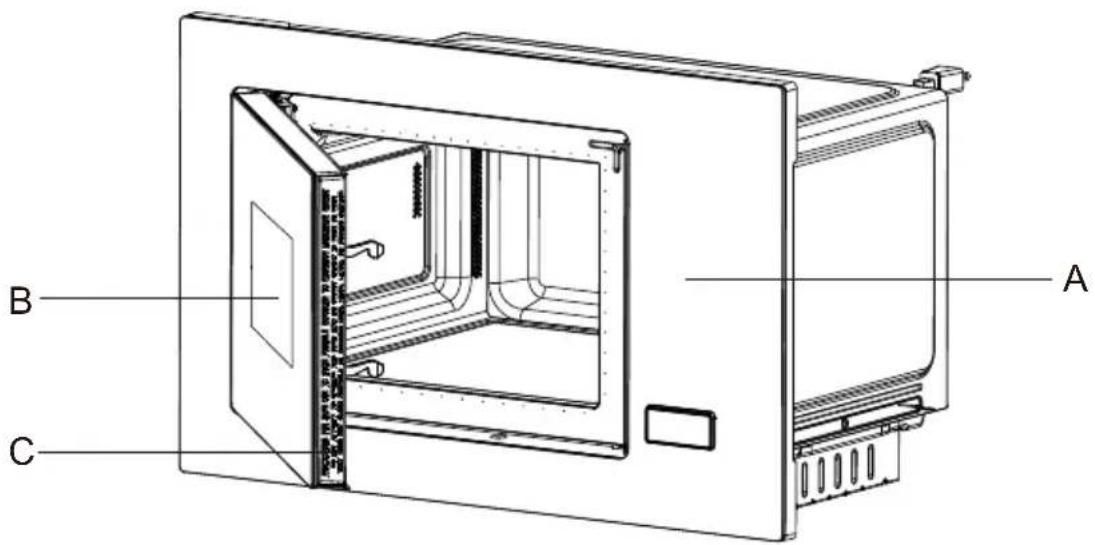
A) Control panel
B) Observation window
C) Door assembly
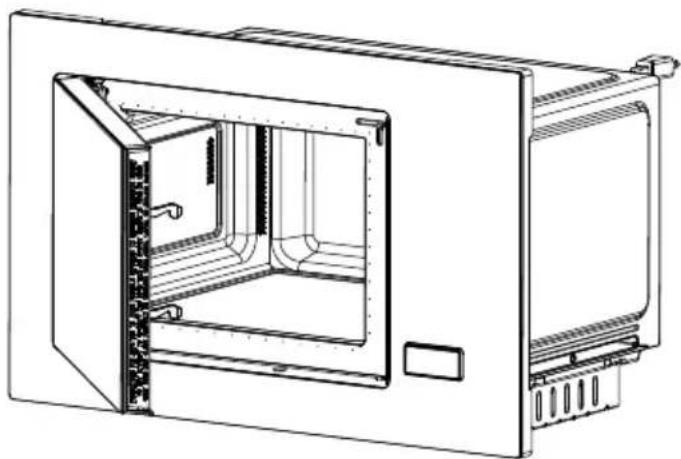
Cleaning the cooking compartment, for new installations, make sure all packaging and shipping tape has been removed. Before using the appliance to prepare food for the first time, you must clean the cooking compartment and accessories.
natural_image
Technical line drawing of a cabinet or oven with internal compartments and ventilation slots (no text or symbols)Notes: All food and containers of food are always placed on the bottom plate center of cavity for cooking.
Installation and connection
- This appliance is only intended for domestic use.
- This oven is intended for built-in use only. It is not intended for counter-top use or for use inside a cabinet.
- Please observe the special installation instructions.
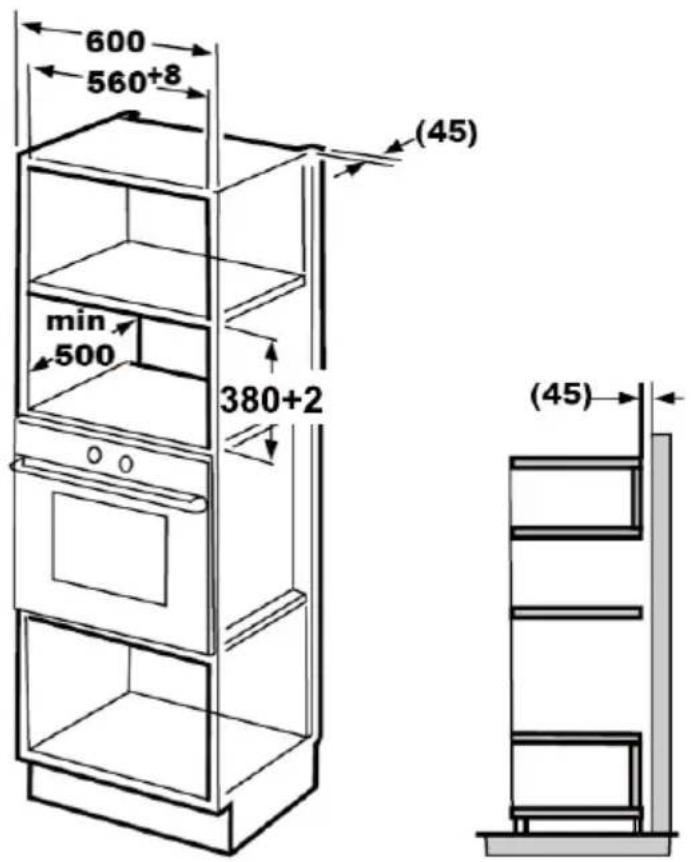
- The appliance can be installed in a 60cm wide wall-mounted cupboard.
- The appliance is fitted with a plug and must only be connected to a properly installed earthed socket.
- The mains voltage must correspond to the voltage specified on the rating plate.
- The socket must be installed and connecting cable must only be replaced by a qualified electrician. If the plug is no longer to accessible following installation, an all-pole disconnecting device must be present on the installation side with a contact gap of at least 3mm.
- Adapters, multi-way strips and extension leads must not be used. Overloading can result in a risk of fire.
The accessible surface may be hot during operation.
Control panel
EN-13
Installation Instructions
Please Read the Manual Carefully Before Installation
Please note
Electrical Connection
The oven is fitted with a plug and must only be connected to a properly installed earthed socket. The socket must only be installed and the connecting cable must only be replaced by a qualified electrician, and in accordance with the appropriate switch must be present on the Installation side with a contact gap of at least 3mm. The fitted cabinet must not have a back wall behind the appliance.
A gap must be maintained between the wall and the base of the unit above.
Specific gap size could be referenced by the diagrams.
Minimum installation height:85cm.
Do not cover ventilation slots and suction holes.
Note:
Do not trap or bend the power cable.

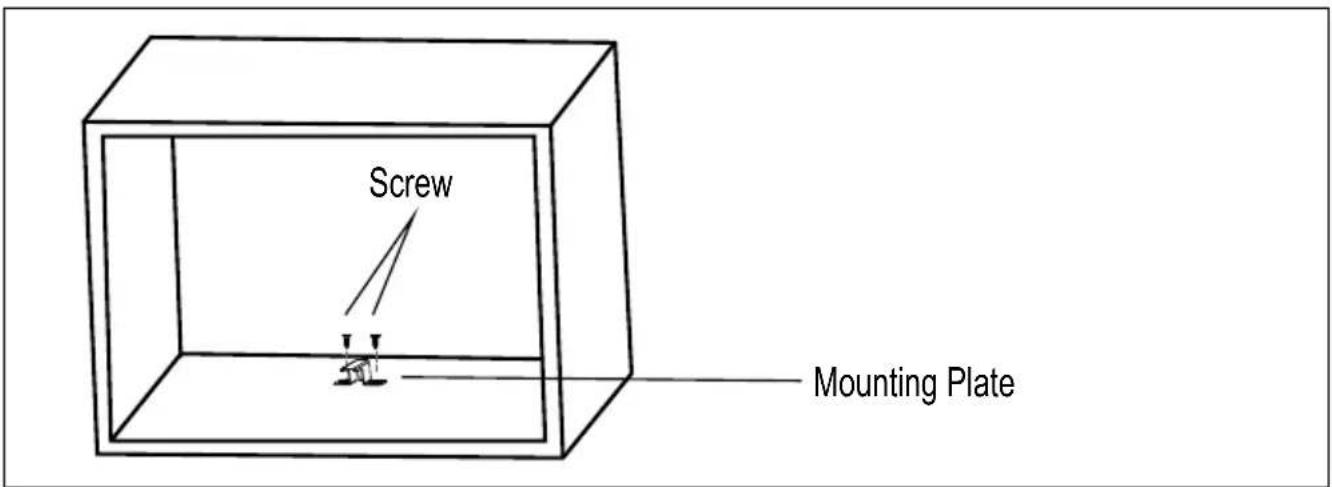
Screw

Mounting Plate

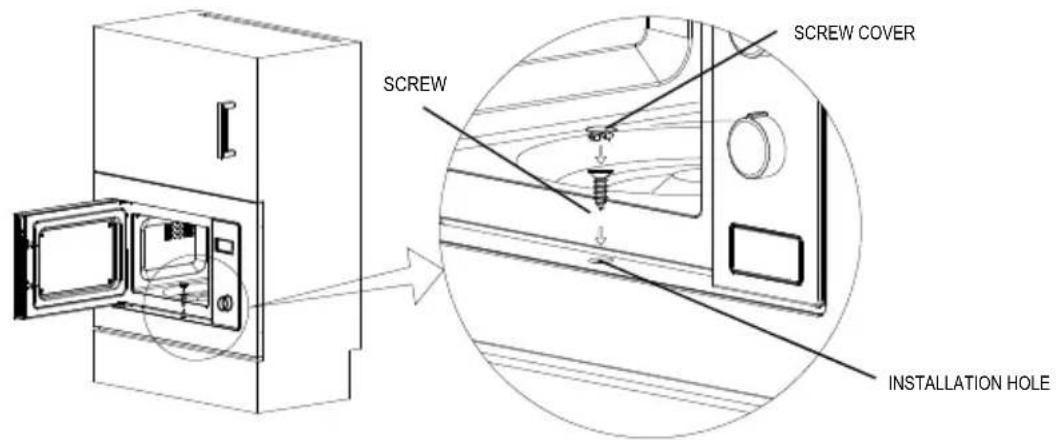
Screw cover

natural_image
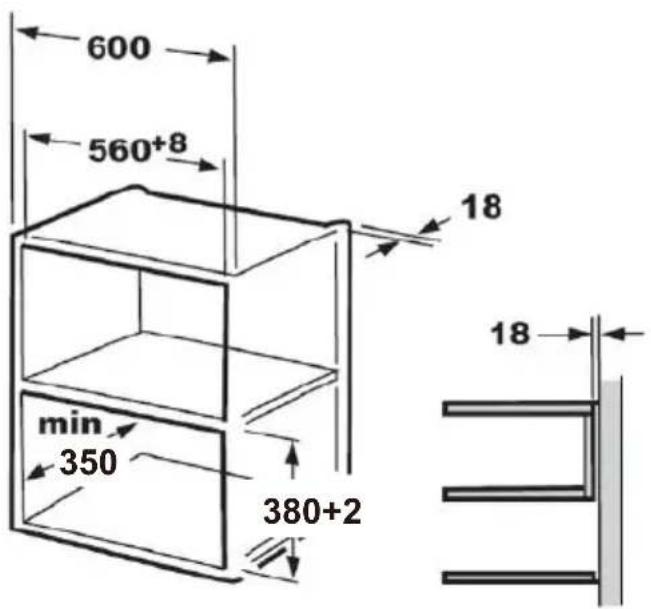
Technical line drawing of a cabinet or oven with internal compartments and ventilation slots (no text or symbols)A. Built-in furniture
The dimensions in the figures are in mm.
B.Pre are the cai inet
- Read the instruction on the BOTTOM CABINET TEMPLATE, put the template on the bottom plane of cabinet.
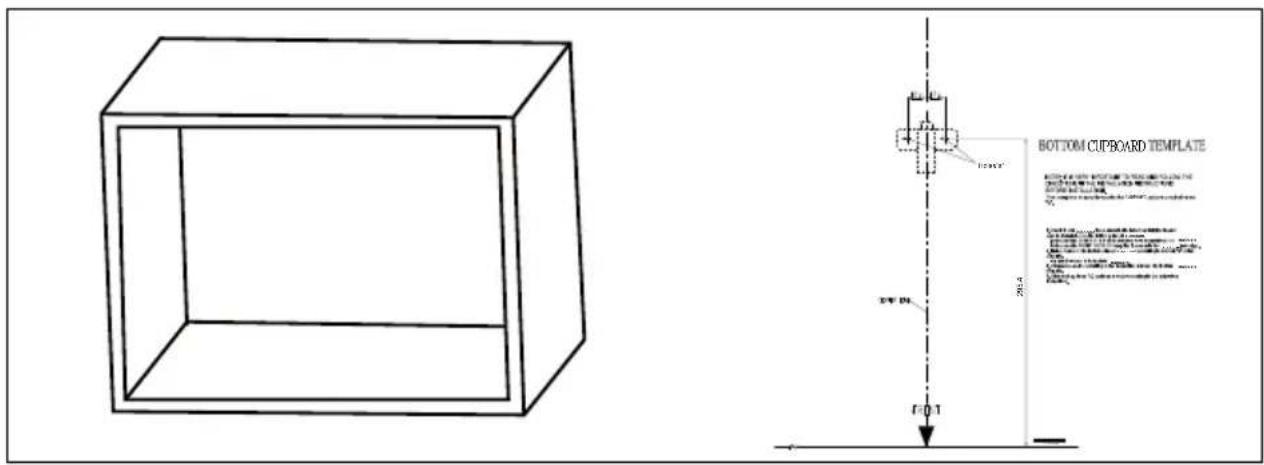
- Make the marks on the bottom plane of cabinet according to marks"a" of the template.

- Remove the bottom cabinet template and fix the mounting plate with screw.
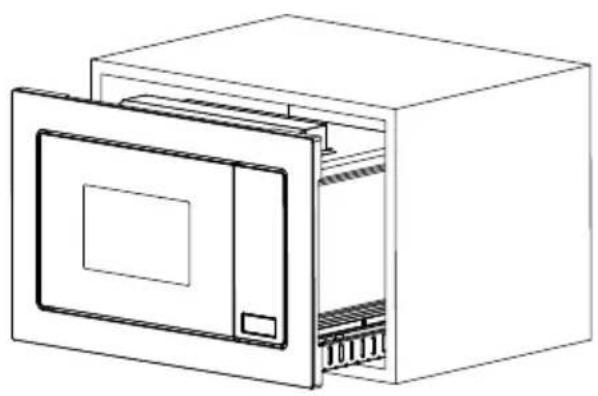
.Install the oven
4. Install the oven to the cabinet
- Make sure the back of the oven is locked by mounting plate.
- Do not trap or kink the power cord.
natural_image
Line drawing of a microwave oven with open lid and internal cooling unit (no text or symbols)
natural_image
Technical line drawing of a mechanical or electrical enclosure with no visible text or symbols- Open the door, fix the oven to the cabinet with Screw, at the installation hole.
Operation Instructions
1. Setting the Clock
(1) Touch “ ” twice and then “0:00” will display.
(2) Touch “+”, “—” or slide “||||||||” to set the hour figures.
(3) Touch “ ⏱ ” to confirm.
(4) Touch “ + ”, “ — ” or slide “ ” to set the minute figures.
(5) Touch “ 🔊 ” to confirm. The clock is set.
Notes:
(1) The clock is a 24-hour display. If the clock is not set, it will not work when powered.
(2) To reset the clock, please repeat step 1 to step 5.
2. Setting the Kitchen Timer
(1) Touch “ 📋 ” once and then “00:00” will display.
(2) Touch “+”, “—” or slide “||||||||” to set the desired time.
The maximum time value is “95:00”.
(3) Touch “Confirmer/Démarrer” to confirm. The timer starts counting down.
Notes:
(1) The kitchen timer is a timer.
(2) Any other program can't be set during the kitchen timer.
3. Grill Cooking
(1) Touch “ ∪” once and then “G” will display.
(2) Touch “Confirmer/Démarrer” to confirm.
(3) Touch “+”, “—” or slide “ ” to set the cooking time.
The maximum time value is “95:00”.
(4) Touch “Confirmer/Démarrer” to start cooking.
4. Microwave Cooking
The 5 power levels are available.
| Power Level | 100% | 80% | 50% | 30% | 10% |
| Display | P100 | P80 | P50 | P30 | P10 |
(1) Touch “ ≈ ≈ ” once and then “P100” will display.
(2) Touch “ ≈ ≈ ” repeatedly or touch “ + ”, “ — ” or slide “ ||||||||||||” to set the power level. The 5 power levels are available.
(3) Touch “Confirmer/Démarrer” to confirm.
(4) Touch “+”, “—” or slide “********” to set the cooking time. The maximum time value is “95:00”.
(5) Touch “Confirmer/Démarrer” to start cooking.
Note: Opening the oven door or touching “ Arrêt/Effacer ” during operation will interrupt the current mode.
5. Defrost by Weight
(1) Touch “ ✗” once and then the screen will display “d01”.
(2) Touch “+”, “—” or slide “ ” to set the weight of the food.
The range of weight is 100 to 2000g.
(3) Touch “Confirmer/Démarrer” to start defrosting.
Note: The buzzer will sound to remind you to turn the food over during defrosting. If no operation, the oven will continue working.
6. Defrost by Time
(1) Touch “ *L ” once and then the screen will display “d02”.
(2) Touch “+”, “—” or slide “||||||||” to set the defrosting time.
The maximum time value is "95:00".
(3) Touch “Confirmer/Démarrer ” to start defrosting.
Notes:
(1) The buzzer will sound to remind you to turn the food over during defrosting. If no operation, the oven will continue working.
(2) The defrost power is P30 and it cannot be changed.
7. Combination Cooking
Your oven also offers the option of combination cooking, which uses microwave energy along with grill cooking. This allows you to cook with speed and accuracy while achieving perfect browning and crisping.
(1) Touch “ ∪” once and then the screen will display “G”.
(2) Touch “ ∪” repeatedly or touch “ + ”, “ — ” or slide “ ” to choose the mode you want, and then “G”, “C-1” or “C-2” will display.
(3) Touch “Confirmer/Démarrer” to confirm.
(4) Touch “+”, “—” or slide “ ” to set the cooking time.
The maximum time value is "95:00".
(5) Touch “Confirmer/Démarrer” to start cooking.
| Function | Display | Microwave Power | Grill Power |
| Combi. 1 | C-1 | 55% | 45% |
| Combi. 2 | C-2 | 66%34% |
8. Multi-Stage Cooking
Notes: (1) Two cooking stages can be set in multi-stage cooking.
(2) If you set the defrost function, it will work automatically in the first stage.
(3) The kitchen timer and auto menu cannot be set as one of the multi-stage.
Example: Defrost food for 500g and then cook with 80% microwave power for 7 minutes.
(1) Touch “ ✉” once and then the screen will display “d01”.
(2) Touch “+”, “—” or slide “||||||||” to set the weight of the food to 500g.
(3) Touch “ ≈ ≈ ” once and then “P100” will display.
(4) Touch “ ≈ ≈ ” repeatedly or touch “ + ”, “ — ” or slide “ ||||||||||||||” to set the power leve to P80.
(5) Touch “Confirmer/Démarrer ” to confirm.
(6) Touch “+”, “—” or slide “********” to set the cooking time to 7 minutes.
(7) Touch “Confirmer/Démarrer” to start cooking.
9. Speedy Cooking
(1) In standby mode, first slide “||||||||” to the left or touch “—” once to set a cooking time at 100% power. Continue to slide “||||||||” or touch “+” or “—” to set the cooking time. Then touch “Confirmer/Démarrer” to start cooking. The maximum time value is “95:00”.
(2) In standby mode, touch “Confirmer/Démarrer” once to cook food at 100% power level for 30 seconds. Each touch on the same key can increase 30 seconds and the maximum time value is “95:00”.
Note: In the microwave cooking and defrosting by time state, each more touch on “Confirmer/Démarrer” can increase the cooking time by 30 seconds (except the defrost by weight and auto menu).
10. Lock Function for Children
You can use this function to disable the screen buttons and prevent your child from accidentally turning the oven on.
To activate the lock:
In standby mode, touch and hold “ Arrêt/Effacer ” for three seconds. The buzzer will sound and the locked icon will display.
To deactivate the lock:
In the locked state, touch and hold “Arrêt/Effacer” for three seconds. The buzzer will sound.
11. Inquiring Function
(1) If the clock has been set, the current time will display for three seconds by touching “ ” in the cooking state.
(2) In the microwave cooking, grill, and combination cooking states, touch “ ≈ ” or “ ≈ ” to inquire about the power level or cooking mode.
It will display for three seconds.
12. Auto Menu
(1) Touch “ ☐ ” once or touch “ + ” once, or first slide “xxxxxxxx” to right and then “A1” will display.
(2) Touch “☐” repeatedly or touch “+”, “—” or slide “||||||||” to choose the menu you need. The 8 auto menus are available.
(3) Touch “Confirmer/Démarrer” to confirm.
(4) Touch “+”, “—” or slide “||||||||” to set the weight of the food you want.
(5) Touch “Confirmer/Démarrer” to start cooking.
Auto Menu Chart
| Menu | Weight | Display | Power |
| A1 Auto reheat | 200g | 200g | P100 |
| 400g | 400g | ||
| A2 Meat | 250g | 250g | P80 |
| 350g | 350g | ||
| 450g | 450g | ||
| A3 Vegetable | 200g | 200g | P100 |
| 300g | 300g | ||
| 400g | 400g | ||
| A4 Pasta | 50g (cold water 450g) | 50g | P80 |
| 100g (cold water 800g) | 100g | ||
| A5 Potato | 1 potato | 1 | P100 |
| 2 potatoes | 2 | ||
| 3 potatoes | 3 | ||
| A6 Fish | 250g | 250g | P80 |
| 350g | 350g | ||
| 450g | 450g | ||
| A7 Beverage | 1 cup | 1 | P100 |
| 2 cups | 2 | ||
| 3 cups | 3 | ||
| A8 Popcorn | 50g | 50g | |
| 100g | 100g |
Materials you can use in Microwave Oven
| Utensils | Remarks |
| Browning dish | Follow manufacturer's instructions. The bottom of browning dish must be at least 3/16 inch (5mm) above the turntable. Incorrect usage may cause the turntable to break. |
| Dinnerware | Microwave-safe only. Follow manufacturer's instructions. Do not use cracked or chipped dishes. |
| Glass jars | Always remove lid. Use only to heat food until just warm. Most glass jars are not heat resistant and may break. |
| Glassware | Heat-resistant oven glassware only. Make sure there is no metallic trim. Do not use cracked or chipped dishes. |
| Oven cooking bags | Follow manufacturer's instructions. Do not close with metal tie. Make slits to allow steam to escape. |
| Paper plates and cups | Use for short-term cooking/warming only. Do not leave oven unattended while cooking. |
| Paper towels | Use to cover food for reheating and absorbing fat. Use with supervision for a short-term cooking only. |
| Parchment paper | Use as a cover to prevent splattering or a wrap for steaming. |
| Plastic | Microwave-safe only. Follow the manufacturer's instructions. Should be labeled "Microwave Safe". Some plastic containers soften, as the food inside gets hot. "Boiling bags" and tightly closed plastic bags should be slit, pierced or vented as directed by package. |
| Plastic wrap | Microwave-safe only. Use to cover food during cooking to retain moisture. Do not allow plastic wrap to touch food. |
| Thermometers | Microwave-safe only (meat and candy thermometers). |
| Wax paper | Use as a cover to prevent splattering and retain moisture. |
Materials to be avoided in Microwave Oven
| Utensils | Remarks |
| Aluminum tray | May cause arcing. Transfer food into microwave-safe dish. |
| Food carton with metal handle | May cause arcing. Transfer food into microwave-safe dish. |
| Metal or metal-trimmed utensils | Metal shields the food from microwave energy. Metal trim may cause arcing. |
| Metal twist ties | May cause arcing and could cause a fire in the oven. |
| Paper bags | May cause a fire in the oven. |
| Plastic foam | Plastic foam may melt or contaminate the liquid inside when exposed to high temperature. |
| Wood | Wood will dry out when used in the microwave oven and may split or crack. |
Cooking Tips
The following factors may influence the outcome of cooking: food arrangement
Placing the thicker portions outward of the flat, the thinnest part towards the center and spread evenly. Do not overlap if possible.
√ Cooking Time
Start cooking with a short time setting, evaluate it after the time and extend it according to real needs. Overcooking may cause smoke and burns.
√ Uniform cooking
Foods like chicken, burger or steak should be turned once during cooking. Depending on the type of food, if necessary, move from outside to center of dish once or twice during cooking.
√ Expect a wait time
After the end of cooking, let the food in the oven for an appropriate time, allowing them to finish cooking cycle and to cool gradually.
√ If the food is cooked
The color and hardness of food help determine if done, including:
- Steam escapes from all parts of the food, not only the edge.
- Joints of poultry come off easily
- Pork or poultry is no longer rare
- The fish is opaque and can be cut easily with a fork.
√ Browning dish
When using a dish browning or a self-heating container, always placing a heat resistant insulator, such as a porcelain plate, to prevent damage to the turntable and the rotating ring.
√ Plastic casing resistant to microwaves
When cooking foods with high fat content, do not let plastic wrap contact with food because it could melt.
√ Resistant plastic cookware microwave
Some plastic cookware from the microwave may not be suitable for cooking foods rich in fat and sugar. In addition, the preheating time specified in the instructions of the dish should not be exceeded.
The oven should be cleaned regularly and any food residue should be removed systematically.

WARNING
- Unplug the unit before cleaning. Never immerse the device in water or other liquid to clean it.
- If the oven is not regularly cleaned, the walls may deteriorate; this phenomenon is potentially dangerous and can shorten the furnace life.
- No part of the oven should not be cleaned with strong detergents, gasoline, abrasive powder or with a wire brush.
- The cover of the waveguide should not be removed.
- When the microwave oven has been used for a long time, some odor can persist in the furnace; Here are 3 ways to eliminate them:
a. Place several lemon slices in a cup, then turn the oven on with a high heat for 2 to 3 minutes.
b. Place a cup of tea in oven, then turn the oven on with high heat.
c. Put some orange peel into the oven and turn the oven on with a high heat for 1 minute. - WARNING: Children must not be allowed to use the oven without supervision if they have been explained in detail its operation and they are fully aware of the risks of Improper use of the oven.
CLEANING TIPS
It provides instructions for cleaning door seals, cavity inner and adjacent parts.
Exterior:
Wipe the outside of the oven with a damp cloth.
Door:
Clean the door and the observation window by the rubbing with a soft damp cloth.
Rub the door seals and adjacent parts to remove any splashes or other dirt.
Wipe the control panel with a damp cloth.
Interior walls:
Wipe the interior walls with a damp cloth.
Wipe the cover of the waveguide in order to remove all possible traces of splashing.
Turntable / rotating ring / axis of rotation:
Wash with water and mild soap.
Rinse with clear water and dry completely.
Repair
Check the following before calling for service.
- Place a cup of water (about 150 ml) in the oven and close the door completely. The oven light goes off when the door is closed. Allow the oven to run for 1 minute.
- Is the oven on?
- Does the cooling fan work?
(Place your hand over the rear ventilation openings.)
- The turntable is running?
(The turntable is rotatable clockwise or counterclockwise. This is normal.)
- The water in the oven is warm?
If the answer to any of these questions is no, check your outlet and fuses the electrical panel.
If the wall outlet and fuses function normally, CONTACT THE AUTHORIZED REPAIR CENTER NEAREST.
Safety instructions for repair Warning:
MICROWAVE RADIATION
- The high voltage capacitor remains charged after disconnection. Short-circuit the negative terminal of the high voltage capacitor with the oven frame (using a screwdriver) to discharge the capacitor before reaching the furnace.
-
During repairs where the parts listed below can be removed, it can give access to potentials above 250V with respect to the earth.
-
Magnetron
• High Voltage Transformer
• high voltage capacitor
• high voltage diode -
high voltage fuse
-
The following situations can cause excessive exposure to microwave for repair.
Incorrect assembly of the magnetron.
Incorrect assembly of the door locks, door hinges or door. Incorrect assembly of the switch supports.
The door, the door seal or enclosure has been damaged.
Specifications
| Reference: | CEMO26GEFB |
| Rated Voltage: 230V~ 50Hz | |
| Rated Input Power(Microwave): | 1450W |
| Rated Onput Power(Microwave): | 900W |
| Rated Input Power(Grill): 1000W |
ENERGY CONSUMPTION
Product information for power consumption and maximum time to reach applicable low power mode.
| Standby mode | 0.8 W |
| The maximum time needed for the microwave oven to automatically reach the applicable low power mode or condition. | 20 minutes |
We disclaim any liability for defects due to misuse of the apparatus and damage repair and maintenance operations by any third party due to or installation of unauthorized parts.
WARNING
To prevent danger, it is imperative, in case of problems, to contact the customer service of the manufacturer or dealer, or a qualified electrician and approved for this type of repair. In all scenarios, the device must be returned to the electrician concerned.
| Normal | |
| Microwave oven interfering with the reception of your TV | The reception of TV and radio stations can be blurred when the microwave oven is operating. This interference is similar to that generated by small appliances such as mixers, vacuum cleaners and electric fans. This is normal. |
| Low oven light | During a cooking microwave at low power, the oven light can lower intensity. This is normal. |
| Steam accumulation on the door of the hot air escapes from the ventilation openings | During cooking, steam emerges foods. This is mainly discharged through the vent holes but a small amount collects on cold surfaces such as the oven door. This is normal. |
| Four accidentally used without food inside. | The use of the vacuum furnace will not damage if it is short. But this is not recommended. |
| Problem | Possible Cause | Solution |
| The oven does not work | (1) The power cord is not properly connected. | Unplug the unit, wait 10 seconds and then reconnect it. |
| (2) Problem with the electrical outlet. | Try the outlet by plugging in other electrical appliances. | |
| The oven is not heating | (3) The door is not closed. | Close the door. |
| The glass turntable makes noise when the microwave oven is in operation | (4) The bearing surface of the castors of the ring plate and the furnace bottom are dirty. | Refer to paragraph Cleaning your microwave oven for cleaning dirty surfaces. |
This device complies with EC guidelines for radio interference suppression and low voltage safety and meets the current requirements for safety.
Subject to technical modifications.
natural_image
Symbol of a trash bin crossed with no text or labels, representing waste sorting or disposal (no text present)According to Waste of Electrical and Electronic Equipment (WEEE) directive, WEEE should be separately collected and treated. If at any time in future you need to dispose of this product please do NOT dispose of this product with household waste. Please send this product to WEEE collecting points where available.
The warranty does not cover product wear parts, no problems or damage resulting from:
(1) Surface damage due to normal wear of the product;
(2) Defects or damage due to contact of the product with liquid and due to corrosion caused by rust or the presence of insects;
(3) Any incident, abuse, misuse, modification, unauthorized removal or repair;
(4) Any improper maintenance operation, not in accordance with product instructions or connection to improper voltage.
(5) Any use of accessories not supplied or approved by the manufacturer.
The warranty is void if the elimination of plate and / or the product serial number.
CONTINENTAL EDISON –
120/126 Quai de Bacalan –
33000 Bordeaux – France –
natural_image
Abstract geometric shapes with no text or symbolsContinental Edison


- Continental Edison
- CEMO26GEFB
- FOUR À MICRO-ONDES-MICROWAVE OVEN
- Remarques:
- Installez le four
- Important Safety Instructions
- READ CAREFULLY AND SAVE THESE INSTRUCTIONS FOR FUTURE REFERENCE.
- Description of your Product
- Installation and connection
- Control panel
- Installation Instructions
- Please Read the Manual Carefully Before Installation
- Built-in furniture
- B.Pre are the cai inet
- .Install the oven
- Install the oven to the cabinet
- Operation Instructions
- Setting the Clock
- Notes:
- Setting the Kitchen Timer
- Grill Cooking
- Microwave Cooking
- Defrost by Weight
- Defrost by Time
- Combination Cooking
- Multi-Stage Cooking
- Speedy Cooking
- Lock Function for Children
- Inquiring Function
- Auto Menu
- Cooking Tips
- WARNING
- CLEANING TIPS
- Exterior:
- Door:
- Interior walls:
- Turntable / rotating ring / axis of rotation:
- Repair
- Check the following before calling for service.
- Safety instructions for repair Warning:
- MICROWAVE RADIATION
- ENERGY CONSUMPTION
Brand : CONTINENTAL EDISON
Model : CEMO26GEFB
Category : Microwave Oven