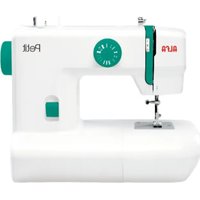
Petit - Sewing machine ALFA - Free user manual and instructions
Find the device manual for free Petit ALFA in PDF.


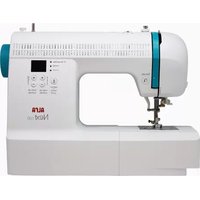
| Product type | Domestic sewing machine |
| Brand | Alfa |
| Model | Petit |
| Power supply voltage | 220-240 V, 50 Hz |
| Number of stitches | 9 patterns (including 1 buttonhole) |
| Sewing speed | Adjustable by pedal |
| Stitch length | Adjustable |
| Stitch width | Adjustable for zigzag stitches |
| Buttonhole | Automatic 4-step |
| Platform | Removable sliding table (accessory box) |
| Lighting | Integrated LED lamp |
| Presser foot | Two positions (additional lift) |
| Bobbin system | Removable bobbin case |
| Compatible needles | System 130/705H, sizes 65 to 110 |
| Included accessories | Universal foot, zipper foot, buttonhole foot, darning plate, screwdriver, brush, needles (x3), bobbins (x3), spool pin, etc. |
| Maintenance | Regular cleaning of feed dogs and hook; lubrication with sewing machine oil |
| Safety | Unplug before maintenance; do not use in damp environment; keep away from children |
| Noise level | Less than 75 dB(A) |
| Operating temperature range | 5 °C to 40 °C |
| Warranty | Statutory warranty according to applicable law |
| Repairability | Authorized service centers |
Frequently Asked Questions - Petit ALFA
User questions about Petit ALFA
0 question about this device. Answer the ones you know or ask your own.
Ask a new question about this device
Download the instructions for your Sewing machine in PDF format for free! Find your manual Petit - ALFA and take your electronic device back in hand. On this page are published all the documents necessary for the use of your device. Petit by ALFA.
USER MANUAL Petit ALFA
natural_image
Line drawing of a vintage sewing machine with no text or symbolsPetit
es
Please, read the instruction manual before using the machine as it contains important operation and safety information. Keep the instruction manual accessible so that you may refer to it at any time while operating the machine. You can find the complete manual by going to the product page of your machine on our website: www.alfahogar.com/en

Sigue leyendo...
Continuar a ler...
Continue reading...
Important safety instructions
When using an electrical appliance, basic safety precautions should always be followed, including the following: Read all instructions before using this sewing machine.
DANGER — To reduce the risk of electric shock:
- An electrical appliance should never be left unattended when plugged in.
- Always unplug the machine from the power outlet immediately after use and before cleaning.
WARNING — To reduce the risk of burns, fire, electric shock, or injury:
- Read these instructions carefully before using the machine.
- Keep the instructions in a suitable place near the machine, and hand them over with the machine if you give it to a third party.
- Use the machine only in dry locations.
- Never leave the machine within reach of children or people with reduced capabilities, as they cannot be responsible for the risk.
- When used by children aged 8 and above, or by people with reduced physical, sensory or mental capabilities or lack of experience/knowledge, supervisors/instructors must ensure the appliance is used as configured and understand the hazards involved.
- Children must not play with the machine.
- Children must not clean or perform user maintenance on the machine without supervision.
ALFA
Petit
- Always switch the machine off when preparing to start work (changing the needle, threading the machine).
- Always unplug the machine if you leave it unattended to avoid injury in case it is switched on accidentally.
- Always unplug the machine when changing the light or performing maintenance (lubricating, cleaning).
- Do not use the machine if it is wet or in a damp environment.
- Never pull the cord; always unplug the LED lamp. If the LED lamp is broken, it must be replaced by the manufacturer or a repair service to avoid hazards.
- Never place objects in the lamp or LED openings.
- Always keep the machine clean.
- Never use the machine if the ventilation openings are blocked; keep them free of lint and dust.
- Use only the correct plug and mains voltage FQ = 50-220VD (220-240 V).
- The power plug must always be fully inserted. If the mains lead is damaged it must be replaced by the manufacturer or a repair service.
- Sound pressure level in normal operation is under 75 dB(A).
- Do not use the appliance near children or people with reduced functions; use suitable facilities (e.g., a worktable).
- Contact your local authorities for information about available collection systems.
- If electrical appliances are disposed of in landfills, hazardous substances can leak, enter groundwater, and the food chain, which may harm your health and wellbeing.
Keep these instructions
Petit
This sewing machine is intended for household use only.
Make sure you use the sewing machine at temperatures between 5 °C and 40 °C.
If the temperature is too low, the machine may not operate normally.
Do not dispose of electrical appliances as unsorted municipal waste, use separate collection facilities. Contact your local government for information regarding the collection systems available. If electrical appliances are disposed of in landfills or dumps, hazardous substances can leak into the groundwater and get into the food chain, damaging your health and well-being. When replacing old appliances with new ones, the retailer is legally obligated to take back your old appliance for disposal, at least for free of charge.
Warranty Alfa
This product is backed by a legal guarantee in accordance with current legislation. To exercise your rights, please contact our official technical assistance services.
Petit
Índice interactivo/Índice interativo Index interactif / Interactive index:
FIGURAS/ FIGURAS/ FIGURES/ FIGURES.... 1
MANUAL USUARIO (ES) 13
MANUAL DO UTILIZADOR (PT)...... 35
MANUEL D'UTILISATION (FR)...... 57
USER MANUAL (EN) 81
Petit
FIGURAS/ FIGURAS/ FIGURES/ FIGURES
ALFA
Petit
ALFA
Petit
ALFA
Petit
1
2
3
natural_image
Technical line drawing of a mechanical clamp or lever mechanism (no text or symbols)4
8
ALfA
Petit
ALFA
Petit
11
12
2
1
B
A
C
D
ALFA
Petit

ALFA
Petit
ALFA
Petit
ALFA
Petit
natural_image
Illustration of four different fabric or sewing tools: a sewing machine, spring, duck, and duckling (no text or symbols present)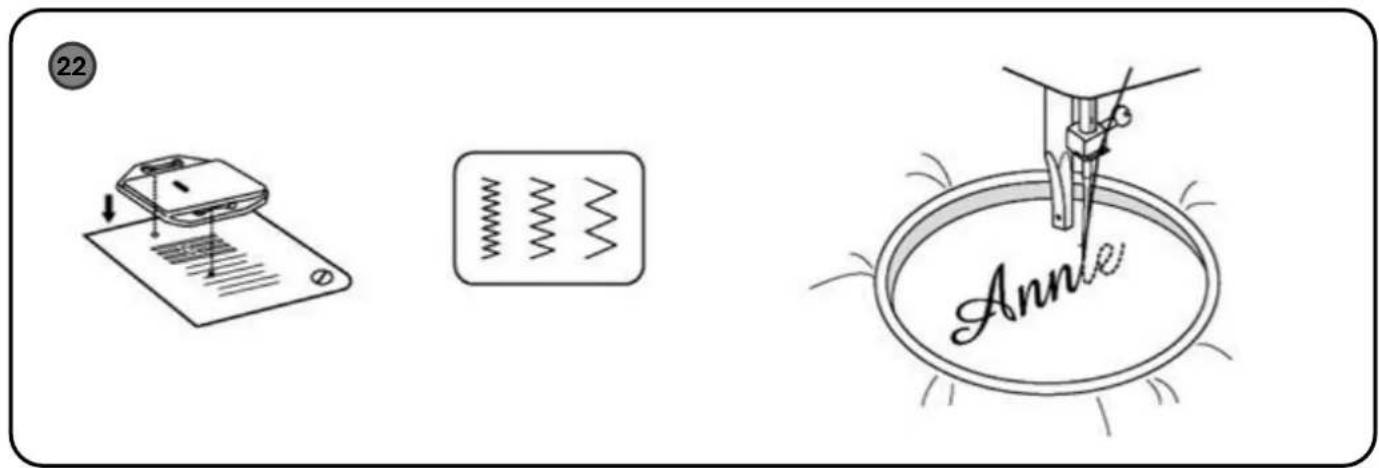
ALFA
Petit
ALFA
Petit
ES
MANUAL USUARIO
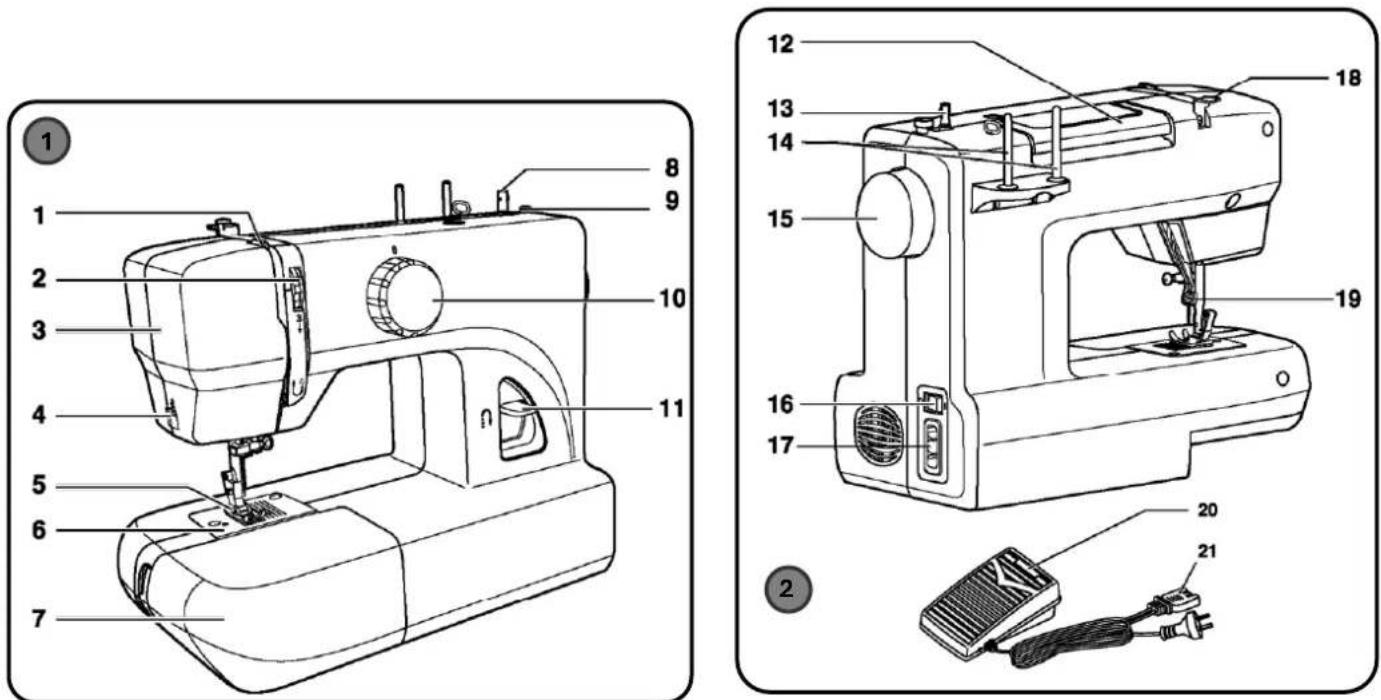
1. Detalles de la máquina (FIGURA 1 Y 2)
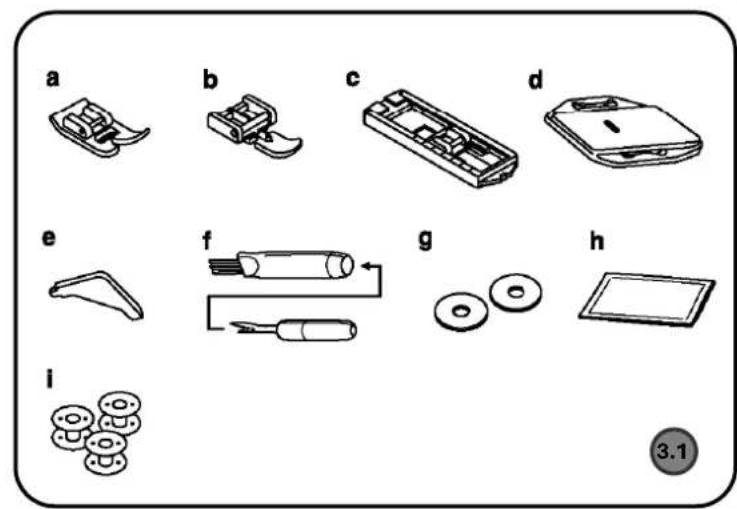
2. Accessoires (FIGURE 3.1/3.2)
1. Machine details (FIGURES 1 AND 2)
No. Description
1 Upper thread guide
2 Thread tension regulator
3 Front cover
4 Thread cutter
5 Presser foot
6 Needle plate
7 Sewing table and accessory box
8 Winder shaft
9 Winder brake
10 Sewing pattern selector
11 Reverse sewing lever
No. Description
12 Carrying handle
13 Bobbin winder
14 Spool holder
15 Steering wheel
16 Power switch
17 Power cable socket
18 Bobbin thread guide
19 Presser foot lift lever
20 Control pedal
21 Power cable
Petit
EN
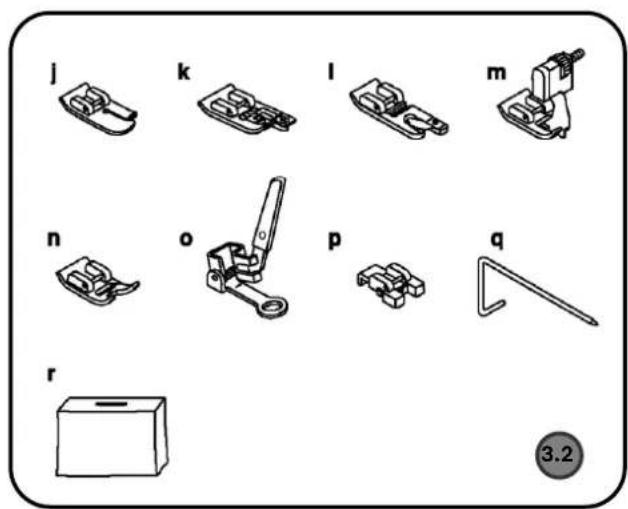
2. Accessories (FIGURE 3.1/3.2)
| Letter | INCLUDED Accessories (3.1) | Letter | OPTIONAL Accessories (3.2) |
| a | Universal foot | j | Foot for quilting |
| b | Foot for fasteners | k | Overlap foot |
| c | Buttonhole foot | l | Hem foot |
| d | Darning plate (stitch cover) | m | Blind hem foot |
| e | L-shaped screwdriver | n | Satin stitch foot |
| f | Scissors opener / brush | o | Darning/embroidery foot |
| g | Felt bobbin stopper (x2) | p | Button sewing foot |
| h | Needle pack (x3) | q | Sewing guide |
| i | Bobbin (x3) | r | Machine cover |
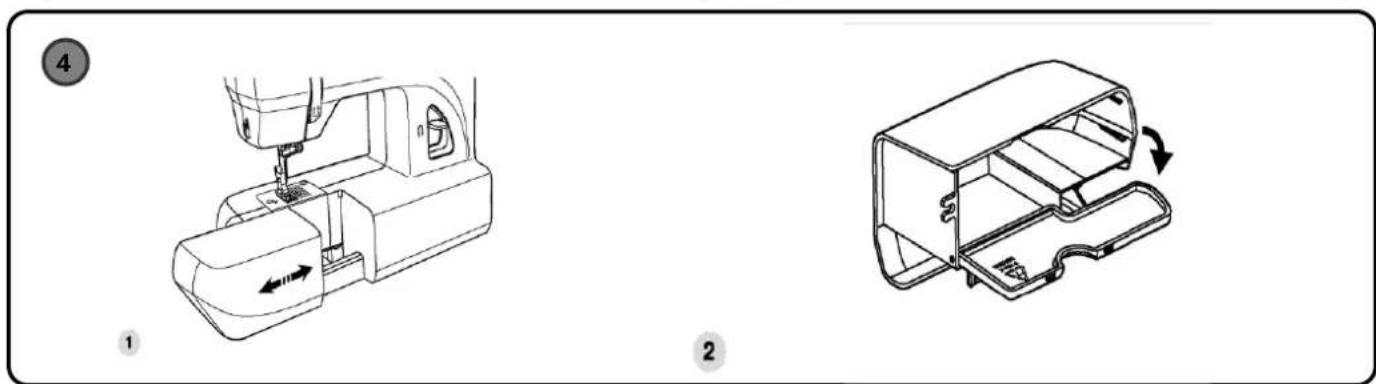
3. Adjusting the sliding sewing table (FIGURE 4)
- Hold the sliding table in a horizontal position and push in the direction of the arrow. (1)
- The inside of the sliding table can be used as an accessory box.
- To open it, move the lid in the direction of the arrow. (2)
Petit
EN
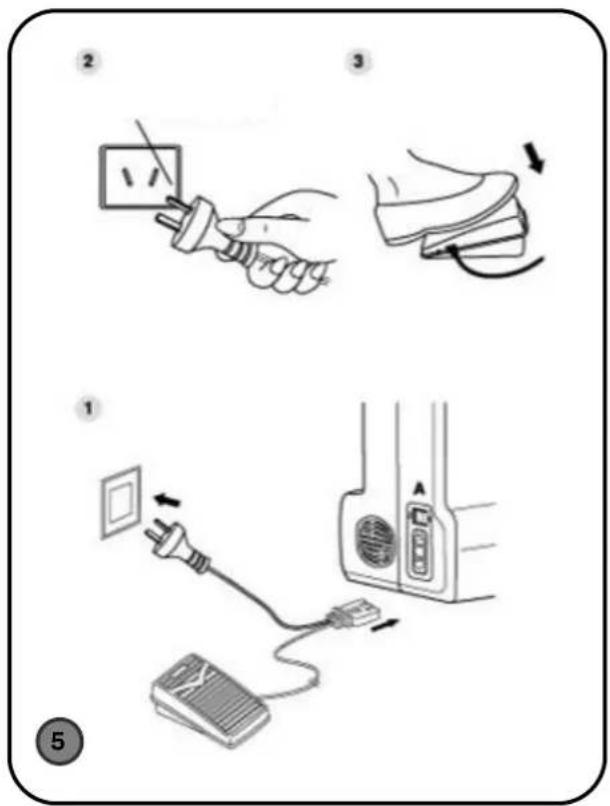
4. Connecting the machine to the power supply (FIGURE 5)
- Connect your sewing machine to the power supply as shown in the illustration. (1)
- The machine is equipped with a polarised plug that must be used with a polarised socket. (2)
Caution: Unplug the machine when not in use.
Control pedal
The foot control regulates the sewing speed. (3)
Caution: Consult a qualified electrician if you have any questions about connecting the machine to the power outlet. Unplug the machine when not in use.
Sewing light
Press the main switch (A) to turn on the machine and the light ("1").
IMPORTANT
The machines come with a polarised plug. To reduce the risk of electric shock, this plug is designed to be used only with a polarised socket. If the plug does not fit completely into the socket, contact a qualified electrician to install the appropriate socket. Do not modify the plug in any way. (2)
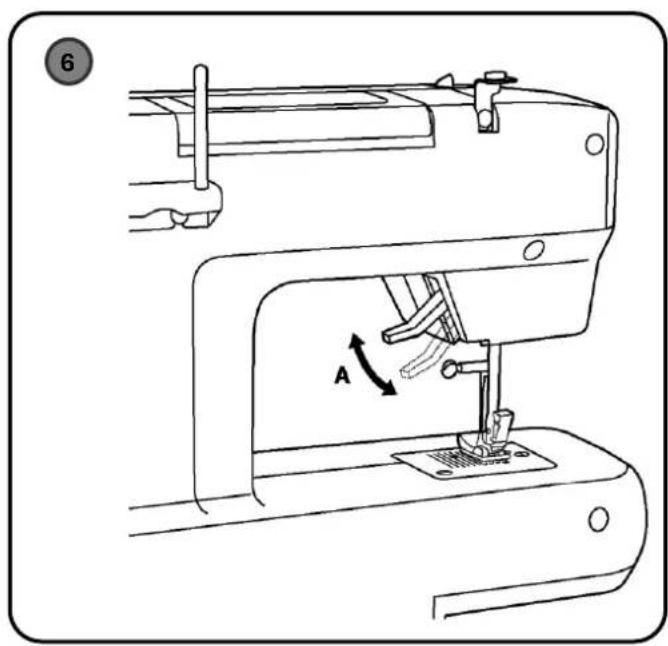
5. Two-step presser foot lever (FIGURE 6)
When sewing multiple layers of fabric or thick fabrics, the presser foot can be raised to a second height for easy positioning of the task (A).
Petit
EN
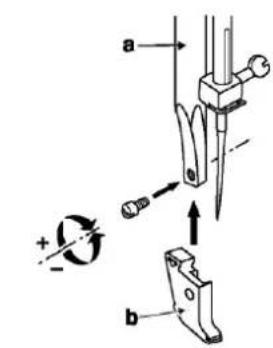
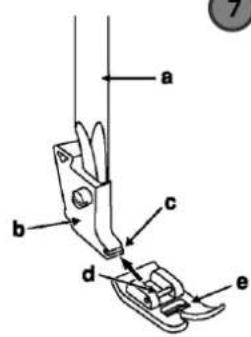
6. Changing the presser foot (FIGURE 7)
Inserting the sleeve
- Raise the presser foot bar (a).
- Insert the sleeve (b) as shown. (1)
Fitting the presser foot
- Insert the pin (d) of the presser foot (e) into the protrusion (c) of the sleeve. (2)
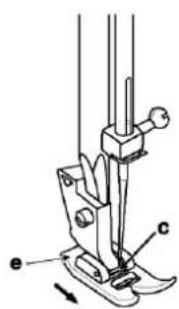
Removing the presser foot
- Push the presser foot (e) to separate it from the attachment (c). (3)
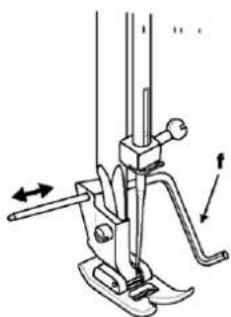
Attaching the quilting guide
- Place the quilting guide (f) in the slot as shown.
- Adjust according to your sewing needs. (4)
Caution: Turn the main switch to the 'O' position when performing any of the above operations.
Petit
EN
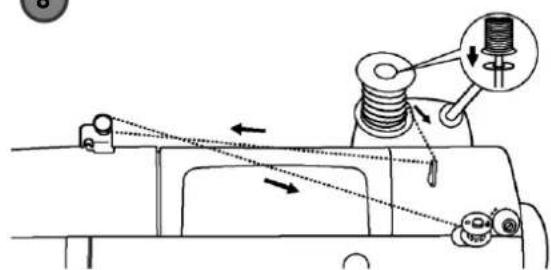
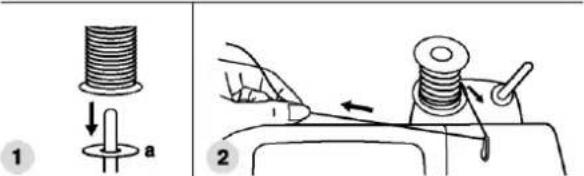
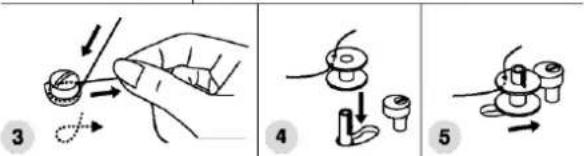
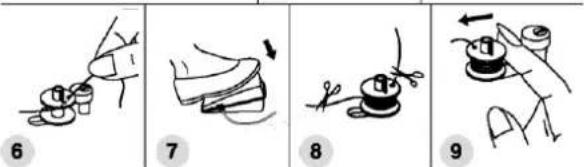
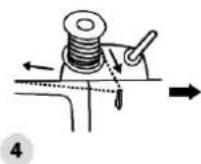
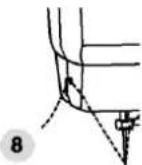
7. Filling the bobbin winder (FIGURE 8)
- Place the thread and felt wheel (a) in the spool holder. (1)
- Pass the thread through the thread guide. (2)
- Pass the thread around the thread guide tension discs in a clockwise direction. (3)
- Thread the bobbin as shown in the illustration and place it on the spindle. (4)
- Push the bobbin winder shaft to the right. (5)
- Hold the end of the thread. (6)
- Press the control pedal with your foot. (7)
- Cut the thread. (8)
- Push the bobbin shaft to the left and remove the bobbin. (9)
Please note:
When the bobbin winder is in the winding position, the machine does not sew and the handwheel does not turn. To start sewing, push the bobbin winder shaft to the left (sewing position).
Petit
EN
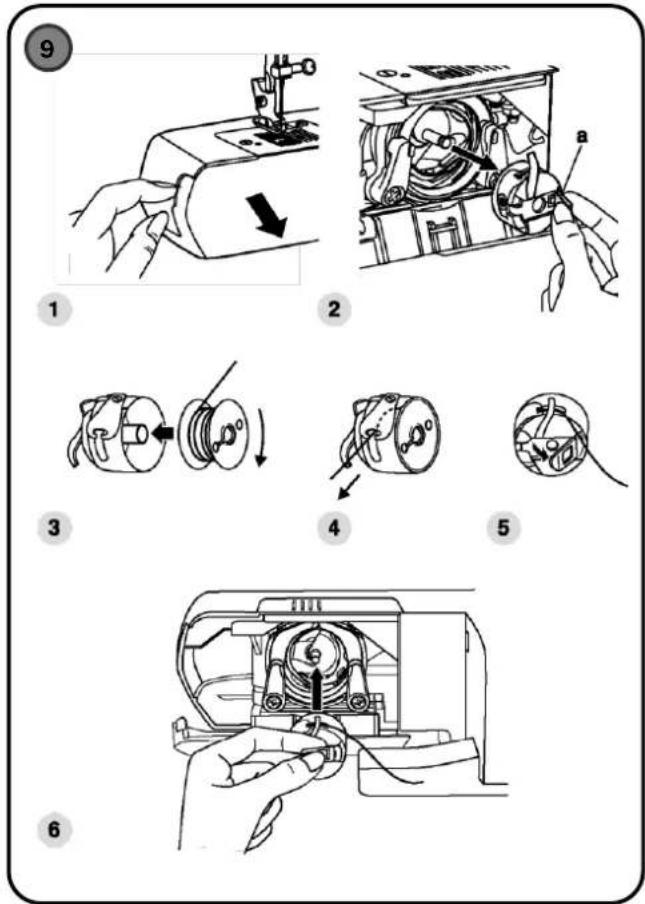
8. How to insert the bobbin (FIGURE 9)
When inserting or removing the bobbin, the needle must be fully raised.
- Remove the sliding table and open the hinged cover. (1)
- Hold the bobbin case (a) and remove it. (2)
- Hold the bobbin case with one hand. Insert the spool with the thread clockwise as shown by the arrow. (3)
- Pass the thread through the slot and under the finger (4). Leave a 15 cm piece of thread.
- Hold the bobbin case by the hinged tab. (5)
- Insert the bobbin case into the shuttle. (6)
Caution: Turn the switch to Off ("O") before removing or inserting the bobbin.
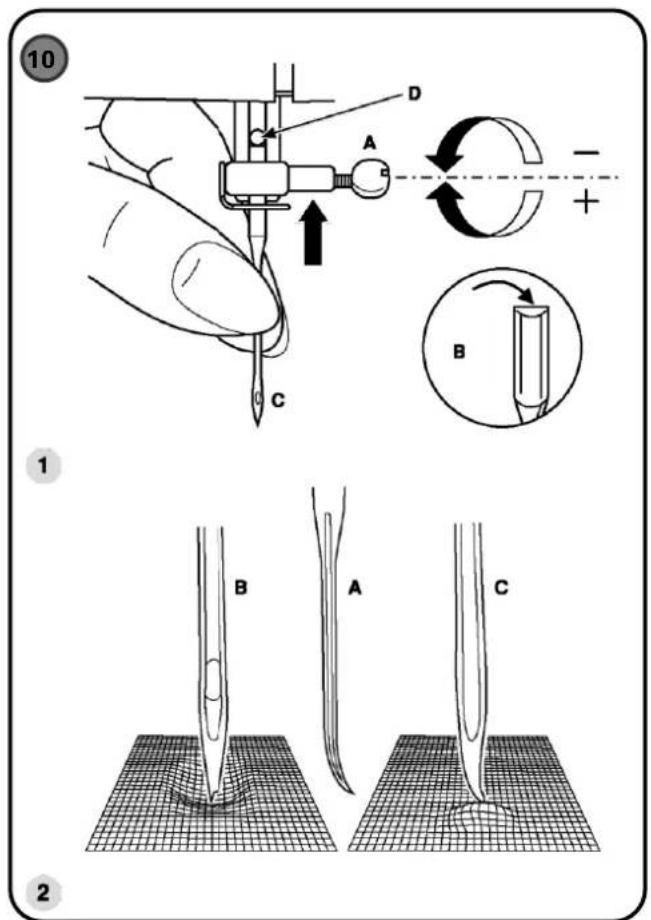
9. Inserting the needle (System 130/705H) (FIGURE 10)
Change the needle frequently, especially if you notice signs of wear and tear and it is causing problems. Insert the needle as illustrated and indicated below.
A. Loosen the clamp screw and retighten it after changing the needle. (1)
B. The flat side of the needle barrel should face backwards.
C–D. Insert the needle as far as possible.
Petit
Caution: Turn the switch to Off ("O") before removing or inserting the needle.
Needles must be in perfect condition. (2)
Problems may arise with:
A. Bent needles.
B. Damaged tips.
C. Blunt needles.
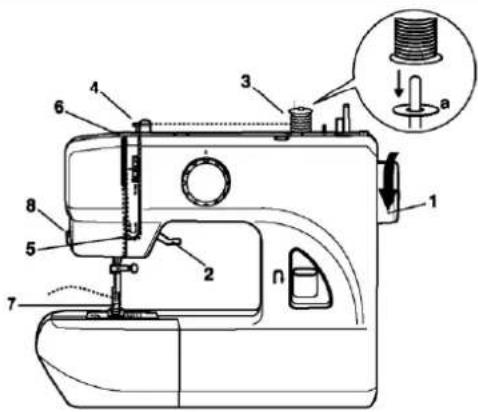
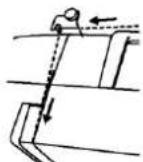
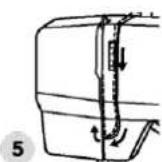
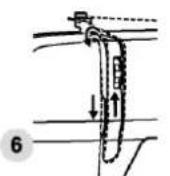
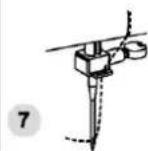
10. Threading the upper thread (FIGURE 11)
This is a simple but important operation; if done incorrectly, it could cause several sewing problems.
-
Raise the needle to its highest position by turning the handwheel counterclockwise until the needle just begins to descend again. Raise the presser foot to release the upper thread tension. (1, 2)
Note: For your safety, it is recommended that you turn off the machine before threading the thread. -
Place the thread and felt disc in the spool holder. (3)
-
Guide the thread through the thread guide to the upper thread guide. (4)
-
Thread through the tension module by bringing the thread down through the channel on the right and up through the channel on the left. (5) During this process, it helps to hold the thread between the thread guide and the spool pin.
Petit
- With the thread puller lever in its upper position, pass the thread from right to left through the eye of the thread puller lever and back down again. (6)
- Pass the thread behind the needle clamp guide (7) and then to the needle (threading from front to back).
- Pull approximately 15 to 20cm of thread back from the needle. Trim and adjust the length of the thread with the integrated cutter. (8)
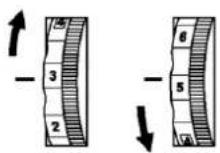
11. Upper/lower thread tension (FIGURE 12)
Upper thread tension
• Normal thread tension position "4". (1)
- To increase the tension, move the knob to a higher number.
- To reduce tension, move the knob to the lower number.
A. Normal thread tension for straight stitching.
B. If the thread is too loose, move the knob to a higher number.
C. If the thread is too tight, change to a lower number.
D. Normal thread tension for zigzag and decorative stitches.
The correct tension is when a little of the upper thread appears on the back of the fabric.
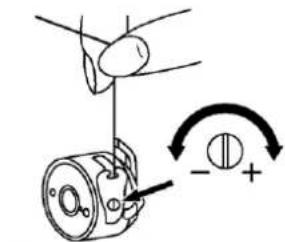
Lower thread tension (2)
To test it, remove the bobbin case and hold it suspended by the thread. Shake it once or twice. If the tension is
Petit
EN
correct, the thread will unwind 3 to 5 cm; if it is too tight, it will not unwind at all; if it is too loose, it will fall a lot. To adjust, turn the small screw on the side of the bobbin case.
Please note:
- Proper tension adjustment is important for good sewing.
• There is no single setting that is valid for all stitches, threads or fabrics. - A balanced tension (identical stitches above and below) is usually desirable only for straight seams.
- Ninety per cent of seams will have the upper tension between "3" and "5".
- For decorative stitches, you will get better results and less puckering if the upper thread appears on the reverse side of the fabric.
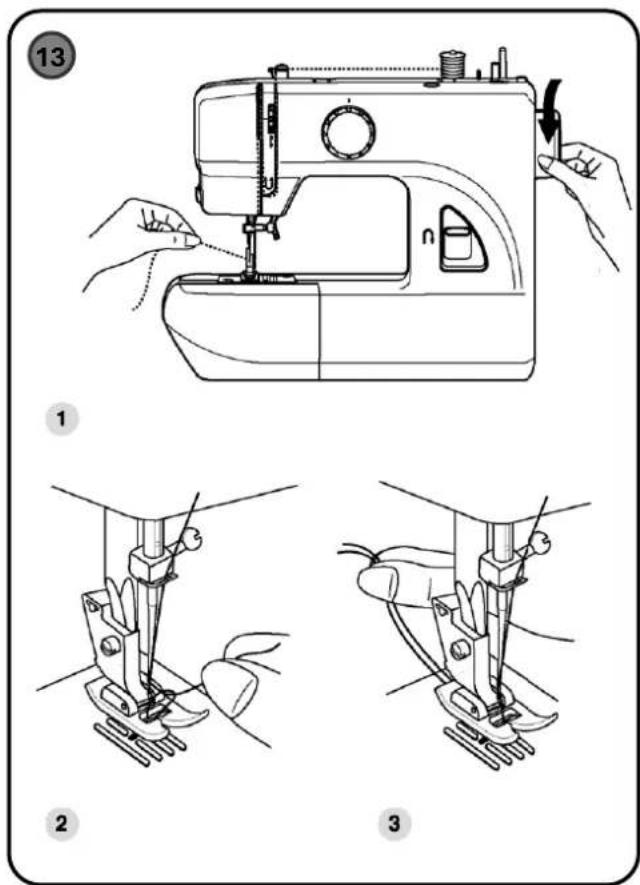
12. Removing the lower thread from the bobbin (FIGURE 13)
With the needle already threaded, hold the upper thread with your left hand. Turn the handwheel (1) towards you in a counterclockwise direction, lowering and raising the bar.
Note: If you have difficulty pulling the thread, check that it is not caught by the drop cover or the sewing table.
Gently pull the upper thread to bring the lower thread up through the hole in the needle cover. (2)
Place both threads back under the presser foot. (3)
Petit
EN
13. Needle, fabric and thread selection guide
Needle size / Fabric
Size Fabric type (examples)
9–11 (65– Lightweight — Thin cotton, voile, twill, silk, muslin, chiffon, taffeta, cotton fabrics, tricot, jersey, crepe, polyester, shirting and blouse.
12 Medium weight — Cotton, satin, canvas, fabric, lightweight wool fabric.
14 (90) Medium weight — Denim cotton, wool fabric, heavier fabric, cotton denim.
16 (100) Heavy — Canvas, wool fabric, cotton drill, upholstery (light to medium).
Thread
Fine cotton, nylon or polyester thread. Most thread is medium weight and is suitable for these fabrics and needle sizes.
If you use polyester thread on synthetic materials, cotton and natural fabrics, you will get good results.
Always use the same thread for the upper and lower threads.
IMPORTANT NOTE: The needle size must be adapted to the thickness of the thread and the weight of the fabric.
Petit
EN
Needle and fabric selection
Needle code Use / Materials
HAx1 (15x1) Normal needles. Sizes 9(65) to 18(110). Natural fabrics — wool, cotton, silk, etc.
15x1/705H (SUK) Semi-spherical tip. 9(65) to 18(110). Natural and synthetic, blends, tricot, etc.
15x1/705H (SUK) elastic Spherical tip. 9(65) to 18(110). Wool jacket, swimsuit.
130 PCL Leather needle. 12(80) to 18(110). Leather, vinyl, upholstery.
Notes:
- European needles use sizes 65, 70, 80, etc.; American and Japanese needles use sizes 9, 11, 12, etc.
- Change the needle each time the thread breaks or skipped stitches occur.
- Use backing material for very fine or stretchy fabrics.
Petit
EN
14. How to choose your design (FIGURE 14)
To select a stitch, turn the selector dial. This dial can be turned in both directions.
STRAIGHT SEWING
Turn the stitch selector to the straight stitch position.
In general, the thicker the fabric, thread and needle, the longer the stitch should be.
Note: Select the "—" stitch to increase the length of the straight stitch.
a. Stitch selector
b. Lockstitch lever
Model: 1 buttonhole (9 designs).
15. Reverse sewing / Removing the fabric / Cutting the thread (FIGURE 15)
Reverse sewing (FIGURE 15)
To secure the beginning and end of a seam, press down on the reverse sewing lever (A). Sew a few stitches backwards. Release the lever and the machine will sew forwards again. (1)
Removing the fabric (FIGURE 15)
Turn the handwheel towards you (counterclockwise) to raise the needle to its highest position, raise the presser foot, and remove the fabric from behind the needle and foot. (2)
Petit
EN
Cutting the thread (FIGURE 15)
Pull the threads from underneath and behind the presser foot. Bring the threads to the cutter (B) on the front cover and pull down to cut. (3)
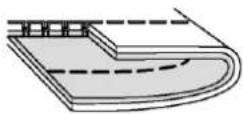
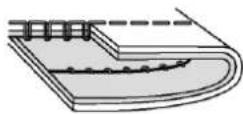
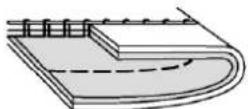
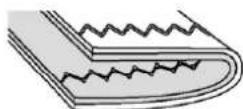
16. Blind hem / Lingerie stitch (FIGURE 16)
Blind hem
Fold the hem up to the desired width and iron. Fold back (Fig. 1) against the right side of the fabric with the top edge of the hem extending about 7 mm to the right side of the folded fabric.
Begin sewing gently along the fold, ensuring that the needle lightly touches the top to catch one or two threads of the fabric. (2)
Unfold the fabric when the hem is finished and iron.
Lingerie stitch
Turn up the hem to the desired width and iron. Place the fabric with the right side facing up with the edge of the hem on the left. Begin sewing so that the needle swings outside the left side of the fabric to form a small scallop. Applying a little more tension will produce a deeper scallop.
Petit
EN
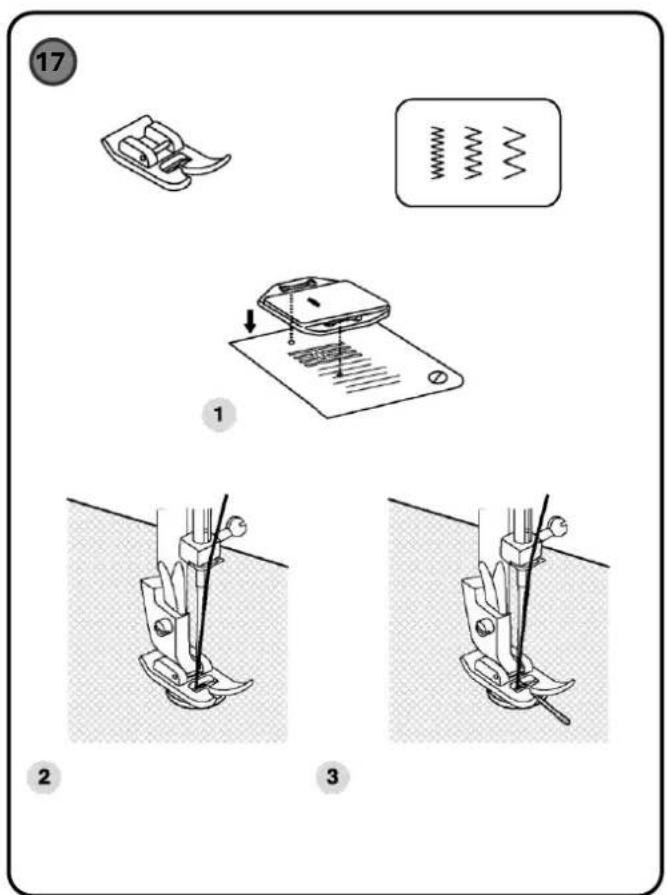
17. Sewing buttons (1-disc model only) (FIGURE 17)
- Install the darning plate. (1)
- Position the fabric under the presser foot. Place the button in the desired location and lower the presser foot.
- Set the stitch selector dial to the second zigzag pattern (as shown), which should correspond to the distance between the two buttonholes. Turn the handwheel towards you to check that the needle goes into the right and left holes without hitting the button. Sew slowly for about 10 stitches. (2)
- Bring the ends of the thread to the back of the fabric and tie them by hand.
- If you need extra thickness, place a darning needle on top of the button and sew. (3)
- For buttons with 4 holes, sew through the two front holes first, push the fabric forward, and then sew through the two back holes.
Petit
EN
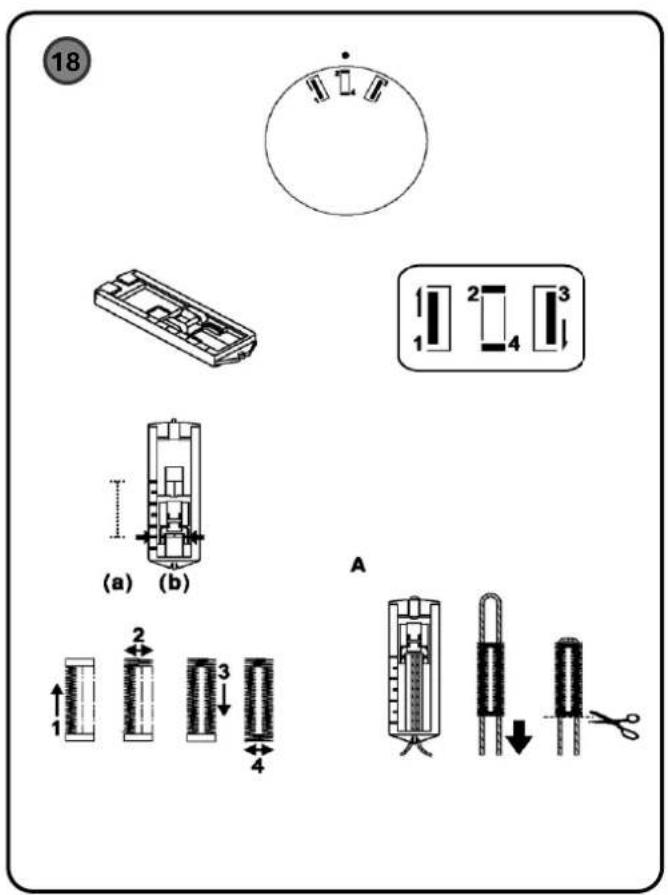
18. Sewing buttonholes in 4 steps (FIGURE 18)
Preparation
- Remove the universal foot and attach the buttonhole foot.
- Measure the diameter and thickness of the button and add 0.3 cm for reinforcement stitches to obtain the appropriate buttonhole length; mark the size of the buttonhole on the fabric (a).
- Lower the presser foot so that the centre line of the button marked on the fabric aligns with the centre of the buttonhole foot (b).
Note: Density varies depending on the fabric. First test on a similar fabric.
Follow the 4-step sequence, changing from one step to the next with the Stitch Selector Disc. When changing steps, make sure the needle is raised before turning the Disc to the next step. Be careful not to sew too many stitches in steps 2 and 4. Use a seam ripper and carefully open the buttonhole from the ends towards the centre.
Tips:
- Loosen the upper thread tension slightly for best results.
- Use reinforcement on very thin or stretchy fabrics.
- It is advisable to use thick thread or cord for stretch fabrics or knitted wool.
- The zigzag stitch should be sewn over the thick thread or cord. (A)
Petit
EN
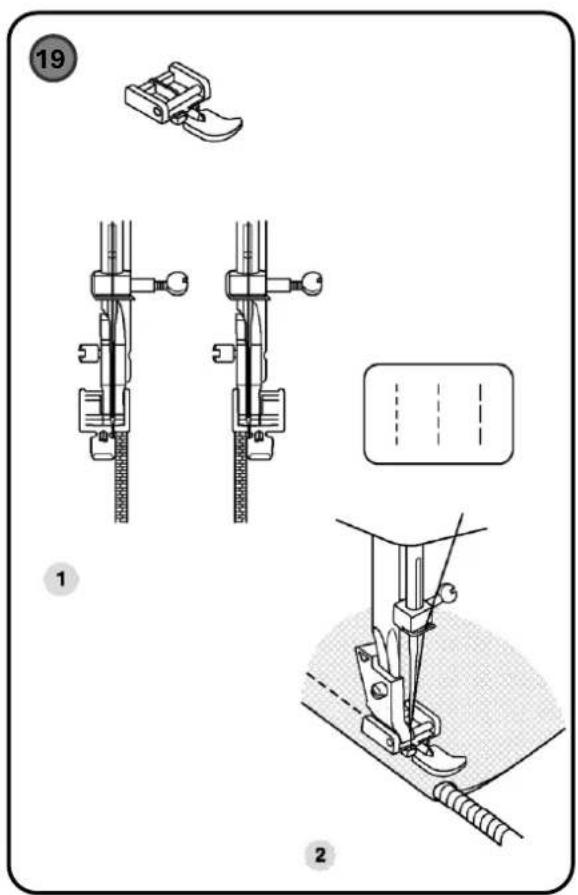
19. Closures and edging (FIGURE 19)
- Adjust the machine as shown in the illustration.
- The fastener foot can be inserted on the right or left, depending on which side you are sewing. (1)
- To sew the ends of the fastener, lower the needle into the fabric, raise the presser foot and push the ends of the fastener under the foot; lower the foot and continue sewing.
- Set the stitch length control between "1" and "4" (depending on the thickness of the fabric). (2)
- Select the "" stitch to fine-tune the straight stitch length.
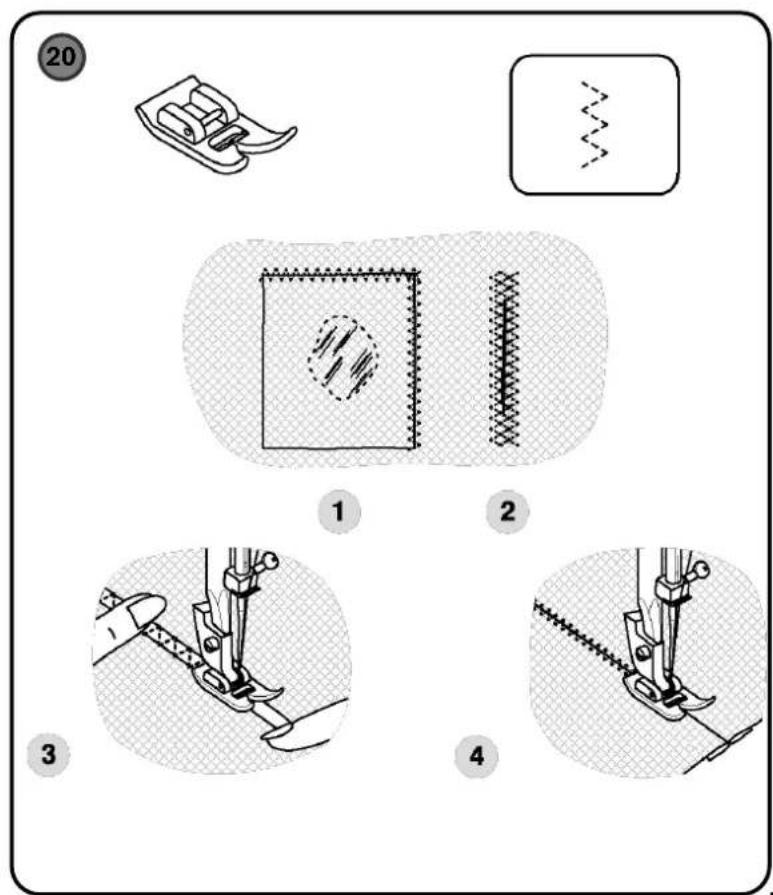
20. 3-step zigzag (FIGURE 20)
For sewing lace, elastic, darning, repairs and edge reinforcement.
Adjust the machine as shown.
- Position the patch. The stitch length can be shortened to close the stitch. (1)
Repairing tears
- It is advisable to use a piece of backing fabric for reinforcement.
- The density can be varied by changing the stitch length.
- First sew down the centre and then overlap on both sides.
• Depending on the type of fabric and the damage, sew between 3 and 5 rows. (2)
Petit
EN
Inserting elastic bands
- Place the elastic on the fabric.
- While sewing, stretch the elastic both in front of and behind the presser foot as shown. (3)
Joining stitch
The elastic stitch can be used to join two pieces of fabric and is very effective on knitted garments. With nylon thread, the stitch will be invisible.
- Join the edges of both fabrics and centre them under the foot.
- Sew with an elastic stitch, keeping the two edges very close together, as shown in the figure. (4)
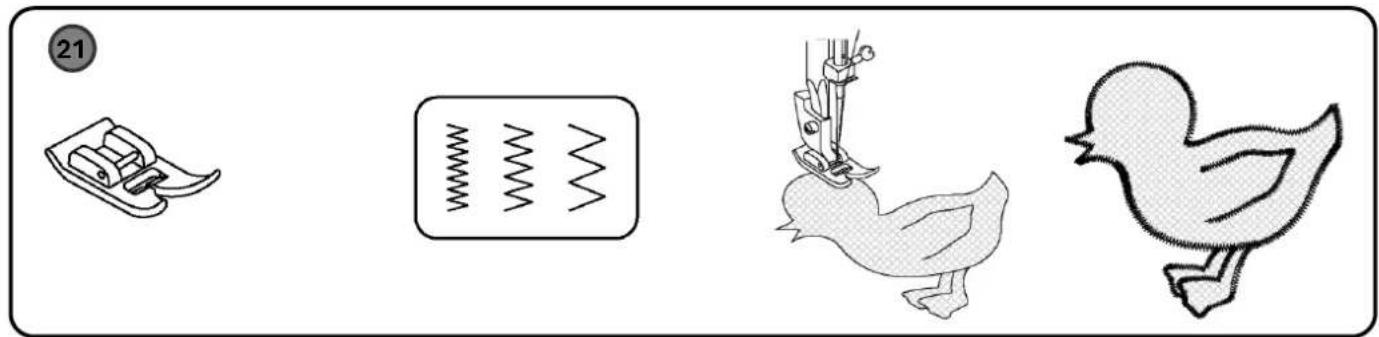
21. Appliqués (FIGURE 21)
• Turn the selector dial to a small wide zigzag.
- Cut out the appliqué design and baste it onto the fabric.
- Sew gently along the edge of the design.
- Trim off any excess material that extends beyond the seam. Be careful not to cut any stitches.
- Remove the basting thread.
- Tie the beginning and end threads under the appliqué to prevent unravelling.
ALFA
Petit
EN
22. Monograms and Embroidery with Hoop\* — Preparation (FIGURE 22)
- Set up the machine as shown above.
- Remove the presser foot and its support.
- Attach the darning plate.
- Lower the presser foot lever before you start sewing.
- Adjust the width according to the size of the letters in the monogram or design.
Preparing the monogram and embroidery
- Trace the desired letters or design onto the right side of the fabric.
- Stretch the fabric on the embroidery hoop as tightly as possible.
- Place the fabric under the needle. Ensure that the needle bar is in the lowest position.
- Turn the handwheel towards you to raise the lower thread through the fabric. Sew a few stitches to secure the starting point.
- Hold the hoop with the thumb and forefinger of both hands while pressing the material with the middle and ring fingers, holding the outside of the hoop with the little finger.
* The hoop is not included with the machine.
Petit
EN
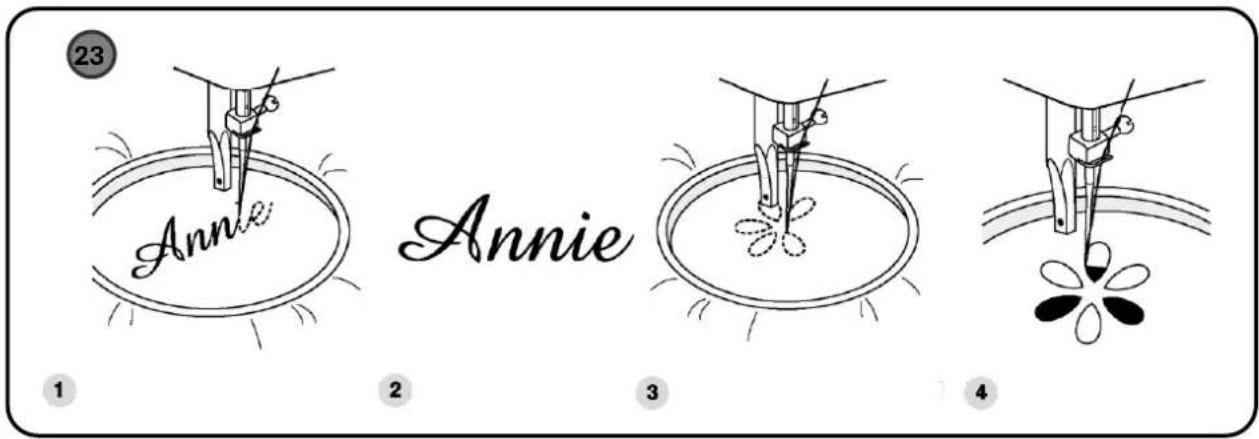
23. Monograms and embroidery with hoop\* — Execution (FIGURE 23)
Monograms
- Sew by gently moving the hoop along the letters at a steady speed.
- Secure with a few straight stitches at the end of the last letter.
Embroidery
- Sew the outer stitches of the design by moving the hoop.
- Fill in the design starting from the outside in and from the inside out until completely filled.
* Keep the stitches close together. A long stitch is achieved by moving the hoop quickly and a short stitch by moving it gently. - Secure with a few straight stitches at the end of the last letter.
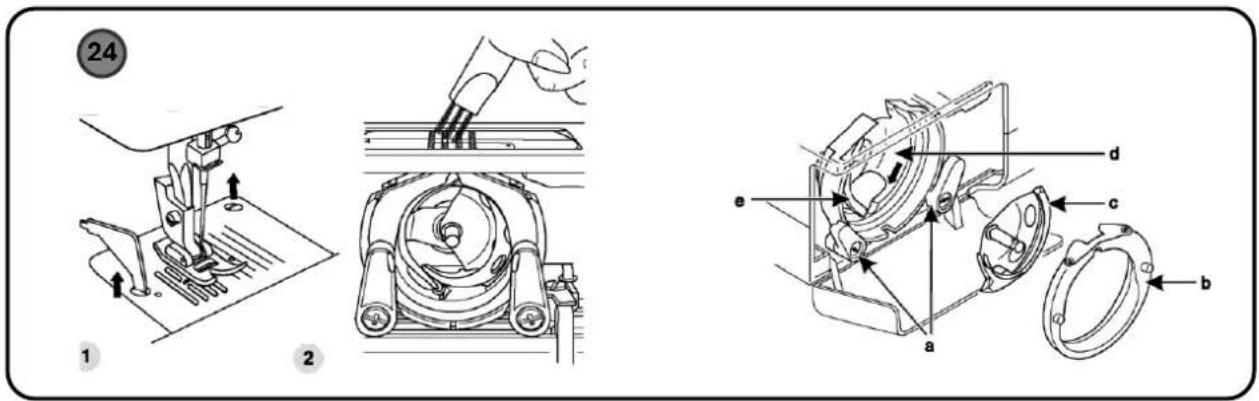
24. Maintenance (FIGURE 24)
Caution: Disconnect the machine from the power supply by removing the plug from the socket. The machine must always be disconnected for cleaning.
Remove the needle plate:
- Turn the handwheel until the needle is fully raised.
Petit
- Open the hinged cover and remove the screws from the needle plate with the screwdriver. (1)
Cleaning the feed dogs:
- Remove the bobbin case and clean the entire area with the brush provided. (2)
Cleaning and lubricating the hook:
- Remove the bobbin case.
- Move the retaining arm hooks (a) outwards until they click into place.
- Remove the hook cover (b) and hook (c) and clean with a soft cloth.
- Lubricate points (d) (1–2 drops) with sewing machine oil.
- Turn the handwheel until the hook rail (e) is on the left.
- Replace the hook (c).
- Put the crochet cover back on and return the two retaining triggers to their original position.
- Insert the bobbin case and bobbin, and replace the needle plate.
Important:
Fabric and thread remnants must be removed regularly. Your machine should be serviced at regular intervals at one of our service agencies.
Petit
EN
- Troubleshooting
| Problem | Causes | Solutions |
| Upper thread breakage | 1) Machine not threaded correctly. 2) Thread too strong. 3) Tension too tight. 4) Needle incorrectly positioned. 5) Thread wound around pin. 6) Bobbin loose. | 1) Re-thread. 2) Readjust tension (lower). 3) Readjust tension (lower). 4) Change needle. 5) Remove/cut thread. 6) Replace bobbin. |
| Lower thread breakage | 1) Bobbin case incorrectly positioned. 2) Poor quality bobbin thread. 3) Bobbin thread too thick. | 1) Reposition and correct the thread. 2) Use good quality thread. 3) Use the correct thread. |
| Skip stitches | 1) Needle incorrectly positioned. 2) Needle too thin for the fabric. 3) Needle bent or tip damaged. | 1) Insert correctly. 2) Use a thicker needle. 3) Change the needle. |
| Needle breakage | 1) Needle incorrectly positioned. 2) Needle too thin for the fabric. 3) Fabric pulled too tightly. 4) Needle hit the presser foot. | 1) Insert correctly. 2) Use a thicker needle. 3) Do not pull the fabric. 4) Use the correct foot. |
| Missed stitches | 1) Machine threaded incorrectly. 2) Incorrect or damaged needle. 3) Needle too thick or too thin. | 1) Re-thread. 2) Change the needle. 3) Use the correct needle. |
| Irregular stitch length | 1) Tension too tight or too loose. 2) Fabric difficult to feed. | 1) Adjust the tension correctly. 2) Use a guide or backing paper. |
Petit
EN
| Problem | Causes | Solutions |
| Puckered stitches | 1) Upper tension too high. 2) Fabric too thin or stretchy without reinforcement. | 1) Reduce upper tension. 2) Use stabiliser/interfacing. |
| Loose stitches | 1) Upper tension too low. 2) Incorrect threading. | 1) Increase tension. 2) Re-thread. |
| Noisy machine | 1) Machine needs cleaning/lubrication. | 1) Clean and lubricate according to "Maintenance".Remove the needle and bobbin case; turn the handwheel to release tangled threads and parts; reassemble. (If the problem persists, contact technical support). |
| Machine jam | Cause: Thread is jammed in the hook. |
Petit
ALFA HOGAR S.L.
C.I.F: B20437547
Torrekua, 3
20600 Eibar (Guipuzcoa), Spain.

- Petit
- es
- Important safety instructions
- DANGER — To reduce the risk of electric shock:
- WARNING — To reduce the risk of burns, fire, electric shock, or injury:
- ALFA
- Keep these instructions
- Warranty Alfa
- Índice interactivo/Índice interativo Index interactif / Interactive index:
- MANUAL USUARIO
- Detalles de la máquina (FIGURA 1 Y 2)
- Accessoires (FIGURE 3.1/3.2)
- Machine details (FIGURES 1 AND 2)
- No. Description
- Accessories (FIGURE 3.1/3.2)
- Adjusting the sliding sewing table (FIGURE 4)
- Connecting the machine to the power supply (FIGURE 5)
- Control pedal
- Sewing light
- IMPORTANT
- Two-step presser foot lever (FIGURE 6)
- Changing the presser foot (FIGURE 7)
- Inserting the sleeve
- Fitting the presser foot
- Removing the presser foot
- Attaching the quilting guide
- Filling the bobbin winder (FIGURE 8)
- Please note:
- How to insert the bobbin (FIGURE 9)
- Inserting the needle (System 130/705H) (FIGURE 10)
- Problems may arise with:
- Threading the upper thread (FIGURE 11)
- Upper/lower thread tension (FIGURE 12)
- Upper thread tension
- Lower thread tension (2)
- Removing the lower thread from the bobbin (FIGURE 13)
- Needle, fabric and thread selection guide
- Needle size / Fabric
- Size Fabric type (examples)
- Thread
- Needle and fabric selection
- Needle code Use / Materials
- Notes:
- How to choose your design (FIGURE 14)
- STRAIGHT SEWING
- Reverse sewing / Removing the fabric / Cutting the thread (FIGURE 15)
- Reverse sewing (FIGURE 15)
- Removing the fabric (FIGURE 15)
- Cutting the thread (FIGURE 15)
- Blind hem / Lingerie stitch (FIGURE 16)
- Blind hem
- Lingerie stitch
- Sewing buttons (1-disc model only) (FIGURE 17)
- Sewing buttonholes in 4 steps (FIGURE 18)
- Preparation
- Tips:
- Closures and edging (FIGURE 19)
- 3-step zigzag (FIGURE 20)
- Repairing tears
- Inserting elastic bands
- Joining stitch
- Appliqués (FIGURE 21)
- Monograms and Embroidery with Hoop\* — Preparation (FIGURE 22)
- Preparing the monogram and embroidery
- Monograms and embroidery with hoop\* — Execution (FIGURE 23)
- Monograms
- Embroidery
- Maintenance (FIGURE 24)
- Remove the needle plate:
- Cleaning the feed dogs:
- Cleaning and lubricating the hook:
- Important:
Brand : ALFA
Model : Petit
Category : Sewing machine