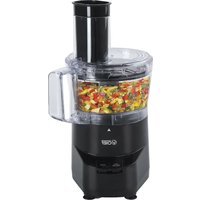
CHFP4MB - Food Processor Commercial Chef - Free user manual and instructions
Find the device manual for free CHFP4MB Commercial Chef in PDF.


User questions about CHFP4MB Commercial Chef
0 question about this device. Answer the ones you know or ask your own.
Ask a new question about this device
Download the instructions for your Food Processor in PDF format for free! Find your manual CHFP4MB - Commercial Chef and take your electronic device back in hand. On this page are published all the documents necessary for the use of your device. CHFP4MB by Commercial Chef.
USER MANUAL CHFP4MB Commercial Chef
natural_image
Line drawing of a coffee maker with lid and side arm (no text or symbols)- READ these instructions carefully before installing and operating the appliance. Keep them for further reference.
- Record in the space below the "SERIAL/MODEL NUMBER" found on the back or bottom of your appliance and retain this information for future reference.
SERIAL NUMBER:
MODEL NUMBER:
DATE OF PURCHASE:
Save and staple your sales receipt to your manual for warranty coverage.
SAFETY INFORMATION

DANGER
DANGER - Immediate hazards which WILL result in severe personal injury or death

WARNING
WARNING - Hazards or unsafe practices which COULD result in severe personal injury or death

CAUTION
CAUTION - Hazards or unsafe practices which COULD result in minor personal injury
IMPORTANT SAFETY INSTRUCTIONS

WARNING
When using electrical appliances, basic safety precautions should be followed, including the following
- READ ALL INSTRUCTIONS BEFORE USE
- To protect against risk of electric shock, do not immerse cord, plug or unit in water or other liquid.
- Close supervision is necessary when any appliance is used by or near children.
- Unplug from outlet when not in use and before cleaning. Allow to cool before putting on or taking off parts, and before cleaning appliance.
- Do not operate any appliance with a damaged cord or plug or after the appliance malfunctions or has been damaged in any manner. Return appliance to the nearest authorized service facility for examination, repair or adjustment.
- The use of accessory attachments not recommended by the manufacturer may cause fire, electric shock, or injuries.
- Do not use outdoors.
- Do not let cord hang over the edge of the table or counter, or touch hot surfaces, including the stove.
- Do not use appliance for other than intended use.
- Keep hands and utensils away from moving blades or discs while processing food to reduce the risk of severe injury to persons or damage to the food processor. A scraper may be used but must be used only when the food processor is not running.
- Blades are sharp. Handle carefully.
- To reduce the risk of severe injury, never place cutting blade or discs on base without first putting bowl properly in place.
- Be certain cover is securely locked in placed before operating appliance.
- Never feed food by hand. Always use food pusher.
- Do not attempt to defeat the cover interlock mechanism.
SAVE THESE INSTRUCTIONS HOUSEHOLD USE ONLY
SAFETY INFORMATION
ELECTRICAL REQUIREMENTS
This appliance has a polarized plug (one blade is wider than the other). To reduce the risk of electric shock, this plug is intended to fit into a polarized outlet only one way. If the plug does not fit into the outlet, reverse the plug. If it still does not fit, contact a qualified electrician. Do not attempt to modify the plug in any way.
POWER SUPPLY CORD
- A short power supply cord is provided to reduce the risk of becoming entangled in or tripping over a longer cord.
- If the power supply cord is too short, do not use an extension cord. Have a qualified electrician or serviceman to install an outlet near the appliance.
- If it is absolutely necessary to use longer cord sets or an extension cord, extreme care must be exercised.
a) The marked electrical rating of the cord set or extension cord must equal to or be greater than the electrical rating of the appliance. The longer cord should be arranged so that it will not drape over the counter top or table top where it can be pulled on by children or tripped over unintentionally.
NOTE: Neither Commercial Chef nor the dealer can accept any liability for damage to the product or personal injury resulting from failure to observe the electrical connection procedures.
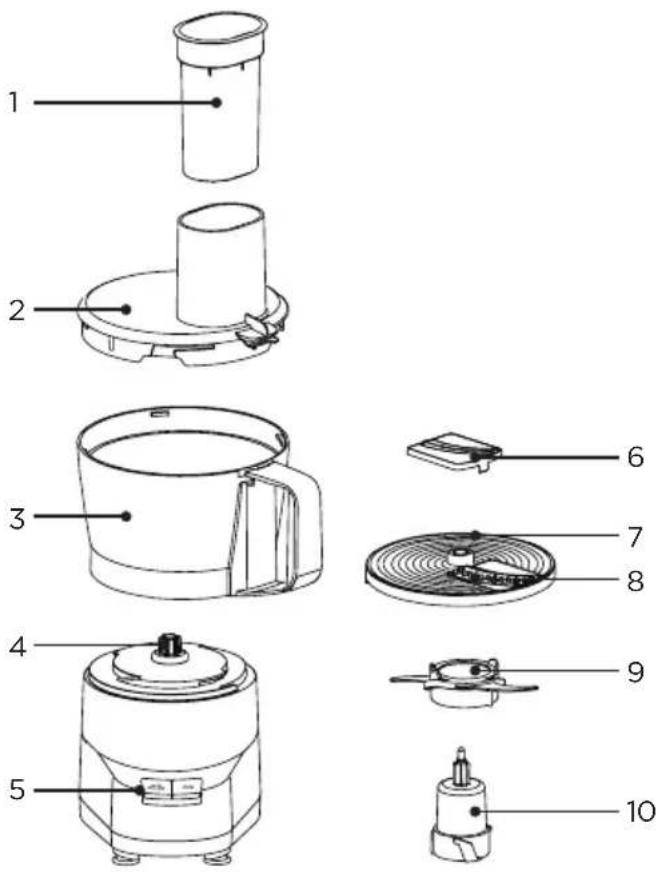
PARTS DESCRIPTION
| NO. Description | |
| 1 | Food Pusher |
| 2 | Lid with feeding tube |
| 3 | Bowl (4 cup) |
| 4 | Motor clutch |
| 5 | Motor unit |
| 6 | Shredding cutter |
| 7 | Shredding disc |
| 8 | Coarse shredding disc |
| 9 | Blades |
| 10 | Blade shaft |
TECHNICAL DATA
| Product name Model No. Rated voltage Rated frequency Rated power | ||||
| Food Processor CHFP4MB 120V~ 60Hz 450W | ||||
INSTRUCTIONS FOR USE
BEFORE FIRST USE
Before using this appliance for the first time, wash the bowl, lid and blades in soapy water, rinse, and dry thoroughly or put in the dishwasher. DO NOT immerse base in water or any other liquid. Instead wipe clean with a damp cloth. Place unit on a counter or other flat surface.

Note
- When first using your appliance, you may notice an odor coming from the motor. This is normal and will dissipate with use.
INSTRUCTIONS FOR USE
HOW TO USE S BLADE (CHOPPING/MIXING)
natural_image
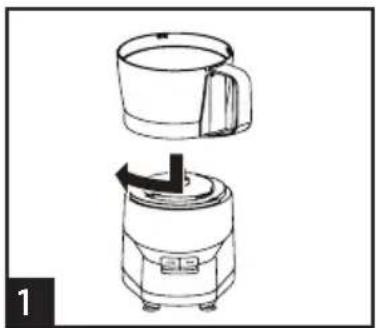
Line drawing of a kitchen appliance with a lid and side view showing the interior (no text or symbols)Align bowl and base. Turn bowl clockwise to lock into place.
NOTE: Unit will not work unless bowl is locked.
natural_image
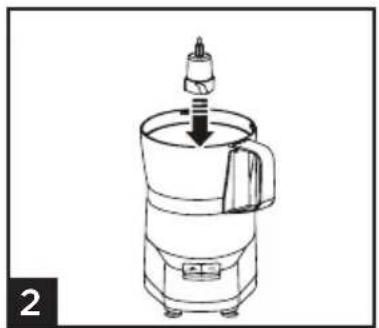
Line drawing of a mechanical device with a downward arrow indicating force or direction (no text or symbols)Place shaft in the middle of the bowl.
natural_image
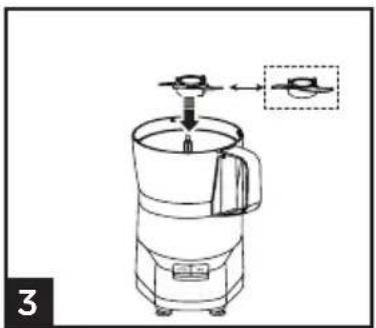
Line drawing of a coffee maker with a handle and spout, showing mechanical components (no text or symbols)Place the blades unto the shaft.
NOTE: The notches must be facing upward.
natural_image
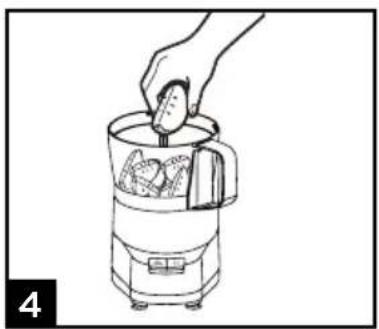
Line drawing of a hand placing food into a blender into a container (no text or symbols)Fill in the food.
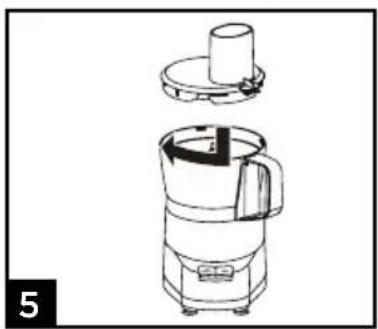
natural_image
Line drawing of a blender with lid and side panel, no text or symbols presentAlign lid and bowl.
Turn lid clockwise to lock into place.
NOTE: Unit will not work unless lid is locked.
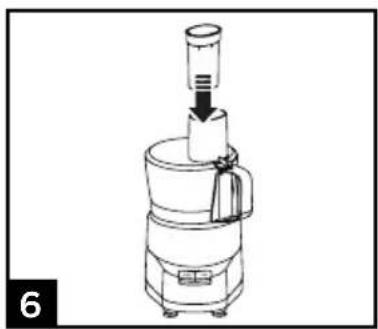
natural_image
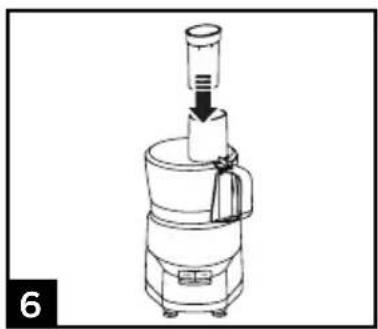
Line drawing of a mechanical device with a cylindrical component inserted into a housing (no text or symbols)Close the feeding tube with the pusher.
WARNING:
Always use food pusher to feed food into the chute.
Never push food through chute with hands or other objects.
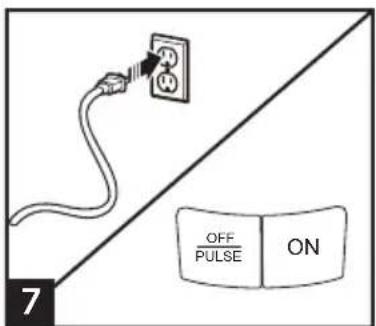
text_image
OFF /PULSE ON 7Select ON, OFF on control knob. ON: Processor will run continuously. OFF/PULSE: For instant on and off control.
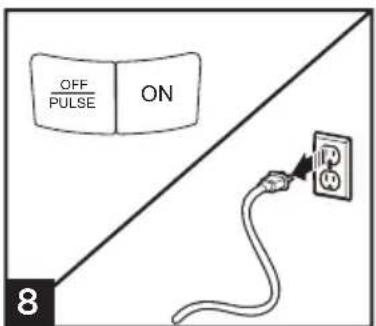
text_image
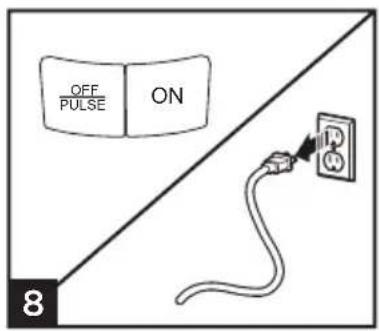
OFF /PULSE ON 8When finished, press the OFF button and unplug.
WARNING!
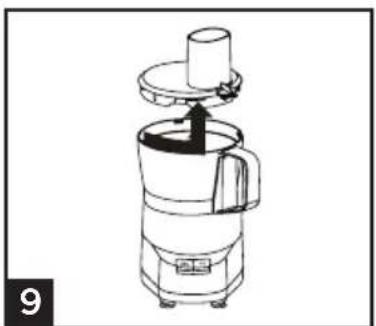
Hazard: Always unplug unit before removing lid.
natural_image
Line drawing of a blender with a lid and handle, showing internal components (no text or symbols)Always remove lid before removing bowl to avoid possible damage to the appliance.
INSTRUCTIONS FOR USE
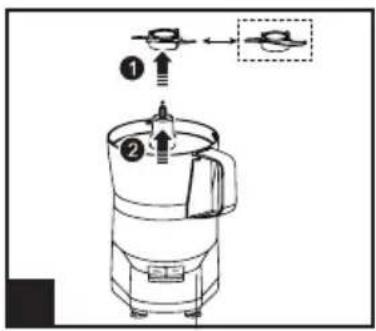
text_image
Diagram of a mechanical device with labeled parts and directional arrows indicating assembly or operationCarefully remove blade from shaft.
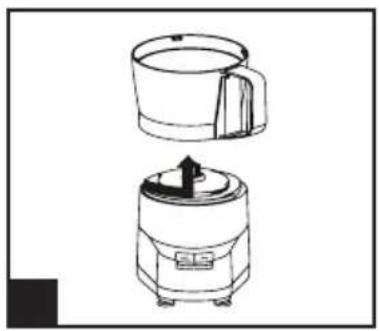
natural_image
Two line drawings of a kitchen appliance, one showing a lid and the other with a handle and arrow (no text or symbols)Unlock bowl by turning counterclockwise and lift off motor clutch.
WARNING!
Hazard: Always unplug unit before removing lid
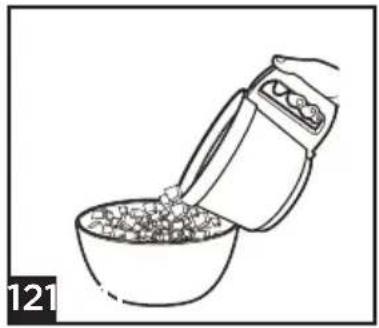
natural_image
Line drawing of a hand pouring granular material into a bowl (no text or symbols)HOW TO USE THE SHREDDING DISC
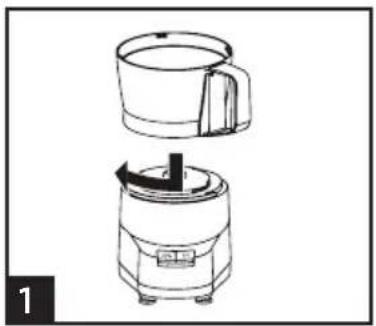
natural_image
Line drawing of a kitchen appliance with a lid and side view showing internal components (no text or symbols)Align bowl and base. Turn bowl clockwise to lock into place.
NOTE: Unit will not work unless bowl is locked.
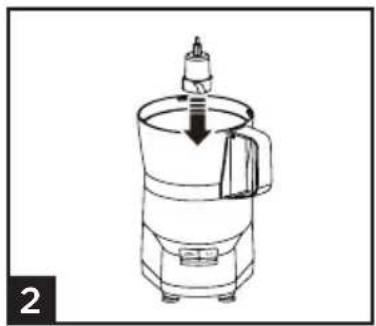
natural_image
Line drawing of a mechanical device with a downward arrow indicating motion or force (no text or symbols)Place Blade shaft in the middle of the bowl.

natural_image
Line drawing of a kitchen appliance with a lid and base, showing internal components and a small inset item (no text or symbols)A: Slide the desired cutter in the inner edge of the cutting disc. Place the cutter down until it locks in place.
B: Then place the cutting disk onto the shaft.
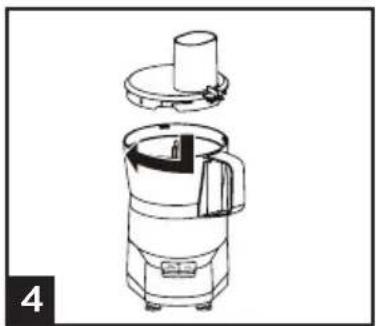
natural_image
Line drawing of a kitchen appliance with lid and side panel (no text or symbols)Align lid and bowl.
Turn lid clockwise to lock into place.
NOTE: Unit will not work unless lid is locked.
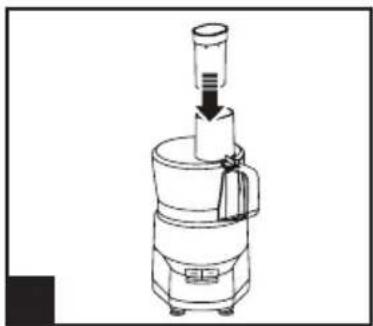
natural_image
Line drawing of a blender with a handle and spool, no text or symbols presentCut food to fit food chute.
Place food into the feeding chute. Use pusher to move food into the cutting disk.
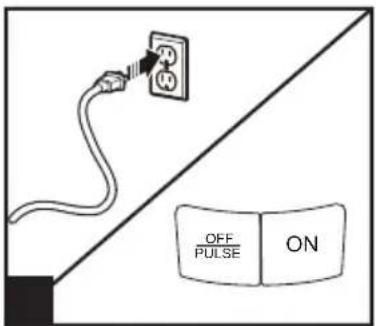
text_image
OFF /PULSE ONSelect ON, OFF/PULSE on control panel.
ON: Processor will run continuously.
OFF/PULSE: For instant on and off control.
Caution:
Always use food pusher to feed food into the chute.
Never push food through chute with fingers or other objects.
INSTRUCTIONS FOR USE
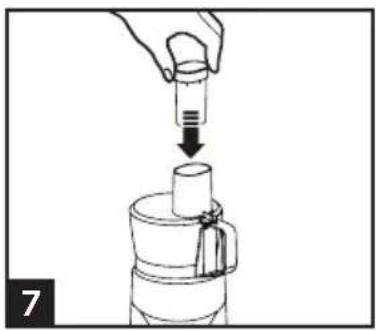
natural_image
Hand pouring liquid into a cylindrical container (no text or symbols visible)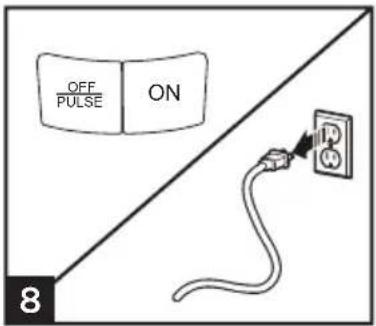
text_image
OFF /PULSE ON 8When finished, press the OFF button and unplug.
WARNING!
Hazard: Always unplug unit before removing lid.
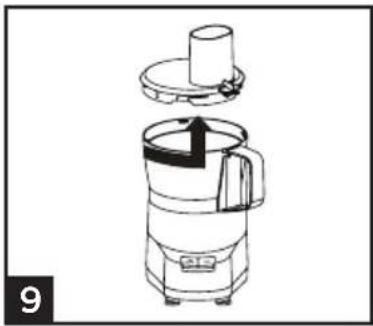
natural_image
Line drawing of a blender with lid and handle, showing internal components and a directional arrow (no text or symbols)Always remove lid before removing bowl to avoid possible damage to the appliance.
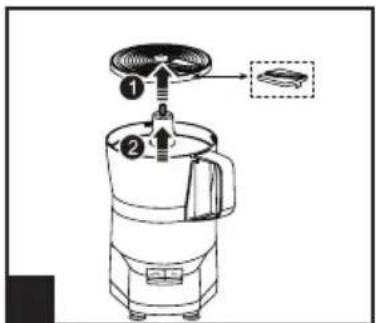
text_image
Diagram of a food processor with labeled parts and directional arrows indicating processing stepsCarefully remove blade from motor shaft.
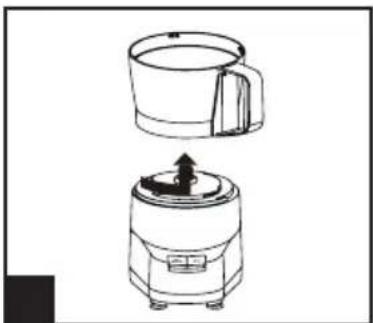
natural_image
Line drawing of two kitchen appliances with a handle and lid, showing front and side views (no text or symbols)Unlock bowl by turning counterclockwise and lift off motor clutch.
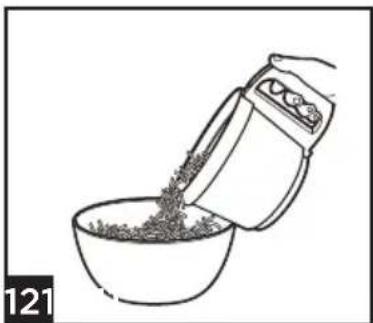
natural_image
Line drawing of a hand pouring granular substance into a bowl (no text or symbols)RECIPES
Before you start, make sure you pick your desired disc from following and assemble.
| Attachment | Food | Ounces (Max) | Processing Time | ||
 | S Blade |  onion onion | 17.0 oz | 5 sec | |
 meat meat | 17.0 oz | 5 sec | |||
 vegetables vegetables | 1.75 oz | 30 sec | |||
 nuts nuts | 8.75 oz | 60 sec | |||
 chocolate chocolate | 8.75 oz | 45 sec | |||
| Shredding Disc |  carrot carrot | 17.0 oz | 30 sec | ||
 cucumber cucumber | 14.0 oz | 30 sec | |||
 potato potato | 17.0 oz | 30 sec | |||
 onion onion | 10.5 oz | 30 sec | |||
 cheese cheese | 7.00 oz | 30 sec | |||
- Precut large ingredients into chunks that fit in the feeding tube.
CLEANING AND MAINTENANCE

Note
• Always disconnect the appliance from the power outlet before cleaning.
- Wipe base, control panel, and cord with a damp cloth or sponge. if necessary, use a mild nonabrasive cleanser.
- Wash the bowl, blades and lid immediately after use with warm, soapy water or in the dishwasher. Wipe off the base with a damp cloth - Do Not immerse in water or any other liquid.
- Do not use chemicals, steel wool or abrasive cleaners to clean the base unit to prevent scratching.

Caution:
• Electrical Shock Hazard.
- Disconnect power before cleaning.
- Do not immerse cord, plug, or base in any liquid.
- Any other service or maintenance should be performed by an authorized service representative.
TROUBLESHOOTING & WARRANTY
BEFORE YOU CALL FOR SERVICE
IF THE APPLIANCE FAILS TO OPERATE:
A) Check to make sure that the appliance is plugged in securely. If it is not, remove the plug from the outlet, wait 10 seconds and plug it in again securely.
B) Check for a blown circuit fuse or a tripped main circuit breaker. If these seem to be operating properly, test the outlet with another appliance.
IF NONE OF THE ABOVE SOLVES THE PROBLEM, CONTACT A QUALIFIED TECHNICIAN. DO NOT TRY TO ADJUST OR REPAIR THE APPLIANCE YOURSELF.
CUSTOMER SERVICE
IMPORTANT
DO NOT RETURN THIS Appliance TO THE STORE
If you have a problem with this appliance, please contact the W Appliance Co. Customer Satisfaction Center at 1-855-855-0294.
DATED PROOF OF PURCHASE, MODEL # AND DATE CODE REQUIRED FOR WARRANTY SERVICE
TROUBLESHOOTING & WARRANTY
TROUBLESHOOTING
- In instances such as abnormal noises, smell, smoke, etc., you should immediately cut off power and stop use.
- If the product is not working, please check if the power supply is connected, if the switch is put to the ON position and if fittings are installed in place.
- Troubleshoot your problem by using the chart below. If the appliance still does not work properly, contact W Appliance Co. customer service center or the nearest authorized service center. Customers must never troubleshoot internal components.
| Problem Possible Solution | |
| Unit does not operate on any speed or Pulse. | • Is the unit plugged in? Does the outlet work? • Are the bowl and lid locked in place? |
| Food is not sliced or shredded uniformly. | • Packing too much food in the food chute or pushing too hard on the food pusher may cause the processed food to be irregular sliced or shredded. Refer to the Food Processing Charts for recommended sizes and quantities. |
| Unit stops and will not come back on. | • Are the bowl and lid locked in place? They may have moved slightly during processing.• Is the outlet still working? Check it by plugging in a working lamp or other appliance. You may have overloaded the circuit and blown a fuse or tripped the circuit breaker.• Turn unit OFF/PUSH, allow to stand for 3 to 4 minutes, and then turn back ON. If none of these suggestions correct the problem, DO NOT attempt to repair the unit. Call the Customer Service number to get the name of your nearest Authorized Service Center. |
| Unit has a burning smell. | • There may be a residue left on the motor from the manufacturing process, causing a slight odor during initial use. This will go away. If a strong odor or any visible smoke appears, unplug unit IMMEDIATELY and call the Customer Service number. |
| Motor seems weak. | • Are you using the recommended food size and quantity to be processed? Refer to the Food Processing Charts for recommended food sizes and speeds. |
| Cheese is not shredding well. | • Cheese should be processed immediately after being removed from the refrigerator. Soft cheese like mozzarella must be placed in the freezer for 30 minutes prior to processing to ensure it is firm enough for shredding. |
| Vegetables are not shredding or slicing. | • Store vegetables with high water content in the refrigerator prior to processing. Room-temperature vegetables are less firm and do not perform as well. |
TROUBLESHOOTING & WARRANTY
LIMITED WARRANTY
Commercial Chef brand is used under license. Any repair, replacement, or warranty service, and all questions about this appliance should be directed to W Appliance Co. at 1 (855)
855-0294 from the USA or Puerto Rico.
W Appliance Co. warrants to the original purchaser that the appliance will be free from defects in material, parts and workmanship for the period designated for this appliance. The warranty commences the day the appliance is purchased and covers up to a period of 1 year (12 months) for labor/1 year (12 months) for parts (manufacturing defects only).
W Appliance Co. agrees that it will, at its option, replace the defective appliance with either a new or remanufactured appliance equivalent to your original purchase during the warranty period.
Exclusions: This warranty does not apply to the below:
-
If the appearance or exterior of the appliance has been damaged or defaced, altered or modified in design or construction.
-
If the appliance original serial number has been altered or removed or cannot be readily determined.
-
If there is damage due to power line surge, user damage to the AC power cord or connection to improper voltage source.
-
If damage is due to general misuse, accidents or acts of God.
-
If repair attempts are done by unauthorized service agents, use of parts other than genuine parts or parts obtained from persons other than authorized service companies.
-
On units that have been transferred from the original owner.
-
On appliances that have been purchased as refurbished, like new, second-hand, in a "As-Is" or "Final Sale" terms.
-
To appliances used in a commercial or rental setting.
-
To appliances used in settings other than ordinary household use or used other than in accordance with the provided instructions.
-
To damages for service calls for improper installations.
-
To glass parts and other accessory items that are included with the unit.
-
Transportation and shipping costs associated with the replacement of the unit.
-
Food loss for loss due to appliance failure or delay in service, repair or replacement.
-
Service calls to instruct you how to use your slow cooker.
-
Service calls to repair or replace the house fuse, reset the circuit breaker or correct the wiring in the house.
REPAIR OR REPLACEMENT AS PROVIDED UNDER THIS WARRANTY IS THE EXCLUSIVE REMEDY OF THE CUSTOMER; W Appliance Co. SHALL NOT BE LIABLE FOR ANY INCIDENTAL OR CONSEQUENTIAL DAMAGES FOR BREACH OF ANY EXPRESS OR IMPLIED WARRANTY ON THIS Appliance, EXCEPT TO THE EXTENT PROHIBITED BY APPLICABLE LAW. ANY IMPLIED WARRANTY OF MERCHANTABILITY OF FITNESS FOR A PARTICULAR PURPOSE ON THIS Appliance IS LIMITED TO THE DURATION OF THE WARRANTY.
Some states do not allow the exclusion or limitations of incidental or consequential damages, or limitations on how long the warranty lasts. In these cases the above exclusions or limitations may not apply to you. This warranty gives you specific legal rights and you may also have other rights which vary from state to state.
Obtaining Service: To obtain service, appliance literature, supplies or accessories please call
1 (855) 855-0294 to create a ticket for exchange/repair. Please make sure to provide the date of purchase, model number and a brief description of the problem. Our customer service representative will contact you or send detailed return instructions.
W Appliance Co. does not warrant that the appliance will work properly in all environmental conditions, and makes no warranty and representation, either implied or expressed, with respect to the quality, performance, merchantability, or fitness for a particular purpose other than the purpose identified within this user's manual. W Appliance Co. has made every effort to ensure that this user's manual is accurate and disclaims liability for any inaccuracies or omissions that may have occurred. Information in this user's manual is subject to change without notice and does not represent a commitment on the part of W Appliance Co.. W Appliance Co. reserves the right to make improvements to this user's manual and/or to the appliances described in this user's manual at any time without notice. If you find information in this manual that is incorrect, misleading, or incomplete, please contact us at 1 (855) 855-0294.
W Appliance Co.,
1356 Broadway
New York, NY 10018
Environmental protection
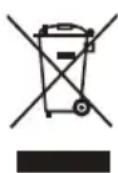
The appliance must not be disposed of with regular household waste. At the end of its service life, the appliance must be properly delivered to a collection point for the recycling of electrical and electronic equipment. By Collection and recycling of old appliances, you are making an important contribution to the conservation of our natural resources and provide for environmentally sound and healthy disposal.

Commercial
CHEF
© 2020 Commercial Chef is a W Appliance Company.
All Rights Reserved.

Commercial
CHEF™
natural_image
Line drawing of a mechanical device with no visible text or symbolsnatural_image
Line drawing of a kitchen appliance with a lid and side view showing the interior (no text or symbols)natural_image
Line drawing of a mechanical device with a downward arrow indicating motion or force (no text or symbols)natural_image
Line drawing of a coffee maker with a handle and spout, showing mechanical components (no text or symbols)natural_image
Line drawing of a hand placing food into a blender with a spoon (no text or symbols)natural_image
Line drawing of a kitchen blender with lid and side panel (no text or symbols)natural_image
Line drawing of a mechanical device with a cylindrical top and base, showing internal components (no text or symbols)natural_image
Line drawing of a kitchen blender with handle and lid (no text or symbols)text_image
Diagram of a mechanical device with labeled parts and directional arrows indicating assembly or operationnatural_image
Two line drawings of a kitchen appliance, one showing a lid and the other with a handle and arrow (no text or symbols)natural_image
Line drawing of a hand pouring granular material into a bowl (no text or symbols)natural_image
Line drawing of a kitchen appliance with a lid and side view showing internal components (no text or symbols)natural_image
Line drawing of a mechanical device with a downward arrow indicating motion or force (no text or symbols)natural_image
Line drawing of a portable kitchen appliance with a lid and base, showing internal components (no text or symbols)natural_image
Line drawing of a multi-tiered kitchen or oven with a lid and side panel (no text or symbols)natural_image
Line drawing of a blender with a handle and spout (no text or symbols)natural_image
Hand pouring liquid into a cylindrical container (no text or symbols visible)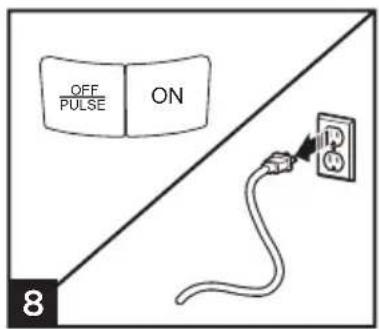
text_image
OFF /PULSE ON 10 8natural_image
Line drawing of a blender with lid and side panel, showing internal components (no text or symbols)text_image
Diagram of a food processor with labeled parts and a close-up view showing the component.natural_image
Two technical line drawings of a coffee maker with lid and side arm, showing front and side views (no text or symbols)natural_image
Line drawing of a hand pouring granular substance from a mixing bowl into a bowl (no text or symbols)RECETTES
natural_image
Line drawing of a coffee maker with lid and side arm (no text or symbols)natural_image
Line drawing of a kitchen appliance with a lid and side view showing the interior (no text or symbols)natural_image
Line drawing of a mechanical device with a downward arrow indicating motion or force (no text or symbols)natural_image
Line drawing of a coffee maker with a handle and spout, showing mechanical components (no text or symbols)natural_image
Line drawing of a hand placing food into a blender into a container (no text or symbols)natural_image
Line drawing of a coffee maker with lid and side cover, no text or symbols presentNOTA: Unit will not work unless lid is locked.
natural_image
Line drawing of a mechanical device with a cylindrical component inserted into a housing (no text or symbols)natural_image
Line drawing of a kitchen blender with a handle and lid, showing internal components (no text or symbols)text_image
Diagram of a mechanical device with labeled parts and directional arrows indicating assembly or operationnatural_image
Two line drawings of a kitchen appliance, one showing a lid and the other with a handle and arrow (no text or symbols)natural_image
Line drawing of a hand pouring granular material into a bowl (no text or symbols)natural_image
Line drawing of a kitchen appliance with a lid and side view showing internal components (no text or symbols)natural_image
Line drawing of a kitchen appliance with a chimney and lid, no text or symbols presentnatural_image
Line drawing of a kitchen appliance with a lid and base, showing internal components and a close-up of the lid (no text or symbols)natural_image
Technical line drawing of a mechanical device with lid and base plate (no text or symbols)natural_image
Line drawing of a mechanical device with a cylindrical component inserted into a housing (no text or symbols)natural_image
Illustration of a hand pouring liquid into a cylindrical container (no text or symbols)