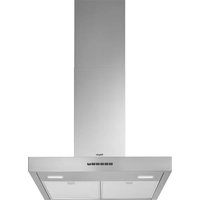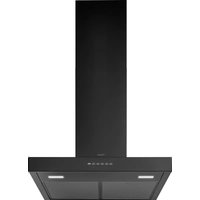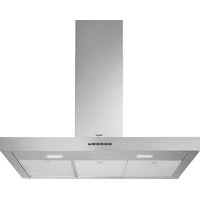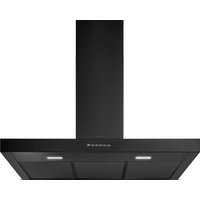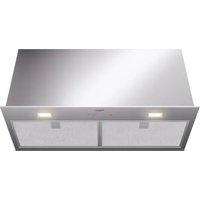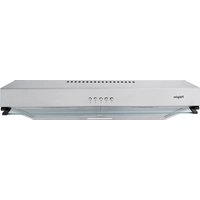
OWA207RVS - Basket Pelgrim - Free user manual and instructions
Find the device manual for free OWA207RVS Pelgrim in PDF.


User questions about OWA207RVS Pelgrim
0 question about this device. Answer the ones you know or ask your own.
Ask a new question about this device
Download the instructions for your Basket in PDF format for free! Find your manual OWA207RVS - Pelgrim and take your electronic device back in hand. On this page are published all the documents necessary for the use of your device. OWA207RVS by Pelgrim.
USER MANUAL OWA207RVS Pelgrim
Instructions for use Cooker hood
natural_image
Diagram of a pipe joint with directional arrows indicating flow or movement (no text or symbols)natural_image
Diagram of a mechanical assembly with rotating components and directional arrows (no text or symbols)flowchart
graph TD
    A["Circle 0"] --> BCDE["Circle 1"]
    BCDE --> Sun["Sun icon"]
natural_image
Diagram showing a hand pressing down on a device with an arrow indicating rotation (no text or symbols present)text_image
Diagram showing three steps of a device with warning indicators and labeled componentsnatural_image
Three abstract geometric shapes: a flat panel, a divided rectangle with scissors, and a rectangular frame (no text or symbols)text_image
Technical diagram showing a mechanical assembly with labeled components and directional arrows, including a magnified inset of cylindrical components.Inbouwmaten
text_image
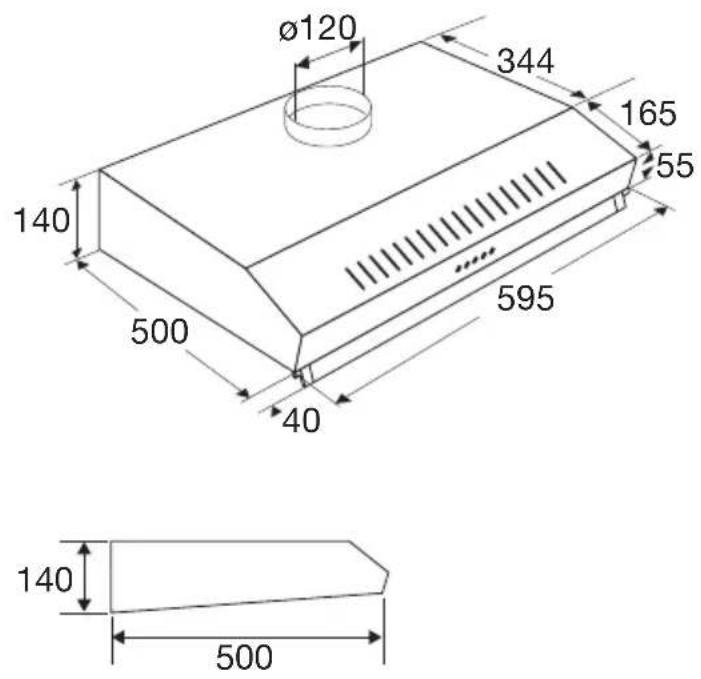
Ø120 344 165 140 500 595 55 40 140 500natural_image
Simple 3D diagram of a rectangular box with labeled points A, A', C, D and a central circular hole (no text or symbols beyond labels)text_image
Diagram illustrating the process of a waste sorting system with labeled components and a 1-year cycle indicator.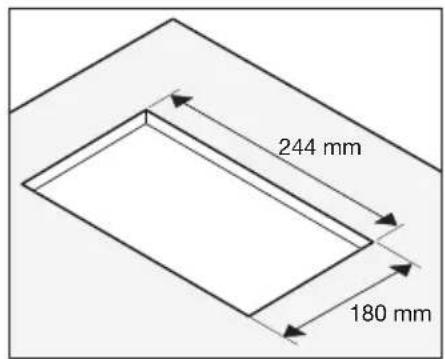
text_image
244 mm 180 mm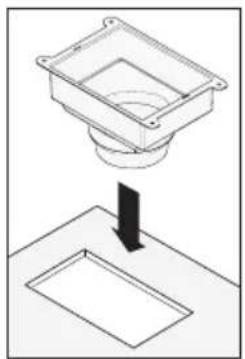
natural_image
Diagram showing a square container being dropped into a rectangular tray, with no text or symbols present.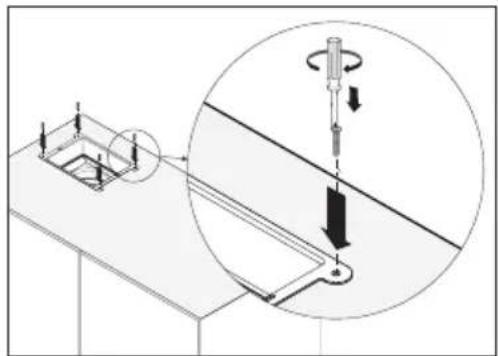
natural_image
Technical diagram showing a mechanical assembly with an inset close-up of a tool and a magnified view of the component (no text or symbols present)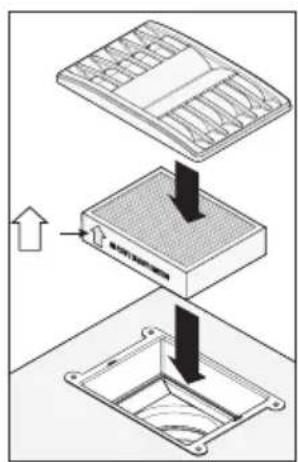
text_image
Diagram showing three steps of a device assembly with arrows indicating process flow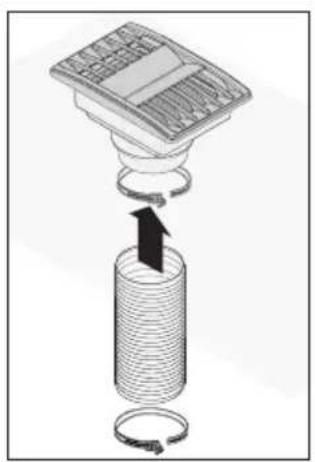
natural_image
Diagram of a mechanical assembly with a cylindrical component and a top panel, showing internal components (no text or symbols)
Let op!
natural_image
3D diagram of a rectangular block with two labeled points A and B, showing internal structure (no text or symbols beyond labels)Tegen de muur
text_image
QR code image containing encoded data, no visible human-readable texttext_image
Prohibition sign for a trash bin with crossed-out lines and a blank rectangular basenatural_image
Diagram of a pipe joint with directional arrows indicating movement or force (no text or symbols)natural_image
Diagram of a mechanical assembly with rotating components and directional arrows (no text or symbols)- Application de recirculation.
natural_image
Illustration of a hand pressing down on a laptop screen with an arrow indicating rotation (no text or symbols)text_image
Diagram showing three steps of a device or device processing process with arrows indicating direction and transformation.natural_image
Blank white rectangular frame with gray border (no text or symbols)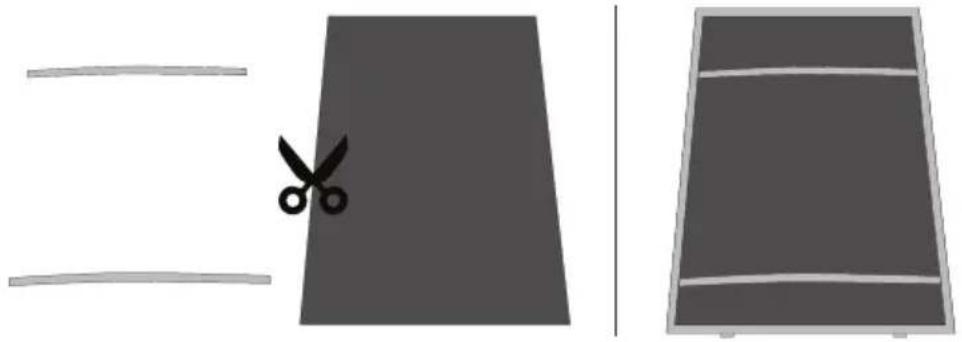
natural_image
Simple diagram showing a pair of scissors cutting a flat surface, with no text or symbols present.text_image
Technical diagram showing a mechanical assembly with labeled components and directional arrows, including a magnified inset of cylindrical components.text_image
C A' D A ASous un placard de cuisine
text_image
Diagram illustrating the process of a waste sorting system with labeled components and a 1-year cycle indicator.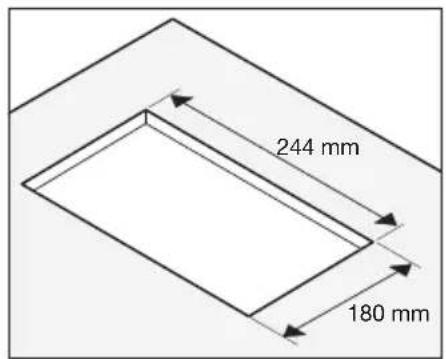
text_image
244 mm 180 mm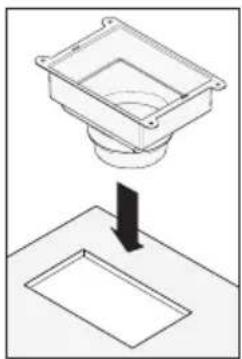
natural_image
Diagram showing a mechanical component being lifted by a downward arrow, with no visible text or symbols.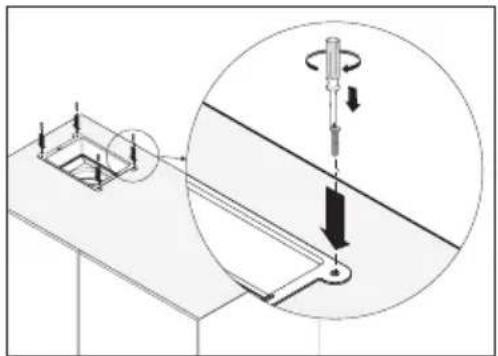
natural_image
Technical diagram showing a mechanical assembly with an inset close-up of a tool interacting with a bracket (no text or symbols present)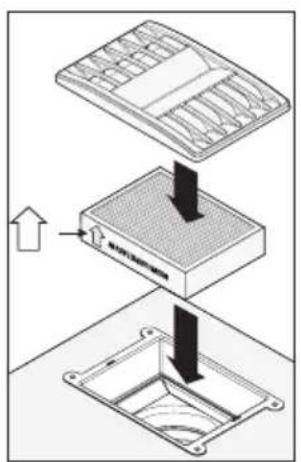
text_image
Diagram showing three steps of a device or device with downward arrows indicating process flow, including a labeled component 'WAN-10000'.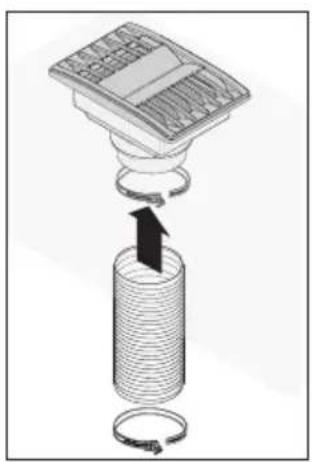
natural_image
Diagram of a mechanical assembly with a cylindrical component and a top panel, showing internal components and motion direction (no text or symbols)
Attention!
text_image
QR code image containing encoded data, no visible human-readable texttext_image
Prohibition sign with crossed-out trash bin and no text or symbolsnatural_image
Diagram of a pipe joint with directional arrows indicating flow or movement (no text or symbols)natural_image
Diagram of a mechanical assembly with rotating components and directional arrows (no text or symbols)natural_image
Illustration of a hand pressing down on a device with a magnified inset showing a button (no text or symbols)text_image
Diagram showing three steps of a device or device processing process with arrows indicating direction and movement.natural_image
Blank white rectangular frame with gray border (no text or symbols)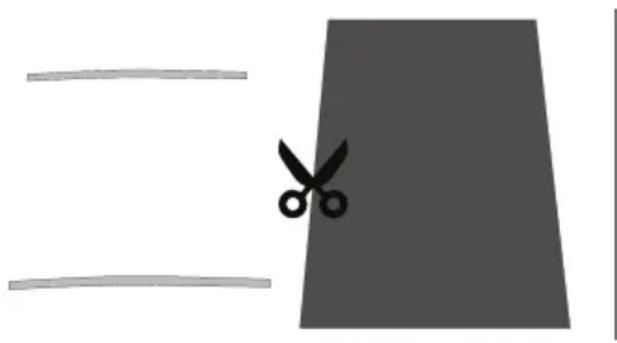
natural_image
Simple diagram showing a pair of scissors cutting a gray rectangular shape (no text or symbols)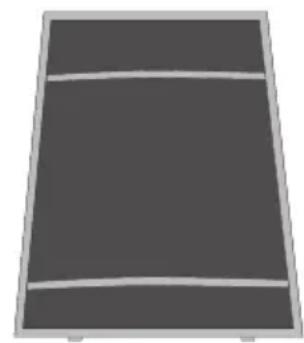
natural_image
Simple gray rectangular shape with two horizontal white lines on top and bottom, no text or symbols present.text_image
Technical diagram showing a mechanical assembly with labeled components and directional arrows, including a magnified inset of cylindrical components.Einbaumaße
text_image
Ø120 344 165 140 500 595 55 40 140 500Erforderlicher Freiraum
natural_image
Simple 3D diagram of a rectangular box with labeled points A, A', C, D and a central circular hole (no text or symbols beyond labels)text_image
Diagram illustrating the process of a recycling or waste sorting system, showing components like a bed, coiled spring, and a bin with a 1-year cycle indicator.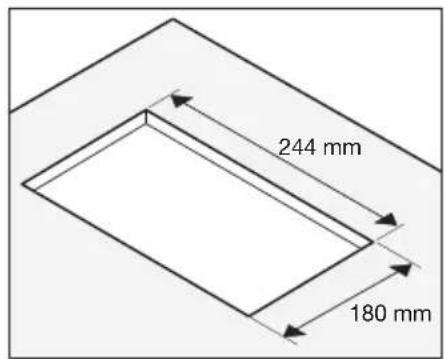
text_image
244 mm 180 mm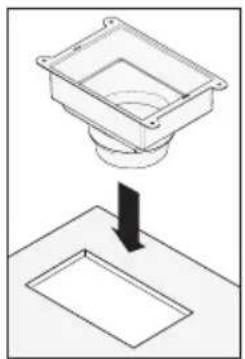
natural_image
Diagram showing a square container being dropped into a rectangular tray, with no text or symbols present.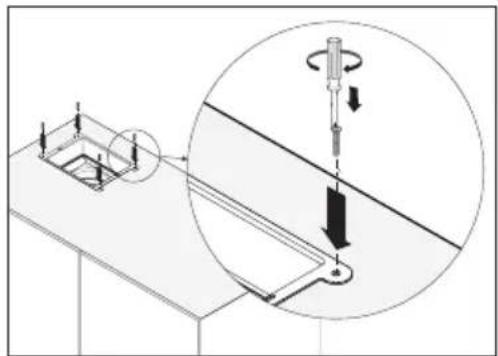
natural_image
Technical diagram showing a mechanical assembly with an inset close-up of a component being inserted into a bracket (no text or symbols present)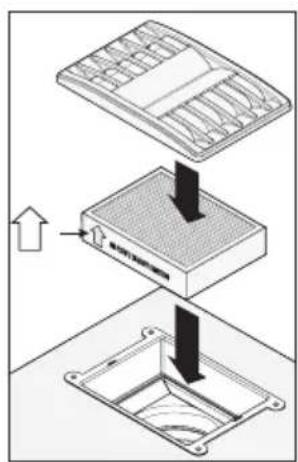
text_image
Diagram showing three steps of a device assembly with arrows indicating process flow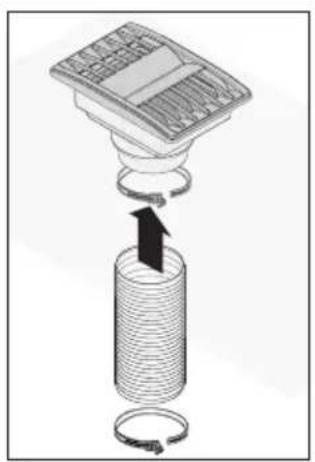
natural_image
Diagram of a mechanical assembly with a cylindrical component and a top panel, showing internal components (no text or symbols)
Achtung!
text_image
QR code image containing encoded data, no visible human-readable texttext_image
Prohibition sign with crossed-out trash bin and no text or symbols| Introduction | 4 | |
| Description | 4 | |
| Extraction systems 5 |
Use
| Controls | 6 |
Maintenance
| Cleaning | 7 | |
| Grease filters 8 | ||
| Odour/fine dust filter 9 | ||
| Lighting | 10 |
Faults
| What should I do if... 11 |
| Faults table 11 |
Installation
| General | 12 | |
| Electrical connection 12 | ||
| Preparation | 13 | |
| Built-in dimensions 14 | ||
| Mounting | 14 |
Matching accessories
| Matching accessories 16 | |
| Appendice | |
| Disposal of appliance and packaging 17 |
Introduction
Congratulations on your choice of this appliance. This product was designed with simple operation and optimum comfort in mind.
This manual describes the best way to use this appliance. In addition to information on operation, you will also find background information that may be useful during the use and maintenance of the appliance.

Please read the separate safety instructions carefully before using the appliance.
Read this manual before using the appliance and keep it in a safe place for future use.
Description
flowchart
graph TD
    A["A"] --> B["0"]
    BCDE["BCDE"] --> D["1"]
    BCDE --> E["2"]
    BCDE --> F["3"]
    BCDE --> G["Sun"]
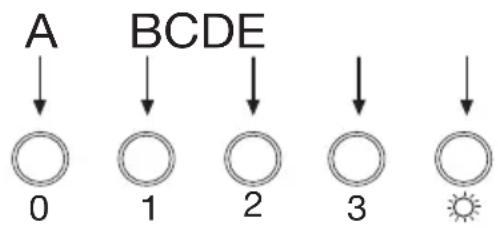
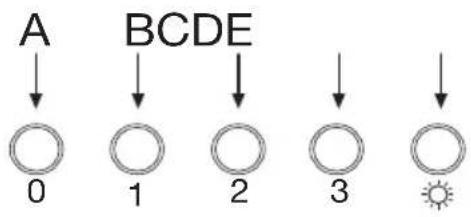
A Switch off
B Fan position 1
C Fan position 2
D Fan position 3
E Lighting
Extraction systems

natural_image
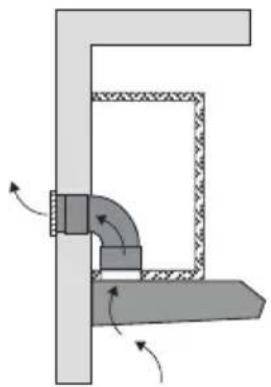
Technical diagram of a pipe joint with directional arrows indicating movement (no text or symbols)This appliance can be connected in two ways.
- Exhaust to the outside.
The cooking air drawn in is discharged to the outside via a drain hose. Make sure to install a shut-off valve in the drain to prevent cold air from entering through the drain hose. This appliance can be freely hung on the wall in this way, or mounted under a cabinet.

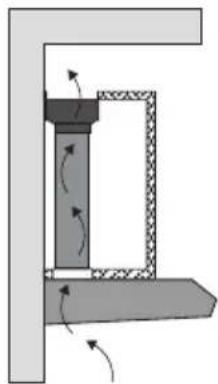
natural_image
Diagram of a mechanical assembly with rotating components and directional arrows (no text or symbols)- Recirculation application.
In this application, cooking air is not exhausted to the outside. Contaminated cooking air is filtered and blown back into the kitchen. This requires an additional odour/fine dust filter, which should be replaced regularly for optimal operation.
Attention! The odour/fine dust filter must be ordered separately.
Controls
flowchart
graph TD
    A["A"] --> 0["0"]
    BCDE["BCDE"] --> 1["1"]
    BCDE --> 2["2"]
    BCDE --> 3["3"]
    BCDE --> a["Sun"]
Switching fan on and off
-
Press the speed button B, C or D The extractor hood switches on in the corresponding position.
-
Press the off button A. ▶The fan will switch off.
Switching lighting on and off
- Press the lighting button E. ▶The lighting switches on.
- Press the lighting button E again. ▶The lighting switches off.
Cleaning

Note! Before each servicing, first disconnect the cooker hood by removing the plug from the wall socket or by switching off the main switch of the residence.

The cooker hood should be cleaned regularly (at least with the same frequency with which you carry out maintenance of the fat filters) internally and externally. Do not use abrasive products. Do not use alcohol!

Attention! Failure to carry out the basic cleaning recommendations of the cooker hood and replacement of the filters may cause fire risks. Therefore, we recommend observing these instructions. The manufacturer declines all responsibility for any damage to the motor or any fire damage linked to inappropriate maintenance or failure to observe the above safety recommendations.

Cooker hood
Clean the cooker hood with soapy water and a soft cloth. Then wipe with clean water to rinse. Do not use aggressive cleaning agents such as soda. The cooker hood paintwork will stay looking nice if you wax it occasionally.

Stainless steel canopy hoods
Do not use any sort of scourer. Treat with a stainless steel care product and polish with the structure of the stainless steel.

Metal grease filters
These must be cleaned once a month (or when the filter saturation indication system – if envisaged on the model in possession – indicates this necessity), using non aggressive detergents, preferably by hand or in the dishwasher, which must be set to a low temperature and a short cycle. The openings must be placed downwards to let the water run out of the filters. The cleaning agents will make the aluminium filter turn dull, this is normal.
Grease filters

Regular filter cleaning ensures optimal performance and prevents release of cooking odours when the appliance is not in use.
Clean the grease filters at least once a month. During cleaning, the aluminium parts of the filters may become dull as a result of the cleaning agents used, particularly when placed in the dishwasher. This is normal.
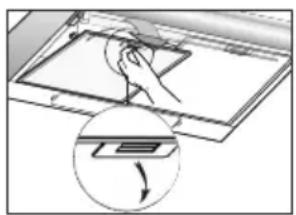
natural_image
Illustration of a hand pressing down on a laptop screen with an arrow indicating rotation (no text or symbols)Removing the filter cassette
- Switch off the appliance and the lighting.
- Using the recess, press the filter backwards and tip it downwards at the front.
- Remove the filter from the hood.
Cleaning
- The filters can be easily cleaned by hand. Clean the filters in water and washing-up liquid and rinse them. Afterwards, let the filters drain and dry thoroughly before replacing them.
- You can also clean the filters in the dishwasher if necessary. Afterwards, let the filters drain and dry thoroughly before replacing them.
- The underside of the extractor hood can be cleaned with a mild cleaning agent and a moist cloth.
Reinstalling filter cassette
Make sure the filters are thoroughly dry before replacing them. The filter has to be installed with the locking mechanism at the front.
- Open the locking mechanism. This pulls the projections at the front of the filter inwards. When installing the filters hold the locking mechanism in this position.
- Push the projections at the back of the filter into the openings provided for this purpose at the rear of the extractor hood.
- Hinge the filter upwards.
- Release the locking mechanism. The projections at the front of the filter move outwards into the openings provided for this purpose at the front of the extractor hood.
Odour/fine dust filter
text_image
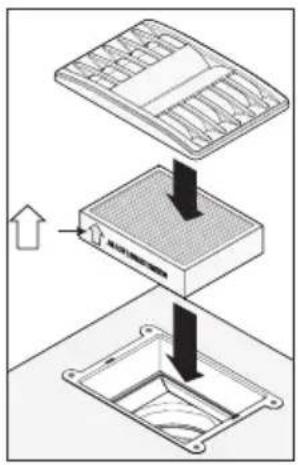
Diagram showing three steps of a device or device processing process with arrows indicating direction and movement.Inserting and replacing the filter in the filter box
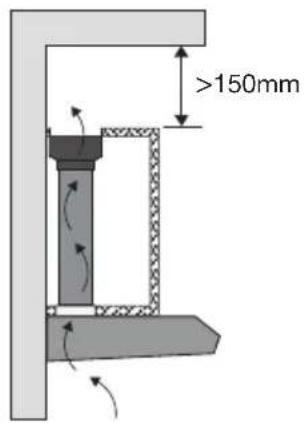
- When the appliance is used as a recirculation extractor, you use the separate filter box HR0001, which is installed in the upper cabinet.
- With the filter box, your extractor hood delivers optimum performance. The filter used cleans cooking vapours of odours and fine dust.
-
You only need to change the filter once a year.
-
Remove the cover grid by pulling it gently.
- Remove the old filter from the box.
- Insert the new filter into the box. When doing so, pay attention to the arrow on the side. This is the direction of the air flow.
- Place the cover grid back on the filter holder.
Alternative: Inserting and replacing an internal carbon filter
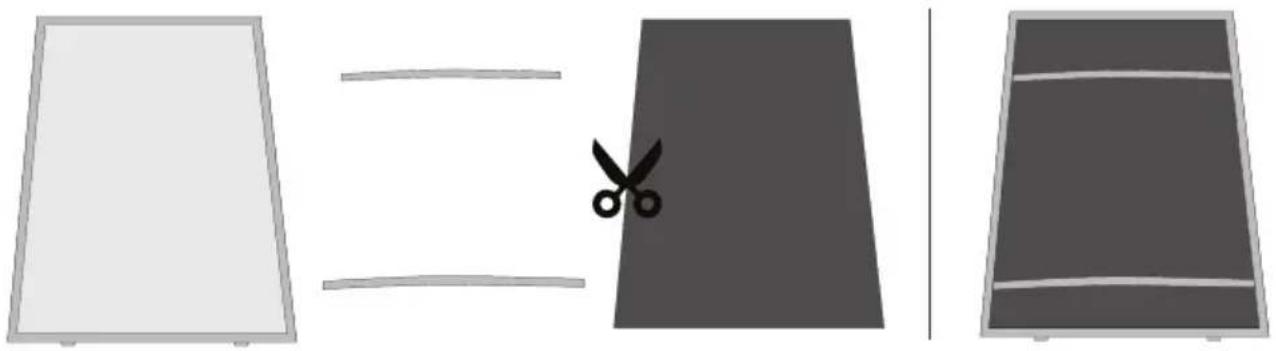
- If the appliance is not mounted under an overhead cupboard but freely suspended on a wall and cannot drain to the outside, you will alternatively need to install an internal filter to neutralise cooking odours.
- Cut the filter material to fit the filter and attach it to the grease filter frame using the two brackets provided as shown in the drawing.
natural_image
Three abstract geometric shapes: a flat panel, a trapezoidal plate with scissors cut out, and a rectangular frame with horizontal stripes (no text or symbols)- Note that this application causes a sharp increase in noise and significantly reduces the performance of the appliance.
- The internal filter should be replaced every 3 months as it becomes saturated sooner.

Important:
- Filter saturation depends on the intensity of use, cooking methods and the regularity with which the grease filters are cleaned.
- The applied odour filters are for single use and should be disposed of via the residual waste.
Lighting

This hood is fitted with a light system. This light system has to be replaced by an authorized technician. Do not attempt to replace it by yourself.

The lamp in this household appliance is only suitable for illumination of this appliance. The lamp is not suitable for household room illumination.
What should I do if...
If the appliance does not work properly, this does not always mean that it is defective. Try to deal with the problem yourself first. Phone the service department if the advice given below does not work.

Attention!
Disconnect the appliance from the mains before starting the repair, preferably by removing the plug from the socket or setting the main switch to zero.
Faults table
| Symptom Possible cause Solution | ||
| Lighting is not functioning. Light system defective. The light system has to be replaced by an authorized technician. Do not attempt to replace it by yourself. | ||
| Extractor hood makes a noise. | Discharge too long or too many bends in the duct. | Change the discharge ducting (see installation guide). |
| Internal odour/fine dust filters inserted. | For recirculation, preferably use the starter set HR0001. | |
| No extraction. Flap or controle defective. Phone the service department. | ||
General
This appliance should be connected to the power supply by a recognized fitter who is familiar with, and works according to the correct safety regulations. This appliance meets the European requirements.
Important that you know:
- The minimum distance between the supporting surface for the cooking vessels on the gashob and the lowest part of the range hood must be not less than 65 cm. For use with an electric, ceramic or induction hob, this distance must be at least 55 cm.
- If the cooker hood is to be fitted to an existing duct no other appliances, such as a geyser or heater, may be connected to that same duct.
- Consider local regulations with respect to the ventilation of gas appliances.
- The shorter the duct, and the fewer the bends in it, the better the cooker hood will work.
- Before you start drilling check that there are no installation cables present.
- The connecting pipe for the cooker hood has a diameter of 125 mm. It is best also to use a flue pipe of the same diameter.
- The installation material supplied with this range hood is designed for fixing to reinforced concrete or masonry walls. For some types of walls you may need special plugs and screws.
- Use if supplied, the mounting template for marking the mounting holes.
Electrical connection

The appliance has been manufactured as a class II, therefore no earth cable is necessary.
Make sure the supply voltage ratings correspond with those stated on the appliance data plate. The connection to the mains is carried out as follows:
$$ B R O W N = \text { phase L } $$
$$ \text { BLUE } = \text { phase N } $$
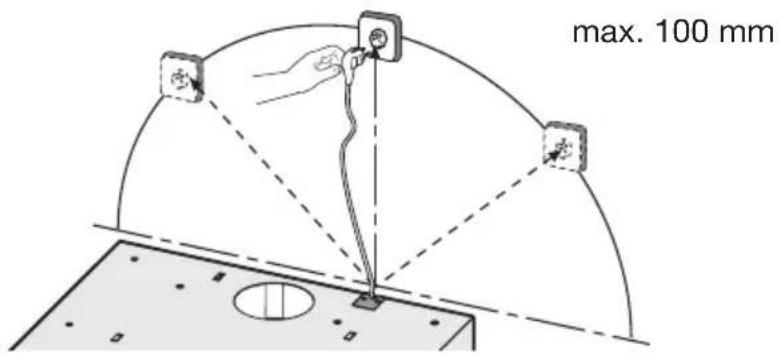
This canopy hood has been provided with a power plug. When installing the hood, make sure that this plug remains accessible. We recommend installing the wall socket out of view, behind the chimney cover.
Attention:

If you want to make a fixed connection, ensure that a multi-pole switch with a distance between contacts of 3 mm is installed in the supply cable.
text_image
max. 100 mmPreparation
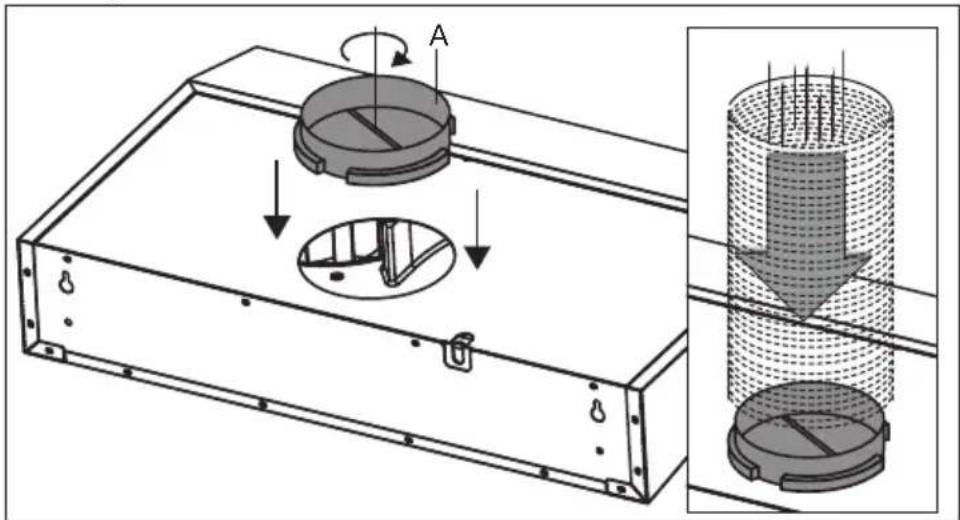
Attach the supplied flange (A) to the hood and fit the exhaust duct to the flange.
text_image
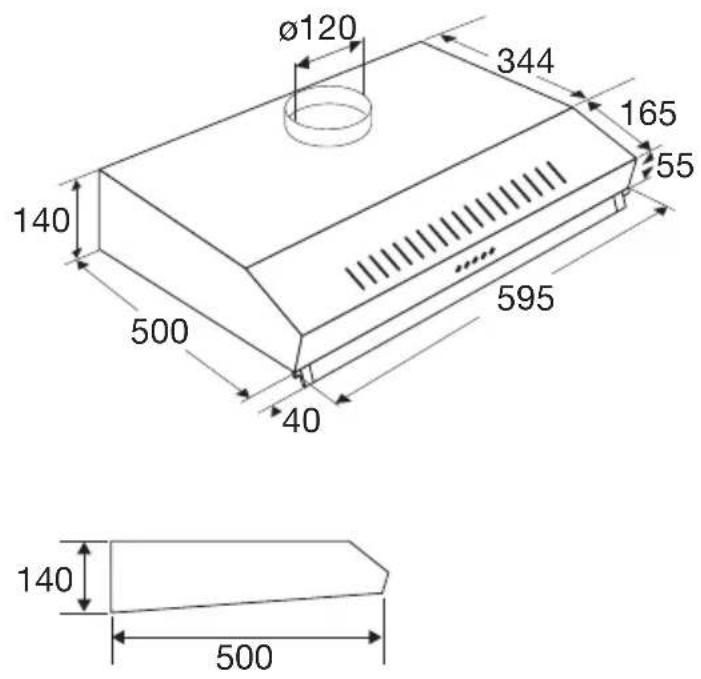
Technical diagram showing a mechanical assembly with labeled components and directional arrows, including a magnified inset of cylindrical components.Built-in dimensions
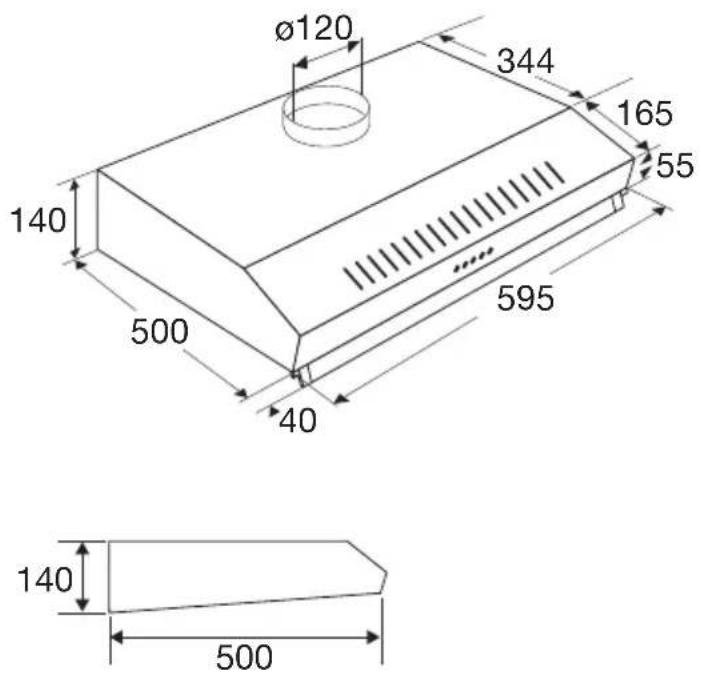
text_image
Ø120 344 165 140 500 595 55 40 140 500Clearance required
The distance between the underside of the extractor hood and the hob should be at least 550 mm. For gas hobs, this distance should be a minimum of 650 mm.
Mounting

text_image
C A D A ABelow a kitchen cupboard
- Use the template supplied to mark the positions of the 4 fixing holes (A), the opening for the power cable (C) and the opening for the exhaust (D) on the underside of the kitchen cupboard.
- Drill the holes.
- Pull the power lead upwards through the hole provided and push the flue ring through the opening.
- Fasten the hood to the bottom of the kitchen cupboard using the screws supplied with the kitchen cupboard.
- Connect the exhaust duct to the exhaust ring.
- Put the plug into the socket.

Mounting the HR0001 starter set for recirculation
text_image
>150mm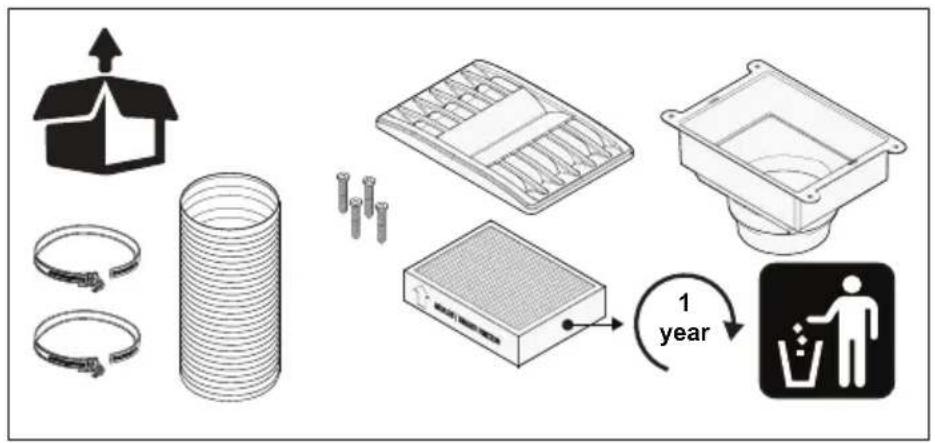
text_image
Diagram illustrating the lifecycle of a plastic waste disposal process, showing stages from raw material to disposal with a 1-year cycle indicated.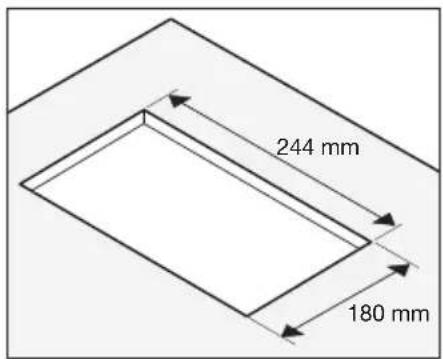
text_image
244 mm 180 mm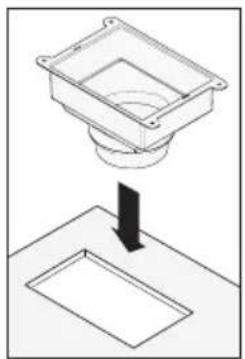
natural_image
Diagram showing a square container being dropped into a rectangular tray, with no text or symbols present.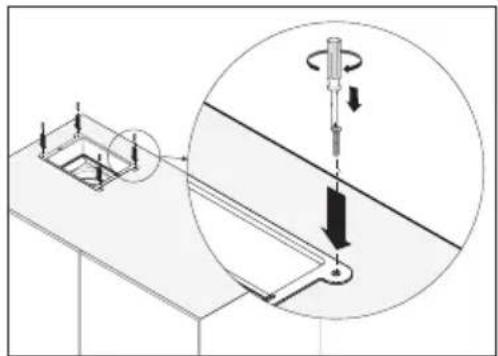
natural_image
Technical diagram showing a mechanical assembly with an inset close-up of a tool and a magnified view of the component (no text or symbols present)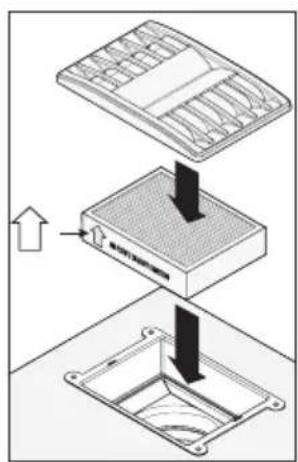
text_image
Diagram showing three steps of a device assembly with arrows indicating process direction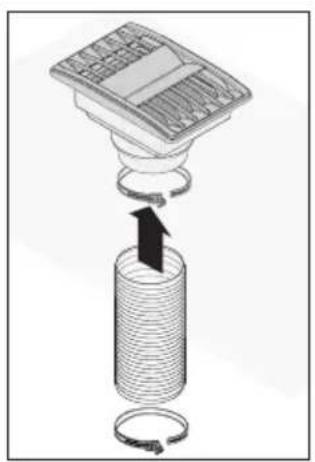
natural_image
Diagram showing a mechanical assembly with a spring and coiled cable, no text or symbols present
Attention!
DO NOT flip the switch for recirculation on the motor; the discharge remains upwards.
text_image
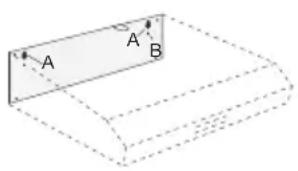
A A BAgainst the wall
- Remove the filters from the extractor hood.
- Hold the hood against the wall.
- Working through the hood, draw the mounting holes (A) and the hole to secure the hood (B).
- Drill the holes and push the wall plugs supplied into the holes.
- Insert the screws into the 2 mounting holes (A).
NB: screw the screws in until 1 cm is left protruding from the wall. - Hang the hood on the 2 mounting screws.
- Tighten the mounting screws.
- Tighten the locking screw.
- Connect the flue pipe to the flue ring.
- Put the plug into the socket.

For recirculation
To blow out the airflow through the front grille: place the cover plate at the top and flip the internal switch on the motor to recirculation mode.
Matching accessories
- HR0001 starter set with connection material for recirculation including filter for odour/fine dust.
- HF3001 Odour/fine dust filter for use in the starter set (annually replaced).
Alternative (only for wall-mounted installation)
• HF2028 filter mat (replacement every 3 months).
Scan the QR code to order the above accessories for your appliance.

text_image
QR code image containing encoded data, no visible human-readable textDisposal of the appliance and packaging
Sustainable materials have been used during the manufacture of this appliance. This appliance must be disposed of responsibly at the end of its service life. Ask your local authorities for more information about how to do this.
The appliance packaging is recyclable. The following may have been used:
- cardboard;
• polyethylene film (PE).
Dispose of these materials in a responsible manner and in accordance with government regulations.

Warning! Never allow children to play with packaging material due to the danger of injury or suffocation. Store the packaging material safely or dispose of it in an environmentally-friendly way.
text_image
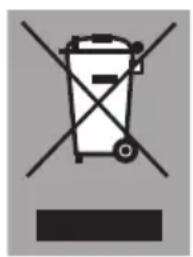
Prohibition sign with a trash bin and crossed-out lines, indicating no waste or discharge.The product has been marked with a crossed-out dustbin symbol to remind you of the obligation to dispose of electrical household appliances separately. This means that the appliance may not be included with normal domestic refuse at the end of its service life. The appliance must be taken to a special municipal centre for separated waste collection or to a dealer providing this service.
A separate collection of household appliances helps to prevent any potential negative impact on the environment and on human health caused by improper disposal. It ensures that the materials of which the appliance is composed can be recovered to obtain significant savings in energy and raw materials.

Declaration of conformity
We hereby declare that our products satisfy the applicable European directives, orders and regulations, as well as the requirements stated in the referenced standards.
Op onze website kunt u de meest recente versie van de gebruiksaanwijzing vinden. Vous pouvez trouver la version la plus récente de le mode d'emploi sur notre site Web. You can find the most recent version of the instructions for use on our website. Die neueste Version der Bedienungsanleitung finden Sie auf unserer Website.
www.pelgrim.nl
www.pelgrim.be

961435
Pelgrim