
H1087 - Intercom Emos - Free user manual and instructions
Find the device manual for free H1087 Emos in PDF.

| Product Type | Audio kit for doorbell / Wireless intercom |
| Brand | Emos |
| Model | H1087 |
| Indoor unit power supply | 18650 3.7 V / 2200 mAh battery, rechargeable via USB-C (5 V / 1 A) |
| Outdoor unit power supply | 18650 3.7 V / 2200 mAh battery |
| Lock switch power supply | DC 8–12 V |
| Communication frequency | 433 MHz |
| Protection rating (outdoor unit and switch) | IP44 |
| Maximum number of outdoor units | 2 |
| Maximum number of indoor units | 3 |
| Main functions | Two-way communication, remote unlocking, ringer, melody selection (8 options), volume adjustment (4 levels), intercom between indoor units |
| Adjustable closing time | 1, 3, 5 or 10 seconds |
| Battery type | Lithium-ion 18650 (2 included) |
| Package contents | Indoor unit, outdoor unit, lock switch, rain shield, USB-C cable, mounting hardware, manual |
| Maintenance and cleaning | Clean with a dry cloth; do not immerse in water |
| Safety | Do not disassemble the device; use only specified power source; repair by qualified technician |
| Spare parts and repairability | Replaceable 18650 batteries; repair by qualified technician only |
| General information | Compliant with EU directive 2014/53; general authorization V0-R/10/07.2021-8 |
Frequently Asked Questions - H1087 Emos
User questions about H1087 Emos
0 question about this device. Answer the ones you know or ask your own.
Ask a new question about this device
Download the instructions for your Intercom in PDF format for free! Find your manual H1087 - Emos and take your electronic device back in hand. On this page are published all the documents necessary for the use of your device. H1087 by Emos.
USER MANUAL H1087 Emos
2
3
GB | Audio Door Phone Set
Safety instructions and warnings

Read the instructions before using the device.

Observe the safety instructions in this manual.
Security risk:
- Do not disassemble, open or break the batteries.
Electrical risk:
- Improper installation or use can cause electric shock or fire.
- Read the instructions before installation and take into account the specific characteristics of the space and location where the product will be installed.
- Do not open, disassemble, modify or alter the device unless specifically instructed to do so in the instructions.
- Any unauthorized opening or repair will result in the loss of all liability, replacement rights and warranties.
• Always use only the original power cord.
- The product can only be supplied with a voltage that corresponds to the information on the product label.
- Only a qualified technician may service this product to reduce the risk of electric shock.
- Disconnect the product from the power supply before cleaning.
- The product must not be used by persons (including children) whose physical, sensory or mental abilities or lack of experience and knowledge prevent them from using the product safely without supervision or instruction.
- Cleaning and user maintenance must not be carried out by unsupervised children.
- Do not immerse the product in water or other liquids.
Risk of fire:
- Do not use the product if any part is damaged or defective. Replace the damaged or defective product immediately.
- Risk of suffocation:
- Do not let children play with the packaging material. Keep the packaging material out of the reach of children.
• Risk of chemical burns: - Do not expose cells or batteries to mechanical stress.
Risk of tripping:
- The power cord and the product must always be positioned so that it does not interfere with normal walking areas.
- Risk of damage to the product:
- Use the product only as described in this document.
- Prevent the product from falling and protect it from impact.
- Do not use aggressive chemical cleaning agents when cleaning the product.
- Supervise children so that they do not play with the product.
EMOS Ltd. hereby declares that the radio equipment type H1087 complies with Directive 2014/53/EU. The full text of the EU Declaration of Conformity is available on the following website http://www.emos.eu/download.
The equipment can be operated on the basis of general authorisation No. VO-R/10/07.2021-8 as amended.
Contents of the package
| 1× Indoor unit | Lock switch |
| 1× outdoor unit | Installation material |
| 2× 18650 batteries | USB-C cable |
| Rain screen | Instructions |
Technical Specifications
Indoor unit:
Battery: 18650, DC 3.7 V/2200 mAh
Power: DC 5 V/1 A
Communication: 433 MHz
The lock switch:
Power: DC 8\~12 V
Communication: 433 MHz
Degree of protection: IP44
Outdoor unit:
Battery: 18650, DC 3.7 V/2200 mAh
Communication: 433 MHz
Degree of protection: IP44
Description (see Figure 1)
| 1 – Indoor unit | 7 – Melody selection button (8 options) |
| 2 – Outdoor unit | 8 – Volume adjustment button (4 levels) |
| 3 – Lock switch | 9 – Lock switch status indicator |
| 4 – Lock control button | 10 – Exit button |
| 5 – Call answer/receive button | 11 – Coding button |
| 6 – Bell button |
Lock switch wiring description (see Fig. 2)
Red: +12 V
Black: -12 V
Yellow: NC (Normally Closed)
Green: COM (common contact)
Blue: NO (Normally Open contact)
Commissioning procedure
-
Insert batteries in both indoor and outdoor units.
-
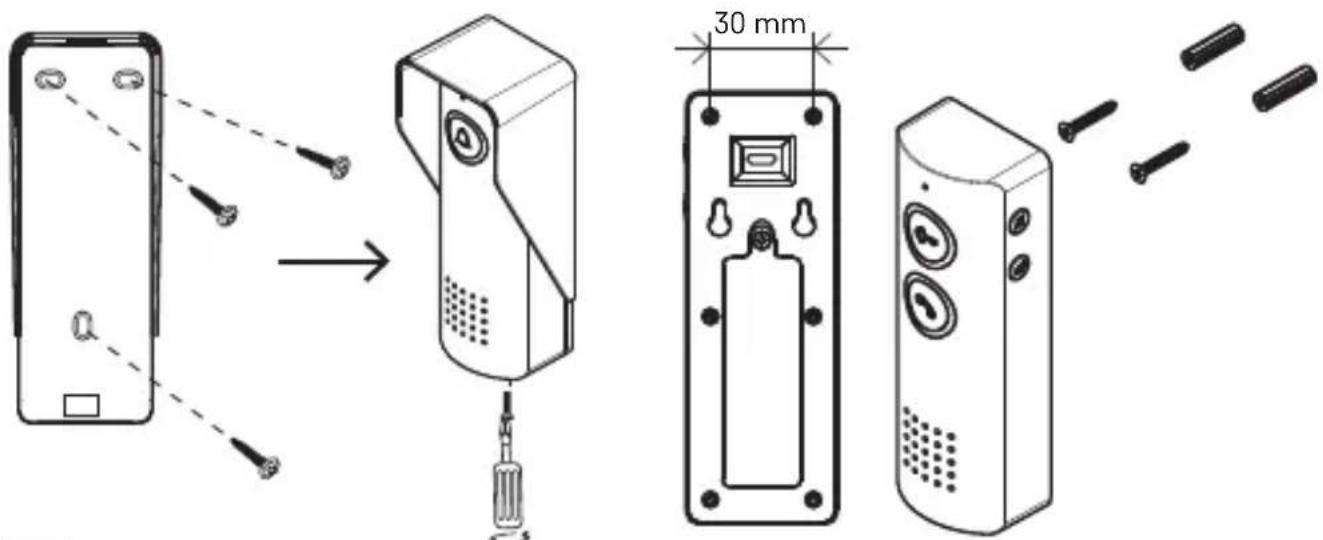
Mount both units on the wall (see Figure 3).
-
Stick the lock switch (3) to the wall using the tape on its back and connect the appropriate wiring (see Figure 2 - wiring with lock).
-
Pair the lock switch (3) with the units by holding the encoder button (11) for at least 5 seconds until the indicator (9) starts flashing blue. This will activate the pairing mode for 60 seconds.
-
During an active call, press the lock control button (4) on the indoor unit. This pairs the lock switch with the indoor unit.
Note: Both units are powered by 18650 batteries. Charging is possible via the internal unit by connecting a USB-C cable.
Controls
Communication
The visitor presses the bell button (6) on the outdoor unit. The indoor unit starts to ring. To answer the call, press the answer/end button (5) and you can communicate with the visitor.
If the lock switch is engaged, you can open the entrance for a visitor by pressing the lock control button (4). The lock switch can only be operated during an active call. The switch also serves as an exit button - by manually pressing it, the entrance can be opened from the inside.
Low battery and charging indication
Weak battery
- Outdoor unit: the call answer/end button light (5) flashes slowly.
- Inner unit: the indicator for the lock control button (4) flashes slowly.
Charging with an internal unit
- When charging: the lock control button flashes rapidly.
- When fully charged: all lights go out.
Adding additional units
This product supports the addition of up to 2 outdoor and 3 indoor units. Adding additional indoor units allows subsequent communication between units (intercom). To start coding the units, hold down the coding button on any unit. The coding button on the outdoor unit is the bell button (6) and on the indoor unit is the lock control button (4).
Procedure:
- On any unit (indoor or outdoor), hold the code button for 3 seconds. When you hear the „Di-Di“ tones, release the button and the unit will enter code send mode (indicator will flash).
- On the second unit (indoor or outdoor), press and hold the code button for 3 seconds. When you hear the „Di-Di“ tones, release the button and the unit will enter code receiving mode. When pairing is complete, you will hear „Di-Di“ tones and the unit will automatically stop pairing. (Repeat this procedure to code additional units.)
- Once all the required units have been paired, press the coding button on the first unit again to complete the process.
- To initiate a call between indoor units, press the lock control button (4) when there is no active call.
Setting the lock on time
By default, the lock switch has a switch-on time of 1 second.
This time can be changed by briefly pressing the encoder button. Each press switches the switch to the next mode (indicated by the number of flashes):
| Mode Number | er of flashes of the indicator Switching time | |
| 1 1 1 s | ||
| 2 3 3 s | ||
| 3 5 5 s | ||
| 4 10 10 s |
Note: The setting repeats cyclically - when mode 4 is reached, it switches back to mode 1.
CZ | Audiotelefon sada
2× Akumulatory 18650
RO|MD | Audiointerfon set
Akumulators: 18650, DC 3,7 V/2200 mAh
Jauda: DC 5 V/1 A
Saziņa: 433 MHz
Āra ierīce:
Akumulators: 18650, DC 3,7 V/2200 mAh
Saziña: 433 MHz
Description (voir figure 1)


- GB | Audio Door Phone Set
- Safety instructions and warnings
- Security risk:
- Electrical risk:
- Risk of fire:
- Risk of tripping:
- Contents of the package
- Technical Specifications
- Indoor unit:
- The lock switch:
- Outdoor unit:
- Description (see Figure 1)
- Lock switch wiring description (see Fig. 2)
- Commissioning procedure
- Controls
- Communication
- Low battery and charging indication
- Weak battery
- Charging with an internal unit
- Adding additional units
- Procedure:
- Setting the lock on time
- CZ | Audiotelefon sada
- RO|MD | Audiointerfon set
- Āra ierīce:
- Description (voir figure 1)
Brand : Emos
Model : H1087
Category : Intercom