IKW0822D - Fridge INVENTUM - Free user manual and instructions
Find the device manual for free IKW0822D INVENTUM in PDF.

User questions about IKW0822D INVENTUM
0 question about this device. Answer the ones you know or ask your own.
Ask a new question about this device
Download the instructions for your Fridge in PDF format for free! Find your manual IKW0822D - INVENTUM and take your electronic device back in hand. On this page are published all the documents necessary for the use of your device. IKW0822D by INVENTUM.
USER MANUAL IKW0822D INVENTUM
natural_image
Front view of a black appliance refrigerator with tiered shelves and ventilation grilles (no visible text or symbols)natural_image
Simple line drawing of a rectangular object with two small circular holes, labeled (X) at the bottom (no text or symbols on the object itself)(X1)
E
(X1)
F
(X1)
G
natural_image
Line drawing of a bent pipe or tube with hexagonal end (no text or symbols)(X1)
A
natural_image
Line drawing of an open refrigerator with multiple shelves and a door, enclosed in a rounded square frame (no text or symbols)1

natural_image
Abstract black-and-white icon showing a human figure with a question mark above and an arrow below (no text or symbols)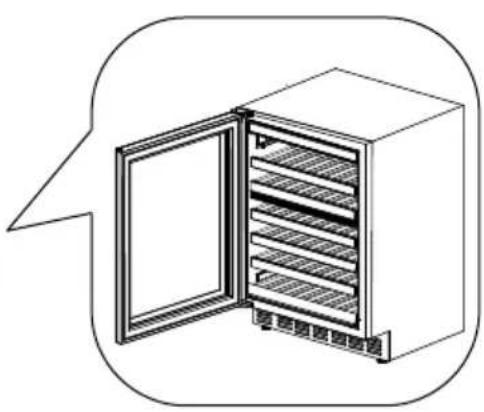
natural_image
Line drawing of an open refrigerator with shelves and doors, enclosed in a rounded square frame (no text or symbols)10


natural_image
Line drawing of a kitchen appliance setup with a mounted air conditioner unit and control panel (no text or symbols)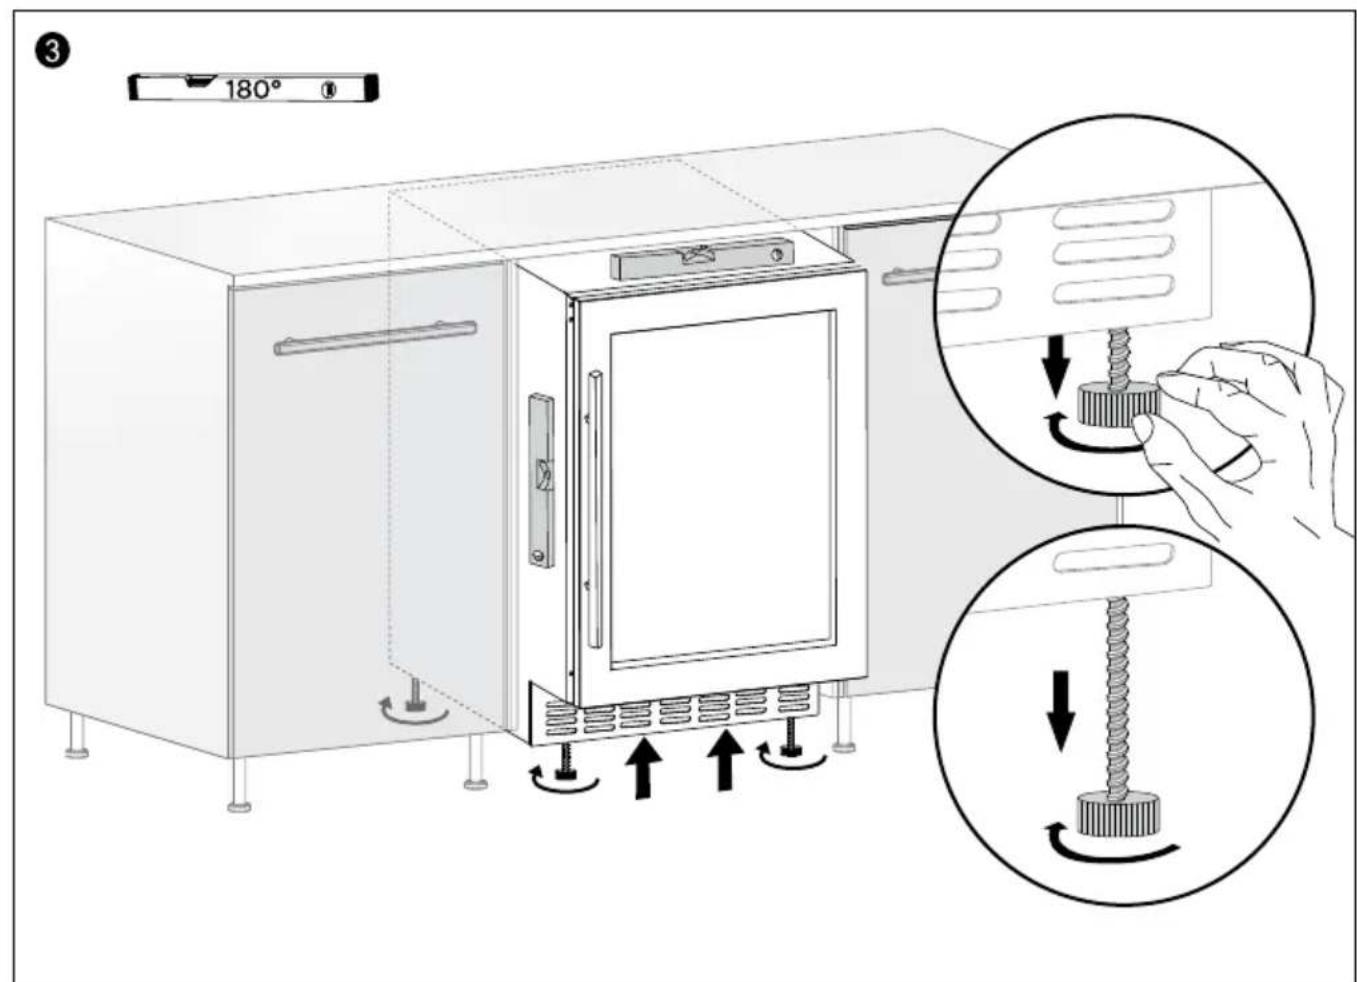
Nederlands
Installation instruction page 3
- safety instructions page 21
- product description page 26
- commissioning & installation page 26
- operating the appliance page 27
- placing wine bottles page 29
- cleaning and maintenance page 30
- resolving failures yourself page 31 general terms and conditions of service and warranty page 55
Deutsch
EXTRA INFORMATIE DIEPE PLINT
INSTALLATIE HANDGREEP
natural_image
Technical line drawing of a structural panel with an arrow indicating direction and a circular symbol labeled 'A' (no text or symbols present)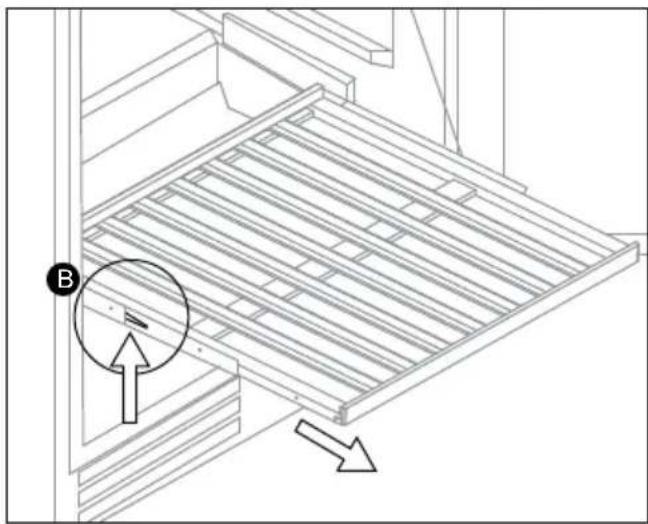
natural_image
Technical line drawing of a structural panel with directional arrows indicating movement (no text or symbols)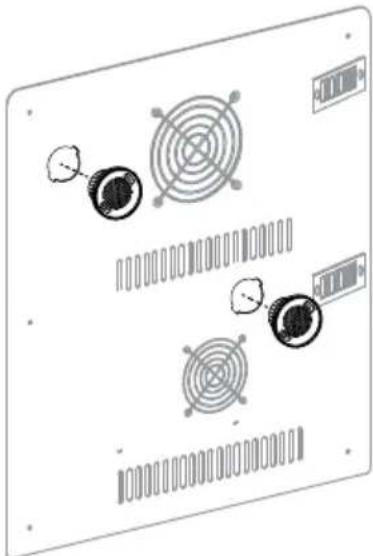
natural_image
Diagram of a computer monitor with circular components and ventilation slots (no text or labels)1 safety instructions
GENERAL SAFETY INSTRUCTIONS
- Read the complete manual before you start using the appliance.
- Save the manual carefully for future use or subsequent owners.
- Only use this appliance for the purpose described in the manual. This appliance is designed as a free-standing or built-in appliance.
- Only use this appliance for storing wine.
- Do not allow children to play with the appliance or hide inside it - they could get trapped inside it and suffocate.
- Keep the appliance out of the reach of children. Children do not understand the dangers of using electrical appliances. Therefore, never allow children to operate electrical appliances without supervision. Keep the appliance and the power cable out of the reach of children younger than 8 years of age.
- The manufacturer accepts no liability for damage resulting from incorrect use or inappropriate operation.
• Warning: Danger of suffocation!

Packaging material is a danger to children. Keep the packaging material out of the reach of children.
- This appliance may be used by children older than 8 years of age and persons with limited physical, sensory or mental capacities or by persons with a lack of experience or knowledge under the condition that a person responsible for their safety maintains supervision, or if they have received instructions on safe use of the appliance and understand the risks of incorrect use of the appliance.
• Children from 3 up to 8 years of age may load and unload fridges.
• Children must not play with the appliance. -
Cleaning and maintenance work to be performed by the user may only be done by children under supervision.
-
This appliance is intended for household and similar applications such as:
- In staff kitchens in shops, offices and other work environments;
- In farms and by customers in hotels, motels and other residential facilities;
- Bed and breakfast facilities and suchlike;
- in catering and similar situations not considered as retail environments.
- If the safety instructions and warnings are not respected, the manufacturer refuses liability for any resulting damage.
- Damage as a result of incorrect connection, incorrect installation or incorrect use is not covered by the guarantee.
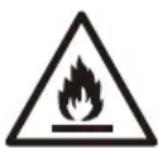
Careful: Fire hazard
- The refrigerant circuit in the appliance contains isobutene R600a refrigerant, a very environmentally friendly natural gas that is nevertheless flammable. Ensure that no parts of the refrigerant circuit are damaged during transport and installation of the appliance.
WARNING: Fridges contain refrigerant and gases inside the insulation. Refrigerants and gases must be professionally discharged because they can cause eye injuries or may ignite. Before discharging, check that the pipes in the refrigerant circuit are not damaged. If the refrigerant circuit is damaged, avoid naked flames and sources of ignition and thoroughly ventilate the space in which the appliance is installed. Changing the specifications of or making any changes to this product is dangerous. Any form of damage to the power cable can cause short circuiting, fire and/or electric shocks.
SAFETY INSTRUCTIONS FOR INSTALLATION
- Move and install the appliance with two persons.
- Wear safety gloves when unpacking and installing the appliance.
- Only connect the appliance to alternating current with an earthed plug socket. Check whether the voltage in your home corresponds to the voltage mentioned on the appliance type plate.
- Check that the appliance has not been damaged after unpacking or during transport. If it has, do not install the appliance before you have consulted the dealer or our service department.
- Only a certified installer may fit the appliance.
- The electrical connection must comply with national and local regulations.
- The connection point, plug socket and the plug must always be accessible.
- The appliance must always be earthed.
- Do not operate the appliance with an external timer or a separate remote control system.
- Avoid connecting multiple portable wall sockets or power supplies at the rear of the appliance.

Warning: risk of electric shock
- During installation make sure the power cable is not damaged and does not run along sharp edges.
- Make sure that the floor is not damaged when moving the appliance.
- Do not lift or drag the appliance by the door(s).
- Make sure that the appliance is not installed near a heat source.
- Do not place heat-generating appliances such as (microwave) ovens above the appliance.
- Make sure of sufficient ventilation and leave a space of at least 25 mm behind the appliance.
- Careful:

Do not damage the piping in the appliance's refrigerant circuit.
- Careful:

Make sure that ventilation openings in the housing of the appliance or in the built-in construction are not blocked.
- Level the appliance on a strong and stable surface.

Warning:
- To prevent danger resulting from instability of the appliance, it should be installed in accordance with the instructions.
- Place the appliance in a dry and well ventilated room. The appliance is intended for use in environments in which the ambient temperature remains within the following values, depending on the appliance. The appliance may not work properly if it has been standing in a temperature outside the specified range for a long time.
| Climate class Ambient temperature | |
| SN Between | 10 °C and 32 °C |
| N Between | 16 °C and 32 °C |
| ST Between | 16 °C and 38 °C |
| T Between | 16 °C and 43 °C |
SAFETY INSTRUCTIONS FOR OPERATION
- Do not use the appliance outdoors.
- Wait for at least three hours before you switch the appliance on to ensure maximum efficiency of the refrigerant circuit.
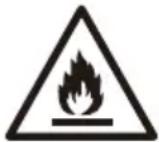
Warning: Fire hazard
- Do not store any explosive substances such as spray cans or other flammable materials in or near the appliance.
SAFETY INSTRUCTIONS FOR CLEANING AND MAINTENANCE
• Always disconnect the appliance from the mains supply before carrying out any work or maintenance on the appliance.
- Do not use a high-pressure cleaner or steam cleaner to clean the appliance.

Careful:
- Only use mechanical appliances or other products recommended by the manufacturer to accelerate the defrosting process.
- Do not use abrasive or corrosive cleaning products such as window sprays, abrasives, flammable fluids, cleaning wax, concentrated cleaning products, bleaching agents or petroleum products containing cleaning products on plastic parts, the inside and the cover material or packing of the door. Do not use papers towels, scourers or other corrosive cleaning aids.

Warning: Risk of electric shock
- Always check the appliance and power cable regularly for visible damage. Contact the customer service if there are any signs of the slightest damage to the appliance or the power cable. To avoid dangerous situations, a damaged power cable may only be replaced by the manufacturer, its service department or similarly qualified persons. For safety reasons only use accessories and spare parts from the manufacturer that are suitable for your appliance.
Warning:
- Have the light source replaced by a professional.
ENVIRONMENTAL PROTECTION
The appliance is energy-efficient. Save even more energy by using the appliance in accordance with the following energy saving tips and instructions for an environmentally friendly disposal of the appliance.
Saving energy
- A high ambient temperature has a negative effect on energy consumption. Direct sunlight and other heat sources near the appliance can also have a negative effect.
- Keep ventilation holes free. Covered and dirty holes cause a higher energy consumption. Ensure sufficient space around the appliance, so that a ventilation and air flow is able to circulate around the appliance properly.
- Do not open the door of the appliance more often than necessary and leave the door open as briefly as possible.
- Set the thermostat to a lower setting if circumstances allow.
- A door rubber that does not seal properly may increase energy consumption. If a door rubber does not seal properly, please contact customer service.
- If the instructions are not observed, this could lead to a higher energy consumption.
- If you will not use your appliance for a long time (e.g. in summer holidays) switch off the appliance. Clean and dry your appliance thoroughly. Leave the door open to prevent humidity and smell, blocking it open if necessary.
Environmentally friendly disposal
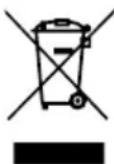
Recycling - WEEE
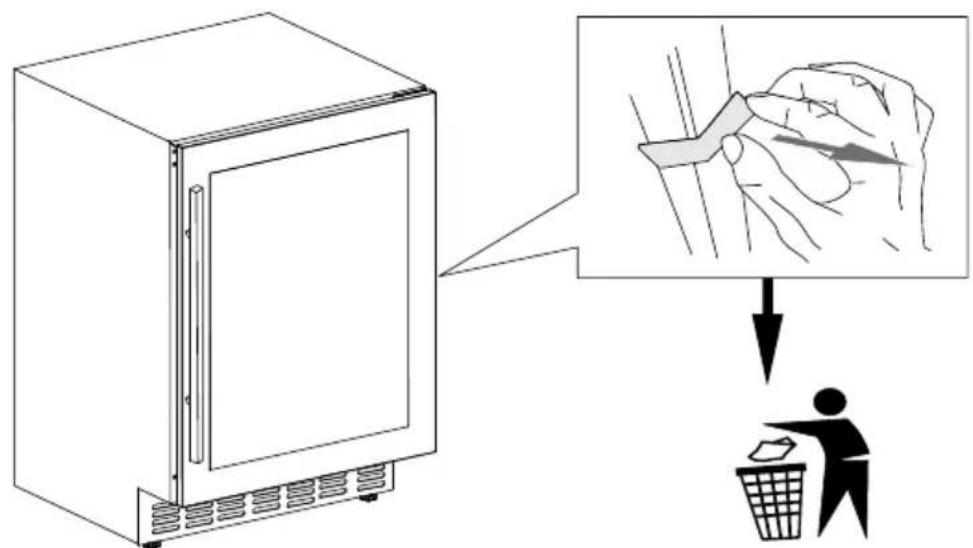
- Dispose the packaging material in an environmentally friendly way.
- This appliance is labelled in accordance with European Directive 2012/19/EU on waste electrical and electronic equipment (WEEE). The directive sets the framework for returning and recycling used equipment as applicable across the EU.
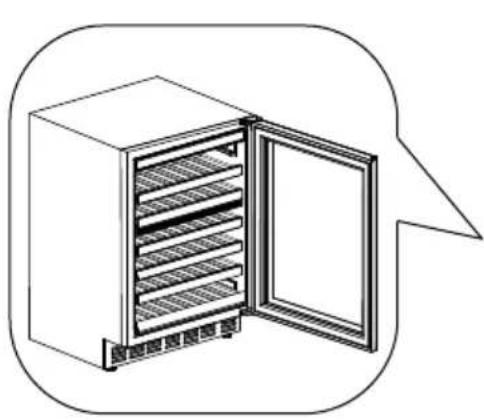
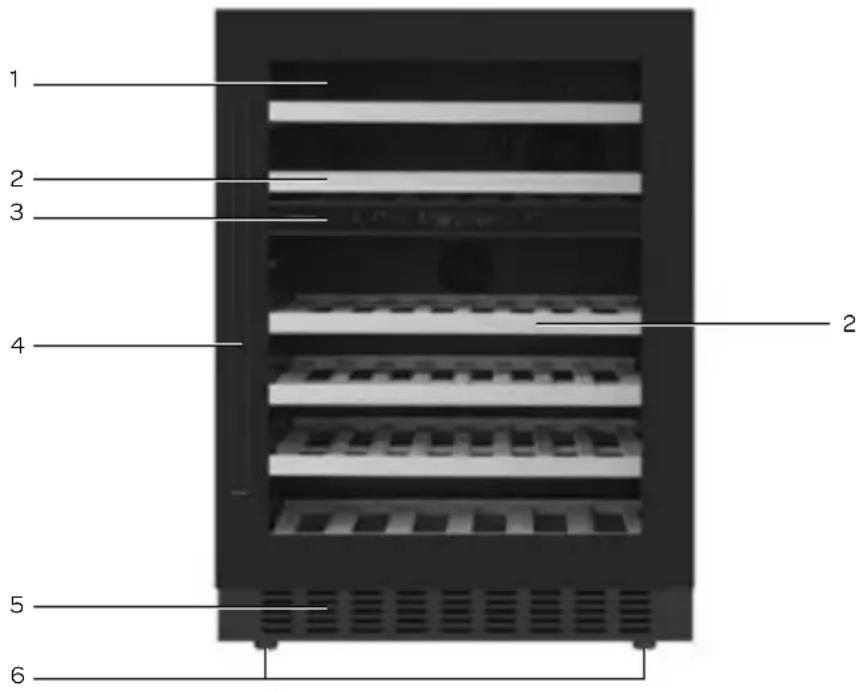
2 product description
- Glass door
- Wooden shelves
- Control panel
- Door handle
- Ventilation grille
- Adjustable feet
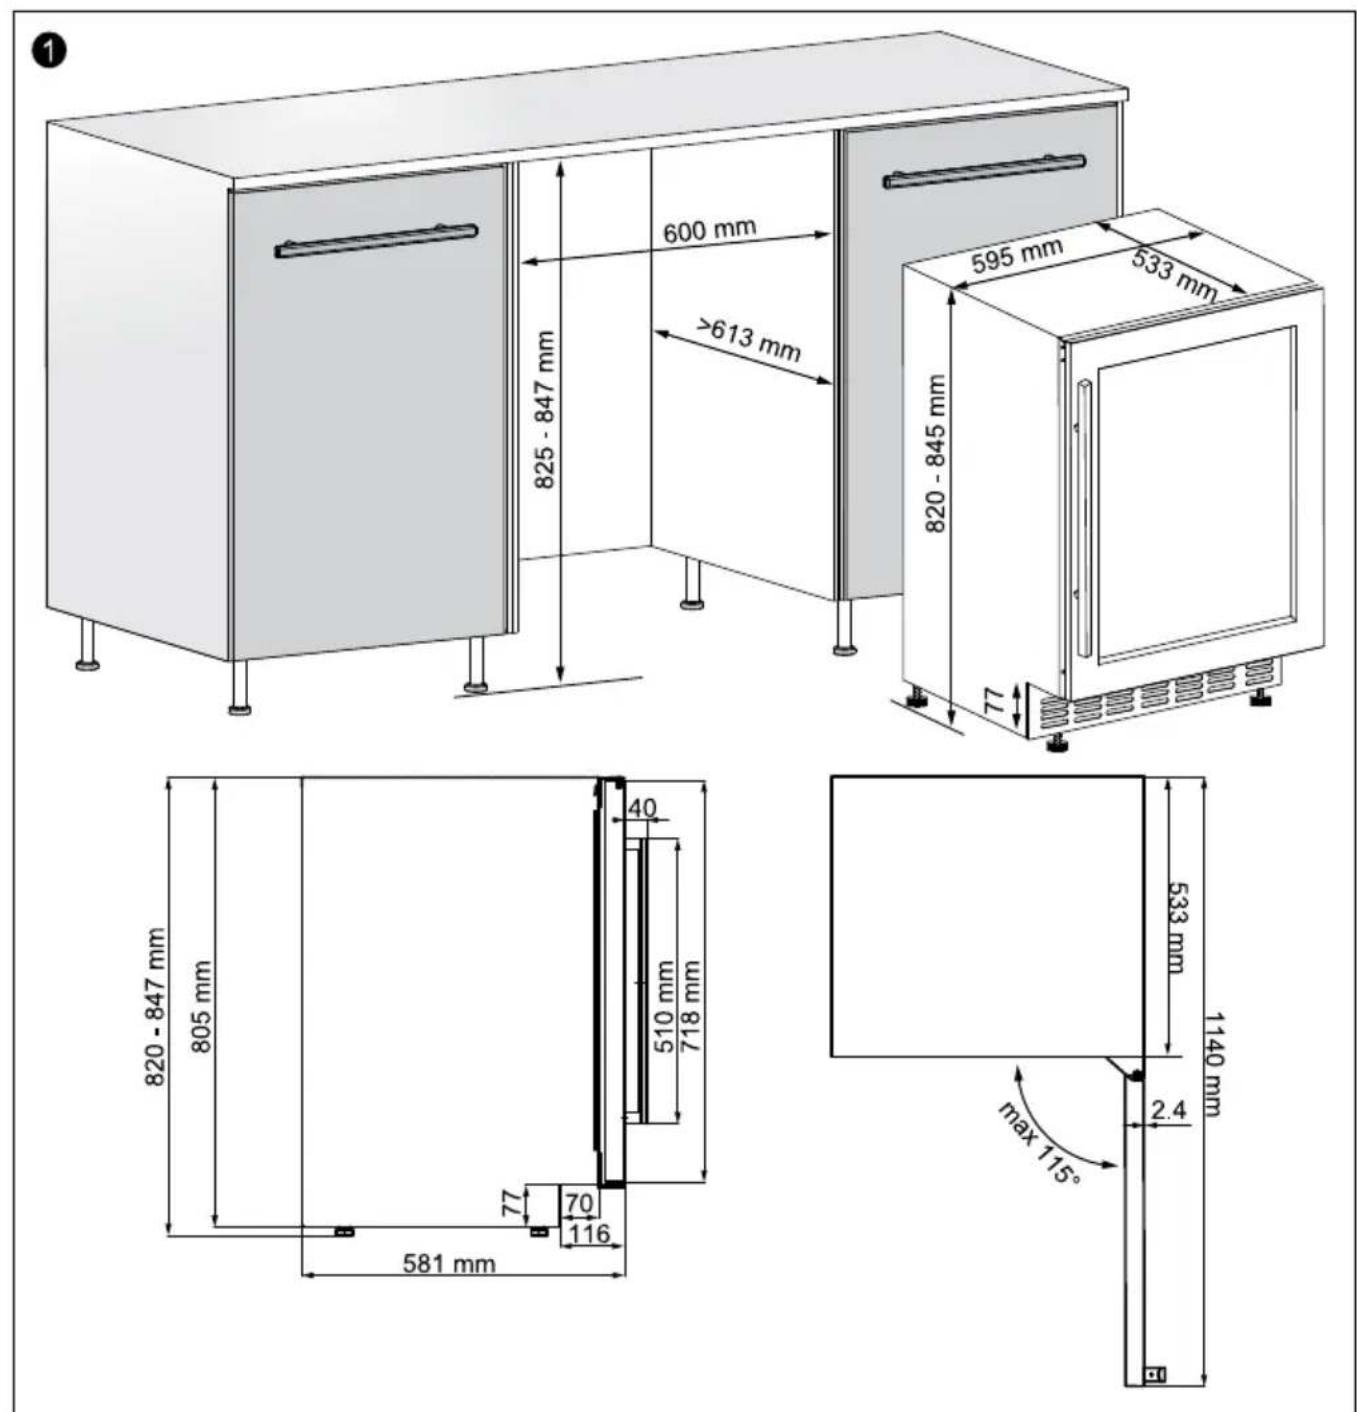
3 commissioning & installation
After installation, leave the appliance for at least 3 hours before inserting the plug into the socket. The cooling circuit must be stabilised, before the appliance is able to work efficiently.
Before using the appliance for the first time, proceed as follows: carefully unpack the appliance and remove all packaging material. Keep the packaging (plastic bags, polystyrene and cardboard) out of the reach of children. After unpacking the appliance, carefully check it for external damage that may have occurred during transport. Level the appliance on a sturdy flat surface. Clean the appliance before using it for the first time; particularly the interior (see Cleaning & Maintenance).
The installation and electrical connection must be performed by a qualified technician, in accordance with the installation instructions and local regulations.
How the appliance should be placed is described in the Installation Instruction.
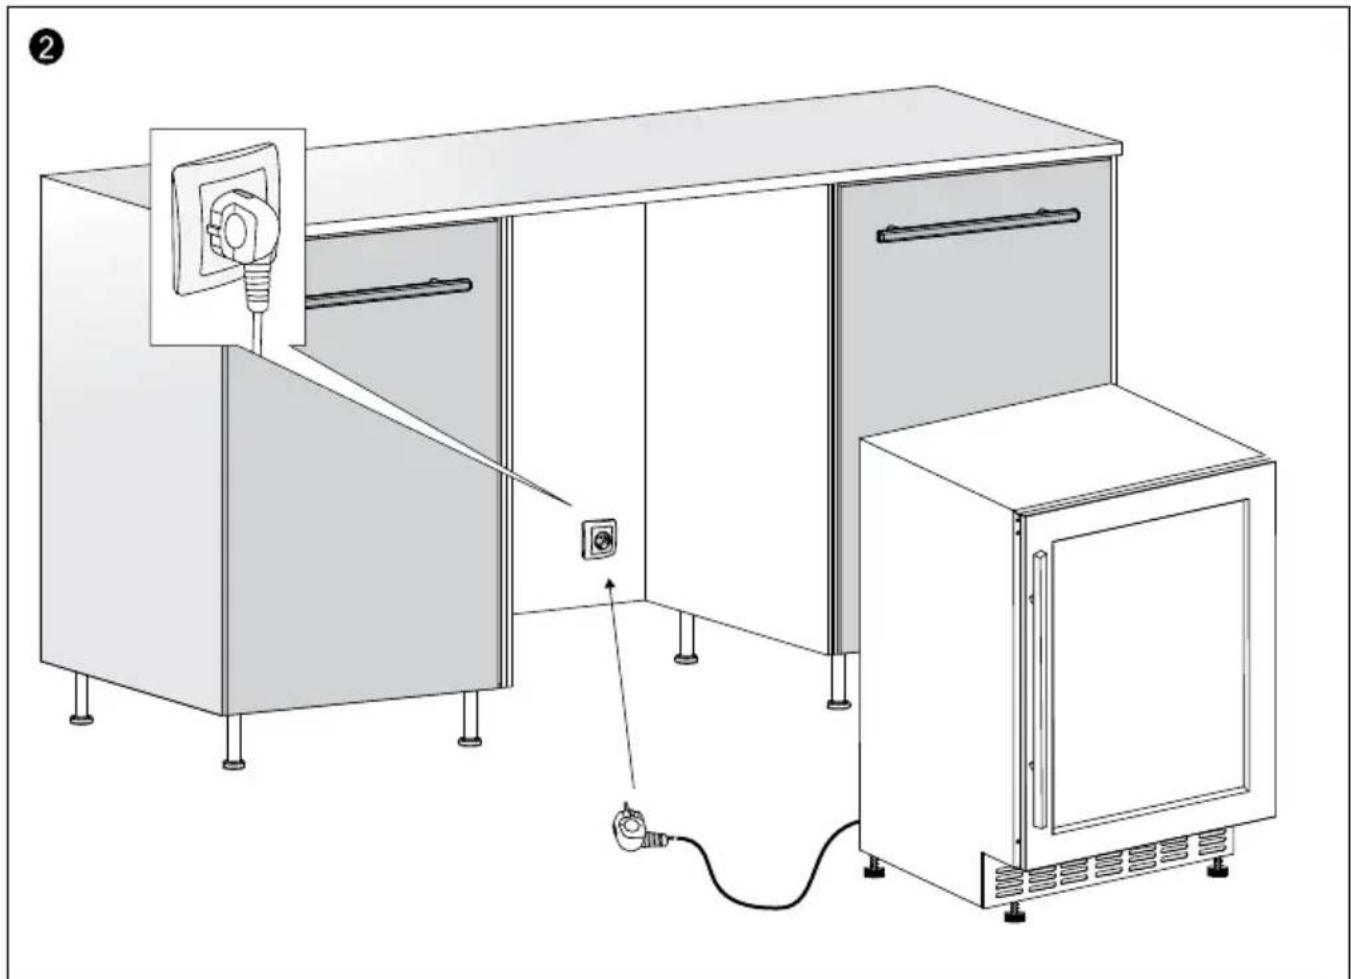
The appliance must be connected to a properly installed earthed socket. The voltage (AC) should correspond with the voltage stated on the information plate. The type plate is located on the back of the appliance.
The appliance may emit a strange smell when switching it on for the first time. This will disappear once the appliance starts to cool.
Before you start using the appliance, you should wipe all components with warm soapy water with washing-up liquid, all-purpose cleaner or soda, for example. CAUTION! Clean the wooden shelves with lukewarm water only, do not use detergents.
Wipe the inside and components of the appliance after cleaning with clean water and properly wipe everything dry. Leave the appliance to dry for 1 to 2 hours.
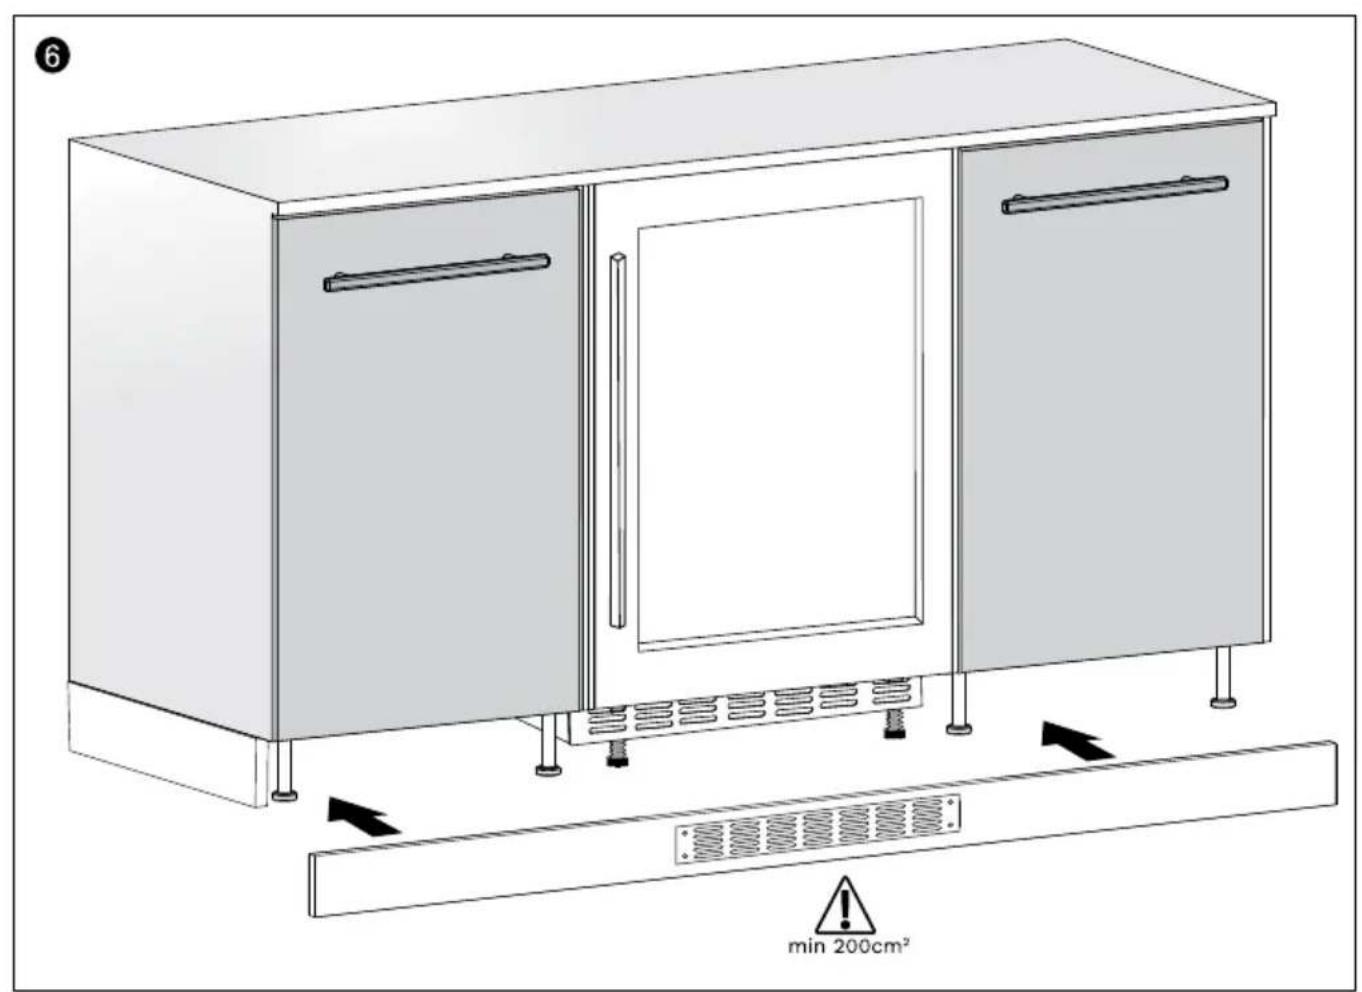
ADDITIONAL INFORMATION ABOUT DEEP SKIRTING
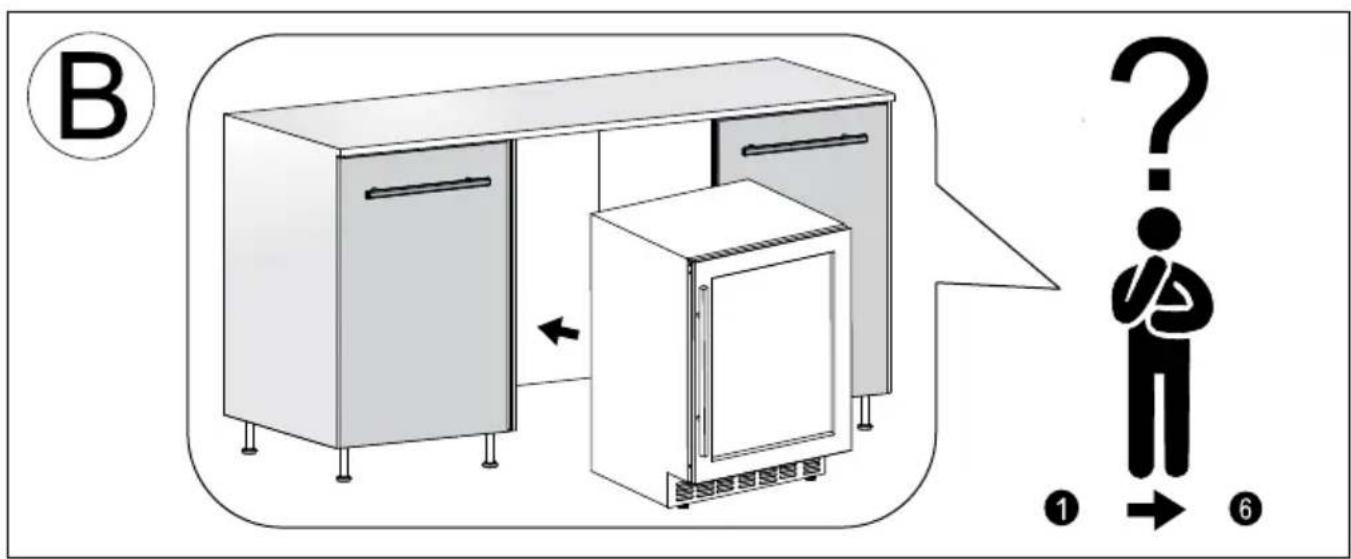
This wine cooler is designed with a deeper skirting, allowing the skirting of your own kitchen to run in front of the wine cooler. For this, a grille of minimum 200cm2 must be placed in the kitchen skirting, which should be located in the middle of the wine cooler (see figures in the Installation Instruction). The grille ensures that the appliance is able to vent sufficiently.
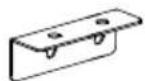
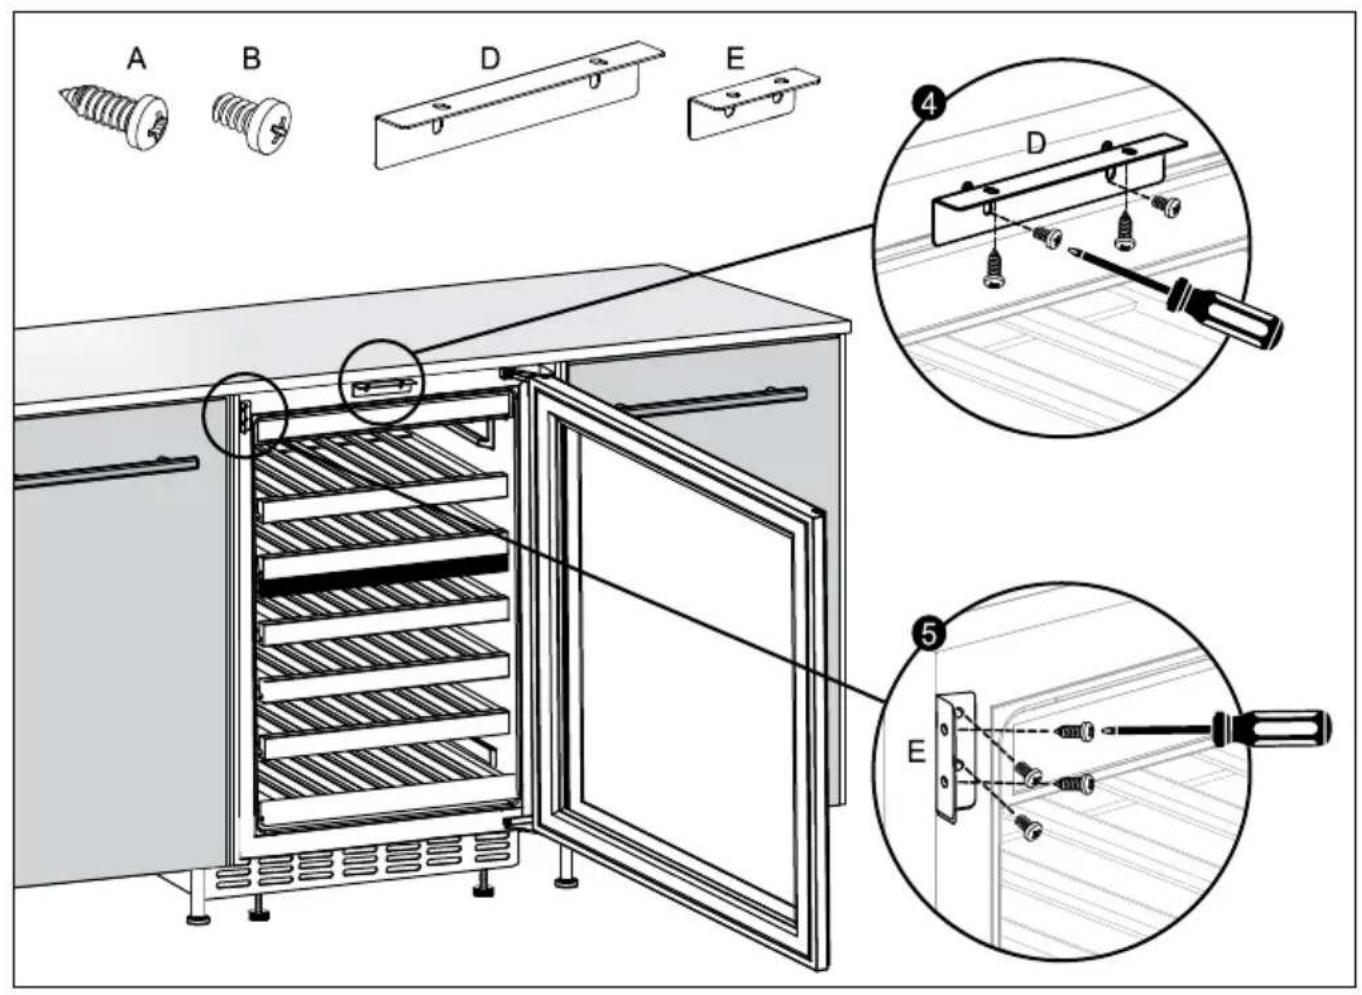
INSTALLING THE DOOR HANDLE
Install the door handle provided with the appliance by following these steps:
Step 1 Remove the gasket at the inner side of the door to expose the two screw holes.
Step 2 Install the handle tightly with the screws and washers pre-installed.
Step 3 Tidy and restore the gasket

CAUTION!
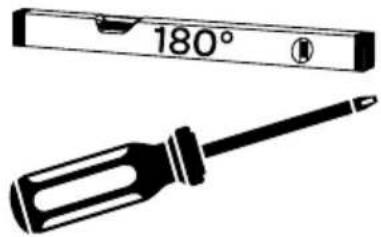
When installing the door handle, do not overtighten it and only use a hand screwdriver (NO ELECTRICAL SCREW DRIVER!) to mount the handle. If the screws are overtightened, the door glass can break due to the tension.
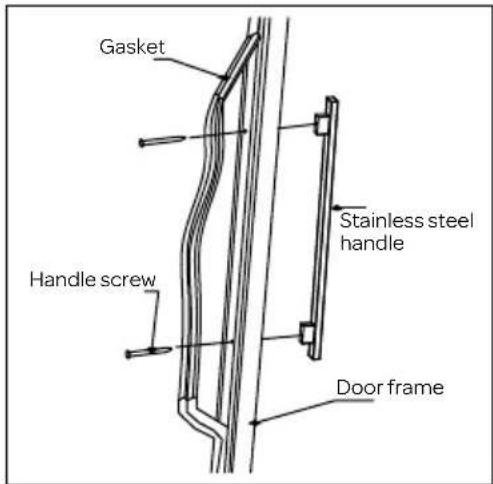
TIGHT = TIGHT! Glass is NOT covered by the warranty!
4 operating the appliance

- Lock/unlock
- Upper zone Temp. Plus
- Upper zone Temp. Minus
- Display
- Lower zone Temp. Plus
- Lower zone Temp. Minus
- Inner light On/Off
UNLOCKING THE CONTROL PANEL
To unlock the control panel, touch the lock button ⏻ and hold it for 3 seconds till an audio sound is heard. The control panel will be automatically locked after 3 minutes without being touched. Under the locked condition, the control panel will not react to any touching (except for the light function).
When the appliance is plugged into a power outlet, it powers on automatically.
Press the left or to adjust the temperature of the upper zone.
Press the right or to adjust the temperature of the lower zone.
Press the left and at the same time for 3 seconds to power on/off.
Press the right and at the same time for 3 seconds to switch between °C and °F.
INNER LIGHT ON/OFF CONTROL
When opening the door the light will go on, when closing the door the light will go off. To keep the light always on the following instructions should be followed: Open the door, then under unlocked condition, touch the light button ⚙ and the interior light will first be turned off, touch the light button ⚙ once again and the light will be turned on again and will stay on after the door is closed.
TEMPERATURE SETTING
After the unit is unplugged, the system will return to the last used temperature setting.
The temperature ranges for both zones (upper & lower) are: +5 to +20°C (41-68°F). To set a temperature range as desired, please make sure the control panel is under unlocked condition.
Directly touch the left + or mark to set the upper compartment temperature as you want. Touch the right or + - mark to set the lower compartment temperature as you want. The first touch on mark or will recall the previous set temperature displayed. Touch the + mark to increase the set temperature by 1°C (or by 1°F). On the contrary, touch the - mark to decrease the set temperature by 1°C (or by 1°F). After stopping pressing the button for 5 seconds, the LED figure will stop flashing, and revert to display the real temperature of the upper or lower compartment.
DIGITAL DISPLAY
The display shows the set temperature when you are setting the temperature, and it will display the real temperature of the inside cabinet after 5 seconds.
- Upper zone cooling 9. Upper zone heating
- Upper zone fan
- Door-open alarm
- Defrost
- Keypad Lock
- Upper zone temperature
- Lower zone temperature
- Light
- Celsius
- Lower zone fan
- Fahrenheit
- Lower zone cooling
- Lower zone heating
- Condenser fan
When the temperature probe is out of order, the display will show "HH" or "LL" while a continuous digital sound will be heard. In such case the wine cooler keeps on cooling as it is considerably designed to keep periodical running of compressor and fans which helps to keep the coldness of the inside cabinet to protect your stored wines.
ATTENTION!
The ambient air temperature, how often the door is opened and the position of the appliance can affect the internal temperature. These factors must be taken into account when setting the thermostat.
Never introduce volatile, inflammable or explosive fluids such as alcohol, acetone or petrol because of the risk of explosion.
DEFROST
The defrost function is used to prevent the inside from icing. When the icon lights up, the appliance automatically defrosts.
CONDENSER FAN
The icon of the condenser fan lights up when the hot air is transported from the back to the bottom front through the ventilation holes.
UPPER AND LOWER ZONE HEATING
The appliance only uses heating when the inside temperature of the zone is not under control. For example: when the door is opened often.
DOOR OPEN ALARM
If the door of the appliance is left open for more than 2 minutes, the interior light will start flashing and the buzzer will go off. The door-open alarm will stop when the door is closed.
5 placing wine bottles
THE CORRECT TEMPERATURE
Wine has specific temperature requirements, depending on the type. Both zones can be set between 5°C and 20°C, making it possible to store all types of wine. You can decide for yourself how you want to arrange the bottles.
When buying wine, ask about the storage period of the wine, as this depends on different factors such as age, type of grape, alcohol percentage, etc. The most suitable temperature is also important, in general the following applies:
• Red wines: between 12°C and 18°C.
- White wines: between 7^ C and 12^ C .
• Rosé: between 8°C and 12°C
- Champagne and sparkling wines: between 5°C and 8°C.
BOTTLE ARRANGEMENT
The wine cooler is suitable for 46 bottles with a volume of 0.75 l. The figure below shows how the bottles can be best arranged.

6 cleaning and maintenance
CLEANING
Before cleaning the appliance, switch off the appliance with the on-/off button and remove the plug from the wall socket.
Clean the interior of the appliance. Use warm water and a neutral detergent to prevent any bad smells occurring. After cleaning, rinse the interior with clean water and rub dry. ATTENTION! Clean the wooden shelves only with lukewarm water, without cleaning agents. Leave the appliance to dry for 1 to 2 hours. Simply remove the shelves (see instructions "removing shelves") to clean them by hand. Do not clean the interior accessories in the dishwasher.
Clean the outside of the appliance and the gasket with a soft moist cloth.
We recommend that you dust the back of the appliance with a cloth or vacuum cleaner once a year in order to maintain a good output and low energy consumption.
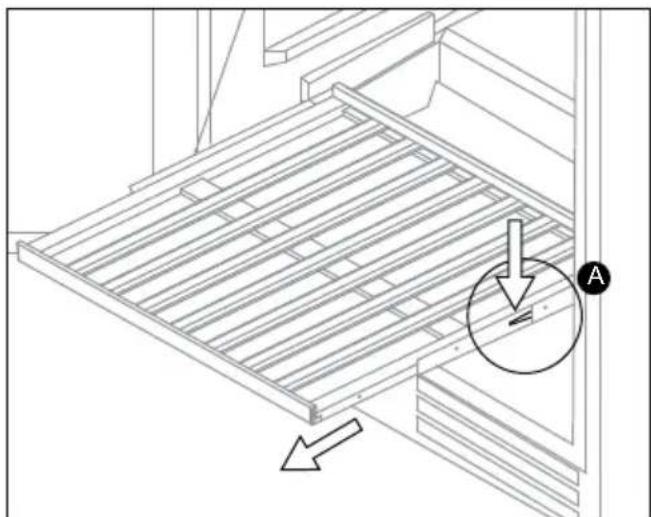
REMOVING THE PULL-OUT SHELVES
- To prevent damaging the door gasket, make sure to have the door all the way opened when pulling shelves out of the rail compartment.
- To remove the shelves out of the rail pull each shelf approximately 1/3 out. If needed, use a long flat screwdriver to press down the right plastic notch as shown in Figure A and at the same time lift the left plastic notch as shown in Figure B. Then proceed to pull out the shelf slowly.
natural_image
Technical line drawing of a metal shelving unit with an arrow indicating direction (no text or symbols present)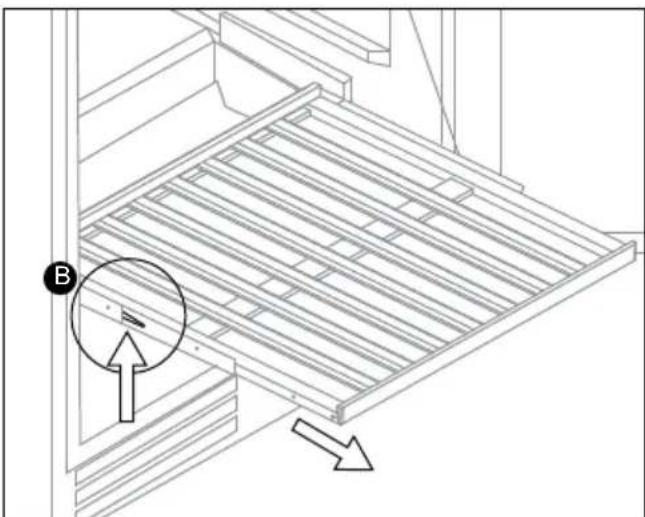
natural_image
Technical line drawing of a mechanical assembly with a circular component and directional arrows (no text or symbols)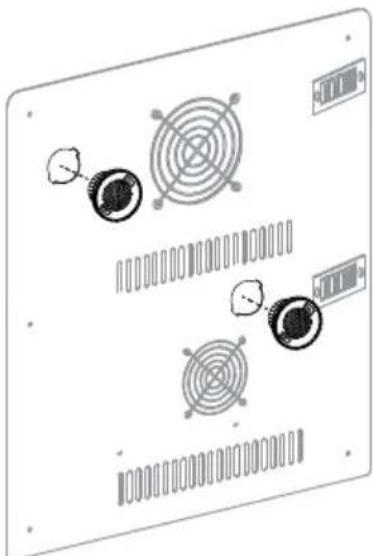
natural_image
Diagram of a computer monitor with circular components and ventilation slots (no text or labels)REPLACING THE CHARCOAL FILTERS
Wine is a living object that breathes through the cork of its bottle. In order to preserve the quality and taste of your fine wines, they must be stored at the ideal temperature and ambient conditions. This wine cooler is equipped with an active charcoal filtration system to ensure air purity, cooling efficiency, and to maintain an odor free cabinet for the storage of your fine wines. The filter assembly is located at the rear panel inside your wine cooler, one for the lower zone and one for the upper zone.
Keep in mind, that these filters must be changed every 12 months.
To replace your filters:
| 1 | Remove the bottles of wine stored on the two (2) shelves in front of the filter. |
| 2 | Remove the shelves and set aside to be replaced once you have changed the filter |
| 3 | Hold the filter and turn it at 45 degrees in the counter-clockwise direction and then pull it out. |
| 4 | Remove the existing filter and replace with a new one. |
| 5 | Put the new filter into the hole and then turn the filter at 45 degrees in clockwise direction. |
Turn the filter counter-clockwise to remove it.
MOVING THE WINE COOLER
Remove all items. Take out the loose items inside the wine cooler (such as shelf), or fix the loose items with the foam. Turn the adjustable legs up to the base to avoid damage. Tape the door shut. Be sure the appliance stays secure in the upright position during transportation. Also protect the outside of appliance with a blanket or similar items and put extra protection materials on the glass door.
REPLACING THE LED LIGHTING
This appliance is equipped with a LED light. It can be used for a long time. In case, the LED light is blown, it must be replaced by a qualified person to avoid any hazard. Contact the Inventum service department.
7 resolving failures yourself
If the appliance does not work properly, this may be caused by a minor problem. First check the following items before contacting an electrician. This will save you time and money.
| Failure Cause Solution | ||
| Appliance does not do anything; led does not light up | - Plug not in socket- Power interruption- The appliance is off. | - Insert the plug in the socket- Check the fuse box- Set the temperature |
| Temperature in the appliance is too high or too low | Incorrect setting of the thermostat Set the thermostat to a different position | |
| The door of the appliance is opened too frequently or remains open for too long | Open the door less often and/or reduce the time that the door remains open | |
| The door rubber does not seal properly Check if the door rubber is damaged or dried out. If necessary, replace the door rubber. | ||
| The ambient temperature is higher or lower than the temperature indicated in the table with technical data | The appliance is intended for operation in an ambient temperature indicated in the table with the appliance's technical data | |
| Ventilation holes are blocked Clean the ventilation holes | ||
| Vibrations The appliance is not level | Use a spirit level to check that the | appliance is level. Adjust the appliance with the adjustable feet if necessary. |
| Unusual or loud noises Is the appliance | ance properly installed? Check the installation - is the appliance level? | |
| Is the rear side of the appliance touching something? | Check this and move the appliance further forward | |
| Lamp is not on Lamp is defective | Please contact customer service | |
Note: During normal use of the refrigerating appliance, different types of noises can occur that do not have any effect on the correct operation of the appliance.
Noises that can be heard during normal use of the appliance are caused by the operation of the thermostat, compressor (activation), cooling system (shrinkage and expansion of the material under the influence of temperature differences and flow of cooling liquid).
natural_image
Technical line drawing of a structural panel with an arrow indicating direction and a circular detail labeled 'A' (no text or symbols present)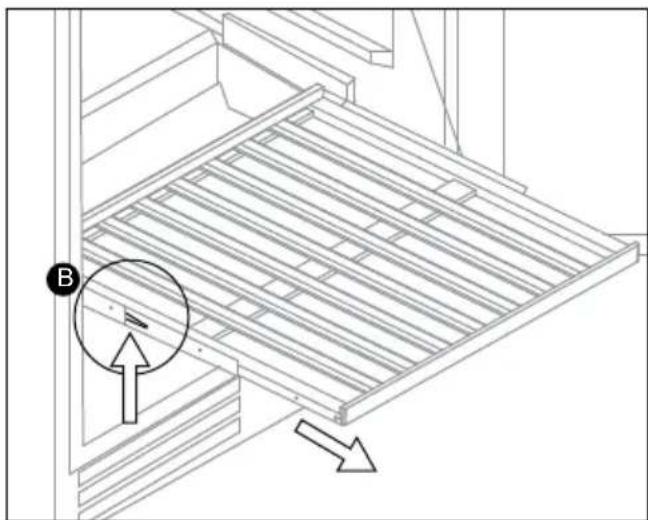
natural_image
Technical line drawing of a structural panel with directional arrows indicating movement (no text or symbols)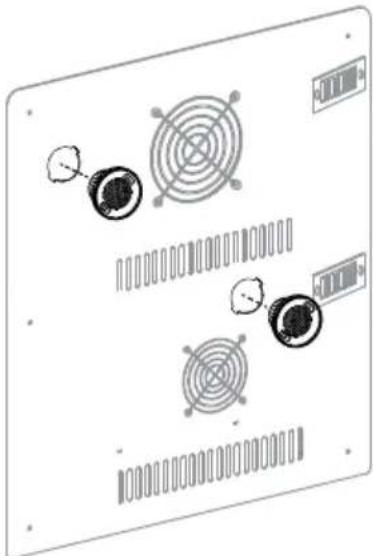
natural_image
Diagram of a computer monitor with circular components and ventilation slots (no text or symbols)natural_image
Technical line drawing of a wooden structure with a circular arrow and label 'A' (no text or symbols beyond labels)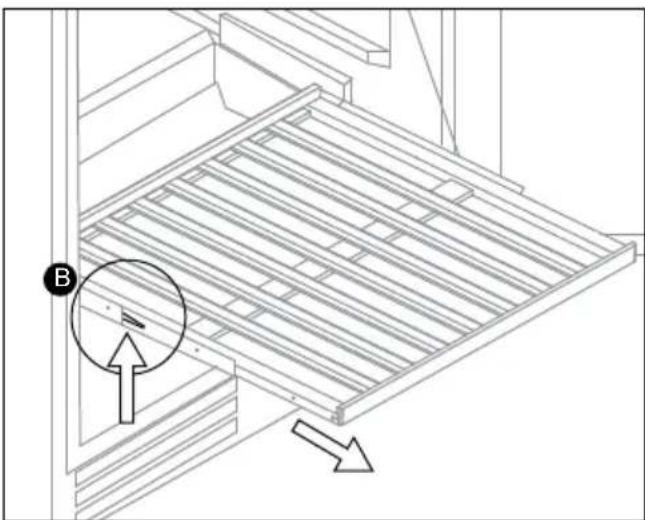
natural_image
Technical line drawing of a mechanical assembly with a circular component and directional arrows (no text or symbols)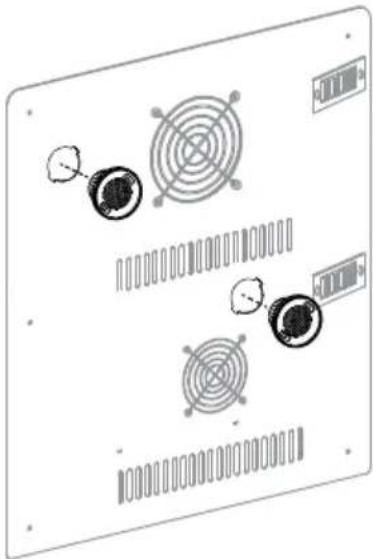
natural_image
Diagram of a computer monitor with four circular components and a grid bar, no text or symbols present.General terms and conditions of service and warranty
5-year Inventum warranty!
- Customers enjoy a 5-year full manufacturer's warranty on all Inventum products.
- Within this period, a defective product or part, which makes normal functioning of the product or part impossible, will always be repaired free of charge or, if repair is not possible and/or does not provide a solution, replaced (by the same or equivalent product). The assessment of this lies with Inventum.
- In order to make a claim under the 5-year Inventum warranty you must, within two months after discovering the fault or defect, either return the product to the shop where you bought it, or contact the Inventum customer service department by using the form at www.inventum.eu/service.
- The warranty period starts from the date stated on the product's original sales receipt.
- To invoke the warranty, you must always send a copy of the original proof of purchase with the service request and present the original proof of purchase to the service technician.
- The 5-year warranty applies only to normal domestic use of Inventum products within the Netherlands.
Warranty exclusions
- The 5-year Inventum guarantee does not apply in case of: normal wear and tear, consumables, improper use, insufficient or incorrect maintenance, incorrect and/or inexpert assembly and installation of the appliance, repairs by unauthorised third parties, business or commercial use, missing serial number, damage caused by an external cause. This enumeration is not exhaustive.
- B-choice products and products that have been built-in in a showroom are not covered by the 5-year Inventum warranty. All optical damage such as dents, scratches and slight traces of use are excluded from any warranty.
Reporting malfunctions on Inventum products
- Faults or defects on Inventum products can be reported by using the service request form on the website www.inventum.eu/service or through the seller of the product.
- A copy of the original proof of purchase must be included with the request.
- Inventum's service department determines whether the product will be repaired or replaced, based on the request and the sales receipt.
Important to know
- Products sent without prior notification will not be accepted. Further to the notification you will be informed by Inventum whether a warranty applies and whether you must return the product.
- The replacement or repair of a defective product, or a part thereof, does not lead to an extension of the original warranty period.
- Products eligible for replacement or repair must be emptied and clean.
For a detailed explanation of the warranty conditions and items excluded from them, please visit Inventum's website www.inventum.eu/algemene-voorwaarden
These general warranty and service conditions apply to Inventum brand products purchased after 27 April 2022 and intended for use within the Netherlands.
For Inventum products used outside the Netherlands, but within a EU Member State, the warranty rules of that country apply. Inventum provides warranty and service by a white goods technician only in the Netherlands.
As a consumer, you are entitled by law to a properly working product. Does the product break down sooner than you might expect? This means that the product is not in conformity. In that case, the law offers you, the buyer, with a number of legal remedies for your protection. This legal protection is not affected by the above commercial warranty given by Inventum on Inventum products used within the Netherlands.
Modifications and errors reserved
facebook.com/inventum1908
pinterest.com/inventum1908
youtube.com/inventum1908
instagram.com/inventum1908