DO95102WM - Washing machine DOMO - Free user manual and instructions
Find the device manual for free DO95102WM DOMO in PDF.

| Product Type | Front-loading washing machine |
| Brand | DOMO |
| Model | DO95102WM |
| Dimensions (W x D x H) | 59.5 x 54 x 84.5 cm |
| Net weight | 58 kg |
| Rated voltage | 220-240 V ~ 50 Hz |
| Heating power | 1800 W |
| Motor power | 300 W |
| Washing capacity | 8 kg (dry laundry) |
| Maximum spin speed | 1400 rpm |
| Protection class | IPX4 |
| Water pressure | 0.1 - 1.0 MPa |
| Number of programs | 15 programs |
| Main programs | White cotton, Colored cotton, Eco 40-60, Synthetics, Wool, Silk, Express, Rinse/Spin, etc. |
| Additional options | Pre-wash, Extra rinse, Intensive wash, Delay end, Child lock, Favorites |
| Anti-leak system | Integrated Aquastop on inlet hose |
| Loading type | Front loading (porthole) |
| Balance control | Automatic imbalance detection |
| Drum cleaning | Specific program at 90°C |
| Filter maintenance | Accessible pump filter, cleaning recommended every 20 cycles |
| Warranty | 2 years |
Frequently Asked Questions - DO95102WM DOMO
User questions about DO95102WM DOMO
0 question about this device. Answer the ones you know or ask your own.
Ask a new question about this device
Download the instructions for your Washing machine in PDF format for free! Find your manual DO95102WM - DOMO and take your electronic device back in hand. On this page are published all the documents necessary for the use of your device. DO95102WM by DOMO.
USER MANUAL DO95102WM DOMO
natural_image
White DOKO washing machine with black vent, showing internal airbag and digital display (no text or symbols visible)EN Instruction booklet Washing machine
www.domo-elektro.be


Read all instructions carefully.
Save this instruction manual for future reference.
NL Nederlands 3
FR Français 23
DE Deutsch 43
EN English 63
GARANTIE
Beste klant,
⚠PRODUCTSPECIFIEKE WAARSCHUWINGEN
natural_image
Simple line drawing of a coiled tube with a connector and label '12' (no text or symbols on the diagram itself)14
natural_image
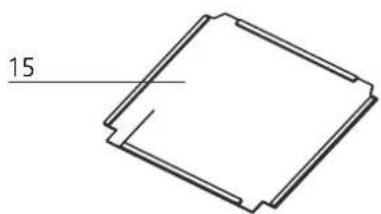
Simple line drawing of a rectangular frame with a labeled dimension line (15), no text or symbols present.WASMIDDELLADE
natural_image
Technical line drawing of a three-tiered industrial or laboratory apparatus with no visible text or symbolsBEDIENINGSPANEEEL
natural_image
Illustration of hands using a screwdriver to adjust a mechanical component (no text or symbols present)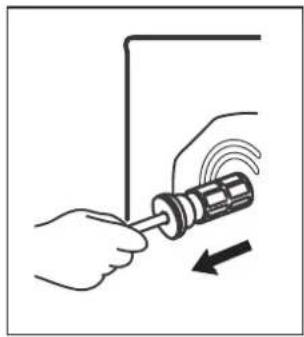
natural_image
Illustration of a hand using a screwdriver to adjust a screw with motion arrows (no text or symbols)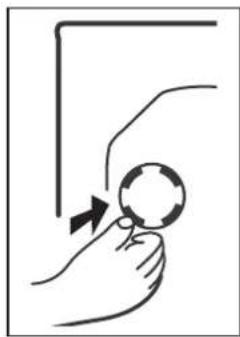
natural_image
Hand holding a magnifying glass with an arrow indicating motion (no text or symbols)natural_image
Pure technical diagram of a rectangular frame with directional arrows indicating rotation or movement (no text or symbols)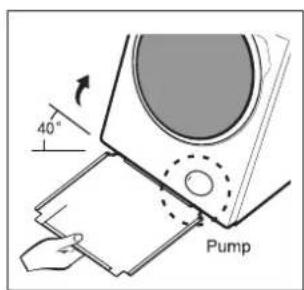

natural_image
Simple line drawing of a hand touching a ball on a curved surface with a knob (no text or symbols)PLAATSEN EN WATERPAS ZETTEN
natural_image
Two diagrams showing mechanical assembly with rotating components and directional arrows (no text or symbols)Aquastop-systeem
natural_image
Diagram of a pipe fitting with a bulb and valve (no text or symbols)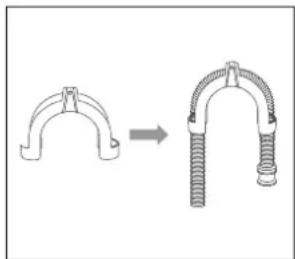
natural_image
Diagram showing a mechanical clamp or bracket being lifted, with no text or symbols present.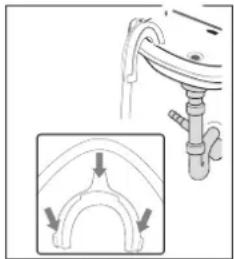
natural_image
Diagram showing a pipe connection with an inset view of a curved pipe or arch structure (no text or symbols)EERSTE WASBEURT NA INSTALLATIE:
natural_image
Technical line drawing of a three-tiered industrial device with no visible text or symbolsMilieubewust wassen
natural_image
Mechanical diagram showing a pulley system with a downward arrow indicating motion (no text or labels)PROGRAMMA ANNULEREN / WATER WEGPOMPEN
natural_image
Diagram of a cable being inserted into a connector with a directional arrow (no text or symbols)
natural_image
Diagram showing a pipe fitting with a pliers and an arrow indicating direction (no text or symbols)
natural_image
Illustration of two hands holding a small object, possibly a tool or device, with no visible text or symbols.
natural_image
Illustration of a hand pressing a button on a pipe fitting (no text or symbols)
natural_image
Diagram of a cable being inserted into a socket with a directional arrow indicating rotation (no text or symbols present)WASMIDDELLADE SCHOONMAKEN
natural_image
Line drawing of a washing machine with internal components and two circular insets showing close-ups of the parts (no text or symbols)PROBLEMEN EN OPLOSSINGEN
natural_image
Symbol of a trash bin with no text or numbers present⚠AVERTISSEMENTS SPÉCIFIQUES AU PRODUIT
natural_image
Simple line drawing of a coiled tube with a connector and label '12' (no text or symbols on the diagram itself)14
natural_image
Simple line drawing of a rectangular frame with a label '15' pointing to its top edge (no other text or symbols)TIROIR À LESSIVE
natural_image
Technical line drawing of a three-tiered water heater system with no visible text or symbolsPANNEAU DE COMMANDE
natural_image
Illustration of hands using a screwdriver to adjust a mechanical component (no text or symbols present)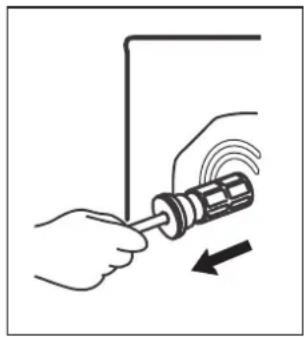
natural_image
Illustration of hands using a screwdriver to adjust a mechanical component (no text or symbols present)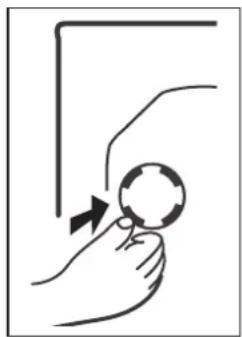
natural_image
Simple line drawing of a hand holding a magnifying glass with an arrow indicating motion (no text or symbols)natural_image
Pure technical diagram of a rectangular component with internal arrows indicating direction (no text or symbols)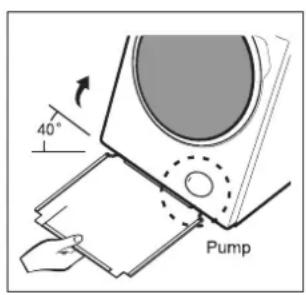
natural_image
Simple line drawing of a hand touching a ball on a curved surface with a knob (no text or symbols)PLACEZ ET METTEZ DE NIVEAU
natural_image
Two diagrams showing mechanical or electrical components with curved arrows indicating motion, no text or symbols present.Système Aquastop
natural_image
Diagram of a pipe fitting with a bulb and valve (no text or symbols)
natural_image
Diagram showing a mechanical clamp or bracket being lifted, with no text or symbols present.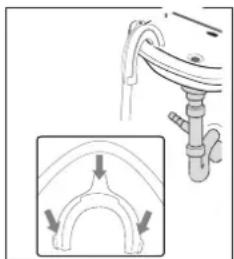
natural_image
Diagram showing a pipe connection with arrows indicating flow direction (no text or symbols)natural_image
Technical line drawing of a three-tiered device with no visible text or symbolsnatural_image
Pure mechanical diagram showing a gear and shaft assembly without any text, numbers, or symbolsnatural_image
Diagram of a cable being inserted into a connector with a directional arrow (no text or symbols)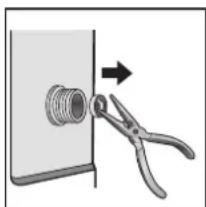
natural_image
Diagram showing a tool applying force to a mechanical component with a threaded bolt (no text or symbols)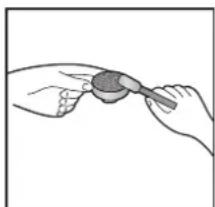
natural_image
Illustration of two hands holding a small object, possibly a tool or device, with no visible text or symbols.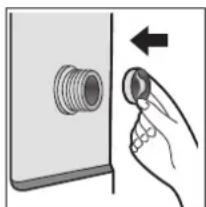
natural_image
Hand inserting a plug into a socket on a device panel (no text or symbols visible)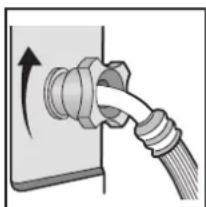
natural_image
Diagram of a cable being inserted into a socket with an arrow indicating rotation (no text or symbols present)NETTOYAGE DU TIROIR À LESSIVE
natural_image
Line drawing of a washing machine with two views of its internal components (no text or symbols)natural_image
Symbol of a trash bin crossed with no text or numbers, representing waste sorting or disposal (no text present)natural_image
Simple line drawing of a coiled tube with a connector and label '12' (no text or symbols on the diagram itself)14


natural_image
Simple line drawing of a rectangular frame with a labeled dimension line (15), no text or symbols present.WASCHMITTELSCHUBLADE
natural_image
Technical line drawing of a three-tiered indoor space unit with labeled components (no text or symbols beyond basic labels)BEDIENFELD

natural_image
Illustration of hands using a screwdriver to adjust a mechanical component (no text or symbols present)
natural_image
Illustration of hands using a screwdriver to adjust a mechanical component (no text or symbols present)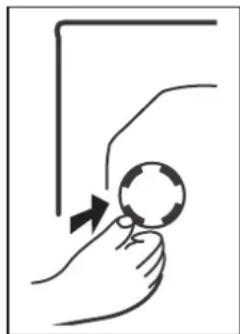
natural_image
Illustration of a hand holding a magnifying glass with an arrow indicating motion (no text or symbols)natural_image
Pure technical diagram of a rectangular component with internal arrows indicating direction (no text or symbols)
natural_image
Simple line drawing of a hand touching a ball on a horizontal surface with a knob (no text or symbols)natural_image
Two diagrams showing mechanical or electrical components with curved arrows indicating motion, no text or symbols present.natural_image
Diagram of a pipe fitting with a bulb and valve (no text or symbols)
natural_image
Diagram showing a mechanical clamp or bracket being lifted, with no text or symbols present.
natural_image
Diagram showing a pipe installation with an inset view of a curved pipe or arch structure (no text or symbols)natural_image
Technical line drawing of three vertical containers with internal compartments and a central control unit labeled MAX (no text or symbols beyond labels)natural_image
Pure mechanical diagram showing a gear and shaft assembly without any text, numbers, or symbolsnatural_image
Diagram of a cable being inserted into a socket with a directional arrow indicating flow (no text or symbols present)
natural_image
Illustration of a pipe fitting being adjusted with scissors (no text or symbols)
natural_image
Illustration of two hands holding a small object with a brush (no text or symbols)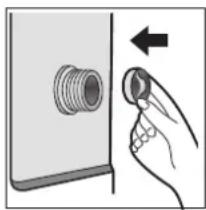
natural_image
Illustration of a hand pressing a button on a wall-mounted device (no text or symbols)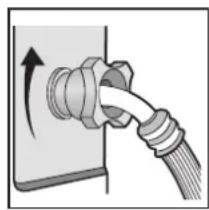
natural_image
Diagram of a cable being inserted into a socket with a rotating arrow (no text or symbols)WASCHMITTELSCHUBLADE REINIGEN
natural_image
Line drawing of a washing machine with two circular insets showing internal components (no text or symbols)natural_image
Symbol of a trash bin with crossed lines indicating no waste, and a solid black rectangle below (no text or labels)Thank you very much for placing your trust in DOMO. We hope you enjoy your new purchase.
All our products undergo strict quality control before reaching you. If you still experience any problems with your device, we sincerely regret that. We have collected the most frequently asked questions about our devices on our webshop. Scan the QR code and have a look!
If you cannot find a solution to your problem there, do not hesitate to contact our customer service via info@linea2000.be. Our staff will do everything they can to assist you!

This device has a warranty period of 2 years from the date of purchase. During this warranty period, the distributor will assume responsibility for any defects that can be shown to be the result of material, construction or manufacturing errors. Such defects will be remedied by repair or replacement of the device. The 2-year warranty period will be suspended during the repair period and will continue after the repair has taken place for the remaining duration of the warranty period. The warranty will be honoured if proof of purchase clearly showing the date of purchase is provided. If your device becomes defective within the 2-year warranty period, please return it with your proof of purchase to the store you purchased it from or follow the procedure of the relevant webshop if you bought it online.
The warranty does not cover damage to the device, accessories or parts caused by:
• normal wear and tear from use;
• non-compliance with the instructions for use, maintenance and cleaning in the manual;
- incorrect connection, e.g. electrical voltage too high;
- incorrect, heavy-handed or abnormal use;
• repairs or alterations carried out by the consumer or unauthorised third parties;
- use of parts or accessories not recommended nor supplied by the distributor.
SAFETY INSTRUCTIONS
When using electrical appliances, basic safety precautions should always be taken, including the following. Any injury or damage caused by failure to comply with these rules are at your own risk. Neither the manufacturer, importer, or the supplier may be held liable.
- Read all instructions carefully.
- Make sure all packaging materials and promotional stickers have been removed before using the appliance for the first time. Make sure children cannot play with the packaging materials.
-
This appliance is only suitable for use in domestic and similar environments, such as:
-
staff kitchen areas in shops, offices and other working environments;
- farm houses;
• by clients in hotels, motels and other residential type environments;
• bed and breakfast type environments.
- This appliance can be used by children aged from 16 years and above and persons with reduced physical, sensory or mental capabilities or lack of experience and knowledge if they have been given supervision or instruction concerning use of the appliance in a safe way and understand the hazards involved.
• Children should be supervised to ensure that they do not play with the appliance.
- Cleaning and user maintenance shall not be made by children unless they are older than 16 or supervised.
- Keep the appliance and its cord out of reach of children younger than 16 years.
- All repairs should be carried out by the manufacturer or its aftersales service.
▲ELECTRICAL WARNINGS
- In order to avoid a hazard this appliance must not be supplied through an external switching device, such as a timer or a separate remote control, or connected to a circuit that is regularly switched on and off by the utility.
- The appliance must be disconnected from its power source when not in use, during service and when replacing parts. If present, first turn all the buttons to the 'off' position, then pull the plug out of the socket by grasping the plug itself. Never pull the cord or appliance to remove the plug from the socket.
- Before use, check carefully that the electric tension and frequency of the power net at your home match the indications on the rating label of the appliance.
- The appliance must be plugged into an appropriate outlet that is installed and grounded in accordance with local installation regulations.
- Do not let the power supply cord hang over the edge of a counter, or touch hot surfaces.
- Keep the power cord away from hot parts and don't cover the appliance.
- Unwrap the cord completely to prevent overheating of the cord. Do not allow the power cord supply to run underneath or around the unit.
- For safety reasons, never use the appliance if the cord, plug, or appliance itself is damaged, or after a malfunction of the appliance. Return the appliance to the DOMO Service Department or its service agent for examination, repair, or electrical or mechanical adjustment. Do not try to repair the appliance yourself.
⚠️INSTALLATION
- Do not place near flammable materials, gases or explosives.
- Do not use or store this appliance outdoors.
• Always use the appliance on a steady, dry and level surface.
- Never place this appliance near a gas stove or electrical stove or in a place where it may come into contact with a warm appliance.
- The washing machine is heavy. Always lift the appliance with at least one other person or use a transport aid.
- The ideal ambient temperature for the washing machine is between 15^ and 25^ .
- Do not install the washing machine in a room where it may freeze. Frozen hoses can burst and the electronics may become damaged.
- Before first use, remove the transport safety devices at the back. Failure to do so may damage the machine during spinning.
- Do not place the washing machine on carpet or any material that obstructs air circulation underneath the appliance.
- Use only new, complete hoses with all associated parts. Replace old hoses with new ones.
- Check that water drains properly before placing the drain hose into a sink. Ensure the hose is securely fixed. Water backflow can push a loose hose out of the sink.
- The water pressure must be at least 0.1 MPa (1 bar) and no more than 1 MPa (10 bar).
- Connect the washing machine only to a cold water supply. The appliance is not suitable for hot water.
- Turn off the tap if you are away for an extended period, especially if there is no floor drain nearby.
- Never place the appliance on its side or upside down.
- Never lift the washing machine by the door or the detergent drawer.
⚠ USE
- Do not use this appliance for other than intended use.
- Do not operate the appliance with wet hands.
- The use of accessories that are not recommended or sold by the manufacturer can cause fire, electrical shock or injuries. Only use the utensils delivered with the appliance.
⚠ CLEANING AND MAINTENANCE
- To protect against electrical shock or burns, do not immerse unit, cord, or plug in water or other liquid.
- Failure to maintain this appliance in a clean condition could adversely affect the life of the appliance and possibly result in a hazardous situation.
⚠️PRODUC-SPECIFIC WARNINGS
- This washing machine must only be used for washing textiles that the manufacturer indicates as washable on the care label.
- Clean the washing machine and the mains cable before first use and after each use. Check for any damage.
- Have the washing machine installed only by a qualified professional. The manufacturer accepts no responsibility for damage caused by incorrect installation by unauthorised persons.
- The manufacturer is not liable for damage resulting from a missing or interrupted earth connection.
- Ensure the power socket is easily accessible so that you can quickly unplug the appliance in case of emergency.
- Do not expose the machine to extreme conditions such as:
• high humidity or damp environments,
• extreme heat or cold,
- direct sunlight,
- open flames.
- Do not place objects on the washing machine. Vibrations during washing may cause them to fall.
- Warning: The viewing window becomes hot during washing at high temperatures. Children aged 16 and over should only use the washing machine under adult supervision.
- Do not allow children to touch the viewing window during washing.
- The maximum load is 8 kg (dry laundry). For smaller loads, see the chapter Overview of Washing Programmes.
- Check that there are no foreign objects such as nails, needles, coins or paper clips in the drum. These can damage components and cause harm to your laundry.
- If you dose the detergent correctly, there is no need to descale the washing machine. If descaling is necessary, use a special product with corrosion protection.
- Textiles treated with solvents must be thoroughly rinsed before washing.
- Do not wash textiles contaminated with flour, as this may damage the machine.
- Do not use cleaning agents containing solvents, such as petrol, in or on the washing machine. These substances can produce toxic fumes and pose a fire or explosion hazard.
- Dyes may only be used if they are suitable for household washing machines.
Always follow the manufacturer's instructions. Do not use bleach, as this can cause corrosion. - Check that there is no water left in the drum before opening the door.
- Do not allow children or pets to climb into the drum. Always check that the drum is empty before loading laundry and starting the machine.
- Do not use the washing machine in rooms with explosive or flammable gases.
- Before first use, run an empty wash cycle at 90^ without detergent.
- Do not wash carpets in the washing machine.
- There is a risk of burns from hot water. Ensure the drain hose is positioned so that hot water can flow away safely and you do not accidentally come into contact with it.
- Never add water manually during a wash programme.
- Wait until the programme has completely finished before opening the door.
- Do not force the door open while the washing machine is still running.
- Do not open the detergent drawer during washing.
- Do not sit on the washing machine, climb on it or lean against the door.
- Do not slam the door shut. If the door does not close, check whether the drum is overloaded or laundry is protruding.
SAVE THESE INSTRUCTIONS FOR FUTURE REFERENCE
All images and descriptions in this manual are purely indicative and may differ slightly from the actual device.
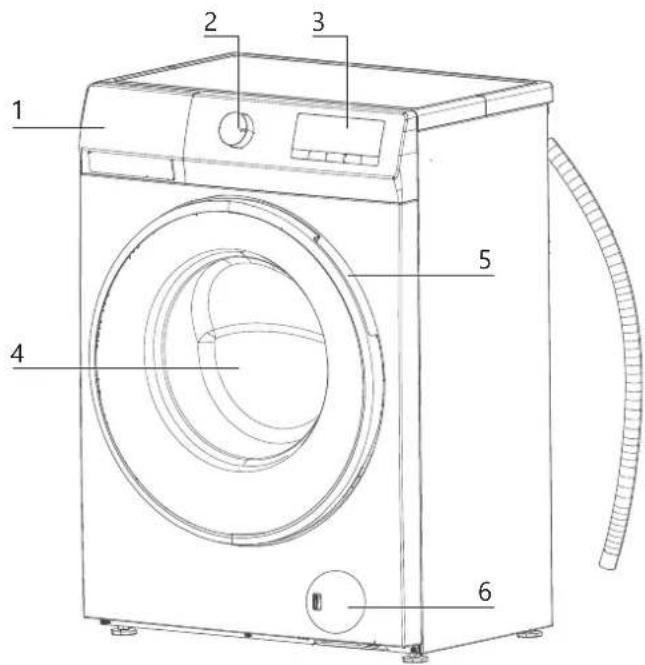
PARTS
FRONTSIDE
- Detergent drawer
- Programme selector knob
- Control panel
- Glass door with viewing window
- Door handle
- Pump filter cover
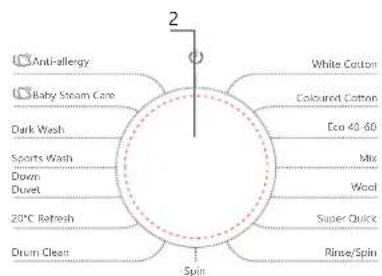
flowchart
graph TD
    A["Anti-allergy"] --> B["Baby Steam Care"]
    B --> C["Dark Wash"]
    C --> D["Sports Wash"]
    D --> E["Down"]
    E --> F["Duvet"]
    F --> G["20°C Refresh"]
    G --> H["Drum Clean"]
    H --> I["Spin"]
    I --> J["White Cotton"]
    I --> K["Coloured Cotton"]
    I --> L["Eco 40-60"]
    I --> M["Mix"]
    I --> N["Wool"]
    I --> O["Super Quick"]
    I --> P["Rinse/Spin"]
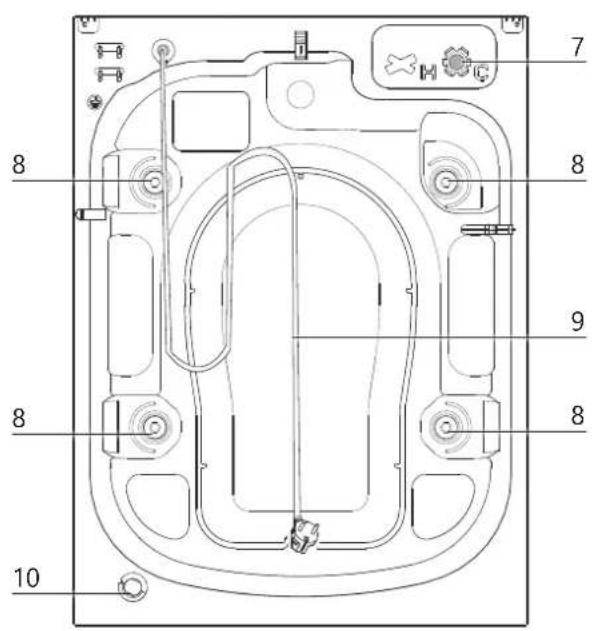
BACKSIDE
- AquaStop inlet hose connection
- Transit bolts
- Power cord with plug
- Drain hose
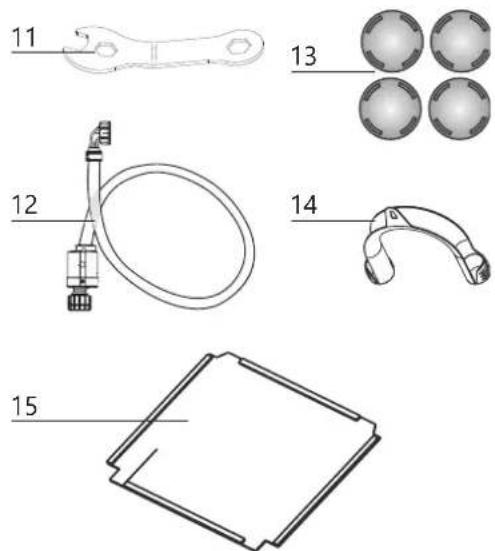
ACCESSORIES
- Installation spanner
- Inlet hose with mechanical AquaStop
- 4 cover caps for transit bolt openings
- Fixing bracket for drain hose
- Sound insulation base plate
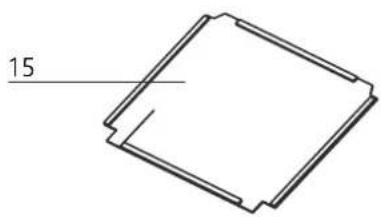
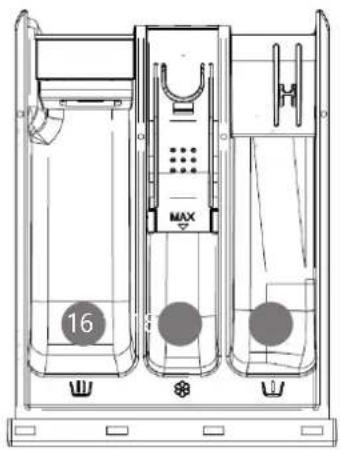
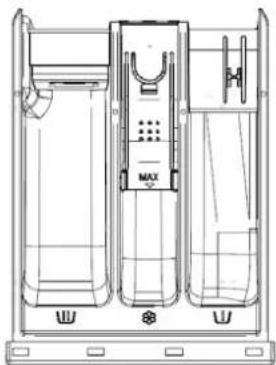
DETERGENT DRAWER
-
Main wash compartment Ⓤ
-
Prewash compartment Ⓤ
-
Fabric softener compartment

natural_image
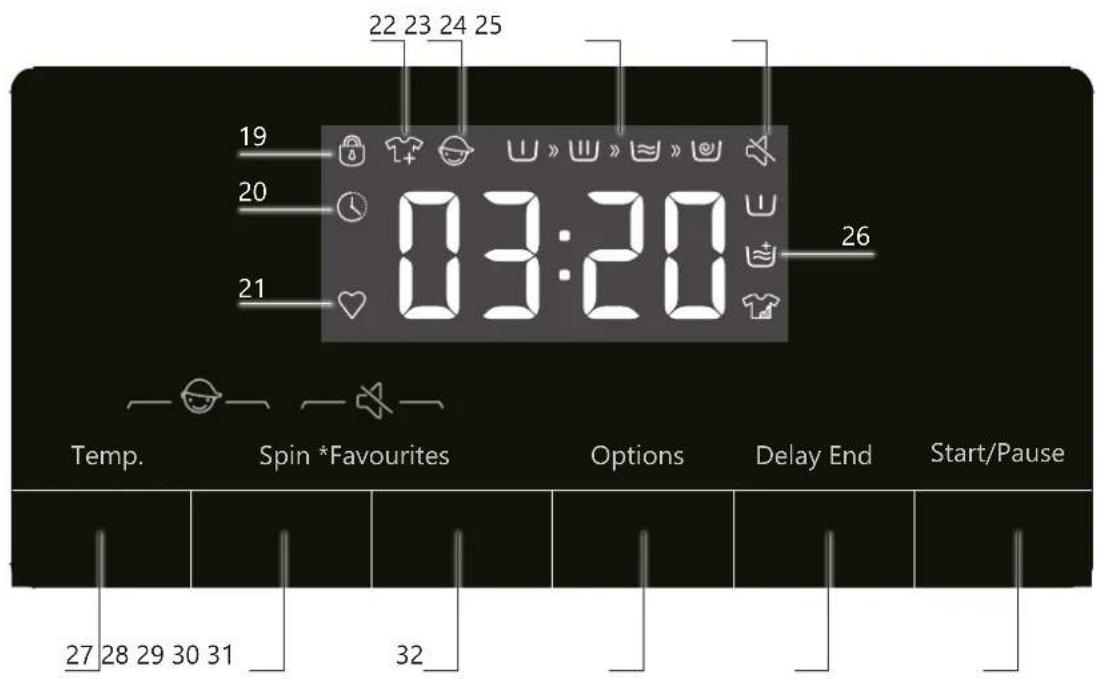
Technical line drawing of a three-tiered industrial or laboratory apparatus with no visible text or symbolsCONTROL PANEL
- Door lock indicator active 🔒
- End delay indicator active
- FAVOURITES indicator active ♥
- Add laundry indicator active
- Child lock indicator active
- Programme progress indicator ∪ » ∪ » ≈ » ∅
- Acoustic signals disabled indicator
- Extra options indicator active (prewash / extra rinse / Intensive wash )
- TEMPERATURE button
- SPIN button
- FAVOURITES button
- OPTIONS button
- DELAY END button
- START/PAUSE button
INSTALLING THE WASHING MACHINE
⚠️Remove all packaging materials and any promotional stickers.
⚠️ Incorrect connection of electricity or water can lead to electric shock or damage to your home. Always have the connection carried out by a qualified professional.

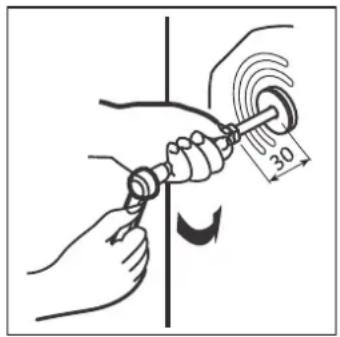
Before using the washing machine for the first time, you must remove the transport safety devices. Using the machine with these protections still in place can cause damage and will void your warranty.
- Loosen the four transport bolts using a 10 mm spanner.
- Remove the rubber sleeves containing the transport supports and pads.
- Seal the open holes with the supplied cover caps.
natural_image
Illustration of hands using a screwdriver to adjust a mechanical component (no text or symbols present)
natural_image
Illustration of hands using a screwdriver to adjust a mechanical component (no text or symbols present)
natural_image
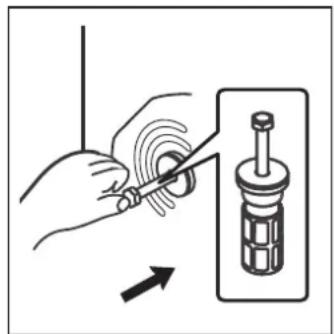
Simple line drawing of a hand holding a magnifying glass with an arrow indicating motion (no text or symbols)Tip: Keep the transport safety devices in a safe place. You will need them again if you ever move the washing machine.
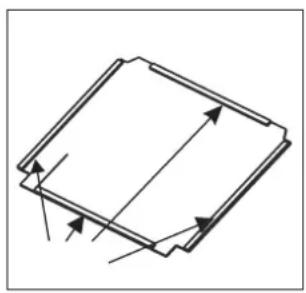
Fit the sound insulation base plate.
For quieter operation, you can attach a sound insulation base plate to the underside of the washing machine. This base plate is supplied with the appliance. Fitting this plate significantly reduces the noise level. The washing machine will also work perfectly without it, but for optimal comfort, installation is recommended.
- Remove the protective paper from the double-sided adhesive strips on the sides of the base plate.
- Tilt the washing machine approximately 30 to 40 degrees to allow the base plate to be fitted. The side with the straight cut-outs must face the front of the washing machine.
- Position the base plate so that the cut-outs for the adjustable feet are at the front.
- Press the base plate firmly by hand on the areas with adhesive tape so that it stays securely attached to the underside of the machine.
natural_image
Pure technical diagram of a rectangular component with internal arrows indicating direction (no text or symbols)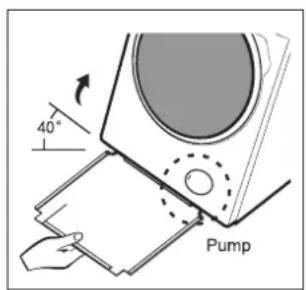

natural_image
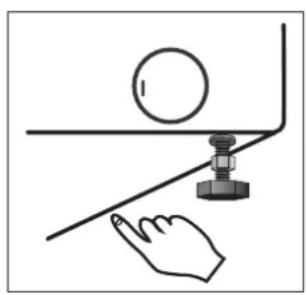
Simple line drawing of a hand touching a ball on a curved surface with a knob (no text or symbols)POSITIONING AND LEVELLING
- Ensure that the washing machine is placed on a stable, level surface so that it operates without vibrations. Position it close to a drain, water supply and a power socket.
- When positioning the appliance, allow sufficient space and make sure all connections are easily accessible.
- Level the machine by adjusting the feet. Turn the feet clockwise or anticlockwise to raise or lower them. Use the supplied spanner for this.
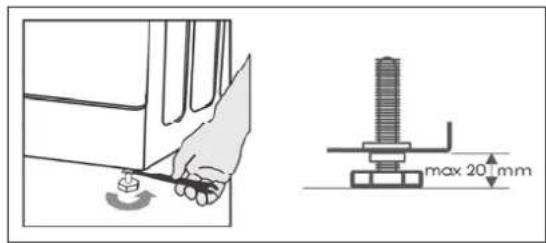
- Then tighten the nut fully against the underside of the machine to prevent the feet from shifting.
natural_image
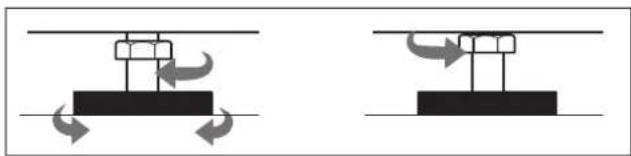
Two diagrams showing mechanical or electrical components with curved arrows indicating motion, no text or symbols present.- Press down on each corner of the washing machine to check if it moves. A stable position prevents vibrations and noise.
- Ensure that the appliance is connected to a correctly installed and earthed socket.
- Check that the water supply and drainage are properly connected (see the following chapters).
- The plug must remain easily accessible even after installation.
⚠️ Never place materials such as cardboard or wood under the washing machine to level it.
⚠️ If you clean under the adjustable feet, take care not to accidentally change their setting.
CONNECTING TO THE WATER SUPPLY
⚠ Warning: Risk of damage if installed incorrectly!
Follow these guidelines to prevent damage to the washing machine or leaks:
- Always use new and complete water hoses with the corresponding fittings. Replace worn or damaged hoses immediately.
- The supply hose, including seals, is provided inside the drum of the washing machine.
- The water pressure in the pipes must be at least 0.1 MPa (1 bar) and no more than 1 MPa (10 bar).
- Connect the machine only to a cold-water tap. Connection to hot water is not permitted.
- Ensure the hose is not twisted or kinked after installation.
- Check that the hose and connection are watertight after tightening.
- Regularly check that the supply hose is still in good condition.
- If your pipes are new or have not been used for a long time, let water run until it is clear to prevent blockages or damage to the washing machine.
- If the supplied hose does not fit your tap, contact a plumber. They can help with a suitable adapter or non-return valve.
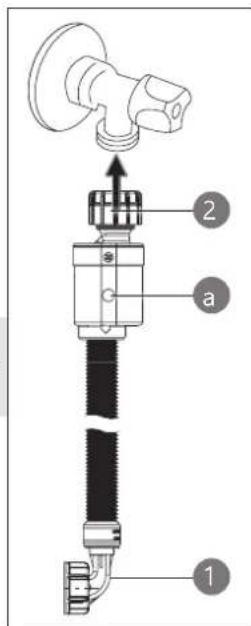
If you connect the washing machine to the drinking water supply, ensure protection against backflow of dirty water (according to DIN EN 1717). We recommend having the installation, including water and electrical connections, carried out by a professional.
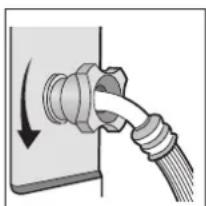
- Attach one end of the hose to the connection at the back of the washing machine.
- Screw the end with the AquaStop (a) onto a suitable cold-water tap with 3/4" thread.
Aquastop System
The AquaStop system prevents leaks. If the supply hose becomes damaged, this system automatically stops the water supply. In that case, the viewing window on the AquaStop housing turns red. If this happens, you must replace the supply hose.
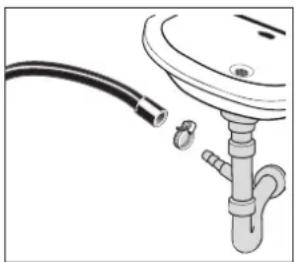
CONNECTING THE DRAIN HOSE
The drain hose is located at the back of the machine.
- Secure the drain hose firmly so that it cannot come loose during washing.
- The outlet of the drain hose must always be positioned above the water level in the drum:
• Minimum height: 0.7 metres
• Maximum height: 1.25 metres
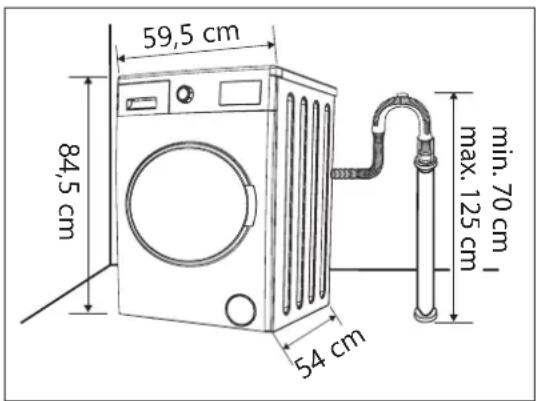
- Do not push the hose too far into the drain pipe. Leave enough space for water pressure to drain properly.
- Connect the drain hose to a suitable waste water outlet, to a siphon, or hang the end of the hose over a sink. If necessary, use the fixing bracket to secure the drain hose firmly.
natural_image
Diagram of a pipe fitting with a coiled tube and valve (no text or symbols)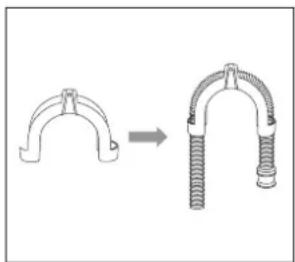
natural_image
Diagram showing a mechanical clamp or spring being inserted into a U-shaped component (no text or symbols present)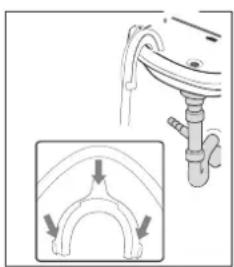
natural_image
Diagram showing a curved pipe or channel with directional arrows indicating flow or movement, no text or symbols present.⚠️ Note: Due to water pressure at the end of the hose, it is usually not possible to position the hose correctly in a small washbasin.
- Ensure that the drain hose is installed without kinks or twists.
CONNECTING TO THE POWER SUPPLY
• After correctly connecting the water inlet and outlet, plug the appliance into an earthed socket.
- Make sure the socket remains easily accessible so you can quickly disconnect the appliance in case of emergency.
FIRST WASH CYCLE AFTER INSTALLATION:
- Plug the washing machine into the socket and turn on the water tap.
- Set the programme selector knob to DRUM CLEANING (90 °C).
- Then press the START/PAUSE button to start the programme.
⚠️ Important: Do not use detergent and do not put any laundry in the drum.
USE
⚠️Incorrect use can damage both the appliance and your laundry.
- Check garments for foreign objects such as coins, metal parts or needles before washing, and remove them.
- Tie fabric belts or similar items together or place them in a laundry bag.
- Close zips, hooks and eyes. Fasten pillowcases and duvet covers.
- Use a laundry bag for delicate items such as underwired bras and tights.
- Sort laundry carefully and follow the care symbols on the label.
- Wash new garments separately the first time or with similar colours to prevent stains or discolouration.
OVERVIEW OF WASHING PROGRAMMES
| Washing Programme | Max. Load (kg) | Max. Spin Speed (rpm) | Available Options | Washing Advice | |||||
| End Delay | Spin | Temperature | Prewash | Extra rinse | Intensive Wash | ||||
| Anti-allergy40, 60°C | 2 1400 | √ | √ | √ | √ | √ | Washing temperature-resistant garments for people with sensitive skinAllergens such as pollen, parasites, and mites are removed by hot steam | ||
| Baby Steam Care40, 60, 90°C | 2 1400 | √ | √ | √ | √ | √ | Baby clothes and underwear are sterilized by hot steam | ||
| Dark wash--, 20, 30, 40, 60°C | 4 1000 | √ | √ | √ | √ | √ | Dark cotton garments or easy-care fabrics | ||
| Sports wash--, 20, 30, 40°C | 2 1000 | √ | √ | √ | √ | √ | Sportswear | ||
| Down--, 20, 30, 40°C | 2 600 | √ | √ | √- | √ | - | Machine-washable blankets, pillows made of synthetic fibers and down-filled pillows | ||
| 20°C Refresh- | 8 1400 | √ | √ | - | √ | √ | √ | Refreshing garments, for lightly soiled laundry or shrink-sensitive fabrics | |
| Drum Clean90°C | -800 | √ | - | - | - | Drum | Cleaning Programme | ||
| White Cotton--, 20, 30, 40, 60, 90°C | 8 1400 | √ | √ | √ | √ | √ | Heavily or moderately soiled cotton or linen laundry, towels (max. 4 kg)At low temperature: Lightly soiled cotton or linen laundry, bed linen, table linen, underwear, towels (max. 2 kg)Use liquid detergent | ||
| Coloured Cotton--, 20, 30, 40, 60°C | 8 1400 | √ | √ | √ | √ | √ | Light to heavily soiled laundry. The temperature can be set individuallyFollow the care instructions on the garments. Wash clothes worn directly on the skin at 60°CLightly soiled laundry is thoroughly cleaned at 40°C | ||
| Eco 40-60- | 8 1400 | √ | √ | - | - | - | Cotton laundry that can be washed at 40°C or 60°C can be washed together in the same programmeThis programme is used to assess compliance with EU Ecodesign regulations | ||
| Mix--, 20, 30, 40°C | 4,5 1400 | √ | √ | √ | √ | √ | Cotton laundry, synthetic or synthetic- blend fabrics that can be washed together, and laundry labeled 'easy-care' Use liquid detergent | ||
| Wool--, 20, 30, 40°C | 2600 | √ | √ | √- | √ | √ | - | Wool garments with the "hand wash" symbol on the care label must not be washed in the washing machine | |
| Super Quick--, 20, 30, 40°C | 1800 | √ | √ | √- | √ | √ | - | Lightly soiled, sweaty cotton and linen garmentsUse less detergent due to the short washing time. Distribute the laundry evenlyUse liquid detergent | |
| Rinse/Spin- | 81400 | √ | √ | - - - - - | Programme for rinsing with additives, such as anti-static agents or fabric softenerFor very delicate fabrics, it is recommended to reduce the spin speed | ||||
| Spin- | 81400 | √ | √ | - - - - - | - | Spin, for example after hand washing | |||
ENERGY CONSUMPTION OF THE WASHING PROGRAMMES
| Washing Programme | Selected Temperature (°C) | Rated Capacity (kg) | Maximum Drum Temperature (°C) | Programme Duration (h:min) | Energy Consumption (kWh/Cycle) | Water Consumption (Litres/Cycle) | Residual Moisture (%) | Maximum Spin Speed |
| Eco 40-60 Full Load | -839 | 3:38 0,760 | 60501400 | |||||
| Eco 40-60 Half Load | -429 | 2:48 0,390 | 45511400 | |||||
| Eco 40-60 1/4 Load | -226 | 2:48 0,220 | 30531400 | |||||
| 20°C Refresh 20 8 18 | 1:50 0,230 | 65531400 | ||||||
| White Cotton 60 8 59 | 3:49 1,550 | 65551400 | ||||||
| Mix 40 4 45 2:18 0,760 | 50451400 | |||||||
| Super Quick 40 1 40 0:30 0,320 17 58 800 | ||||||||
The programme duration and the energy and water consumption values may vary depending on the weight and type of laundry, the selected additional functions, the properties of the tap water, and the ambient temperature.
Energy-Saving Tips
To use the washing machine efficiently, keep the following in mind:
- Do not use the prewash programme if your laundry is only lightly soiled. This saves electricity and water.
- The most energy-efficient programs are generally those with longer durations and lower temperatures.
- Use the quick wash programme for smaller loads.
- Modern detergents allow washing at low temperatures. Therefore, choose a programme with low temperatures (e.g., REFRESH 20°C) to save energy.
- Loading the washing machine up to the weight specified by the manufacturer for each programme helps save energy and water.
USE OF DETERGENT
Always follow the instructions of the fabric softener and other additive manufacturers.
- If you use a prewash, put the detergent for it in compartment I.
- The detergent for the main wash goes in compartment II.
- Fabric softener should be placed in the middle compartment of the detergent drawer, identified by the flower symbol. It will be automatically added during the final rinse.
⚠️ Note: Never add more detergent than the maximum indicated in the compartment (marked MAX).
natural_image
Technical line drawing of a three-tiered cylindrical device with no visible text or symbolsEnvironmentally Conscious Washing
Use only the amount of detergent needed for the selected programme.
- A water softener is only necessary for hard water. Information about water hardness can be obtained from your local water supplier.
- Use bleach only for stubborn stains or white laundry. Always check the garment care label and the instructions on the bleach packaging.
- For low-temperature programs, it is recommended to use liquid detergent.
Detergent Dosing
Follow the dosing recommendations of the manufacturer. The correct amount depends on the level of soiling, the load size, and water hardness.
Incorrect dosing can cause problems:
- Too little detergent:
- Laundry becomes dull
- Grease deposits may accumulate
• The machine may scale up
- Too much detergent:
• Excessive foam formation
- Detergent does not rinse out properly and laundry will not be clean
Handling Different Types of Soiling
- Stubborn stains: treat stains with a stain remover before washing.
- Heavily soiled laundry: wash heavily soiled garments in smaller loads. Use slightly more detergent than usual.
• After washing work clothes or lint-producing fabrics, it is advisable to run the DRUM CLEAN programme without laundry to rinse the machine. - Lightly soiled laundry: choose a programme suitable for small amounts of lightly soiled laundry, such as REFRESH 20°C.
POWER OUTAGE
If the washing machine temporarily loses power, the programme will not be erased. Once power is restored, the cycle will continue from where it left off.
⚠️Note: Do not open the door during a power outage.
LOADING THE WASHING MACHINE
⚠ An overloaded drum can cause damage to both the washing machine and your clothes.
Check the maximum load in the "Overview of Washing Programs" table.
The drum can hold up to 8 kg of laundry. Never force clothes into the drum, as this will result in poor washing performance.
Drum Balance
The washing machine has an automatic imbalance control. If the laundry is not evenly distributed, the message UNB will appear on the display.
- Turn the selector knob to the OFF position for about 3 seconds to switch off the machine.
- Open the door and loosen the laundry. Distribute it evenly in the drum.
- Close the door, select the SPIN programme, and reduce the spin speed if necessary.
- Press START/PAUSE to continue.
- Repeat the original washing programme if needed.
DOOR LOCK
During washing, the door remains automatically locked. The lock symbol 📄 will appear on the display. After the programme ends, the door will unlock automatically, usually after a few minutes. The duration depends on the drum temperature. If the temperature is still too high, the door will remain locked longer.
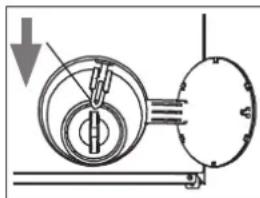
Emergency Door Opening
If the door does not open due to a power failure or another exceptional situation, you can use the emergency release via the lever located behind the drain pump cover.
⚠️ Do not use this function when the washing machine is operating normally.
-
Before performing an emergency opening, make sure the drum has completely stopped spinning, the temperature inside the drum is not too high, and the water level is below the drum opening. If the water level is higher, first drain the water using the drain hose (if available) or by slowly loosening the filter.
-
Open the drain pump cover, pull the release lever downward using a tool (such as a screwdriver). You can then open the door.
natural_image
Mechanical diagram showing a pulley system with a downward arrow indicating motion (no text or symbols)- Sort your laundry by type and colour. Close buttons and zippers, remove metal buckles, and empty pockets. Fasten pillowcases and duvet covers. Pre-treat stains if necessary.
- Place delicate items and bras in a laundry bag.
- Plug in the power cord and turn on the water tap.
Opening and Closing the Door
To open the door, pull the handle. Open the door fully to make loading easier. Close the door gently until you hear a click.
Selecting and Starting a Programme
- Turn the selector knob to the desired programme (see "Overview of Washing Programs").
- Want to adjust settings? You can change the temperature or spin speed, or activate additional functions (see chapter "SETTING EXTRA FUNCTIONS").
- Add detergent to the correct compartment.
- Then press START/PAUSE to start the programme.
- The display will first show ----. The washing machine automatically weighs the load and adjusts the programme duration accordingly. The estimated time (in hours and minutes) will then appear.
- The programme progress will then be shown on the display.
Pausing the Programme and Adding Laundry
- Press START/PAUSE to temporarily stop the programme.
- Want to add more laundry? Do this as soon as possible, preferably within the first few minutes. If the symbol #? flashes, you can open the door and add laundry.
- If the symbol 1+ does not flash, it is too late to add laundry because the temperature is above 50 °C or the programme is too far advanced.
- Close the door properly and press START/PAUSE again to continue.
You can also use the pause function to soak laundry. This helps with stubborn dirt. Start the programme, wait about 10 minutes, then press START/PAUSE to pause. After the desired soaking time, press START/PAUSE again to resume.
End of the Programme
- When the programme is finished, END will appear on the display. Turn the selector knob to OFF ⏻ to switch off the machine completely.
- Wait until the door unlocks automatically. Then open the door and remove the laundry immediately to prevent creasing.
- Unplug the power cord.
- Turn off the water tap.
- Leave the door slightly open and pull out the detergent drawer a little. This allows the appliance to dry properly and prevents mold or unpleasant odours.
After 2 minutes of inactivity, the washing machine automatically switches to standby mode.
CHANGING THE WASHING PROGRAMME
Do you want to stop the current programme and select another one?
- Turn the selector knob to the OFF position ⏻
- Then choose the new programme. Do not add extra detergent.
- Press START/PAUSE to start the new programme.
CANCELING A PROGRAMME / DRAINING WATER
Do you want to cancel a running programme? Turn the selector knob to the OFF position.
Do you only want to drain the water from the drum? Set the selector knob to the SPIN programme. Press START/PAUSE to start.
SETTING EXTRA FUNCTIONS
Note: Not all functions are available in every programme. The options you can use depend on the selected wash cycle.
Set Temperature
Press the TEMP button repeatedly to select the desired temperature. Depending on the programme, you can choose from
-- (cold) | 20 °C | 30 °C | 40 °C | 60 °C | 90 °C
The symbol -- means the temperature cannot be set manually.
Set Spin Speed
Press the SPIN button repeatedly to select the spin speed (rpm). The following options are available (depending on the programme):
0 (no spin) | 400 | 600 | 800 | 1000 | 1200 | 1400
The higher the spin speed, the more noise the machine makes, but the laundry will come out drier.
Prewash
Use Prewash for heavily soiled clothes. It helps remove stubborn stains more effectively.
Press the Options button until the PREWASH indicator lights up. Add detergent to the prewash compartment (compartment I) for best results.
Extra rinse
This function adds an extra rinse before the fabric softener cycle.
Useful if you:
• have allergies or sensitive skin,
• are washing baby clothes,
- use liquid starch instead of fabric softener (e.g., for shirts, tablecloths, or curtains).
Press the Options button repeatedly until the EXTRA RINSE indicator lights up.
Intensive Wash
If your laundry is heavily soiled, select this function to extend the washing time for better results.
Press the Options button until the INTENSIVE WASH indicator lights up.
CHILD LOCK
The child lock prevents settings from being changed during a wash cycle.
⚠️ Note: You can still switch off the machine using the programme selector knob.
- To activate, press and hold the TEMP and SPIN buttons simultaneously for a few seconds during a running programme.
- The child lock symbol lights up when active.
• After the programme ends or if an error occurs, the child lock is automatically deactivated. If you manually switch the machine off and on again, the child lock will also reset.
DISABLE SOUND SIGNALS
Don't like the beeps? You can turn off the sound signals for button presses and at the end of the programme.
⚠ Error alerts will always remain audible.
- Press and hold the SPIN and FAVOURITES buttons simultaneously for a few seconds.
- The corresponding symbol lights up when the signals are disabled.
END TIME DELAY
The End Time Delay function lets you set when the wash cycle should finish. This is useful if you want to wash overnight or have the laundry ready when you return home.
- Close the washing machine door.
- Turn the selector knob to the desired programme. Add any extra functions if needed.
- Press the End Time Delay button to activate the function.
-
Press the End Time Delay button repeatedly to set the desired finish time. You can choose between 3 and 24 hours. The delay time appears on the display.
-
Press START/PAUSE. The machine enters standby mode, and the corresponding symbol ⏻ flashes. The wash cycle will start automatically so that it finishes at the set time. During washing, the remaining time is shown on the display.
To cancel the delay, turn the selector knob to another programme before pressing START/PAUSE.

FAVOURITES
- Set a programme with any extra functions you want.
- Press and hold the FAVOURITES button for a few seconds.
- Your settings are now saved as your favorite programme.
- Press the FAVOURITES button to load this programme, then press START/PAUSE to begin. The corresponding symbol ♥ lights up.
⚠️ Pressing FAVOURITES loads your saved settings immediately—regardless of the position of the selector knob. The knob position does not matter.
⚠️You can only save one favorite setting, not one per programme.
CLEANING AND MAINTENANCE
Do not use aggressive or abrasive cleaning agents such as acetic acid, soda, or solvents. These can damage the machine, especially the surfaces and rubber seals.
DRUM CLEANING
Run the DRUM CLEANING programme at 90 °C every two months. Do this without laundry and without detergent to keep the inside of the machine clean.
You may use a suitable descaler for washing machines—always follow the manufacturer's instructions.
⚠ Ensure no metal objects such as pins, paper clips, coins, etc., remain in the drum, as they can cause rust stains.
To remove rust stains, use a chlorine-free cleaning agent and follow the manufacturer's instructions.
Do not use steel wool or other abrasive cleaners to remove rust stains, as these can damage the drum surface. A damaged drum may in turn damage your clothes.
CLEANING THE DOOR
After each wash, wipe lint, hair, detergent residue, or dirt from the rubber seal of the door with a damp cloth. Gently pull the rubber seal open and remove any debris.
Clean the inside and outside of the door with a damp cloth.
CLEANING THE HOUSING AND CONTROL PANEL
Clean the outside of the machine and the control panel with a soft cloth lightly moistened with lukewarm soapy water.
Make sure no moisture enters the electronics when cleaning the control panel.
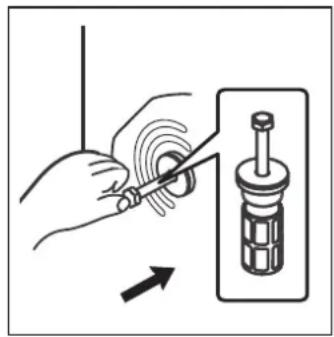
CLEANING THE PUMP FILTER
⚠ Warning: Risk of burns from hot water. The water in the drain pump may still be hot. Always wait until it has cooled before starting cleaning or maintenance.
Clean the pump filter after approximately 20 wash cycles. Failure to do so may cause blockages in the drainage system.
- Unplug the machine. Close the water tap.
- Place an absorbent cloth under the pump filter cover.
- Open the pump filter cover.
- Turn the filter counterclockwise and remove it once all water has drained.
- Remove any foreign objects from the filter and pump chamber.
-
Rinse the filter under running water using a soft brush.
-
Reinsert the filter in reverse order. Ensure the filter fits exactly into the pump chamber recess. Tighten clockwise. Close the pump filter cover securely.
CLEANING THE INLET VALVE
Clean the water inlet valve at least once a month. Skipping this maintenance may cause blockages in the supply system.
- Unplug the machine. Close the water tap.
- Disconnect the water supply hose from the rear connection of the washing machine.
- Remove the filter from the valve with pliers and clean it.
- Reinsert the filter.
- Clean the filter at the other end of the hose with a brush under running water.
- Reconnect the hose to the machine's water inlet.
- Reattach the hose to the water tap.
natural_image
Diagram of a cable being inserted into a socket with a directional arrow (no text or symbols)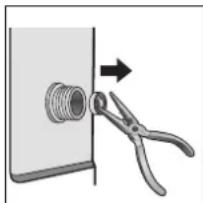
natural_image
Diagram showing a pipe fitting with forceps and an arrow indicating direction (no text or symbols)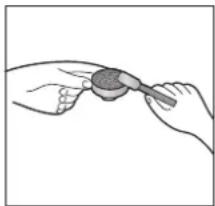
natural_image
Illustration of two hands holding a small object with a magnifying glass (no text or symbols)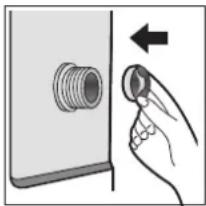
natural_image
Illustration of a hand inserting a plug into a socket (no text or symbols)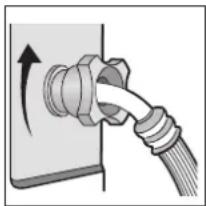
natural_image
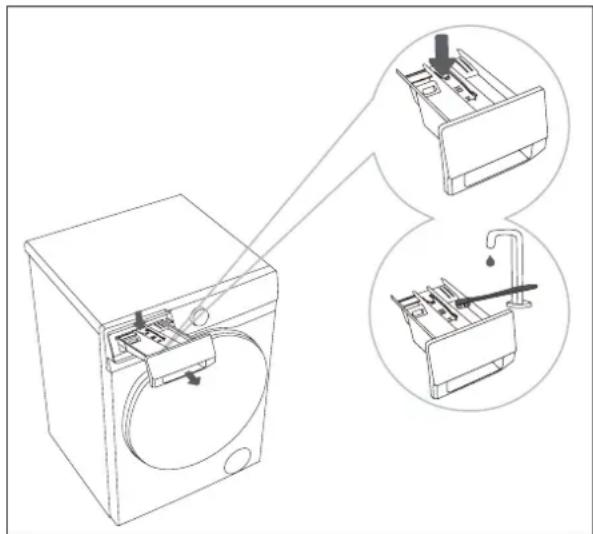
Diagram of a cable being inserted into a socket with an arrow indicating direction (no text or symbols present)CLEANING THE DETERGENT DRAWER
Clean the detergent drawer if dirt or detergent residue remains.
- Pull the drawer out slightly and press the tab at the back to remove it completely.
- Remove detergent residue and limescale from the spray nozzles in the compartment using a dish brush.
- Rinse the entire drawer under running water and wipe clean
- Slide the drawer back into the machine.
natural_image
Line drawing of a washing machine with two views of internal components (no text or symbols)PROBLEMS AND SOLUTIONS
During use, problems may occur. Check the following table to see if you can solve the issue yourself. Other repairs must not be carried out by the user—doing so will void the warranty.
In case of a malfunction, contact our customer service or an authorized technician.
| PROBLEMS POSSIBLE CAUSE SOLUTIONS | ||
| Washing machine does not work | No power supply | Plug in the power cord, check fuses and power supply. |
| Water supply interrupted | Open the tap and clean the filter in the inlet hose. | |
| Door not properly closed | Close the washing machine door correctly. | |
| Programme not started • Press the START/PAUSE button. | ||
| Water leakage | Inlet hose not properly connected | Connect the hose securely. |
| Pump filter not correctly installed | Check the filter and ensure proper installation. | |
| Unpleasant odour from drum • Build-up of detergent residues. • Run a drum cleaning cycle. | ||
| No water in drum | Tap closed or AquaStop activated | Open the tap and check the hose. Replace if necessary. |
| Poor washing results | ·Too little or incorrect detergent dosage | ·Dose according to soil level and water hardness. Run a drum cleaning cycle. |
| ·Grease deposits / detergent residues | ·Run a drum cleaning cycle. | |
| ·Pump filter clogged ·Clean the pump filter. | ||
| Machine does not fill with water | ·Water supply interrupted ·Open the tap. | |
| ·Programme not started | ·Check if the programme is set correctly. | |
| ·Water pressure too low ·Check water pressure. | ||
| ·Inlet hose not properly connected, kinked or blocked | ·Reconnect the hose and ensure it is not kinked or blocked. | |
| ·Door not properly closed | ·Close the washing machine door correctly. | |
| Water flows in and out simultaneously | ·Drain hose positioned too low | ·Ensure the hose is at a height of 70–125 cm. |
| Water not draining properly | ·Pump filter clogged ·Clean the pump filter. | |
| ·Drain hose incorrectly installed | ·Ensure the hose is correctly installed and at 70–125 cm height. | |
| Washing machine vibrates | ·Transport safety devices not removed | ·Remove transport safety devices. |
| ·Machine not level. | ·Level the machine and tighten the lock nuts on the feet against the housing. | |
| Fabric softener not dispensed | ·Fabric softener compartment clogged | ·Clean the fabric softener compartment. |
| Foam in detergent drawer | ·Too much detergent or incorrect dosage | ·Use less detergent and dose according to water hardness. |
| Machine stops prematurely | ·Power failure or blockage in water supply/drain | ·Check power and water supply/ drain. |
| Noise from drain pump after draining | ·Air in the drainage system (not a defect) | ·This is normal, no action required. |
| Short pauses during programme | ·Foam formation or water refilling | ·The machine automatically refills water.·Excess foam is being removed. |
ERROR CODES
| ERROR CODE CAUSE SOLUTION | ||
| F01 Low water pressure | or no water | Open the tap and check the hose and filter.Press START/PAUSE after fixing.Contact service if the problem persists. |
| F03 | Water not draining / pump or filter issue | Switch off the machine and unplug it.Check the pump, hose, and filter.Press START/PAUSE after fixing. |
| F13 Door lock problem | Start a programme for 20 seconds and unlock the door to check if it is closed.Open and close the door again.Press START/PAUSE after fixing. | |
| F14 Door unlock problem | Press START/PAUSE.The door is unlocked and the alarm is off.You can also turn the knob to OFF, then select a programme.Alarm is cleared. | |
| F24 Overflow or excessive foam | Use less detergent.Turn the knob to OFF for a few seconds, then select SPIN with spin speed set to 0 to drain water. | |
| UNB Drum imbalance | Do not overload the drum. Redistribute laundry manually. | |
| F04-F98 Electronic fault | Turn the knob to OFF for a few seconds.Press START/PAUSE after fixing. Contact service if the problem persists. | |
SPECIFICATIONS
| Model DO95102WM | |
| Rated Voltage 220-240V~ 50Hz | |
| Power Consumption• Heating Power• Motor Power | 1800W• 1500W• 300W |
| Washing Capacity 8 kg | |
| Maximum Spin Speed 1400 RPM | |
| Net Weight 58 kg | |
| Dimensions (W × D × H) | 59.5 x 54 x 84.5 cm |
| Water Pressure | 0.1 - 1.0 MPa |
| Protection Class | IPX4 |
GUIDELINES
natural_image
Symbol of a trash bin crossed with a diagonal line, no text or numbers presentThis symbol on the product or on its packaging indicates that this product may not be treated as household waste. Instead it must be brought to the applicable collection point for recycling of electrical and electronic equipment. By ensuring this product is disposed of correctly, you will help prevent potential negative consequences for the environment and human health, which could otherwise be caused by inappropriate waste handling of this product. For more detailed information about recycling of this product, please contact your local city office, your household waste disposal service or the shop where you purchased the product.
The packaging is recyclable. Please treat the packaging ecologically.

This appliance conforms to all European requirements in the areas of safety, health, and environmental protection.
The EU declaration concerning this appliance can be requested at any time from info@linea2000.be
WEBSHOP
NL
Looking for extra accessories or you have a broken piece?
ORDER the original DOMO accessories and parts on our webshop.

Webshop

natural_image
Stack of sheets of paper with a small circular object on top (no visible text or symbols)
natural_image
Two white plastic electrical connectors with metal contacts, shown against a plain background (no text or symbols visible)
natural_image
White plastic container with black lid, no visible text or symbols