
DC200100 - Compressor Campbell Hausfeld - Free user manual and instructions
Find the device manual for free DC200100 Campbell Hausfeld in PDF.


User questions about DC200100 Campbell Hausfeld
0 question about this device. Answer the ones you know or ask your own.
Ask a new question about this device
Download the instructions for your Compressor in PDF format for free! Find your manual DC200100 - Campbell Hausfeld and take your electronic device back in hand. On this page are published all the documents necessary for the use of your device. DC200100 by Campbell Hausfeld.
USER MANUAL DC200100 Campbell Hausfeld
Operating Instructions and Parts Manual
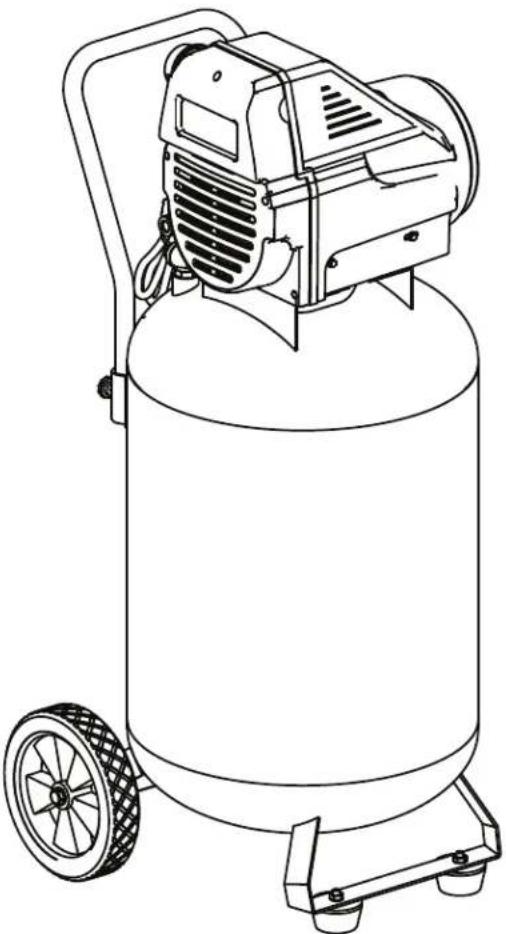
Models: AC200100 and DC200100

CAMPBELL HAUSFELD
Please read and save these instructions. Read carefully before attempting to assemble, install, operate or maintain the product described.
Protect yourself and others by observing all safety information. Failure to comply with instructions could result in personal injury and/or property damage! Retain instructions for future reference.
REMARKER: Keep your dated proof of purchase for warranty purposes! Attach it to this manual or file it for safekeeping.
Model #:
Serial #:
Purchase Date:
For parts, product & service information visit www.campbellhausfeld.com
Campbell Hausfeld 350 Embry Drive
Leitchfield, KY, 42754
BEFORE YOU BEGIN
Description
This residential oilless compressor is designed for do-it-yourselfers with a variety of home and automotive jobs. These compressors power spray guns, impact wrenches and other tools. Compressed air from this unit will contain moisture. Install a water filter or air dryer if application requires dry air.
UNPACKING
CAUTION
Do not lift or move unit without appropriately rated equipment. Be sure the unit is securely attached to lifting device used. Do not lift unit by holding onto tubes or coolers. Do not use unit equipment.
to lift other attached equipment.
After unpacking the unit, inspect carefully for any damage that may have occurred during transit. Check for loose, missing or damaged parts. Check to be sure all supplied accessories are enclosed with the unit. In case of questions, damaged or missing parts, please visit www.campbellhausfeld.com for customer assistance.

DO NOT RETURN THE PRODUCT TO THE RETAILER!
OWRNTING
if damaged during shipping, handling or use. Damage may result in bursting and cause injury or property damage.
GENERAL SAFETY INSTRUCTIONS
Safety Guidelines
This manual contains information that is very important to know and understand. This information is provided for SAFETY and to PREVENT EQUIPMENT PROBLEMS. To help recognize this information, observe the following symbols.
ADANGER
imminently hazardous situation which, if not avoided, WILL result in death or serious injury.
a
potentially hazardous situation which, if not avoided, COULD result in death or serious injury.
CAUTION
Caution indicates a potentially hazardous situation which, if not avoided, MAY result in minor or moderate injury.
NOTICE
Notice indicates important information, that if not followed, may cause damage to equipment.
IMPORTANT or NOTE: Information that requires special attention.
Safety Symbols
The following Safety Symbols appear throughout this manual to alert you to important safety hazards and precautions.

Wear Eye and Mask Protection
Read Manual First
Wear eye and hearing protection

Risk of Fire
Risk of Hot Parts

Risk of Explosion

Risk of Shock
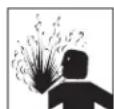
Risk of Pressure
GENERAL SAFETY INSTRUCTIONS (CONTINUED)
California Proposition 65
HiWARNNEXpose you to chemicals including lead, which are known to the State of
California to cause cancer and birth defects or other reproductive harm. For more information
go to www.P65Warnings.ca.gov.
WAWMnInest when you cut, sand, drill or grind materials such as wood, paint,
metal, concrete, cement, or other masonry. This dust often contains chemicals known to cause
cancer, birth defects, or other reproductive harm. Wear protective gear.
Illinois Lead Poisoning Prevention Act
CONVENTIONAL MAY BE HARMFUL IF EATEN OR CHEWED. COMPLIES WITH FEDERAL
STANDARDS.
Important Safety Information
Please read and save these instructions. Read carefully before attempting to assemble, install, operate or maintain the product described. Protect yourself and others by observing all safety information. Failure to comply with instructions could result in personal injury and/or property damage! Retain instructions for future reference.
This manual contains important safety, operational and maintenance information. If you have any questions, lease visit www.campbellhausfeld.com for customer assistance.
DANGER
BREATHABLE AIR WARNING
This compressor/pump is not equipped and should not be used "as is" to supply breathing quality air. For any application of air for human consumption, the air compressor/pump will need to be fitted with suitable in-line safety and alarm equipment. This additional equipment is necessary to properly filter and purify the air to meet minimal specifications for Grade D breathing as described in Compressed Gas Association Commodity Specification G 7.1, OSHA 29 CFR 1910.134, and/or Canadian Standards Associations (CSA).
DISCLAIMER OF WARRANTYES
In the event the compressor is used for the purpose of breathing air application and proper in-line safety and alarm equipment is not simultaneously used, existing warranties shall be voided, and Campbell Hausfeld disclaims any liability whatsoever for any loss, personal injury or damage.
General Safety
Since the air compressor and other components (material pump, spray guns, filters, lubricators, hoses, etc.) used make up a high pressure pumping system, the following safety precautions must be observed at all times:
WARNING:Leaving compressor in AUTO position may allow it to turn on
advertently. To prevent this and possible damage from power surge, turn to OFF position after
each use.
- Read all manuals included with this product carefully. Be thoroughly familiar with the controls and the proper use of the equipment.
- Follow all local electrical and safety codes as well as in the United States, the National Electrical Codes (NEC) and Occupational Safety and Health Act (OSHA).
- Only persons well acquainted with these rules of safe operation should be allowed to use the compressor.
- Keep visitors away and NEVER allow children in the work area.
- Wear safety glasses and use hearing protection when operating the unit.
- Do not stand on or use the unit as a handhold.
- Before each use, inspect compressed air system and electrical components for signs of damage, deterioration, weakness or leakage. Repair or replace defective items before using.
- Check all fasteners at frequent intervals for proper tightness.
Now warning equipment and controls can cause electrical arcs that will ignite a
flammable gas or vapor. Never operate or repair in or near a flammable gas or vapor. Never
store flammable liquids or gases in the vicinity of the compressor.
GENERAL SAFETY INFORMATION (CONTINUED)

CAUTION
Compressor parts may be hot even if the unit is stopped.
- Keep fingers away from a running compressor; fast moving and hot parts will cause injury and/or burns.
- If the equipment should start to vibrate abnormally, STOP the engine/motor and check immediately for the cause. Vibration is generally a warning of trouble.
- To reduce fire hazard, keep engine/motor exterior free of oil, solvent, or excessive grease.
New Warning ttempt to adjust safety valve. Keep safety valve free from paint
and other accumulations.
WARNING
Never use plastic (PVC) pipe for compressed air. Serious injury or death could result.

CANCER
Repair or modify a tank! Welding, drilling or any other modification will weaken the tank resulting in damage from rupture or explosion. Always replace worn, cracked
or damaged tanks.
NOTICE
Drain liquid from tank daily.
- Tanks rust from moisture build-up, which weakens the tank. Make sure to drain tank regularly and inspect periodically for unsafe conditions such as rust formation and corrosion.
- Fast moving air will stir up dust and debris which may be harmful. Release air slowly when draining moisture or depressurizing the compressor system.
Spraying Precautions
WARNING
Do not spray flammable materials in vicinity of open flame or near ignition sources including the compressor unit.
- Do not smoke when spraying paint, insecticides, or other flammable substances.
- Use a face mask / respirator when spraying and spray in a well ventilated area to prevent health and fire hazards.
- Do not direct paint or other sprayed material at the compressor. Locate compressor as far away from the spraying area as possible to minimize overspray accumulation on the compressor.
- When spraying or cleaning with solvents or toxic chemicals, follow the instructions provided by the chemical manufacturer.
SPECIFICATIONS
| AC200100, DC200100 |
| Motor HP 1.3 |
| Tank Capacity 20 gallon |
| Phase Single |
| Number of Cylinders 1 |
| Air Delivery @ 90 PSI 4.0 SCFM |
| Voltage 120 |
| Amperes 14A |
| Hertz (Cycle) 60 |
| Maximum Pressure 150 |
| Tank Outlet 1/4 inch IM |
| Unit Weight 88.4 pounds |
DIMENSIONS
| AC200100, DC200100 | |
| Length 19.9 inch | |
| Width 18.7 inch | |
| Height | 42.1 inch |
ASSEMBLY INSTRUCTIONS
Handle Assembly (Figure 1)
- Place ends of handle around tank and into the mounting pipe. Align holes in handle to holes in mounting pipe.
- Assemble two (2) screws (from parts package) through holes in mounting pipe and handle. Tighten screws.
e WnRnngle to lift the unit completely off the ground. Only use the handle to lift one end so the wheels may be used to move the unit.
Wheel Assembly (Figure 2)
Wheel assembly kit includes:
- 2 wheels
- 2 axle bolts *
- 2 washers
- 2 nuts
The items marked with an asterisk (*) were shipped loose with the unit.
- Wheel has an offset hub. Place wheel insert into center of hub. With offset hub facing axle iron, assemble axle bolt through washer and then holes in wheel and axle iron.
- Place lock washer on axle bolt. Then tighten nut securely to threaded part of axle bolt.
- Repeat procedure with other side.
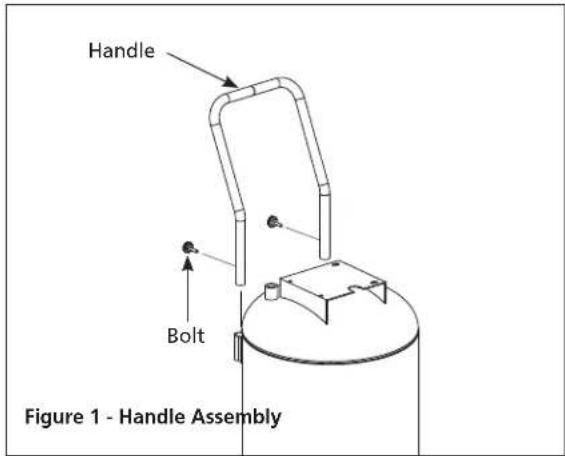
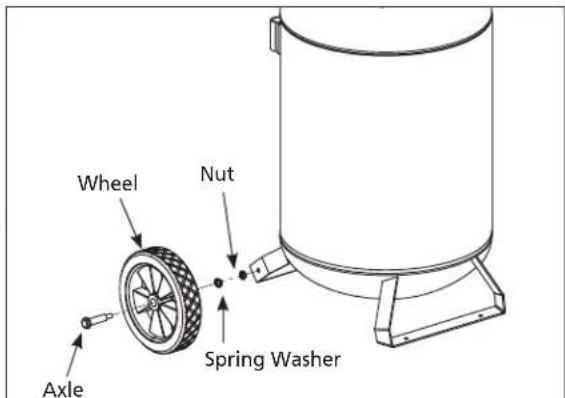
Figure 2 - Wheel Assembly
GETTING TO KNOW YOUR UNIT
Pressure Switch - Auto/Off Switch - In the "AUTO" position, the compressor shuts off automatically when tank pressure reaches the maximum preset pressure. In the "OFF" position, the compressor will not operate. This switch should be in the "OFF" position when connecting or disconnecting the power cord from the electrical outlet.
Regulator - The regulator controls the amount of air pressure at the hose outlet.
ASME Safety Valve - This valve automatically releases air if the tank pressure exceeds the preset maximum.
Exhaust Tube - This tube carries compressed air from the pump to the check valve. This tube becomes very hot during use. To avoid the risk of severe burns, never touch the discharge tube.
Check Valve - One-way valve that allows air to enter the tank, but prevents air in the tank from flowing back into the compressor pump.
Handle - Designed to move the compressor.
WARNING Never use the handle on wheeled units to lift the unit completely off the ground.
Drain Valve - This valve is located on the bottom of the tank. Use this valve to drain moisture from the tank daily to reduce the risk of corrosion.
Pressure Gauges - These gauges will show air pressure in the compressor tank and at the compressor outlet.
Outlet Pressure Gauge - Will show air pressure at the outlet in pounds per square inch (PSI). Make sure this gauge reads ZERO (by adjusting regulator knob fully counterclockwise) before changing air tools or disconnecting air hose from outlet.
Tank Pressure Gauge - Will show air pressure in tank while the compressor is running, indicating compressor is building pressure properly. This gauge will show maximum pressure of compressor when it shuts off automatically at the pressure switch.
Motor Reset - (not shown, located inside motor). Designed to keep the motor from overheating. The motor has an auto reset protector. To reset once the motor has cooled, turn the pressure switch to the OFF position, then to the AUTO position.
HCAUION equipped with an overload protector which will shut off motor if it becomes overloaded.
A tector is actuated, the motor must be allowed to cool down for approximately 30 minutes before it will reset.
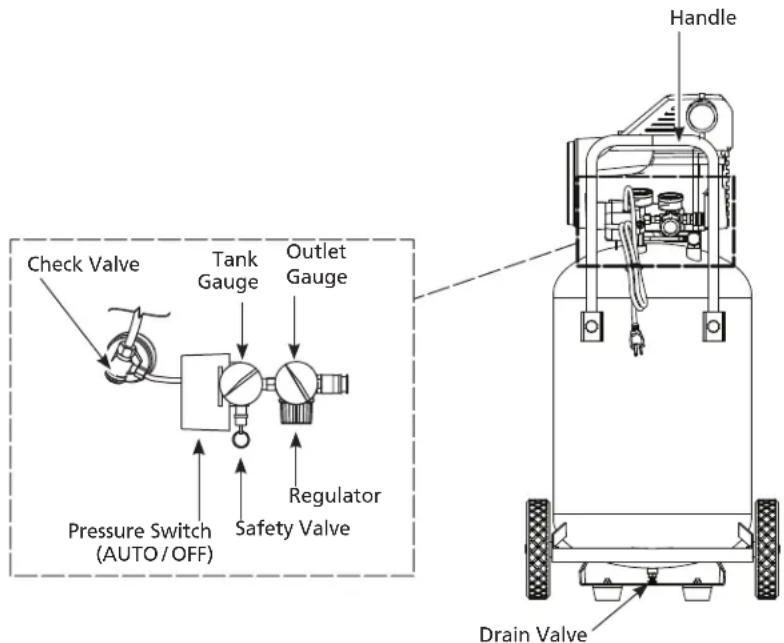
Figure 3
INSTALLATION INSTRUCTIONS
Location
It is extremely important to install the compressor in a clean, dry, and well ventilated area. The compressor must be placed on a firm, level surface where the surrounding air temperature will not be more than 100^ .
A minimum clearance of 18 inches between the compressor and a wall is required because objects could obstruct air flow.
RCAUTION compressor air inlet near steam, paint spray, sandblast areas or any other source of contamination. This debris will damage the motor.

Electrical Installation
WARNING clrical connections should be performed by a qualified electrician. Installation must be in accordance with local codes and national electrical codes.
Wiring
- Local electrical wiring codes differ from area to area. Source wiring, plug and protector must be rated for at least the amperage and voltage indicated on motor nameplate, and meet all electrical codes for this minimum.
- Use a slow blow fuse or a circuit breaker.
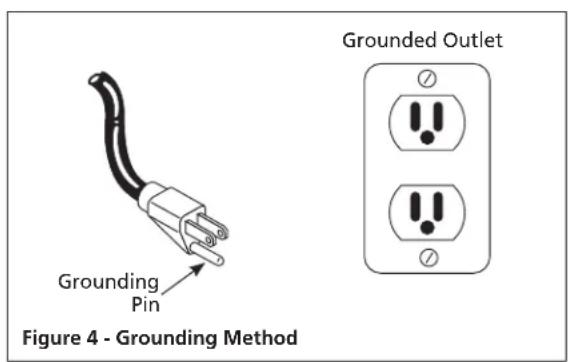
- This product is for use on a nominal 120 volt circuit and has a grounding plug that looks like the plug illustrated in Figure 4. Make sure the product is connected to an outlet having the same configuration as the plug. This product must be grounded. In the event of an electrical short circuit, grounding reduces risk of electrical shock by providing an escape wire for electric current. This product is equipped with a cord having a grounding wire with an appropriate grounding plug. Plug must be plugged into an outlet that is properly installed and grounded in accordance with all local codes and ordinances.
CAUTION
Overheating, short circuiting and fire damage will result from inadequate wiring.
| Minimum Gauge of Extension Cord | ||
| 25 ft. 50 ft. 14 12 10 | 100 ft. | |
| Use of an extension cord may cause excess heat to motor. This could lead to tripped breaker (at electrical panel) or tripped thermal overload (on compressor motor). If this occurs, eliminate extension cord and plug compressor directly into electrical outlet. Avoid using extension cords; use longer air hose(s) instead. | ||
OPERATING INSTRUCTIONS
Before First Start-Up Break-In Procedure
(Complete this procedure before using compressor for the first time. Once completed, it is not necessary to repeat.)
- Open drain valve located on bottom of tank.
- Turn ON/OFF switch to OFF position.
- Plug in power cord.
- Turn ON/OFF switch to ON position and run compressor for 30 minutes.
- Turn ON/OFF switch to OFF position.
- Unplug power cord.
- Close drain valve.
The compressor is now ready for use.
Operating Procedure
- Turn switch to OFF position and plug in power cord.
- Turn regulator knob counterclockwise to close air flow.
- Turn switch to AUTO position.
- Compressor will build to maximum pressure and shut off.
- With hose attached to outlet of compressor, attach tire chuck or other tool to open end of hose.
- Adjust regulator to proper pressure for tool or tire. Operate tool per instructions.
As air is depleted from the tank by use of a tire chuck, tool, etc., the compressor will restart automatically at its preset "cut-in" pressure. When a tool is being used continuously, the compressor will cycle on and off automatically.
- Turn switch to OFF position, unplug power cord and drain tank of air when finished using compressor.
MOISTURE IN COMPRESSED AIR
Moisture in compressed air will form into droplets as it comes from an air compressor pump. When humidity is high or when a compressor is in continuous use for an extended period of time, this moisture will collect in the tank. When using a paint spray or sandblast gun, this water will be carried from the tank through the hose, and out of the gun as droplets mixed with the spray material.
IMPORTANT: This condensation will cause water spots in a paint job, especially when spraying other than water based paints. If sandblasting, it will cause the sand to cake and clog the gun, rendering it ineffective.
A filter in the air line, located as near to the gun as possible, will help eliminate this moisture.
TROUBLESHOOTING GUIDE
SYMPTOM POSSIBLE CAUSE(S) CORRECTIVE ACTION
Compressor will not run 1. Switch in OFF position 1. Make sure compressor is plugged in and switch is ON.
- No electrical power at wall outlet 2. Check circuit breaker or fuse at electrical panel.
- Compressor has reached automatic 3. Release air from tank until compressor restarts shut-off pressure automatically.
-
Motor overheated 4. Allow compressor to cool for approximately 30 minutes so thermal overload switch will reset. Make sure compressor is run in a clean, well-ventilated area where temperature will not exceed 100^
-
Loose electrical connection 5. Check all electrical connections.
- ON/OFF switch bad 6. Replace ON/OFF switch.
- Pressure switch bad 7. Replace pressure switch.
- Defective motor 8. Replace pump / motor assembly.
Fuses blow/circuit breaker trips repeatedly
- Incorrect size fuse, circuit overloaded 1. Check for proper fuse, use time-delay fuse. Disconnect other electrical appliances from circuit or operate compressor on its own branch circuit.
- Extension cord usage - wrong gauge 2. Remove extension cord or refer to Extension Cord wire and/or too long Chart on page 7.
- Worn check valve 3. Replace check valve.
DANGER
check valve with air pressure in tank; bleed
tank.
- Defective unloader valve (on pressure switch)
- Defective motor capacitor(s)
-
Defective motor 6. Replace motor.
-
Replace unloader valve.
- Replace capacitor(s).
Tank pressure drops when compressor shuts off
- Loose connections (fittings, tubing, etc.)
- Open tank drain valve 2. Close tank drain valve.
-
Tank leaks
-
Check all connections with soap and water solution. Tighten; or remove and apply pipe dope or pipe tape to the threads, then reassemble.
- Check tank for leaks with soap and water solution. If leak is detected, tank must be replaced with genuine replacement part.
Compressor runs continuously and/or air output is lower than normal/low discharge pressure
-
Open tank drain valve 3. Close tank drain valve.
-
Excessive air usage
- Clogged intake filter
- Air leaks in piping (on machine or in outside system)
- Piston ring worn
- Broken valve (in pump)
- Tank leaks
-
Defective pressure switch
-
Decrease air usage; compressor not large enough for air requirement.
-
Clean or replace filter.
-
Check all connections with soap and water solution. Tighten; or remove and apply pipe dope or pipe tape to the threads, then reassemble.
- Replace piston and cylinder.
- Replace valve.
- Check tank for leaks with soap and water solution. If leak is detected, tank must be replaced with genuine replacement part.
- Replace switch.
TROUBLESHOOTING GUIDE (CONTINUED)
SYMPTOM POSSIBLE CAUSE(S) CORRECTIVE ACTION
| Excessive moisture in discharge air | 1. Excessive water in tank 1. Drain tank. |
| 2. High humidity 2. Move to area of less humidity; use air line filter. | |
| Knocks, rattles, and/or excessive vibration | 1. Loose mounting bolts 1. Tighten bolts. |
| 2. Tank not level 2. Use sturdy wedge / object to bring tank to level position. | |
| 3. Cylinder or piston is worn/scored 3. Replace or repair as necessary. | |
| Compressor runs continuously and safety valve opens as pressure rises | 1. Defective pressure switch 1. Replace switch. |
| 2. Defective safety valve 2. Replace safety valve with genuine replacement part. | |
| Air leaking from unloader valve on pressure switch | 1. Check valve stuck in an open position 1. Replace check valve. |
| 2. Unloader valve stuck in open position 2. Replace unloader valve. | |
| check valve with air pressure in tank; bleed tank. |
MAINTENANCE AND INSPECTION INSTRUCTIONS
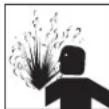
WARNING
Disconnect, tag and lock out power source, then release all pressure from the system before attempting to install, service, relocate or perform any maintenance.
Check compressor often for any visible problems and follow maintenance procedures each time compressor is used.
ASME Safety Valve
WARNING
Do not remove or attempt to adjust the safety valve!
Check the safety valve by performing the following steps:
- Plug the compressor in and run until shut off pressure is reached.
- Wearing safety glasses, pull the ring on the safety valve to release pressure from compressor tank. Use your other hand to deflect fast-moving air from being directed toward your face.
- The safety valve should automatically close at approximately 40 PSI - 50 PSI. If the safety valve does not allow air to be released when you pull on the ring, or if it does not close automatically, it MUST be replaced.

Figure 5
WARNING
Safety valve must be replaced if it cannot be actuated or it leaks air after ring is released.
Drain Tank
- Turn compressor off and release pressure from system. (To release pressure from system, pull ring on ASME safety valve. Deflect escaping air by shielding valve with one hand as you pull ring with other hand.) Pull ring until tank is empty.
A CAUTION fast moving air will be released when the safety valve is opened with pressure in the tank. Wear ANSI approved Z87.1 safety glasses.
- Drain moisture from tank by opening drain valve underneath tank. Tilt tank to remove all moisture.
- Clean dust and dirt from tank, air lines and pump cover while compressor is still OFF.
Intake Air Filter Maintenance
Removal, Inspection and Replacement (Figure 6). The intake filter element should be removed and checked periodically. A clogged intake filter can decrease compressor performance and cause the compressor to overheat.
- Remove bolt.
- Remove the filter cover and filter element. Inspect each piece.
- If the filter element is dirty or clogged, replace it.
- Reinstall filter, cover, and bolt. Thread the intake air filter into the threaded opening in the side of the compressor head as illustrated in Figure 6 before use.
IMPORTANT: Locate unit as far from spraying area as hose will allow to prevent overspray from clogging filter.
End of Operation/Storage
- Turn AUTO/OFF switch to the OFF position.
- Unplug power cord from wall outlet and wrap around handle to prevent damage when not in use.
- Wearing safety glasses drain tank of air by pulling the ring on the safety valve. Use other hand to deflect fast moving air from being directed toward your face.
- Drain tank of condensation by opening drain valve on bottom of tank. Tank pressure should be below 10 PSI when draining tank.
MAINTENANCE AND INSPECTION INSTRUCTIONS (CONTINUED)
- Air hose should be disconnected from compressor and hung open ends down to allow any moisture to drain.
- Compressor and hose should be stored in a cool, dry place.
Technical Service
For information regarding the operation or repair of this product, please visit www.campbellhausfeld.com.
MAINTENANCE SCHEDULE
| OPERATION DAILY WEEKLY MONTHLY | |
| DRAIN TANK | ● |
| CHECK AIR FILTER | ● |
| CHECK SAFETY VALVE | ● |
| CLEAN UNIT | ● |
NOTES
REPAIR PARTS ILLUstration FOR AC200100 AND DC200100
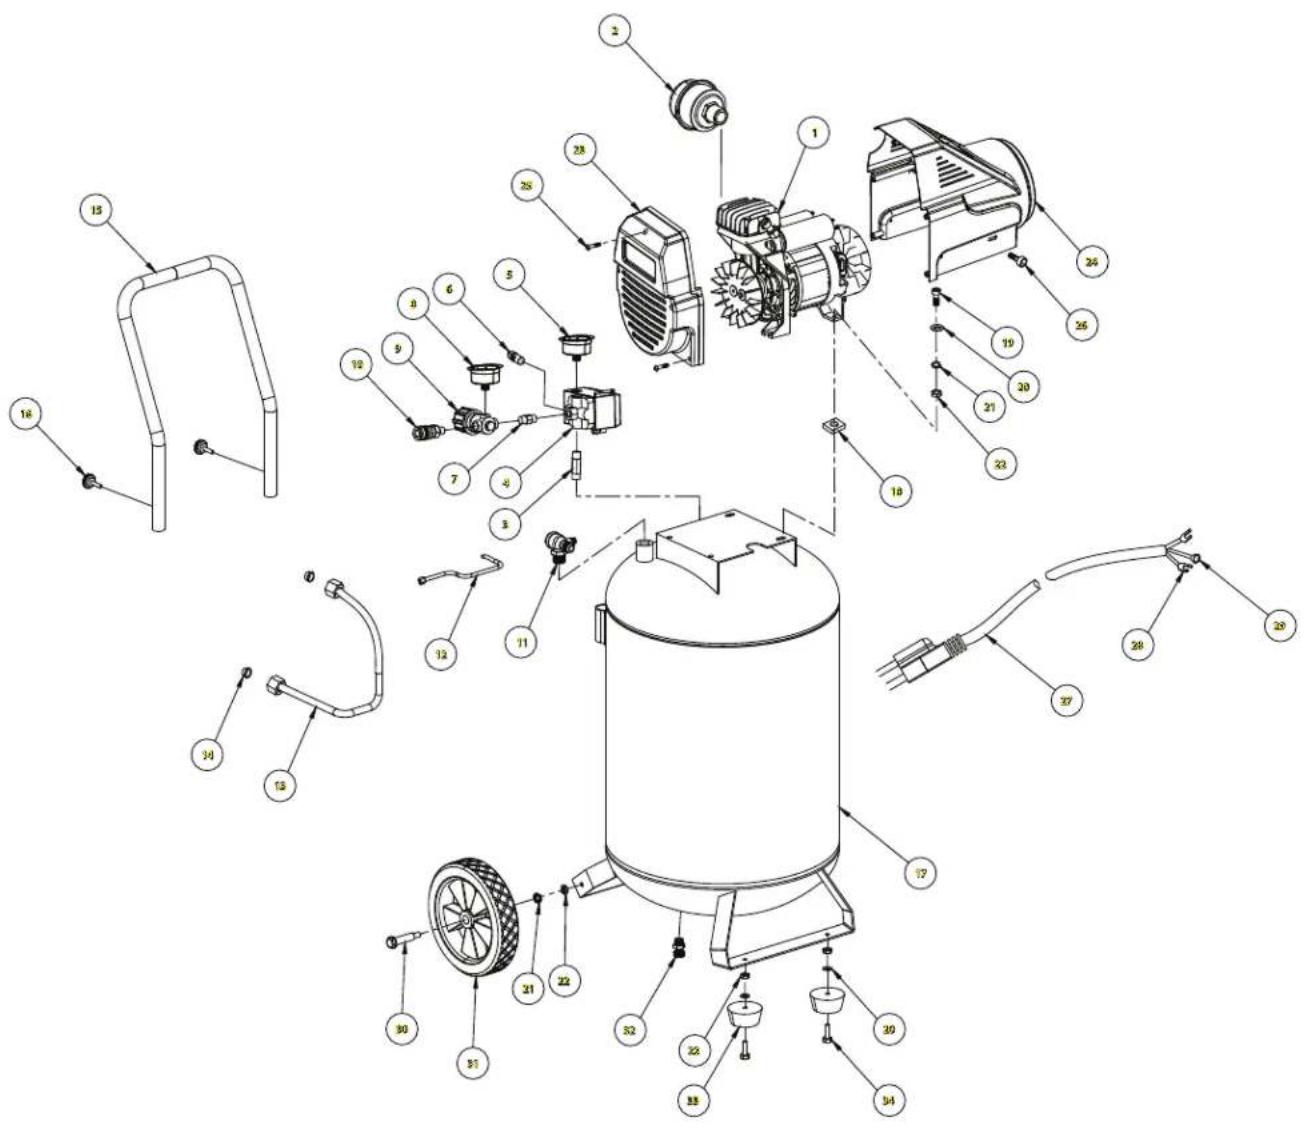
For Repair Parts, visit www.campbellhausfeld.com
24 hours a day - 365 days a year
Please provide following information:
- Model number
- Serial number (if any)
- Part description and number as shown in parts list
REPAIR PARTS LIST FOR AC200100 AND DC200100
Ref.
No. Description Part Number Qty.
1 PUMP/MOTOR ASSEMBLY DC200102AV 1
2 FILTER DC200150AV 1
3 CONNECT--1
4 PRESSURE SWITCH 1
5 TANK GAUGE 1
6 SAFETY VALVE 1
7 CONNECT 1
8 OUTLET GAUGE 1
9 REGULATOR 1
10 COUPLER 1
11 CHECK VALVE ASSEMBLY DC200151AV 1
12 UNLOAD TUBE DC200152AV 1
13 EXHAUST TUBE 1
14 O-RING 2
15 HANDLE
16 BOLT 2
17 TANK -- 1
18 RUBBER PAD -- 4
19 M8X35 BOLT
20 M8 WASHER 4
21 M8 SPRING WASHER
22 M8 NUT
23 FRONT SHROUD --1
24 REAR SHROUD --1
25 SCREW -- 5
26 M5X12 BOLT
27 POWER CORD --1
28CABLE CONNECTU --2
29 CABLE CONNECT O --1
30 AXLE 2
31 WHEEL 2
32 DRAIN VALVE DC200153AV 1
33 RUBBER FOOT --2
34 M8X20 BOLT
REPLACEMENT PARTS KITS
EXHAUST TUBE KIT DC200154AV
PRESSURE SWITCH AND REGULATOR KIT DC200155AV
WHEEL KIT DC200163AV
▲ HANDLE KIT DC200164AV
REPAIR PARTS ILLUSTRATION FOR DC200102AV
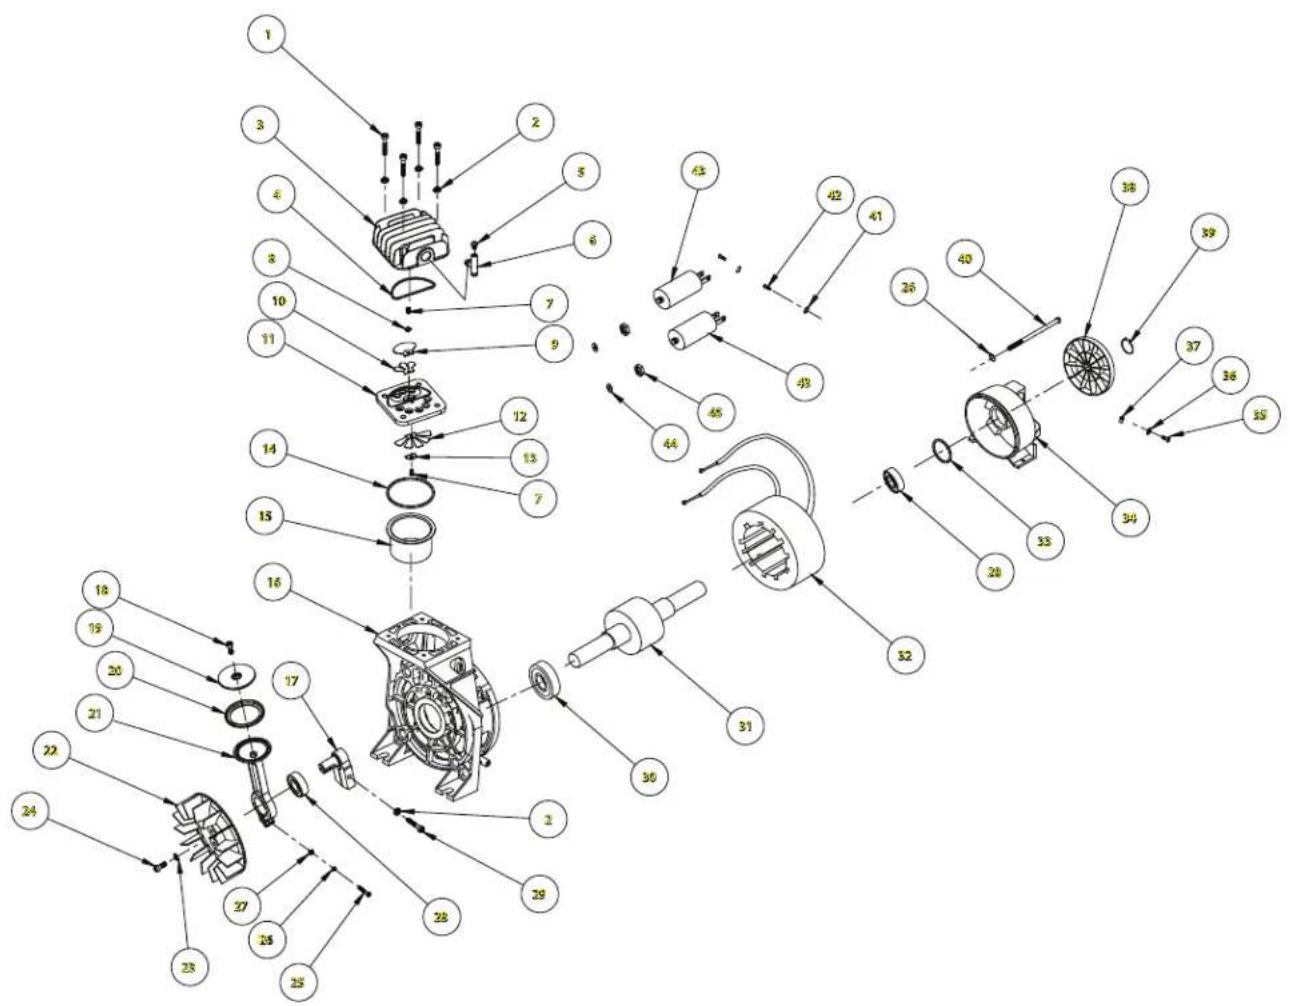
For Repair Parts, visit www.campbellhausfeld.com
24 hours a day - 365 days a year
Please provide following information:
- Model number
- Serial number (if any)
- Part description and number as shown in parts list
REPAIR PARTS LIST FOR DC200102AV
Ref.
No. Description Part Number Qty.
1 M6X35 BOLT 4
2 SPRING WASHER 5
3 CYLINDER HEAD 1
4 O-RING FOR VALVE PLATE 1 UPPER
5 RELIEF VALVE 1
6 T-FITTING CONNECT 1
7 M4X8 SCREW 2
8 M4 SPRING WASHER
9 VALVE LIFT GUARD 1
10 OUTLET VALVE 1
11 VALVE PLATE 1
12 INLET VALVE 1
13 CAP OF INLET VALVE 1
14 O-RING FOR VALVE PLATE 1 LOWER
15 CYLINDER 1
16 CRANKCASE -- 1
17 ECCENTRIC--1
18 M6X16 SCREW 1
19 COVER OF CONROD 1
20 PISTON RING 1
21 CONROD 1
22 FAN 1
23 M6 WASHER 1
24 M6X16 SCREW 1
25 M5X25 SCREW 1
26 M5 SPRING WASHER 5
27 M5 NUT
28 6203 BEARING--2
29 M6X40 SCREW--1
30 6204 BEARING--1
31 ROTOR - 1
32 STATOR -1
33 WASHER --1
34 REAR MOTOR SEAT --1
35 M4X6 SCREW --1
36 M4 WASHER --1
37 GROUNDING SIGNAL --1
38 MOTOR FAN 1
Ref.
No. Description Part Number Qty.
39 CIRCLI 1
40 M5X10 BOLT 4
41 M3 SPRING WASHER -- 4
42 M3X6 SCREW -- 4
43 RUNNING CAPACITOR 2
44 M8 INNER WASHER 2
45 M8 NUT 2
REPAIR PARTS KITS
PUMP HEAD KIT DC200156AV
COLD START VALVE KIT DC200157AV
VALVE PLATE KIT DC200158AV
PISTON/CYLINDER KIT DC200159AV
CAPACITOR KIT DC200165AV
FRONT END FAN KIT DC200161AV
MOTOR FAN KIT DC200162AV
Reminder: Keep your dated proof of purchase for warranty purposes! Attach it to this manual or file it for safekeeping.
LIMITED WARRANTY
- DURATION: From the date of purchase by the original purchaser as follows: One Year.
- WHO GIVES THIS WARRANTY (WARRANTOR): Campbell Hausfeld a Marmon/Berkshire Hathaway Company, 350 Embry Drive, Leitchfield, KY, 42754. Visit www.campbellhausfeld.com
- WHO RECEIVES THIS WARRANTY (PURCHASER): The original purchaser (other than for purposes of resale) of the Campbell Hausfeld compressor.
- WHAT PRODUCT IS COVERED BY THIS WARRANTY: This Campbell Hausfeld air compressor.
- WHAT IS COVERED UNDER THIS WARRANTY: Substantial defects due to material and workmanship with the exceptions noted below.
- WHAT IS NOT COVERED UNDER THIS WARRANTY:
A. Implied warranties, including those of merchantability and FITNESS FOR A PARTICULAR PURPOSE ARE LIMITED FROM THE DATE OF ORIGINAL PURCHASE AS STATED IN THE DURATION. If this compressor is used for commercial, industrial or rental purposes, the warranty will apply for ninety (90) days from the date of purchase. Some States do not allow limitations on how long an implied warranty lasts, so the above limitations may not apply to you.
B. ANY INCIDENTAL, INDIRECT, OR CONSEQUENTIAL LOSS, DAMAGE, OR EXPENSE THAT MAY RESULT FROM ANY DEFECT, FAILURE, OR MALFUNCTION OF THE CAMPBELL HAUSFELD PRODUCT. Some States do not allow the exclusion or limitations of incidental or consequential damages, so the above limitation or exclusion may not apply to you.
C. Any failure that results from an accident, purchaser's abuse, neglect or failure to operate products in accordance with instructions provided in the owner's manual(s) supplied with compressor.
D. Pre-delivery service, e.g. assembly, oil or lubricants, and adjustment.
E. Items or service that are normally required to maintain the product, e.g. lubricants, filters and gaskets, etc.
F. Gasoline engines and components are expressly excluded from coverage under this limited warranty. The Purchaser must comply with the warranty given by the engine manufacturer which is supplied with the product.
G. Additional items not covered under this warranty:
- All Compressors
a. Any component damaged in shipment or any failure caused by installing or operating unit under conditions not in accordance with installation and operation guidelines or damaged by contact with tools or surroundings.
b. Pump or valve failure caused by rain, excessive humidity, corrosive environments or other contaminants.
c. Cosmetic defects that do not interfere with compressor functionality.
d. Electric motors, check valves and pressure switches.
e. Drain cocks.
f. Damage due to incorrect voltage or improper wiring.
g. Other items not listed but considered general wear parts.
h. Pressure switches, air governors and safety valves modified from factory settings.
- Lubricated Compressors
a. Pump wear or valve damage caused by using oil not specified.
b. Pump wear or valve damage caused by any oil contamination or by failure to follow proper oil maintenance guidelines.
- Belt Drive / Direct Drive / Gas Driven Compressors
a. Belts.
b. Ring wear or valve damage from inadequate filter maintenance.
c. Manually adjusted load/unload and throttle control devices.
-
RESPONSIBILITIES OF WARRANTYOR UNDER THIS WARRANTY: Repair or replace, at Warrantor's option, compressor or component which is defective, has malfunctioned and/or failed to conform within the duration of the specific warranty period.
-
RESPONSIBILITIES OF PURCHASER UNDER THIS WARRANTY:
A. Provide dated proof of purchase and maintenance records.
B. Portable compressors or components must be delivered or shipped to the nearest Campbell Hausfeld Authorized Service Center. Freight costs, if any, must be borne by the purchaser.
C. Use reasonable care in the operation and maintenance of the products as described in the owner's manual(s).
- WHEN WARRANTYOR WILL PERFORM REPAIR OR REPLACEMENT UNDER THIS WARRANTY: Repair or replacement will be scheduled and serviced according to the normal work flow at the servicing location, and depending on the availability of replacement parts. This Limited Warranty applies in the U.S., Canada and Mexico only and gives you specific legal rights. You may also have other rights which vary from State to State or country to country.
Leitchfield, KY, 42754
AVANT DE COMMENCER
Description
NE PAS RENVOYER LE PRODUIT AU MARCHAND!
AeAVERTBSEMENT
Leitchfield, KY, 42754


