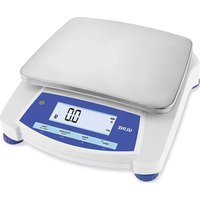
H-9886 - Scale Uline - Free user manual and instructions
Find the device manual for free H-9886 Uline in PDF.


User questions about H-9886 Uline
0 question about this device. Answer the ones you know or ask your own.
Ask a new question about this device
Download the instructions for your Scale in PDF format for free! Find your manual H-9886 - Uline and take your electronic device back in hand. On this page are published all the documents necessary for the use of your device. H-9886 by Uline.
USER MANUAL H-9886 Uline
OVERVIEW OF CONTROLS
CONTROL PANEL
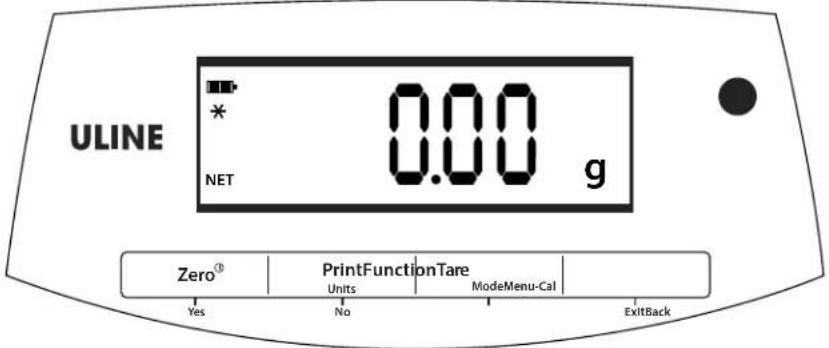
CONTROL FUNCTIONS
| BUTTON | FUNCTION |
| Zero① Yes | Short Press (when on): Sets display to zero. (when off): Turns scale on. Long Press (when on): Turns the scale off. Short Press (in Menu): Selects/accepts displayed setting. |
| Print Units No | Long Press: Toggles through active units. Short Press (in Menu): Toggles through available settings. |
| Function Mode Back | Short Press: Selects function setting. Long Press: Selects active mode. Short Press (in Menu): Returns to previous settings. |
| Tare Menu-Cal Exit | Short Press: Enters/clears a Tare value. Long Press: Enters user menu. Short Press (in Menu): Quickly exits user menu. |
SAFETY

WARNING! Read all safety warnings before installing, making connections or servicing this scale. Failure to comply with these warnings could result in personal injury and/or property damage. Retain these instructions for future reference.
- Verify that the AC adapters input voltage range and plug type are compatible with the local AC mains power supply.
- Position the instrument so that the AC adapter can be easily disconnected from the wall socket.
-
Position the power cord so that it does not pose a potential obstacle or tripping hazard.
-
Operate the unit only under ambient conditions specified in these instructions.
Scale is for indoor use only. - Do not operate in hazardous or explosive environments.
- Only use in dry locations.
- Only use approved accessories and peripherals.
- Disconnect from power supply when cleaning.
Service should only be performed by authorized personnel.
SETUP
TRANSPORTATION LOCK
- Rotate the
pointer on the transportation lock to the unlocked position. (See Figure 1)

NOTE:
Transportation lock is located on underside of scale.

LOCATION

NOTE: Use on a firm, steady surface.

NOTE: Avoid locations with excessive air current, vibrations, heat sources or rapid temperature changes.
- Adjust the leveling feet so level bubble is centered in circle. (See Figure 2)

CONNECTING POWER
BATTERY
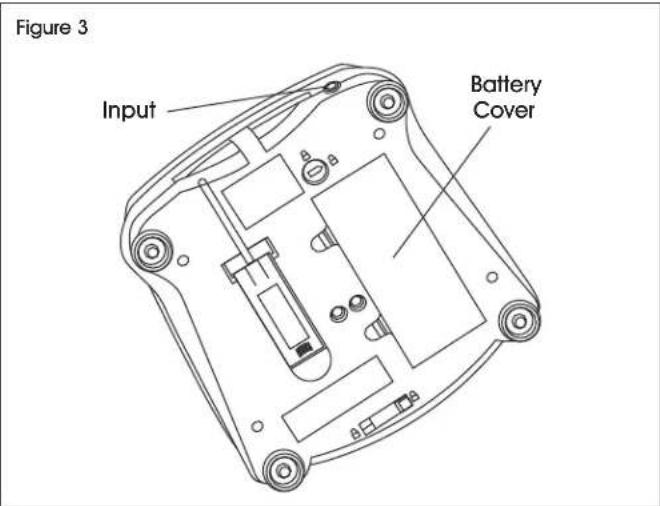
- Remove battery cover and install four C batteries using the polarity indications as shown in the battery compartment. (See Figure 3)
AC ADAPTER

NOTE: The AC adapter is used to power the balance when battery power is not needed.
- Connect the AC adapter plug to the input jack. (See Figure 3)
- Connect AC adapter (supplied) to the proper AC supply.
OPERATION
CALIBRATION
- Press and hold MENU-CAL until menu is displayed. When button is released, the display will show CRL.
- Press YES to accept; SPAN will be shown. Press YES again to begin span calibration.
- --C-- will blink while zero reading is stored. The display will show the calibration weight value. Place the specified weight value on the pan. --C-- will blink while the reading is stored.
- The scale will return to the previous application mode and is ready for use.
WEIGH MODE
- Press and hold MODE until WEIGHT is displayed.
- If required, place an empty container on the pan and press TARE.
- Add material to the pan or container. The display will show the weight of the material.
PARTS COUNTING MODE

NOTE: This mode counts large numbers of items based on the weight of a reference count.
- Place an empty container on the pan and press TARE.
- Press and hold MODE until COUNT is displayed. C.R.P.U (Clear Average Piece Weight) will then display.
- Press NO to use the stored Average Piece Weight (APW) or press YES to establish a new APW.

NOTE: If choosing NO to use stored APW, skip to step 6.

NOTE: If choosing YES to set a new APW, continue to step 4.

NOTE: Press FUNCTION to view the current APW.

NOTE: To clear the stored APW, press and hold MODE until count is displayed. Press YES when C.R.PU is displayed.
- After pressing yes, the scale will then display the stored sample size. Press NO or BACK to toggle the choices 5, 10, 20, 50 or 100.
- Put the indicated number of pieces on the pan. Press YES to calculate the APW. The display will show the piece count.
- Add additional pieces until the desired count is reached.
CHECKWEIGH MODE

NOTE: This mode sets low and high weight limits for portion control processes.
-
Press and hold MODE until CHECK is displayed.
A. C. E F (Clear References) will then display. -
Press NO to use the stored reference weight limits or press YES to establish new reference values. (Skip to step 5)

NOTE: If choosing NO to use stored reference weight limits, skip to step 5.

NOTE: If choosing YES to set new reference weight limits, continue to step 3.

NOTE: Press FUNCTION to view low and high reference weight limits.

To clear the stored reference values, press and hold MODE until CHECK is displayed. Press YES when CL.rEF is displayed.
- The balance will then display SET. Lo. Press YES to view the "Low" limit value. Press YES to accept or NO to edit the "Low" limit value. The stored value displays with the first digit highlighted 000.000 kg. Repeatedly press NO until the desired number appears. Press YES to accept and highlight the next digit. Repeat until all the digits are correct. Press YES to accept the "Low" limit value; SET. HI will be displayed.
- Repeat steps 1-3 to accept or edit the "High" value.
- Place sample material on the pan. The "Accept" indicator will show that the sample weight is within the acceptable range.
SETTINGS
USER MENU

NOTE: The user menu allows the customizing of scale settings.

NOTE: All modes except for weighing must be activated in the user menu before they are available.
| Sub - Menu | .C.a.l. | .S.e.t.u.p.* | .M.o.d.e | .U.n.i.t.* | .E.n.d |
| Menu Items | Span LIN | b.light A-OFF Filter AZT Stab Stab.C | Count Check | g, kg, N oz, ozt, dwt lb, lb:oz, ct grain | |
| End | End | End | End |
- Press and hold MENU until menu is displayed. When released, the first sub-menu (C.R.L.) will be shown.
- Press YES to enter the displayed sub menu or press NO to advance to next.
- Press YES to view the menu item setting or press NO to move to the next menu item. When viewing the setting, press YES to accept the setting or NO to change the setting.
- When E d is displayed, press YES to return to the sub-menu selections or NO to return to the first item in the current menu.
CALIBRATION SUB-MENU
- Span [SPR] (yes, no) - Initiates a span calibration procedure (zero and span). A span calibration is important when initially setting up the scale.
Lin [Lfi] (yes, no) - Initiates a linearity calibration procedure (zero, mid-point and span).
SETUP SUB-MENU
- Back Light [b.l. g,h] (on, off, Auto) - When Back light is set to "ON", the scale will always be on.
- Back Light [b,L right] Auto - The scale will turn on when a button is pressed or the display weight changes.
- Auto Off [R-Off] (on, off) - When Auto Off is set to "ON," the scale will turn off automatically after five minutes of inactivity. Auto Off is used to save battery power.
Filter [FILER] (L1, L2, L3, L4) - Set the amount of signal filtering.
| L1 | L4 | |
| Stability | Less | Greater |
| Stabilization Time | Faster | Slower |
- Auto Zero Tracking [R27] (OFF, 0.5d, 1d, 3d, 5d, 8d, 10d) - Set the automatic zero tracking functionality. The display will maintain zero until a change of 0.5d, 1d, 3d, 5d, 8d, or 10d divisions per second has been exceeded.
- Stable [STAB] (0.5d, 1d, 2d, 5d) - Set the amount the reading can vary while the stability symbol remains on.
- Stable Compensation [STRB.C] (on, off) - Set the automatic stable tracking functionality. Set it to "OFF" for dosing or filing application.
SETTINGS CONTINUED
MODE MENU

NOTE: This sub-menu activates modes so they will be available for use with the MODE button. Weigh mode is always active.
- Parts Count [count] (on, off) - Set to "ON" for the mode to be active.
- Check Weigh [Check] (on, off) - Set to "ON" for the mode to be active.
UNITS MENU

NOTE: This sub-menu activates units so they will be accessible with the UNITS button. The units in the menu must be turned on to be active.

NOTE: Available units and modes vary by model and local regulations.
SECURITY SWITCH
- Menu Lock switch may be used to limit changes to the user menu. (See Figure 4)
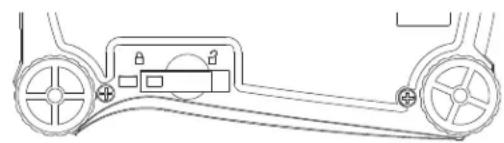
Figure 4
Unlocked
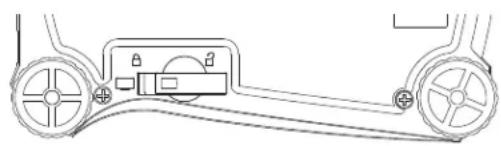
Locked
- The switch may set some scale settings as required by the approval agency.
- The switch may be secured using paper seals, wire seals or plastic ties.
MAINTENANCE

WARNING! Electric shock hazard. Disconnect the equipment from the power supply before cleaning.

ATTENTION! Do not use solvents, harsh chemicals, ammonia or abrasive cleaning agents.
- Clean the main housing with a damp cloth and mild detergent, if necessary.
TROUBLESHOOTING
| OPERATING ISSUE POSSIBLE CAUSE REMEDY | ||
| Cannot turn on No power to scale. Verify connections and voltage. | ||
| Poor accuracy | Unstable environment. Improper calibration. | Move scale to suitable location away from airflow and vibrations. Perform calibration. |
| Cannot calibrate | Unstable environment. Incorrect calibration weight. | Move scale to suitable location away from airflow and vibrations. Use correct calibration weight. |
| Cannot access mode Mode not enabled. Enter menu and enable mode. | ||
| Cannot access unit Unit not enabled. Enter menu and enable unit. | ||
| Lo rEF | Reference weight is too low. | Increase reference weight. |
| rEF Err | Parts counting - sample weight < 1d. | Shows error, exits mode or goes to Cir.RPU. |
| Err 3.0 CAL | Incorrect calibration weight. | See Calibration on page 3. |
| ERR 4.4 Full | RS232 Buffer is full. | Set Handshake on, see Interface User Manual. |
| Err 8.1 LoRd | Power on zero range exceeded. | Clear pan; check shipping lock setting. |
| Err 8.2 LoRd | Power on zero under range. | Install pan; check shipping lock setting. |
| Err 8.3 LoRd | Overload. | Load exceeds scale maximum capacity. |
| Err 8.4 LoRd | Under load. | Reading below min. range; re-install pan. |
| Err 8.6 999999 | Displayed value > 999999. | Result exceeds display capability. |
| Err 9 dRtA | Internal data error. Contact Uline Customer Service. | |
| Err 13 MEM | Fail to write EEPROM. | Contact Uline Customer Service. |
| Err 53 CSUM | Invalid checksum data. | Contact Uline Customer Service. |
If troubleshooting section does not resolve or describe problem, contact Uline Customer Service at 1-800-295-5510.
TECHNICAL DATA
EQUIPMENT RATINGS
Pollution degree 2
Installation category II
Altitude 2000m
- Humidity: Maximum 80% for temperatures up to 88^ decreasing linearly to 50% at 104^ non-condensing
- Electrical supply: Rated 12VDC 500mA for use with a certified/listed power adapter, or battery operated
- Indoor use only
- Temperature range: 50^ to 104^
The main supply voltage fluctuations are not to exceed ± 10% of the nominal supply voltage.
SPECIFICATIONS
| MODEL H-9884 H-9886* | |||
| Capacity (g) | 220 2200 2200 | ||
| Readability (g) | 0.01 0.01 0.1 | ||
| Repeatability (Std. Dev) | 1d 2d 1d | ||
| Linearity | ±2d ±5d ±2d | ||
| Span Calibration Mass (Not Included) | 200 2,000 | 1,000 | |
| Linearity Calibration Mass | 100 g, 200 g | 1 kg, 2 kg | 1 kg, 2 kg |
| Stabilization Time(s) | 1 | 2 | 1 |
| Construction | ABS housing & stainless steel pan | ||
| Draftshield | No | ||
| Calibration | User-selectable external span or linearity calibration/Digital with external weight | ||
| Tare Range | Full capacity by subtraction | ||
| Weighing Unit | g, N, oz, ozt, dwt, ct, grain | ||
| Application Modes | Weighing, Parts Counting, Checkweighing | ||
| Power Requirement | AC adapter (included) or four C batteries (not included) | ||
| Typical Battery Life | 270 hours | 200 hours | 270 hours |
| Specified Temperature Range | 50°F to 104°F at 10% to 85% relative humidity, non-condensing | ||
| Storage Conditions | -4°F to 131°F at 10% to 90% relative humidity, non-condensing | ||
| Communication | RS232, USB or Ethernet (available as accessories) | ||
| Display Type | Liquid Crystal Display (LCD) with backlight | ||
| Display Size | 0.78 in / 20 mm digits | ||
| Pan Size (W x D) | 5.7 in / 145 mm diameter | 7.5 x 5.7 in / 190 x 144 mm | |
| Scale Dimensions (W x D x H) | 8 x 9.1 x 2.8 in / 204 x 230 x 70 mm | ||
| Shipping Dimensions (W x D x H) | 11.8 x 9.8 x 5.3 in / 300 x 250 x 134 mm | ||
| Net Weight | 2.2 lb / 1.0 kg | ||
| Shipping Weight | 3.3 lb / 1.5 kg | ||
*Also kg, lb, lb:oz convertible
SPECIFICATIONS CONTINUED
| MODEL H-9884 H-9885 H-9886 | |||
| Gram (g) 220 x 0.01 | 2,200 x 0.01 2,200 x 0.1 | ||
| Kilogram (kg) | -------- | 2.2 x 0.00001 | 2.2 x 0.0001 |
| Newton (N) 2.1574 x 0 | 0001 21.5744 x 0.0001 21.574 x 0.001 | ||
| Ounce (oz) | 7.7600 x 0.0005 | 77.6025 x 0.0005 | 77.600 x 0.005 |
| Ounce Troy (ozf) | 7.0730 x 0.0005 | 70.7315 x 0.0005 | 70.730 x 0.005 |
| Pennyweight (dwt) | 141.46 x 0.01 | 1,414.63 x 0.01 | 1,414.6 x 0.1 |
| Pound (lb) | -------- | 4.85015 x 0.00005 | 4.8500 x 0.0005 |
| Pound:Ounce (lb:oz) | -------- | 4lb:13.603 oz x 0.0005 oz | 4lb:13.600 oz x 0.005 oz |
| Carat (ct) | 1,100 x 0.05 | 11,000.0 x 0.05 | 11,000 x 0.5 |
| Grain (grn) | 3,395.0 x 0.2 | 33,951.2 x 0.2 | 33,950 x 2 |


