
Triton K-7827 - Faucet KOHLER - Free user manual and instructions
Find the device manual for free Triton K-7827 KOHLER in PDF.

| Brand | Kohler |
| Model | Triton K-7827 |
| Product Type | Kitchen Faucet |
| Use | Sink |
| Material | Brass |
| Finish | Chrome |
| Number of Holes Required | 3 |
| Handle Type | Two Lever Handles |
| Pull-out Sprayer | Yes |
| Overall Height | 35 cm |
| Spout Reach | 20 cm |
| Supply Connection | 1/2" NPT |
| Recommended Water Pressure | 0.5 to 8 bar |
| Weight | 2.5 kg |
| Maintenance | Clean with a soft cloth and soapy water |
| Warranty | Limited Lifetime Warranty |
Frequently Asked Questions - Triton K-7827 KOHLER
User questions about Triton K-7827 KOHLER
0 question about this device. Answer the ones you know or ask your own.
Ask a new question about this device
Download the instructions for your Faucet in PDF format for free! Find your manual Triton K-7827 - KOHLER and take your electronic device back in hand. On this page are published all the documents necessary for the use of your device. Triton K-7827 by KOHLER.
USER MANUAL Triton K-7827 KOHLER
Mproduct numbers are for Mexico (i.e. K-12345M)
Los númeroos de produits seguidos de
Mcorresponden a Mexico (Ej.
K-12345M)
- Observe all local plumbing and building codes.
Shut off the water supplies.
Carefully inspect waste and supply tubing for any sign of damage and replace if necessary.
For new installations, assemble the faucet to the sink before installing the sink.
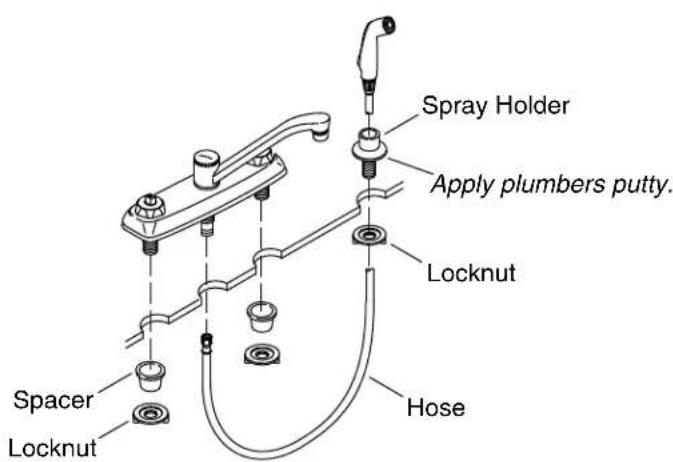
1. Install the Faucet
- Insert the faucet into the sink holes.
From under the sink, install the spacers and plastic locknuts. - Handtighten the plastic locknuts. Do not tighten with a wrench.
2. Install the Handspray
For K-7827 Models Only
- Apply a bead of plumbers putty or other sealant to the underside of the spray holder.
- Insert the spray holder into the sink hole.
From under the sink, securely handtighten the locknut. - Remove any excess putty or sealant.
- Insert the handspray hose through the spray holder.
- Connect the handspray hose to the spray tube on the underside of the faucet.
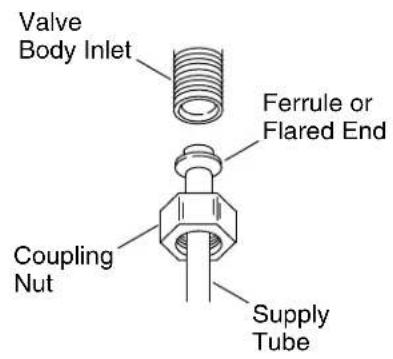

3. Install the Supplies
NOTE:If the supply tubes need to be cut, allow for required penetration of the tube into the supply stop.
NOTE:If the sink is not installed, install it at this time. Follow all instructions packed with the sink.
Remove the burrs from all tubing cuts.
- Slip the coupling nuts onto the supply tubes.
Position the round end of the supply tube (either flared or ferrule) squarely into the valve body inlet.
Handtighten the coupling nuts.
- Carefully bend the supply tubes to align them with the supply stops.
- Slide the coupling nuts and ferrules from the stops onto the supply tubes.
- Insert the supply tubes into the outlets of the shut-off valves.
- Tighten the coupling nuts on the shut-off valves.
Turn on the water supply.
- Ensure that both faucet handles are turned off. Hot is clockwise close and cold is counterclockwise close.
Turn on the hot and cold water supplies.
Check for leaks.
Remove the aerator by turning it counterclockwise.
Turn on the hot and cold faucet handles for one minute to flush debris from the faucet. - Close the hot and cold faucet handles.
Reattach the aerator by turning it clockwise until hand tight.


Brand : KOHLER
Model : Triton K-7827
Category : Faucet