
Pulse Confort EJD2 - Water flosser Essentiel B - Free user manual and instructions
Find the device manual for free Pulse Confort EJD2 Essentiel B in PDF.

| Brand | Essentiel B |
| Model | Pulse Confort EJD2 |
| Product type | Water flosser |
| Box contents | 1 water flosser, 1 charging station, 2 nozzles, 1 user manual |
| Spray modes | Normal, Soft, Pulse |
| Tank capacity | 170 mL |
| Battery type | Lithium-ion 1400 mAh |
| Charging time | Approximately 24 hours |
| Battery life | Approximately 45 minutes |
| Power cord length | 1.2 meters |
| Automatic shut-off | After 2 minutes of use |
| Replaceable nozzle | Yes (every 6 months with regular use) |
| Removable tank | Yes |
| Compatible with dental appliances | Yes |
| Charge indicator | Yes (flashing while charging, solid when fully charged) |
| Immersion protection | Do not immerse the charging base or the water flosser |
| Power consumption in off mode | 0.0 W |
Frequently Asked Questions - Pulse Confort EJD2 Essentiel B
User questions about Pulse Confort EJD2 Essentiel B
0 question about this device. Answer the ones you know or ask your own.
Ask a new question about this device
Download the instructions for your Water flosser in PDF format for free! Find your manual Pulse Confort EJD2 - Essentiel B and take your electronic device back in hand. On this page are published all the documents necessary for the use of your device. Pulse Confort EJD2 by Essentiel B.
USER MANUAL Pulse Confort EJD2 Essentiel B
natural_image
White electric toothbrush with a blue circular button and metallic tip, isolated on white background (no text or symbols visible)Notice d'utilisation / User guide / Bedienungsanleitung / Gebruiksaanwijzing
AVANT\*
FRONT ^A
VORDERSEITE*
VOORKANT*
ARRIÈRE\*\*
BACK"
RÜCKSEITE**
ACHTERKANT**
FR EN DE NL
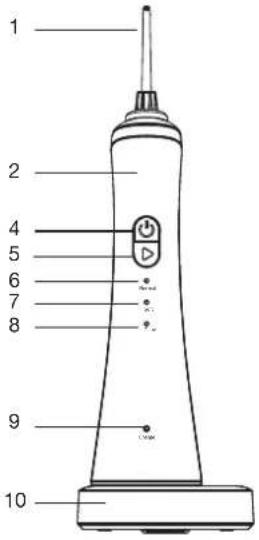
| 1 | Canule Tip Kanüle Canule | |||
| 2 | Hydropulsour Water flosser Munddusche Mondouche | |||
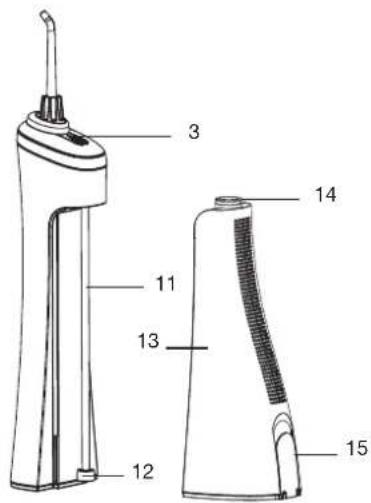
| 3 | Bouton de déverrouillage de la canule | Tip unlock button | Entriegelungsknopf der Kanüle | Ontgrendelingsknop voor de canule |
| 4 | Bouton marche/arêt On/Off button Ein/Aus Knopf Aan/uit-knop | |||
| 5 | Bouton de sélection du mode | Mode selection button | Modus-Auswahlknopf | Knop voor het selecteren van de modus |
| 6 | Indicateur lumineux du mode 1 | 1 mode indicator lamp | Leuchtanzeige für den 1-Modus | Indicatorlampje van de modus '1 |
| 7 | Indicateur lumineux du mode 2 | 2 mode indicator lamp | Leuchtanzeige für den 2-Modus | Indicatorlampje van de modus 2 |
| 8 | Indicateur lumineux du mode 3 | 3 mode indicator lamp | Leuchtanzeige für den 3-Modus | Indicatorlampje van de modus 3 |
| 9 | Indicateur lumineux de charge | Charge indicator lamp | Leuchtanzeige für das Laden | Oplaadindicatie-lampje |
| 10 | Socle de charge Charging base Ladesockel Oplaadsokkel | |||
| 11 | Tuyau d'aspiration Suction tube Saugschlauch Aanzuigslang | |||
| 12 | Filtre | Filter | Filter | Filter |
| 13 | Réservoir d'eau | Water tank | Wassertank | Waterreservoir |
| 14 | Joint étanche Waterproof ring Dichtungsring Waterdichte pakking | |||
| 15 | Couvercie du réservoir d'eau | Water tank door | Deckel des Wassertanks | Deksel van het waterreservoir |
votre produit
Contenu de la boîte
utilisation
natural_image
Diagram of a mechanical device with a lever and base, showing a downward arrow (no text or symbols)natural_image
Illustration of a medical or surgical tool tip with arrows indicating insertion or dissection (no text or symbols present)natural_image
Diagram of a handheld device with a downward arrow indicating compression or disassembly (no text or symbols present)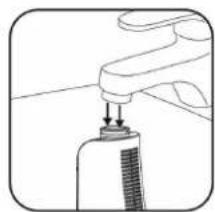
natural_image
Illustration of a hand holding a small object with a downward arrow, possibly part of a device or tool (no text or symbols visible)natural_image
Illustration of a person drinking from a bottle into a sink (no text or symbols)natural_image
Illustration of two dental arches with braces and clamps, no text or symbols present• 1 water f l osser
• 1 charging station
• 2 tips
• 1 instruction leafl et
Technical characteristics
• 3 modes: 1) normal 2) soft 3) pulse
- On/Off button
- Mode selection button
• Charge & low battery indicator
• 1400mAh Li-ion battery
• Charge time: about 24 hours
• Battery life: about 45 minutes
• Removable and transparent 170 ml tank
• Power cord length: 1.2 m
| Product information for power consumption and maximum time to reach applicable low power mode | |
| Power consumption in off mode | NA |
| Power consumption in standby | 0.37 W |
| The maximum time needed to automatically reach the applicable low power mode or condition | NA |
| Power consumption in network standby if all wired network ports are connected and all wireless network ports are activated | NA |
before first use
- The water fl osser must be charged before first use. Refer to the next section entitled "Charging".
charging
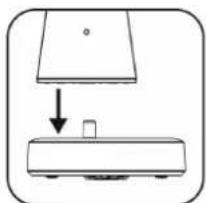
- Make sure that the charging base is placed on a fl at, stable, and dry surface.
- Place the water f l osser on its charging base.
- Plug the power cord into a mains socket. The charging indicator lamp will flash.
- When charging is complete (about 24 hours), the indicator lamp will remain steadily lit. Unplug the power cord.
Note: if, during or after use, the indicator lamp fl ashes, the water flosser needs to be charged.
use
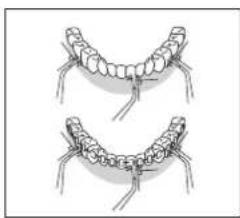
The water f l osser is suitable for cleaning dental appliances and prostheses.
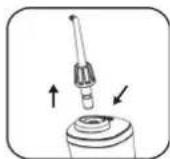
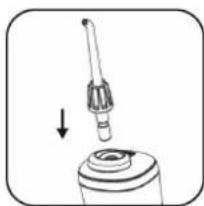
- Make sure the head of the tip is pointed towards the side with the ⏻ on/off button, and push it onto the handle until it clicks into place.
natural_image
Simple line drawing of a mechanical setup with a downward arrow and a small object on a base (no text or symbols)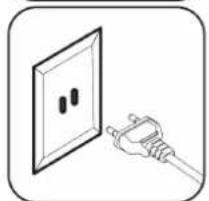
natural_image
Illustration of a hand holding a plug inserted into a wall socket (no text or symbols)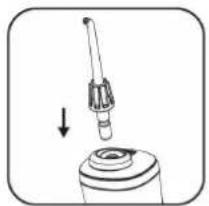
natural_image
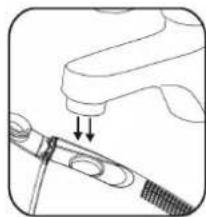
Diagram of a mechanical component with a downward arrow indicating motion (no text or symbols)- Open the cover of the tank and fill it with cold or warm water (max. 40°C).
natural_image
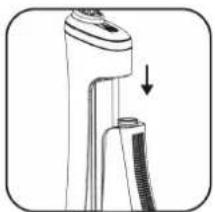
Diagram of a medical or surgical tool with a pointed tip and inserted screw (no text or symbols)You can also take the tank out of the handle to make it easier to fill, and then reassemble it on the water filter.
natural_image
Diagram of a handheld device with a downward arrow indicating compression or disassembly (no text or symbols present)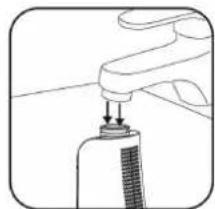
natural_image
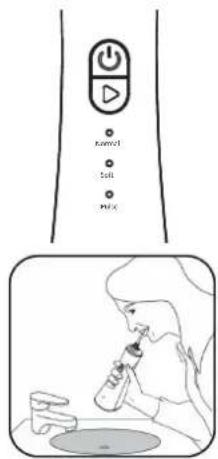
Illustration of a hand holding a small object with a downward arrow, possibly indicating a process or insertion (no text or symbols present)- Press the mode button ▷ repeatedly to select the desired spray type:
• Normal : for normal cleaning to eliminate bacteria that cause cavities and plaque.
- Soft: to massage the gums and stimulate blood circulation. Ideal for sensitive gums.
- Pulse: to effectively remove all food residue and clean interdental spaces.
- Turn on the device with the on/off button ⏻ and start cleaning your teeth. Keep the water f l osser in an upright position with the tip head facing the teeth.
after use
- The stream will automatically stop after 2 minutes.
- Switch off the device with the on/off button ⏻.
- Open the cover of the water tank and empty the remaining water into a sink.
- Close the cover, turn on the device again and drain the remaining water from the suction tube, then turn off the device.
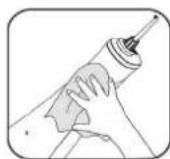
- Wipe the water fl osser with a dry cloth and press the unlock button on the tip to remove it if you wish to replace it.
Note: for hygiene reasons and to avoid bacterial growth, make sure that the tank is completely empty after each use. If you do not intend to use the device for a long period of time, allow the inside of the tank to dry and leave the lid open.
tips for use
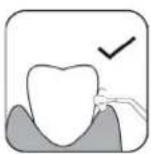
• The water must be sprayed at a 90° angle to the teeth.
- Slowly move the water fl osser along your teeth and gums.
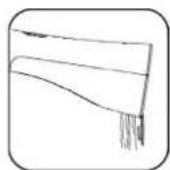
- Pay particular attention to the area between the teeth and, if necessary, around dental appliances and prostheses.

natural_image
Illustration of two dental arches with braces and clamps, no text or symbols presentcleaning and maintenance
- Do not immerse the charging base or water fl osser in water or any other liquid.
- Before cleaning, the device must be switched off.
- Never use alcohol, solvents or abrasives to clean your device. Only clean water or a neutral cleaning agent suitable for this device.
Tip
- Press the unlock button on the tip to remove it, and clean it with clean water. Then wipe it with a soft, dry cloth.
- When used regularly, the tip should be replaced every 6 months.
Body of the water flosser
- Clean the water fl osser's surfaces with a soft, damp cloth with liquid detergent and dry it thoroughly.
Suction tube
- Clean the suction tube with clean water and wipe it with a soft, dry cloth.
- Do not bend, pull, or twist the tube, as this may damage it.
Water tank
- Rinse the tank with clean water and let it dry completely and leave the lid open (especially if you do not plan to use the water fl osser for a long time).
Charging base
- Clean the surface of the charging base with a soft, dry cloth.
troubleshooting guide
The water f l osser isn't working:
- You're using the water fl osser for the first time or it hasn't been used for more than three months. Charge the water fl osser for at least 24 hours.
The stream pressure is low:
- The tip is blocked or deformed. Replace it.
The water fl osser doesn't work or stops working after a few minutes:
- The filter at the end of the suction hose is obstructed: clean it.
- The battery is flat or wasn't charged long enough. Charge the device for at least 24 hours before using it.
- If it still doesn't work after charging, contact your retail store's customer service department.
Water is not coming out of the tip:
• The tank is empty. Fill it.
- The water f l osser is tilted too much during use. Place it in an upright position.
If the problems persist, contact your retailer's after-sales department.
recycling the battery

This device has a built-in rechargeable battery that can be recycled but not replaceable. At the device's end of life, return it to your retail store or place it in a dedicated container for this type of waste.
All information, designs, drawings and pictures in this document are the property of SOURCING & CREATION. SOURCING & CREATION reserves all rights to its brands, designs and information. Any copy and reproduction through any means shall be deemed and considered as counterfeiting.
ihr produkt
Verpackungsinhalt
natural_image
Diagram of a mechanical device with a lever and base, showing an arrow indicating motion (no text or symbols present)natural_image
Diagram of a hand holding a tool with a screwdriver inserted, showing mechanical components (no text or symbols)natural_image
Diagram of a mechanical device with a downward arrow indicating motion or force (no text or symbols present)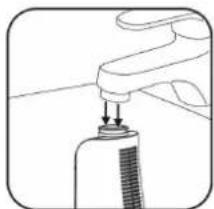
natural_image
Simple line drawing of a faucet handle with a spray bottle inserted (no text or symbols)natural_image
Illustration of a person drinking from a bottle while holding a cup, with a sink in the background (no text or symbols)ende der anwendung
natural_image
Illustration of two dental arches with teeth and jaw structures (no text or symbols)natural_image
Simple line drawing of a mechanical setup with a downward arrow and a small block on a base (no text or symbols)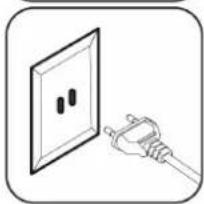
natural_image
Illustration of a hand holding a plug inserted into an electrical outlet (no text or symbols)gebruik
natural_image
Diagram of a mechanical device with a lever and base, showing an arrow pointing to a component (no text or symbols present)natural_image
Diagram of a medical or surgical tool with a pointed tip and forceps, showing no text or symbolsnatural_image
Illustration of a handheld device with a downward arrow indicating compression or adjustment (no text or symbols)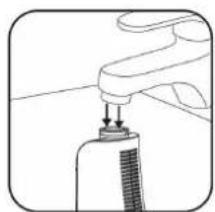
natural_image
Simple line drawing of a hand holding a tool with a brush (no text or symbols)natural_image
Line drawing of a person drinking from a bottle into a sink (no text or symbols)na het gebruik
natural_image
Illustration of two dental arches with braces and clips, no text or symbols presentProtection of the environment
This symbol attached to the product means that it is an appliance whose disposal is subject to the directive on waste from electrical and electronic equipment (WEEE). This appliance may not in any way be treated as household waste and must be subject to a specific type of removal for this type of waste. Recycling and recovery systems are available in your area (waste removal) and by distributors. By taking your appliance at its end of life to a recycling facility, you will contribute to environmental conservation and prevent any harm to your health.
Umweltschutz
Tested in our laboratories
Warranty valid from the date of purchase (receipt as proof of purchase). This warranty does not cover defects or damage caused by improper set up, incorrect use, or normal wear and tear of this product.