
H15W25W-CA - Air-conditioner TCL - Free user manual and instructions
Find the device manual for free H15W25W-CA TCL in PDF.

| Product Type | Window Air Conditioner |
| Brand | TCL |
| Model | H15W25W-CA |
| Cooling Capacity | 15 000 BTU |
| Power Supply | 115 V ~ 60 Hz, 11 A max |
| Adjustable Temperature Range | 16 °C to 31 °C (61 °F to 88 °F) |
| Operating Modes | Auto, Cool, Dry, Fan, Eco |
| Fan Speed | High, Medium, Low, Auto |
| Programmable Timer | 0.5 to 24 hours |
| Sleep Function | Yes, automatically adjusts temperature |
| Air Filter | Washable, cleaning indicator after 500 hours |
| Remote Control | Yes, with AAA batteries included |
| WiFi Connectivity | Yes, 2.4 GHz band via TCL Home app |
| Installation | Double-hung window |
| Plug Type | Polarized with ground (3 prong) |
| Electrical Protection | Time-delay fuse or circuit breaker, RESET button on cord |
| Warranty (non-commercial use) | 12 months parts and labor |
| Product Registration | Online at register.tcl.com |
| Customer Service | 1-800-825-6747 |
Frequently Asked Questions - H15W25W-CA TCL
User questions about H15W25W-CA TCL
0 question about this device. Answer the ones you know or ask your own.
Ask a new question about this device
Download the instructions for your Air-conditioner in PDF format for free! Find your manual H15W25W-CA - TCL and take your electronic device back in hand. On this page are published all the documents necessary for the use of your device. H15W25W-CA by TCL.
USER MANUAL H15W25W-CA TCL
Hi! Let's Get Started.
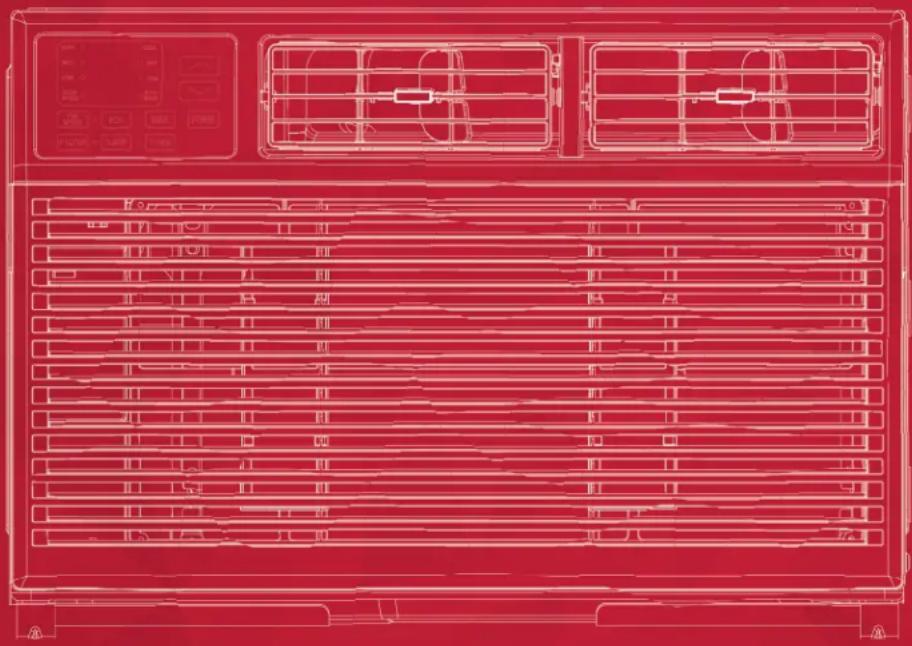
natural_image
Red wireframe diagram of a front view of an air conditioner unit with ventilation grilles and control panel (no text or symbols)Table of Contents
English
Register and Protect Your Purchase .... 3
Important Safety Instructions....4
What's in the Box....5
Let's Get Started! 6
Assembly and Installation 8
How to Control Your AC....12
Troubleshooting 14
WiFi App Installation (WiFi Models Only) 15
Warranty Information....14
Spanish
Registre y proteja su compra....16
Register and protect your purchase
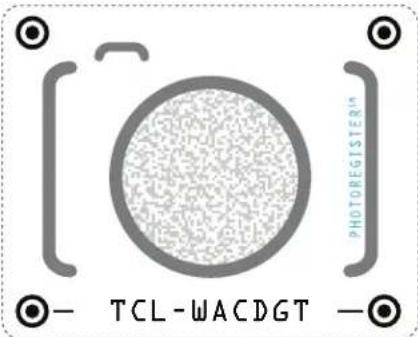
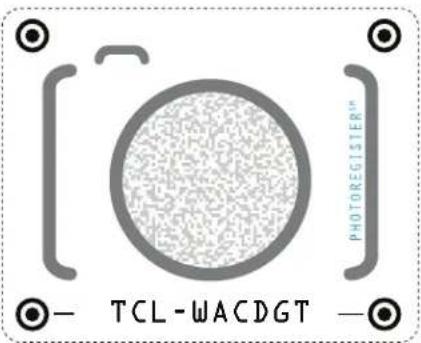
Register easily with your smartphone
Scan or text a photo of the camera icon to 71403
Or register online at www.tclusa.com/register
Need help? Visit photoregister.com/help or text HELP to 71403
Add a TCL Protection Plan when you register your product and be covered from life's mishaps
Thank you for choosing TCL. We want your ownership experience to bring you as much joy as the product you purchased does, so we're offering you a special price on TCL Protection Plans when you purchase during registration. Add a TCL Protection Plan within your first 30 days of ownership to receive the best value and we'll make sure nothing gets in the way of you enjoying your new product.
Benefits & Description
PROTECT PLUS
| Extended Manufacturer CoverageExtended parts & labor coverage for manufacturer defects. | Up To 4 Years | Up To 4 Years |
| Priority ServiceFree shipping and rapid turn-around time. | 3-5 Days | 3-5 Days |
| Product ReplacementFree 1-time replacement if product cannot be fixed. | ⊕ | ⊕ |
| TCL Parts & ServiceGenuine TCL parts & factory certified service. | ⊕ | ⊕ |
| No Deductible$0 out of pocket expense. | ⊕ | ⊕ |
| Accidental Damage ProtectionCoverage for drops, breaks and spills starts after 30 days. | ⊕ |
*Extended service plans (i.e., “Protect” and “Plus” plans) are only offered in the United States (US). All TCL products continue to offer a limited consumer warranty in both the US and Canada. Please refer to the warranty section in this guide for additional details on warranty information.
IMPORTANT SAFETY INSTRUCTIONS
Before installing and using your air conditioner, please read this owner's manual carefully. Store this manual in a safe place for future reference. Your safety and the safety of others is very important to us. Please pay attention to all safety messages outlined in this owner's manual.
WARNING: To reduce the risk of fire, electrical shock or injury when using your air conditioner, follow the following basic precautions:
ELECTRICAL REQUIREMENTS
The electrical ratings for your air conditioner are listed on the model and serial number label located on the front right side of the unit (when facing the front).
REGISTER YOUR APPLIANCE
You can register your appliance online by going to register.tcl.com
Be sure to retain your original sales receipt. A valid proof of purchase is required for all warranty claims.
BATTERY WARNING STATEMENT
Do not mix old and new batteries and do not mix alkaline, standard (carbon-zinc) or rechargeable (ni-cad, ni-mh, etc.) batteries
Document your model and serial numbers here:
Model #
Serial #
You can locate your 20 digit serial number underneath the bar code (right hand side of the AC).
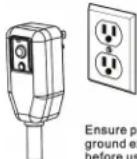
WARNING
Electrical Shock Hazard
Plug into a grounded 3 prong outlet.
Do not remove the ground prong.
Do not use an adapter
Do not use an extension cord.
Failure to follow these instructions can result in death, fire, or electrical shock
Specific electrical requirements are shown in the diagram below. Follow the requirements below for the type of plug on the power supply cord.
Wiring Requirements Power Supply Cord
• (15K) 115 Volts
(103 min - 127 max)
(18K - 24K) 230 Volts
(187 min - 253 max)
• (15K) 0-11 amps
(18K) 7.1 amps
(24K) 11.0 amps
(15K) 3.15 amp time-delay fuse or circuit breaker
(18K-24K) 3.15 amp time-delay fuse or circuit breaker
- Use on single outlet circuit only on all sizes
15K BTU
115 Volt
18K - 24K BTU
208/230 Volt
RECOMMENDED GROUND METHOD
For your personal safety, this air conditioner must be grounded. This air conditioner is equipped with a 3 prong power supply cord with a grounded plug. To minimize the possibility of electrical shock, the cord must be plugged into a 3 prong outlet and grounded in accordance with all local codes and ordinances. If a 3 prong outlet is not available, it is the customer's responsibility to have a properly grounded 3 prong outlet installed by a qualified electrician.
FCC CAUTION
This device complies with part 15 of the FCC Rules. Operation is subject to the following two conditions: (1) This device may not cause harmful interference, and (2) this device must accept any interference received, including interference that may cause undesired operation. Any Changes or modifications not expressly approved by the party responsible for compliance could void the user's authority to operate the equipment.
Note: This equipment has been tested and found to comply with the limits for a Class B digital device, pursuant to part 15 of the FCC Rules. These limits are designed to provide reasonable protection against harmful interference in a residential installation. This equipment generates uses and can radiate radio frequency energy and, if not installed and used in accordance with the instructions, may cause harmful interference to radio communications. However, there is no guarantee that interference will not occur in a particular installation. If this equipment does cause harmful interference to radio or television reception, which can be determined by turning the equipment off and on, the user is encouraged to try to correct the interference by one or more of the following measures:
-Reorient or relocate the receiving antenna.
-Increase the separation between the equipment and receiver.
DO NOT RETURN TO STORE
WE ARE READY TO HELP contact us first with any questions

TCL SUPPORT: support.tcl.com/us 1-800-825-6747

BE CAREFUL WHEN REMOVING
THE AIR CONDITIONING UNIT
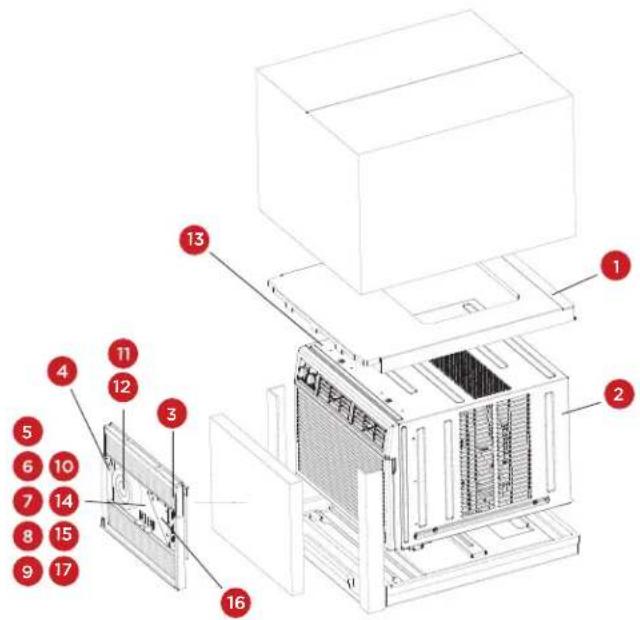
What's in the Box
| NO. APPEARANCE PART NAME QUANTITY | |||
| 1 | 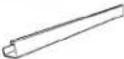 | Top Rail 1 | |
| 2 | 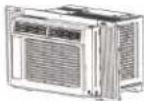 | AC Unit 1 | |
| 3 | 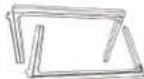 | Filler Panels (Labeled “Left” & “Right”) | 2 |
| 4 | [A98Z] | Remote Control 1 | |
| 5 |  | Sash Lock 2 | |
| 6 | [20CT] | 5/16" Long Hex-head Screw 4 | |
| 7 |  | 5/8" Long Hex-head Screw 3 | |
| 8 | 1/2" Long Hex-head Screw 4 | ||
| 9 |  | 5/8" Long Flat Head Bolt and Locknut | 1 |
| 10 |  | Sill Angle Bracket 1 | |
| 11 |  | Window Sash Seal 1 | |
| 12 | 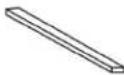 | Foam Top Window Gasket (Thin sponge material) | 1 |
| 13 |  | Foam Insulation 2 | |
| 14 | 1/2" Long Flat Head Bolt and Locknut | 4 | |
| 15 | Gasket | 2 | |
| 16 | 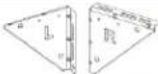 | Support Bracket (Labeled “Left” & “Right”) | 2 |
| 17 |  | Battery (AAA) | 2 |
Tip! Before unboxing, cut the tape along the top of the box to loosen contents inside. Once you lift and remove the box, check the inside of the box as some parts may be stuck at the top. You can find the screws and other parts located in the tray beneath the AC unit.
Let's Get Started!
Step 1: Testing
Before installing your AC, let's test it to make sure it works properly and your outlet has the proper power level. First, place it on a flat surface, plug it directly into a wall outlet (never use a power strip or other device), and turn it on. Next, put the mode to cool and change the temperature setting to the max cool setting. After 3 minutes, the AC should be blowing cool air. If so, please continue on to the next step. If not, see detailed troubleshooting tips at support.tcl.com/us.
Step 2: Installation
A few quick notes before installing:
- This unit is made to fit inside a standard double-hung window.
- Check the size of your window before installing.
WINDOW MOUNTING
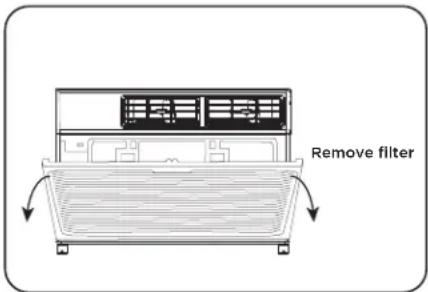
- Pull down the front panel and lift upwards. Place to the side.
- Remove the filter.
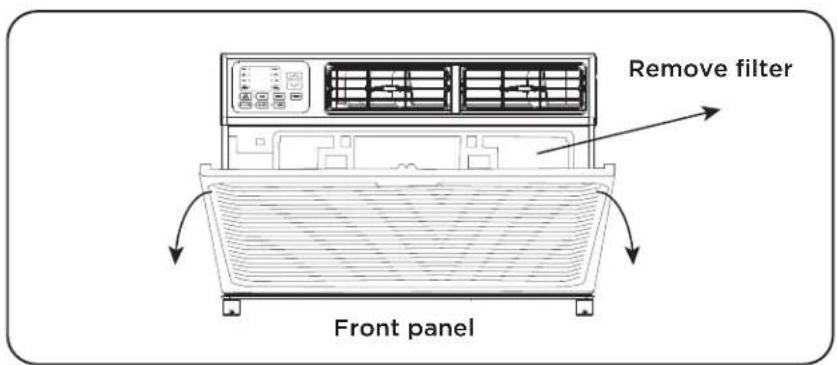
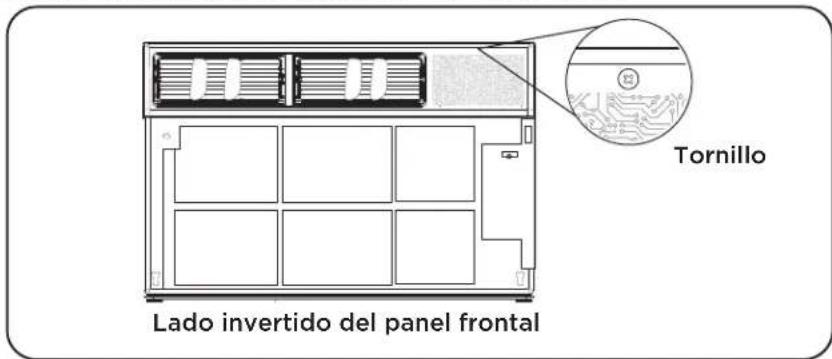
- Locate the four faceplate screws and remove. These screws will need to be re-installed prior to mounting the air conditioner.
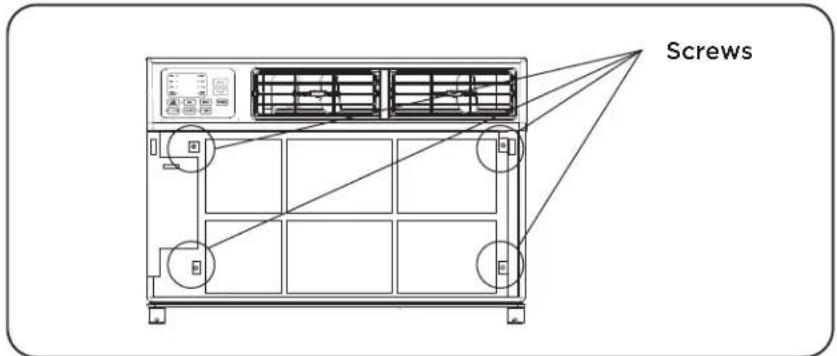
- After removing the screws, gently pull away the faceplate from the air conditioner cabinet.
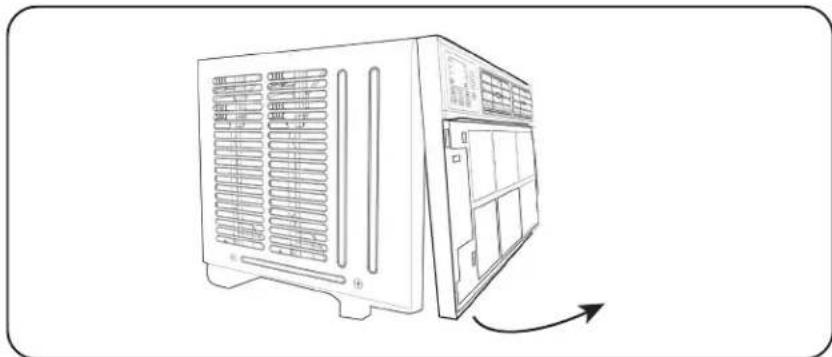
natural_image
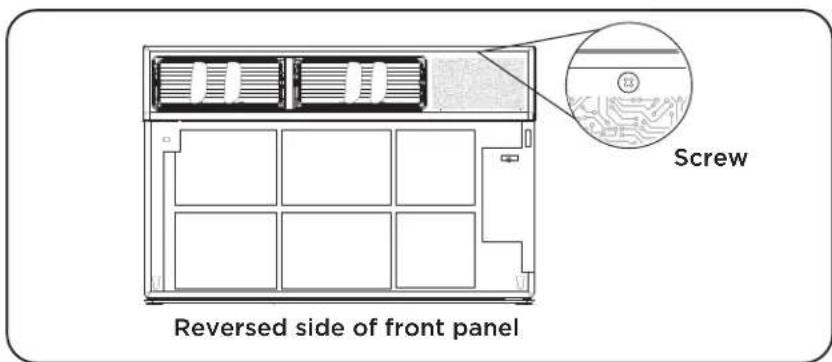
Line drawing of a server rack unit with ventilation grilles and a side panel, showing an arrow indicating rotation (no text or symbols)- Rotate the detached faceplate to expose the backside of the front panel. Remove the control panel screw and set aside the faceplate.
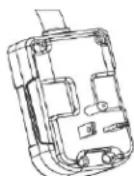
REMOVE CHASSIS
- Remove the six screws from the cabinet. (There are two screws on the top, left and right.)
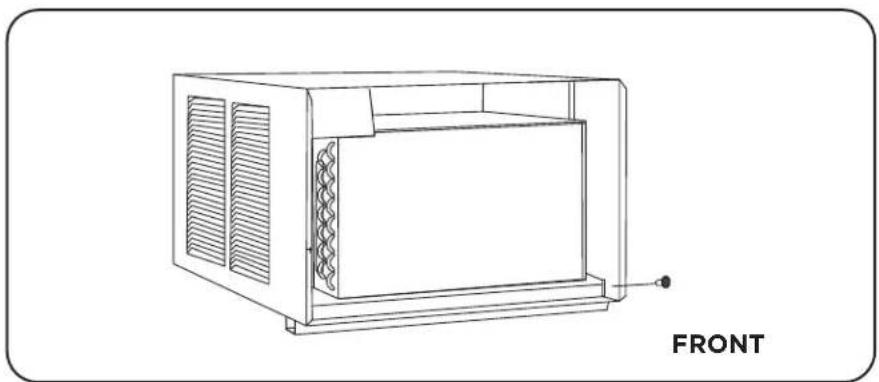
natural_image
Line drawing of a portable air conditioner unit with ventilation grilles and a front-mounted button (no text or symbols on the device itself)- Hold the cabinet while pulling on the base handle to carefully remove the unit. Do not pull or lift near the top of the unit.

Assembly and Installation
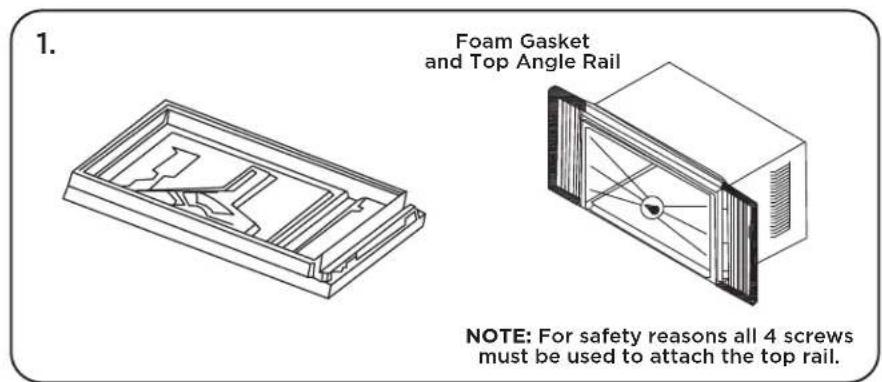
Step 3: Top Angle Rail and Side Bracket Installation
The top rail must be assembled prior to installing the air conditioner in the window
- Place the air conditioner on a flat hard surface.
-
Remove top rail from the bottom of the packaging material as shown.
-
Secure the top rail to the unit with the 5/16" screws as shown in (Fig. 1).
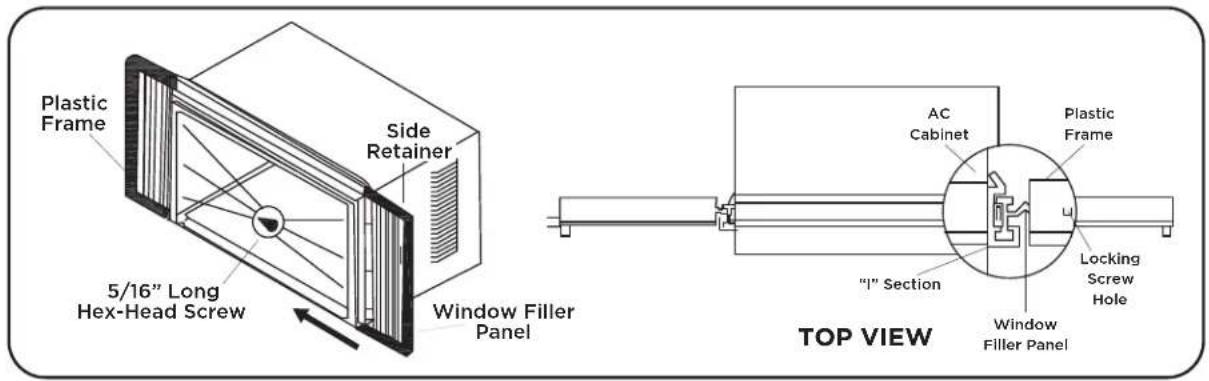
- Slide the "I" section of the window panel into the side bracket of the cabinet. Do this for both sides.
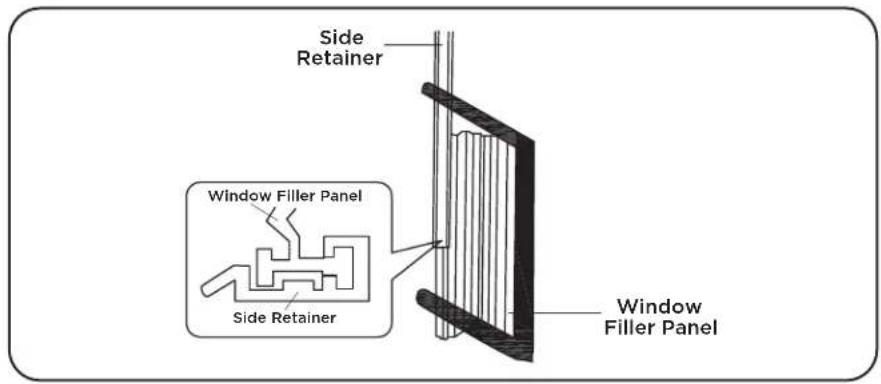
- Insert top and bottom legs of window filler panel frame into the channel on the top angle and bottom rail. Do both sides. Install side retainer to cabinet as shown.
Step 4: Placing the Cabinet Inside the Window
- Open the window and place the cabinet in the middle of the window sill.
- Make sure the bottom rail is seated over the window sill as shown below. Bring the window down temporarily behind the top angle rail to hold the cabinet in place. (It is suggested to keep a downward angle so accumulated rain water can drain out from the backside of the unit).
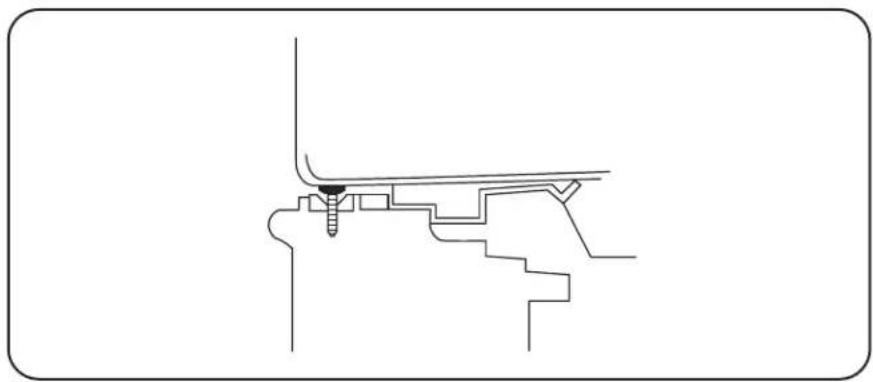
natural_image
Pure technical line drawing of a mechanical assembly without any text, numbers, or symbols- Fasten the cabinet to the window sill using two 5/8" round head screws. Pre-drill holes if needed. Add the bottom rail seal over the screws.

Step 5: Install Support Brackets
- Hold each support bracket flush against the outside of the window sill. Tighten each bracket to the bottom of the cabinet as shown below. Mark the brackets at the top level of the window sill and then remove.
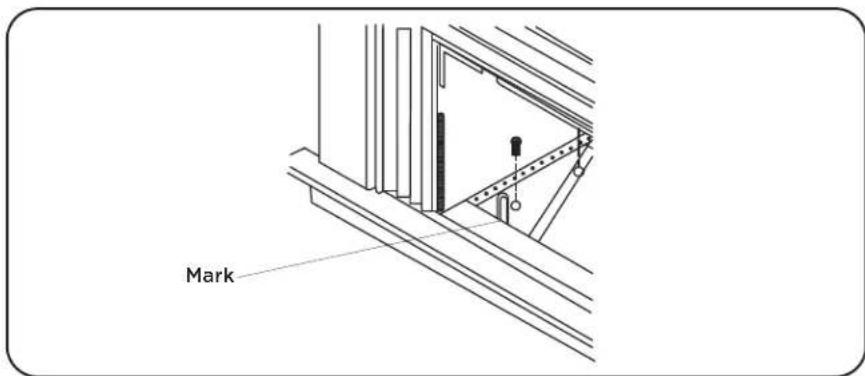
- Assemble the sill angle brackets to the support brackets at the marked position as shown below. Hand tighten, but not all the way for any changes that may be needed to be made later during the installation.
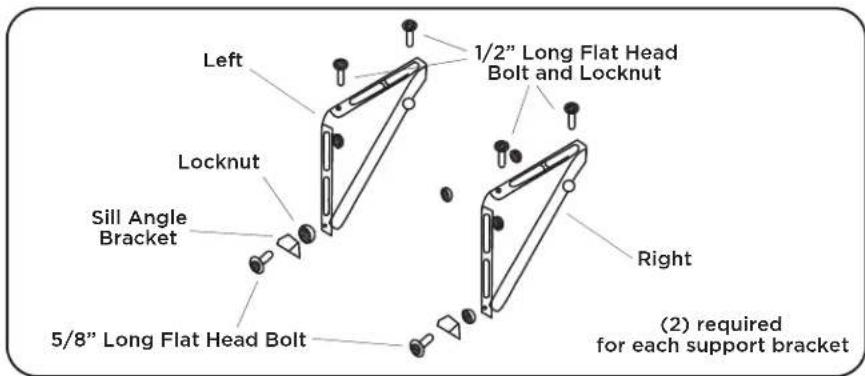
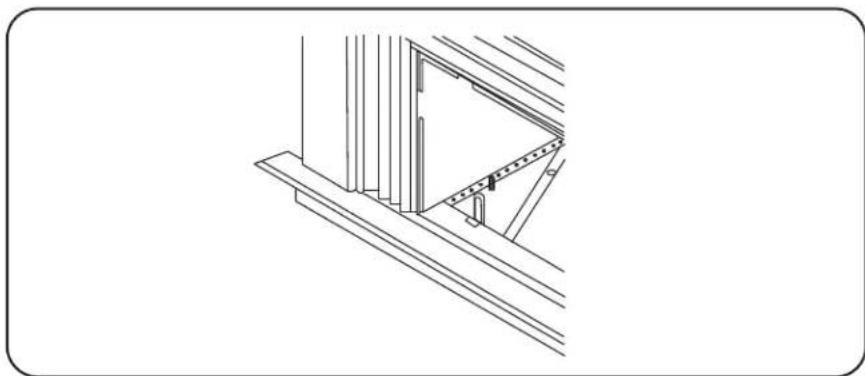
-
Install the support brackets (with sill angle brackets attached) to the bottom of the cabinet as shown below.
-
Tighten all 6 bolts securely.
natural_image
Technical line drawing of a structural frame or panel assembly (no text or symbols)Step 6: Extend the Accordion Panels
-
Carefully raise the window to expose the accordion panel and panel frame. Loosen the locking screws so the accordion panels slide easily.
-
Extend each panel to completely fill the width of the window. Tighten the locking screws when the panels are fully extended.
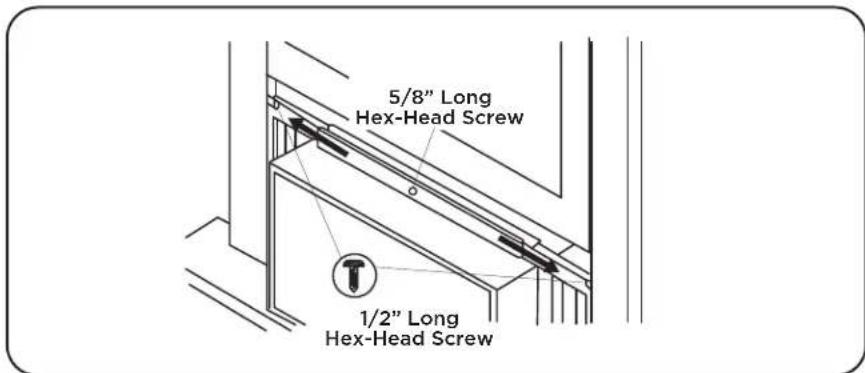
Step 7: Install the Window Lock and Sash Seal
- Trim the sash seal to fit the width of the window. Insert the sash seal into the space between the upper and lower sashes.
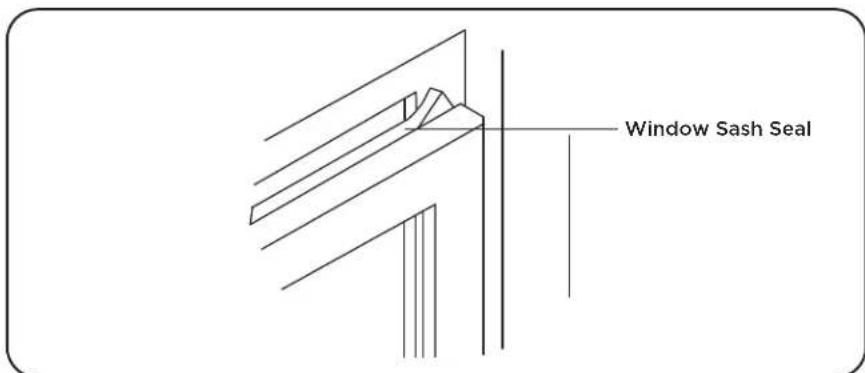
- Attach the right angle sash lock as shown below.

Step 8: Installing the Chassis into the Cabinet
- Team lift (with 2 people) the air conditioner chassis and carefully slide it into the cabinet. Let the front of the air conditioner hang out approximately 6 inches.
- CAUTION! Do not push on the CONTROLS OR FINNED COILS!
- Be sure the chassis is firmly seated in the back of the cabinet.
- Insert all screws removed during the window installation and reattach the front face plate, front panel, and the air filter.
For through the wall installation, please refer to the online user manual.
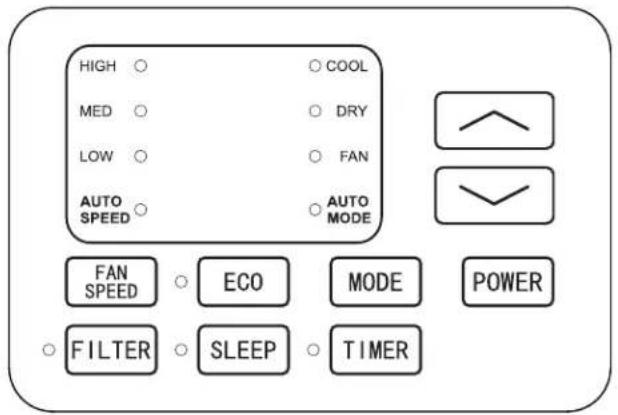
How to Control Your AC
All the basics you need to know to stay cool!
- Power - turn the air conditioner on and off.
- and Buttons - use these buttons on the control panel or remote control to increase or decrease the desired temperature, or time using the Timer. The temperature range is: 61^ - 88^ Fahrenheit, or 16^ - 31^ Celsius.
- Display - By pressing the Display button on the remote, it can switch off/on all lights and LED Display. When the timer is not in use, the operation mode and the set temperature will be displayed. Time will be displayed under the timer setting.
- Modes - Press the mode button on the control panel to cycle and select a Mode, or select a Mode by pressing the desired button the remote.
- Auto Mode – The unit automatically chooses the mode of operation (cool, dry or fan). In this mode the temperature will be set according to the room temperature (tested by the temperature sensor which is incorporated in the indoor unit.).
- Cool Mode - The cooling function allows the air conditioner to cool the room and reduce air humidity at the same time. Adjust the fan speed and temperature to your desired comfort level. In this mode, if Eco is not enabled, the fan may continue to run after reaching the desired temperature.
- Eco Mode - In Eco mode, the unit will turn off once the room is cooled to the user-set temperature. The unit will turn back on when the room temperature rises above the user-set temperature. While in Eco mode, the fan will occasionally turn on for a few seconds in order to take an accurate temperature reading.
- Fan Mode – Fan Mode helps to circulate air in your home, but only works when the air conditioner is vented.
- Fan Speed - Press the Fan Speed button to choose the fan speed options. You can choose Hi, Med, Lo or auto speed in cool mode and choose Hi, Med, Lo in fan mode.
-
Dry Mode – This function reduces the humidity of the air to make the room more comfortable. Press the Mode button to set to Dry mode. An automatic function of alternating cooling cycles and air fan is activated.
-
Timer Button - press the Timer button on the panel or the Timer button on the remote to set the timer.
- Set Timer On: With the AC off, press the Timer button and then use the ^ and ^ buttons to set the desired temperature. Press the Timer button again and use the ^ and ^ buttons to set the desired amount of time before the AC turns on. Press the timer button again to start the countdown.
- Set Timer Off: With the AC on, press the Timer button and then use the ^ and √ buttons to set the length of time before the AC will turn off. Press the timer button again to start the countdown.
Note: It can be set to automatically turn off or on in 0.5-24 hours. Each press of the buttons will increase or decrease the timer. The Timer can be set in 0.5 hour increments below 10 hours and 1 hour increments for 10 hours or above.
The Set light will turn on while setting. To cancel the set function, press the Timer button again.
-
Sleep Button - In Sleep mode, all of the display lights will turn off after a while, but the Sleep light stays on. In Sleep mode, the air conditioner will automatically adjust the temperature and fan speed to make the room more comfortable during the night. The set temperature will automatically raise every 30-60 minutes, and at most change six times until the set temperature is 81 or 82 degrees.
-
Filter Button - After the fan motor has run for 500 total hours, the Filter Check light will turn on to remind the user to clean the filter. After you clean the filter, you can turn off the light by pressing the Filter button.
Remove the filter by removing the air intake grille using the two notches on the top left and right side of the grille cover. Once the grille is removed, you can then remove the filter. Gently wash it with a mild dish washing detergent and let dry completely before reinstalling it into the AC.
Normal Operating Sounds
You may hear a pinging noise, caused by the water hitting the condenser on rainy days, or when the humidity is high. This design feature helps remove moisture and increase efficiency.
You may hear the thermostat click when the compressor cycles on and off. Water will collect in the base pan on rainy days, or high humidity days. The water may overflow and drip from the unit on the outside. The fan may run, even when the compressor is not on.
Troubleshooting
Having trouble completing installation? Don't worry, it's usually an easy fix.
| PROBLEM POSSIBLE CAUSES SOLUTIONS | ||
| Air Conditioner will not start | The air conditioner is unplugged | • Make sure the air conditioner is plug is pushed completely into the outlet |
| The fuse is blown/circuit breaker is tripped | • Check the house fuse/circuit breaker box and replace the fuse or reset the breaker | |
| Power Failure | • The unit will automatically re-start when power is restored• There is a protective time delay (approx. 3 minutes) to prevent damage to the compressor. For this reason, the unit may not start normal cooling for 3 minutes after it is turned back on. | |
| The current interrupter device is tripped | • Press the RESET button located on the power cord plug• If the RESET button will not stay engaged, discontinue use of the air conditioner and contact a qualified service technician | |
| Air Conditioner does not cool as it should | Airflow is restricted | • Make sure there are no curtains, blinds, or furniture blocking the front of the air conditioner |
| The temperature control may not be set correctly | • Lower the set thermostat tempera ture | |
| The air filter is dirty | • Clean the filter. See the Cleaning and Care Section of the manual | |
| The room may be too warm | • Please allow time for the room to cool down after turning on the air conditioner | |
| Cold air is escaping | • Check for open furnace registers and cold air returns | |
| The Cooling Coils are frozen • See “Air Conditioner Freezing Up” below | ||
| Air Conditioner is freezing up | Ice blocks the air flow and stops the air conditioner from cooling the room | • Set the MODE to HIGH FAN or HIGH COOL and set the thermostat to a higher temperature |
| Remote Control is not working | The batteries are inserted incorrectly • Check the position of the batteries | |
| The batteries may be dead • Replace the batteries | ||
| Water is dripping outside Hot and humid weather • This is normal | ||
| Water is dripping inside the room | The air conditioner is not correctly tilted outside | • For proper water drainage, make sure the air conditioner is slightly tilted downward from the front of the unit to the rear |
| Water collects in the base pan | Moisture removed from the air is draining into the base pan. | • This is normal for a short period in areas with low humidity and nor mal for a longer period in areas with high humidity |
| Digital Display reads “E1”, “E2” | A sensor has failed • Contact customer service | |
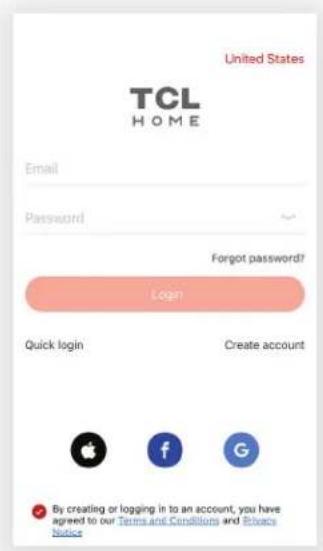
Step 1: Download and Install the TCL Home App
Using the camera function on your smartphone, scan the QR code below to be directed to the TCL Home page. If your phone does not have a QR scanner, download one from the app store or manually type in the URL below in your smartphone's web browser. Then, download and launch the app.


https://tcl.link/homeplusapp
Note: The App only supports the 2.4 GHz WiFi band (all routers have a 2.4 GHz band). Please connect to the 2.4 GHz band before you begin the app setup process.
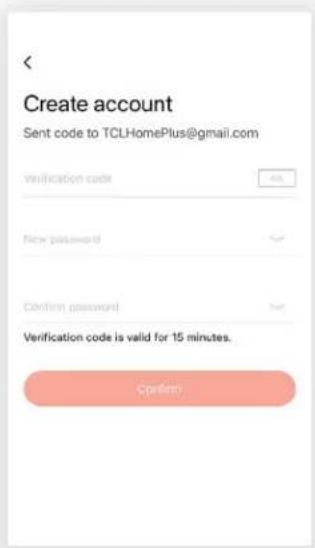
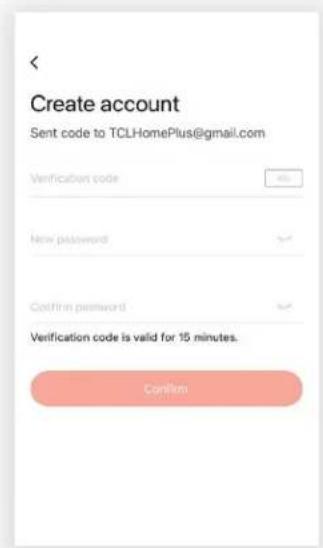
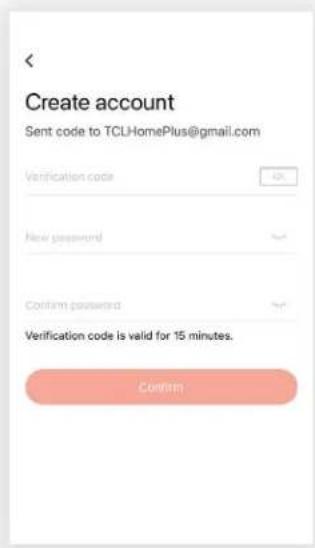
Step 2: Create an Account
Once you have opened the app, select "Create account." You will then be sent a verification code to your email. Input the code and continue.

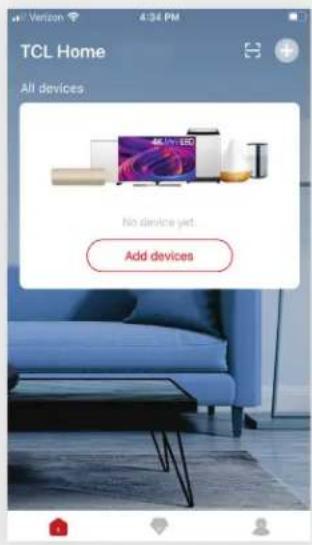
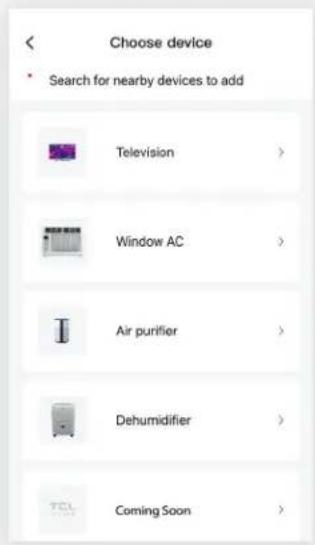
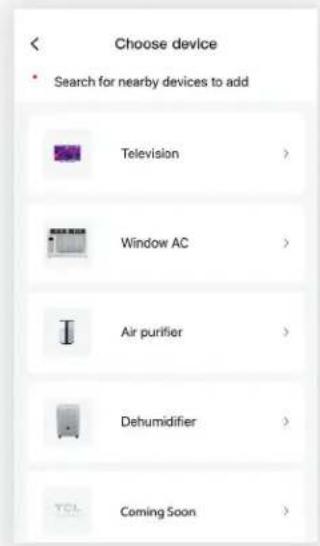
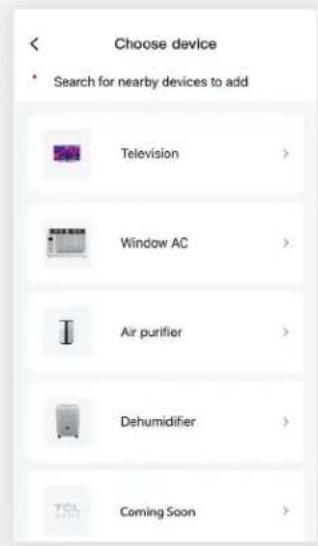
Step 3: Add Your Device
Select the "Add Devices" button and follow the in-app instructions to complete the setup.
Troubleshooting
Having trouble completing installation? Don't worry, it's usually an easy fix.
| PROBLEM POSSIBLE CAUSES SOLUTIONS | ||
| TCL Home App loses connectivity to AC during setup | Wireless router may be too far from AC | • Relocate wireless router closer to AC. |
| Network error | • Restart wireless router, AC, and mobile device. | |
| TCL Home App cannot find AC | Network error | • Restart wireless router, AC, and mobile device. |
| App & AC are not on the same 2.4GHz channel | • Confirm your device is connected to the 2.4GHz channel. | |
| Router blocking TCL Home App | • Verify App is not being blocked by the router's firewall. | |
| Incorrect WiFi Password • Reinput and verify WiFi password. | ||
| Unable to find or connect to Wireless Network | App may need permission to location | • Give TCL Home App permission to Location in phone settings. |
TCL North America
LIMITED PRODUCT WARRANTY
What your warranty covers: Defects in materials or workmanship to the original owner of this TCL product when purchased as new from an Authorized Dealer of TCL brand products and packaged with this warranty statement.
| WARRANTY PERIOD (NON-COMMERCIAL USE):Labor: Twelve (12) Months from the original date of purchase.Parts: Twelve (12) Months from the original date of purchase. | WARRANTY PERIOD (COMMERCIAL USE):Labor: Six (6) Months from the original date of purchase.Parts: Six (6) Months from the original date of purchase. |
Commercial Use includes, but is not limited to, the use of this product in a commercial or business environment, the use of this product in an institution or for institutional purposes, or for other commercial purposes including rental purposes.
Should your TCL device prove to be defective in material or workmanship under normal use during the warranty period listed above, effective from the date of original consumer purchase of the product, TCL North America at its sole discretion will, (1) pay an Authorized TCL Service Center for both labor charges and parts to repair your device, or (2) replace your device with a new or refurbished/recertified equivalent product. If repaired at an Authorized TCL Service Center, TCL is not responsible for the transportation costs to the Authorized TCL Service Center. However, TCL will pay for the return shipping. TCL will provide instructions for the packaging and shipping of the unit. Units that are improperly packed and damaged during shipping are not covered under this limited product warranty. This limited product warranty is good only to the original purchaser of the product and effective only when used in North America. You must have your original purchase receipt or proof of purchase (bill of sale or received invoice) which states the condition of the unit (new, used), the unit's date of purchase, place of purchase, and model/serial number.
HOW SERVICE IS HANDLED: Call 1-800-825-6747 and choose the appropriate prompt. Please have product type, model number, serial number, and ZIP code ready. Troubleshooting and prior approval from a TCL representative MUST occur before sending in your product for repair.
Product Registration Information
You can find the model number and serial number on a label on the back or side of the product. Register your product online at register.tcl.com.
NO OTHER WARRANTY IS APPLICABLE TO THIS PRODUCT. THIS LIMITED WARRANTY IS IN LIEU OF ANY OTHER WARRANTY, EXPRESS OR IMPLIED, INCLUDING WITHOUT LIMITATION, ANY WARRANTY OF MERCHANTABILITY OR FITNESS FOR A PARTICULAR PURPOSE. TO THE EXTENT ANY IMPLIED WARRANTY IS REQUIRED BY LAW, IT IS LIMITED IN DURATION TO THE EXPRESS WARRANTY PERIOD ABOVE. NEITHER THE MANUFACTURER NOR ITS DISTRIBUTOR SHALL BE LIABLE FOR ANY INCIDENTAL, CONSEQUENTIAL, INDIRECT, SPECIAL, OR PUNITIVE DAMAGES OF ANY NATURE, INCLUDING WITHOUT LIMITATION, LOST REVENUES OR PROFITS, OR ANY OTHER DAMAGE WHETHER BASED IN CONTRACT, TORT, OR OTHERWISE. SOME STATES AND/OR TERRITORIES DO NOT ALLOW THE EXCLUSION OR LIMITATION OF INCIDENTAL OR CONSEQUENTIAL DAMAGES OR LIMITATIONS ON THE LENGTH OF TIME AN IMPLIED WARRANTY LASTS, SO THE ABOVE EXCLUSION OR LIMITATION MAY NOT APPLY TO YOU. THIS LIMITED WARRANTY GIVES YOU, THE ORIGINAL PURCHASER, SPECIFIC LEGAL RIGHTS AND YOU MAY ALSO HAVE OTHER RIGHTS THAT VARY FROM STATE TO STATE OR TERRITORY TO TERRITORY. THIS WARRANTY IS SUBJECT TO CHANGE WITHOUT NOTICE. PLEASE VISIT WWW.TCL.COM/EN TO VIEW THE MOST CURRENT VERSION.
THIS LIMITED WARRANTY DOES NOT APPLY TO:
- Service calls to your home for delivery or pick-up, installation, instruction, replacement of house fuses, connection of house wiring or plumbing, or to correct unauthorized repairs.
- Failure of the product to perform due to signal reception problems not caused by your unit, or due to power failures or interruptions or inadequate electrical service.
- Damage caused by transportation or handling, including damage during shipment from a Retailer (please contact your Retailer for assistance).
- Damage caused to the product by accident, vermin, lightning, wind(s), fire, flood(s), or act(s) of God.
- Damage caused by operating the product in a corrosive or wet atmosphere.
- Repairs when your TCL product is used in other-than-normal, single-family household use, or contrary to the instructions described in the product User's Guide.
-
Damage resulting from accident, alteration, misuse, abuse, neglect, insects, normal wear-and-tear, cosmetic damage, mishandling, power line surges, improper or faulty installation, or improper repair or maintenance. Improper repair includes the use of parts not approved or specified by TCL.
-
Markings or images on the product's LCD/LED panel resulting from viewing fixed images (including but not limited to certain 4:3 images on wide screen televisions, and/or data or images in fixed screen locations from banners, video games, or certain broadcast networks).
- Normal maintenance as described in the User's Guide (including but not limited to cleaning or replacing filters, cleaning coils, or other normal maintenance).
- Use of accessories or components that are not compatible with this product.
- Products with altered, missing, defaced, unreadable, or removed serial numbers.
- Changes in the appearance of the product that do not affect product performance.
- Increases in utility costs and/or additional utility expenses.
- Products purchased from non-authorized TCL resellers.
- Products sold in any condition other than new from the original manufacturer, or sold outside of North America.
The cost of repair or replacement under these excluded circumstances shall be borne by the consumer.
CONTACT INFORMATION:
TCL North America
1860 Compton Ave Corona, California 92881
1-800-825-6747
www.tcl.com/en
¡Hola! Comencemos.
natural_image
Top-down technical line drawing of a red HVAC unit panel with ventilation grilles and control panel (no text or symbols)Registre y proteja su compra
iComencemos!
Paso 1: Pruebas
natural_image
Line drawing of a server unit with ventilation grilles and a door, showing a rightward arrow indicating rotation (no text or symbols)- Retire el tornillo del panel de control del panel frontal (FIG. 6)
QUITAR EL CHASIS
natural_image
Line drawing of a Delantero air conditioner unit with ventilation slots and cooling fins (no text or symbols on the device itself)natural_image
Pure technical line drawing of a mechanical assembly without any text, numbers, or symbolsnatural_image
Architectural line drawing of a window frame structure with diagonal braces and a labeled 'Marca' (no other text or symbols)natural_image
Line drawing of a structural frame with diagonal braces and a central opening (no text or symbols)
https://tcl.link/homeplusapp

natural_image
Red wireframe diagram of an air conditioner unit panel with ventilation grilles and control buttons (no text or symbols)Text a photo of the camera icon to 71403
Or register online at register.tcl.com/en-ca/Need help? Visit photoregister.com/help or text HELP to 71403
Enjoy exclusive benefits with registration:

Expedited support and service Insider tips on your appliance

Exclusive offers and promotions Verification of ownership
*All TCL products continue to offer a limited consumer warranty in both the US and Canada. Please refer to the warranty section in this guide for additional details on warranty information.
natural_image
Line drawing of a server rack unit with ventilation grilles and internal compartments, showing an arrow indicating rotation (no text or symbols)natural_image
Line drawing of a Devant air conditioner unit with ventilation slots and a cooling chamber (no text or symbols on the diagram itself)natural_image
Pure technical line drawing of a mechanical assembly without any text, numbers, or symbolsnatural_image
Technical line drawing of a structural frame or panel assembly (no text or symbols)
https://tcl.link/homeplusapp

GARANTIE LIMITÉE DU PRODUIT
Copyright © 2019 by TLL. All rights reserved.
TCL and the TCL Logo are owned by TCL
Corporation and under license to TTE Technology, Inc.