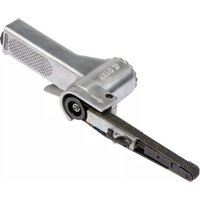
YT-09741 - Grinder Yato - Free user manual and instructions
Find the device manual for free YT-09741 Yato in PDF.


| Brand | Yato |
| Model | YT-09741 |
| Product type | Pneumatic belt sander |
| Weight | 0.78 kg |
| Abrasive belt dimensions | 10 x 330 mm |
| Rated speed | 20,000 min⁻¹ |
| Maximum working pressure | 0.63 MPa |
| Recommended working pressure | 0.6 MPa |
| Required air flow (at 6.2 bar) | 170 l/min |
| Air connection diameter | 6.3 mm (1/4") |
| Hose inner diameter | 10 mm (3/8") |
| Sound pressure (ISO 15744) | 93 ± 3 dB(A) |
| Sound power (ISO 15744) | 104 ± 3 dB(A) |
| Vibrations (ISO 28927-3) | 4.8 ± 1.5 m/s² |
| Power source | Compressed air |
| Main functions | Grinding and polishing of surfaces |
| Maintenance and cleaning | Regular lubrication with SAE 10 oil, cleaning with compressed air (max 0.3 MPa) |
| Safety | Wear safety glasses, hearing protectors, gloves and fitted clothing; use a filter and lubricator system |
| Spare parts and repairability | Consult the manufacturer or an approved workshop; spare parts available |
| General information | User manual included; do not dispose of with household waste |
Frequently Asked Questions - YT-09741 Yato
User questions about YT-09741 Yato
0 question about this device. Answer the ones you know or ask your own.
Ask a new question about this device
Download the instructions for your Grinder in PDF format for free! Find your manual YT-09741 - Yato and take your electronic device back in hand. On this page are published all the documents necessary for the use of your device. YT-09741 by Yato.
USER MANUAL YT-09741 Yato
natural_image
Technical illustration of a handheld mechanical device with no visible text or symbolsYT-09741
CE
natural_image
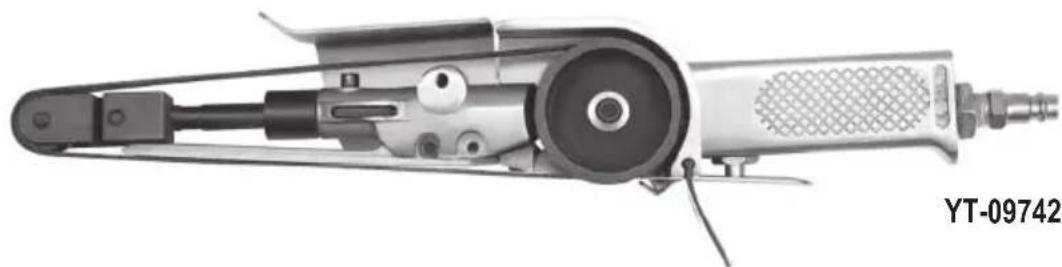
Technical illustration of a mechanical tool with internal components and a labeled identifier YT-09742 (no text or symbols on the device itself)PL EN DE RU UA LT LV CZ SK HU RO ES FR IT NL GR
natural_image
Close-up of hands using a wrench to adjust a mechanical component (no visible text or symbols)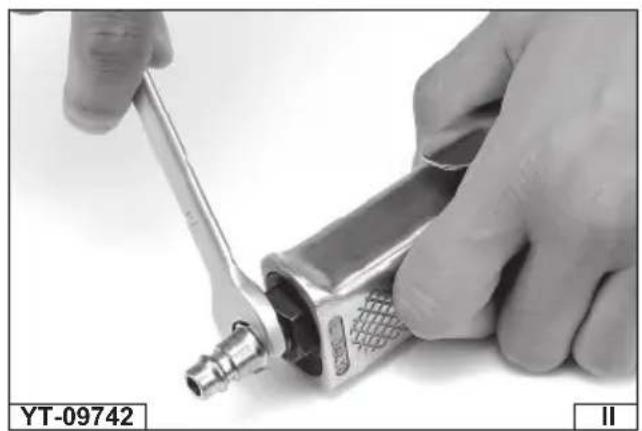
natural_image
Close-up of hands using a wrench to adjust a mechanical component (no visible text or symbols)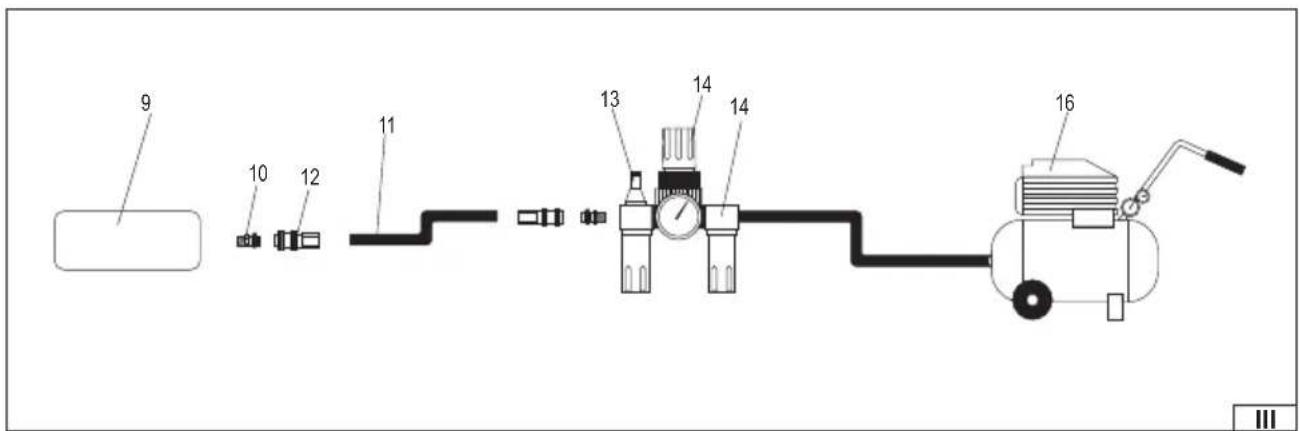
natural_image
Close-up of a hand using a tool to adjust or install a mechanical component (no visible text or symbols)natural_image
Close-up of hands holding a mechanical component, no visible text or symbols on the device itself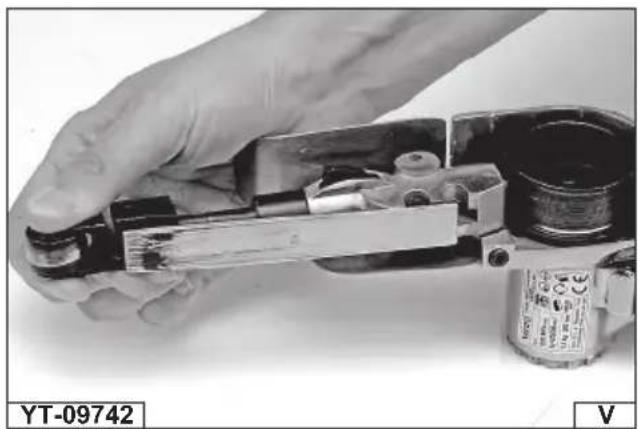
natural_image
Close-up of a hand holding a mechanical component, no visible text or symbols on the main subject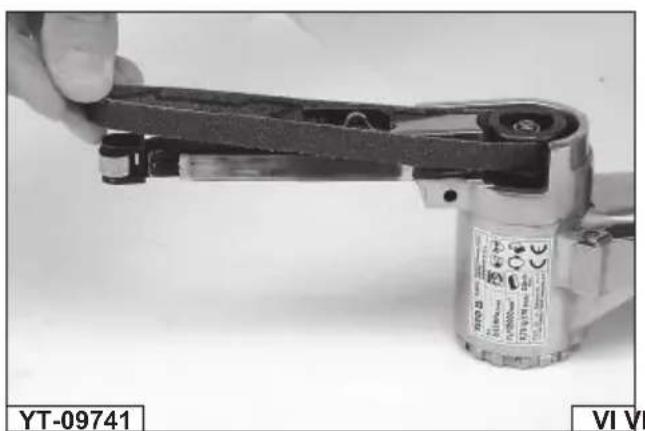
natural_image
Close-up of a hand using a mechanical clamp or tool to handle a cylindrical component, with no visible text or symbols on the device itself.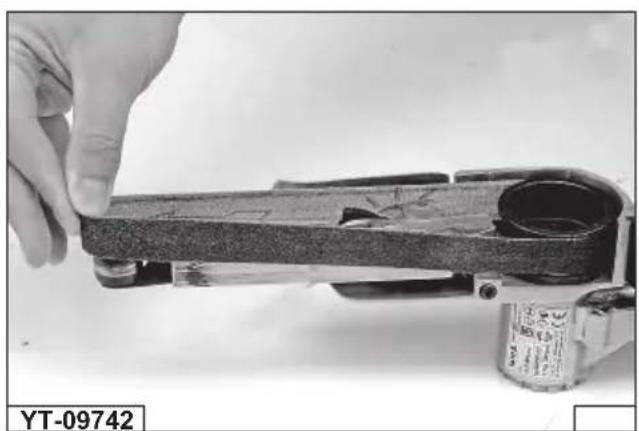
natural_image
Close-up of a hand holding a mechanical tool, no visible text or symbols on the tool itself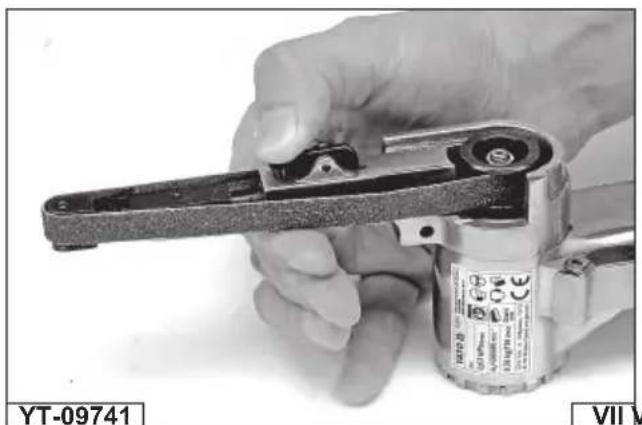
natural_image
Close-up of a hand holding a mechanical clamp or tool, with no visible text or symbols on the tool itself.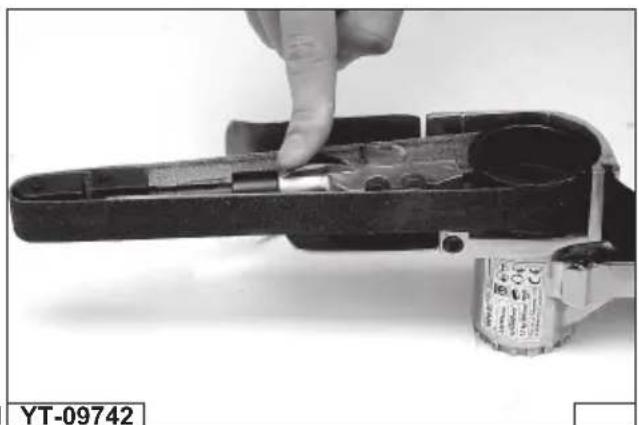
natural_image
Close-up of a hand using a crimping tool to adjust internal components (no visible text or symbols)PL EN DE
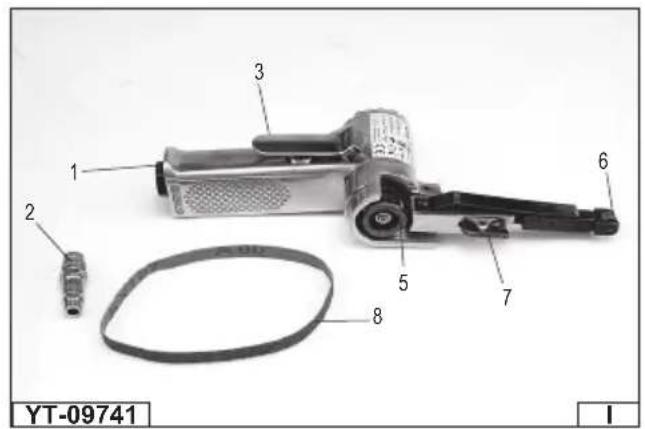
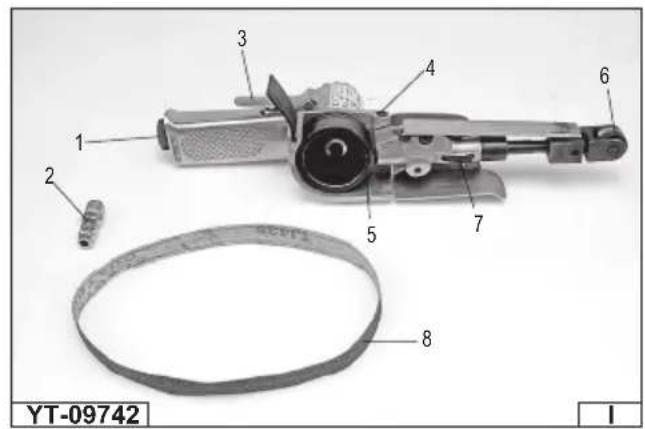
- wlot powietrza
- złączka wlotu powietrza
- włącznik
- blokada obrotu
- rolka napędowa
- rolka napinająca
- blokada rolki napinającej
- taśma szlifi erska
- narzędzie
- gniażdo weża
- wąż
- złączka węża
- smarownica
- reduktor
- fi ltr
-
kompresor
-
air inlet
- air inlet connector
- switch
- rotation lock
- power transmission roller
- tightening roller
- tightening roller lock
- grinding belt
- tool
- hose socket
- hose
- hose connector
- lubricator
- reducer
- fi lter
-
compressor
-
Lufteintritt
- Verbindungsstück für den Lufteintritt
- Schalter
- Blockade der Umdrehung
- Antriebsrolle
- Spannrolle
- Blockade der Spannrolle
- Schleifband
- Werkzeug
- Schlauchbuchse
- Schlauch
- Verbindungsstück für den Schlauch
- Schmierbuchse
- Reduzierventil
- Filter
- Kompressor
RU UA LT
Read the operating instruction
Wear protective goggles
Schutzbrille tragen
Wear hearing protectors
Gehörschutz tragen
Maximum air pressure
Max. Betriebsdruck
Required air supply rate
Air connection diameter
Nominal rotation speed
The pneumatic belt grinder is a tool powered with compressed air under adequate pressure. Thanks to the endless grinding belts it is possible to grind and polish different surfaces. The tool has been designed for work in interiors and it must not be exposed to humidity and precipitations. A correct reliable and safe functioning of the tool depends on its operation, so:
Before any work with the tool, it is required to get acquainted with the manual and keep it.
The supplier will not be held responsible for any damage and injuries caused by operating the tool for purposes it has not been designed for, inobservance of the safety regulations and the recommendations included in this manual. Furthermore operating the tool for purposes it has not been designed for cancels any guarantee rights of the user and any rights as regards inconformity with the contract.
ACCESSORIES
The grinder is equipped with a connector which permits to connect it to a pneumatic system. The grinder is equipped with three endless grinding belt of different granularity.
TECHNICAL DATA
| Parameter Unit of measurement Value | |||
| Catalogue number YT-09741 YT-09742 | |||
| Weight | [kg] | 0,78 | |
| Diameter of the air connector (PT) [mm / " ] 6,3 / 1/4 6,3 / 1/4 | |||
| Internal diameter of the air supply hose [mm / " ] 10/ 3/8 10/ 3/8 | |||
| Nominal rotation [min -1] | 20 000 20 000 | ||
| Size of the grinding belt | [mm] 10 x 330 | 20 x 520 | |
| Maximum operating pressure | [MPa] | 0,63 0,63 | |
| Recommended operating pressure | [MPa] | 0,6 | 0,6 |
| Required air flow (at 6.2 bars) | [l/min] | 170 | 200 |
| Acoustic pressure (ISO 15744) | [dB(A)] | 93 ± 3 | 93 ± 3 |
| Acoustic power (ISO 15744) | [dB(A)] 104 ± 3 | 104 ± 3 | |
| Vibration (ISO 28927-3) | [m/s2] 4,8 ± 1,5 | 4,8 ± 1,5 | |
GENERAL SAFETY RULES
General safety rules
For multiple hazards, read and understand the safety instructions before installing, operating, repairing, maintaining, changing accessories on, or working near the assembly power tool for threaded fasteners. Failure to do so can result in serious bodily injury. Only qualified and trained operators should install, adjust or use the assembly power tool for threaded fasteners. Do not modify this assembly power tool for threaded fasteners. Modifications can reduce the effectiveness of safety measures and increase the risks to the operator. Do not discard the safety instructions; give them to the operator. Do not use the assembly power tool for threaded fasteners if it has been damaged. Tools shall be inspected periodically to verify that the ratings and markings required by this part of ISO 11148 are legibly marked on the tool. The employer/user shall contact the manufacturer to obtain replacement marking labels when necessary.
Projectile hazards
Be aware that failure of the workpiece or accessories, or even of the inserted tool itself can generate high-velocity projectiles. Always wear impact-resistant eye protection during operation of the sander or polisher. The grade of protection required should be assessed for each use. For overhead work, wear a safety helmet. The risks to others should also be assessed at this time. Ensure that the workpiece is securely fixed.
Entanglement hazards
Choking, scalping and/or lacerations can occur if loose clothing, personal jewellery, neck wear, hair or gloves are not kept away from the tool and its accessories.
Operating hazards
Use of the tool can expose the operator's hands to hazards, including cuts and abrasions and heat. Wear suitable gloves to protect hands. Operators and maintenance personnel shall be physically able to handle the bulk, weight and power of the tool. Hold the tool correctly; be ready to counteract normal or sudden movements and have both hands available. Maintain a balanced body position and secure footing. Release the start-and-stop device in the case of an interruption of the energy supply. Use only lubricants
EN
recommended by the manufacturer. Personal protective safety glasses shall be used; suitable gloves and protective clothing are recommended. Inspect the backing pad before each use. Do not use if cracked or broken or if it has been dropped. Avoid direct contact with the moving sanding pad in order to prevent pinching or cutting of hands or other body parts. Wear suitable gloves to protect hands. Never run the tool unless abrasive is applied to the workpiece. There is a risk of electrostatic discharge if used on plastic and other non-conductive materials. Potentially explosive atmospheres can be caused by dust and fumes resulting from sanding or grinding. Always use dust extraction or suppression systems which are suitable for the material being processed.
Repetitive motions hazards
When using a sander or polisher to perform work-related activities, the operator can experience discomfort in the hands, arms, shoulders, neck or other parts of the body. While using a sander or polisher, the operator should adopt a comfortable posture whilst maintaining secure footing and avoiding awkward or off-balance postures. The operator should change posture during extended tasks; this can help avoid discomfort and fatigue. If the operator experiences symptoms such as persistent or recurring discomfort, pain, throbbing, aching, tingling, numbness, burning sensations or stiffness, these warning signs should not be ignored. The operator should tell the employer and consult a qualified health professional.
Accessory hazards
Disconnect the sander or polisher from the energy supply before fitting or changing the inserted tool or accessory. Avoid direct contact with the inserted tool during and after use, as it can be hot or sharp. Use only sizes and types of accessories and consumables that are recommended by the manufacturer of sanders or polishers; do not use other types or sizes of accessories or consumables. Grinding wheels and cutting-off tools shall not be used. Check that the maximum operating speed of the inserted tool (flap wheels, abrasive belts, fibre discs, backing pads, etc.), is higher than the rated speed of the sander or polisher. Self-fixing sander discs shall be placed concentrically on the supporting pad.
Workplace hazards
Slips, trips and falls are major causes of workplace injury. Be aware of slippery surfaces caused by use of the tool and also of trip hazards caused by the air line or hydraulic hose. The sander or polisher is not intended for use in potentially explosive atmospheres and is not insulated against contact with electric power. Ensure that there are no electrical cables, gas pipes, etc., which can cause a hazard if damaged by use of the tool.
Dust and fume hazards
Dust and fumes generated when using sanders and polishers can cause ill health (for example cancer, birth defects, asthma and/or dermatitis); risk assessment and implementation of appropriate controls for these hazards are essential. Risk assessment should include dust created by the use of the tool and the potential for disturbing existing dust. Operate and maintain the sander or polisher as recommended in these instructions, to minimize dust or fume emissions. Direct the exhaust so as to minimize disturbance of dust in a dust-filled environment. Where dust or fumes are created, the priority shall be to control them at the point of emission. All integral features or accessories for the collection, extraction or suppression of airborne dust or fumes should be correctly used and maintained in accordance with the manufacturer's instructions. Select, maintain and replace the consumable/inserted tool as recommended in the instruction handbook, to prevent an unnecessary increase in dust or fumes. Use respiratory protection in accordance with employer's instructions and as required by occupational health and safety regulations.
Noise hazards
Exposure to high noise levels can cause permanent, disabling hearing loss and other problems, such as tinnitus (ringing, buzzing, whistling or humming in the ears). Therefore, risk assessment and implementation of appropriate controls for these hazards are essential. Appropriate controls to reduce the risk can include actions such as damping materials to prevent workpieces from "ringing". Use hearing protection in accordance with employer's instructions and as required by occupational health and safety regulations. Operate and maintain the sander or polisher as recommended in the instruction handbook, to prevent an unnecessary increase in the noise level. Select, maintain and replace the consumable/inserted tool as recommended in the instruction handbook, to prevent an unnecessary increase in noise. If the sander or polisher has a silencer, always ensure it is in place and in good working order when the tool is being operated.
Vibration hazards
Exposure to vibration can cause disabling damage to the nerves and blood supply of the hands and arms. Wear warm clothing when working in cold conditions and keep your hands warm and dry. If you experience numbness, tingling, pain or whitening of the skin in your fingers or hands, stop using the sander or polisher, tell your employer and consult a physician. Operate and maintain the sander or polisher as recommended in the instruction handbook, to prevent an unnecessary increase in vibration levels. Hold the tool with a light but safe grip, taking account of the required hand reaction forces, because the risk from vibration is generally greater when the grip force is higher.
Additional safety instructions for pneumatic power tools
Air under pressure can cause severe injury:
EN
- always shut off air supply, drain hose of air pressure and disconnect tool from air supply when not in use, before changing accessories or when making repairs;
- never direct air at yourself or anyone else.
Whipping hoses can cause severe injury. Always check for damaged or loose hoses and fittings. Whenever universal twist couplings (claw couplings) are used, lock pins shall be installed and whipcheck safety cables shall be used to safeguard against possible hose-to-tool or hose-to-hose connection failure. Do not exceed the maximum air pressure stated on the tool. Never carry an air tool by the hose.
CONDITIONS OF USE
Make sure the source of compressed air permits to generate adequate operating pressure and guarantees the required airflow. In case of an excessive air pressure, it is required to use a reducer with a safety valve. The pneumatic tool must be powered through the filter and lubricator system. This will guarantee that the air will be clean and lubricated with oil. The conditions of the filter and the lubricator must be revised before each use. If necessary the filter must be cleaned and the lubricator filled with oil. This will guarantee a proper operation of the tool and prolong its life.
Do not use grinding belts whose dimensions are different from those indicated in the technical specification.
Before using the tool check the endless band. If any damage or wear is detected, use a new band.
Make sure the arrow on the band coincides with the arrow on the grinder.
Place the band parallel to the rollers of the grinder, so that it does not fall from the rollers during operation.
During work wear protective goggles and anti-dust masks. It is also recommended to wear gloves and protective clothes.
While processing certain materials toxic or inflammable powder or vapours may be generated. Work must be realised in well-ventilated rooms and it is required to use individual protective means.
USING THE TOOL
Before each use of the tool make sure no element of the pneumatic system is damaged. In case any damage is observed replace immediately the damaged elements of the system.
Before each use of the pneumatic system, dry the humidity condensed inside the tool, the compressor and the conduits.
Connecting the tool to the pneumatic system
The drawing indicated the recommended manner of connecting the tool to the pneumatic system. The indicated connection will ensure the most effective operation of the tool, and prolong its life.
Place a couple of drops of an SAE 10 oil in the air inlet.
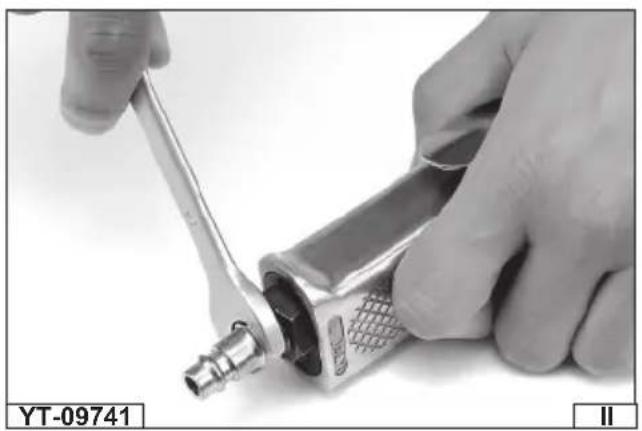
Connect safely and tightly to the air inlet thread an adequate tip, which permits to connect an air supply hose. (II)
Place the grinder in a position which ensures the safest and most ergonomic operation, in accordance with the procedure described below.
Place the band on the rollers in accordance with the procedure described below.
Connect the tool to the pneumatic system, using a hose whose internal diameter is 10 mm / 3/8". Make sure the minimum resistance of the hose is 1.38MPa. (III)
Start the tool for a couple of seconds, and make sure it does not emit any suspicious sounds or vibrations.
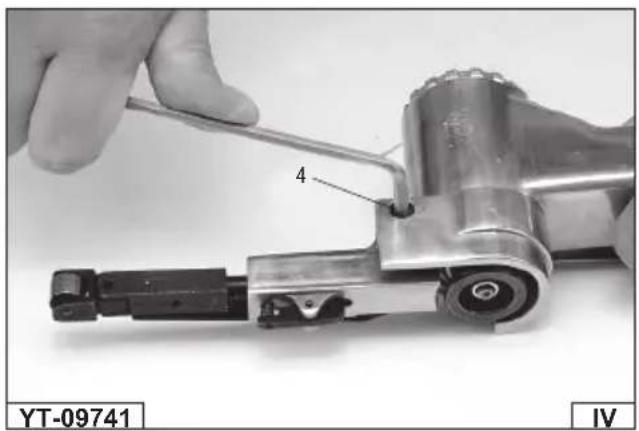
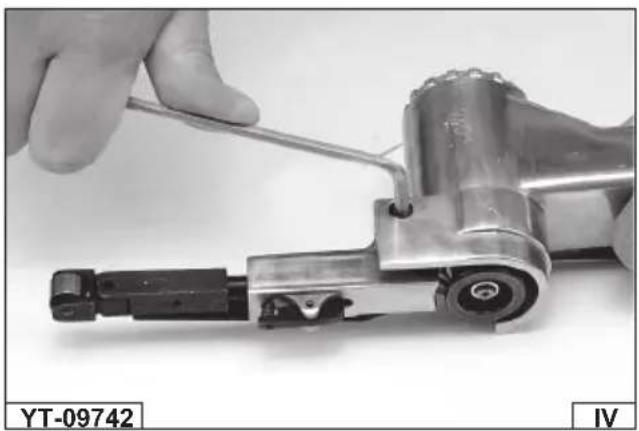
Positioning the grinder in the working position (IV)
Loosen the rotation lock bolt and then turn the power transmission section of the grinder, so that safe and efficient operation is ensured. Tighten the locking bolt so that it does not turn during operation. During operation check whether the bolt is tight from time to time.
Attention! Make sure the set position does not imply any contact between the rotating parts with the body or the clothes of the operator.
Installation of the grinding band
Make sure the arrow on the band coincides with the arrow on the grinder. (V)
Press the tightening roller until the lock is activated. (VI)
Install the band starting at the power transmission roller and passing to the tightening roller. (VII)
Release the lock of the tightening roller, which will permit to tighten the band. (VIII)
Turn the band several times, and make sure it rotates freely and does not tend to fall from the rollers during operation. If necessary repeat the tasks until the band is properly installed.
Work with the grinder
Start the grinder and wait until the band has reached the full rotational speed. It is only allowed to place a rotating band at the processed material.
Exert only such pressure on the tool which is required to process the material. Do not press the tightening roller too long and at
EN
the same time move it perpendicularly to the direction of rotation. This might cause the band to fall from the z rollers of the grinder, which in turn implies a risk of serious injuries.
MAINTENANCE
Do not ever use gasoline, solvents or any other inflammable liquids to clean the tool. Vapours may ignite causing explosion of the tool and serious injuries.
Solvents used to use the handle and the body of the tool may soften the sealing. Dry the tool thoroughly before work commences.
In case any irregularities in the functioning of the tool are detected, the tool must be immediately disconnected from the pneumatic system.
All the elements of the pneumatic system must be protected from dirt. Dirt inside the pneumatic system may damage the tool and other elements of the pneumatic system.
Maintenance of the tool before each use
Disconnect the tool from the pneumatic system.
Before each use place a small quantity of maintenance liquid (eg. WD-40) into the air inlet.
Connect the tool to the pneumatic system and start it for about 30 seconds. This will permit to distribute the maintenance liquid inside the tool and clean it.
Disconnect the tool from the pneumatic system.
Place a small quantity of a SAE 10 oil inside the tool through the air inlet and holes provided for this purpose. It is recommended to use a SAE 10 oil for maintenance of pneumatic tools. Connect the tool and start it for a while.
Attention! A WD-40 oil must not be used as the proper lubricant.
Wipe off the excess of oil which comes out of the outlets. Remaining oil might damage the sealing of the tool.
Other maintenance tasks
Before each use of the tool make sure there is no visible damage of the tool. Drivers, fixtures and spindles must be kept clean.
Every six months, or after 100 hours of operation, have the tool revised by qualified personnel in a service workshop. If the tool was used without the recommended air supply system, the frequency of inspections must be increased.
Trouble shooting
Stop using the tool immediately, if any damage is detected. Working with a non-operational tool may cause injuries. Any repairs and replacement of the elements of the tool must be realised by qualified personnel in a service workshop.
| Failure | Possible solution |
| The rotation of the tool is too low or the tool does not start | Place a small quantity of a WD-40 grease in the air inlet. Start the tool for a couple of seconds. The blades might have stuck to the rotor. Start the tool for about 30 seconds. Lubricate the tool with a small quantity of oil. Attention! Excess of oil may cause a reduction of the power of the tool. In such cases the power transmission system must be cleaned. |
| The tool starts and then slows down | The compressor does not ensure a sufficient air supply. The tool starts thanks to the air accumulated in the compressor tank. When the tank is being emptied, the compressor does not follow up. Connect the device to a more efficient compressor. |
| Insufficient power | Make sure the internal diameter of the hoses is at least the once indicated in the technical specification. Check whether pressure is set to the maximum value. Make sure the tool is properly cleaned and lubricated. If there are no results have the tool repaired. |
Spare parts
Information regarding spare parts for pneumatic tools may be obtained from the manufacturer or their agent.
Once work has been concluded, the casing, the ventilation orifices, the switches, the additional handle and the guards must be cleaned, e.g. with air jet (whose pressure must not exceed 0.3 MPa), with a brush or with a dry cloth, without using any chemicals or cleaning liquids. The tool and the handles should be cleaned with a dry and clean cloth.
Old tools are recyclable – they must not be disposed of with household garbage, since they contain substances which are dangerous for people and the environment! We ask for active assistance in efficient management of natural resources and protection of the environment. Send the device to an adequate collection point. In order to reduce the amount of waste, it is necessary to reuse, recycle or recover it.
DE
CHARAKTERISTIK DES WERKZEUGES
CONDITIONS D'EXPLOITATION
DECLARATION OF CONFORMITY
0125/YT-09741/EC/2025
We declare and guarantee with full responsibility that the following products:
Pneumatic belt grinder; 0,63 MPa; 20 000 min ^-1 ; 10 x 330 mm; item no. YT-09741
Pneumatic belt grinder; 0,63 MPa; 20 000 min ^-1 ; 20 x 520 mm; item no. YT-09742
meet requirements of the following European Standards / Technical Specifications:
EN ISO 11148-9:2011
and fulfill requirements of the following European Directives:
2006/42/EC Machinery and safety elements
Serial number: concern all serials numbers of item(s) mentioned in this declaration
The person authorized to compile the technical file:
Agnieszka Rędziak
(Place and date of issue)
V-CE PREZES ZARZADU
JAN SZMIDT
(Name and signature of authorized person)
TOYA S.A.

- PL EN DE
- RU UA LT
- ACCESSORIES
- GENERAL SAFETY RULES
- Projectile hazards
- Entanglement hazards
- Operating hazards
- EN
- Repetitive motions hazards
- Accessory hazards
- Workplace hazards
- Dust and fume hazards
- Noise hazards
- Vibration hazards
- CONDITIONS OF USE
- USING THE TOOL
- MAINTENANCE
- Trouble shooting
- Spare parts
- DE
- CHARAKTERISTIK DES WERKZEUGES
- CONDITIONS D'EXPLOITATION
- DECLARATION OF CONFORMITY
Brand : Yato
Model : YT-09741
Category : Grinder