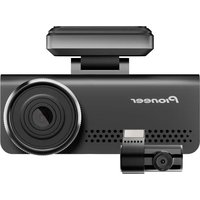
VREC-H520DC - Dash cam PIONEER - Free user manual and instructions
Find the device manual for free VREC-H520DC PIONEER in PDF.

| Product type | Front and rear dash camera |
| Brand | Pioneer |
| Model | VREC-H520DC |
| Front resolution | 2K |
| Rear resolution | 1080p (Full HD) |
| Screen | 3-inch LCD (7.2 cm) |
| Built-in Wi-Fi | Yes, 2.4 GHz |
| Built-in GPS | Yes |
| G-sensor | Yes |
| Storage | microSD card (Class 10 or higher, up to 512 GB) |
| Power | 5 V, 2.0 A via cigarette lighter socket or permanent wiring kit (optional) |
| Power connector | USB Type-C® |
| Power backup | Supercapacitor |
| Main features | Continuous recording, event recording, 24/7 parking mode, audio, ADAS (lane departure warning, etc. via app), time-lapse, gallery, settings |
| Connectivity | Wi-Fi for connection to smartphone app (Pioneer Dash Cam App) |
| Package contents | Front camera, rear camera, power adapter, power cable, 2 electrostatic films, adhesive mount, rear connection cable, quick start guide |
| Maintenance and cleaning | Clean the lens with a soft, dry cloth; regularly check the mount and cables |
| Safety | Do not install in front of an airbag; maintain a distance of 20 cm from the body for RF; use only the vehicle's 12V socket or a USB port |
| Spare parts and repairability | Contact an authorized Pioneer dealer or Pioneer customer service for repairs; do not ship without authorization |
| General information | Brand: Pioneer; Model: VREC-H520DC; Category: Dash camera; Manual available for free download |
Frequently Asked Questions - VREC-H520DC PIONEER
User questions about VREC-H520DC PIONEER
0 question about this device. Answer the ones you know or ask your own.
Ask a new question about this device
Download the instructions for your Dash cam in PDF format for free! Find your manual VREC-H520DC - PIONEER and take your electronic device back in hand. On this page are published all the documents necessary for the use of your device. VREC-H520DC by PIONEER.
USER MANUAL VREC-H520DC PIONEER
If you wish to use the audio recording function, you can visit https://usa.pioneer/PUSA/arn to print out a notice to post in your vehicle, or you can find a notice you prefer at retail. Your use of this product, including how you provide notice to passengers, is your responsibility as the operator of the product.
This Quick Start Guide is intended to guide you through the basic functions of this unit. For more detailed information, please refer to the Owner's Manual, which you can find by visiting our website, entering the model number in the search box to locate the product page, and clicking on the "Manuals/Warranty" tab.
https://usa.pioneer
in Canada
https://ca.pioneer
Français
https://usa.pioneer.
en Canadá
https://ca.pioneer.com
Information to User
Alteration or modifications carried out without appropriate authorization may invalidate the user's right to operate the equipment.
This device complies with part 15 of the FCC Rules. Operation is subject to the following two conditions:
(1) This device may not cause harmful interference, and (2) This device must accept any interference received, including interference that may cause undesired operation.
Note
This equipment has been tested and found to comply with the limits for a Class B digital device, pursuant to Part 15 of the FCC Rules. These limits are designed to provide reasonable protection against harmful interference in a residential installation.
This equipment generates, uses and can radiate radio frequency energy and, if not installed and used in accordance with the instructions, may cause harmful interference to radio communications. However, there is no guarantee that interference will not occur in a particular installation.
If this equipment does cause harmful interference to radio or television reception, which can be determined by turning the equipment off and on, the user is encouraged to try to correct the interference by one or more of the following measures:
- Reorient or relocate the receiving antenna.
- Increase the separation between the equipment and receiver.
- Connect the equipment into an outlet on a circuit different from that to which the receiver is connected.
- Consult the dealer or an experienced radio/TV technician for help.
FEDERAL COMMUNICATIONS COMMISSION SUPPLIER'S DECLARATION OF CONFORMITY
PRODUCT NAME: DASH CAMERA
MODEL NUMBER: VREC-H520DC
RESPONSIBLE PARTY NAME: PIONEER
ELECTRONICS (USA) INC.
SERVICE SUPPORT DIVISION
ADDRESS: 970 W. 190th Street, Suite 360, Torrance, CA 90502, U.S.A.
Phone: (800) 421-1404
URL: https://usa.pioneer.
This transmitter must not be installed or operated in conjunction with any other antenna or transmitter.
This equipment complies with FCC/ISED radiation exposure limits set forth for an uncontrolled environment and meets the FCC radio frequency (RF) Exposure Guidelines and RSS-102 of the ISED radio frequency (RF) Exposure rules.
This equipment should be installed and operated keeping the radiator at least 20~cm or more away from person's body.
For Canada: The frequency stability of all transmission frequencies of U-NII-1 and U-NII-3 meets the requirements of RSS-Gen Issue 5, Section 6.11, and the manufacturer states that their transmissions remain within the U-NII-1 and U-NII-3 bands.
This device contains licence-exempt transmitter(s)/receiver(s) that complies with Part 15 of FCC Rules and Innovation, Science, and Economic Development Canada licence-exempt RSS(s). Operation is subject to the following two conditions:
(1) this device may not cause interference, and
(2) this device must accept any interference, including interference that may cause undesired operation of this device.
CANICES(B)/NMB(B)
After Sales Service for Pioneer products
Please contact the authorized Pioneer dealer from which you purchased this unit or an authorized Pioneer service company for aftersales service or questions you may have about the product. You may contact Pioneer directly as follows:
Do not ship your unit in for repair without contacting Pioneer first. Units sent without a return authorization number will be refused.
USA & CANADA
Pioneer Electronics (USA) Inc.
CUSTOMER SUPPORT DIVISION
P.O.Box 1760
Long Beach, CA 90801-1760 U.S.A.
800-421-1404
For warranty information, please see the Limited Warranty sheet included with this unit.
Visit our website
U.S.: https://usa.pioneer.com
Canada: https://ca.pioneer.
Learn about product updates (such as firmware updates) for your product.
- Register your product.
- Access owner's manuals, spare parts information, service information, and much more.
Listening Safety
Over time your hearing "comfort level" adapts to higher volumes so that what sounds "normal" can actually be loud and harmful to your hearing. Guard against this by setting your equipment at a safe level BEFORE your hearing adapts.
- Set your volume control at a low setting, then slowly increase the volume until you can hear it comfortably and clearly, without distortion. Once you have established a comfortable sound level, leave it there.
- Do not turn up the volume so high that you can't hear what's around you.
- Use caution or temporarily discontinue use in potentially hazardous situations.
Precautions

WARNING
Do not allow the battery to be exposed to fire or excessive heat or to become crushed or cut, or dispose of the battery in a fire or hot oven, which could result in an explosion.
- Do not expose a battery to high or low extreme temperatures during storage or transportation.

CAUTION
The graphical symbol placed on the product means direct current.
- When disposing of used batteries, please comply with governmental regulations or environmental public institution's rules that apply in your country / area.
- Your location may require you to post a notice to passengers that conversations are being recorded if you use the product's audio recording function. It is your responsibility to learn and comply with the requirements of your location, including notice and consent for recording audio and/or video.
Safety Precautions
Certain country and state laws may prohibit or restrict the placement and use of this product in your vehicle. Please comply with all applicable laws and regulations regarding the use, installation and operation of this product. It is the user's responsibility in compliance with all applicable laws and ordinance.

WARNING
- Do not install this product in your vehicle if its location or use would obstruct the driver's clear view of the road or the operation of any vehicle airbag. It is also the driver's responsibility to know and comply with the laws, rules, and regulations of the driving location, including, for example, passenger privacy rights, and not to use the device in any location where its installation or use is prohibited.

WARNING
- Do not allow this product to come into contact with liquids. Electrical shock could result. Also, damage to the product, smoke, and overheating could result from contact with liquids.
Before using this product, be sure to read and fully understand the following safety information: - Do not operate this product if doing so will divert your attention in any way from the safe operation of your vehicle. Always observe safe driving rules and follow all existing traffic regulations. If you experience difficulty in operating this product or reading the display, park your vehicle in a safe location and apply the handbrake before making the necessary adjustments.
Certain functions (such as viewing of screen and certain button operations) offered by this product could be dangerous (possibly resulting in serious injury or death) and/or unlawful if used while driving.
Precautions before connecting the system

CAUTION
- Firmly install this product so it does not fall off the windscreen. If this product is not firmly installed, it may fall off the windscreen while driving and cause an accident. Periodically inspect this product.
- Secure all wiring with cable clamps or electrical tape. Do not allow any bare wiring to remain exposed.
- Pioneer recommends that only authorized service company personnel, who have special training and experience in mobile electronics, set up and install this product.
- It is extremely dangerous to allow cables to become wound around the steering column or shift lever. Be sure to install this product, its cables, and wiring away in such so that they will not obstruct or hinder driving.
- Make sure that the cables and wires will not interfere with or become caught in any of the vehicle's moving parts, especially the steering wheel, shift lever, parking brake, sliding seat tracks, doors, or any of the vehicle's controls.
- Do not route wires where they will be exposed to high temperatures. If the insulation heats up, wires may become damaged, resulting in a short circuit or malfunction and permanent damage to the product.
- Do not shorten any cables. If you do, the protection circuit (use holder, fuse resistor or filter, etc.) may fail to work properly.
- Never feed power to other electronic products by cutting the insulation of the power supply cable of this product and tapping into the cable. The current capacity of the cable will be exceeded, causing overheating.
Precautions before installation

WARNING
- Do not install this product where it may (i) obstruct the driver's vision,
(ii) impair the performance of any of the vehicle's operating systems or safety features, including airbags, hazard lamp buttons or impair the driver's ability to safely operate the vehicle. - Never install this product in front of or next to the place in the dashboard, door, or pillar from which one of your vehicle's airbags would deploy.
Please refer to your vehicle's owner's manual for reference to the deployment area of the frontal airbags.

CAUTION
- To ensure proper installation, be sure to use the supplied parts in the manner specified. If parts other than those supplied are used, they may damage internal parts of the product or come loose and the product may become detached, which could injure the driver or passengers if the vehicle stops suddenly.
- Do not install this product in places subject to - Places close to a heater, vent or air conditioner.
-Places that may be exposed to rain, such as close to the door.
Packaging Contents
1x Dash Camera [VREC-H520DC], 1N Power Adapter, 1N Power Cable, 2N Electrostatic Film, 1N Mount with adhesive, 1N Rear Camera, 1N Rear Camera Connecting Cable, 1N Quick Start Guide
Product Appearance
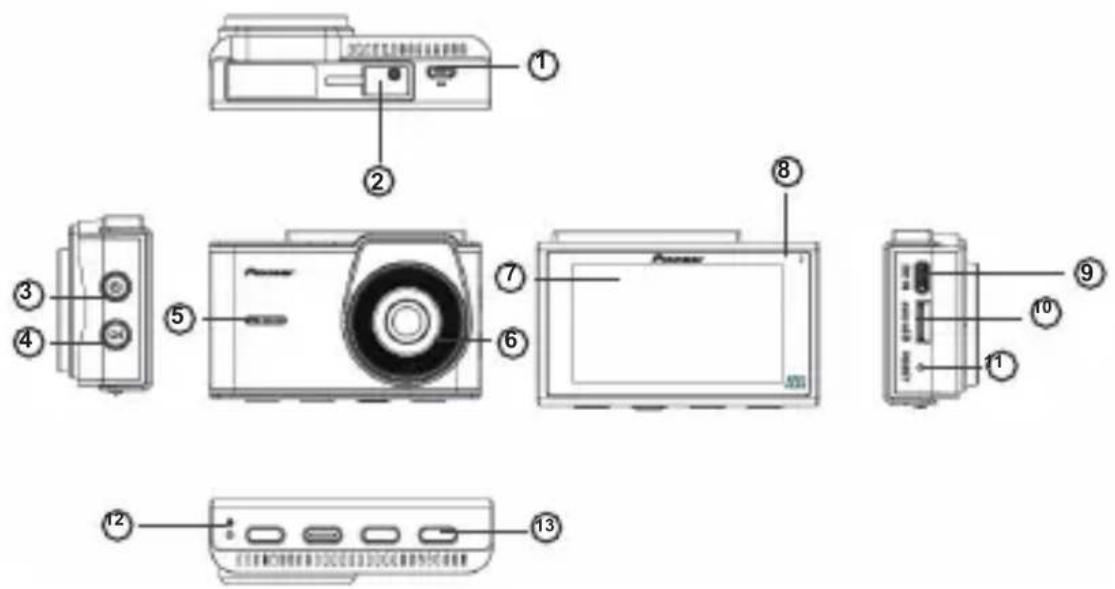
- Rear camera connection terminal (to connect rear camera cable)
- Adhesive Mount Cradle connection point
- ON/OFF Power Button
- Toggle Button to switch between Rear and Front Camera view
-
Speaker
-
Camera Lens
- LCD Display
- System/LED Indicator
- Power port (to connect power cable)
- microSD TM Card Slot
- Reset
- Mic
- Function Buttons
Product Appearance
Resolution: 2K (Front); 1080p/Full HD (Rear)
Display Screen: LCD; 3 inches; 7.2 cm
Wi-Fi: In-built (2.4 GHz)
G-sensor: Supported
GPS: Supported
Storage: microSD Card (Class 10 or above; up to 512 GB)
Power Supply: 5 V, 2.0 A (via cigarette charger slot of vehicle or via Hardwire Kit)
Power Connector: USB Type-C®
Power Back-up: Super Capacitor
Status Display
The status display shows the operating status of this product.
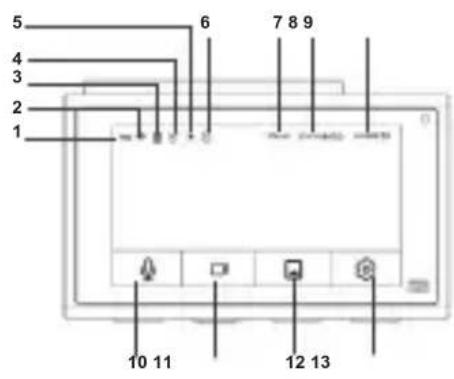
| 1 Recording | 8 Date |
| 2 Wi-Fi | 9 Time |
| 3 Rear Camera | 10 Mic |
| 4 GPS | 11 Event Recording |
| 5 ADAS | 12 Gallery |
| 6 Timelapse | 13 Settings |
| 7 Speed |
System Indicator Display
The operating status of this product is displayed with the system indicator.
| System Indicator | Illuminated green | Illuminated red | Blinking green | Solid green |
| Menu Displayed | - - - - - | |||
| Normal Recording | ○ | - - - - - | ||
| Recording Event | - - - - - | ○ | ||
| Under parking surveillance | - - - - - | ○ | ||
| Error Has Occurred (Including microSD Card not Inserted) | - - - - - | ○ |
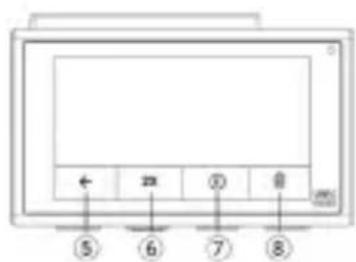
Function Buttons
There are 4 function button on the bottom of the dash camera and 2 buttons on the side as indicated below. The functions of the buttons will depend on the displayed screen.
Recording
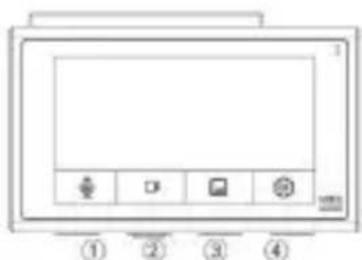
1 Turn ON/OFF Audio recording
2 Capture emergency video (60 s)
3 Access Gallery
4 Settings
During playback
5 Back
6 Video Speed
7 Play/Pause
8 Delete
During MENU screen display
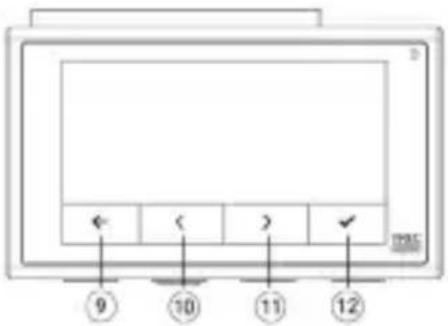
9 Back
10 Go Previous / Up
11 Go Next / Down
12 Confirm
During MENU screen display
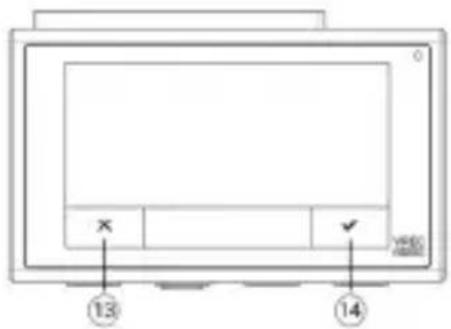
13 Cancel
14 Confirm
Installation
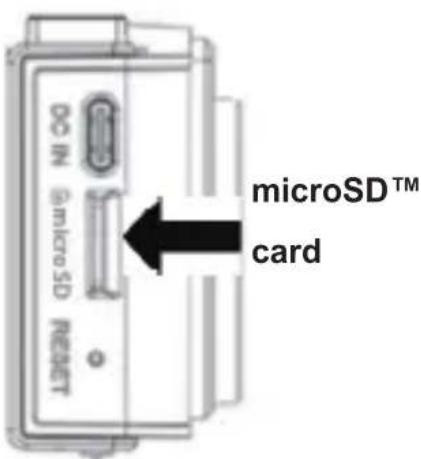
Installing the microSD™ card
Note:
- Use a Class 10 or above microSD card for proper functionality. Due to continuous recording, we strongly recommend using a high-performance, endurance-grade microSD card. These cards are designed to withstand frequent read/write cycles, ensuring reliable performance and minimizing the risk of missed recordings—especially during crucial moments such as accidents.
- You will not be able to record videos without microSD card.
- You shall be prompted to format the microSD card after inserting it first time into the dash camera.
Specified Installation Position on Front Windshield
When installing this product in your vehicle, please be mindful of the position on the front windshield. Install in a way that satisfies any prescribed or applicable laws at your location and also following conditions:
- Install in a 7-inch/17.8 cm square in the lower corner of the windshield farthest from the driver, a 5-inch/12.7 cm square in the lower corner of the windshield nearest to the driver and outside of any airbag deployment zone, or in a 5-inch/12.7 cm square mounted to the center uppermost portion of the interior of the windshield. The ideal location is behind the rearview mirror out of the driver's view as shown below.
- A position where this entire product is within 20% of the top edge of the height of the front windshield or are in the shadow of the rear-view mirror as viewed from the driver's seat. Note that "20%" as described above is a rough estimate. Please install the product in accordance with your location's laws and regulations.
- A position where the lens part of this product is within the wiping range of the wiper.
- A position where the lens part of this product does not hang over the sunshade and black ceramic lines/black ceramic pattern.
- A position where this product faces in the horizontal direction to the front and side to side.
- A position where the cigarette lighter USB power cable can be routed without unnecessary force.
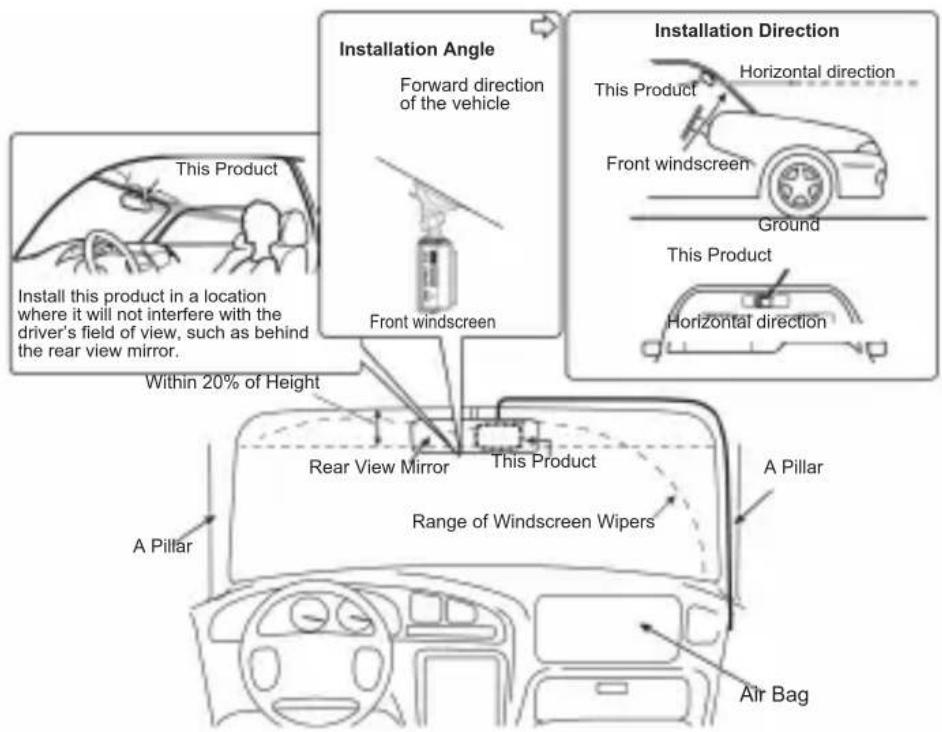
Always install this product in the specified installation position to ensure a safe field of view while driving and to achieve full performance from the product. Pioneer is not liable for any damages due to faulty or improper installation or use of the product.
- For vehicles equipped with driver-assistance systems, there may be areas where the installation of accessory items is prohibited. For details, please refer to the instruction manual of your vehicle.
- Installing the Dash Camera main unit or cables near the film antenna element may affect the TV reception sensitivity.
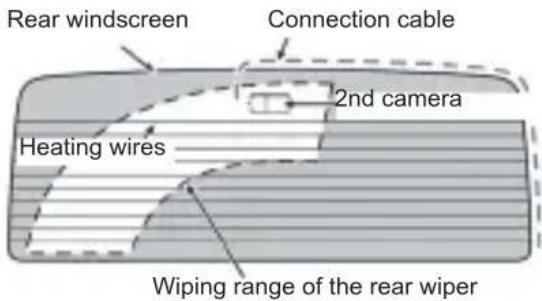
Recommended Installation Position on Rear Windshield
When installing the rear camera inside the rear window, it is recommended to mount it in a position that meets all of the following conditions.
- A position where the lens part of the rear camera is within the wiping range of the wiper.
- A position where the rear camera faces in the horizontal direction to the rear and side to side.
- A position where the lens part of the rear camera and the double-sided tape do not overlap the heating wires.
- A position where the rear camera connection cable can be routed without unnecessary force.
Installing the rear camera
The top and bottom of the image can be set according to the mounting direction of the rear camera
- Clean the installation area of dirt and oils using a clean cloth.

Take the smaller Electrostatic film supplied in the packaging.
- Peel-off the protective film off the electrostatic film.
- Align the protective film position on the windshield as per recommended place of installation.
Fix the film in a straight line horizon tally and vertically.

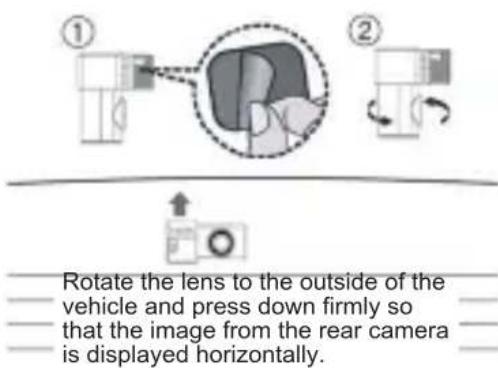
2. Install the rear camera.
Peel off the double-sided tape release paper from the rear camera.
Adjust the lens so that it faces outside the vehicle, and install at the specified position on the rear windshield.
CAUTION
Make sure that the surface of the rear windshield is clean and dry, before attaching the rear camera.
- Use extreme care as the double-sided tape on the rear camera is extremely strong, and should not be reapplied once it has been applied.
To ensure the installation strength of the adhesive tape, leave this product for 24 hours after application before using it.
Note
A protective film is applied to the lens when the product is purchased. Peel off this film.
English
Installing the Dash Camera
- Clean the installation area of dirt and oils using a clean cloth.
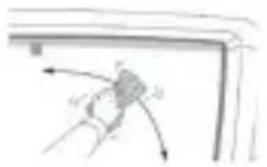
- Install this product.
Peel off the double-sided tape release paper from the dash camera mount.
Mounting bracket
Note
- You can use the app to display the camera's image horizontally to support installation.
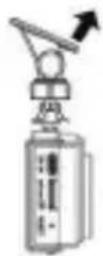
Install at the specified position of the front windshield.
Firmly push this product

Front Windshield
WARNING
User is requested to connect the power adapter supplied with the product, only to the Vehicle's original factory-installed socket, which maintains proper polarity, meets OEM safety standards and avoid any malfunction.

CAUTION
- Make sure that the surface of the front windshield is clean and dry, before attaching the dash camera mount.
- Use extreme care as the double-sided tape on the dash camera mount is extremely strong, and should not be reapplied once it has been applied.
- For optimal tape adhesion, it is recommended that the product remains undisturbed in the vehicle for about 24 hours, and avoiding any shock during driving.
Note
A protective film is applied to the lens when the product is purchased. Peel off this film.
Installing the Dash Camera
3. Connecting the cables.
- Connect the power cable to the power adapter and main unit.
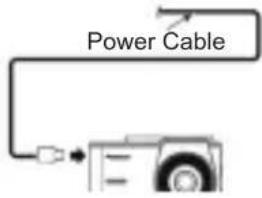
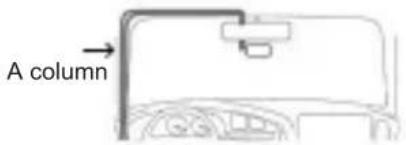
- Route the power cable via A column as shown below.

- Please route the cable of rear camera via ceiling only.
- Connect the USB power adapter to cigarette lighter socket of the vehicle. Fully insert this into the vehicle accessory socket to make a good connection. (The location of the accessory socket will differ depending on the vehicle).

CAUTION
-
The accessory socket may be extremely hot immediately after connecting the adapter into the accessory socket. The tip of the power cable may melt or short circuit if it is plugged in while the socket is hot. Ensure that the socket is cool before plugging in the cigarette lighter power cable.
-
Use only with 12V vehicle accessory cigarette lighter socket or USB port to avoid damage/malfunction.
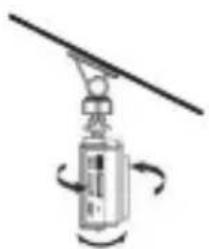
4. Adjust the angles
Adjust the angles of this product so that video outside the vehicle is properly displayed.
5. Switch on the ignition
Switch on the ignition to check if the installed product is working as expected.
Parking Mode
Parking Mode provides added security by monitoring your vehicle when it is parked, and the engine is turned OFF. This mode is especially useful for capturing video footage of incidents such as theft, vandalism, or collisions that may occur while your vehicle is unattended.
When activated, the dash camera enters a state of low power consumption and starts recording if vibration (detected by the G-sensor) or motion is detected.
Connecting to Dash Camera App
- Scan the code to download the App from Google Play or App Store


App StoreGoogle Play
- Download the App
- Sign up and follow pairing instructions.
- Default Wi-Fi Name (SSID): Pioneer_H520DC_XXXX
- Default password: 12345678
Note
- XXXX shall be a unique alphanumeric entity.
Supports Android OS version 11 & above, iOS version 13 & above.
Radiation information
Wireless Lan:
Output power: + 19 dBm Max.
Frequency band(s): 2412 MHz to 2462 MHz
Trademarks and Copyrights
- USB Type-C® and USB-C® are registered trademarks of USB Implementers Forum.
- IOS is a trademark or registered trademark of Cisco in the U.S. and other countries and is used under license.
App Store is a service mark of Apple Inc., registered in the U.S. and other countries and regions. -
Android and Google Play are trademarks of Google LLC.
-
microSD, microSDHC and microSDXC Logos are trademarks of SD-3C LLC.

CLASS

CLASS
- The Wi-Fi CERTIFIED ^ Logo is a registered trademark of Wi-Fi Alliance ^ .

CERTIFIED

Français
U.S.: https://usa.pioneer
Canada: https://ca.pioneer.