
Freewill K-12211 - Shower head KOHLER - Free user manual and instructions
Find the device manual for free Freewill K-12211 KOHLER in PDF.

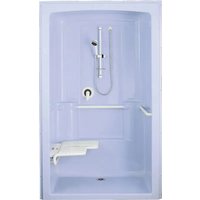
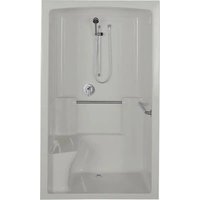
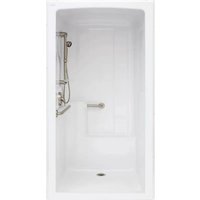
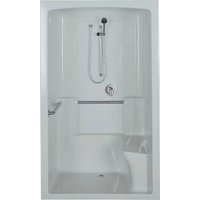
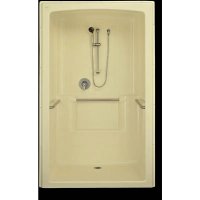
| Product Type | Shower Receiver / Shower Module |
| Brand | Kohler |
| Model | Freewill K-12211 |
| Dimensions (L x W x H) | 132.7 cm x 66 cm x 98.1 cm (52-1/4" x 26" x 38-5/8") |
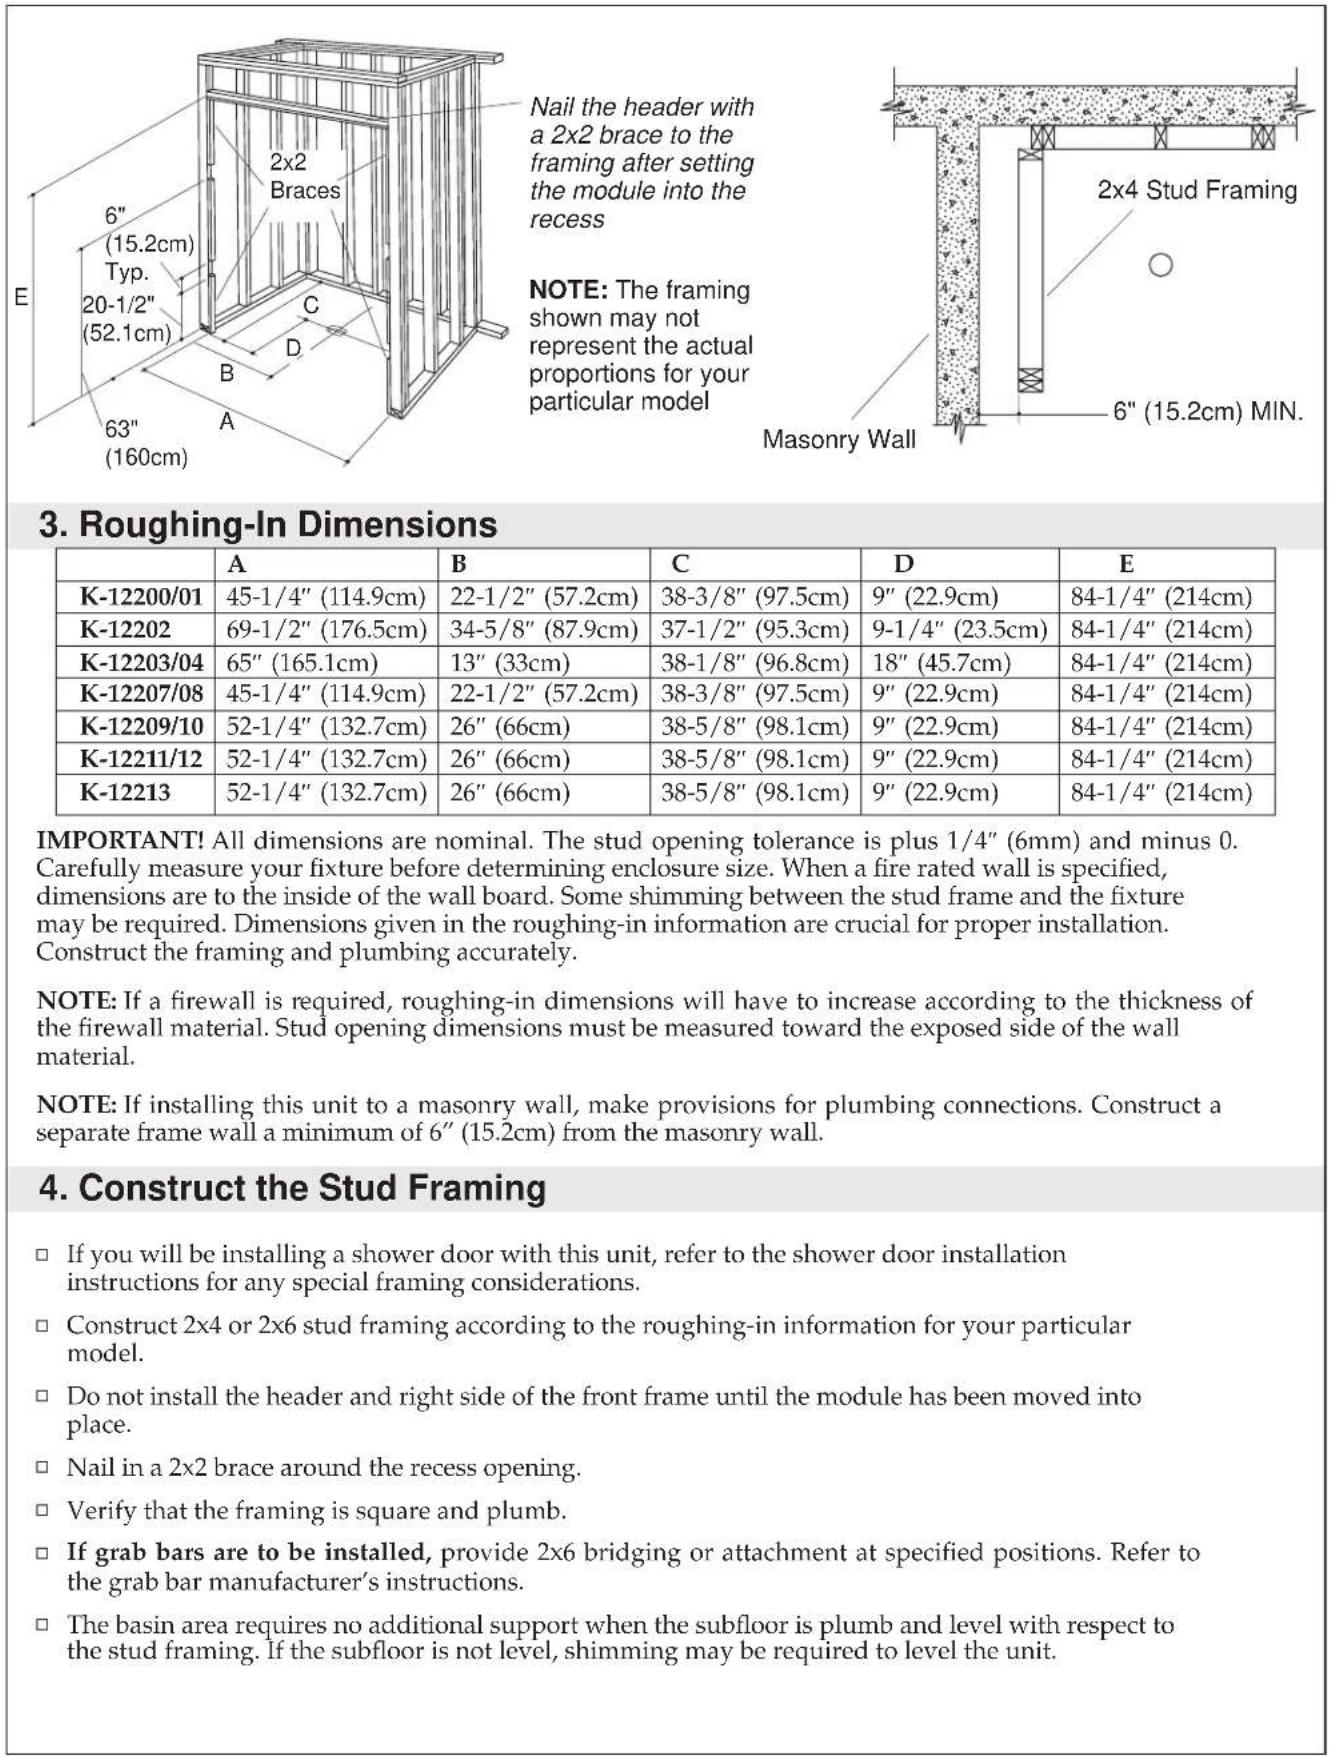
| Connection Plan Dimensions | See table: A=132.7 cm, B=66 cm, C=98.1 cm, D=22.9 cm, E=214 cm |
| Material | Reinforced Acrylic (Fiberglass) |
| Estimated Weight | Approximately 50 kg |
| Color | White (standard finish) |
| Installation Type | Recessed or alcove, possible with wheelchair ramp |
| Accessibility | Designed for accessibility for people with reduced mobility (low threshold) |
| Main Functions | Shower receiver, central drain, pre-drilled for shower door |
| Drain | Drain to be installed according to manufacturer's instructions, sealant gasket provided |
| Faucet | Not included, to be installed separately |
| Tools Required for Installation | Drill, screwdriver, spirit level, tape measure, silicone sealant, etc. |
| Care and Cleaning | Clean with warm water and non-abrasive liquid cleaner. Avoid petroleum solvents and metal tools. |
| Safety | Do not use abrasive products. Do not leave petroleum distillates in prolonged contact. |
| Spare Parts Available | Seal gasket, nailing flange, bolts and washers (on request) |
| Repairability | Repairable by a professional; contact KOHLER for assistance |
| Warranty | Limited manufacturer's warranty (see manual) |
| General Information | Complies with ANSI Z124.2 standards. Follow local plumbing codes. |
Frequently Asked Questions - Freewill K-12211 KOHLER
User questions about Freewill K-12211 KOHLER
0 question about this device. Answer the ones you know or ask your own.
Ask a new question about this device
Download the instructions for your Shower head in PDF format for free! Find your manual Freewill K-12211 - KOHLER and take your electronic device back in hand. On this page are published all the documents necessary for the use of your device. Freewill K-12211 by KOHLER.
USER MANUAL Freewill K-12211 KOHLER
K-12200, K-12201, K-12202,
K-12203, K-12204, K-12207,
K-12208, K-12209, K-12210,
K-12211, K-12212, K-12213
M product numbers are for Mexico (i.e. K-12345M)
Los númeroos de produits seguidos de M corresponden a Mexico
(Ej. K-12345M)
Thank You For Choosing Kohler Company
We appreciate your commitment to Kohler quality. Please take a few minutes to review this manual before you start installation. If you encounter any installation or performance problems, please don't hesitate to contact us. Our phone numbers and website are listed on the back cover. Thanks again for choosing Kohler Company.
Tools and Materials
Safety Glasses

Drill
Screwdriver
Pencil

Tape Measure

Level
Sealant

Plumbers Putty
Plus:
Common Woodworking
Tools and Materials
Nails/ Drywall Screws
- Drop Cloth
- 2 x 4s or 2 x 6s and 2 x 2s
Water Resistant Wall Material
- Knife
Pliers - Putty Knife
- Adjustable Wrench
Clean Work Gloves
Hole Saw
Wrench

Masking Tape
Square
Before You Begin
- Observe all local plumbing and building codes.
- Locate the rough plumbing for the drain in accordance with the roughing-in dimensions for your particular model.
A variety of installations are possible. These instructions show suggested installation procedures, your particular installation may require other construction techniques.
Please read these instructions carefully to familiarize yourself with the required tools, materials, and installation sequences. Follow the sections that pertain to your particular installation. This will help you to avoid costly mistakes. - Avoid flexing the side walls to prevent damage to the module.
Unpack and inspect the shower module for damage. If you find any damage, do not install the module. Report the specific problem to your dealer immediately.
After inspection, return the shower module to the carton until you are ready to install it.
Insulate all exterior walls before installation.
You must install this shower module to an adequately supported, level subfloor. - Be sure that you have enough access to move the module into the construction area.
One-piece shower modules are too large to fit through standard door openings. This multi-piece module is designed to be separated into sections for moving into the installation area. Once near the installation area, reassemble the module and place it within the installation area prior to the completion of framing.
Before installation, provide access to all connections. Because the module must be installed as an assembled "one-piece" module, the drain and overflow connections cannot be made by reaching over the end of the module.
Make sure the installation area is clean and free of all debris. If remodeling, remove all finished wall material to expose the framing and remove all floor coverings to expose the subfloor.
Before You Begin (cont.)
□ Provide properly dimensioned framing.
- Exact location of the end studs will depend on the thickness of the finished wall material.
If installing this unit adjacent to vertical ducts or chases, surround the unit with fire-rated water-resistant wall material.
□ When fire-rated wall is specified, stud-opening dimensions are toward the exposed side of the wall material.
The basin area requires no additional support when the subfloor is level and square with respect to the framing. Consider using shims for additional support if the subfloor is uneven.
Consult all applicable instructions for options and accessories before beginning this installation.
Fixture conforms to ANSI Standard Z124.2. All dimensions are nominal.
| Concrete Wheelchair RampWood-Framed | |
| 1. Pit Installation | |
| Concrete Pit Installation □ Use a recessed pit installation when a low outside threshold is either required or desired. □ For a pit installation, the finished floor must be no more than 1/2" (1.3cm) below the top of the outside threshold. For the easiest wheelchair entry and exit, the finished floor should be flush with the outside threshold of the module. □ A typical tile installation will require a 3/4" (1.9cm) minimum pit into the subfloor. □ Make sure the subfloor is flat and level. | |
| Wood-Framed Sunken Installation □ Framing for a wood-framed sunken installation must be similar to the framing used in a stairwell. □ The designer or architect should specify the quantity and size of the reinforcing joists and headers. □ Size the joists, subflooring, underlayment and floor covering to make the finished floor flush with, or a maximum of 1/2" (1.3cm) below the module threshold height. □ Make sure the subfloor is flat and level. | |
| Wheelchair Ramp Alternative □ An alternative to a pit installation is to build a wheelchair ramp above the subfloor up to the outside threshold of the module. □ Make sure the subfloor is flat and level. | |
| 2. Prepare the Site | |
| □ Ensure that the installation area is clean and free of all debris. If remodeling, remove all finished wall material to expose the framing and remove all floor coverings to expose the subfloor. □ Inspect the flooring at the installation site. Repair as necessary. □ Make sure the sub and finished floors are flat and level. |
5. Install the Plumbing
NOTE: Provide access to all plumbing connections to simplify future maintenance.
- Locate rough plumbing for the drain according to the correct model's roughing-in dimensions.
NOTE: If plumbing is to be installed on the unfinished stud wall, install the supplies after the module is installed.
Position the plumbing according to the roughing-in information. Cap the supplies and check for leaks.
Install a drain pipe according to the roughing-in information.
If possible, provide an access at the back of the plumbing wall for servicing the supply and waste piping.
- Install the shower valving according to the manufacturer's instructions. Do not install the trim at this time.
6. Module Separation and Re-Assembly
Multi-piece modules are shipped assembled, and must be separated for transportation into the installation area and for the application of sealant.
Cover the floor or other level surface with a cloth or soft padding that will protect the module and joining surfaces when they are laid down.
Lay the module face down.
Loosen and remove all the nuts and washers. Keep all fasteners for reassembly.
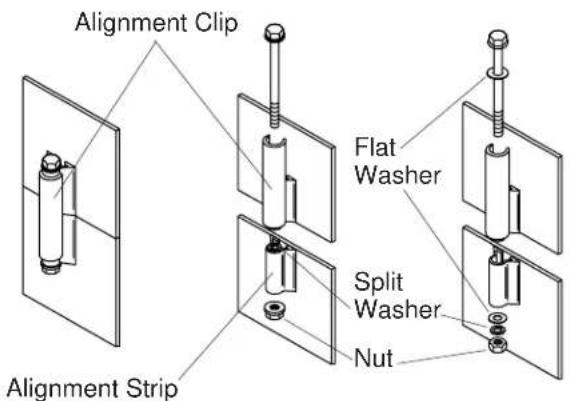
- Slide the alignment clips above the section joint, but do no remove the clips completely.
- Remove the split washers that act as spacers during shipping.
- Remove the bolts and separate the module sections.
- With help, carefully move the sections to the installation area, setting them again on a covered, level surface. Move the bottom segment of the module into the re-assembly area first.
Re-assemble the sections by placing the upper sections over the lower sections.
Align the sections by sliding an alignment clip over the alignment strip of each block. Start at each door column, then align the back corners, the back wall next, and lastly, the side walls.
- Slide a flat washer onto each of the bolts and insert the bolts into the mounting blocks located on the side and back walls. Do not insert the bolts at the door columns and back corners at this time.
- Slide a flat washer and a split washer onto the end of each bolt and loosely thread on the nuts. Do not tighten.
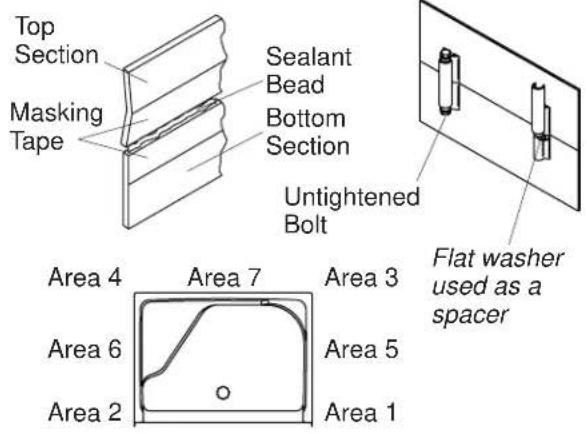
7. Seal the Module Sections
Clean the shower module to reduce the risk of surface damage.
Place a clean drop cloth or other similar material into the bottom of the module.
Wear gloves and use a soft damp cloth to carefully wipe the joining surfaces of each module section and remove any dust or dirt.
Apply a 2^ (5cm) wide strip of masking tape along the entire length of the joining surfaces on the inside of each module section.
- Insert a flat washer between the upper and lower mounting blocks at each door column and the back corners to create a gap for the sealant. Make sure the washers do not block the bolt holes or protrude into the wall joint. The bolts should be able to be inserted into the mounting blocks without passing through the washers. Do not install the bolts at this time.
NOTE: Use of clear silicone sealant is recommended to ensure against leakage. Use of acrylic or other caulks is not recommended.
NOTE: Sealant may set quickly. Proceed to the next steps immediately.
Work from the inside of the module and apply a generous, continuous bead of silicone sealant into the joint.
Reinstall the bolts into the upper blocks and gently tap them into the corresponding lower blocks.
- Remove the spacer washers and allow the upper section to slide down.
- Tighten all the bolts starting at the door columns and work to the center of the back wall. See illustration for tightening sequence. Do not overtighten.
- Immediately wipe away any excess sealant from the front face of the module.
- Spread out any excess sealant found along the backside seam areas.
Apply additional sealant to the backside seams.
Verify that all nuts and bolts are tight.
8. Prepare the Module

CAUTION: Risk of property damage. If a watertight seal on the drain is not obtained, water damage to the subfloor may occur.
- Install the drain to the module according to the drain manufacturer's instructions.
- Layout and mark the location of the mixing valve, shower, and the bath spout holes on the back surface of the module wall.
Prepare the Module (cont.)
NOTE: A template can be used for multiple installations if the supply fittings have been located accurately during rough fitting. Make a pilot hole template of lightweight plywood. Use the template to mark fitting locations on the back side of the module.
Drill 1 / 4^ (6mm) pilot holes at the marked locations.
Clean the module to reduce the risk of surface damage.
Place a clean drop cloth or other similar material into the bottom of the module.
From the inside of the module (finished surface), use a hole saw of the correct diameter to carefully drill the fitting holes.
Clean any debris from the module to reduce the risk of surface damage. Be careful not to scratch the surface of the unit.
9. Position the Module
- Move the module into position.
Fit the drain into the trap. - Verify that the bottom of the module is firmly supported by the floor. No additional support is needed.
Verify proper fit.
The module must be plumb and level to ensure proper shower enclosure installation. Make framing adjustments or shim, as needed.
Position the right side of the front frame and the header in the recess and nail into place.
Verify that the framing and headers are square and plumb.
Do not secure the nailing-in flanges at this time.
10. Secure the Module to the Stud Framing

CAUTION: Risk of property damage. Make sure a watertight seal exists on all drain connections.
Complete the drain installation according to the instructions packed with the drain.
□ If not already installed, install the supplies and shower valving at this time. See "Install the Plumbing".
- Open the water supplies and check all the connections for leaks.
Run water into the module and check the drain connections for leaks.
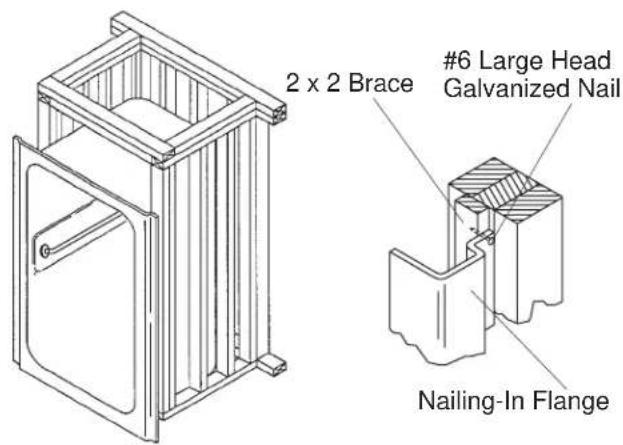
- Drill holes in the front nailing-in flanges and 2 × 2 braces at 18^ (45.7cm) centers.
- Secure the nailing-in flanges to the 2 × 2 braces at the predrilled locations using #6 large-head galvanized nails or screws. Be careful when nailing, not to damage the finished surfaces.
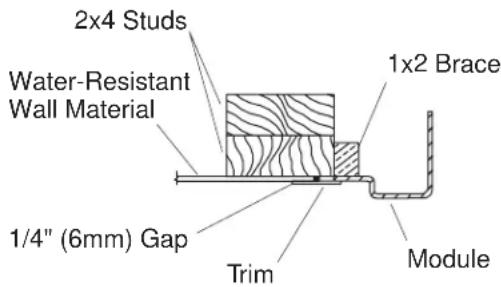
Flush Installation
(Top Down View)
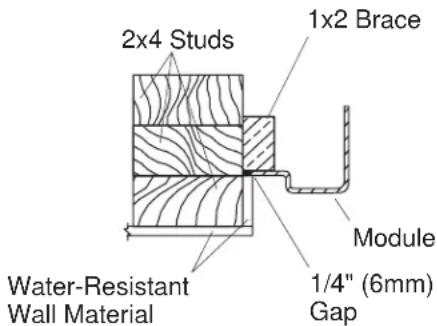
Alcove Installation
(Top Down View)
11. Complete the Installation
Flush Installations
Install water-resistant wall material to within 1 / 4^ (6mm) of the module edge.
- Install desired trim (not provided) around the unit to conceal the module edge.
- Also install trim along the bottom apron edge.
Alcove Installations
- Install water-resistant wall material around the unit to conceal the module edge.
All Installations
Apply a bead of silicone sealant to the nailing-in flanges.
- Install water-resistant wall material with the paperbound edge a maximum of 1/4'' (6mm) above the finished, concave surface of the module.
Tape and mud the wall material.
- Seal around the valving and outlets with silicone sealant or plumbers putty.
- Install the faucet and drain trim according to the faucet manufacturer's instructions.
If used, install the grab bars or towel bars to the backing in the stud wall (previously installed). Follow the manufacturer's installation instructions.
□ If used, install the shower door according to the manufacturer's instructions.
- Clean up with a non-abrasive cleaner.
12. Clean-Up

CAUTION: Risk of product damage. Do not allow cleaners containing petroleum distillates to remain in contact with module surfaces for any length of time.
CAUTION: Risk of product damage. Do not use abrasive cleaners.
- When cleaning up after installation, use warm water and an approved liquid cleanser to clean the surface.
Stubborn stains, paint or tar can be removed with turpentine or paint thinner.
Clean-Up (cont.)
Plaster can be removed by scraping with a wood edge. Do not use metal scrapers, wire brushes, or other metal tools. Use warm water and an approved liquid cleanser to provide mild abrasive action to remove residual plaster.
Common Woodworking Tools and Materials
Nails/Drywall Screws
- Drop Cloth
- 2 x 4s or 2 x 6s and 2 x 2s
Water Resistant Wall Material
- Thank You For Choosing Kohler Company
- Tools and Materials
- Plus:
- Before You Begin
- Before You Begin (cont.)
- Install the Plumbing
- Module Separation and Re-Assembly
- Seal the Module Sections
- Prepare the Module
- Prepare the Module (cont.)
- Position the Module
- Secure the Module to the Stud Framing
- Complete the Installation
- Flush Installations
- Alcove Installations
- All Installations
- Clean-Up
- Clean-Up (cont.)
Brand : KOHLER
Model : Freewill K-12211
Category : Shower head