
AF6LNRSB - Deep fryer SABA - Free user manual and instructions
Find the device manual for free AF6LNRSB SABA in PDF.

| Product Type | Air Fryer |
| Reference | AF-6L-NRSB |
| Capacity | 6 liters |
| Power | 1450-1750 W |
| Power Supply | 220-240 V ~ 50/60 Hz |
| Temperature Range | 80 °C to 200 °C |
| Timer | 1 to 60 minutes |
| Functions | Preheat, Keep Warm, Light, Shake reminder |
| Preset Menus | 8 menus: Fries, Steak, Chicken Wings, Drumstick, Fish, Vegetables, Cake, Dried Fruit |
| Control | Touch panel with digital display |
| Cleaning | Inner bowl and grid dishwasher safe (top rack recommended) |
| Coating | Non-stick (do not use metal utensils or abrasive cleaners) |
| Safety | Automatic shut-off at end of cooking, shut-off if bowl removed, hot surfaces |
| Warranty | 2-year legal conformity warranty |
| After-Sales Service | Contact Conforama SAV at 09 69 32 05 05 (local call rate) |
Frequently Asked Questions - AF6LNRSB SABA
User questions about AF6LNRSB SABA
0 question about this device. Answer the ones you know or ask your own.
Ask a new question about this device
Download the instructions for your Deep fryer in PDF format for free! Find your manual AF6LNRSB - SABA and take your electronic device back in hand. On this page are published all the documents necessary for the use of your device. AF6LNRSB by SABA.
USER MANUAL AF6LNRSB SABA
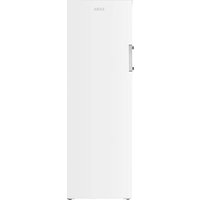
natural_image
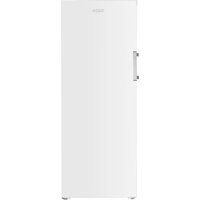
SABA air fryer with digital display and orange liquid, no visible text or symbols on the device itself.
CONFORAMA France
Thank you for choosing SABA quality. This product has been developed by our team of professional and according to European regulations. In order to get the most out of your new appliance, we recommend that you read this instruction manual carefully and keep it for future reference.
TABLE OF CONTENTS
IMPORTANT SAFEGUARDS 20
KNOW YOUR AIR FRYER 22
CONTROL PANEL 23
CLEANING AND MAINTAINACE. 30
TECHNICAL SPECIFICATION 31
TROUBLESHOOTING....31
STORING INSTRUCTION 32
ENVIRONMENT FRIENDLY DISPOSAL. 33
IMPORTANT SAFEGUARDS
When using electrical appliances, basic safety precautions should always be followed, including the following:
- Read all instructions.
-
Do not touch hot surfaces. Use handles or knobs.
CAUTION: Hot surface
Surfaces are liable to get hot during use. -
To protect against electric shock do not immerse cord, plugs, or appliance in water or other liquid.
- Unplug from outlet when not in use and before cleaning. Allow to cool before putting on or taking off parts, and before cleaning the appliance.
- Do not operate any appliance with a damaged cord or plug or after the appliance malfunctions, or has been damaged in any manner. Bring it to a qualified technician for examination, repair or electrical or mechanical adjustment.
- If the supply cord is damaged, it must be replaced by the manufacturer, its service agent or similarly qualified persons in order to avoid a hazard.
- The use of accessory attachments not recommended by the appliance manufacturer may cause injuries.
- Do not use outdoors.
-
Do not let cord hang over edge of table or counter, or touch hot surfaces.
-
Do not place on or near a hot gas or electric burner, or in a heated oven.
- Extreme caution must be used when moving an appliance containing hot oil or other hot liquids.
- To disconnect, turn off the Power button and then remove plug from wall outlet.
- Do not use appliance for other than intended use.
- Always make sure the inner pot is fully closed while Air Fryer is in operation. Air Fryer will not operate unless the inner pot is fully closed.
• After the hot air frying is completed, the inner pot and the cooked foods are hot. Be careful when handling the hot inner pot. - The inner pot can not be used for storing things, especially papers, cardboard or plastic.
- The appliances are not intended to be operated by means of an external timer or separate remote-control system.
- This appliance can be used by children aged from 8 years and above and persons with reduced physical, sensory or mental capabilities or lack of experience and knowledge if they have been given supervision or instruction concerning use of the appliance in a safe way and understand the hazards involved. Children shall not play with the appliance. Cleaning and user maintenance shall not be made by children unless they are older than 8 and supervised.
- Keep the appliance and its cord out of reach of children less than 8 years.
-
This appliance is intended to be used in household and similar applications such as:
-
staff kitchen areas in shops, offices and other working environments,
– farmhouses,
— by clients in hotels, motels and other residential type environments,
— bed and breakfast type environments. - WARNING: Be careful when flipping over the food in the inner pot. To avoid personal injury or property damage, do not flip over the food by shaking the whole machine.
- WARNING: Be extra careful when removing and placing the inner pot to avoid being scalded by hot steam.
- WARNING: After cooking, do not put the shelf and inner pot directly on the plastic table to avoid scorching the plastic table. Don't turn the inner pot with shelf over.
- WARNING: For the details on how to clean surfaces in contact with food, please refer to the section "CLEANING AND MAINTENANCE".
- WARNING: The door or the outer surface may get hot when the appliance is operating.
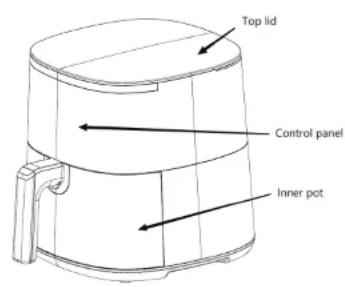
KNOW YOUR AIR FRYER
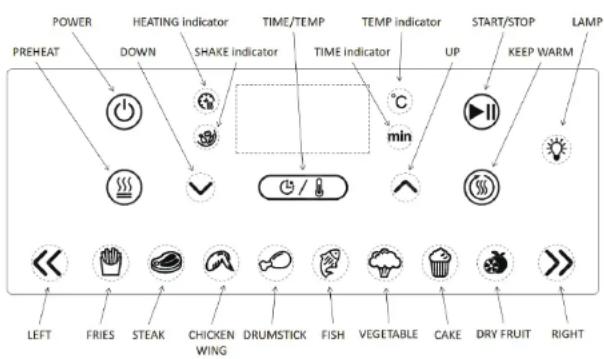
CONTROL PANEL
flowchart
graph TD
    A["POWER"] --> B["PREHEAT"]
    C["HEATING indicator"] --> D["DOWN"]
    E["TIME/TEMP"] --> F["SHAKE indicator"]
    G["TEMP indicator"] --> H["TIME indicator"]
    I["START/STOP"] --> J["UP"]
    K["LAMP"] --> L["KEEP WARM"]
    M["UP"] --> N["COOKING SWITCH"]
    O["UP"] --> P["COOKING SWITCH"]
    Q["UP"] --> R["COOKING SWITCH"]
    S["UP"] --> T["COOKING SWITCH"]
    U["UP"] --> V["COOKING SWITCH"]
    W["UP"] --> X["COOKING SWITCH"]
    Y["UP"] --> Z["COOKING SWITCH"]
    AA["UP"] --> AB["COOKING SWITCH"]
    AC["UP"] --> AD["COOKING SWITCH"]
    AE["UP"] --> AF["COOKING SWITCH"]
    AG["UP"] --> AH["COOKING SWITCH"]
    AI["UP"] --> AJ["COOKING SWITCH"]
    AK["UP"] --> AL["COOKING SWITCH"]
    AM["UP"] --> AN["COOKING SWITCH"]
    AO["UP"] --> AP["COOKING SWITCH"]
    AQ["UP"] --> AR["COOKING SWITCH"]
    AS["UP"] --> AT["COOKING SWITCH"]
    AU["UP"] --> AV["COOKING SWITCH"]
    AW["UP"] --> AX["COOKING SWITCH"]
    AY["UP"] --> AZ["FRIES"]
    BA["FRIES"] --> BB["STEAK"]
    BC["STEAK"] --> BD["CHICKEN WING"]
    BE["STEAK"] --> BF["DRUMSTICK"]
    BG["FISH"] --> BH["VEGETABLE"]
    BI["VEGETABLE"] --> BJ["CAKE"]
    BK["DRY FRUIT"] --> BL["RIGHT"]
- After plug in, beep can be heard, all the indicators on the control panel illuminate for 1 second and the appliance enters into the standby mode. At that time, the indicator of Power button illuminates solidly while other buttons and indicators go into the sleep mode.
- Shortly press the Power button "◎", all the functional buttons on the control panel are activated. At that time, the default temperature is 200 °C and the default time is 15 minutes.
-
Shortly press “<<” or “>>” to make switching among the menus. The indicator of the selected menu flashes while the indicators of the other menus illuminate solidly.
-
Shortly press the TIME/TEMP button “☐/☐” to make switching between the temperature and time, and then adjust the temperature or time by “^” or “√”. Hold and press “^” or “√” to adjust the temperature or time quickly, at that time, you can still make switching among the menus.
- After setting the temperature, time and menu, shortly press the START/STOP button “▶”, the appliance starts to work and the heating indicator illuminates.
- During working, shortly press the START/STOP button “▶”, the appliance pauses working and the heating indicator extinguishes. Press the the START/STOP button “▶” again and the appliance continues working.
- After the working is completed or hold and press the Power button, the appliance exits from the working mode, beep is heard and the heating indicator extinguishes, the display shows "0:00" and "0:00" flashes. When the display extinguishes completely (only the indicator of Power button illuminates), the appliance enters into the standby mode.
-
For the Preheat function, the default temperature is 200 °C and the default time is 3 minutes. The time and temperature can not be adjusted under the preheat mode. In the standby mode or pause mode, shortly press the PREHEAT button “ ☑” to select the function (press it again to cancel the selection). Shortly press the START/STOP button “ ☑” enter the preheating mode, and return to the standby mode after the working is completed.
-
For the keep-warm function, the default temperature is 80 °C and the default time is 60 minutes. The time and temperature can not be adjusted under the keep-warm mode. In the standby mode or pause mode, shortly press the KEEP WARM button “③” to select the function (press it again to cancel the selection). After the heating work is completed, the appliance enter the keep-warm mode, and return to the power-on mode after the working is completed.
• After the appliance is powered on, you can control the lamp inside the appliance by the Lamp button at any time. - After the appliance is powered on, you can remove the inner pot at any time, at that time, the appliance stops working, the indicator light extinguishes, the digital screen displays “---”, at that time, the appliance can not be operated. And the appliance will continue working after the inner pot is placed correctly again.
- When the appliance work to the specified time, the Shake indicator will flash and the buzzer will beep for 30 seconds to remind the user to perform the "Shake" operation. And the "Shake" operation will be canceled after either of the following operations is performed.
(1) The user removes the inner pot and perform the "Shake" operation within beep, and then place the inner pot in the main body again.
(2) There is not any operation within beep.
Either of the above conditions is considered to be the comple
tion of the "Shake" operation. After the "Shake" operation is completed, the buzzer will stop beeping, the Shake indicator will extinguish and the appliance will continue working.
BEFORE USING FOR THE FIRST TIME
- Your Air Fryer is supplied with a shelf placed in the inner pot. Grasp the handle to remove the inner pot from the main body and then place it on a flat and clean working area. Remove all packing material and labels from the inside and outside of the Air Fryer.
- Check and ensure that there is no packing material under and around the inner pot.
- Wash shelf and inner pot in hot, soapy water.
- DO NOT IMMERSE THE AIR FRYER BODY IN WATER. Wipe Air Fryer body with a damp cloth. Dry all parts thoroughly.
NOTE: During first use, the Air Fryer may emit a slight odor. This is normal.
WARNING: This appliance can not be used to boil water.
PRODUCT OPERATION GUIDELINES
- Place the Air Fryer on a flat and heat-resistant working area which is close to an electrical outlet.
- Firmly grasp the handle to remove the inner pot from the main body and then place it on a flat and clean surface.
- Place the food on the shelf and please do not overfill.
- Push the inner pot into the main body and make sure that
inner pot is placed correctly.
- Connect the appliance with power source.
- The adjustable temperature range between 80 °C and 200 °C and the adjustable time ranges between 1 minute and 60 minutes.
- If the Air Fryer is at the cold state, select the Preheat function (no need to load food), the heating indicator illuminates and the Air Fryer starts to heat. The cooking effect will be better after the appliance is preheated.
- Follow the operation in the section of "OPERATION INSTRUCTION FOR CONTROL PANEL" to select the proper time and temperature according to the food to be cooked. And then turn on the appliance.
-
- When working to the specified time, the appliance will remind the user to remove the inner pot for checking the food. At that time, please flip or shake the food in the pot. And then place the inner pot in the main body correctly. And you can adjust the temperature and time if necessary.
- When the inner pot is removed, the heating element will stop working and the display will indicate that the inner pot has been removed. After the inner pot is placed correctly, the appliance will continue heating.
- When the set cooking time is reached, the buzzer will beep continuously and the fryer will switch off automatically.
- Flip the food over to check the browning and doneness of the food. If need to continue cooking, adjust the temperature and
time until the food is cooked completely.
• After the cooking is completed, remove the inner pot from the body and place it on a flat and heat-resistant surface. Put the cooked food in a proper container.
- The cooking can be continued if necessary. Unplug the appliance when not in use.
NOTE: The Air Fryer will not heat if the START/STOP button is not activated. Unless the inner pot is installed correctly, the Air Fryer will not heat and the display will indicate that the inner pot has been removed. After the cooking is completed, please press the Power button to turn off the Air Fryer.
HELPFUL TIPS
- Olive oil or vegetable oil works well for air frying. Oil can be applied on the foods to get a better cooking result. And please make sure the foods are dried before being applied with oil.
- The food can be cut into small pieces to increase the cooking area and make the food be crispier. Activate the preheat function before frying food for better cooking result.
- Do not overfill the inner pot with food. Never fill the inner pot with food of which amount is more than 1/2 of the maximum capacity of inner pot.
- For the best cooking result, some foods need to be flipped over during air-frying. Refer to "INTRODUCTION FOR MENUS" for specific information.
- When cooking foods that are naturally high in fat, such as chicken wings or sausages, it may be necessary to empty the grease from the inner pot between uses to avoid excessive smoke.
- Always dry the food before cooking to improve browning and avoid excessive smoke.
- The food in the inner pot must not be higher than the mouth of the inner pot to allow air to circulate inside.
INTRODUCTION FOR MENUS
| FOOD | TEMP | TIME | KEEP WARM | TEMP RANGE | TIME RANGE | SHAKE |
| FRENCH FRIES | 200°C | 20mins YES | 80~200°C | 1~60min | YES | |
| STEAK | 200°C | 13mins YES | 80~200°C | 1~60min | YES | |
| CHICKENWING | 200°C | 15mins YES | 80~200°C | 1~60min | YES | |
| DRUMSTICK | 200°C | 20mins YES | 80~200°C | 1~60min | YES | |
| FISH | 180°C | 20mins YES | 80~200°C | 1~60min | YES | |
| VEGETABLE | 180°C | 10mins YES | 80~200°C | 1~60min | YES | |
| CAKE | 160°C | 30mins YES | 80~200°C | 1~60min | NO | |
| DRY FRUIT | 60°C | 240mins NO | 60~80°C | 120~540min | NO |
• NOTES:
- Always use a meat thermometer to ensure that meat, poultry and fish are cooked thoroughly before eating.
- The "INSTROCTION FOR MENUS" is only for reference. The amount, thickness or density of the food and whether the food is fresh, thawed or frozen may affect the cooking time.
- The "INSTROCTION FOR MENUS" shows the average cooking time, the time required to take some measures and the measures taken to achieve the best cooking result.
- Frying a small amount of food will result in a shorter cooking time and a better cooking result. Adjust the temperature and time as necessary to suit your taste.
CLEANING AND MAINTAINACE
WARNING: Allow the Air Fryer to cool down fully before cleaning.
- Unplug the Air Fryer. Remove the inner pot from the main body. Make sure the inner pot and shelf have cooled completely before cleaning.
- Wash the inner pot and shelf in hot soapy water. Do not use metal kitchen utensil or abrasive cleanser or cleaning product as this may damage the non-stick coating.
- The shelf and inner pot are dishwasher-safe. For the best results, place them on the top rack of your dishwasher to clean.
- Wipe the Air Fryer body with a soft, non-abrasive damp cloth.
- 5. The appliance contains no user serviceable parts. Except for cleaning, all maintenance requiring disassembling must be carried out by qualified service personnel.
TECHNICAL SPECIFICATION
Reference : AF-6L-NRSB
Power supply : 220-240V \~ 50-60Hz
Power: 1450-1750W
Capacity : 6L
The product has been designed to meet Commission Regulation with regard to ecodesign requirements for electric power consumption off mode & standby mode of electrical and electronic household equipment. The technical information of each mode:
| Mode | Power consumption(Watts) | The period(Minutes) |
| Off < 0.5W <2D | ||
| Standby NA NA |
TROUBLESHOOTING
| Problem | Reason | Solution |
| No indication or thecontrol panel can not be operated. | The plug has not been inserted well or the inner pot is not placed correctly. | Insert the power plug correctly and place the inner pot correctly, and ensure that the Power button is turned on. |
| Uneven browning | The food is not shaken during cooking. | When the appliance work to the specified time, remove the inner pot and shake the food. |
| There is a large amount of smoke produced. | There is too much moisture on the surface of food | Clean the moisture on the surface of food with kitchen paper |
STORING INSTRUCTION
- Make sure the Air Fryer is unplugged and all parts are cleaned and dried before storing.
- Never store the Air Fryer at a hot and wet place.
• Store Air Fryer in its box or at a clean, dry place.
We decline liability for any damage or accident derived from any use of this product which is not in conformity with the instructions contained in this booklet.
GB
ENVIRONMENT FRIENDLY DISPOSAL

European directive 2012/19/EU on Waste from Electrical and Electronic Equipment (WEEE), requires that used household appliances are not thrown into the normal municipal waste stream.
Used appliances must be collected separately in order to optimize the rate of recovery and recycling of materials that compose them, and to reduce the impact on human health and on the environment.
The crossed bin symbol is affixed to all the products to remind you of the obligations of separated collection.
In accordance with Article L. 217 of the Consumer Code, your product benefits from a legal guarantee of conformity of 2 years.
This instruction book is also available on our website: www.conforama.fr If you have a problem with your product, before going to your Conforama store, please get in touch with our aftersales services for electrical household appliances: http://sav-client.conforama.fr / or call :09 69 32 05 05 from Monday to Saturday, 8:30 to 19:00 price of a local call.
CE
GB

Brand : SABA
Model : AF6LNRSB
Category : Deep fryer