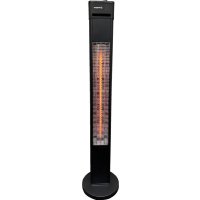
WES31-1592 - Heating WESTINGHOUSE - Free user manual and instructions
Find the device manual for free WES31-1592 WESTINGHOUSE in PDF.

User questions about WES31-1592 WESTINGHOUSE
0 question about this device. Answer the ones you know or ask your own.
Ask a new question about this device
Download the instructions for your Heating in PDF format for free! Find your manual WES31-1592 - WESTINGHOUSE and take your electronic device back in hand. On this page are published all the documents necessary for the use of your device. WES31-1592 by WESTINGHOUSE.
USER MANUAL WES31-1592 WESTINGHOUSE
natural_image
Line drawing of a wireless device with two antennas and a speaker grille (no text or symbols)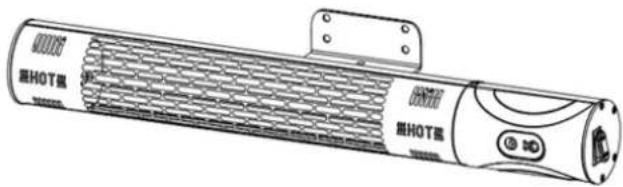
text_image
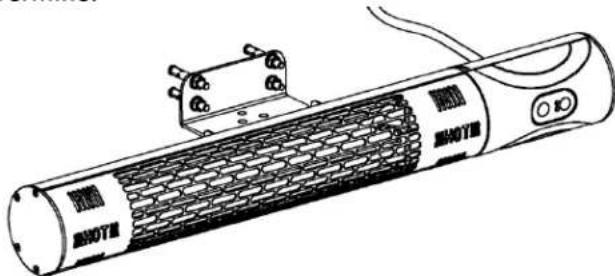
HOT HOTInstruction Manual
Guide d'utilisation
- Assembly
- Operation
- For your safety
- Cleaning and storage
- Specifications
- Grounding instructions
- Warranty
FRANÇAIS
Please empty the packing box thoroughly, and make sure that there are no missing parts.
MAKE SURE THERE IS NO DAMAGE TO THE UNIT AND POWER CORD. IF THERE IS ANY DAMAGE OR IF THERE ARE MISSING PARTS, PLEASE CONTACT 1-866-967-7333 ext 227.
2. ASSEMBLY
| Ref. | Name | Qty. |
| 1 | M6 * 12 screws | 4 |
| 2 | U' shaped support | 1 |
| 3 | M6 nuts | 4 |
| 4 | Non-slip mat | 1 |
| 5 | M6*50 screws | 2 |
| 6 | M8*25 handle | 1 |
| 7 | L' shaped hexagonal wrench | 1 |
Wall mounted: Brick or concrete
Step 1: Using the wall mount bracket as a template mark the four holes where you plan to install the radiator. Drill four holes into the wall and hammer the supplied four M6*50 expansion bolts into the wall.
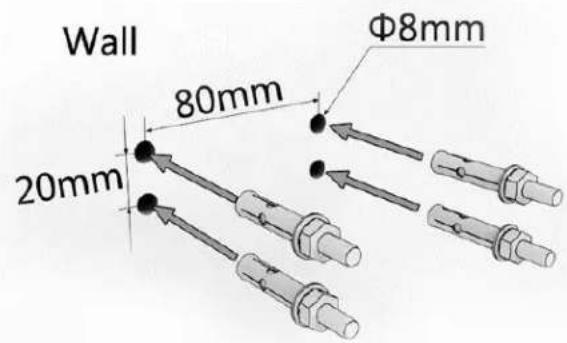
text_image
Wall 20mm 80mm Φ8mmStep 2: Unscrew the four nuts, spring locks washers and plain washers from the four expansion bolts. Keep them for the next step.
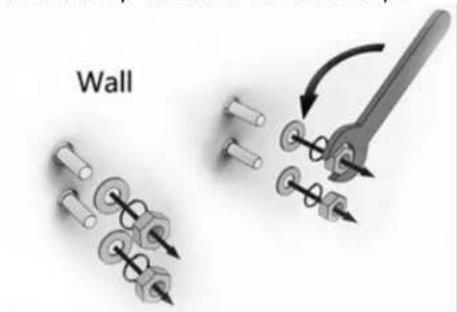
text_image
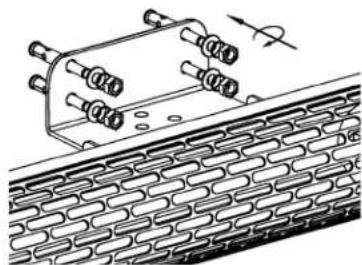
WallStep 3:
Fix the radiator mounting bracket over the four
natural_image
Technical line drawing of a mechanical assembly with rollers and a meshed component (no text or symbols)Step 4 :
Finished!

natural_image
Line drawing of a cylindrical device with mesh grille and attached electrical connector (no text or symbols)Wall mounted (Other surfaces):
Step 1: Using the radiator wall mount bracket as a template mark the four screw holes where you plan to install the radiator.
Step 2: Place the radiator mounting bracket on the four marks and tighten four screws (not included).
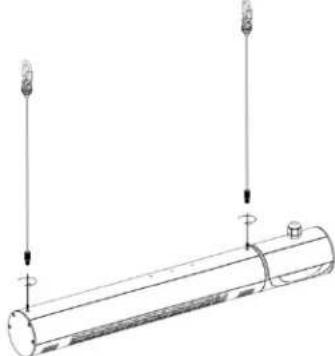
Ceiling/hanging mounted (concrete or very hard surfaces)
Step 1: Screw the hanging wire on the radiator.
natural_image
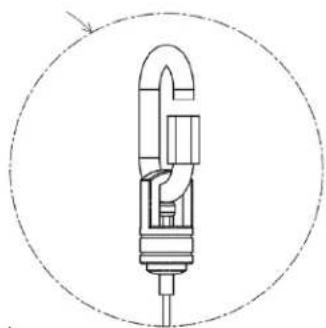
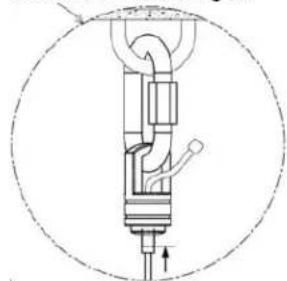
Technical line drawing of a cylindrical mechanical component with two vertical arrows indicating direction (no text or symbols)Step 2: Unscrew the nut on the buckle.
natural_image
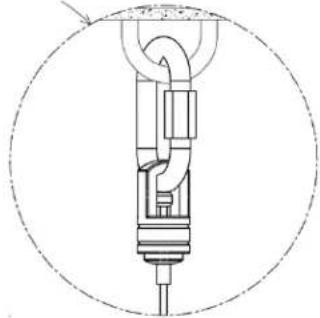
Cross-sectional diagram of a mechanical component inside a dashed circle (no text or symbols)Step 3: Attach the buckle on an object. You can also attach it around a secure object.
natural_image
Technical line drawing of a mechanical component with no visible text or symbolsStep 4: To adjust the hanging height, press the bottom of the buckle (arrow) and the pull the hanging wire at the desired height.
natural_image
Technical line drawing of a mechanical device with no visible text or symbolsStep 5: You can attach the power cord to the hanging Wire using metal ties. Make sure the power cord does not hang less than 50cm behind the heater.
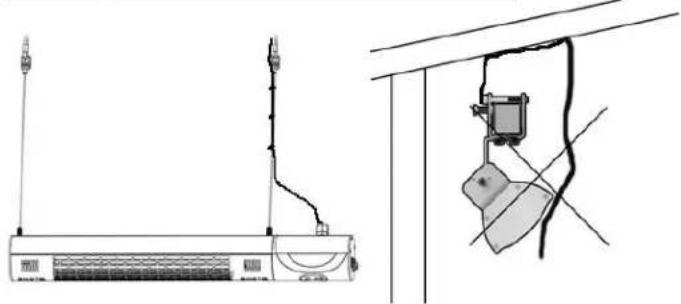
natural_image
Technical line drawing of a rack-mounted air conditioner unit connected to a cable and a hanging device (no text or symbols)Ceiling mounted
Step 1: Screw the 'U' shaped bracket to the heater.

text_image
1 2 3 HeaterStep 2: Attach the 'U' shaped bracket around a pole. You can secure it using the non-slip mat.

text_image
4 tube less than 40mm at least 20mm 6 53. OPERATION
MAKE SURE THE HEATER IS NOT FUNCTIONING BEFORE YOU HANG IT ON A GAZEBO, OR UNDERNEATH A BALCONY OR A ROOF.
NOTE: Wait until the heater's heating element has cooled down before moving it.
REMEMBER: Portable electric heaters are designed for spot heating or as a supplementary heat source. They are not intended to be the main source of heat during cold months.
Caution: If you must use an extension cord, the cord should be at least No. 14 AWG and rated for no less than 1875 W.
You must always make sure that there is at least 1' 6" (50 cm) of empty space above the heater, 9" (25 cm) from the side and 5' (1.8 m) below the heater.
Control Panel
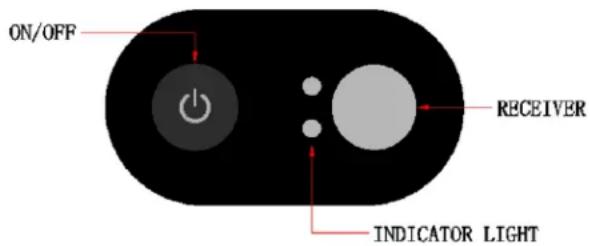
text_image
ON/OFF RECEIVER INDICATOR LIGHTRemote control

Press the On/Off main switch to activate the heater.
Press the remote control On/Off button to activate or deactivate the heat.
IMPORTANT: To operate properly, the remote must be pointed toward the remote-control sensor.
Activation button

Press the On/Off switch to activate the heater.
Press on the On/Off button on the heater control panel to activate the heat.
4. FOR YOUR SAFETY
IMPORTANT INSTRUCTIONS
- ONLY USE THE UNIT ON A SECURED AND SOLID ATTACHMENT POINT.
- This heater is not intended for use in bathrooms, laundry areas or similar indoor locations where there may be moisture. Never place heater where it may fall into a pool, bathtub or other water receptacle.
- This unit is intended for household use only. DO NOT use the unit in such areas as construction sites, greenhouses, barns or stables or any place that has flammable materials.
- DO NOT use the unit in an unventilated area.
- A heater has hot, arcing and sparking parts inside. DO NOT use it in areas where gasoline, paint or flammable liquids are used or stored.
- DO NOT move the unit when it is still connected to an electrical outlet, and always wait for the unit to cool down before moving, cleaning and storing it.
-
DO NOT touch the heater when in use. Please wait at least 10 minutes after it has been turned off before touching it.
-
Extreme caution is necessary when any heater is used near a child or someone physically disabled.
-
DO NOT LEAVE THE UNIT UNATTENDED WHEN IN OPERATION.
-
This heater is hot when in use. To avoid burns, do not let bare skin touch hot surfaces. Use handles (not provided) when moving this heater. Keep combustible materials such as furniture, pillows, bedding, papers, clothes and curtains at least 3' (0.9 m) from the front of the heater.
-
DO NOT cover the unit with any type of cloth while in operation or a short time after turning the unit off.
-
DO NOT wrap the power cord around the unit.
-
DO NOT insert or allow foreign objects to enter any ventilation or exhaust opening of the unit as this may cause electric shock, fire or damage to the heater.
-
PLEASE HANDLE THE UNIT WITH CARE.
-
DO NOT operate the heater with a damaged power cord or a damaged AC wall outlet. DO NOT operate the heater if it has been dropped or damaged in any manner.
-
DO NOT USE THE UNIT AS A ROOM HEATER.
-
DO NOT run the power cord under carpeting. DO NOT cover the cord with throw rugs, runners or the like. Position the cord away from traffic areas where it may be tripped over.
-
To disconnect heater, turn the power switch to off, then unplug the unit.
-
To prevent the possibility of fire, DO NOT block air intakes or exhaust openings in any manner. DO NOT use on soft surfaces such as a bed where openings may become blocked.
-
Use this heater only as described in this manual; any other use not recommended by the manufacturer may cause fire, electric shock or injury to persons.
SAVE THESE INSTRUCTIONS.
5. CLEANING AND STORAGE
-
Turn the unit OFF and unplug the unit before cleaning.
-
Use only a soft cloth to clean the exterior. An air compressor or a vacuum cleaner can be used to clean the interior.
-
Do not use gasoline, paint thinner or other chemicals to clean the heater
-
Store the heater in its original box and keep in a cool, dry place.
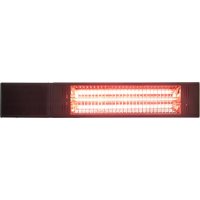
6. SPECIFICATIONS
Power supply: 120 V/60 Hz
Wattage: 1500 W
7. GROUNDING INSTRUCTIONS
This product is for use on a nominal 120 V circuit with a grounding plug that looks like the plug illustrated below. Make sure that the product is connected to an outlet having the same configuration as the plug. If you use an extension cord, make sure it also has a grounding plug. No adaptor should be used with this product.
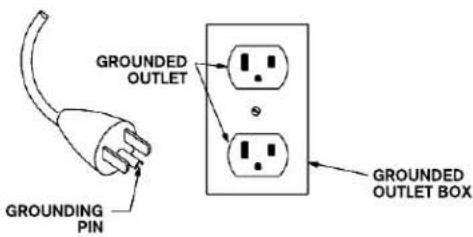
text_image
GROUNDED OUTLET GROUNDING PIN GROUNDED OUTLET BOXDANGER
Improper connection of the equipment-grounding conductor may result in a risk of electrocution. Check with a qualified electrician or other service personnel if you doubt the outlet is properly grounded. Do not modify the
power cord provided with the product. If it does not fit the wall outlet, have a proper outlet installed by a qualified electrician. Do not use any type of adaptor with this product.
8. WARRANTY
LIMITED ONE (1) YEAR WARRANTY
This product is guaranteed against all manufactured faults and defects for a period of one (1) year from the date of purchase. For repairs or product defects, please call our customer service department at: 1-866-967-7333. Please have your proof of purchase on hand. We will repair or replace defective units at our discretion.
Important notes: Any damage caused by an accident or an abusive usage is NOT covered under warranty. We also decline all responsibility concerning indirect or consecutive damages. In certain Canadian provinces or USA States, it is not permitted to limit indirect or consecutive damages. Therefore, it is possible these limitations are not applicable to you. This warranty gives you specific legal rights. You may also have other legal rights which vary from one province or State to another.
CUSTOMER SERVICE: 1-866-967-7333 ext 227
TABLE DES MATIÈRES
text_image
20mm 80mm Φ8mmÉtape 2:
text_image
Diagram illustrating how fastening a bolt on a brick wall with a wrench, showing mechanical assembly and tool path.Étape 3:
natural_image
Technical line drawing of a mechanical assembly with bolts and a meshed component (no text or symbols)Terminé: