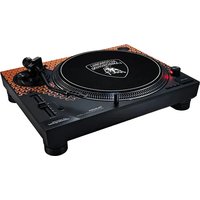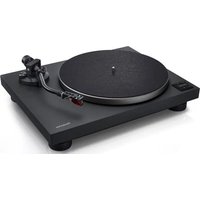
SL-50C - Turntable TECHNICS - Free user manual and instructions
Find the device manual for free SL-50C TECHNICS in PDF.


User questions about SL-50C TECHNICS
0 question about this device. Answer the ones you know or ask your own.
Ask a new question about this device
Download the instructions for your Turntable in PDF format for free! Find your manual SL-50C - TECHNICS and take your electronic device back in hand. On this page are published all the documents necessary for the use of your device. SL-50C by TECHNICS.
USER MANUAL SL-50C TECHNICS
natural_image
Technical line drawing of a vintage CD/DVD machine with a circular head and attached trigger device (no text or symbols)SL-50C
Music is borderless and timeless, touching people's hearts across cultures and generations. Each day the discovery of a truly emotive experience from an unencountered sound awaits. Let us take you on your journey to rediscover music.
Delivering the Ultimate Emotive Musical Experience to All
At Technics we understand that the listening experience is not purely about technology but the magical and emotional relationship between people and music.
We want people to experience music as it was originally intended and enable them to feel the emotional impact that enthuses and delights them.
Through delivering this experience we want to support the development and enjoyment of the world's many musical cultures. This is our philosophy.
With a combination of our love of music and the vast high-end audio experience of the Technics team, we stand committed to building a brand that provides the ultimate emotive musical experience by music lovers, for music lovers.
Thank you for purchasing this product. Please read these instructions carefully before using this product, and save this manual for future use.
- About descriptions in these operating instructions
- Pages to be referred to are indicated as “(⇒ 00)”.
- The illustrations shown may differ from your unit.
If you have any questions, visit: https://help.na.panasonic.com/
Register online at https://help.na.panasonic.com/ (U.S. customers only)
Features
Coreless direct drive motor to achieve high precision, stable rotation and high reliability
- The coreless direct drive motor reduces minute vibration during rotation, combined with the high-precision motor control technology.
Tone arm with excellent initial sensitivity featuring new high-precision bearings - The newly designed tone arm bearing system achieves high initial response sensitivity, ensuring accurate tracking of the record groove.
Complete package to easily enjoy playing back records - The built-in high-quality phono-equalizer amplifier allows for connection with a wide range of devices.
- The included high-quality MM cartridge offers comfortable listening with easy setup.

Quick Setup Guide
Scan the QR code to access the setup video.
Table of contents
- Before use
IMPORTANT SAFETY INSTRUCTIONS .....04
Accessories 07
Parts Name 08
- Getting started
Putting the player together ....10
- Before fitting the turntable ....11
- Fitting the turntable ....11
- Fitting the turntable mat ....11
- Attaching the head shell ....11
- Attaching the balance weight .....11
- To remove the turntable ....11
Connections and installation ......12
- Connecting to an integrated amplifier or component system (Connecting the LINE output terminals Connecting the PHONO output terminals) ...12
- Installation....14
- Fit the dust cover ....14
Adjustment....15
● Horizontal balance .....15
- Stylus pressure ....15
- Anti-skating ....15
- Playing back
Playing records 16
- Maintenance
Maintenance....18
Replacing the cartridge ....19
Troubleshooting guide ......20
Specifications....21
Limited Warranty (ONLY FOR U.S.A.) ......22
Limited Warranty (ONLY FOR CANADA) .....23
Playing back
Maintenance
IMPORTANT SAFETY INSTRUCTIONS
Read these operating instructions carefully before using the unit. Follow the safety instructions on the unit and the applicable safety instructions listed below. Keep these operating instructions handy for future reference.
1 Read these instructions.
2 Keep these instructions.
3 Heed all warnings.
4 Follow all instructions.
5 Do not use this apparatus near water.
6 Clean only with dry cloth.
7 Do not block any ventilation openings. Install in accordance with the manufacturer's instructions.
8 Do not install near any heat sources such as radiators, heat registers, stoves, or other apparatus (including amplifiers) that produce heat.
9 Do not defeat the safety purpose of the polarized or grounding-type plug. A polarized plug has two blades with one wider than the other. A grounding type plug has two blades and a third grounding prong. The wide blade or the third prong are provided for your safety. If the provided plug does not fit into your outlet, consult an electrician for replacement of the obsolete outlet.
10 Protect the power cord from being walked on or pinched particularly at plugs, convenience receptacles, and the point where they exit from the apparatus.
11 Only use attachments/accessories specified by the manufacturer.
12 Use only with the cart, stand, tripod, bracket, or table specified by the manufacturer, or sold with the apparatus. When a cart is used, use caution when moving the cart/ apparatus combination to avoid injury from tip-over.
13 Unplug this apparatus during lightning storms or when unused for long periods of time.
14 Refer all servicing to qualified service personnel. Servicing is required when the apparatus has been damaged in any way, such as power-supply cord or plug is damaged, liquid has been spilled or objects have fallen into the apparatus, the apparatus has been exposed to rain or moisture, does not operate normally, or has been dropped.

Warning
Unit
- To reduce the risk of fire, electric shock or product damage,
- Do not expose this unit to rain, moisture, dripping or splashing.
- Do not place objects filled with liquids, such as vases, on this unit.
- Use only the recommended accessories.
- Do not remove covers.
- Do not repair this unit by yourself.
Refer servicing to qualified service personnel.
AC power supply cord
- The power plug is the disconnecting device. Install this unit so that the power plug can be unplugged from the socket outlet immediately.
Caution
Unit
- Do not place sources of naked flames, such as lighted candles, on this unit.
Placement
- To reduce the risk of fire, electric shock or product damage,
- Do not install or place this unit in a bookcase, built-in cabinet or in another confined space.
Ensure this unit is well ventilated. - Do not obstruct this unit's ventilation openings with newspapers, tablecloths, curtains, and similar items.
- Keep your speakers at least 10 mm ( ^13/_32 ) away from the system for proper ventilation.
- Keep any IC card or magnetic card such as a credit card away from the turntable.
- Otherwise the IC card or magnetic card may become unusable due to magnetic effect.
The following mark and symbols are located on bottom of the unit.



CAUTION :
TO REDUCE THE RISK OF ELECTRIC SHOCK, DO NOT REMOVE SCREWS. NO USER-SERVICEABLE PARTS INSIDE. REFER SERVICING TO QUALIFIED SERVICE PERSONNEL.

The lightning flash with arrowhead symbol, within an equilateral triangle, is intended to alert the user to the presence of uninsulated "dangerous voltage" within the product's enclosure that may be of sufficient magnitude to constitute a risk of electric shock to persons.
The exclamation point within an equilateral triangle is intended to alert the user to the presence of important operating and maintenance (servicing) instructions in the literature accompanying the appliance.
THE FOLLOWING APPLIES ONLY IN THE U.S.A. FCC Note:
This equipment has been tested and found to comply with the limits for a Class B digital device, pursuant to Part 15 of the FCC Rules.
These limits are designed to provide reasonable protection against harmful interference in a residential installation. This equipment generates, uses and can radiate radio frequency energy and, if not installed and used in accordance with the instructions, may cause harmful interference to radio communications.
However, there is no guarantee that interference will not occur in a particular installation. If this equipment does cause harmful interference to radio or television reception, which can be determined by turning the equipment off and on, the user is encouraged to try to correct the interference by one or more of the following measures:
- Reorient or relocate the receiving antenna.
- Increase the separation between the equipment and receiver.
- Connect the equipment into an outlet on a circuit different from that to which the receiver is connected.
- Consult the dealer or an experienced radio/TV technician for help.
FCC Caution:
To assure continued compliance, follow the attached installation instructions and use only shielded interface cables when connecting to peripheral devices.
Any changes or modifications not expressly approved by the party responsible for compliance could void the user's authority to operate this equipment.
This device complies with Part 15 of the FCC Rules.
Operation is subject to the following two conditions:
(1) This device may not cause harmful interference, and
(2) this device must accept any interference received, including interference that may cause undesired operation.
Supplier's Declaration of Conformity
Trade Name: Technics
Model No.: SL-50C
Responsible Party:
Panasonic Corporation of North America
Two Riverfront Plaza, Newark, NJ 07102-5490
Support Contact: https://help.na.panasonic.com/
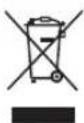
Information on Disposal in other Countries outside the European Union
This symbol is only valid in the European Union.
If you wish to discard this product, please contact your local authorities or dealer and ask for the correct method of disposal.
Accessories
In order to prevent damage during shipping some of the equipment has been disassembled. Please check and identify the supplied accessories. (Some accessories parts are supplied in a bag.)
| Turntable (1 pc.) Turntable mat (1 pc.) Dust cover (1 pc.) | ||
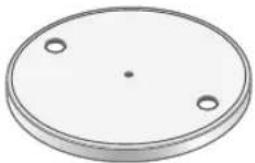 | 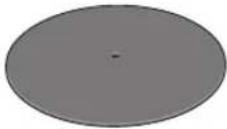 | 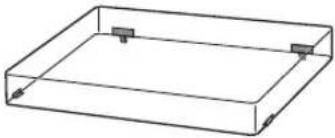 |
| EP record adaptor (1 pc.) Balance weight (1 pc.) | Head shell with cartridge (1 pc.) | |
 | 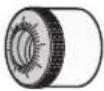 | 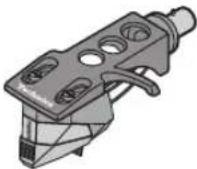 The head shell comes with a cartridge equivalent to "ortofon 2M Red". The head shell comes with a cartridge equivalent to "ortofon 2M Red". |
| PHONO cable (1 pc.)PHONO earth lead (1 pc.) | AC power supply cord (1 pc.) (K2CB2YY00065) | |
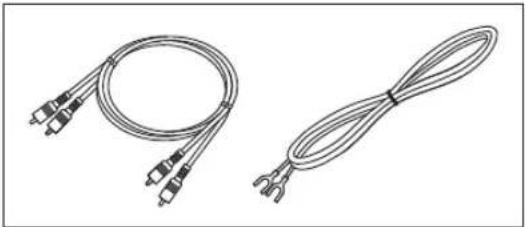 | 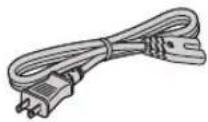 | |
- The model numbers of the accessories are as of June 2025.
They are subject to change without notice. - Keep the packaging materials without taking them to pieces after taking out the goods. You will need them when carrying the product over long distances.
- Follow the local regulations when disposing of the product.
- Do not use any other AC power supply cord, PHONO cable and PHONO earth lead except the supplied one.
- Keep the cartridge, nuts, screws and washers out of reach of children to prevent swallowing.
● Illustrations and figures in this manual are of the grey main body. - The stylus is a consumable item. When replacing, purchase ortofon "stylus 2M Red".
Parts Name
Numbers such as ( 00) indicate reference pages.
Front
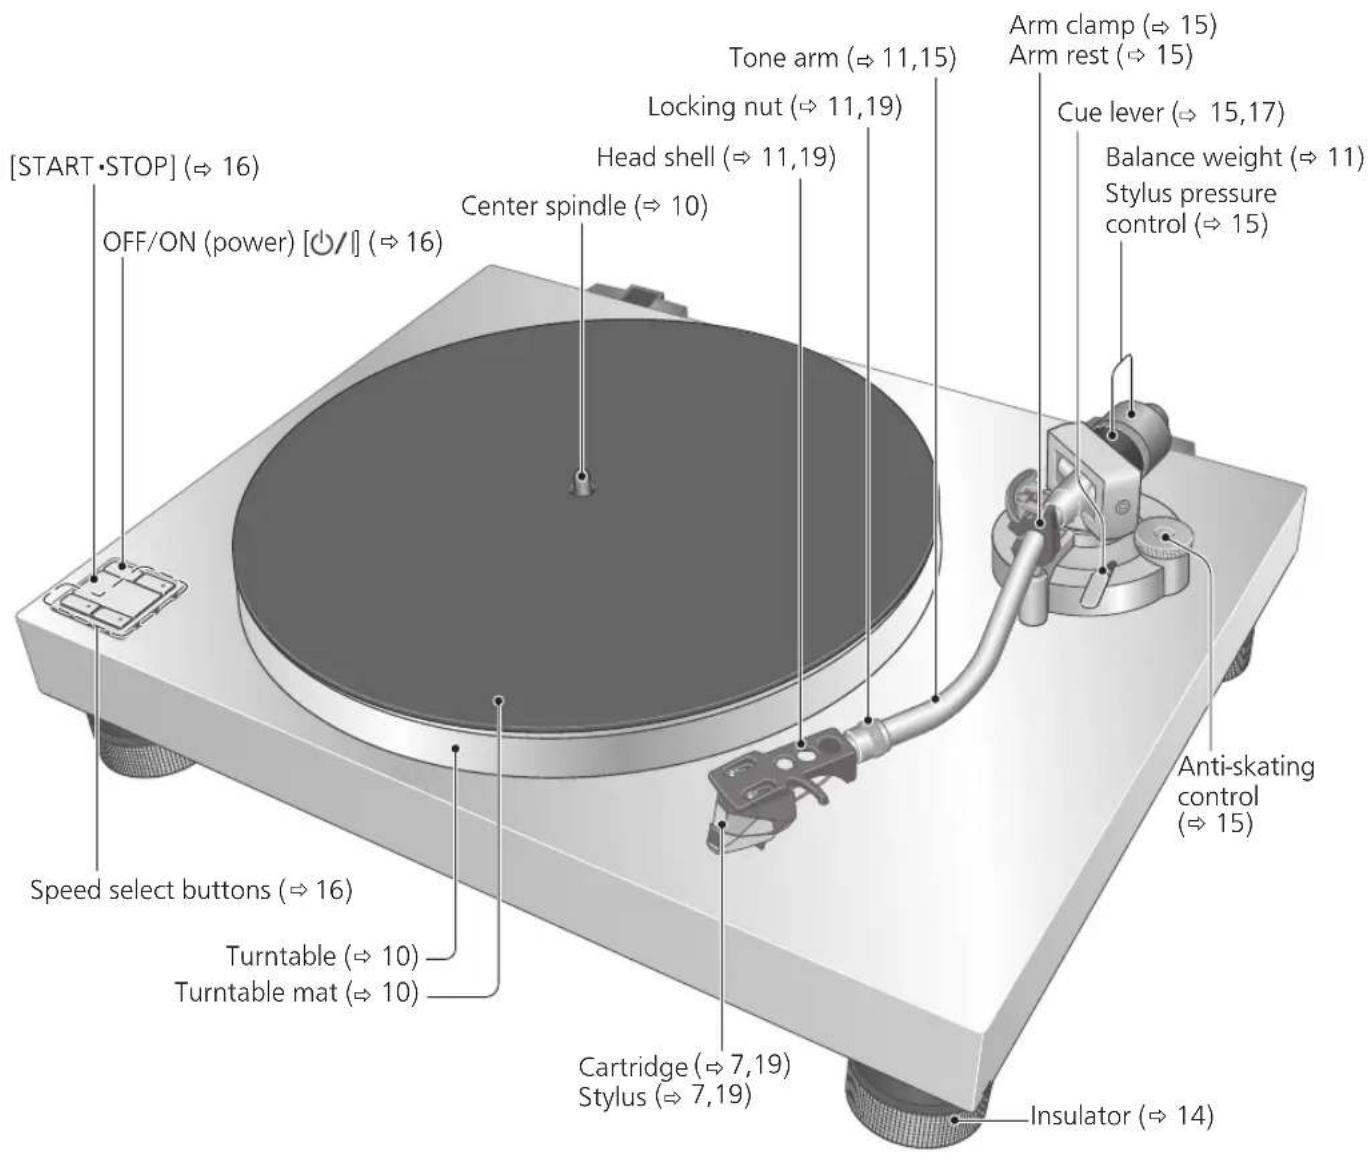
text_image
[START·STOP] (⇒ 16) OFF/ON (power) [⏻/ Ivory] (⇒ 16) Speed select buttons (⇒ 16) Turntable (⇒ 10) Turntable mat (⇒ 10) Center spindle (⇒ 10) Locking nut (⇒ 11,19) Head shell (⇒ 11,19) Tone arm (⇒ 11,15) Arm clamp (⇒ 15) Arm rest (⇒ 15) Cue lever (⇒ 15,17) Balance weight (⇒ 11) Stylus pressure control (⇒ 15) Anti-skating control (⇒ 15) Cartridge (⇒ 7,19) Stylus (⇒ 7,19) Insulator (⇒ 14)Back
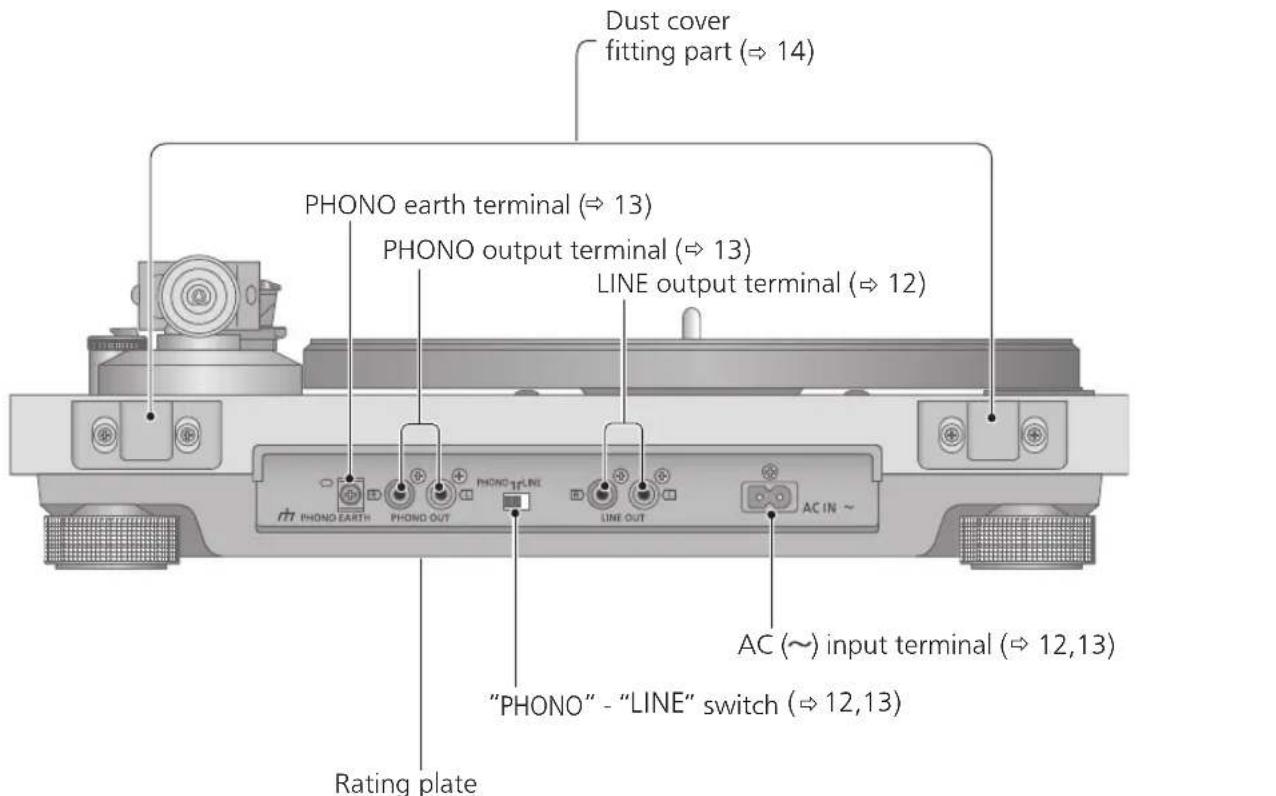
text_image
Dust cover fitting part (⇒ 14) PHONO earth terminal (⇒ 13) PHONO output terminal (⇒ 13) LINE output terminal (⇒ 12) PHONO EARTH PHONO LINE PHONO OUT LINE OUT AC IN ~ AC (~) input terminal (⇒ 12,13) "PHONO" - "LINE" switch (⇒ 12,13) Rating plate- Product Identification Marking is located on the bottom of the unit. The product number is shown in the rating plate.
( ☐ Class II equipment (The construction of the product is double-insulated.))
Putting the player together
In order to prevent damage during shipping, some of the equipment has been disassembled. Put the player together in the following order.
Attention
- Before setting up, put on the stylus guard to protect the stylus tip, ensuring that it is in place (⇒ 16). Return the tone arm to the arm rest and fix it with the arm clamp.
- Do not connect the AC power supply cord until set up is complete.
- When fitting the turntable, prevent foreign material from getting in between the main unit and turntable.
- Do not touch or scratch the board.
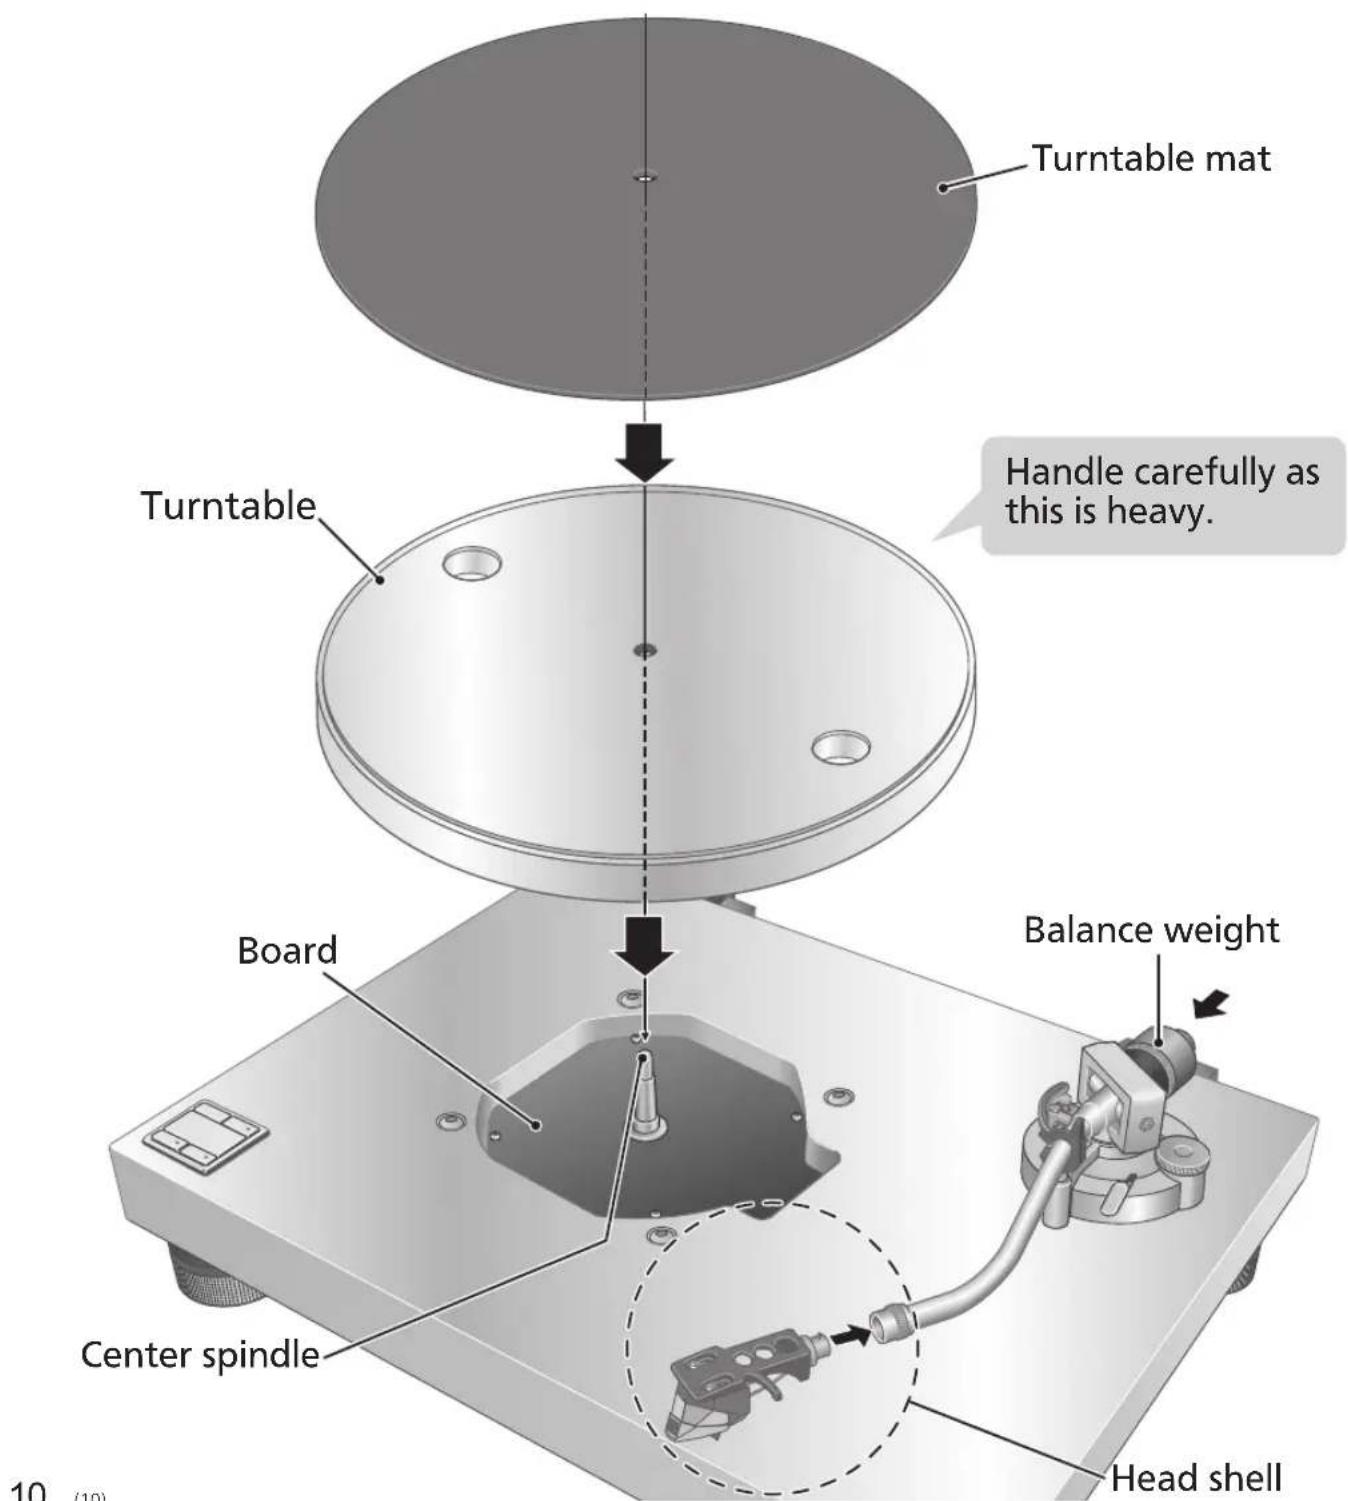
text_image
Turntable mat Turntable Handle carefully as this is heavy. Board Balance weight Center spindle Head shell 10 (10)Before fitting the turntable
1 Remove the magnet cover from the turntable.
- There is a magnet and its cover on the back side of the turntable. Remove the magnet cover before fitting to the main unit.
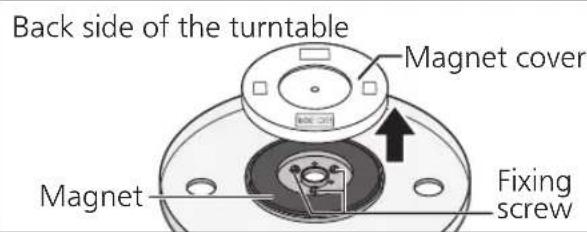
text_image
Back side of the turntable Magnet cover Magnet Fixing screwAttention
- Keep any magnetic-sensitive object such as a magnetic card and watch away from the magnet.
- Prevent the turntable from hitting the main unit or falling off.
Prevent dust or iron powder from adhering to the magnet on the back side. - Do not touch the fixing screws (three locations) of the turntable. The rating performance cannot be guaranteed if they are out of position.
Fitting the turntable
2 Slowly set the turntable on the center spindle.
Attention
- Be careful when handling the turntable, as it is heavy.
- Keep your fingers from being caught.
● Wipe off fingerprints or dirt with a soft cloth.
Fitting the turntable mat
3 Lay the turntable mat on the turntable.
Attaching the head shell
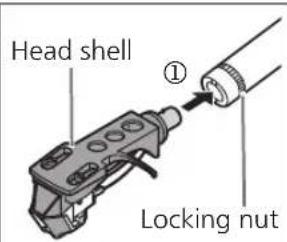
4 ① Fit the head shell with the cartridge into the tone arm.
② Adjust the head shell so that it becomes horizontal.
③ While keeping the head shell horizontal, tighten the locking nut.
- Be careful not to touch the stylus tip.
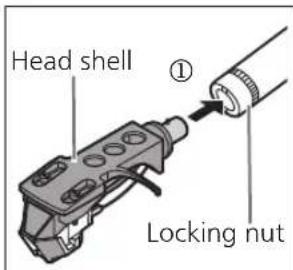
text_image
Head shell Locking nut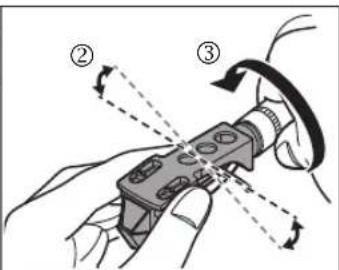
text_image
Diagram illustrating a mechanical device with labeled parts and directional arrows indicating motion or force directions.Attaching the balance weight
5 Attach the balance weight to the rear of the tone arm.
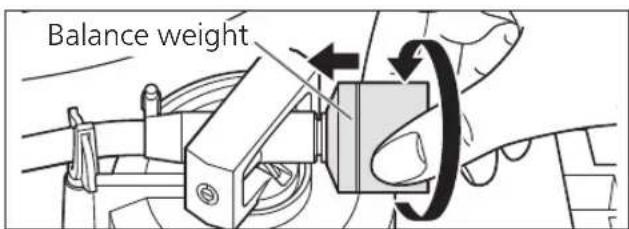
text_image
Balance weightNote
- The inside of the balance weight is greased.
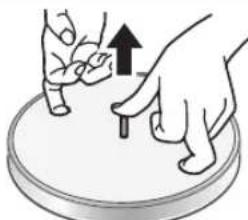
To remove the turntable
As shown in the figure on the right, set your fingers in the two holes on the turntable, hold the center spindle down and remove the turntable upward.
natural_image
Illustration of a hand pressing down on a plate with an upward arrow (no text or symbols)Connections and installation
- Do not connect cables to the PHONO output terminals and PHONO earth terminal when using the LINE output terminals. Do not connect cables to the LINE output terminals when using the PHONO output terminals. Incorrect cable connections may cause noise and/or popping sounds.
● Turn off all units and disconnect the AC power supply cord from the socket before making any connections. - Do not operate the "PHONO" - "LINE" switch and connect or disconnect cables with the unit turned on.
- When connecting the PHONO output terminals, be sure to connect the PHONO earth lead. Otherwise, mains hum (buzzing noise) may occur.
- Refer also to the instruction manual of the connected device.
Connecting to an integrated amplifier or component system
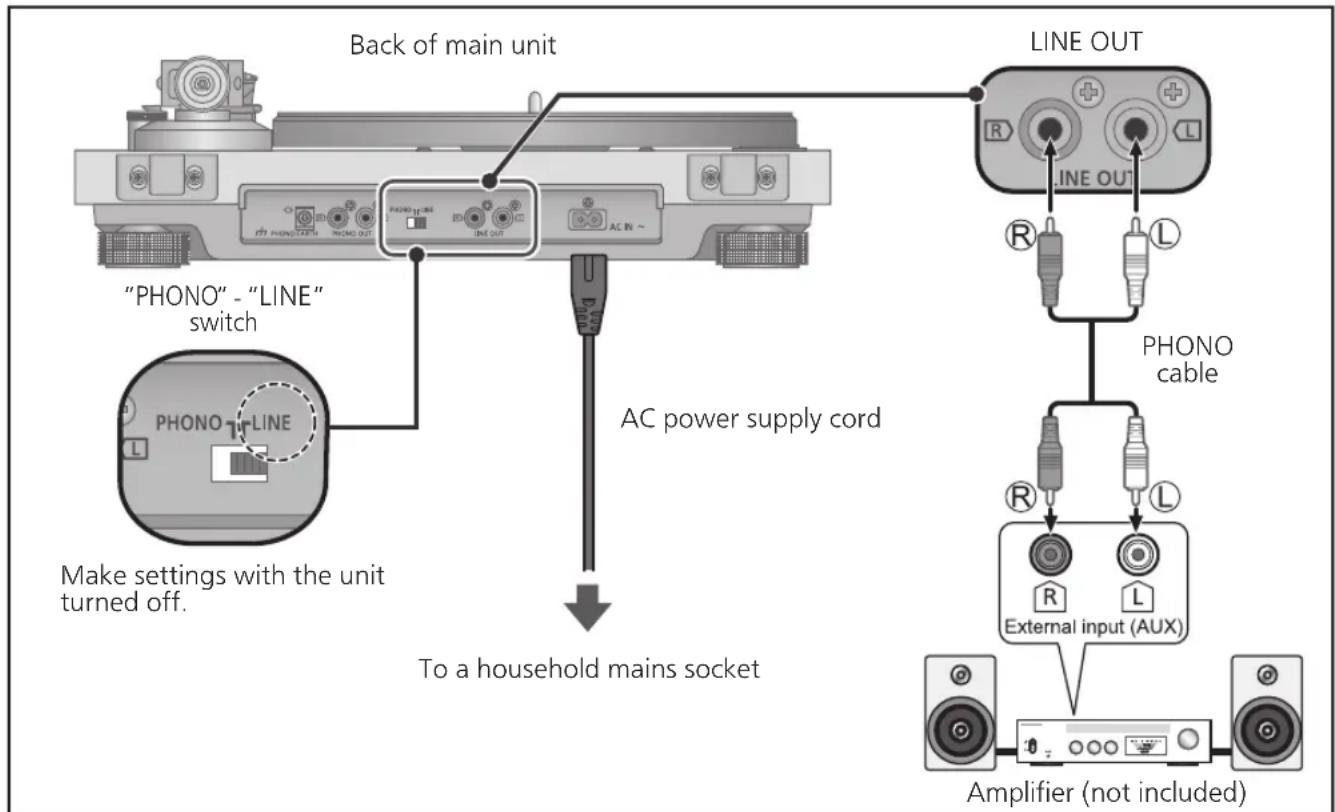
Connecting the LINE output terminals
1 Turn off the unit and the connected device, and disconnect the AC power supply cord from the socket.
2 Connect the PHONO cable to the LINE output terminals of the unit and the external input terminals of the connected device.
- When connecting the LINE output terminals, do not connect the PHONO earth lead.
- Connecting to the PHONO input terminals of the connected device produces abnormal output, loud and with distorted sound quality.
3 Set the "PHONO" - "LINE" switch to "LINE".
4 Connect the AC power supply cord.
- Confirm the wattage of the AC outlet on the connected equipment before using it for this unit.
For the power consumption of this unit, see the specifications. ( 21)
flowchart
graph TD
    A["Back of main unit"] --> B[""PHONO" - "LINE" switch"]
    B --> C["AC IN ~"]
    C --> D["To a household mains socket"]
    D --> E["Line OUT"]
    E --> F["PHONO cable"]
    F --> G["External input (AUX)"]
    G --> H["Amplifier (not included)"]
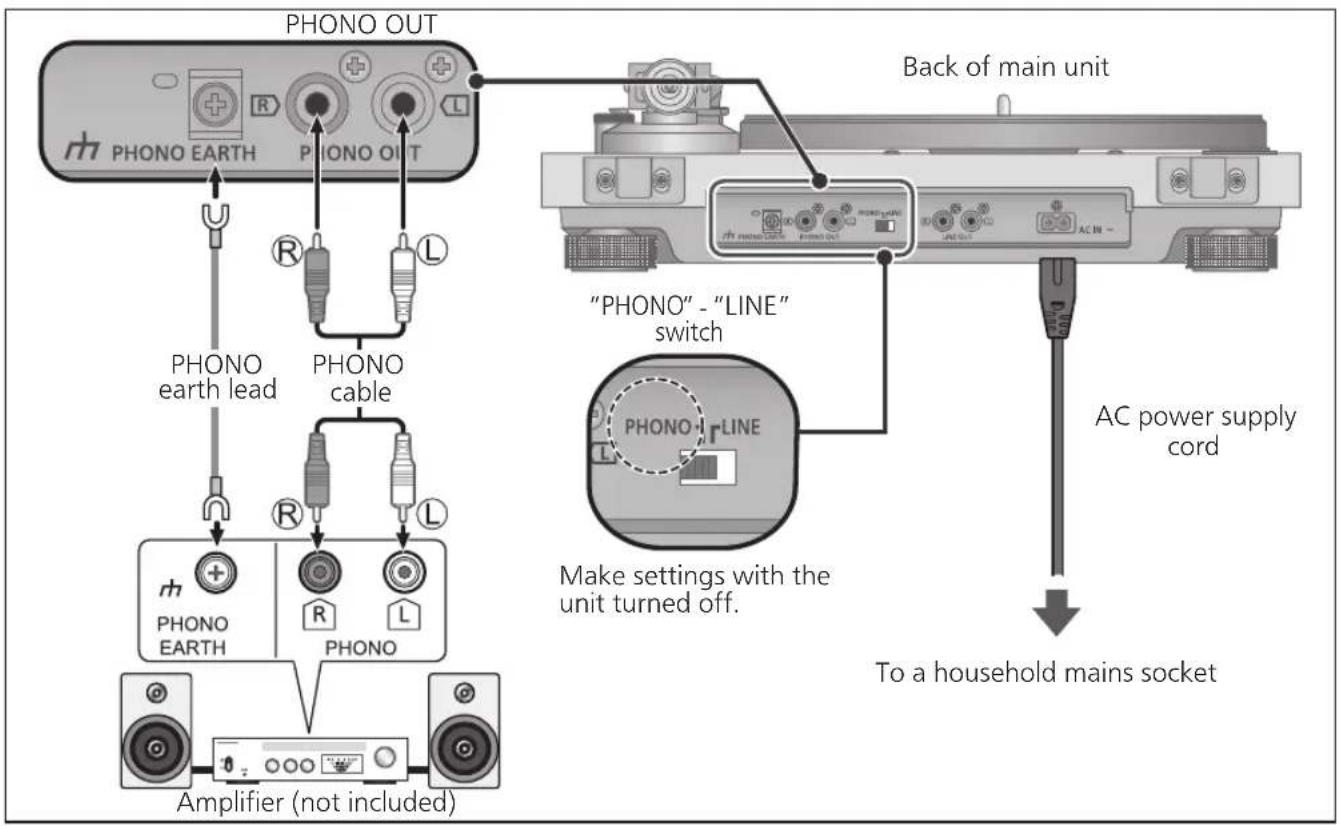
Connecting the PHONO output terminals
1 Turn off the unit and the connected device, and disconnect the AC power supply cord from the socket.
2 Connect the PHONO cable and PHONO earth lead to the PHONO input terminals of the connected equipment.
- Adequate volume and sound quality cannot be obtained when connected to the external input terminals of the connected device.
3 Set the "PHONO" - "LINE" switch to "PHONO".
4 Connect the AC power supply cord.
- Confirm the wattage of the AC outlet on the connected equipment before using it for this unit.
For the power consumption of this unit, see the specifications. ( 21)
flowchart
graph TD
    A["PHONO OUT"] --> B["PHONO EARTH"]
    A --> C["PHONO OUT"]
    B --> D["PHONO lead"]
    C --> E["PHONO cable"]
    D --> F["Amplifier (not included)"]
    E --> G["PHONO EARTH"]
    E --> H["PHONO"]
    G --> I["Amplifier (not included)"]
    H --> J["Amplifier (not included)"]
    K["Back of main unit"] --> L[""PHONO" - "LINE" switch"]
    L --> M["AC power supply cord"]
    M --> N["To a household mains socket"]
Attention
- Tighten the PHONO earth terminal using a Phillips head screwdriver.
Note
- Although the AC power switch is in the "OFF" position, the unit is not completely disconnected from the mains. Remove the plug from the main electrical outlet if you will not be using the unit for an extended period of time. Place the unit so the plug can be easily removed.
Connections and installation (continued)
Installation
Install the unit on a horizontal surface protected from vibrations.
Keep this unit as far as possible from speakers.
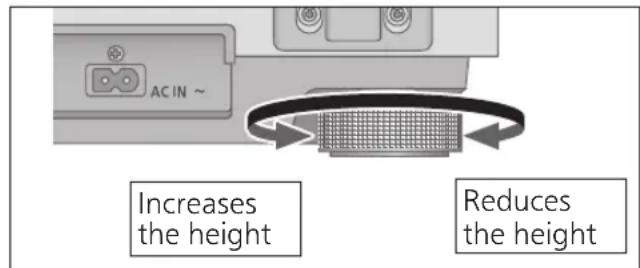
■ Adjusting the height to make the unit horizontal
text_image
AC IN ~ Increases the height Reduces the heightRaise the main unit to turn the insulators and adjust the height.
- Clockwise: Reduces the height.
- Anti-clockwise: Increases the height.
Attention
- Do not turn the insulators too far. Doing so may cause them to come off or damage them.
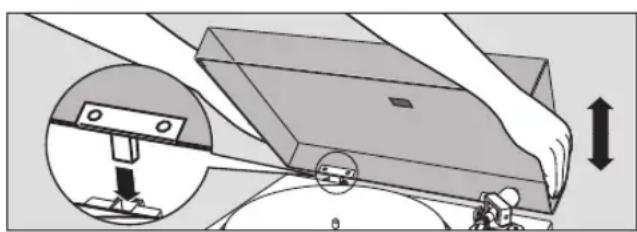
Fit the dust cover
1 Hold the dust cover with both hands and insert it into the dust cover fitting parts ( 9) on the player.
- To remove the dust cover, keep it open and lift it straight above.
natural_image
Diagram showing a hand pressing down a rectangular object with an inset close-up of a device (no text or symbols present)Attention
- Return the tone arm to the arm rest and fix it with the arm clamp before you attach or detach the dust cover.
- Remove the dust cover while playing.
- When inserting the dust cover, prevent the tip of the hinges from hitting and damaging the main unit.
- Note that an auxiliary weight of any other Technics model attached to the rear of the tone arm may prevent the dust cover from closing.
■ Notes for installation
- Before you move the unit, turn the unit off, pull out the power plug and disconnect all connected devices.
- Ensure the unit is not exposed to direct sunlight, dust, humidity, and heat from a heating appliance.
- This unit may pick up interference from a radio if there is one nearby. Keep the unit as far as possible from a radio.
- Do not install the unit on a heat source.
- Avoid a place with large temperature variations.
- Avoid a place with frequent condensation.
- Avoid an unstable place.
- Do not put an object on the unit.
- Do not install the unit in a confined space such as a book shelf.
- Install the unit at a position well away from walls or other devices to ensure effective heat radiation from the inside of the unit.
- Make sure the installation location is sufficiently strong to withstand the total weight of the unit and system. ( 21)
- Note that the unit may be damaged by cigarette smoke or moisture from an ultrasonic humidifier.
Condensation
Think of taking out a cold bottle from a refrigerator. If you leave it in a room for a while, dewdrops will form on the bottle surface. This phenomenon is called "condensation".
- Conditions causing condensation
◇ Rapid temperature change (caused by moving from a warm place to a cold place or vice versa, rapid cooling or heating, or direct exposure to cooled air)
◇ High humidity in a room with much steam, etc.
◇ Rainy season - Condensation may damage the unit. If it has occurred, turn the unit off and leave it until it adapts to the ambient temperature (approximately 2 to 3 hours).
Adjustment
Horizontal balance Stylus pressure
Preparation
- First, remove the dust cover.
- Remove the stylus cover ( 16), taking care not to damage the stylus, then release the arm clamp.
- Lower the cue lever.
- Turn the anti-skating control to "0".
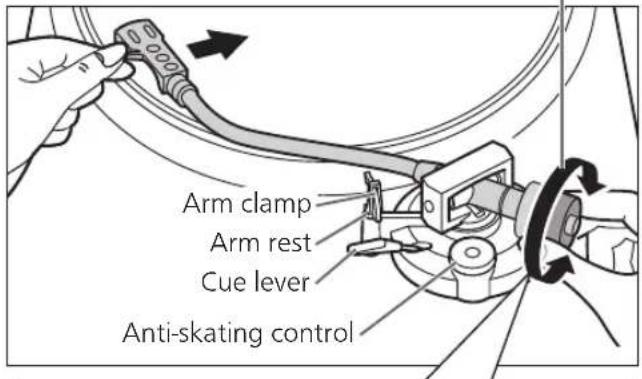
1 Free the tone arm from the arm rest and adjust horizontal balance by turning the balance weight.
Hold the tone arm and turn the balance weight in the arrow direction to adjust the balance until the arm is approximately horizontal.
● Take care not to allow the stylus tip to touch the turntable or main unit.
Balance weight

Hold here to turn
text_image
Arm clamp Arm rest Cue lever Anti-skating control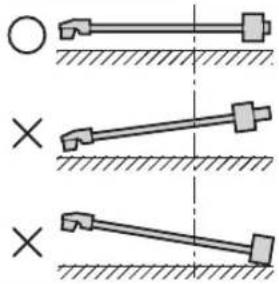
natural_image
Diagram showing three mechanical linkage configurations with cross and circle symbols, no text or labels presentBalanced and the tone arm is parallel to the turntable.
The balance weight is too far forward.
The balance weight is too far back.
Preparation
- Return the tone arm to the arm rest and fix it with the arm clamp.
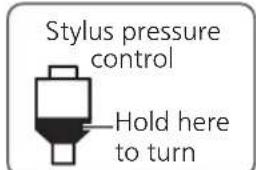
1 Turn the stylus pressure control until "0" comes to the center line of the rear of the tone arm.
● Hold the balance weight still during doing this.
text_image
Stylus pressure control Hold here to turn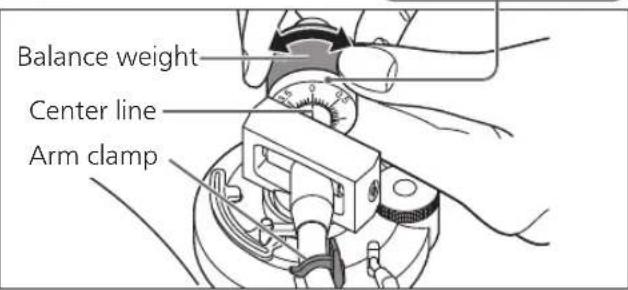
text_image
Balance weight Center line Arm clampNote
• Stylus pressure of the cartridge: 1.8 g
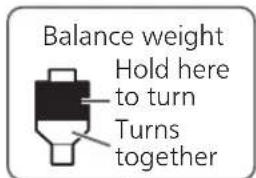
2 Turn the balance weight to adjust to the appropriate stylus pressure for the cartridge.
- The stylus pressure together with the balance weight. - Turn until the center line points to the appropriate stylus pressure.
text_image
Balance weight Hold here to turn Turns together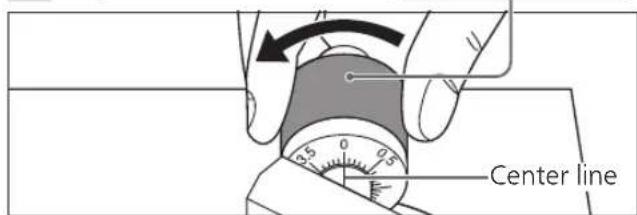
text_image
Center lineAnti-skating
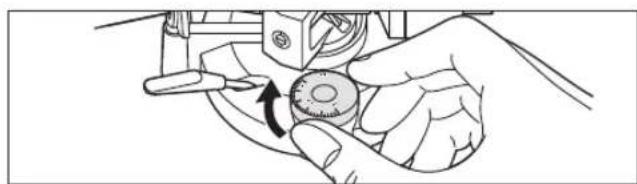
1 Turn the anti-skating control to adjust it to the same value as the stylus pressure control.
natural_image
Illustration of a hand using a sewing machine to adjust a circular component (no text or symbols visible)Playing records
Preparation
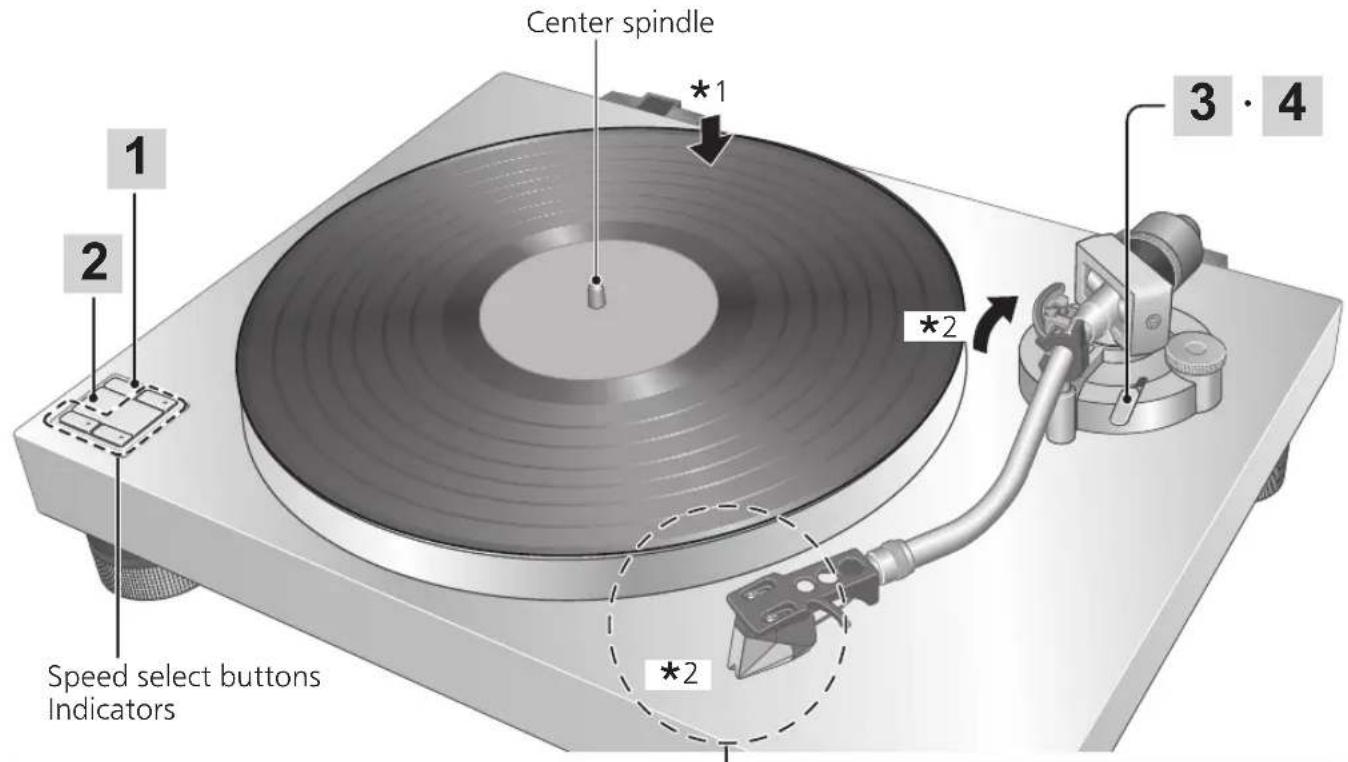
*1 Put a record (not included) on the turntable.
*2 Take off the stylus cover and release the arm clamp.
1 Press [ ] to turn the unit on.
33-1/3 rpm is automatically selected and the indicator [33] lights.
2 Press [START·STOP].
The turntable starts revolving.
![TECHNICS SL-50C - Press [START·STOP]. - 1](/content/2026/04/744843/images/0f18caaf78f177eeeb5c1279df3a7c1c57cebbc122a858a0172a002f337f10de.jpg)
text_image
+/I 78 S ·STOP 33 45![TECHNICS SL-50C - Press [START·STOP]. - 2](/content/2026/04/744843/images/0fba3abc32a167087e2e054789b5e39f6c0a24a153a0d4a5ad0e8d574b2ac40d.jpg)
text_image
START·STOP 33 45 Indicator![TECHNICS SL-50C - Press [START·STOP]. - 3](/content/2026/04/744843/images/2bcd6256c87c51ae4bcf408c0e3b5fc121554dd006d0231685b84772e57e4f1c.jpg)
text_image
0/1 78 START·STOP 33 4Attention
- Do not press [START·STOP] when the turntable is removed.
If you have accidentally pressed [START·STOP]
• The indicator of the speed select button ([33] or [45]) starts blinking.
If it is blinking, press [0/1] to turn the unit off, fit the turntable and then press [0/1] turn the unit on.
- Turn the unit on or off with the volume on the connected device set to the minimum.
text_image
Center spindle *1 *2 3 · 4 1 2 Speed select buttons Indicators *2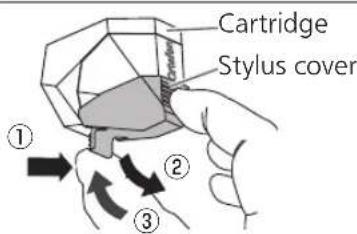
text_image
Cartridge Stylus cover ① ② ③■ Removing the stylus cover
Hold the stylus cover from its front and back, and while pushing the latch on the rear part (①), slowly tilt the stylus cover downward (②).
■ Attaching the stylus cover
Hold the stylus cover from its front and back, align with the front of the cartridge, and slowly lift it (③) taking care not to damage the stylus.
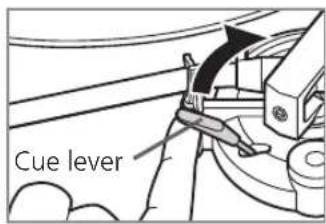
3 Lift the cue lever and move the tone arm over the record.
text_image
Cue lever4 Lower the cue lever slowly. The tone arm moves down slowly.

natural_image
Line drawing of a hand using a tool to adjust or install a mechanical component (no text or symbols visible)Play starts.
■ To temporarily stop play
Lift the cue lever.
- The stylus lifts off the record.
- To start play again, lower the cue lever.
■ When play finishes
① After lifting the cue lever to return the tone arm to the arm rest, lower it completely.
② Press [START•STOP].
The electronic brake gently stops the turntable.
③ Press [1] to turn the unit off.
④ Clamp the tone arm with the arm clamp.
⑤ Put the stylus cover back on (to protect the stylus tip).
■ When playing EP records
- Press the speed select button [45] ([45] lights).
- Fit the EP record adaptor over the center spindle.
■ When playing high-quality (78 rpm) LP records
- Press the speed select button [78] ([78] lights).
- The cartridge is for LP/EP records. Playing 78 rpm mono records is not recommended. Do not play 78 rpm records.
■ When using a record stabilizer (not included)
- See the instruction manual of the record stabilizer.
● Maximum weight: 500 g
Maintenance
■ Care of the parts
Thoroughly clean dust off the stylus and record.
- Take off the head shell with the cartridge and clean the stylus using a soft brush. Brush from the base to the tip.
- Use a record cleaner to keep your records clean.
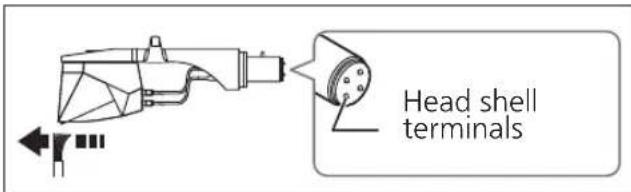
text_image
Head shell terminalsWipe the head shell terminals occasionally.
Wipe the head shell terminals with a soft cloth and fit the head shell to the tone arm.
Turn the amplifier volume down or turn the amplifier off before fitting or removing the head shell.
Damage to your speakers can occur if the head shell is moved while the volume is turned up.
■ Cleaning the dust cover and cabinet
Wipe the dust cover and cabinet with a soft cloth.
Do not touch the board while cleaning.
Otherwise, the player may fail.
When dirt is heavy, wring a wet cloth tightly to wipe the dirt, and then wipe it with a soft cloth.
- Do not use solvents including benzene, thinner, alcohol, kitchen detergent, a chemical wiper, etc. This might cause the exterior case to be deformed or the coating to come off.
- Do not wipe the dust cover when it is in place. Doing so may cause the tone arm to be attracted towards the dust cover as a result of the generated static electricity. Be sure the dust cover is removed while playing a record.
■ Moving the unit
Repackage the unit in the packaging it came in.
Keep the packaging materials without taking them to pieces after taking out the goods. If you no longer have the packaging, do the following:
● Take off the turntable and turntable mat and carefully wrap them.
- Remove the head shell and balance weight from the tone arm and carefully wrap them. (For the head shell cartridge, attach the stylus guard.)
- Clamp the tone arm with the arm clamp and tape it in place.
- Carefully wrap the main unit in a blanket or paper.
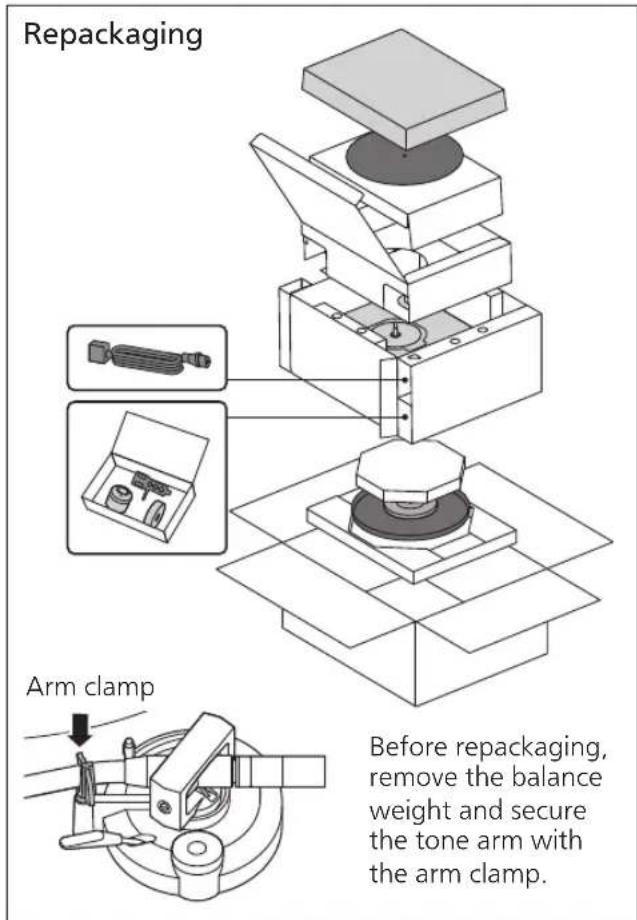
text_image
Repackaging Arm clamp Before repackaging, remove the balance weight and secure the tone arm with the arm clamp.■ WEEE symbol
Disposal of the product outside the EU countries
This symbol is valid within the EU only.
Contact a local governmental office or your dealer to confirm a right manner of disposal.
Replacing the cartridge
This unit cannot adjust either the tone arm height or the armlift height. For cartridge replacement, purchase and use the "ortofon 2M Red" (height (H): 18 mm).
Removing the supplied cartridge
1 Attach the stylus cover ( 16) and loosen the locking nut to remove the head shell from the tone arm.
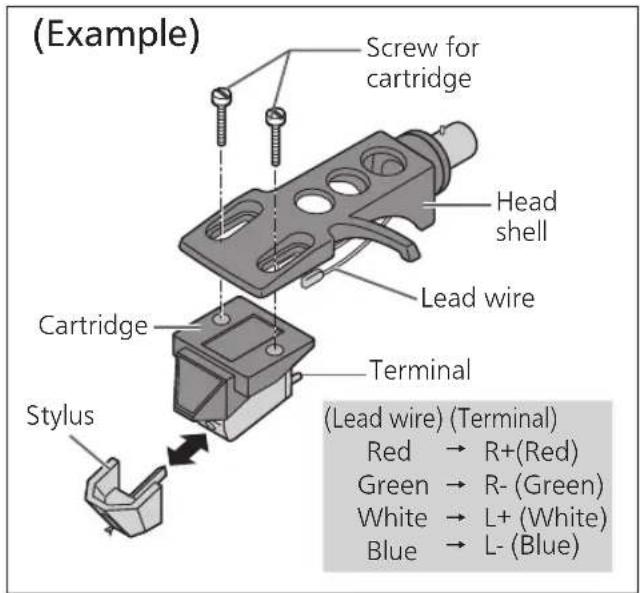
2 Loosen the cartridge mounting screws to remove the supplied cartridge from the head shell.
- Use a commercially available mini flat screwdriver (4 mm [5/32").
- Be careful not to touch the stylus tip.
3 Remove the leads from the terminals.
- Be careful not to cut the leads.
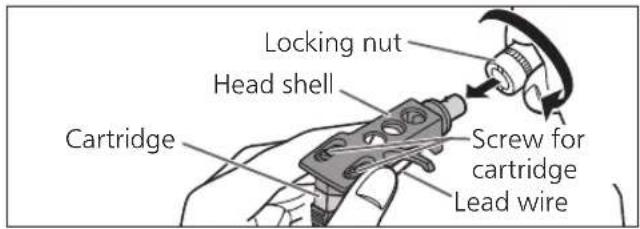
text_image
Locking nut Head shell Screw for cartridge Lead wire CartridgeAttaching the cartridge
1 Attach a cartridge tentatively.
Follow the instructions of the replacement cartridge to correctly attach it to the head shell, and tighten the screws lightly.
- If the mounting screws are included in the cartridge, use them.
- Use a commercially available mini flat screwdriver (4 mm [5/32]).
- Be careful not to touch the stylus tip.
text_image
(Example) Screw for cartridge Head shell Lead wire Cartridge Terminal Stylus (Lead wire) (Terminal) Red → R+(Red) Green → R- (Green) White → L+ (White) Blue → L- (Blue)2 Adjust the overhang.
- Be careful not to touch the stylus tip.
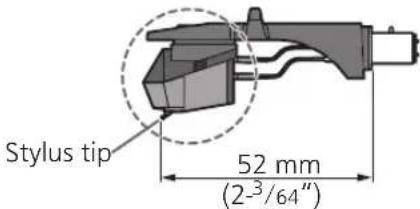
① Move the cartridge to adjust the overhang in such a way that the stylus tip is at 52 mm from the head shell mounting end, as shown in the figure below.
text_image
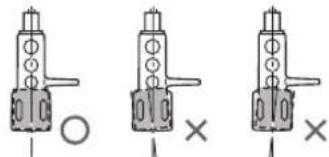
Stylus tip 52 mm (2-3/64")② The cartridge should be parallel on the shell head when viewed from the top and side (the illustration is the top view).
natural_image
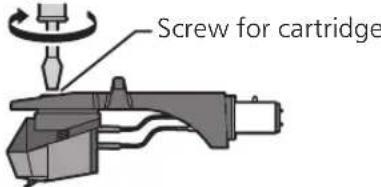
Three identical mechanical component diagrams with no text or symbols③ Tighten the screw for cartridge.
- Be careful not to allow the cartridge to slip out of place.
text_image
Screw for cartridgeAttaching the head shell
1 ① Fit the head shell with the cartridge into the tone arm.
② Adjust the head shell so that it becomes horizontal.
③ While keeping the head shell horizontal, tighten the locking nut.
- Be careful not to touch the stylus tip.
text_image
Head shell Locking nut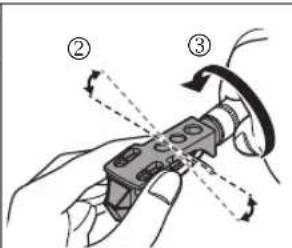
text_image
Diagram illustrating a mechanical device with labeled parts and directional arrows indicating motion or force directions.Attention
- Store the removed screws, washers and nuts in such a way that they do not get lost.
- This unit is for use with MM type cartridges.
Troubleshooting guide
Before requesting service, make the below checks. If you are in doubt about some of the check points, or if the remedies indicated in the chart do not solve the problem, contact your dealer.
No power.
- Is the AC power supply cord plugged in?
→Plug the AC power supply cord in firmly. (⇒ 12, 13)
There is power but no sound, sound is weak or abnormal, loud and with distorted sound quality.
- Are device connections and PHONO or LINE output terminal connections correct?
→Connect the PHONO output terminals with the amplifier's PHONO input terminals. (⇔ 13)
→Connect the LINE output terminals to the amplifier's external input terminals. (⇒ 12)
- Check the setting of the "PHONO" - "LINE" switch. (⇒ 12, 13)
Left and right sounds are reversed.
- Are the stereo connection cable connections to the amplifier or receiver reversed?
→Double check all connections. (⇒ 12, 13)
- Are connections of the head shell's lead wires to the cartridge terminals correct?
→Double check all connections. (⇒ 19)
Low, continuous sound (humming or buzzing sound), noise or popping sound is heard during play.
- Are there other appliances or their AC power supply cord near the stereo connection cable?
→Separate the appliances and their AC power supply cord from this unit. - Is the earth lead connected?
→When connecting the PHONO output terminals, correctly connect the PHONO earth lead. (⇒ 13) - Is the "PHONO" - "LINE" switch set to "LINE" when using PHONO output terminals?
→ Set the "PHONO" - "LINE" switch to "PHONO". (⇒ 13) - Are cables connected to PHONO output terminals and PHONO earth terminal when using LINE output terminals?
→ Disconnect the cables. (⇒ 12)
The indicator on the speed select button [33] or [45] blinks.
Perform the following operations when the indicator on the speed select button [33] or [45] blinks. The symptom may be improved.
① Press [1] to OFF.
② Pull out the power plug, wait for three seconds or more, and then insert the plug again.
③ Press [∅] to turn the unit on and press [START • STOP] to rotate the turntable.
- If the indicator on the speed select button blinks again, check which one is blinking and contact our service representative.
Specifications
| General | |
| Power supply AC 1 | 20 V, 60 Hz |
| Power consumption | 4 W (Power ON)0.2 W (Power OFF) |
| Dimensions(W×H×D) | 430 x 128 x 353 mm(16-59/64" × 5-1/32" × 13-57/64") |
| Weight Approx. 7.1 k g (15.7 lbs) | |
| Operating temperature range | 0 °C to +40 °C(+32 °F to +104 °F) |
| Operating humidity range | 35 % to 80 % RH(no condensation) |
| Turntable section | |
| Type Direct drive manual turntable | |
| Drive method Direct drive | |
| Motor Brushless DC motor | |
| Turntable platter Aluminum diecast Diameter: 300 mm(11-51/64") Weight: Approx. 1.26 kg(2.78 lbs)(including turntable mat) | |
| Turntable speeds 33-1/3, 45 and 78* rpm | |
| Build-up characteristics | 0.7 s. from standstill to 33-1/3 rpm |
| Braking system Electronic brake | |
| Wow and flutter 0.025 % W.R.M.S. | |
* The turntable speed will be 78.26 rpm when set to 78 rpm.
| Tone arm section | |
| Type Static Balance | |
| Effective length 23 | 0 mm (9-1/16") |
| Overhang 15 mm | (19/32") |
| Tracking error angle | Within 2° 32'(at the outer groove of 30 cm (12") record)Within 0° 32'(at the inner groove of 30 cm (12") record) |
| Offset angle 22° | |
| Phono equalizer section | |
| Gain 36.5 dB | |
| Cartridge section | |
| Model name ortofon | 2M Red |
| Terminals section | |
| Audio output PHONO (Pin Jack)PHONO earth terminalLINE (Pin Jack) | |
Specifications are subject to change without notice.
Limited Warranty (ONLY FOR U.S.A.)
Technics Products – Limited Warranty
Limited Warranty Coverage (For USA Only)
If your product does not work properly because of a defect in materials or workmanship, Panasonic Corporation of North America (referred to as "the warrantor") will, for the length of the period indicated on the chart below, which starts with the date of original purchase ("warranty period"), at its option either (a) repair your product with new or refurbished parts, (b) replace it with a new or a refurbished equivalent value product, or (c) refund your purchase price. The decision to repair, replace or refund will be made by the warrantor.
| Product or Part Name | Parts Labor | |
| Technics Turntable System (SL-50C) | 2(two)years | 2(two)years |
During the "Labor" warranty period there will be no charge for labor. During the "Parts" warranty period, there will be no charge for parts. This Limited Warranty excludes both parts and labor for non-rechargeable batteries, antennas, and cosmetic parts (cabinet). This warranty only applies to products purchased and serviced in the United States. This warranty is extended only to the original purchaser of a new product which was not sold "as is".
Mail-In Service—Online Repair Request
Online Repair Request
To submit a new repair request and for quick repair status visit our Web Site at
https://help.na.panasonic.com/
When shipping the unit, carefully pack, include all supplied accessories listed in the Owner's Manual, and send it prepaid, adequately insured and packed well in a carton box. When shipping Lithium Ion batteries please visit our Web Site at https://help.na.panasonic.com/ as Panasonic is committed to providing the most up to date information. Include a letter detailing the complaint, a return address and provide a daytime phone number where you can be reached. A valid registered receipt is required under the Limited Warranty.
IF REPAIR IS NEEDED DURING THE WARRANTY PERIOD, THE PURCHASER WILL BE REQUIRED TO FURNISH A SALES RECEIPT/PROOF OF PURCHASE INDICATING DATE OF PURCHASE, AMOUNT PAID AND PLACE OF PURCHASE. CUSTOMER WILL BE CHARGED FOR THE REPAIR OF ANY UNIT RECEIVED WITHOUT SUCH PROOF OF PURCHASE.
Limited Warranty Limits and Exclusions
This warranty ONLY COVERS failures due to defects in materials or workmanship, and DOES NOT COVER normal wear and tear or cosmetic damage. The warranty ALSO DOES NOT COVER damages which occurred in shipment, or failures which are caused by products not supplied by the warrantor, or failures which result from accidents, misuse, abuse, neglect, mishandling, misapplication, alteration, faulty installation, set-up adjustments, misadjustment of consumer controls, improper maintenance, power line surge, lightning damage, modification, introduction of sand, humidity or liquids, commercial use such as hotel, office, restaurant, or other business or rental use of the product, or service by anyone other than a Factory Service Center or other Authorized Servicer, or damage that is attributable to acts of God.
The model number and serial number of this product can be found on either the back or the bottom of the unit. Please note them in the space provided below and keep for future reference.
MODEL NUMBER
SL-50C
SERIAL NUMBER
THERE ARE NO EXPRESS WARRANTIES EXCEPT AS LISTED UNDER "LIMITED WARRANTY COVERAGE".
THE WARRANTOR IS NOT LIABLE FOR INCIDENTAL OR CONSEQUENTIAL DAMAGES RESULTING FROM THE USE OF THIS PRODUCT, OR ARISING OUT OF ANY BREACH OF THIS WARRANTY.
(As examples, this excludes damages for lost time, travel to and from the servicer, loss of or damage to media or images, data or other memory or recorded content. The items listed are not exclusive, but for illustration only.)
ALL EXPRESS AND IMPLIED WARRANTIES, INCLUDING THE WARRANTY OF MERCHANTABILITY, ARE LIMITED TO THE PERIOD OF THE LIMITED WARRANTY.
Some states do not allow the exclusion or limitation of incidental or consequential damages, or limitations on how long an implied warranty lasts, so the exclusions may not apply to you.
This warranty gives you specific legal rights and you may also have other rights which vary from state to state. If a problem with this product develops during or after the warranty period, you may contact your dealer or Service Center. If the problem is not handled to your satisfaction, then write to:
Panasonic Corporation of North America
Consumer Affairs Department
Two Riverfront Plaza
Newark NJ 07102-5490
PARTS AND SERVICE, WHICH ARE NOT COVERED BY THIS LIMITED WARRANTY, ARE YOUR RESPONSIBILITY.
Product registration is not mandatory. Failure to complete the form does not affect the consumer's warranty rights.
Shop
Accessories!
for all your Technics gear
Go to
https://help.na.panasonic.com/
Get everything you need to get the most out of your Technics products
Accessories & Parts for your Camera, Phone, A/V products, TV, Computers & Networking, Personal Care, Home Appliances, Headphones, Batteries, Backup Chargers & more…
Customer Services Directory
For Product Information, Operating Assistance, Parts, Owner's Manuals, Dealer and Service info go to https://help.na.panasonic.com/
For the hearing or speech impaired TTY: 1-877-833-8855
As of September 2025
User memo:
DATE OF PURCHASE
DEALER NAME
DEALER ADDRESS
REBMUN ENOTHEPE
Limited Warranty (ONLY FOR CANADA)
Panasonic Canada Inc.
5770 Ambler Drive, Mississauga, Ontario L4W 2T3
TECHNICS PRODUCT - LIMITED WARRANTY
Panasonic Canada Inc. warrants this product to be free from defects in material and workmanship under normal use and for a period as stated below from the date of original purchase agrees to, at its option either (a) repair your product with new or refurbished parts, (b) replace it with a new or a refurbished equivalent value product, or (c) refund your purchase price. The decision to repair, replace or refund will be made by Panasonic Canada Inc.
| Technics Turntable System (SL-50C) | 2 (two) years parts and labour |
This warranty is given only to the original purchaser, or the person for whom it was purchased as a gift, of a Technics brand product mentioned above sold by an authorized Panasonic dealer in Canada and purchased and used in Canada, which product was not sold "as is", and which product was delivered to you in new condition in the original packaging.
IN ORDER TO BE ELIGIBLE TO RECEIVE WARRANTY SERVICE HEREUNDER, A PURCHASE RECEIPT OR OTHER PROOF OF DATE OF ORIGINAL PURCHASE, SHOWING AMOUNT PAID AND PLACE OF PURCHASE IS REQUIRED
LIMITATIONS AND EXCLUSIONS
This warranty ONLY COVERS failures due to defects in materials or workmanship, and DOES NOT COVER normal wear and tear or cosmetic damage. The warranty ALSO DOES NOT COVER damages which occurred in shipment, or failures which are caused by products not supplied by Panasonic Canada Inc., or failures which result from accidents, misuse, abuse, neglect, mishandling, misapplication, alteration, faulty installation, set-up adjustments, misadjustment of consumer controls, improper maintenance, power line surge, lightning damage, modification, introduction of sand, humidity or liquids, commercial use such as hotel, office, restaurant, or other business or rental use of the product, or service by anyone other than an Authorized Servicer, or damage that is attributable to acts of God.
Dry cell batteries are also excluded from coverage under this warranty.
THIS EXPRESS, LIMITED WARRANTY IS IN LIEU OF ALL OTHER WARRANTIES, EXPRESS OR IMPLIED, INCLUDING ANY IMPLIED WARRANTIES OF MERCHANTABILITY AND FITNESS FOR A PARTICULAR PURPOSE. IN NO EVENT WILL PANASONIC CANADA INC. BE LIABLE FOR ANY SPECIAL, INDIRECT OR CONSEQUENTIAL DAMAGES RESULTING FROM THE USE OF THIS PRODUCT OR ARISING OUT OF ANY BREACH OF ANY EXPRESS OR IMPLIED WARRANTY. (As examples, this warranty excludes damages for lost time, travel to and from the Authorized Servicer, loss of or damage to media or images, data or other memory or recorded content. This list of items is not exhaustive, but for illustration only.)
In certain instances, some jurisdictions do not allow the exclusion or limitation of incidental or consequential damages, or the exclusion of implied warranties, so the above limitations and exclusions may not be applicable. This warranty gives you specific legal rights and you may have other rights which vary depending on your province or territory.
WARRANTY SERVICE
For product operation, repairs and information assistance, please visit our Support page on:
https://help.na.panasonic.com/
IF YOU SHIP THE PRODUCT TO A SERVICENTRE
Carefully pack and send prepaid, adequately insured and preferably in the original carton. Include details of the defect claimed, and proof of date of original purchase.
Introduction
Raccordements et installation 12
text_image
ContrepoidsNota
natural_image
Illustration of two hands performing a finger manipulation on a plate with an upward arrow (no text or symbols)Raccordements et installation
Raccordements et installation (suite)
Installation
natural_image
Diagram showing a hand operating a device with an inset close-up of a mechanical component (no text or symbols)Attention
natural_image
Illustration of a hand turning a mechanical component with a tool (no text or symbols visible)Lecture de disques
Préparatifs
text_image
I 78 S STOP 33 45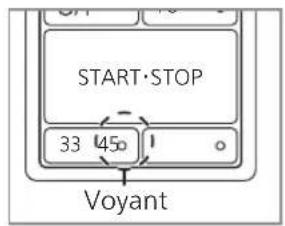
text_image
START·STOP 33 45° 1 Voyant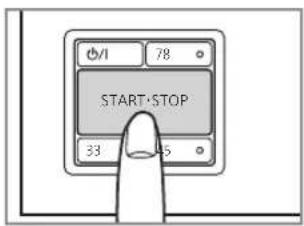
text_image
0/1 78 START·STOP 33 45Attention
natural_image
Line drawing of a hand using a tool to adjust or install a mechanical component (no text or symbols visible)La lecture commence.
text_image
I O I × I ×Panasonic Canada Inc.
5770, Ambler Drive, Mississauga (Ontario) L4W 2T3
PRODUIT TECHNICS - GARANTIE LIMITÉE
Panasonic Corporation of North America
Two Riverfront Plaza, Newark, NJ 07102-5490
https://shop.panasonic.com
Panasonic Canada Inc.
5770 Ambler Drive,
Mississauga, Ontario,
L4W 2T3
https://www.panasonic.com