
SH-EX1200S - Blender TECHNICS - Free user manual and instructions
Find the device manual for free SH-EX1200S TECHNICS in PDF.


| Product Type | Blender |
| Brand | Technics |
| Model | SH-EX1200S |
| Dimensions (H x W x D) | 40 cm x 20 cm x 20 cm |
| Weight | 3.5 kg |
| Power Consumption | 700 W |
| Voltage | 220-240 V, 50/60 Hz |
| Capacity (Jar) | 1.5 L |
| Speed Settings | 5 speeds + pulse |
| Jar Material | Glass |
| Blade Material | Stainless steel |
| Dishwasher Safe Parts | Jar, lid, and blade assembly |
| Safety Lock | Yes, motor stops when jar is removed |
| Overload Protection | Yes, auto shut-off |
| Non-Slip Feet | Yes |
| Cord Length | 1.2 m |
| Functions | Blending, pureeing, crushing ice, making smoothies |
| Cleaning | Fill jar with warm water and a drop of soap, run for 30 seconds |
| Spare Parts Availability | Jar, lid, blade assembly, gasket |
| Repairability Index | 7.5 / 10 |
Frequently Asked Questions - SH-EX1200S TECHNICS
User questions about SH-EX1200S TECHNICS
0 question about this device. Answer the ones you know or ask your own.
Ask a new question about this device
Download the instructions for your Blender in PDF format for free! Find your manual SH-EX1200S - TECHNICS and take your electronic device back in hand. On this page are published all the documents necessary for the use of your device. SH-EX1200S by TECHNICS.
USER MANUAL SH-EX1200S TECHNICS
natural_image
Exterior view of a laboratory instrument with control knobs and a central display (no visible text or symbols)The photograph shows the silver model.
Technics®
Audio Mixer
Operating Instructions
Model No. SH-EX1200
natural_image
Black-and-white illustration of a saxophone, pen, and sheet music with musical notes on the open (no text or symbols)Before connecting, operating or adjusting this product, please read these instructions completely.
Please keep this manual for future reference.
Dear customer
Thank you for purchasing this product.
For optimum performance and safety, please read these instructions carefully.
Contents
Supplied accessories 2
Listening caution 3
IMPORTANT SAFETY INSTRUCTIONS .... 4
Features 5
Connections 6
Names of the parts 8
Block diagram 10
Maintenance 11
Product service 11
Troubleshooting guide 12
Specifications 12
Supplied accessories

Please check and identify the supplied accessories.
Use numbers indicated in parentheses when asking for replacement parts.
(Only for U.S.A.)
To order accessories contact 1-800-332-5368 or web site (http://www.panasonic.com).
□ Sticker .... 1pc.

☐ AC power supply cord (RJA0065-A) 1pc.

Note
The included AC power supply cord is for use with this unit only. Do not use it with other equipment.
User memo:
DATE OF PURCHASE ____
DEALER NAME
DEALER ADDRESS
TELEPHONE NUMBER ____
The model number and serial number of this product can be found on either the back or the bottom of the unit.
Please note them in the space provided below and keep for future reference.
MODEL NUMBER SH-EX1200
SERIAL NUMBER ____
WARNING:
TO REDUCE THE RISK OF FIRE, ELECTRIC SHOCK OR PRODUCT DAMAGE, DO NOT EXPOSE THIS APPARATUS TO RAIN, MOISTURE, DRIPPING OR SPLASHING AND THAT NO OBJECTS FILLED WITH LIQUIDS, SUCH AS VASES, SHALL BE PLACED ON THE APPARATUS.
CAUTION:
TO PREVENT ELECTRIC SHOCK MATCH WIDE BLADE OF PLUG TO WIDE SLOT, FULLY INSERT.
CAUTION!
DO NOT INSTALL, OR PLACE THIS UNIT, IN A BOOKCASE, BUILT-IN CABINET OR IN ANOTHER CONFINED SPACE. ENSURE THE UNIT IS WELL VENTILATED. TO PREVENT RISK OF ELECTRIC SHOCK OR FIRE HAZARD DUE TO OVERHEATING, ENSURE THAT CURTAINS AND ANY OTHER MATERIALS DO NOT OBSTRUCT THE VENTILATION VENTS.
Listening caution


Selecting fine audio equipment such as the unit you've just purchased is only the start of your musical enjoyment. Now it's time to consider how you can maximize the fun and excitement your equipment offers. This manufacturer and the Electronic Industries Association's Consumer Electronics Group want you to get the most out of your equipment by playing it at a safe level. One that lets the sound come through loud and clear without annoying blaring or distortion—and, most importantly, without affecting your sensitive hearing.
We recommend you to avoid prolonged exposure to excessive noise.
Sound can be deceiving. Over time your hearing "comfort level" adapts to higher volumes of sound. So what sounds "normal" can actually be loud and harmful to your hearing.
Guard against this by setting your equipment at a safe level BEFORE your hearing adapts.
To establish a safe level:
- Start your volume control at a low setting.
- Slowly increase the sound until you can hear it comfortably and clearly, and without distortion.
Once you have established a comfortable sound level:
- Set the dial and leave it there.
Taking a minute to do this now will help to prevent hearing damage or loss in the future. After all, we want you listening for a lifetime.
The following mark and symbols are located on the bottom of the unit.

CAUTION
RISK OF ELECTRIC SHOCK DO NOT OPEN

CAUTION: TO REDUCE THE RISK OF ELECTRIC
SHOCK, DO NOT REMOVE SCREWS.
NO USER-SERVICEABLE PARTS INSIDE.
REFER SERVICING TO QUALIFIED SERVICE PERSONNEL.

The lightning flash with arrowhead symbol, within an equilateral triangle, is intended to alert the user to the presence of uninsulated "dangerous voltage" within the product's enclosure that may be of sufficient magnitude to constitute a risk of electric shock to persons.

The exclamation point within an equilateral triangle is intended to alert the user to the presence of important operating and maintenance (servicing) instructions in the literature accompanying the appliance.
IMPORTANT SAFETY INSTRUCTIONS
Read these operating instructions carefully before using the unit. Follow the safety instructions on the unit and the applicable safety instructions listed below. Keep these operating instructions handy for future reference.
1) Read these instructions.
2) Keep these instructions.
3) Heed all warnings.
4) Follow all instructions.
5) Do not use this apparatus near water.
6) Clean only with dry cloth.
7) Do not block any ventilation openings. Install in accordance with the manufacturer's instructions.
8) Do not install near any heat sources such as radiators, heat registers, stoves, or other apparatus (including amplifiers) that produce heat.
9) Do not defeat the safety purpose of the polarized or grounding-type plug. A polarized plug has two blades with one wider than the other. A grounding-type plug has two blades and a third grounding prong. The wide blade or the third prong are provided for your safety. If the provided plug does not fit into your outlet, consult an electrician for replacement of the obsolete outlet.
10) Protect the power cord from being walked on or pinched particularly at plugs, convenience receptacles, and the point where they exit from the apparatus.
11) Only use attachments/accessories specified by the manufacturer.
12) Use only with the cart, stand, tripod, bracket, or table specified by the manufacturer, or sold with the apparatus. When a cart is used, use caution when moving the cart/apparatus combination to avoid injury from tip-over.
13) Unplug this apparatus during lightning storms or when unused for long periods of time.
14) Refer all servicing to qualified service personnel. Servicing is required when the apparatus has been damaged in any way, such as power-supply cord or plug is damaged, liquid has been spilled or objects have fallen into the apparatus, the apparatus has been exposed to rain or moisture, does not operate normally, or has been dropped.

Features
Since 1997, this model has been used as the official mixer at the World DJ Championships, an event sponsored by DMC held annually that brings together professional disc jockeys from all over the world. It is a top-of-the-line audio mixer with the kind of outstanding design, functions, and sound quality that suits the requirements of disc jockeys accustomed to giving scratch-mixing performances in a variety of ways.
Operating ease
- This audio mixer is the same height as the SL-1200 series for operating ease.
- By providing adequate space in the panel layout around the channel faders and cross fader and by eliminating protruding parts, full rein can be given to individual technique which exactly reflects the mood of the moment even when it comes to high-powered scratch-mixing.
Functions
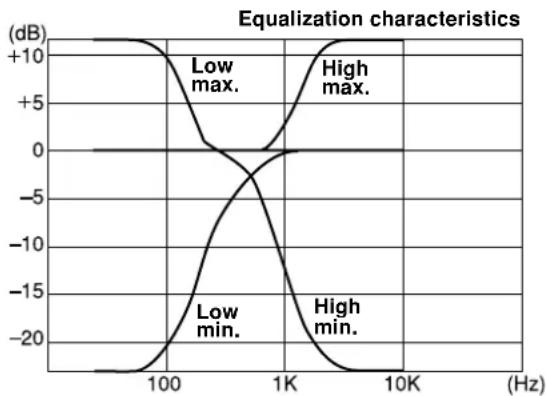
- The model comes with both high and low equalizers so that all manner of sound sources can be accommodated to generate a highly creative style of sound. A wide margin of creativity in producing sound is provided since the attenuation is set to a high -24 dB (12 dB/oct).
line
| Frequency (Hz) | Low min. (dB) | Low max. (dB) | High min. (dB) | High max. (dB) | | -------------- | ------------- | ------------- | -------------- | -------------- | | 100 | -20 | +10 | -20 | 0 | | 1K | -10 | 0 | -10 | 0 | | 10K | 0 | +10 | 0 | 0 |- The model is equipped with [TRIM] controls (±10 dB) which compensate for differences in the source level.
- The life of the cross fader has been dramatically increased by using a photocoupler cross fader circuit.
- By reversing the input channel of the cross fader with the new cross fader switch, you can reverse the operation of the fader.
- By adding a pre-fader monitor, the channels selected by [MONITOR CUE] controls can be monitored regardless of the positions of the faders.
It is also possible to mix and monitor the line-out sources. - The model comes with line-out connectors for monitoring so that sound can be monitored not only with headphones but through the speakers inside the booth.
- The line-out source L and R levels as well as the monitor source levels can be checked out on the 12-point, 3-column level meter.
- An [AUX IN] connector is provided to enable a sampler, keyboard, etc. to become part of the disc jockey scene.
Construction and materials
- New 45 mm stroke faders with excellent durability and smooth operating touch have been developed for this model.
- A spare channel fader has been provided on the bottom panel just in case, and it is designed to enable easy replacement.
- Lever switches are employed for the input selector controls (LINE, PHONO) and, by providing adequate space around them, they can also be used for operations involving transformer scratching.
What is DMC?

Web site (http://www.dmcworld.com)
DMC is the world's largest disc jockey organization whose members include the world's top disc jockeys, musicians and producers. Its objective is to contribute to improvements in the creation of music by its members. With main offices in England (London) and the United States (New York), it has branches in 32 countries throughout the world. Through its many activities which include the publication of "MIX MAG", the world's best-selling dance music trade magazine, DMC has sponsored the World DJ Championships since 1987 with the support of
Technics'. At this venue, disc jockeys from 32 nations around the globe who have won top honors in the Championships held in their respective countries put on their most impressive shows and compete to determine who will be crowned as world champion.

flowchart
graph TD
    A["Stereo connection cable"] --> B["(white) (L) (red) (R)"]
    B --> C["CH E/D or MD player (not included)"]
    C --> D["AC IN ~"]
    D --> E["Monitor amplifier (not included)"]
    E --> F["Speakers"]
    F --> G["Booth monitor"]
    H["CH Burntable (not included)"] --> I["CH A Burntable (not included)"]
    I --> J["CH A MD or CD player (not included)"]
    J --> K["Grounding wire"]
    K --> L["Grounding wire"]
    M["Household AC outlet"] --> N["AC power supply cord (included)"]
    O["Alternative, a keyboard or other unit can be connected."] --> P["Sampler (not included)"]
    Q["Cassette deck (not included)"] --> R["Cassette deck (not included)"]
    S["Amplifier (not included)"] --> T["Amplifier (not included)"]
    U["Speakers"] --> V["Alternatively, a power amplifier, PA system or other unit can be connected."]
    W["(page 9) 25"] --> X["AC IN ~"]
    X --> Y["MONITOR OUT"]
    Y --> Z["PHONO"]
    Z --> AA["PROVINCE LINE"]
    AB["POONO"] --> AC["PROVINCE LINE"]
    AD["AUX IN"] --> AE["PROVINCE LINE"]
    AF["PROVINCE LINE"] --> AG["PROVINCE LINE"]
    AH["PROVINCE LINE"] --> AI["PROVINCE LINE"]
    AJ["PROVINCE LINE"] --> AK["PROVINCE LINE"]
Rear panel connections
This model is connected with the other equipment using stereo connection cables (not included). Before proceeding with the connections, make absolutely sure that the power is turned off to the units concerned.
Connect the power cord after all the other connections have been completed.
For your reference:
A grounding wire need not be connected if the turntable does not have a grounding wire or terminal.
A

B
flowchart
graph TD
    A["Amplifier"] --> B["Turntable 1 Turntable 2"]
    B --> C["CD, MD player 1"]
    B --> D["MD, CD player 2"]
    B --> E["MD, MD player 3"]
    F["Monitor amplifier"] --> G["Turntable 3 Turntable 4"]
    G --> H["MD, CD player 4"]
    G --> I["MONITOR OUT"]
    J["Line OUT"] --> K["AUX IN"]
    J --> L["MONITOR OUT"]
    M["Technics"] --> N["Master mixer Sub mixer"]
    O["Technics"] --> P["Master mixer Sub mixer"]
    Q["Technics"] --> R["Master mixer Sub mixer"]
    S["Technics"] --> T["Master mixer Sub mixer"]

Front panel connections
To listen with the headphones:
- Before connecting headphones, turn down the volume with [MONITOR LEVEL], etc.
- Avoid listening for prolonged periods of time to prevent hearing damage.

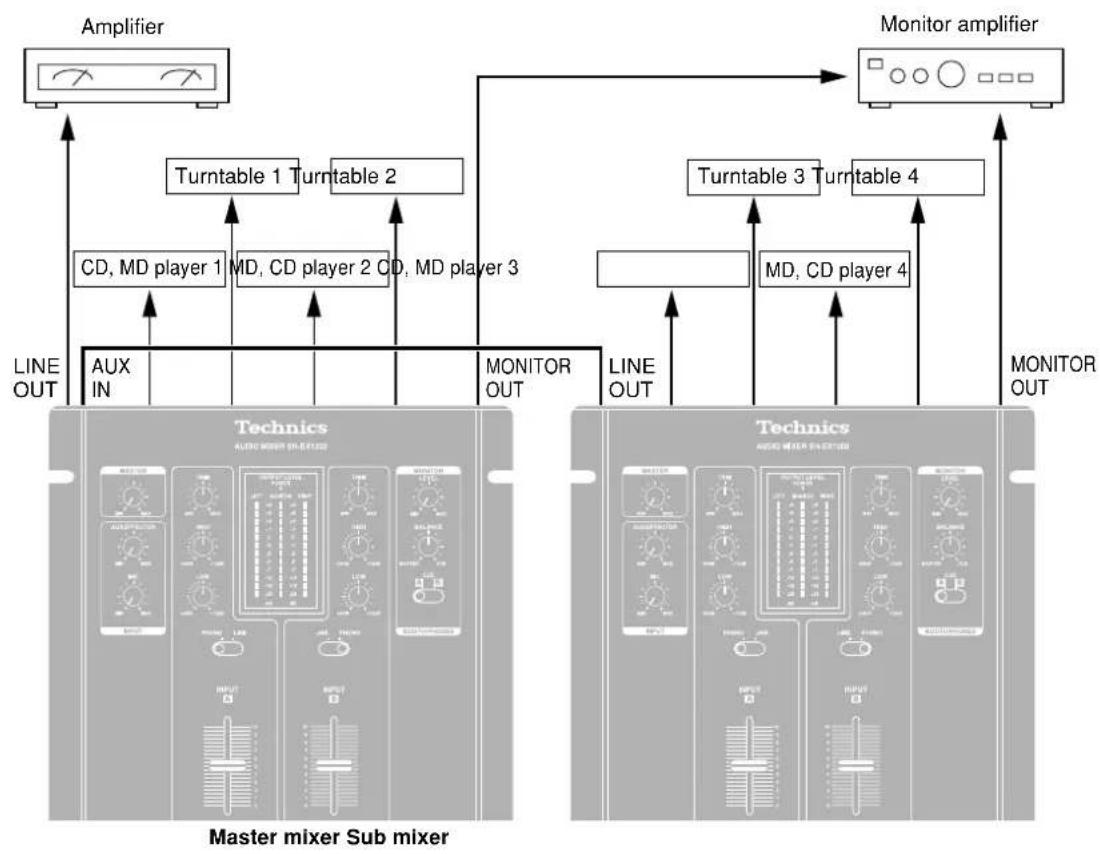
Connecting two audio mixers side by side
Connect the [LINE OUT] connector of the sub mixer to the [AUX IN] connector on the master mixer.
How to align the volume levels of the master and sub mixers:
Adjust [AUX/EFFECTOR] volume on the master mixer and [MASTER] volume on the sub mixer so the levels are identical.
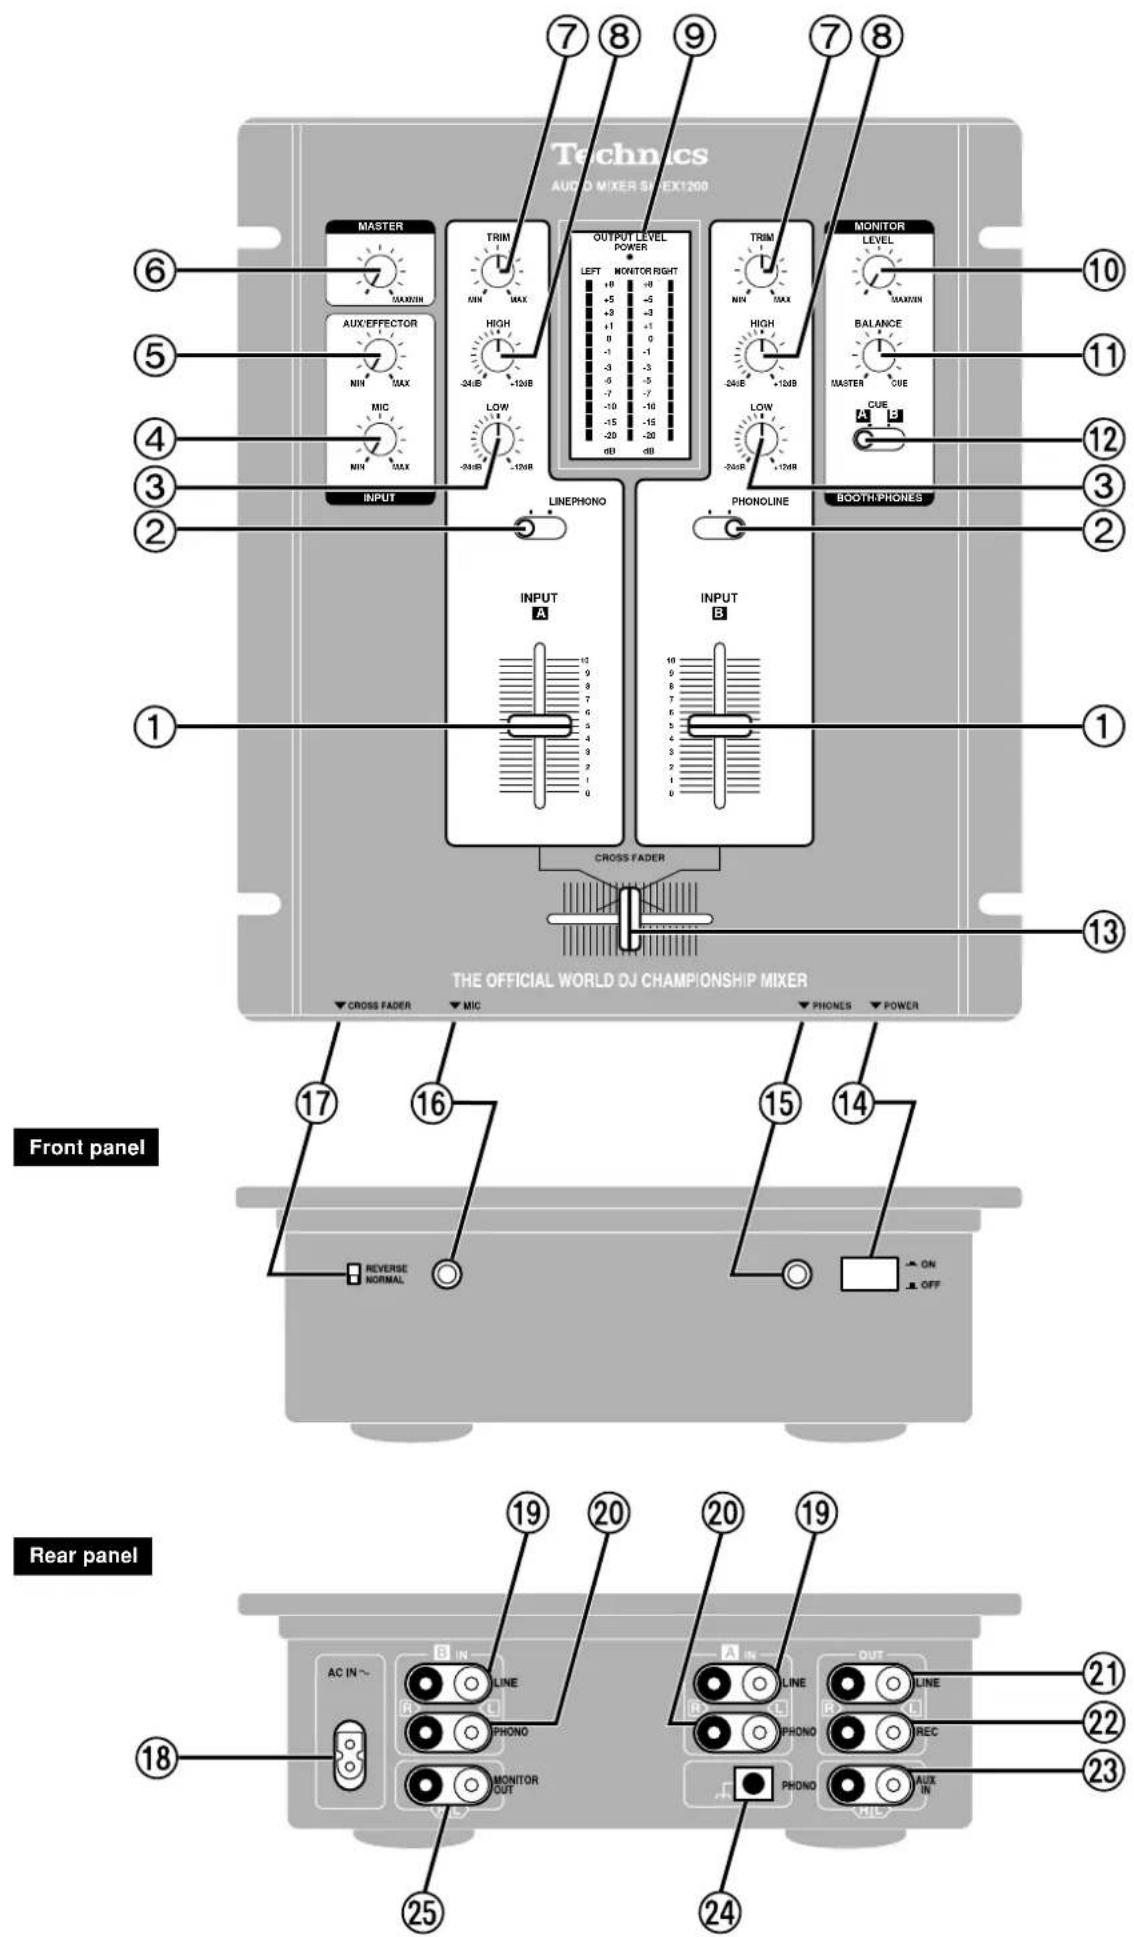
① A ) channel fader (INPUT)
② A) Bput selector (LINE, PHONO)
③ A ) BOW-range level control (LOW)
④ MIC volume level control (MIC)
⑤ AUX/EFFECTOR volume level control (AUX/EFFECTOR)
⑥ MASTER volume level control (MASTER)
⑦ A) Rput sensitivity control (TRIM)
⑧ A ) HIGH-range level control (HIGH)
⑨ OUTPUT LEVEL meter (OUTPUT LEVEL)
This indicates the [LINE OUT] (L and R channels) and [MONITOR OUT] output levels.
⑩ MONITOR volume level control (MONITOR LEVEL)
⑪ MONITOR BALANCE control (MONITOR BALANCE)
This adjusts the balance between the [LINE OUT] source and source selected by the [MONITOR CUE] selector.
⑫ MONITOR source selector (MONITOR CUE)
Channels And be selected as the output for headphones or monitor speakers regardless of the position of the faders.
⑬ CROSS FADER (CROSS FADER)
This adjusts the signals of CH And CH sB that they are both output as mixed signals or output as only CH A CH signals.
⑭ Power button (POWER)
⑮ Headphones jack (PHONES)
⑯ MIC input jack (MIC)
⑰ CROSS FADER switch (CROSS FADER)
This reverses the input signals of CH And CH a3 controlled by the cross fader 13
NORMAL : output as labeled
REVERSE : output reversed
⑱ Power input socket (AC IN ∼)
⑲ A) BNE IN connector (LINE IN)
⑳ A) BHONO IN connector (PHONO IN)
②1 LINE OUT connector (LINE OUT)
②2 REC OUT connector (REC OUT)
②3 AUX IN connector (AUX IN)
⑳ PHONO grounding terminal (PHONO)
Secure the grounding wire of the turntable to [PHONO] to prevent hum and noise.
⑲ MONITOR OUT connector (MONITOR OUT)
Outputs the same signal as the headphones. Connect a monitor amplifier when monitoring from the speakers without headphones as in independent DJ booths. Connect the general output amplifier to [LINE OUT] ②1
[MONITOR BALANCE] control ⑪
Select [CUE] (completely to the right)
- Works as past general DJ mixer monitors.
- Allows the CH (A, B) input selected with [MONITOR CUE] ⑫ to be monitored regardless of the position of the [INPUT] channel faders and [CROSS FADER].
Select [MASTER] (completely to the left)
- Disregards the source selected with [MONITOR CUE] (A, B).
- Allows monitoring of the output from the [LINE OUT] connector 21.
Select the center
- Allows the CH (A) Eput selected with the [MONITOR CUE] control and the output from the [LINE OUT] connector to be mixed and monitored.
Note:
The channel faders are designed for a long service life, but this can be shortened if they are used in a situation that requires rapid movement, such as during Hip-Hop transfer play. The controls may need to be replaced frequently if used this way.
A spare channel fader is provided inside the bottom panel of the unit. Refer to the additional instructions.
Consult your dealer if the cross fader ever needs replacing.
Fader replacement
Use numbers indicated in parentheses when asking for replacement parts.
(Only for U.S.A.)
To order accessories contact 1-800-332-5368 or web site (http://www.panasonic.com).
• Channel fader (RFKVHDX1200B)
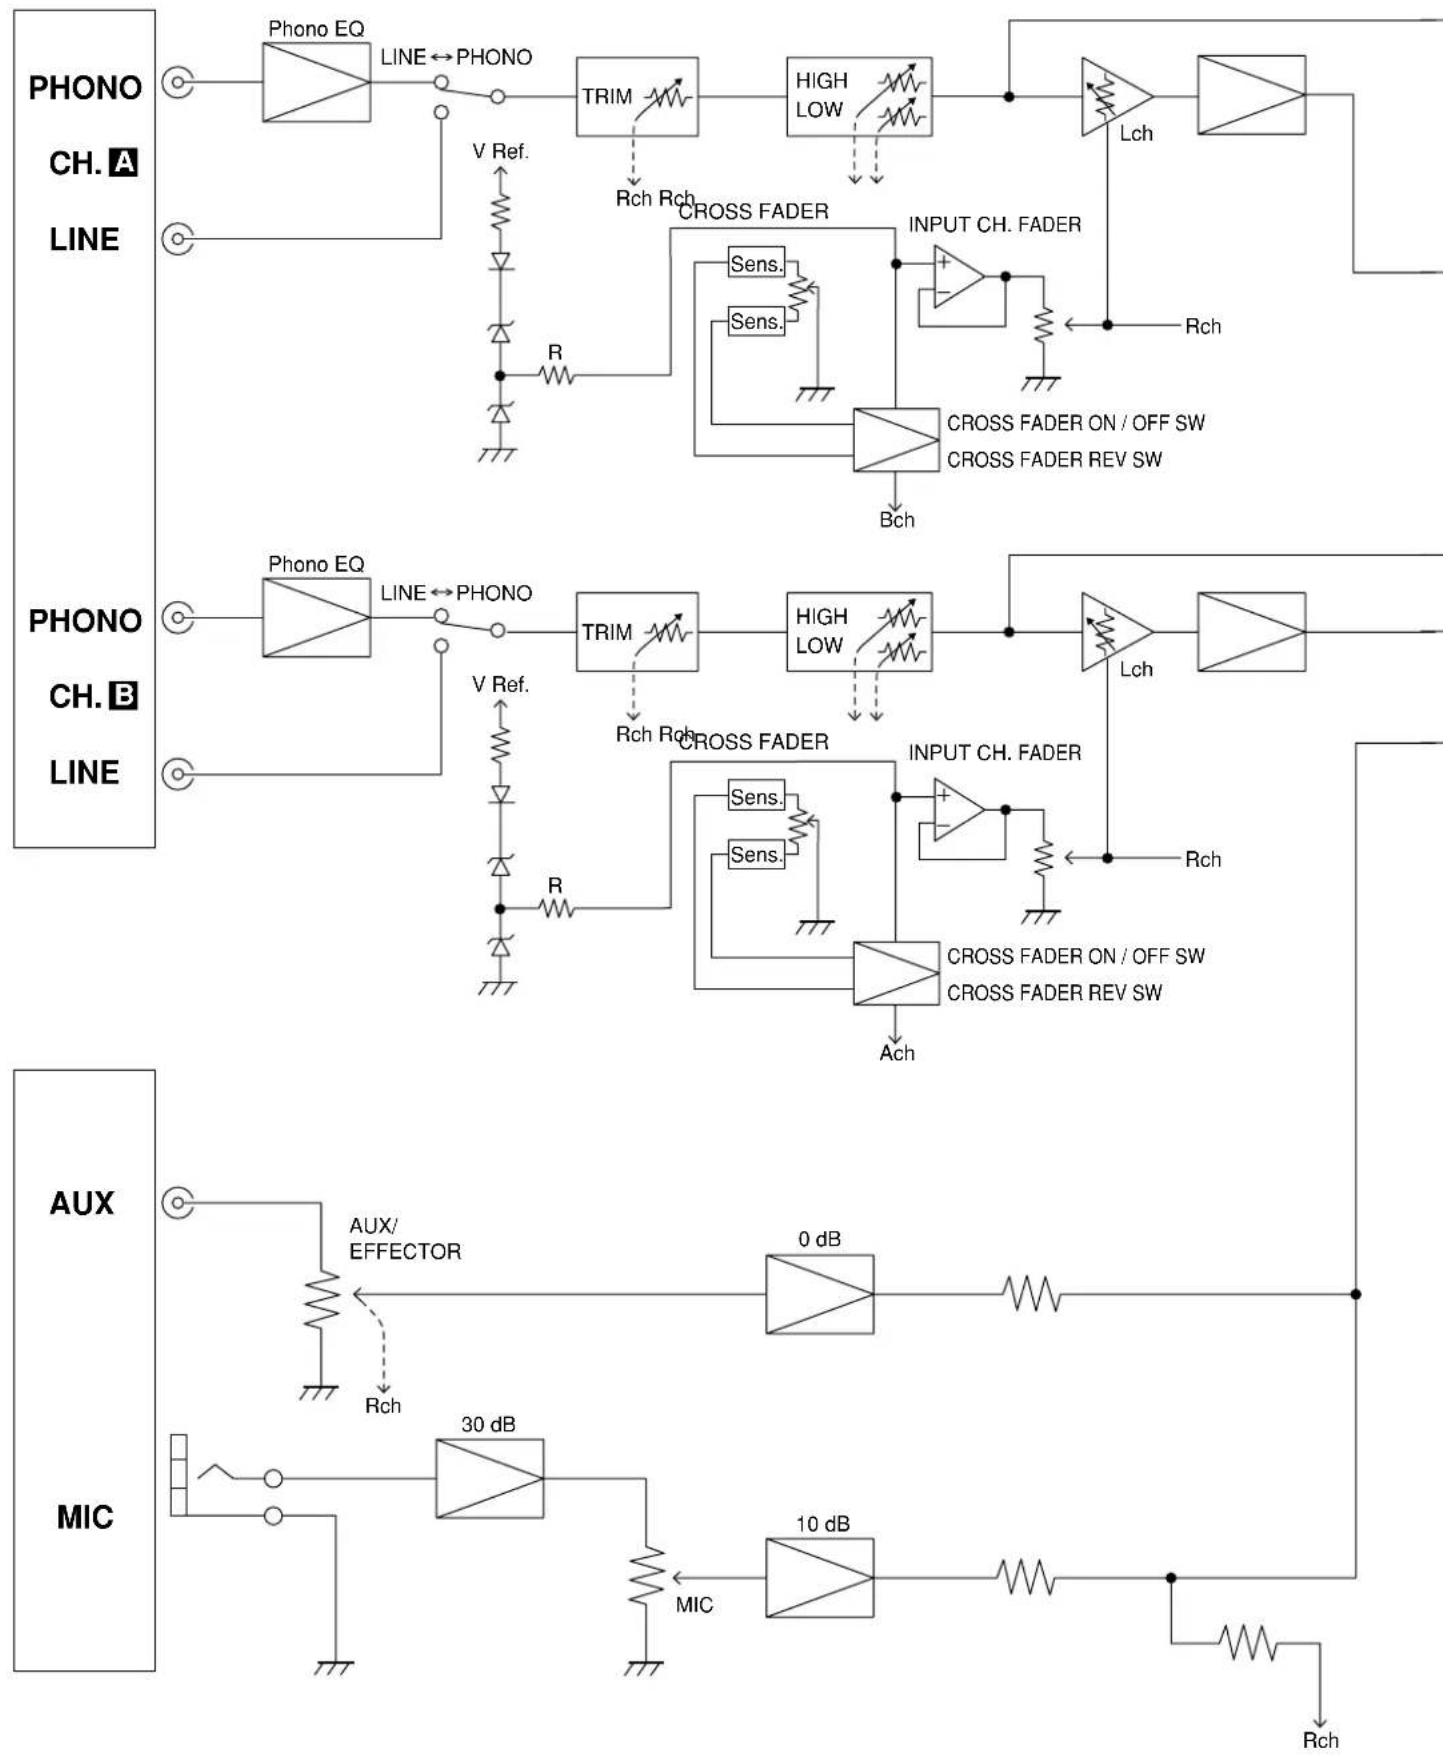
flowchart
graph TD
    subgraph PHONO
        A["Phono EQ"] -->|LINE↔PHONO| B["TRIM"]
        B --> C["HIGH LOW"]
        C --> D["Lch"]
        E["V Ref."] --> F["Rch"]
        G["R"] --> H["CROSS FADER"]
        H --> I["Sens."]
        H --> J["Sens."]
        K["Rch"] --> L["CROSS FADER ON / OFF SW"]
        L --> M["CROSS FADER REV SW"]
        N["Bch"] --> O["INPUT CH. FADER"]
        P["Rch"] --> Q["CROSS FADER ON / OFF SW"]
        Q --> R["CROSS FADER REV SW"]
    end

    subgraph CH. A
        S["PHONO"] --> T["Phono EQ"]
        T --> U["TRIM"]
        U --> V["HIGH LOW"]
        V --> W["Lch"]
        X["V Ref."] --> Y["Rch"]
        Z["R"] --> AA["CROSS FADER"]
        AA --> AB["Sens."]
        AA --> AC["Sens."]
        AD["Rch"] --> AE["CROSS FADER ON / OFF SW"]
        AE --> AF["CROSS FADER REV SW"]
        AG["Ach"] --> AH["CROSS FADER ON / OFF SW"]
        AH --> AI["CROSS FADER REV SW"]
    end

    subgraph CH. B
        AJ["PHONO"] --> AK["Phono EQ"]
        AK --> AL["TRIM"]
        AL --> AM["HIGH LOW"]
        AM --> AN["Lch"]
        AO["V Ref."] --> AP["Rch"]
        AQ["R"] --> AR["CROSS FADER"]
        AR --> AS["Sens."]
        AR --> AT["Sens."]
        AU["Rch"] --> AV["CROSS FADER ON / OFF SW"]
        AV --> AW["CROSS FADER REV SW"]
        AX["Aux"] --> AY["AUX/ EFFECTOR"]
        AY --> AZ["0 dB"]
        AZ --> BA["30 dB"]
        BA --> BB["MIC"]
        BC["Rch"] --> BD["10 dB"]
        BE["Rch"] --> BF["10 dB"]
    end

    subgraph AUX
        BG["AUX"] --> BH["AUX/ EFFECTOR"]
        BH --> BI["Rch"]
        BI --> BJ["30 dB"]
        BJ --> BK["MIC"]
        BL["Rch"] --> BM["10 dB"]
        BN["Rch"] --> BO["10 dB"]
    end

flowchart
graph TD
    A["CUE A"] --> B["Rch"]
    B --> C["MONITOR BALANCE"]
    C --> D["0 dB"]
    D --> E["MONITOR"]
    E --> F["PHONES"]
    F --> G["MUTE"]
    G --> H["MUTE OUT"]
    H --> I["REC OUT"]
    H --> J["LINE OUT"]
    C --> K["OUTPUT LEVEL METER"]
    K --> L["Rch"]
    L --> M["0 dB"]
    M --> N["MASTER"]
    N --> O["Rch"]
    O --> P["12 dB"]
    P --> Q["MUTE"]
    Q --> R["LINE OUT"]
Maintenance
To clean this unit, wipe with a soft, dry cloth.
- Never use alcohol, paint thinner, or benzine to clean this unit.
- Before using chemically treated cloth, read the instructions that came with the cloth carefully.
Product service
- Damage requiring service—The unit should be serviced by qualified service personnel if:
(a) The AC power supply cord or AC adaptor has been damaged; or
(b) Objects or liquids have gotten into the unit; or
(c) The unit has been exposed to rain; or
(d) The unit does not operate normally or exhibits a marked change in performance; or
(e) The unit has been dropped, or the cabinet damaged.
- Servicing—Do not attempt to service the unit beyond that described in these operating instructions. Refer all other servicing to authorized servicing personnel.
- Replacement parts—When parts need replacing ensure the servicer uses parts specified by the manufacturer or parts that have the same characteristics as the original parts. Unauthorized substitutes may result in fire, electric shock, or other hazards.
- Safety check—After repairs or service, ask the servicer to perform safety checks to confirm that the unit is in proper working condition.
Product information
For product information or assistance with product operation:
In the U.S.A., contact the Panasonic Customer Call Center at 1-800-211-7262, or e-mail consumerproducts@panasonic.com, or web site (http://www.panasonic.com).
In Canada, contact Panasonic Canada Inc. Customer Care Centre at 905-624-5505, web site (www.panasonic.ca), or an authorized Servicentre closest to you.
Troubleshooting guide
Before requesting service, make the below checks. If you are in doubt about some of the check points, or if the remedies indicated in the chart do not solve the problem:
In the U.S.A., contact the Panasonic Customer Call Center at 1-800-211-7262, or e-mail consumerproducts@panasonic.com, or web site (http://www.panasonic.com).
In Canada, contact the Panasonic Canada Inc. Customer Care Centre at 905-624-5505, web site (www.panasonic.ca), or an authorized Servicentre closest to you.
Reference pages are shown as black circled numbers ⑥.
| Symptom | Checkpoint | Remedial action |
| No power. | Has the power plug been disconnected? | Connect the power plug securely.6 |
| No sound even when power is supplied. | Has the input selector control been set to another source? | Check the source and set the control to the proper position.89 |
| Have any of the units been wrongly connected? | Connect the units properly.67 | |
| Is the master level control or another volume level control at the [MIN] position? | Adjust the volume level controls correctly.89 | |
| Left and right sound is reversed. | Have any of the units been connected with the left and right channels reversed? | Connect the channels correctly.6 |
| Low hum or buzz is heard during play. | Is there a fluorescent light or other electrical appliance or its power cord near any of the connecting cords? | Place the fluorescent light, other appliances or their power cords as far away from the audio mixer as possible. |
| Has the turntable's grounding wire been disconnected? | Connect the grounding wire securely.6 | |
| Fader (slide volume control) fails to move smoothly. | Is one of the faders worn? | Replace with a new fader. (Refer to the additional instructions provided separately.)9 |
Specifications
■ Input sensitivity/input impedance
PHONO 1.5 to 15 mV/47 kΩ
LINE 100 to 1000 mV/more than 10 kΩ
AUX/EFFECTOR 150 mV/47 kΩ
MIC 0.7 mV/1 kΩ
■ Rated output voltage
LINE 1 V/600 Ω
MONITOR 2 V/2.2 kΩ
PHONES 1.5 V/100 Ω
REC 1 V/2.2 kΩ
■ Maximum output voltage
(10 kΩ load excluding headphones)
LINE 8 V
MONITOR 8 V (headphones open)
PHONES 1.5 V/100 Ω
REC 8 V
■ Applicable load impedance
LINE More than 600 Ω
MONITOR More than 10 kΩ
PHONES More than 47 Ω
REC More than 10 kΩ
■ Residual hum and noise Less than 0.2 mV
■ Frequency response
PHONO 30 Hz to 15 kHz (RIAA ±1 dB)
LINE 10 Hz to 70 kHz(-3 dB)
AUX/EFFECTOR 10 Hz to 100 kHz(-3 dB)
MIC 100 Hz to 15 kHz(-3 dB)
■ Tone control characteristics 12 dB/oct
LOW +12 dB, -24 dB(63 Hz)
HIGH +12 dB, -24 dB(10 kHz)
General
Power supply AC 120 V, 60 Hz
Power consumption 16 W
Dimensions(WxHxD) 260 x 102 x 305 mm
(10^15/64'' × 4^1/64'' × 12^1/_64'')
Mass 3.5 k g
(7.5 lb.)
Note
Specifications are subject to change without notice.
Mass and dimensions are approximate.

PRINTED WITH
SOYINK
This manual was printed with soy based ink.
Panasonic Consumer Electronics
Company, Division of Panasonic
Corporation of North America
One Panasonic Way Secaucus,
New Jersey 07094
http://www.panasonic.com
Panasonic Puerto Rico, Inc.
San Gabriel Industrial Park, Carolina,
Puerto Rico 00985
Panasonic Canada Inc.
5770 Ambler Drive
Mississauga, Ontario
L4W 2T3
www.panasonic.ca

- Technics®
- Audio Mixer
- Dear customer
- Contents
- Supplied accessories
- Note
- User memo:
- WARNING:
- CAUTION:
- CAUTION!
- Listening caution
- IMPORTANT SAFETY INSTRUCTIONS
- Features
- Operating ease
- Functions
- Construction and materials
- Rear panel connections
- For your reference:
- Front panel connections
- To listen with the headphones:
- Connecting two audio mixers side by side
- How to align the volume levels of the master and sub mixers:
- [MONITOR BALANCE] control ⑪
- Select [CUE] (completely to the right)
- Select [MASTER] (completely to the left)
- Select the center
- Note:
- Fader replacement
- Maintenance
- Product service
- Product information
- Troubleshooting guide
- Specifications
Brand : TECHNICS
Model : SH-EX1200S
Category : Blender