EFP461P - Oven Essentiel B - Free user manual and instructions
Find the device manual for free EFP461P Essentiel B in PDF.

| Brand | Essentiel B |
| Model | EFP461P |
| Product type | Electric mini oven |
| Capacity | 46 L |
| Power supply | 220-240 V~, 50/60 Hz |
| Power | 1800 W |
| Temperature range | 90 °C – 230 °C |
| Main functions | Traditional cooking, rotisserie, convection, grill with convection, combined |
| Included accessories | Rack, drip tray, drip tray handle, rotisserie, rotisserie handle |
| Door type | Tempered glass door |
| Interior lighting | Yes, replaceable bulb |
| Timer | Yes, mechanical (0-120 min with shut-off) |
| Cleaning and maintenance | Clean with a damp sponge; rack and drip tray dishwasher safe; do not immerse the oven |
| Safety | Insulated handle, automatic timer shut-off, do not use abrasive substances |
| Standby consumption | 0 W |
| Warranty | Legal warranty, excluding normal wear and incorrect use |
| Repairability | User-replaceable bulb; other repairs by a professional |
| Country of origin | Not specified |
Frequently Asked Questions - EFP461P Essentiel B
User questions about EFP461P Essentiel B
0 question about this device. Answer the ones you know or ask your own.
Ask a new question about this device
Download the instructions for your Oven in PDF format for free! Find your manual EFP461P - Essentiel B and take your electronic device back in hand. On this page are published all the documents necessary for the use of your device. EFP461P by Essentiel B.
USER MANUAL EFP461P Essentiel B
natural_image
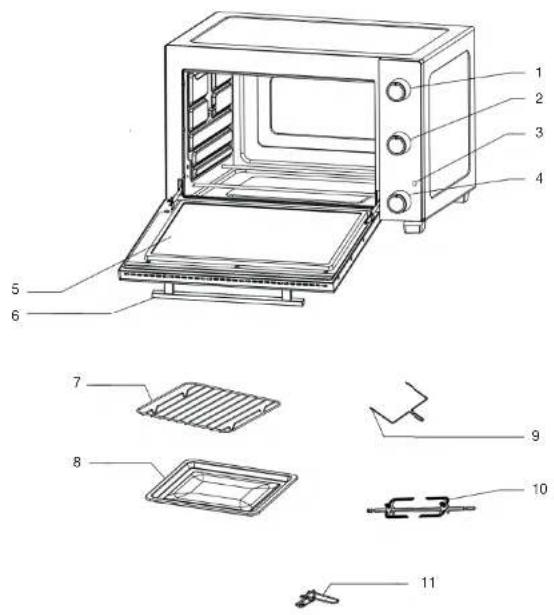
Front view of a black microwave oven with open lid and control knobs (no visible text or symbols)Notice d'utilisation / User guide / Bedienungsanleitung / Gebruiksaanwijzing
| FR EN DE NL | ||||
| 1 | Bouton du thermostat Thermostat Knob Temperatureregler Thermostaatknop | |||
| 2 | Bouton de fonction Function Knob Funktionswahlknopf Functieknop | |||
| 3 | Voyant d'alimentation Power Indicator Betriebsanzeige Aan/vuit-indicator | |||
| 4 | Bouton du minuteur Timer Knob Timer-Knopf Timerknop | |||
| 5 | Porte vitrée Glass Door | Glastür | Glazen deur | |
| 6 | Poignée de la porte | Door Handle | Tügriff | Deurgreep |
| 7 | Grille | Grill Rack | Bratrost | Grillek |
| 8 | Léchefrite | Food Tray | Fettauffangschale | Voedsellade |
| 9 | Poignée du tournebroche | Rotisserie Handle | Drehspießgriff | Braadspitgreep |
| 10 | Toumebroche | Rotisserie Fork | Drehspießgabel | Braadvork |
| 11 | Poignée de la léchefrite | Food Tray Handle | Griff der Fettauffangschale | Voedselladegreep |
You have just purchased an Essentiel b branded product and we thank you for your purchase. We pay particular attention to the RELIABILITY, EASE-OF-USE and DESIGN of our products.
We hope that this mini-oven will give you complete satisfaction.
Getting to know your oven
Feature
- Knob: Temperature Knob, Function Knob and Timer Knob,
- Grill Rack: For toasting, baking, and general cooking in casserole dishes and loading food tray.
Note: Wire rack should be positioned with the indentations pointing down.
- Food Tray: For use in broiling and roasting various foods that contain water or will release water or oil during cooking.
- Food Tray Handle: Allows you to pick up Food Tray and Grill Rack to avoid any scald.
• Rotisserie Forks: Cooks chicken or roast up to 3.5 kg. - Rotisserie Handle: Pulls out the hot roasting spit out of the oven.
- Door Handle: Cool handle to avoid any scald.
- Glass Door: Transparent tempered glass allows you to view the cooking process conveniently.
Before fi rst use
- Remove all packing materials from the appliance.
• Take all the accessories (rack, tray, rotisserie set, food tray handle) out of the appliance. - Wipe the oven and accessories with a damp cloth and then dry them.
- Fully unwind the power cord. Then plug it into an electrical outlet.
- Set the function selector to
- Set the thermostat knob to 230^ .
- Set the timer knob to 15 minutes in order to operate the oven empty (without food or accessory) during this period.
ATTENTION: The oven may emit a slight odor and some smoke when it is used for the first time. This is normal and will stop very quickly. Make sure that the appliance operates in a well ventilated place.
Using your oven
Tips
- For baking and grilling, it is advisable to always preheat the oven to the desired cooking temperature in order to achieve perfect cooking.
- Place the drip tray under the baking rack to avoid fat from dripping onto the heating elements and the bottom of the oven.
- If the food to be cooked is oily or greasy, you can use two sheets of aluminum foil. Place one on the drip tray and cover the food with the other sheet. This helps prevent oil and grease splashing on the oven walls during cooking.
Functions
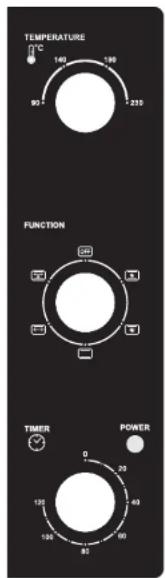
| OFF | Stop oven cooking |
| Traditional cooking | |
| Rotisserie cooking | |
| Cooking with fan assist function | |
| Grilling with fan assist function | |
| Traditional cooking with fan assist function and rotisserie |
Traditional cooking
This function automatically initiates upper & lower heating.
- Place grill rack in lower position.
- Set function selector at □
- Set cooking temperature with thermostat button.
- Set cooking time with timer button.
- Wait until oven reaches temperature set, and then put food in.
- Should cooking be fi nished before end of time set, turn timer button manually to "0".
Rotisserie cooking
This method is ideal for barbecuing chickens, poultry, roast pork and pieces of veal. This method does not require pre-heating of the oven.
- Place piece of meat on skewer, then fix it firmly with the forks (even better results can be achieved by anchoring the meat with cooking string).
- Place food tray at bottom, then insert rotisserie into retainers inside oven.
- Set function selector at
- Set cooking temperature with thermostat button.
- Set cooking time with timer button.
Cooking with fan assist function
This function is ideal combined with using your oven for traditional cooking or keeping warm. Actually fan function circulates heat in oven and thus allows you to grab and rapidly cook red meat, poultry and fish, making sure they are tender, succulent and juicy.
- Place grill rack in lower position.
- Set function selector at *
- Set cooking temperature with thermostat button.
- Set cooking duration with timer button.
- Wait until oven reaches temperature set, then put the food in.
- Should cooking be finished before end of time set, turn timer button manually to "0".
Grilling with fan assist function
This method is ideal for grilling minced beef steaks, chops, sausages... It is equally good for browning food such as scallops.
- Place grill rack in upper position and food tray at bottom.
Tip: We recommend pouring two glasses of water into tray to prevent build-up of smoke and encrusted patches of burnt grease, and to facilitate cleaning.
- Set function selector at
- Set cooking temperature with thermostat button.
- Set cooking duration with timer button.
- Preheat oven for about 5 minutes.
- Place food on grill, then close door. Consider turning food, when it is half-cooked.
- Should cooking be finished before end of time set, turn timer button manually to "0".
Traditional cooking with fan assist function and rotisserie
This method is ideal for barbecuing chickens, poultry, roast pork and pieces of veal with fan assisted. This method does not require pre-heating of the oven.
- Place piece of meat on skewer, then fix it firmly with the forks (even better results can be achieved by anchoring the meat with cooking string).
- Place food tray at bottom, then insert rotisserie into retainers inside oven.
Tip: We recommend pouring two glasses of water into tray to prevent build-up of smoke and encrusted patches of burnt grease, and to facilitate cleaning.
- Set function selector at
- Set cooking temperature with thermostat button.
- Set cooking duration with timer button.
- Should cooking be finished before end of time set, turn timer button manually to "0".
Installing rotisserie in oven
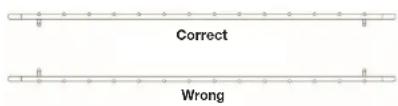
Install rotisserie beginning with side B and fi nishing with side A.
In order to extract rotisserie, begin by extracting side A then side B.

Maintenance and cleaning
- Allow your oven to cool completely before cleaning. Unplug from wall socket.
- Grill rack and food tray can be cleaned in the normal way either by hand or in dishwasher.
• Always use a damp sponge to clean external surfaces. Do not use abrasive substances, because they might damage the coating. Take care no water or detergent leaks into oven through air holes located on its surface. - Never immerse oven in water or any other liquid.
- When cleaning inside, never use corrosive substances (spray detergents) and never scrape surfaces with sharp or pointed objects.
- If appliance is not kept in a good state of cleanliness, its surface may be damaged, which would negatively affect its life and lead to a dangerous situation. Oven should be cleaned regularly and any food residue should be removed.
Replacing the light
Lighting

The bulb is replaceable by the user.
The included light source is not intended for use in other applications.
Technical specification
WE DECLINE ANY LIABILITY FOR DEFECTS DUE TO IMPROPER USE OF THE APPLIANCE AND DAMAGE CAUSED BY SERVICE OR REPAIR MADE BY A THIRD PARTY OR DUE TO INSTALLATION OF UNAUTHORIZED PARTS.
| Product Information for power consumption and maximum time to reach applicable low power mode | |
| Power consumption in off mode 0 W | |
| The maximum time needed to automatically reach the applicable low power mode or condition | 0 min |

All information, designs, drawings and pictures in this document are the property of SOURCING & CREATION. SOURCING & CREATION reserves all rights to its brands, designs and information. Any copy and reproduction through any means shall be deemed and considered as counterfeiting.
Protection of the environment
This symbol attached to the product means that it is an appliance whose disposal is subject to the directive on waste from electrical and electronic equipment (WEEE). This appliance may not in any way be treated as household waste and must be subject to a specific type of removal for this type of
waste. Recycling and recovery systems are available in your area (waste removal) and by distributors. By taking your appliance at its end of life to a recycling facility, you will contribute to environmental conservation and prevent any harm to your health.

Umweltschutz
\* Tested in our laboratories
Warranty valid from the date of purchase (receipt as proof of purchase). This warranty does not cover defects or damage caused by improper set up, incorrect use, or normal wear and tear of this product.
\* In unseren Labors getestet
SERVICE RELATION CLIENTS / Customer Relations Department / Kundenservice / Klantenafdeling
Avenue de la Motte
CS 80137
59811 Lesquin cedex
FABRIQUÉ EN R.P.C. / Made in China / Hergestellt in VR China / Gefabriceerd in VRC.
SOURCING & CREATION
Avenue de la Motte
59810 Lesquin - FRANCE
contact@sc-ub.com