
GP DIGIT B22 - Toaster SABA - Free user manual and instructions
Find the device manual for free GP DIGIT B22 SABA in PDF.

| Product type | Toaster |
| Brand | SABA |
| Model | GP DIGIT B22 |
| Power supply | 220-240 V ~ 50-60 Hz, 730-870 W |
| Number of slots | 2 |
| Browning levels | 8 levels (1 light to 8 dark) |
| Functions | Toasting, defrost, reheat, cancel, pastry rack |
| Display | Digital screen with countdown and browning level |
| Height lever | Yes, adjustable for different bread types |
| Crumb tray | Yes, removable for easy cleaning |
| Exterior material | Plastic and metal |
| Dimensions (approx.) | 30 x 18 x 20 cm (L x W x H) |
| Weight (approx.) | 1.2 kg |
| Cable length | Approximately 80 cm |
| Cleaning | Clean the exterior with a damp cloth; empty the crumb tray regularly; do not immerse |
| Safety | Automatic shut-off, overheating protection, lever does not lock without power |
| Spare parts | Crumb tray, power cord (replacement by a professional) |
| Repairability | Repair only by an authorized service center |
| Warranty | Legal conformity warranty (2 years) |
| General information | German brand founded in 1923, distributed by Conforama France |
Frequently Asked Questions - GP DIGIT B22 SABA
User questions about GP DIGIT B22 SABA
0 question about this device. Answer the ones you know or ask your own.
Ask a new question about this device
Download the instructions for your Toaster in PDF format for free! Find your manual GP DIGIT B22 - SABA and take your electronic device back in hand. On this page are published all the documents necessary for the use of your device. GP DIGIT B22 by SABA.
USER MANUAL GP DIGIT B22 SABA
natural_image
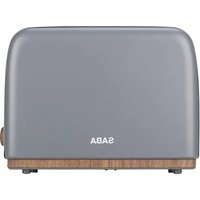
Black SABA 8:88 digital toaster with white LCD display and control buttons (no text or symbols on device body)Thank you for choosing SABA quality. This product has been developed by our team of professional and according to European regulations. In order to get the most out of your new appliance, we recommend that you read this instruction manual carefully and keep it for future reference.
TABLE OF CONTENTS
GB
SAFETY INSTRUCTIONS 15
TECHNICAL SPECIFICATIONS 17
FEATURES OF TOASTER.... 18
DISPLAYS INSTRUCTIONS 19
CARE AND CLEANING 22
DISPOSAL OF OLD ELECTRICAL APPLIANCES 23
SAFETY INSTRUCTIONS
Read these safety instructions carefully before using your appliance and keep them safe for future reference.
- This appliance can be used by children aged from 8 years and above and persons with reduced physical, sensory or mental capabilities or lack of experience and knowledge if they have been given supervision or instruction concerning use of the appliance in a safe way and understand the hazards involved.
• Children shall not play with the appliance. - Cleaning and user maintenance shall not be made by children unless they are older than 8 and supervised.
- Keep the appliance and its cord out of reach of children less than 8 years.
- If the supply cord is damaged, it must be replaced by the manufacturer, its service agent or similarly qualified persons in order to avoid a hazard.
- The bread may burn, therefore do not use the toaster near or below combustible material, such as curtains.
- The appliances are not intended to be operated by means of an external timer or separate remote-control system.
- This appliance is intended to be used in household and similar applications such as:
- staff kitchen areas in shops, offices and other working environments;
- farm houses;
- by clients in hotels, motels and other residential type environments; - bed and breakfast type environments.
• To protect against electrical hazard do not immerse any part of the appliance or cord in water or any other liquid.
- Close supervision is necessary when the appliance is near children.
- Do not leave the appliance unattended when in use.
• Always use the appliance on a dry, level surface.
- Do not use this appliance outdoors.
- Always unplug from the plug socket when not in use and before cleaning.
- Do not operate the appliance if damaged, after an appliance malfunctions or it has been damaged in any manner, return to the customer service department for repair, because special purpose tools are required.
- In the interest of safety, regular periodic close checks should be carried out on the supply cord to ensure no damage is evident. Should there be any signs that the cord is damaged in the slightest degree, the entire appliance should be returned to the customer service department.
- Do not let the cord hang over the edge of a table or counter or touch hot surfaces. Allow the unit to cool before wrapping the cord around base for storage.
- Care must be taken, not to touch any hot surfaces, do not store or cover the appliance until it has fully cooled down.
- Do not place this appliance on or near a hot gas or electric burner, in or where it could touch a heated oven, or a microwave oven.
- Do not use harsh abrasives, caustic cleaners or oven cleaners when cleaning this appliance.
- When using this appliance, allow adequate air space above and on all sides for air circulation. Do not allow this appliance to touch curtains, wall coverings, clothing, dishtowels or other flammable materials during use. CAUTION is required on surfaces where heat may cause a problem - an insulated heat pad is recommended.
- Do not use the toaster without the crumb tray in place. The crumb tray
should be cleaned regularly. Do not allow crumbs to build up in the tray.
- Do not use this appliance with any foodstuff product containing sugar content or with products containing jam or preserves.
- The temperature of accessible surfaces may be high when the appliance is operating.
- Make sure to turn the Bread rack handle in position thoroughly before placing the bread on the bread rack.
- Regarding the instructions for cleaning the surfaces in contact with food and removing breadcrumbs, thanks to refer to the section “CARE AND CLEANING”.
WARNING!!
Never attempt to extract jammed toast, muffins, bagels or any other item with a knife or any other object, as contact with live elements may cause electrocution.
Allow the appliance to cool down, unplug and carefully remove the bread
TECHNICAL SPECIFICATIONS
220-240V\~50-60Hz 730-870W
The product has been designed to meet Commission Regulation with regard to ecodesign requirements for electric power consumption off mode of electrica and electronic householod equipment.
The technical information of each mode:
| Mode Power consumption(Watts) | The period(Minutes) |
| Off 0 0 |
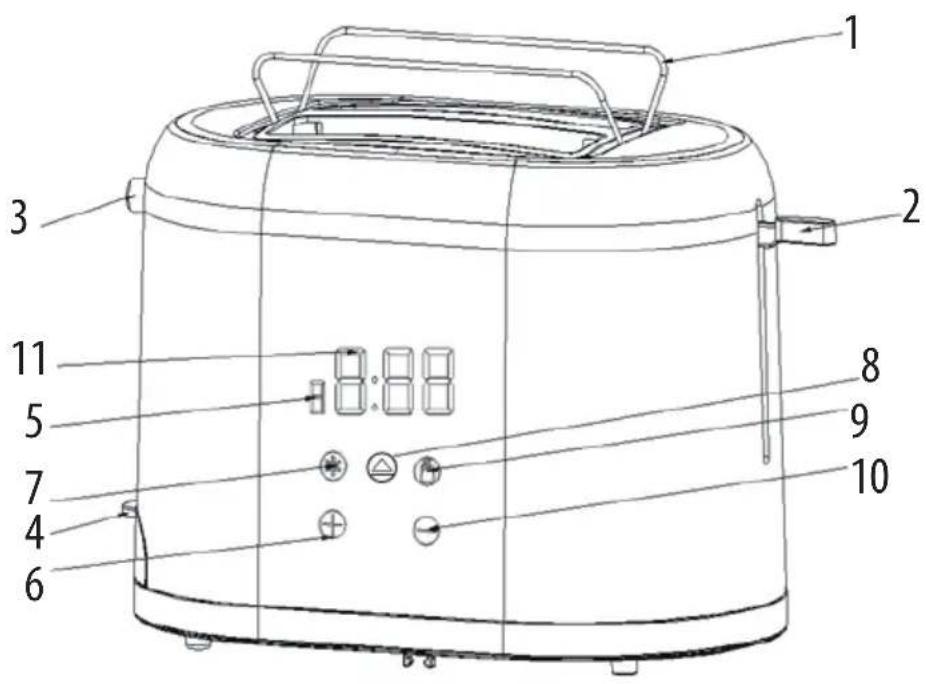
- Bread rack
- Carriage control lever
- Bread rack control
- Pull out crumb tray
- Setting display
- Electronic variable browning control, increase "+
- Defrost button
- Cancel button
- Reheat button
- Electronic variable browning control, decrease “—”
- Time countdown display
DISPLAYS INSTRUCTIONS
- Countdown display bar (11): When the toaster begins to heat, the icon of countdown display bar will fully light up. As working time goes, the Time countdown display will decrease gradually.
- Setting display (5): When the browning control is set, the digital icon will show up. When you press “”, letter R (Reheat) will appear.
- Electronic variable browning control, increase “”(6): To increase browning setting.
- Electronic variable browning control, decrease “”(10): To decrease browning setting.
- Defrost button (7): Set the browning control at your desired setting, press "Defrost button", the indicating lamp above of "defrost" lights up, the toasting time will increase automatically to give the same degree of browning you get with unfrozen bread.
- Cancel button (8): To interrupt toasting process press “the heating elements will turn off. The corresponding indicating lamp above button lights up during toasting.
- Reheat button (9): Press “ ” the indicating lamp of above “ ” lights up. The toast will be given a short burst of heat (regardless of the browning setting), then pop up.
OPERATING TOASTER
Before first use of the product, put the toaster in a properly ventilated room and select the highest browning setting. Let the toaster complete a few toasting cycles without bread in it. This burns off any dust and prevents unpleasant smells.
- Insert the plug into a suitable mains supply socket.
- Place up to two slices of bread, muffins, or bagels into bread slots.
- Press the carriage control lever down until it clicks into place. Toasting cycle will automatically commence. When working normally, only the setting display and time countdown display light up. If you press the reheat or defrost button, then reheat or defrost button indicator lights up. At this time, the desired browning control, reheat or defrost can be set by pressing related buttons. You may press reheat or defrost button once again to cancel reheating or defrosting progress if it has been accidentally activated. In addition, you can also switch to defrost if you chose reheat mode.
Please note: if the toaster is not plugged in and switched on at the power point, the carriage control lever will not click into place.
-
Select the desired browning setting by pressing the mark “”(16) or “”(10), the display will thereupon show the selected number from 1 to 8 (No.1-lightest, No.8-darkest). When using the toaster for the first time we suggest you toast on number 4. Varying types of bread and personal preference may require a different browning setting.
-
As the toasting time goes, countdown bars will disappear one after another. The toaster turns off when the desired toast color is achieved and automatically raises the toast. The toasting process can be stopped
at any time by pressing the cancel button.
- Use the bread rack to heat up rolls or other bread. Place the bread on the top of the rack.
Please note: only heat up one piece at a time. Press the carriage control lever down and select browning setting to toast. Toasting cycle will commence and the toaster turns off when the desired toast color is achieved automatically.
TOASTING FROZEN BREAD: To toast frozen bread, place the bread into the bread slots, press the carriage control lever down until it clicks into place and select the desired Browning Setting, then press the Defrost Button.
REHEATING TOAST: The toaster allows you to reheat toast without additional toasting. To reheat, place toast into bread slots, lower the carriage control lever until it clicks into place and press the Reheat Button.
In the unlikely event that the bread or crumpet becomes jammed, switch the toaster off at the power outlet, remove the plug from the supply socket and carefully ease the bread out of the toaster, ensuring that you do not damage the element.
CARE AND CLEANING
- Always turn the power off, remove the plug and allow the toaster to cool before cleaning.
- To remove any crumbs from the toaster, slide out the crumb tray from under the toaster, empty and replace in the toaster before using it again.
- Wipe the outside of the toaster with a slightly dampened cloth and polish with a soft dry cloth.
- Do not immerse the unit in water.
- To clean the interior, turn the toaster upside down over the sink and shake crumbs free.
The crumb tray should be cleaned regularly. Do not allow breadcrumbs to accumulate in the bottom of the toaster.
This instruction book is also available on our website: www.conforama.fr
DISPOSAL OF OLD ELECTRICAL APPLIANCES
European directive 2012/19/EU on Waste from Electrical and Electronic Equipment (WEEE), requires that used household appliances are not thrown into the normal municipal waste stream. Used appliances must be collected separately in order to optimize the rate of recovery and recycling of materials that compose them, and to reduce the impact on human health and on the environment. The crossed bin symbol is affixed to all the products to remind you of the obligations of separated collection.
GB
CE

SABA is a German brand born in 1923 in the heart of the black forest.
Pioneers in electrical equipment, it continues its search for quality by offering smart products that will accompany you on a daily life.
This product has been manufactured and sold under the responsibility of CONFORAMA FRANCE S.A..
SABA, and the SABA logo are trademarks used under license by CONFORAMA FRANCE S.A. – further information at www.saba-brand.com.
All other products, services, companies, trademarks, trade or product names and logos referenced herein are the property of their respective owners.
CONFORAMA France SA

Brand : SABA
Model : GP DIGIT B22
Category : Toaster