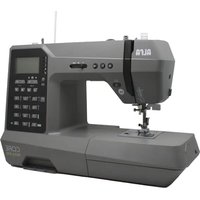
Core – Heavy Duty - Sewing machine ALFA - Free user manual and instructions
Find the device manual for free Core – Heavy Duty ALFA in PDF.


| Product type | Electronic sewing machine |
| Brand | Alfa |
| Model | Core – Heavy Duty |
| Usage | Domestic |
| Power supply | 220-240 V AC, 50/60 Hz (polarized plug) |
| Foot pedal | Dedicated connector with needle up/down function |
| Display | LCD with indicators (needle position, tension, stitch length/width, etc.) |
| Number of stitches | Over 200 stitches (straight, regular, quilting, alphabet) |
| Special stitches | Electronic buttonhole, eyelet, darning, blind hem, smocking, free embroidery |
| Sewing speed | Adjustable by slider or foot pedal (integrated start/stop) |
| Max stitch width | 7.0 mm |
| Max stitch length | 5.0 mm (max.) |
| Needle threader | Automatic built-in |
| Included presser feet | Universal, zipper, blind hem, overcast, quilting, Teflon, electronic buttonhole |
| Included accessories | 3 bobbins, spool pin, felt, screwdriver, quilting guide, assorted needles, extension table |
| Lighting | LED lamp (replacement by professional) |
| Weight | Approximately 8 kg (estimated) |
| Dimensions (L x W x H) | Approximately 45 x 25 x 30 cm (estimated) |
| Maintenance | Regular cleaning of hook and feed dogs with brush |
| Safety | Automatic stop in case of jam, overvoltage protection, use by children >8 years under supervision |
| Repairability | Spare parts available (needles, bobbins, feet); contact Alfa service for complex repairs |
Frequently Asked Questions - Core – Heavy Duty ALFA
User questions about Core – Heavy Duty ALFA
0 question about this device. Answer the ones you know or ask your own.
Ask a new question about this device
Download the instructions for your Sewing machine in PDF format for free! Find your manual Core – Heavy Duty - ALFA and take your electronic device back in hand. On this page are published all the documents necessary for the use of your device. Core – Heavy Duty by ALFA.
USER MANUAL Core – Heavy Duty ALFA
natural_image
Line drawing of a sewing machine with control panel and buttons (no text or symbols)ES
Please, read the instruction manual before using the machine as it contains important operation and safety information. Keep the instruction manual accessible so that you may refer to it at anytime while operating the machine. You can find the complete manual by going to the product page of your machine on our website: www.alfahogar.com/en
FR
Important safety instructions
When using an electrical appliance, basic safety should always be followed, including the following: Read all instructions before using this sewing machine.
DANGER - To reduce the risk of electric shock:
- An appliance should never be left unattended when plugged in.
- Always unplug this appliance from the electric outlet immediately after using and before cleaning.
WARNING - To reduce the risk of burns, fire, electric shock, or injury to persons:
- Read the instruction carefully before you use the machine
- Keep the instructions at a suitable place close to the machine and hand it over if you give the machine to a third party.
- Use the machine only in dry locations.
- Never leave the machine unattended with children or elderly people as they may not be able to estimate the risk.
- This appliance can be used by children aged from 8 years and above and persons with reduced physical, sensory or mental capabilities or lack of experience and knowledge if they have been given supervision or instruction concerning use of the appliance in a safe way and understand the hazards involved.
- Children shall not play with the appliance.
- Cleaning and user maintenance shall not be made by children without supervision.
- Always switch off the machine if you carry out preparation for work (change the needle, feed the yarn through the machine, change the footer, etc.).
- Always unplug the machine if you leave it unattended, to avoid injury by expediently switch on the machine.
- Always unplug the machine if you carry out maintenance (oiling, cleaning).
- Don't use the machine if it's wet or in humid environment.
- Never pull at the cord, always unplug the machine by gripping the plug.
- If the LED lamp is damaged or broken, it must be replaced by the manufacturer or its service agent or a similarly qualified person, in order to avoid a hazard.
- Never place anything on the pedal.
- Never use the machine if the air vents are blocked, keep the air vents of the machine and the foot pedal free from dust, fusel and leftovers.
- The machine must only be used with designated foot controller, in order to avoid a hazard. If the foot controller is damaged or broken, it must be replaced by the manufacturer or its service agent or a similarly qualified person.
- The power cord of the foot controller can not be replaced. If the power cord is damaged the foot controller must be disposed of.
- The sound pressure level at normal operation is smaller than 80dB(A).
- Do not dispose of electrical appliances as unsorted municipal waste, use separate collection facilities.
- Contact your local government for information regarding the collection systems available.
-
If electrical appliances are disposed of in landfills or dumps, hazardous substances can leak into the groundwater and get into the food chain, damaging your health and well-being.
-
When replacing old appliances with new ones, the retailer is legally obligated to take back your old appliance for disposal at least for free of charge.
-
The appliance is not to be used by persons (including children) with reduced physical sensory or mental capabilities, or lack of experience and knowledge, unless they have been given supervision or instruction. (For outside Europe)
-
Children being supervised not to play with the appliance. (For outside Europe)
Save these instructions
This sewing machine is intended for household use only.
Be sure to use the sewing machine in the temperature range from 5°C to 40°C. If the temperature is excessively low, the machine can fail to operate normally. To carry the sewing machine, hold the carrying handle with your hand, and support the sewing machine with the other hand.
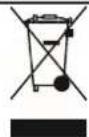
Do not dispose of electrical appliances as unsorted municipal waste, use separate collection facilities. Contact your local government for information regarding the collection systems available.
If electrical appliances are disposed of in landfi lls or dumps, hazardous substances can leak into the groundwater and get into the food chain, damaging your health and well-being. When replacing old appliances with new ones, the retailer is legally obligated to take back your old appliance for disposal at least for free of charge.
Warranty Alfa
This product is backed by a legal guarantee in accordance with current legislation. To exercise your rights, please contact our official technical assistance services.
fr
FIGURAS/FIGURAS/FIGURES/FIGURES....1
Español:
(1) Vista general frontal....29
(1) Front Overview....93
(2) Needle area overview......93
(3) Back Overview....93
13. (4) Standard accessories... 93
(5) Optional accessories......93
(6-8) Connecting machine to power source....93
(9-11) Sewing table....94
(12-13) Two-step presser foot lifter 94
(14-15) Install the extension table94
(16) Adjusting the presser foot pressure....94
(17-26) Winding the bobbin......95
(27-30) Inserting the bobbin......95
(31-45) Threading the upper thread 95
(46-48) Bringing up the bobbin thread....96
(49-52) Replacing the needle.....96
Matching needle/fabric/thread...98
(53-56) Changing the presser foot 99
(57-67) Attaching the straight stitch needle plate....99
(68-69) To raise or drop the feed dogs....100
(70-74) Thread tension....100
(75-76) LCD screen....100
(77-97) Operation buttons......101
(98-101) Selecting stitch....104
(102) Memory function buttons.104
(103-118) Memory program.....104
(119-123) Stitch chart....106
(124-125) Straight-stitch.....106
(126-127) Zigzag stitch....106
(128-131) Starting to sew....106
(132-141) Useful skills.....107
(142-144) Stretch stitch....108
(145-147) Sewing stretch fabrics and elastic tape....109
(148-149) Overcasting stitch.....109
(150-153) Blind Hem....109
(170-172) Bar tack stitch....111
(173-178) Darning stitch....112
(179-180) Eyelet stitch....112
(181-185) Button sewing....113
(186-192) Zipper insertion......113
(193) Satin stitch sewing .....114
(194-197) Smocking....114
(198-205) Free motion darning, embroidery and monogramming ....115
(206-211) Quilting....116
(212) Applique....116
(213-214) Fagoting....116
(215-217) Scallop stitch....117
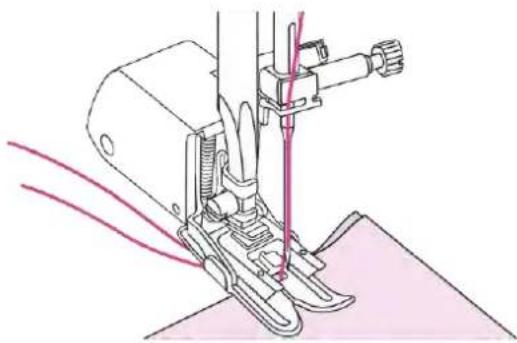
(218-219) Walking foot .....117
(220-224) Twin needle.....117
(225-226) Maintenance....118
(227-231) Warning Function......118
Trouble shooting guide......120
Français:
FIGURAS/FIGURAS/FIGURES/FIGURES
(1)
(2)
(3)
natural_image
Technical line drawings of mechanical components and a table (no text or symbols)(4)
(5)
(6)
natural_image
Hand using a power tool to cut or adjust an electrical outlet (no text or symbols visible)(7)

natural_image
Illustration of a foot stepping on a curved object with a pink directional arrow indicating motion (no text or symbols)(8)
natural_image
Technical line drawing of a sewing machine needle stitching a component, with no visible text or symbols(9)
natural_image
Technical line drawing of a mechanical component with a red arrow indicating a specific feature (no text or symbols present)(10)
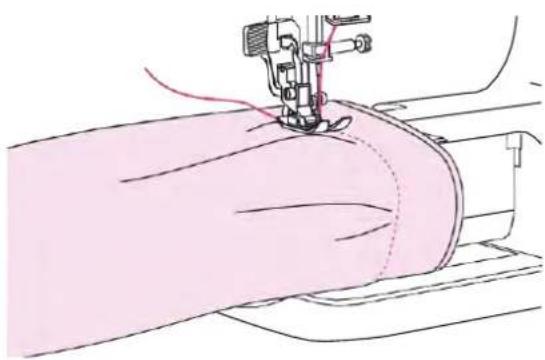
natural_image
Line drawing of a sewing machine needle stitching a fabric piece (no text or symbols)(11)

natural_image
Technical diagram of a sewing machine needle and base mechanism, showing no text or symbols(12)
natural_image
Technical diagram of a sewing machine needle and handle assembly (no text or labels)(13)
natural_image
Illustration of two hands holding a small object with pink arrows indicating movement or force (no text or symbols)(19)
natural_image
Hand holding a mechanical component with directional arrows indicating motion (no text or symbols)(20)
(21)
natural_image
Diagram of a mechanical device with a fan and base, showing motion direction (no text or symbols)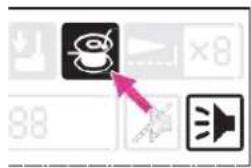
(22)
natural_image
Illustration of a hand holding a tool with directional arrows indicating motion (no text or symbols)
(23)
natural_image
Illustration of a sewing machine needle being sewn into a spool, showing thread and base components (no text or symbols)(24)
natural_image
Illustration of a sewing process showing scissors cutting a pink thread into a spool, with a small component nearby (no text or symbols)(25)
natural_image
Illustration of two spools of thread with circles and crosses, no text or symbols present(26)
(27)
(28)
natural_image
Illustration of hands operating a sewing machine with a red dotted line indicating the seam (no text or symbols present)(29)
(30)
natural_image
Line drawing of a sewing machine with a close-up inset showing the mechanism of cutting (no text or symbols present)(31)
(32)
natural_image
Three-panel diagram showing a mechanical device with a red arrow and a pink circular symbol, alongside a separate schematic of a tool or component (no text or labels)(33)
natural_image
Illustration of a spool and a yarn reel being sewn into a wire (no text or symbols)(34)
natural_image
Illustration of two hands holding a small object with pink arrows indicating direction (no text or symbols)(35)
natural_image
Diagram showing mechanical components with directional arrows, no text or symbols present(36)
natural_image
Diagram of a mechanical component with a curved handle and a highlighted section, showing a downward arrow (no text or symbols present)(37)
natural_image
Diagram of a vertical pipe with directional arrows indicating flow or movement (no text or symbols)(38)

natural_image
Diagram of a mechanical component with motion arrows indicating flow direction (no text or symbols)(39)
natural_image
Diagram of a mechanical or electrical component with directional arrows indicating movement (no text or symbols)(40)
(41)
(42)
(43)
natural_image
Mechanical assembly diagram showing a tool interacting with a component, with an inset magnified view of a pin detail (no text or symbols)(44)
(45)
natural_image
Illustration showing two hand positions: one with a pen tip and red line, the other with a circular button and arrow (no text or symbols)(46)
natural_image
Line drawing of a hand using a sewing machine to adjust the base of a piece (no text or symbols present)(47)
natural_image
Simple line drawing of three parallel elongated shapes with circular cutouts, enclosed in a rounded rectangle (no text or symbols)(51)
natural_image
Line drawing of a hand operating a sewing machine with needle and handle (no text or symbols)(48)
(53)
(49)
(54)
(55)
(56)
(57)

natural_image
Diagram showing a transformation from a simple rectangular structure with a curved top to a simplified rectangular structure with a dot and arrow (no text or symbols)(58)
(59)
natural_image
Technical line drawing of a device casing with internal components and mounting holes (no text or symbols)(60)
(61)
(62)
(63)
(64)

(65)
(66)
(67)
natural_image
Line drawing of a sewing machine needle and base (no text or symbols)(68)

(69)
(70)
(71)
natural_image
Diagram of a layered structure with pink and gray components, showing a wavy boundary and a separate wavy line pattern (no text or symbols)(72)
natural_image
Diagram of a layered structure with a dashed line indicating a seam or connection, shown alongside by a schematic symbol (no text or labels present)(73)
natural_image
Illustration of a layered structure with zigzag patterns and a wavy top layer, accompanied by two pink square symbols below (no text or labels)(74)
(75)
(76)
(77)
(78)
(79)

(80)
(81)
(82)
(83)
(84)
(85)
(86)
(87)
(88)
(89)
(90)
(91)
(92)
(93)
(94)

①

②

③

(100)
(101)
(102)
(103)
(104)
(105)
(106)

(107)
(108)
(109)
 <details> <summary>text_image</summary> MEM:02 18/18 25 7.5 - 5.4 ××2-4 </details> (111)  <details> <summary>text_image</summary> - | + ~ </details> (112)  <details> <summary>text_image</summary> - +](/content/2026/04/743222/images/2afd5b3cafd91b13fa506782e58fb09104f2d0f5267fe2541a20ed59568dfeac.jpg)
(113)
(114)
(115)
(116)
(117)

(118)
(119)
bar
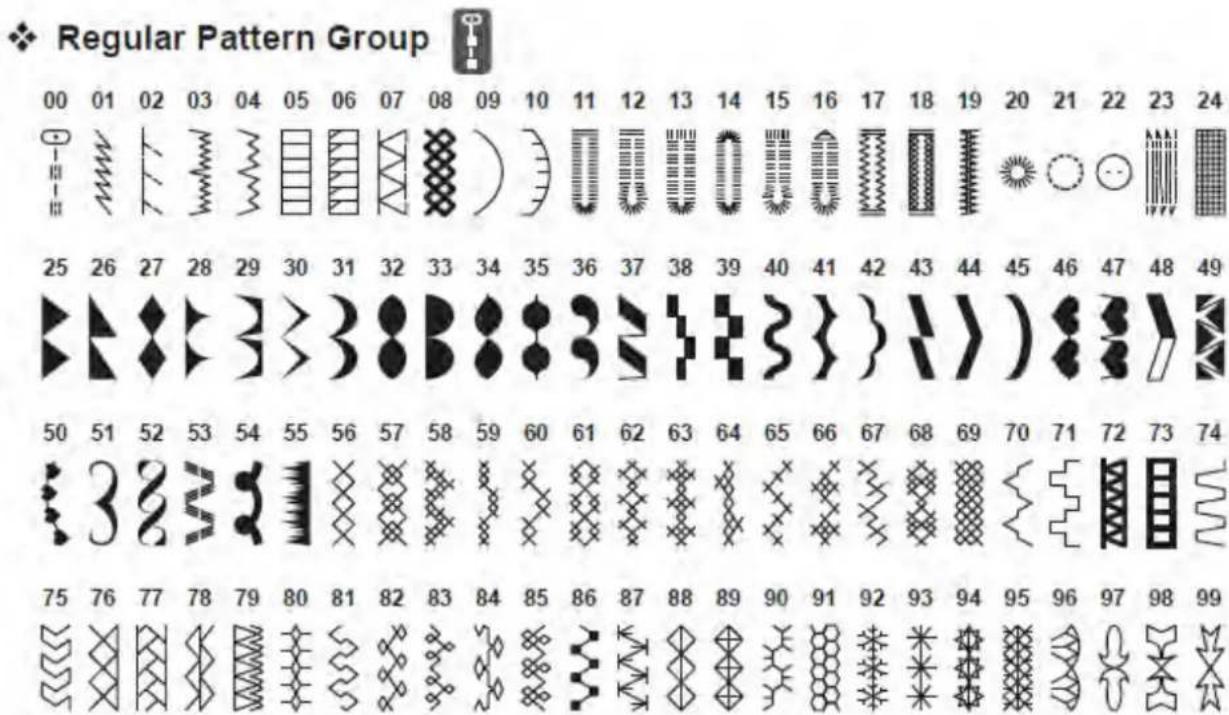
Regular Pattern Group | Position | Pattern 1 | Pattern 2 | Pattern 3 | Pattern 4 | Pattern 5 | Pattern 6 | Pattern 7 | Pattern 8 | Pattern 9 | Pattern 10 | Pattern 11 | Pattern 12 | Pattern 13 | Pattern 14 | Pattern 15 | Pattern 16 | Pattern 17 | Pattern 18 | Pattern 19 | Pattern 20 | Pattern 21 | Pattern 22 | Pattern 23 | Pattern 24 | |---|---|---|---|---|---|---|---|---|---|---|---|---|---|---|---|---|---|---|---|---|---|---|---|---| | 00 | 01 | 02 | 03 | 04 | 05 | 06 | 07 | 08 | 09 | 10 | 11 | 12 | 13 | 14 | 15 | 16 | 17 | 18 | 19 | 20 | 21 | 22 | 23 | 24 | | 25 | 26 | 27 | 28 | 29 | 30 | 31 | 32 | 33 | 34 | 35 | 36 | 37 | 38 | 39 | 40 | 41 | 42 | 43 | 44 | 45 | 46 | 47 | 48 | 49 | | 50 | 51 | 52 | 53 | 54 | 55 | 56 | 57 | 58 | 59 | 60 | 61 | 62 | 63 | 64 | 65 | 66 | 67 | 68 | 69 | 70 | 71 | 72 | 73 | 74 | | 75 | 76 | 77 | 78 | 79 | 80 | 81 | 82 | 83 | 84 | 85 | 86 | 87 | 88 | 89 | 90 | 91 | 92 | 93 | 94 | 95 | 96 | 97 | 98 | 99 | The image displays a grid of stylized symbols (e.g., wavy lines, circles, triangles) with no explicit numerical values but structured data for visual interpretation.(120)

Quilting Pattern Group

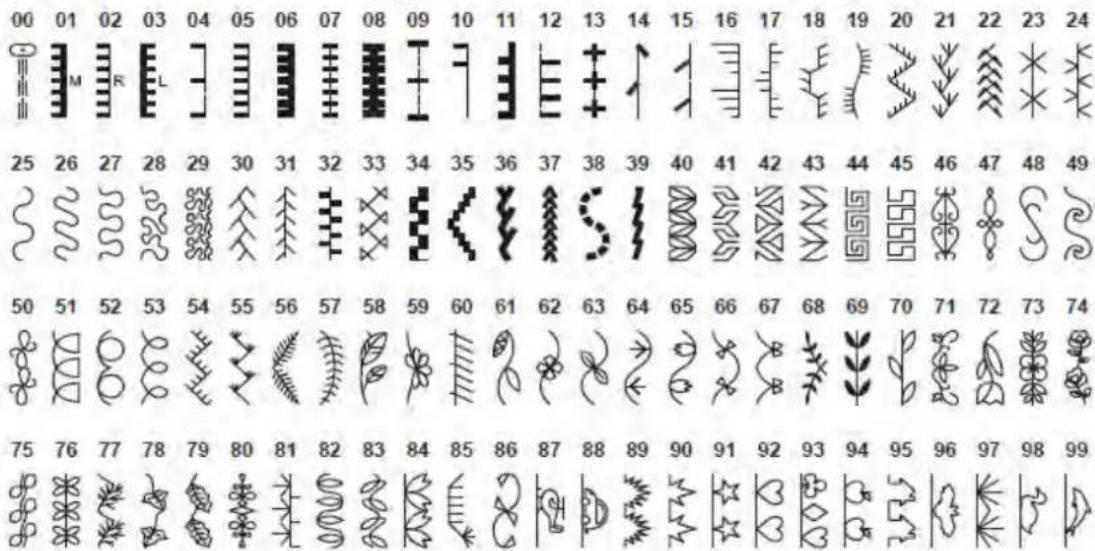
(121)

Alphabet Group-Block style

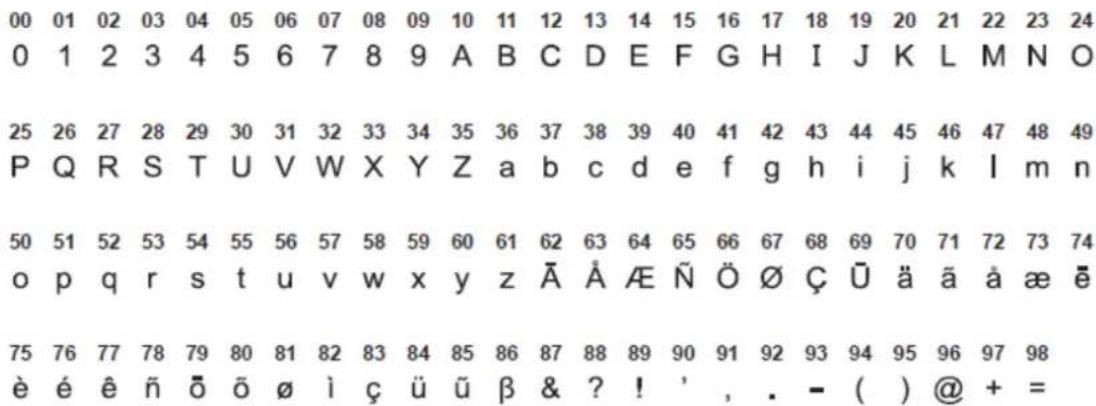
(122)

Alphabet Group-Script style

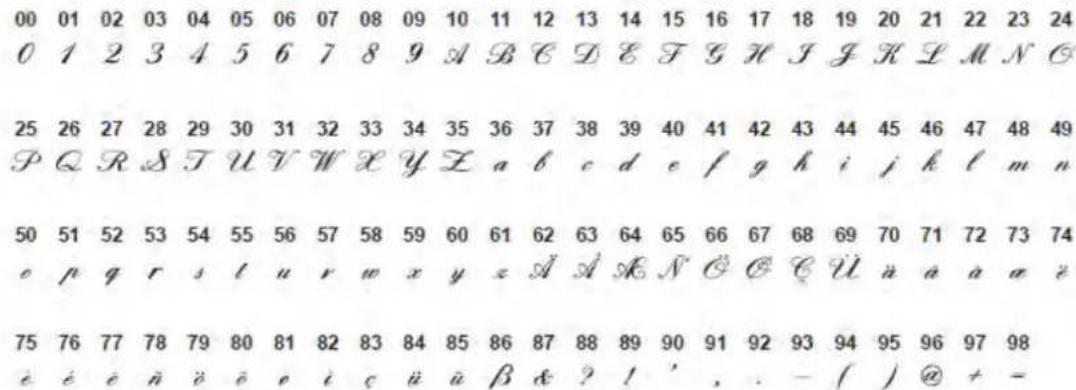
(123)
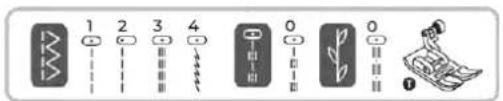
(124)
(125)
(126)
(127)
(128)
natural_image
Illustration of a sewing machine being adjusted for a piece, showing step-by-step assembly (no text or symbols)(129)
natural_image
Line drawing of a sewing machine needle stitching a pink fabric edge (no text or symbols)(134)
natural_image
Illustration of a sewing machine needle stitching with a magnified inset showing the needle being cut (no text or symbols)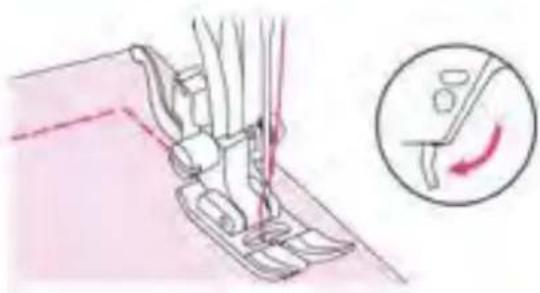
natural_image
Illustration of a sewing machine needle stitching fabric, with a magnified inset showing the needle being cut (no text or symbols)(135)
natural_image
Line drawing of a sewing machine needle stitching fabric (no text or symbols)(136)
natural_image
Technical line drawing of a sewing machine needle and foot, showing stitching details (no text or symbols)(137)
natural_image
Illustration of a sewing machine needle stitching on fabric, showing step-by-step instructions (no text or symbols)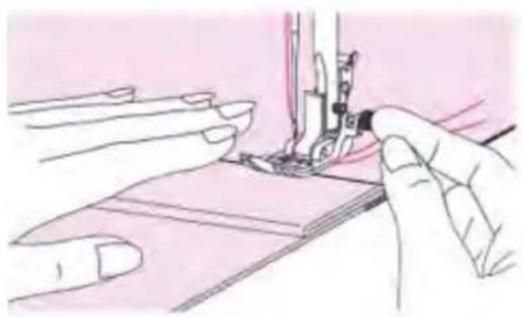
natural_image
Illustration of hands operating a sewing machine needle on fabric (no text or symbols visible)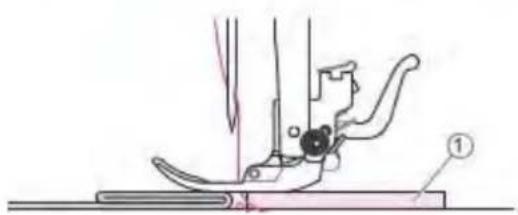
natural_image
Technical line drawing of a sewing machine needle and base (no text or symbols)(138)

A
(139)
(140)
(141)
(142)

(143)
natural_image
Line drawing of a sewing machine needle stitching fabric, showing thread and stitching details (no text or symbols)(146)
natural_image
Diagram showing a coiled spring with dashed red lines indicating crack or force (no text or symbols)(147)
natural_image
Abstract pink wavy line on white background with no text or symbols(144)

(148)
(145)
(149)
(150)
(151)
(152)
(153)
(154)

(155)
natural_image
Simple diagram with a pink button and two vertical lines, no text or symbols present(156)
(157)

(158)
natural_image
Technical illustration of a mechanical device with a highlighted circular component (no text or symbols)(159)
natural_image
Line drawing of a sewing machine needle stitching fabric, with no text or symbols present(165)

natural_image
Illustration of a hand holding a pink pen tip with a small object above, against a pink background (no text or symbols)(166)
(167)
(168)
(169)
natural_image
Technical line drawing of a mechanical device with an inset showing a shaft and lever mechanism (no text or symbols)(170)
natural_image
Technical illustration of a mechanical assembly with labeled parts (no readable text or symbols)(171)
natural_image
Simple line drawing of a U-shaped tube with dashed internal lines, no text or symbols present(172)
natural_image
Diagram showing a curved surface with a diagonal line and a numbered label (1), no readable text or symbols present.(173)
(174)
natural_image
Technical line drawing of a mechanical device with no visible text or symbols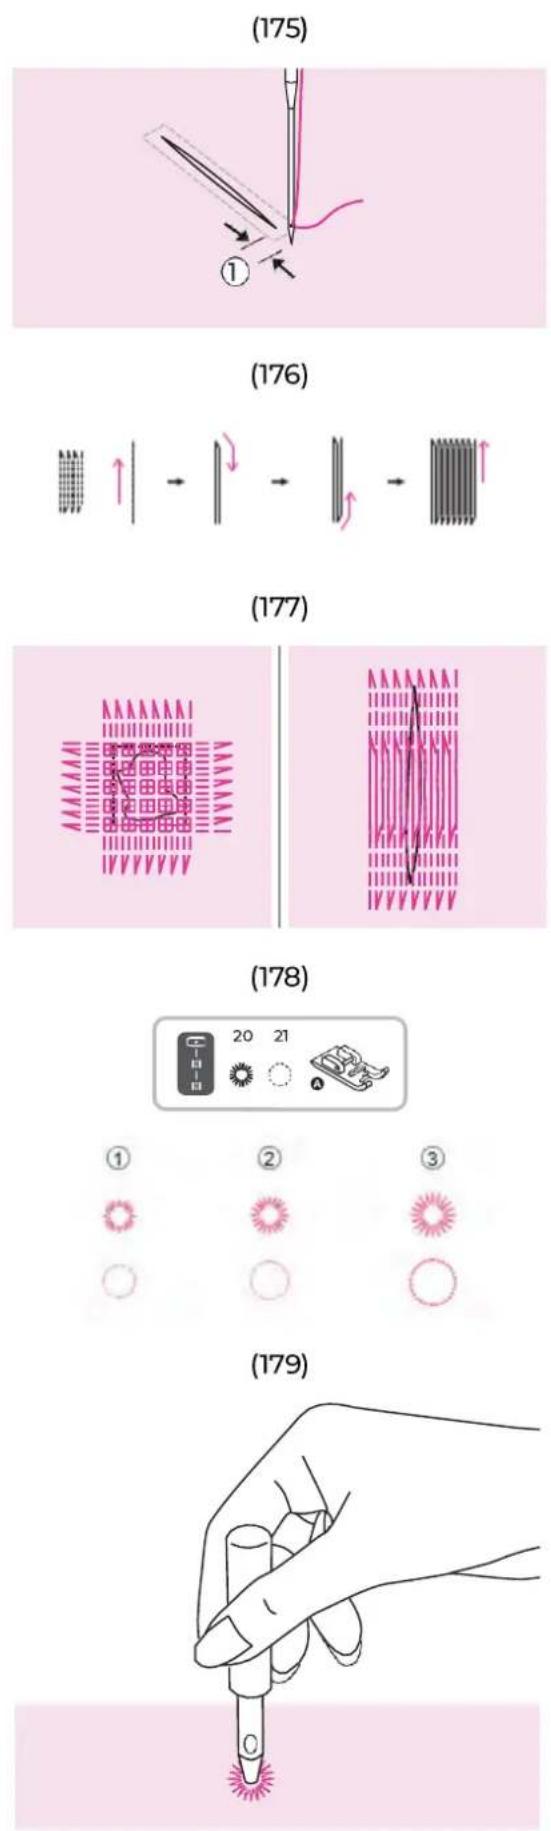
(180)
natural_image
Pure diagram of a mechanical or electrical component with no text, numbers, or symbols(181)
natural_image
Technical line drawing of a mechanical assembly with a needle inserted (no text or symbols)(182)
natural_image
Cross-sectional diagram of a mechanical component with no visible text or symbols(183)

chemical
Two circular molecular diagrams showing different types of atoms or molecules, likely representing chemical structures or ions.(184)
natural_image
Pure diagram of a mechanical or electrical component with no text, numbers, or symbols(185)
(190)
natural_image
Technical diagram showing a mechanical assembly with a spring-loaded component and a side-view cross-section (no text or labels)(191)
(192)
natural_image
Line drawing of a sewing machine needle stitching fabric, with no text or symbols present(193)
(194)
natural_image
Illustration of a hand holding a pink fabric with parallel lines and a numbered label (11) at the bottom, no text or symbols present.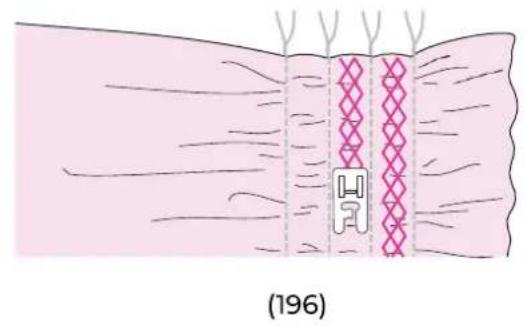
natural_image
Diagram of a hair follicle with visible mesh and stitching details, labeled (196) at bottom (no text or symbols within the diagram itself)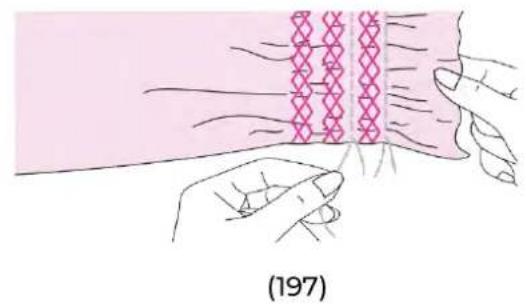
natural_image
Illustration of hands manipulating a knitted fabric with a red and pink patterned seam (no text or symbols)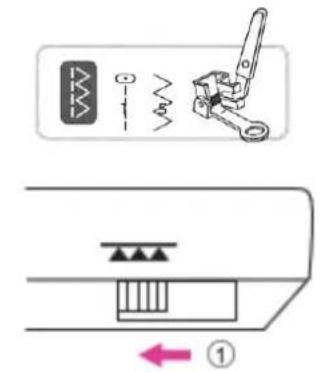
natural_image
Illustration of hands operating a sewing machine on a circular base, with no visible text or symbols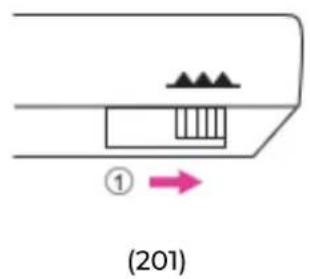
natural_image
Illustration of a sewing machine needle stitching a circular arc, with no text or symbols present.
natural_image
Diagram of a sewing machine needle stitching a circular ring pattern, labeled (203), with no text or symbols on the diagram itself.
natural_image
Illustration of a sewing machine stitching a pink flower shape on a circular base, labeled (204) at bottom (no text or symbols on the diagram itself)
(205)
natural_image
Pure technical line drawings of mechanical components without any text or symbols
natural_image
Technical line drawing of a sewing machine tool with no visible text or symbols(206)
natural_image
Line drawing of a sewing machine needle stitching on a pink fabric background (no text or symbols)(207)
(208)

natural_image
Two-step diagram showing a garment patterning process: before and after cutting, with no text or symbols present.(209)
natural_image
Line drawing of a sewing machine needle stitching fabric, no text or symbols present(210)

natural_image
Technical illustration of a sewing machine needle and foot assembly (no text or symbols)(211)
natural_image
Illustration of a pink duck with a numbered point and a hand holding a small object, alongside a pink outline of the duck (no text or symbols)(212)
(213)
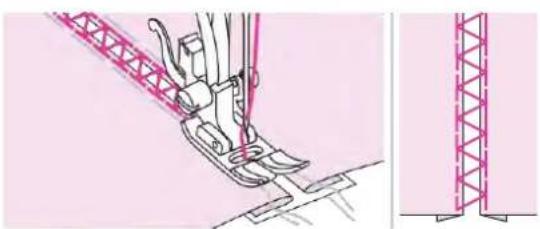
natural_image
Technical illustration of a sewing machine needle stitching on fabric, with close-up view of the structure (no text or symbols)(214)
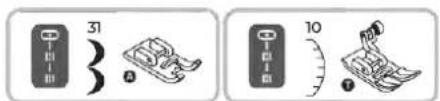
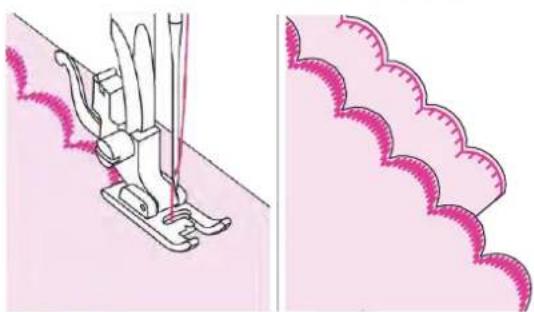
natural_image
Illustration of a sewing machine needle stitching on fabric, with a close-up of the patterned fabric edge (no text or symbols)(215)
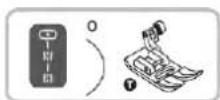
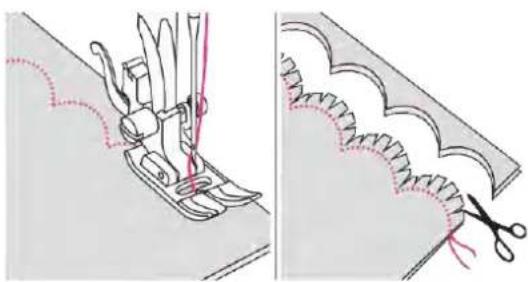
natural_image
Two-step illustration showing sewing process: one with needle stitching on fabric, the other with scissors cutting through a patterned edge (no text or symbols)(216)
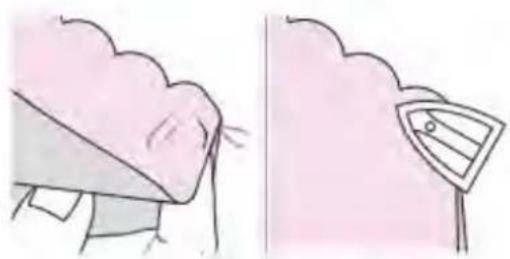
natural_image
Illustration showing a person's face being held by a cloud-shaped object, with no text or symbols present.(217)
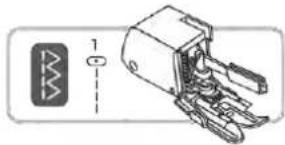
natural_image
Diagram of an electronic component with a switch and multi-pin connector (no text or symbols)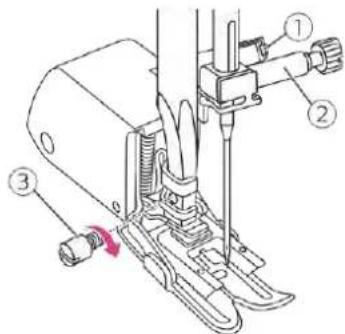
(218)
natural_image
Line drawing of a sewing machine needle stitching fabric (no text or symbols)(219)
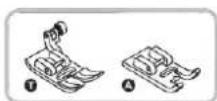
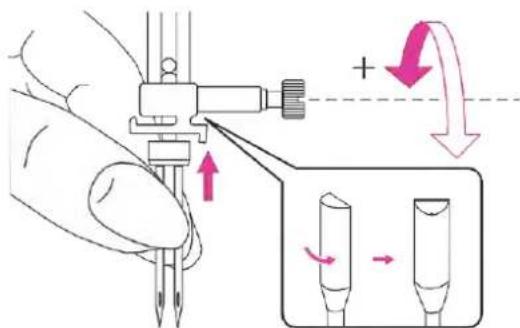
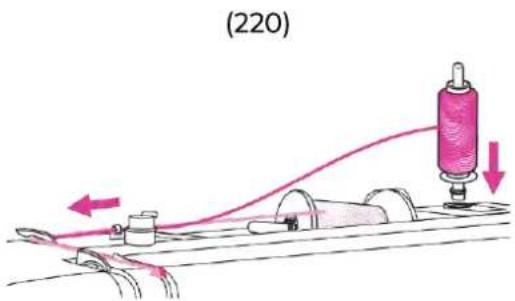
(221)
(222)
(223)
natural_image
Abstract pattern of pink zigzag and wavy lines on white background, no text or symbols present(224)
(225)
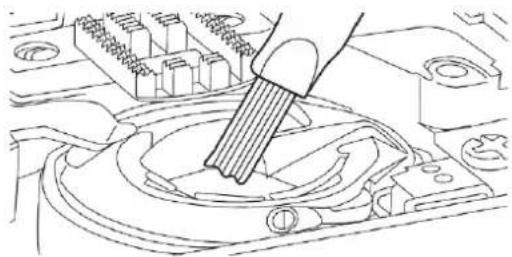
natural_image
Technical line drawing of a mechanical assembly with a tool interacting with a component (no text or symbols visible)(226)

(227)
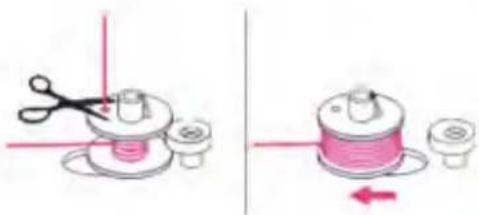
natural_image
Illustration showing a sewing process: cutting a spool with scissors and moving a thread into a spool (no text or symbols)(228)
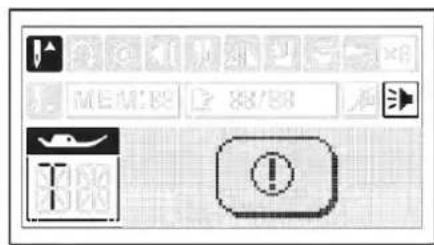
(229)
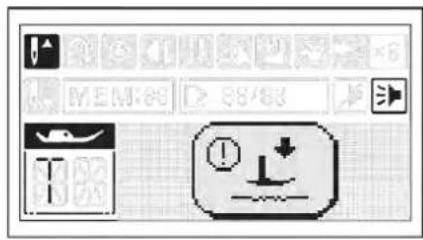
(230)
(231)
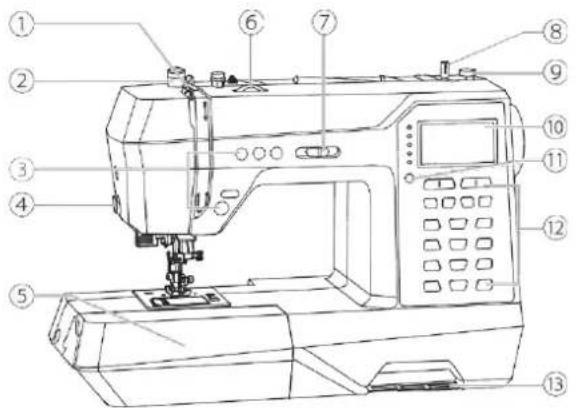
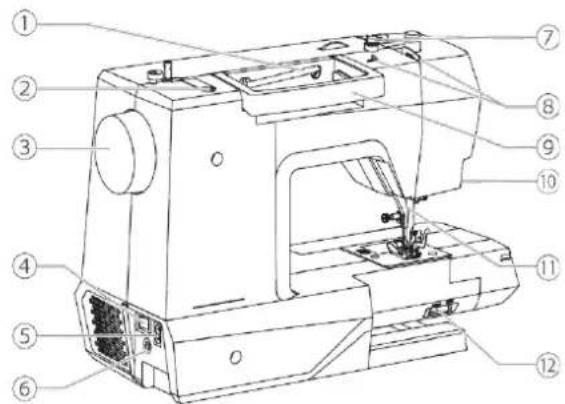
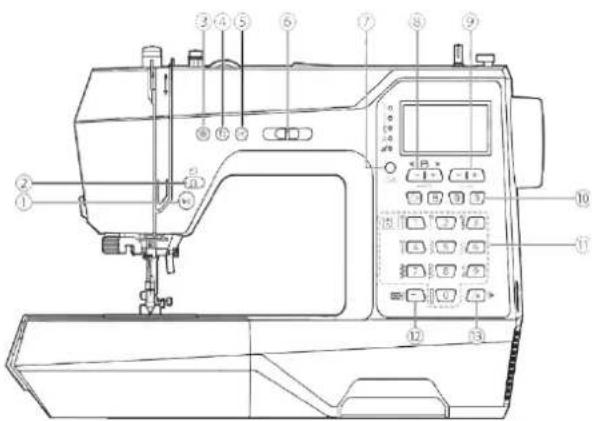
(1) Vista general frontal
① Pequeno: 5,0 mm
② Médio: 6,0 mm
③ Grande: 7,0 mm
- Take-up lever
- Presser foot pressure dial
- Operation buttons
- Thread cutter
- Sewing table and accessory box
- Tension dial
- Speed adjustment slider
- Bobbin winder spindle
- Bobbin winder stopper
- LCD screen
- Pattern group switch button
- Operation buttons
- Quick reference plate
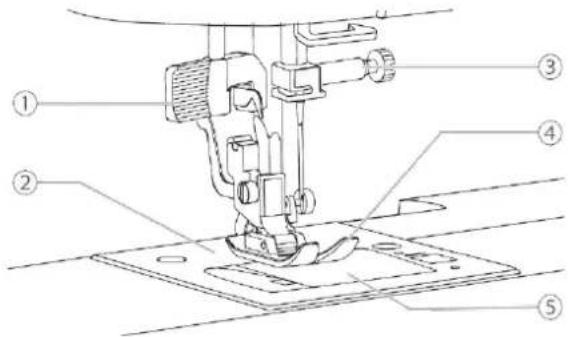
(2) Needle area overview
- Needle threader
- Needle plate
- Needle clamp screw
- Presser foot
- Bobbin cover
(3) Back Overview
- Horizontal spool pin
- Second spool pin hole
- Handwheel
- Main power switch
- Power cord socket
- Foot control connector
- Bobbin thread guide
- Upper thread guide
- Handle
- Electronic buttonhole foot socket
- Presser foot lifter
- Drop feed lever
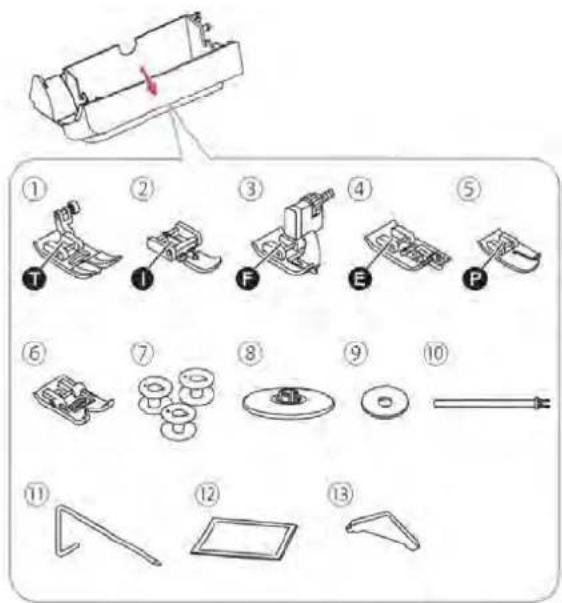
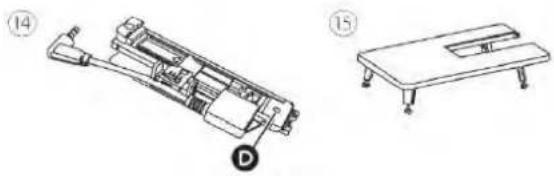
(4) Standard accessories
- Universal presser foot (zigzag)
- Zipper foot
- Blind hem foot
- Overcasting/overedge foot
- Quilting foot
- Non-stick (Teflon) foot
- Bobbins (3×)
- Spool cap
- Spool felt
- Auxiliary spool pin
- L-shaped screwdriver
- Quilting guide (guide bar)
- Needle set
- Electronic buttonhole foot (sensor)
- Extension table
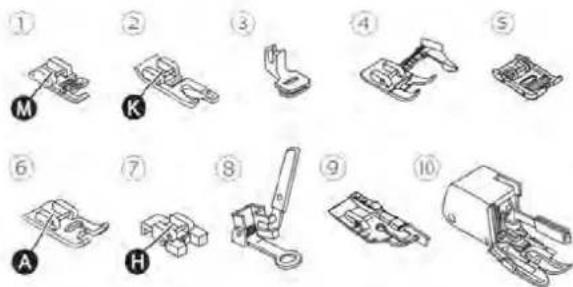
(5) Optional accessories
- Piping foot
- Hemmer foot (rolled hem)
- Gathering foot
- Adjustable guide foot
- Roller foot
- Satin stitch foot
- Button sewing foot
- Darning/embroidery foot (free-motion)
- 1/4" quilting foot (quarter-inch)
- Walking foot (even feed)
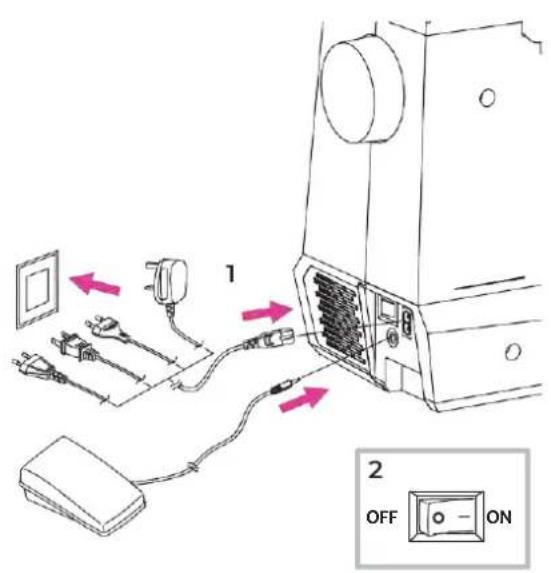
(6-8) Connecting machine to power source
Before connecting the power supply, make sure that the voltage shown on the rating plate is conforming with your main power.
Put the machine on a stable table.
Connect the machine to a power source as illustrated.
Turn the power switch to on ("I"). The sewing lamp will light up when the switch is turned on. (6)
- Attention: Always make sure that the machine is unplugged from power source and the main switch is off ("O"), when the machine is not in use and before inserting or removing parts
Polarized plug information
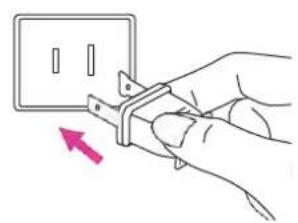
This appliance has a polarized plug (one blade is wider than the other), to reduce the risk of electrical shock; this plug will fit in a polarized outlet only one way. If the plug does not fit fully in the outlet, reverse the plug. If it still does not fit, contact a qualified electrician to install the proper outlet. Do not modify the plug in any way. (7)
- Attention: Consult a qualified electrician if in doubt as to connect the machine to the power source.
Foot control
When the machine is off, insert the foot control plug into its connector on the machine. Turn on the machine, and then slowly press down the foot control to start sewing. Release the foot control to stop the machine.. (8)
Foot controller with needle up and down feature
User can quickly press one step on the foot controller to change the needle position go up or down into the fabric.
(9-11) Sewing table
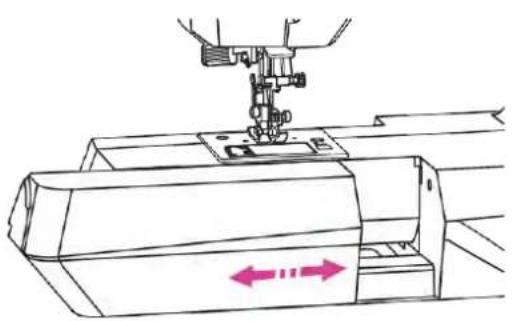
Hold the sewing table horizontally, then pull toward the left to remove it from the machine. Attach the sewing table and then push it to the right. (9)
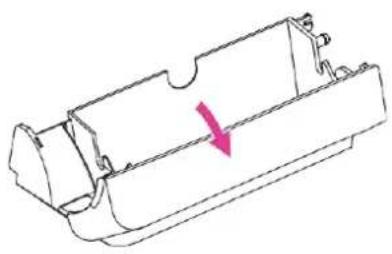
The inside space of the sewing table is used as an accessory box. (10)
Free-arm sewing is convenient for sewing tubular areas such as pant hems and cuffs. (11)
(12-13) Two-step presser foot lifter
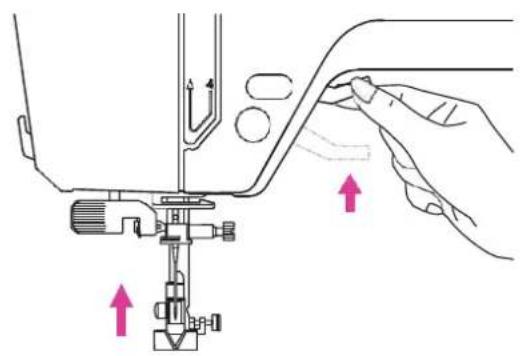
The presser foot lifter is to raise or lower your presser foot. (12)
When sewing multi-layers or thick fabrics, the presser foot can be further raised up manually to allow enough space for your sewing work. (13)
• Attention: The needle must always be at the highest position.
(14-15) Install the extension table
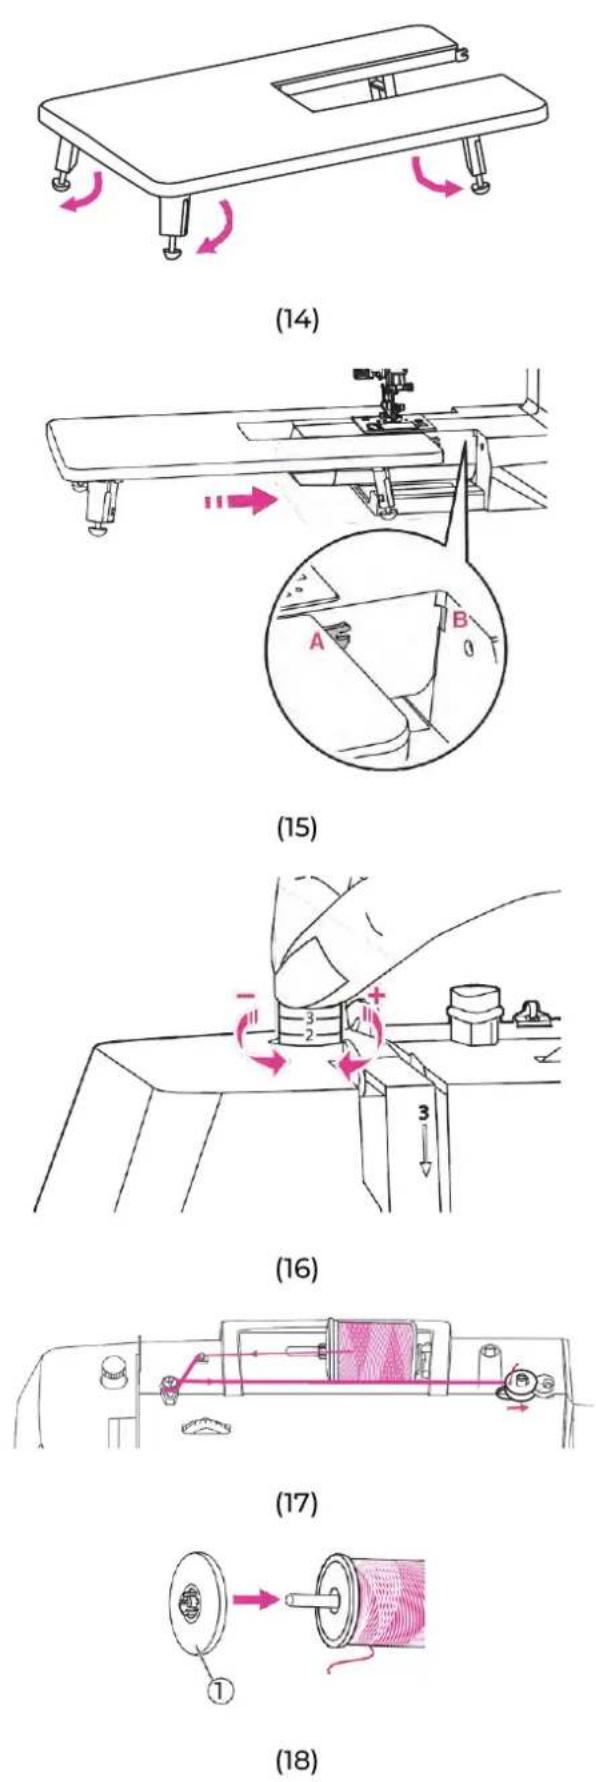
Pull the sewing table and accessory box off by sliding it to the left. Follow the arrow and stretch the foot of the extension table. (14)
Snap (A) of the extension table into (B) of the machine. (15)
(16) Adjusting the presser foot pressure
The presser foot pressure dial is on the top left of the face plate.
The presser foot pressure of the machine has been pre-set and requires no particular adjustment for general sewing.
Basic presser foot pressure setting: "2".
For sewing with very thin fabric, reduce the pressure by turning the dial counterclockwise. If kept turning the dial, it could be take out.
By that time, just turn the screw clockwise, it could be locked back and readjust the pressure.
For heavy fabric, increase the pressure by turning it clockwise. Once dial could not be moved any further, it has been reached the bottom, please do not turn any more.
(17-26) Winding the bobbin
It is important to carry out the threading correctly to get a quality sewing. Otherwise, several problems will occur. (17)
Place the thread and spool holder onto the spool pin. For better sewing quality, choose a proper size of the spool holder for the thread and attach it next to the spool. (18)
① Spool holder
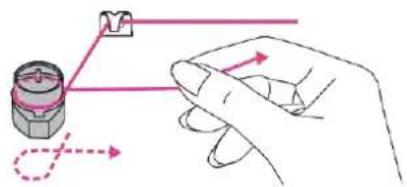
Draw the thread from the spool and place the thread in between the upper thread guide. (19)
Wind the thread clockwise around the tension discs (20)
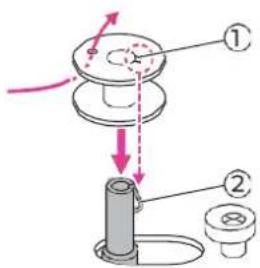
Place the thread end through one of the inner holes as illustrated and place the empty bobbin on the bobbin winder spindle. Then align the notch with bobbin winder spindle spring. (21)
① Notch
② Bobbin winder spindle spring.
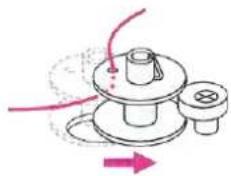
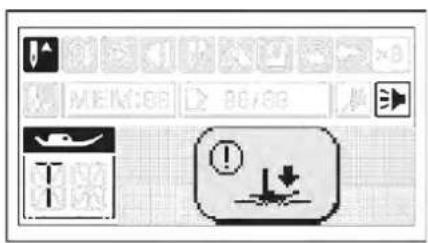
Push the bobbin to the right. When the bobbin winder spindle is pushed to the right, the screen will display the figure. (22)
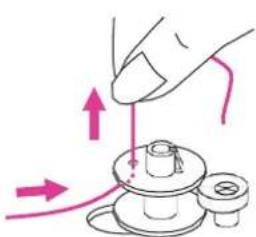
Hold the thread tail securely in one hand. Step on the foot control or press the start/stop button to start winding the bobbin. (23)
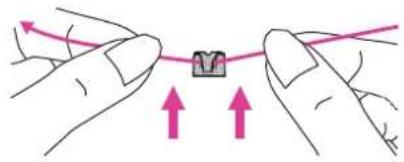
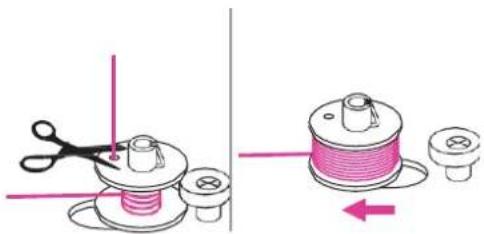
After the bobbin has wound a few rounds, stop the machine and cut the thread near the hole of the bobbin. Continue filling the bobbin until it is full. Once the bobbin is full, it rotates slowly. Release the foot control or press the start/stop button to stop the machine, then push the bobbin winder spindle to the left. (24)
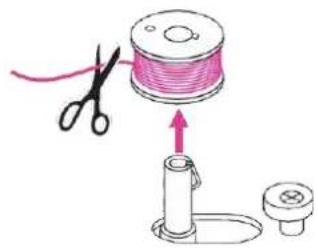
Cut the thread and then remove the bobbin. (25)
Note: When the bobbin winder spindle is pushed to the right position, it's in "bobbin winding" mode and the machine is not allowed to sew and the handwheel will not be able to turn. To start sewing, push the bobbin winder spindle back to the left.
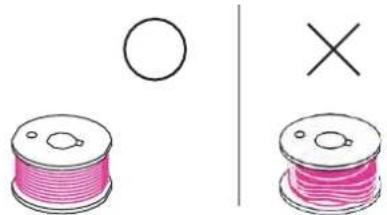
Note: Use a bobbin that has been correctly wound with thread, otherwise the needle may break or the thread tension will be incorrect.
(27-30) Inserting the bobbin
- Attention: Turn the power switch to off ("O").
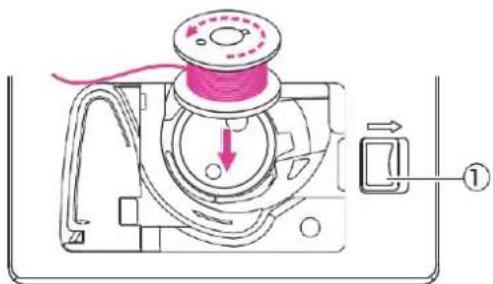
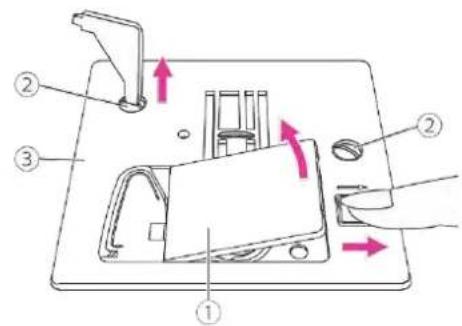
When inserting or removing the bobbin, the needle and the presser foot must be fully raised. Open the bobbin cover by pushing the release button to the right. (27)
① Release button
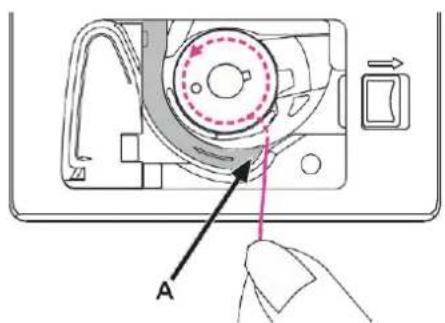
Insert the bobbin in the bobbin case with the thread running in a counter-clockwise direction (arrow).
Pull the thread through the slit (A) (28)
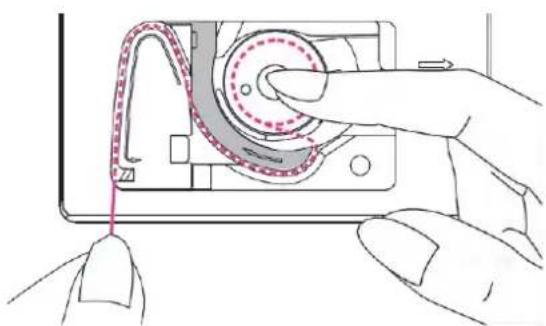
With a finger hold gently on top of the bobbin, please follow the arrow markings and draw the thread into the bobbin thread guide. (29)
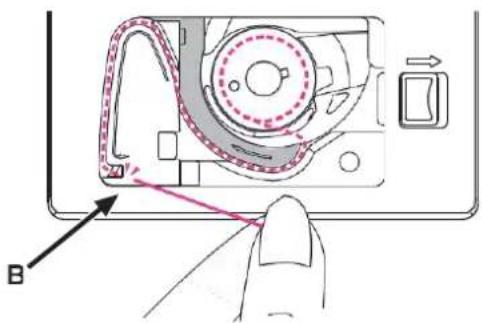
To cut off excessive thread, pull it to the cutter at point (B). (30)
Close the bobbin cover
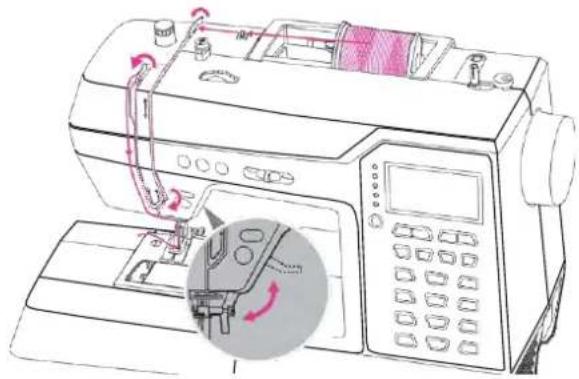
(31-45) Threading the upper thread
It is important to carry out the threading correctly to get a quality sewing. Otherwise several problems will occur. (31)
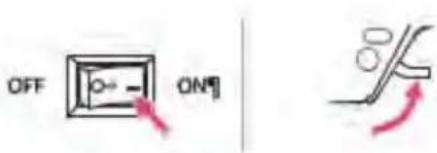
Raise the presser foot lifter (32)
- Attention: Turn the power switch to on ("I"). The needle threader can be with a 75/11 through 100/16 home sewing machine needle.
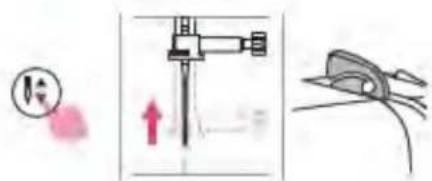
Press the needle up/down position button to bring the needle and take-up lever to highest position. (33)
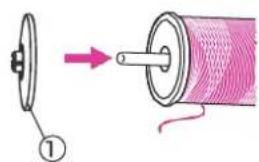
Place the thread and spool holder onto the spool pin. For better sewing quality, choose a proper size of the spool holder for the thread and attach it next to to the thread. (34)
① Spool holder
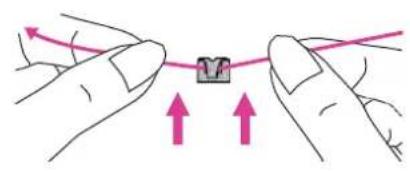
Draw the thread from the spool and place the thread in between the upper thread guide. (35)
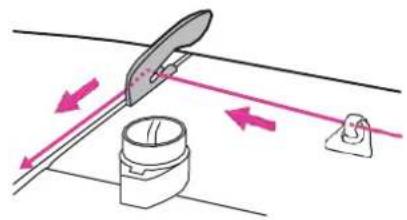
Guide the thread ahead and pull the thread through the pre-tension spring as illustrated. (36)
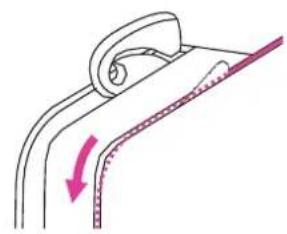
Continue to guide the thread into the silver discs to keep the thread in proper tension. (37)
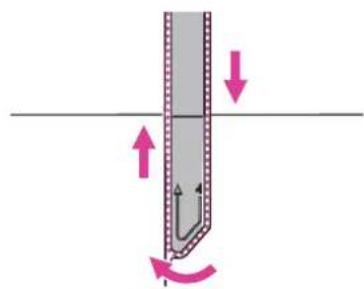
Pass the thread under the take-up spring then pull it upwards as arrow marks illustrated. (38)
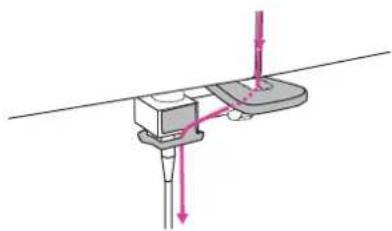
Pull the thread to the top then pass the thread through the slotted eye of the take-up lever. Guide the thread down afterwards. (39)
Pass the thread behind the flat, horizontal thread guide. Use the needle threader to thread the needle. (40)
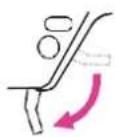
Lower the presser foot lifter. (41)
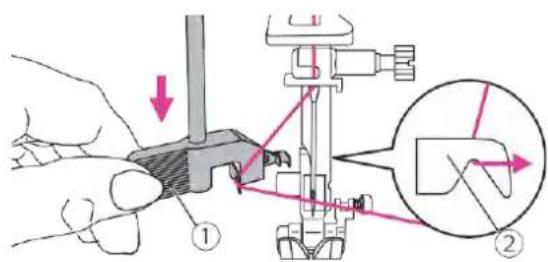
Lower the needle threader lever slowly and draw the thread through the thread guide as illustrated and then to the right. (42)
① Lever
② Thread guide
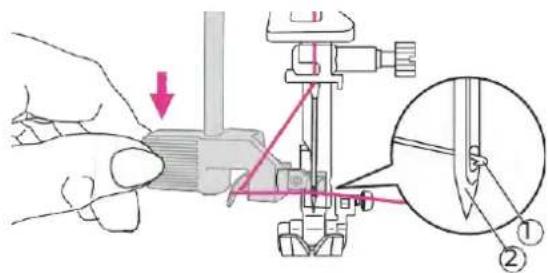
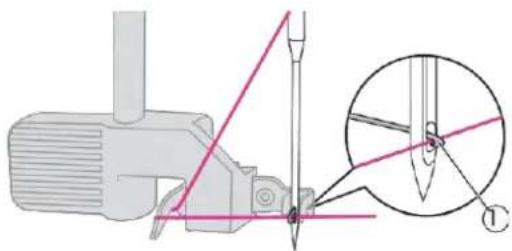
The needle threader automatically turns to the threading position and the hook pin passes through the needle eye. (43)
① Hook pin
② Needle
Take the thread in front of the needle and make sure it is under the hook pin. (44)
① Hook pin
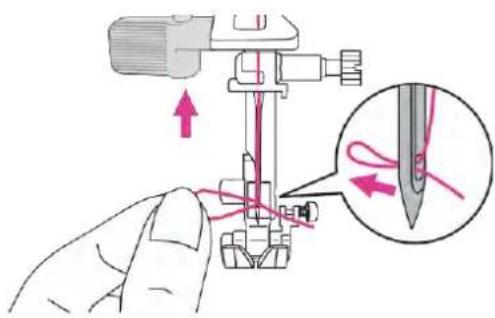
Hold the thread loosely and release the lever slowly. The hook turns and passes the thread through the needle eye forming a loop. Pull the thread through the needle eye. (45)
(46-48) Bringing up the bobbin thread
When sewing gathering or smocking stitch, bring up the bobbin thread first as below instruction.
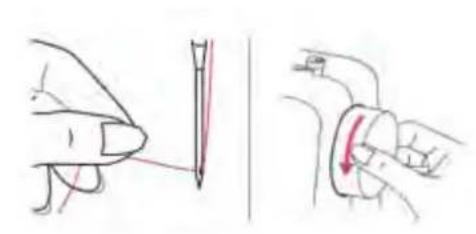
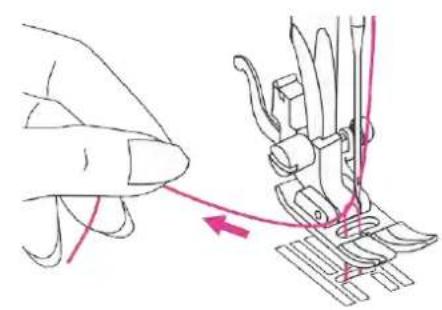
Hold the upper thread with your left hand. Turn the handwheel towards you (counterclockwise) to lower the needle down below the needle plate then raise it to bring the bobbin thread up. (46)
Gently pull on the upper thread to bring the bobbin thread up through the needle plate hole. The bobbin thread will come up in a loop. (47)
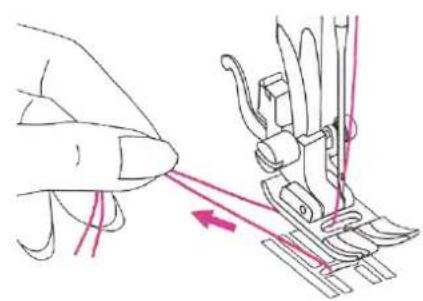
Pull both threads to the back under the presser foot. (48)
(49-52) Replacing the needle
Change the needle regularly, especially when it shows signs of wear or if it causes problems.
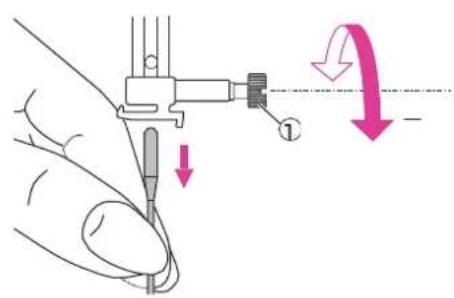
Turn the handwheel toward you to raise the needle then loosen the needle clamp screw to remove the needle. (49)
① Needle clamp screw
- Attention: Turn the power switch to off ("O") when carrying out below operations!
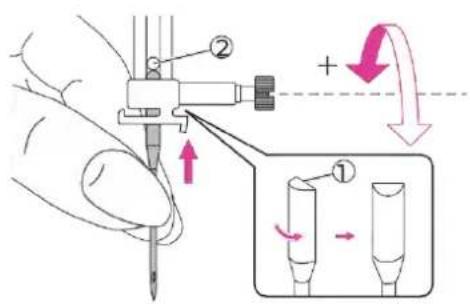
When inserting a new needle, keep the flat side of the shaft to the back. Push the needle into the clamp until it touches the pin and stops. Then secure it by tightening the needle clamp screw. (50)
① Flat side of the shaft
② Pin
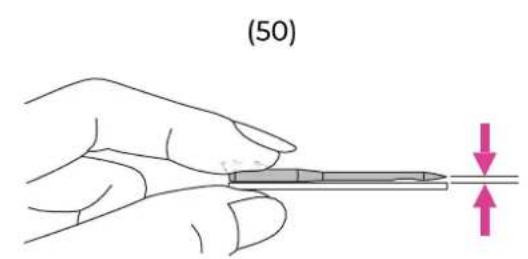
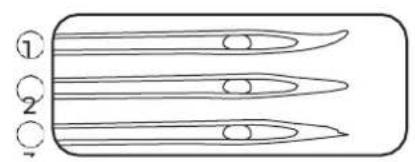
Needles must be in perfect condition. (51)
Problems can occur with: (52)
① Bent needles
② Blunt needles
③ Damaged points
Matching needle/fabric/thread
| FABRICS | THREAD | NEEDLE SIZE | |
| Light weight | Thin cottons, voile, serge, silk, muslin, Qiana, interlocks, cotton knits, tricot, jerseys, crepes, woven polyester, shirt & blouse fabrics. | Light-duty thread in cotton, nylon, polyester or cotton wrapped polyester. | 65/9 - 75/11 |
| Medium weight | Cotton, satin, kettleclote, sailcloth, double knits, lightweight woolens. | Most threads sold are medium size and suitable for these fabrics and needle sizes. | 80/12 |
| Medium weight | Cotton duck, woolen, heavier knits, terrycloth, denims. | Use polyester threads on synthetic materials and cotton on natural woven fabrics for best results. | 90/14 |
| Heavy weight | Canvas, woolens, outdoor tent and quilted fabrics, denims, upholstery material (light to medium). | Always use the same thread on top and bottom. | 100/16 |
- Note: In general, fine threads and needles are used for sewing fine fabrics, thicker threads and needles are used for sewing heavy fabrics.
Always test thread and needle size on a small piece of fabric which will be used for actual sewing.
Use the same thread for needle and bobbin.
Use a stabilizer or place a backing for fine or stretchy fabrics, and select the correct presser foot.
It is recommended that a 90/14 needle should be used when embroidering on heavyweight fabrics or stabilizing products (for example, denim, puffy foam, etc.). A 75/11 needle may bend or break, which could result in injury.
For transparent nylon thread, always use needle 90/14 - 100/16. The same thread is usually used for the bobbin thread and upper threading.
(53-56) Changing the presser foot
- Attention: Turn the power switch to off ("O"). Always use the proper foot for the selected stitch. The wrong foot can cause the needle to break.
Remove the presser foot
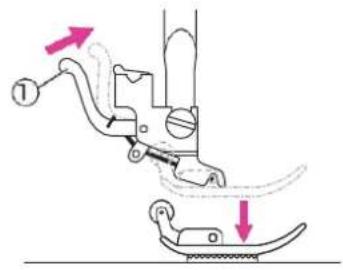
Raise the presser foot lifter. Press the back lever to release the presser foot. (53)
① Lever
Attach the presser foot
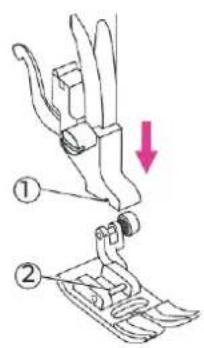
Lower the presser foot lifter until the cut-out meets the pin. The presser foot will attach to the presser foot holder automatically. (54)
① Cut-out
② Pin
Remove and insert the presser foot holder
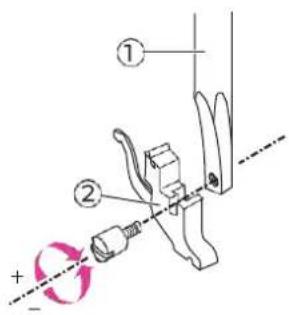
Raise the presser foot lifter. Align the presser foot holder with the lower left side of the presser bar. Hold the presser foot holder, then tighten the screw using the enclosed screwdriver. (55)
① Presser foot bar
② Presser foot holder
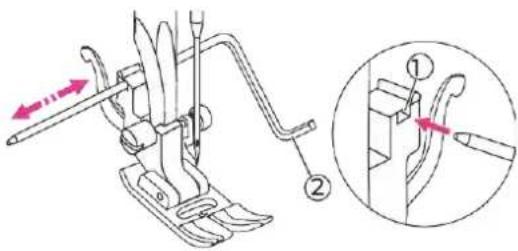
Insert the edge/quilting guide
Insert the edge/quilting guide in the slot as illustrated. Adjust the needed width according to your sewing applications. (56)
① Slot
② Edge/quilting guide
(57-67) Attaching the straight stitch needle plate
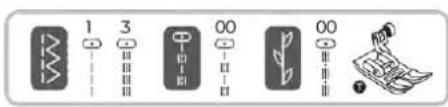
- Attention: Turn the power switch to off ("O"). Only specific stitches are applicable while using straight stitch needle plate, including the Direct Pattern Group number 1 and 3, Regular Pattern Group number 00 and Quilting Pattern Group number 00. (57)
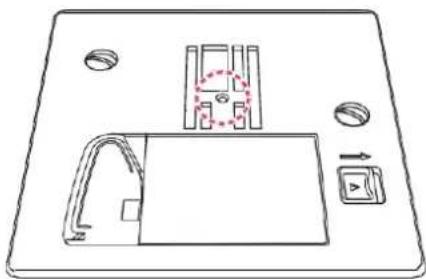
The particular design of smaller central hole can give a better support of the fabric during straight stitch sewing. (58)
Thus, the fabric can be prevented from being pulled down into bobbin/hook area, especially in the beginning or end of a seam.
Remove the needle, presser foot and presser foot holder.
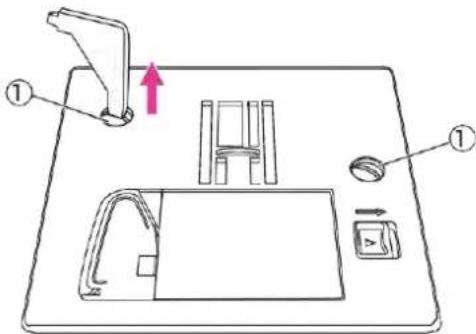
Use the L-screwdriver to unscrew and remove the regular needle plate. (59)
① Screws
Change to straight stitch needle plate and tighten the screws. (60)
Straight stitch needle plate setting
- Attention: Use the straight stitch needle plate setting to prevent the needle breakage when straight stitch needle plate attached.
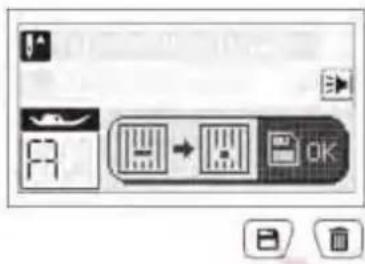
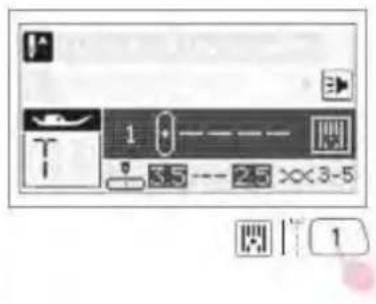
With straight stitch needle plate attached, long press the Direct Pattern Group number 1 to straight stitch needle plate setting. (61)
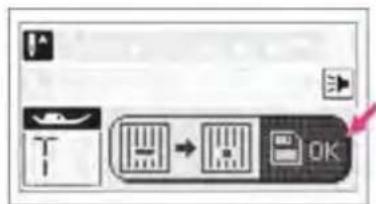
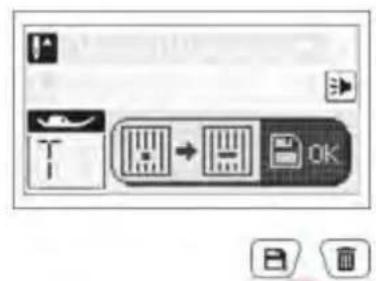
The screen shows the needle plate have changed from regular one to straight stitch needle plate, press the memory button and the stitch width is automatically selected to middle needle position stitches only. (62)
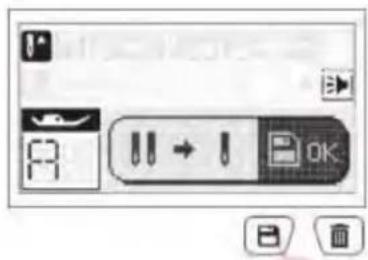
Make sure that the twin needle is not used and it is single needle only. Press the memory button to finish the setting. (63)
- Attention: To prevent needle breakage or damage the needle plate, do not use twin needle
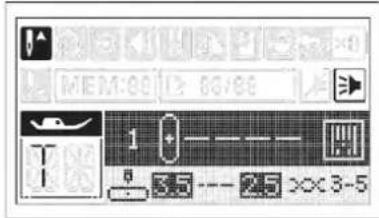
Machine is automatically selected to Direct Pattern Group number 1 stitch. (64)
• Note: A sound will appear warning that the stitch pattern is not middle needle position stitches.
Note: The straight stitch needle plate setting is maintained even the machine turn off. When turn on the machine the pop-up window to remind the straight stitch needle plate is setting. Press the memory button to remove it. (65)
Remove the straight needle plate setting
Long press the Direct Pattern Group number 1. (66)
The screen shows the straight stitch needle plate to change to regular needle plate, press the memory button to confirm. (67)
(68-69) To raise or drop the feed dogs
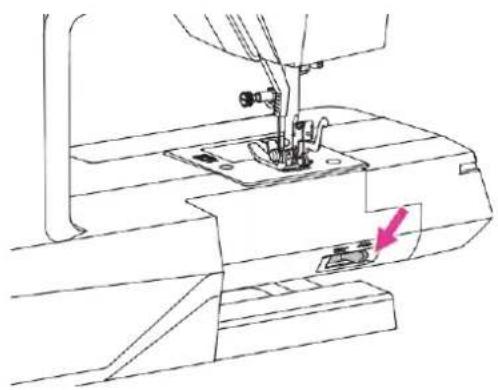
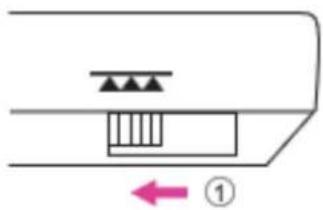
The drop feed lever can be seen on the base at the back side of the sewing machine.
Sliding the drop feed lever to lower or raise the feed dogs. When lever is in raised position, the feed dog will arise automatically when you are sewing. (68)
① Drop feed lever
② Lowered position
③ Raised position (69)
- Note: When you finish the work, (e.g. button sewing, free motion darning, embroidery and monogramming), please move the drop feed lever to raised position for general sewing purpose.
(70-74) Thread tension
Proper tension setting is important for sewing. There is no single tension setting appropriate for all the stitch functions and fabrics.
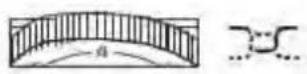
Basic thread tension setting: "4". (70)
Normal thread tension for straight stitch sewing. (71)
① Upper thread
② Bobbin thread
③ Surface
① Wrong side
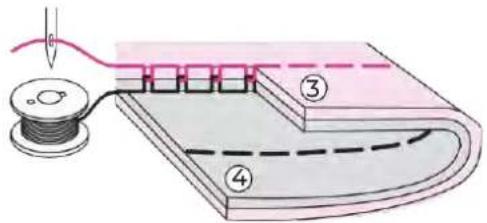
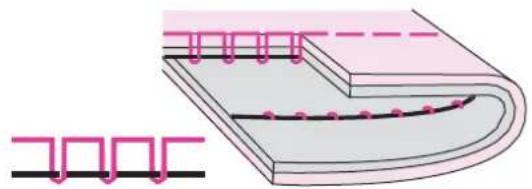
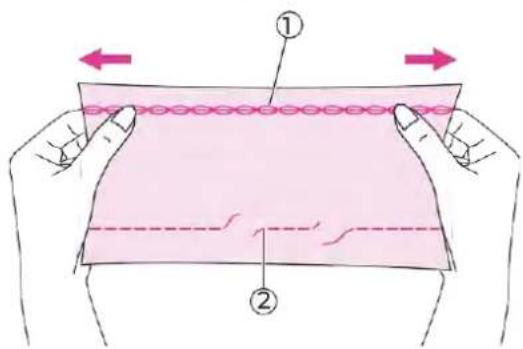
Thread tension is too loose for straight stitch sewing. Turn the dial to the higher number. (72)
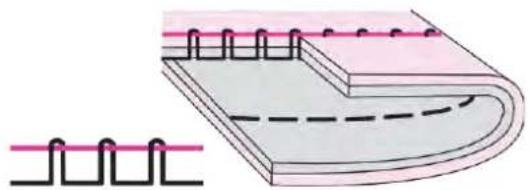
Thread tension is too tight for straight stitch sewing. Turn the dial to the lower number. (73)
Normal thread tension for zig zag and decorative sewing.
For all decorative sewing you will always obtain a nicer stitch and less fabric puckering.
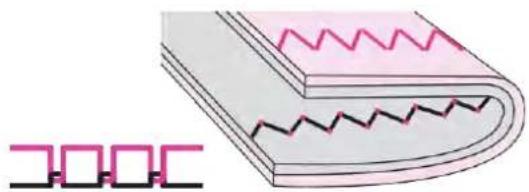
Correct thread tension is when a small number of the upper thread appears on the bottom side of fabric. (74)
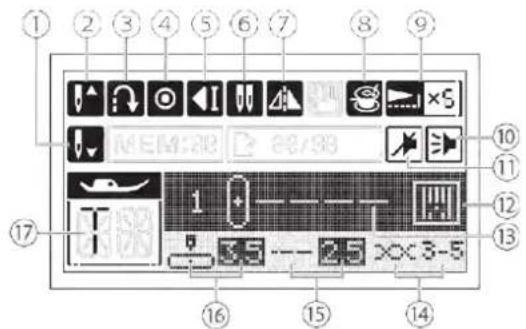
(75-76) LCD screen
① Needle down position
② Needle up position
③ Reverse
④ Auto-lock
⑤ Auto-stop
⑥ Twin needle mode
⑦ Mirror
⑧ Bobbin winding
⑨ Amount of elongation
⑩ Buzzer on
⑪ Buzzer off
⑫ Straight stitch needle plate
⑬ Stitch number/stitch
⑭ Tension
⑮ Stitch length
⑯ Needle position/Stitch width
⑰ Suggested presser foot
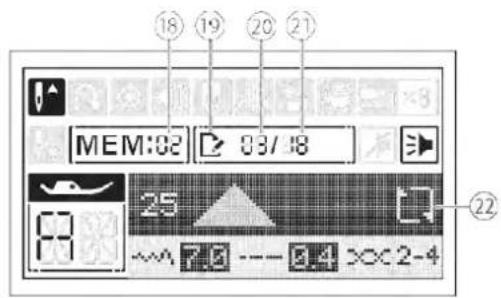
⑱ Memory group
⑲ Edit mode
⑳ Number of current unit
②1 Total number of unit
②Repeat sewing
(77-97) Operation buttons
① Start/stop button
Press the start/stop button to start machine running. Press the start/stop button again to stop machine. The machine (77) rotates slowly at the beginning of the sewing.
The sewing speed can be controlled by the speed adjustment slider. (78)
This way you may operate the machine without foot control.
Color of button indicates machine status.
Green: Ready to start and/or while sewing.
Red: Not ready to start. (Presser foot is not lowered. The thread is twisted or jammed.)
Orange: Machine is bobbin winding condition.
② Reverse button
When the Direct Pattern Group number 1-5 or Regular Pattern Group number 00 or Quilting Pattern Group 00 is selected, the machine will sew reverse at a low speed if the reverse button is pressed. The machine will sew forward after the button is released.
When the Direct Pattern Group number 6-9 or Regular Pattern Group number 01-10 or 25-99 or Quilting Pattern Group 01-99 is selected, the machine will immediately sew 3 locking stitches when the reverse button is pressed, then automatically stop.
The LCD screen will display the reverse icon. (79)
Repeat sewing function (In memory program)
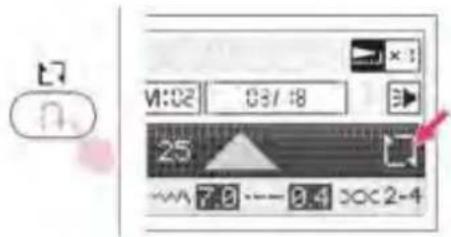
Under the memory program, the reverse button is using for repeat sewing. The stitch combination can be sewn continuously if the icon appeared. (80)
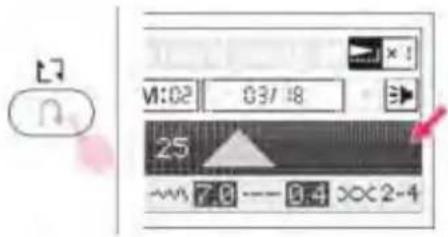
Press the reverse button to cancel the repeat sewing, machine will sew 3 locking stitches at the end of one complete combination. The LCD screen will display the auto-stop icon during sewing the last stitch. (81)
③ Auto-lock button
When machine is not sewing: Press the auto lock button, machine will sew 3 stitches in the same position then stop. (82)
During machine is sewing: When Direct Pattern Group number 1-5 or Regular Pattern Group number 00 is selected, the machine will sew 3 locking stitches if the auto-lock button pressed. Then it will stop automatically.
During machine is sewing: When Direct Pattern Group number 6-9 or Regular Pattern Group number 01-10 or 25-99 or Quilting Pattern Group 01-99 is selected, the machine will sew 3 locking stitches at the end of the current stitch if the auto-lock button pressed. Then it will stop automatically. The function can be cancelled if pressed the button once again during sewing. (83)
The auto-lock icon will be disappeared when the current sewing completed.
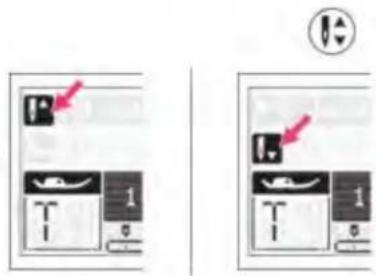
④ Needle up/down position button
With the needle up/down position button, you decide whether the needle stops in the highest or in the lowest position (i.e. in the fabric) when you stop sewing.
- Note: During sewing, press the needle up/down position button, it can not to change the needle position.
Press the button so that the arrow on the LCD screen points upward and the needle stops in the highest position. Press the button so that the arrow points downward, the machine stops with the needle in the lowest position. (84)
⑤ Thread cutter button
Press this button after finishing sewing and the machine will trim the threads. (85)
⑥ Speed adjustment slider
The speed adjustment slider can control the sewing speed. To increase the speed, slide the lever to the right. To decrease the sewing speed, slide the lever to the left.
The sewing speed can be adjusted without foot controller. (86)
⑦ Pattern group switch button
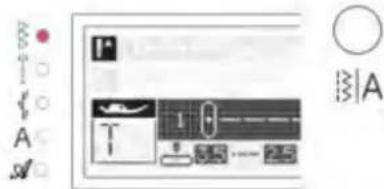
When machine is turned on, the LED light will be set at Direct Pattern Group. By pressing the pattern group switch button, LED light will move step by step to select the pattern group: (87)
- Direct Pattern Group
• Regular Pattern Group
• Quilting Pattern Group
• Alphabet Group-Block style
• Alphabet Group-Script style →
⑧ Stitch width adjustment button
When you select a stitch, the machine will automatically set the recommended stitch width values which will be shown on the LCD screen. The highlighted value will be erased if the setting be adjusted.
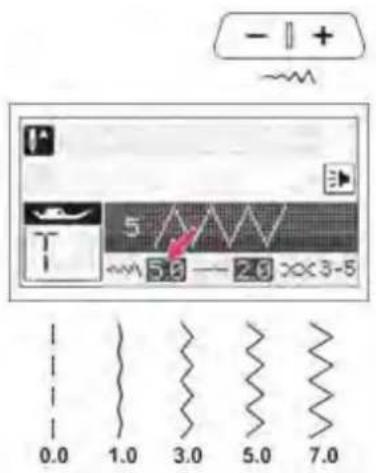
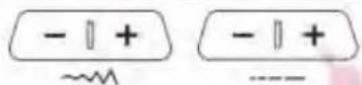
The stitch width can be regulated by pressing the stitch width adjustment buttons. For a narrower stitch, press the "-" button. For a wider stitch, press the "+" button. (88)
Different stitches will have different width limitation.
Needle position adjustment
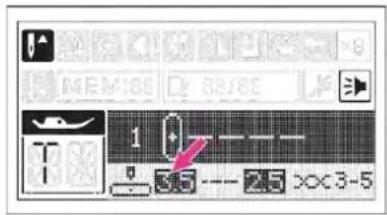
When the straight stitch is selected, Direct Pattern Group1-4 or Regular Pattern Group 00 or Quilting Pattern Group 00 is selected, the needle position can be changed by adjusting the stitch width.
The pre-set position is "3.5", center position. (89)
Press the "+" button, the needle position will be moved to the right. Press the "-" button, the needle position will be moved to the left.
⑨ Stitch length adjustment button
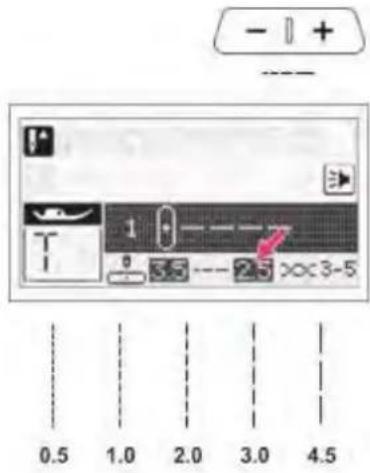
When you select a stitch, the machine will automatically set the recommended stitch length values which will be shown on the LCD screen. The highlighted value will be erased if the setting be adjusted. (90)
The stitch length can be regulated by pressing the stitch length adjustment buttons. For a shorter stitch, press the "-" button. For a longer stitch, press the "+" button.
Different stitches will have different length limitation.
⑩ Twin needle button
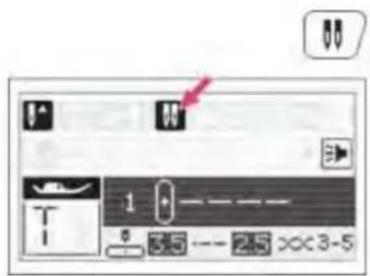
Press the twin needle button, the LCD screen will display the twin needle icon. (91)
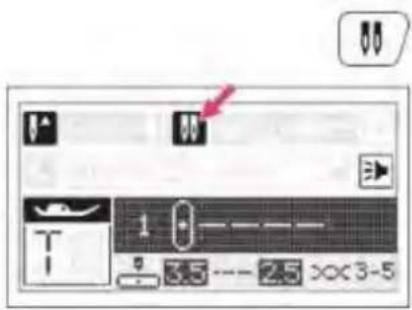
The machine automatically reduces the maximum width for the twin needle sewing. Please refer to "Twin needle" chapter for more information. Press the button again to return to single needle sewing.
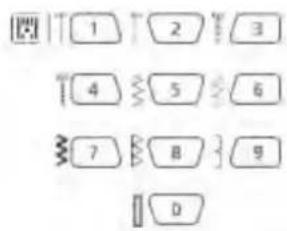
⑪ Direct stitch selection and number buttons
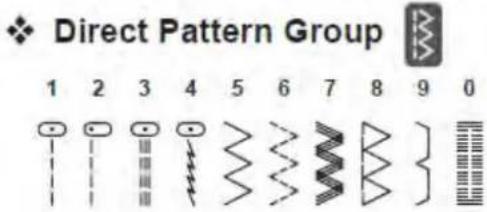
Under Direct Pattern Group, press the buttons to select the direct stitches shown beside the number buttons.
Under Regular Pattern Group and Alphabet Group Patterns, refer to the stitch pattern plate and use the number buttons 0-9 to select the preference stitches. (92)
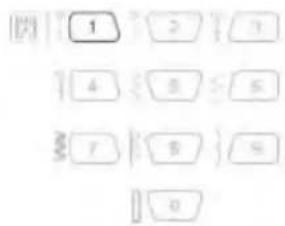
Straight stitch needle plate setting button
Long press the Direct Pattern Group number 1 to set the straight stitch needle plate.
Please refer to "Straight stitch needle plate setting" and "Remove the straight needle plate setting" chapter for more information. (93)
⑫ Elongation button
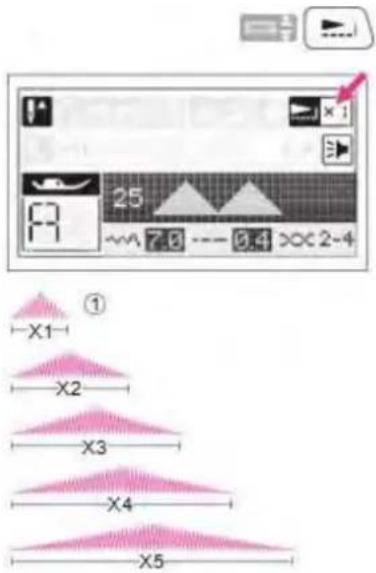
When the satin stitch is selected, Regular Pattern Group 25-46 can be elongated up to 5 times its normal size by pressing the elongation button.
The LCD screen will display the elongation icon and the machine will continue to sew the elongation stitch until the elongation button is pressed again.
When the width or length or stitch is changed, a greater variety of stitches are available. (94)
① Normal stitch size
Buttonhole adjustment button
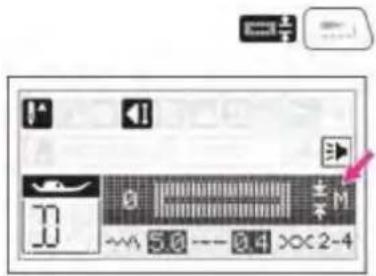
When the buttonhole stitch is selected, Direct Pattern Group number 0 or Regular Pattern Group number 11-18, the LCD screen will display the buttonhole width size.
Continuously press the elongation button to adjust buttonhole size, from M → L → S. (95)
Note: Use the seam ripper to cut the center of the buttonhole being careful not to cut any stitches on either side. Restart the buttonhole width will automatically default to M size setting. Refer to electronic buttonhole foot sewing chapter and set up the buttonhole sewing size precisely. Please refer to "Buttonhole stitch" chapter for more information.
① S: Small
② M: Medium
③ L: Large
⑬ Mirror button
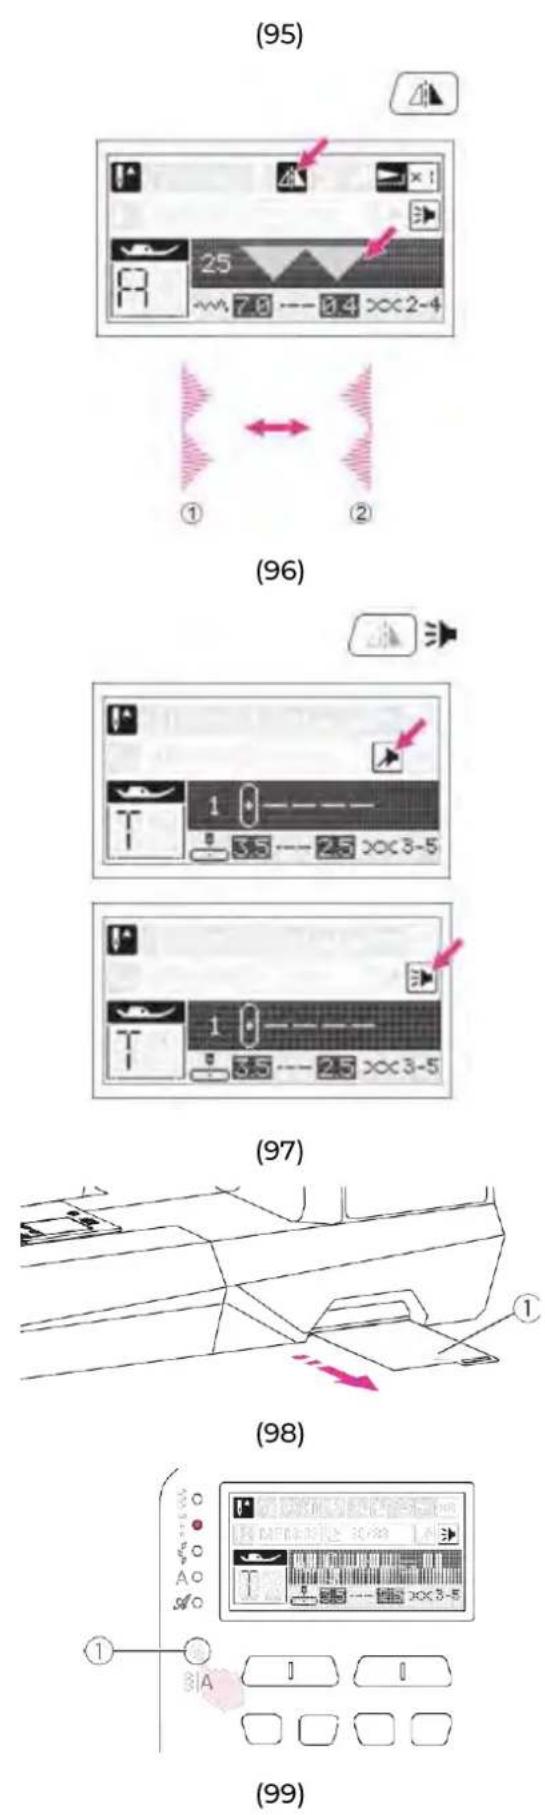
The mirror function is to create the horizontal mirror image of selected stitch. Except the Direct Pattern Group number 8, 9, 0 the Regular Pattern Group number 03-04, 11-24, 72-73 and Alphabet Groups, the other stitches can be mirror imaged by pressing the mirror button.
The LCD screen will display the mirror icon and the machine will continue to sew the mirror stitch until the mirror button is pressed again. (96)
The mirror function also will be canceled if the stitch changed.
① Normal stitch
② Mirror image stitch
Sound button
Buzzer turn off: Press the sound button for 2 seconds and when you hear the machine delivering a short beep, the sound will be turned off.
Buzzer turn on: When machine is in silent mode, press the button for 2 seconds and it will deliver two short beeps to remind you that the sound is turned on now. (97)
(98-101) Selecting stitch
Select the desired stitch from those shown on the stitch pattern plate. (98)
① Stitch pattern plate
The LED light will be set at Direct Pattern Group. By pressing the pattern group switch button, LED light will move step by step to select the stitch mode. (99)
① Pattern group switch button
Press 2 digits under the pattern group which selection. (100)
① Direct Pattern Group:
Use the numeric buttons 0-9 to select the most often used stitches. (101)
② Regular Pattern Group:
Refer to stitch pattern plate, use the number buttons 0-9 to select the preference stitches.
③ Quilting Pattern Group:
Refer to stitch pattern plate, use the number buttons 0-9 to select the preference stitches.
④ Alphabet Group-Block style/Script style:
Refer to stitch pattern plate, use the number buttons 0-9 to select the preference alphanumeric stitches.
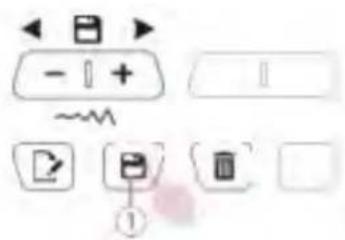
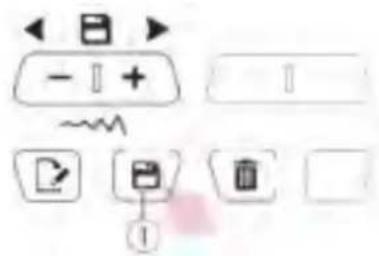
(102) Memory function buttons
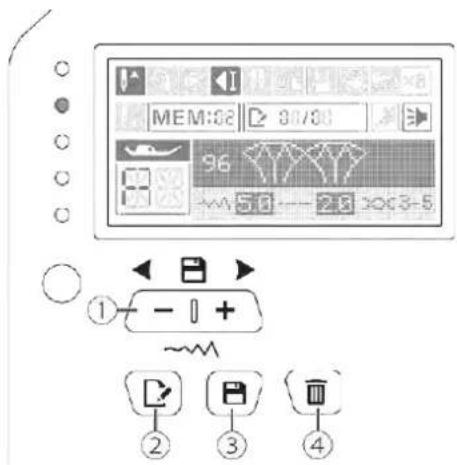
① Memory stitch selecting button
Use the stitch width adjustment button "+" or "-" to selected the memorized stitch.
② Edit button
Press the edit button to enter the edit mode to edit the stitch length, stitch width, mirror and elongation of the stitches.
③ Memory button
Press the memory button to enter the memory mode, and store the combination of stitches desired. Press the memory button again to leave the memory mode.
④ Clear button
Press the clear button to delete the stitch that you want to clear and the next stitch in the back will move forward.
(103-118) Memory program
You can save frequent-use combining stitches for future use, such as names. Since stored stitches are not lost after the sewing machine is turned off, they can be recalled at any time.
Note: Multiple stitches selecting from Regular Pattern Group, Quilting Pattern Group and Alphabet Groups can be combined and sewn together. This machine has 4 modules of program memory and each module can retain 20 units of stitches. Direct Pattern Group 8, 9, 0 and Regular Pattern Group 03-04, 11-24, 72-73 can not be memorized.
Combine stitches
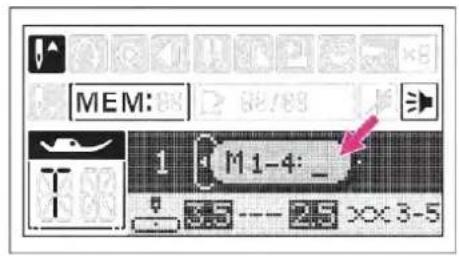
Turn the power switch to on ("I"). Press the memory button to enter the memory mode. (103)
① Memory button
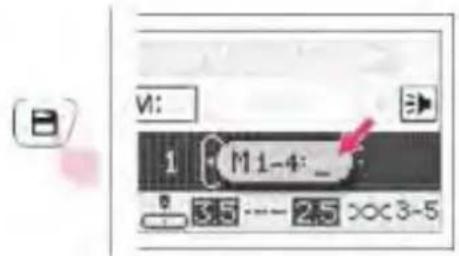
A sub-screen appears. Select a number 1-4 of the memory module in the cursor flashing. (104)
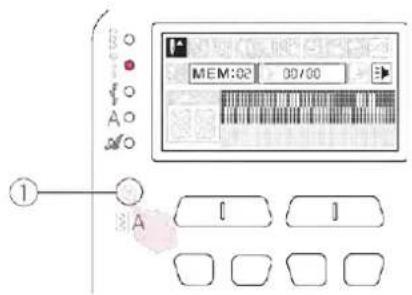
The memory screen appears automatically. Press pattern group switch button to change Regular Pattern Group, Quilting Pattern Group or Alphabet Groups. (105)
① Pattern group switch button
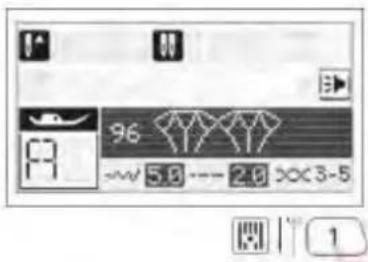
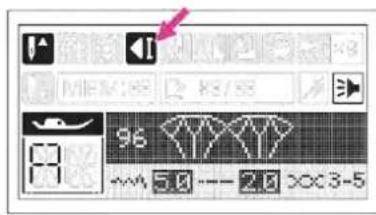
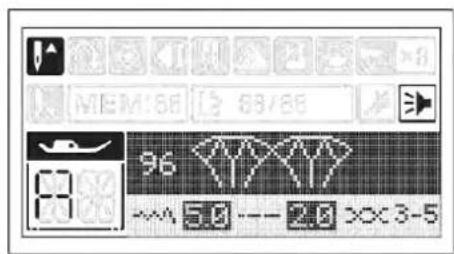
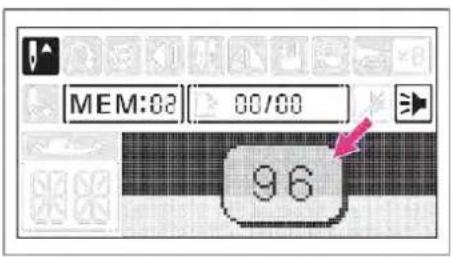
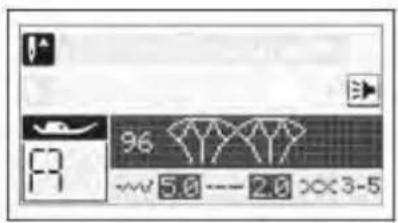
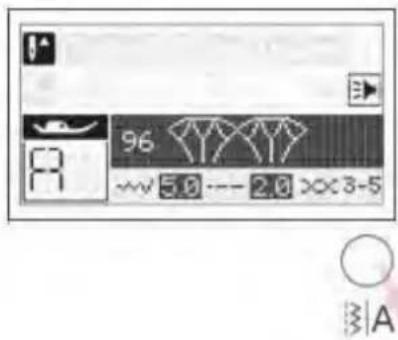
Press the desired stitch number directly. (e.g.96) (106)
The selected stitch displays on the LCD screen. Repeat step several times for stitches combination. Up to 20 characters can be combined in one memory module. (107)
Press the memory button to save the stitches combination, and return to standard sewing mode. Recall the memorized stitches and start to sew. (108)
① Memory button
- Attention: The selected stitch will be cleared from the memory program after closing the machine if you do not press the memory
button again when you have completed your selection.
Recalling and sewing the memorized stitches
Press the memory button to enter the memory mode, and select the stored memory module (1-4) in the cursor flashing. (109)
Scroll stitch width adjustment button "+" or "-" repeatedly, the LCD will display the stitches and the settings that have been stored one by one. (110)
Note: The last stitch will be tied off automatically under the memory mode. (111)
Inserting stitches
Use the stitch width adjustment button "+" or "-" move prior to the stitch you left out.
Then select the pattern group and stitch you would like to add, the stitch number you have selected is displayed, then add the new stitch. (112)
Editing stitches
Use the stitch width adjustment button "+" or "-" to select the stitch to edit. Press the edit button to edit the stitch. (113)
① Edit button
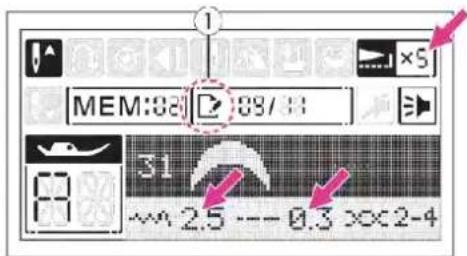
The stitch length, stitch width, mirror and elongation of the stitches can be adjusted manually depending on each stitch settings.
For details on the stitches' limitation, please refer to the "Operation buttons" chapter. (114)
① Edit mode
Press the edit button to leave the edit mode
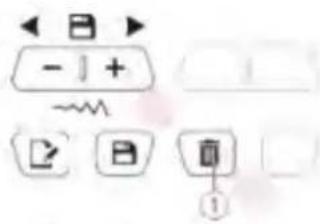
Clearing stitches
Use the stitch width adjustment button "+" or "-" to select the stitch that you want to clear.
Press the clear button to delete the selected stitch and the next stitch in the back will move forward. (115)
① Clear button
Repeat setting
Under the memory mode, the reverse button is using for repeat sewing. The stitch combination can be sewn continuously if the icon appeared. (116)
Press the reverse button again to cancel repeat sewing function, the icon will be disappeared on LCD screen. (117)
- Note: The repeat sewing function setting returns to off as its default setting while leave the memory mode.
During machine is sewing, the machine will sew 3 locking stitches at the end of the current stitch if the auto-lock button pressed. Then it will stop automatically. The LCD screen will display the auto-lock icon. If pressing the start/stop button again, it will sew from the next stitch. (118)
(119-123) Stitch chart
Direct Pattern Group. (119)
Regular Pattern Group. (120)
Quilting Pattern Group. (121)
Alphabet Group-Block style. (122)
Alphabet Group-Script style. (123)
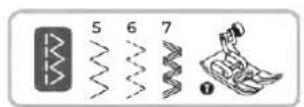
(124-125) Straight-stitch
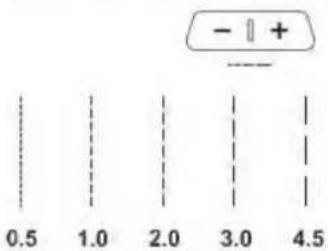
Using the all purpose foot. Set the stitch as shown in figure.
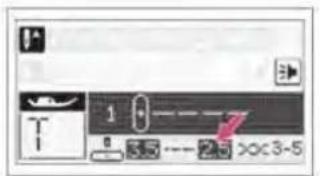
The stitch length can be regulated by pressing the stitch length adjustment button.
For a shorter stitch, press the "-" button. For a longer stitch, press the "+" button. (124)
Changing the needle position
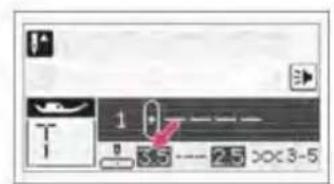
The needle position for straight stitches can be changed by adjusting the stitch width adjustment button.
The pre-set position is "3.5", center position.
Press the stitch width adjustment button "+", the needle position will be moved to the right.
Press the stitch width adjustment button "-", the needle position will be moved to the left
Generally speaking, the thicker the fabric, thread and needle, the longer the stitch length should be. (125)
(126-127) Zigzag stitch
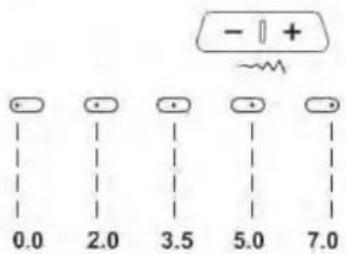
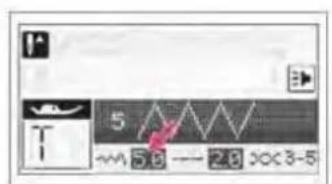
Using the all purpose foot. Set the stitch as shown in figure.
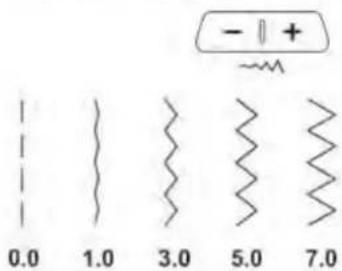
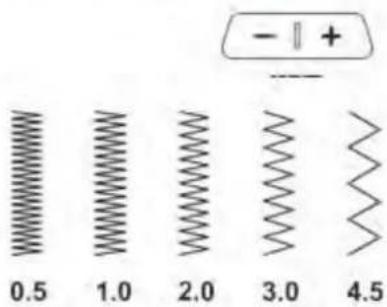
The width can be adjusted between "0.0-7.0" as you press the stitch width adjustment button "+" or "-" . (126)
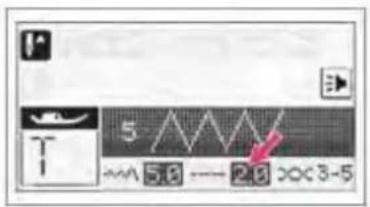
Press the stitch length adjustment button "+" or "-" to adjust the stitch length. Neat zig-zag stitches are usually achieved at "2.5" or below. Closed up zigzag stitches are referred to as a satin stitch. (127)
(128-131) Starting to sew
Make sure you follow the needle/fabric/thread combinations and use the suggested presser foot before sewing.
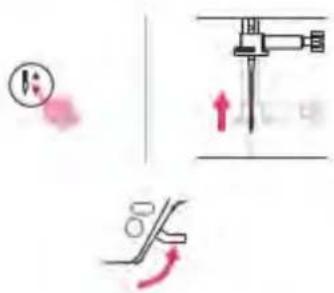
Turn the power switch to on ("I"). Press the needle up/down position button to bring
the needle to highest position. Raise the presser foot lifter. Select a stitch. (128)
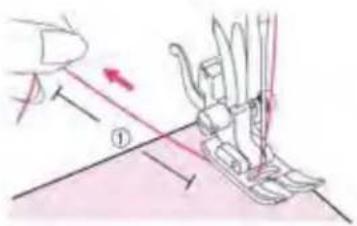
Place the fabric under the presser foot, pass the thread under the presser foot, and then pull out about 10cm of thread toward the rear of the machine.
①10cm
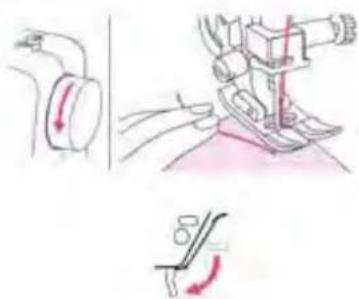
Turn the handwheel toward you (counterclockwise) to lower the needle into the fabric at the beginning of the stitching. Lower the presser foot lifter. (129)
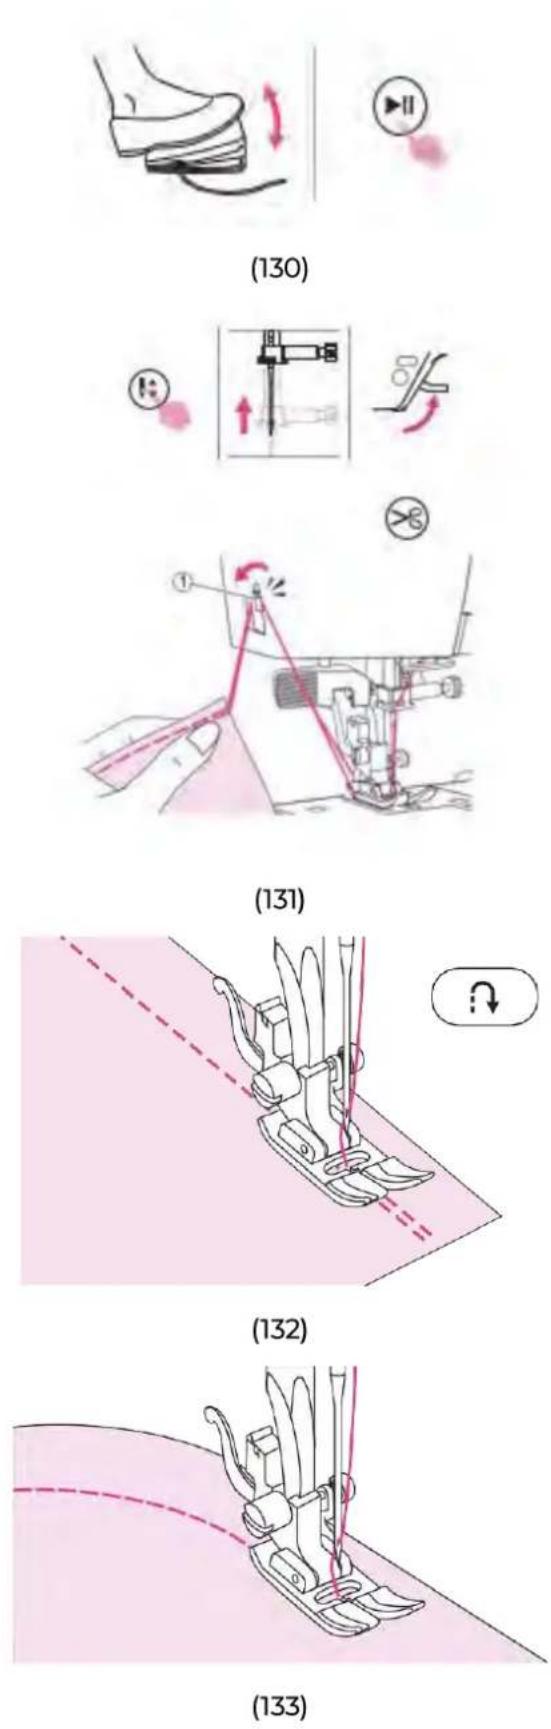
Slowly press down the foot control or long press the start/stop button to start sewing. Release the foot control or press the start/stop button again to stop the machine. (130)
Note: You can use reverse sewing for back tacking and reinforcing seams by pressing the reverse button. Please refer to "Useful skills" chapter for more information.
Press the needle up/down position button to raise the needle. Raise the presser foot lifter and remove the fabric.
Press the thread cutter button to trim the threads. Or guide both threads to the side of the face plate and into the thread cutter to cut them. (131)
① Thread cutter
(132-141) Useful skills
Various ways to achieve better results for your sewing projects are described below. Refer to these tips when sewing your project.
The results depend on types of fabrics and stitches. Please use the same fabric of the project and do a sewing test in advance.
For the trial sewing, use a piece of fabric and thread that are same as those used for your project
and check the thread tension and stitch length and width.
Since the results differ depending on types of stitching and layers of fabric sewn, perform the trial
sewing under the same conditions that will be used with your project.
Reverse sewing
Reverse stitching is used to secure the threads at the beginning and at the end of a seam.
Press the reverse button and sew 4-5 stitches.
The machine will sew forward when the button is released. (132)
Sewing curves
Slightly change the sewing direction to sew around the curve. (133)
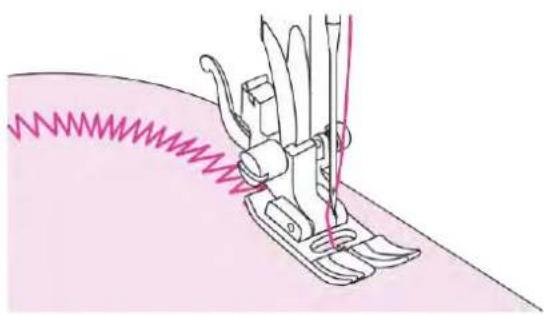
When sewing along a curve while using a zigzag stitch, select a shorter stitch length in order to obtain a finer stitch. (134)
Sewing corners
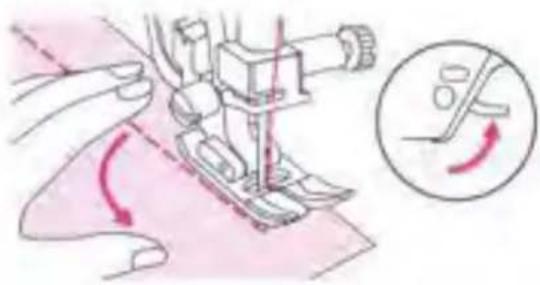
Stop the sewing machine when you reach a corner. Lower the needle into the fabric. Raise the presser foot lifter. Use the needle as a pivot and turn the fabric 90°. Lower the presser foot lifter and resume sewing. (135)
Sewing stretch fabrics
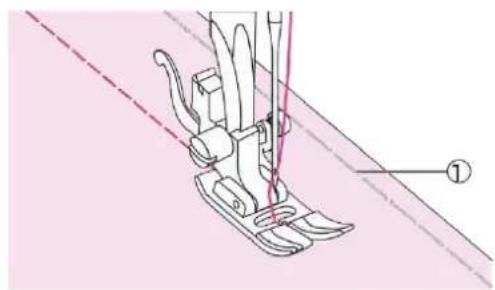
Baste the pieces of fabric together, and then sew without stretching the fabric. (136)
① Basting
Sewing thin fabrics
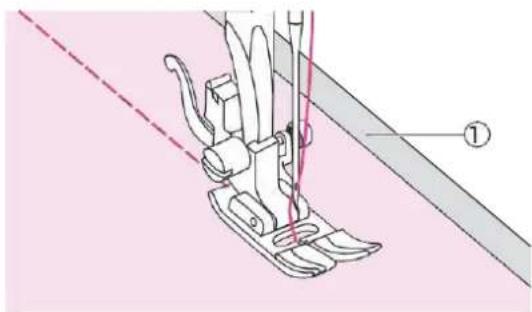
When sewing thin fabrics, the stitches may become misaligned or the fabric may not feed correctly. If this occurs, place thin paper or stabilizer material under the
fabric and sew it together with the fabric. (137)
When you have finished sewing, tear off any excess paper.
① Stabilizer material or paper
Sewing heavy fabric
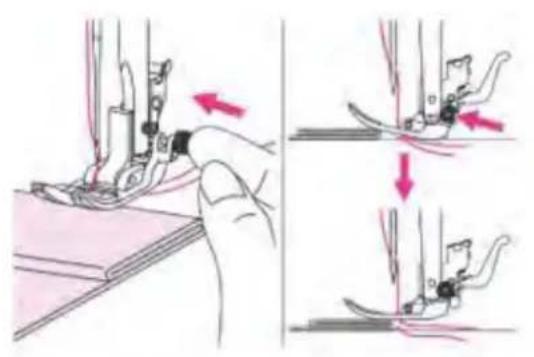
The black button on the right side of the presser foot will lock the presser foot in a horizontal position if you push it in before lowering the presser foot.
This ensures even feeding at the beginning of a seam and helps when sewing multiple layers of fabrics such as sewing over seams when hemming jeans.
When you reach the point of an increased thickness, lower the needle and raise the presser foot lifter. Press the toe of the foot to the horizontal line and push in the black button, then lower the foot and continue sewing.
The black button releases automatically after sewing few stitches.
You also can place another piece of fabric with the same thickness at the back of the seam. Or support the presser foot while feeding by hand and sewing toward the folded side. (138)
① Cardboard or thick fabric
Stitch balance adjustment
The stitch performance may be slightly different in regards to fabric types, thickness or sewing speed.
If decorative stitches, letter, numbers or buttonhole are uneven on a particular fabric, then just adjust the stitch balance for a better performance.
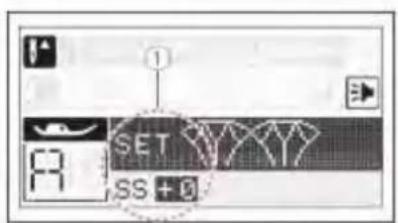
After selecting the pattern, long press the pattern group switch button to enter the stitch balance adjustment mode.
The default setting is in 0.
Press the stitch width adjustment button or stitch length adjustment button to adjust
deformed pattern, the range can be adjusting from -9 to +9. (139)
① Stitch balance adjustment mode
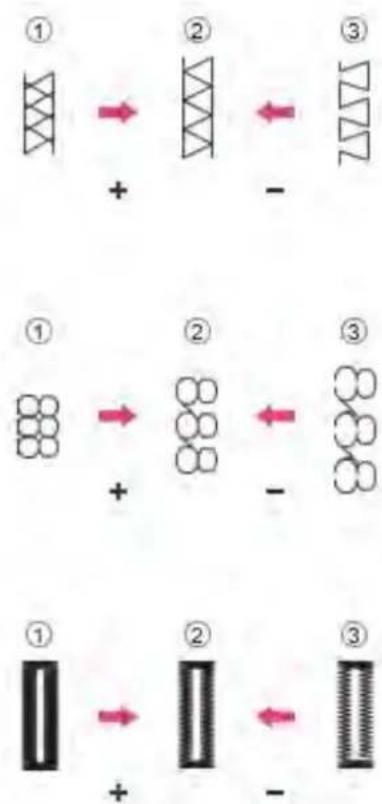
Adjusting distorted stretch stitches
① Stitches are too compressed, press the "+" button
② Stitches in normal situation
③ Stitches are too drawn out, press the "-" button (140)
Adjusting distorted letters or numbers
① Letters or numbers are overlap, press the "+" button
② Letters or numbers in normal situation
③ Letters or numbers are too far, press the "-" button (140)
Adjusting the stitch density for iconhole
① Buttonhole is too dense, press the "+" button
② Buttonhole in normal situation
③ Buttonhole is less dense, press the "-" button (140)
Note: It takes practice on a scrap piece of the same type of fabric. Please use the same fabric of the project and do a sewing test in advance.
Press the pattern group switch button again to leave stitch balance adjustment mode. (141)
(142-144) Stretch stitch
Use this stitch with knitted tricot or other stretchy fabrics. The stitch enables your seam to stretch without breaking the thread.
Good for easy to ravel and knit fabrics. It's good for joining durable fabric such as denims.
These stitches can also be used as a decorative top stitches. (142)
① Stretch stitch
② Straight stitch
Straight stretch stitch
Using the all purpose foot.
Straight stretch stitch is used to add triple reinforcement to stretch and hardwearing seams. (143)
Zigzag stretch stitch
Using the all purpose foot.
Triple zigzag stretch stitch is suitable for firm fabrics like denim, poplin, etc. (144)
(145-147) Sewing stretch fabrics and elastic tape
When elastic tape is attached to the cuff or waist of a piece of clothing, the finished dimensions will be that of the stretched elastic tape. Therefore, it is necessary that a suitable length of the elastic tape be used.
Using the all purpose foot.
Pin the elastic tape to the wrong side of fabric at a few points to make sure that the tape is uniformly positioned on the fabric. (145)
① Pin
② Elastic tape
③ Wrong side
Sew the elastic tape to the fabric while stretching the tape so that it is the same length as the fabric.
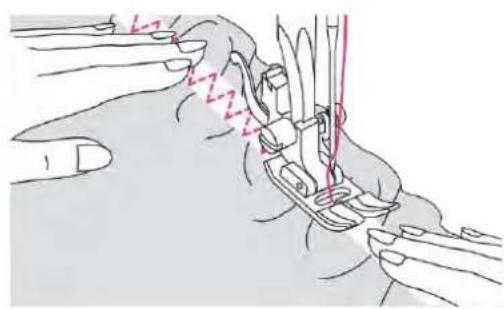
While pulling the fabric behind the presser foot with your left hand, pull the fabric at the pin nearest the front of the presser foot with your right hand.(146)
Note: When sewing, be sure that the needle does not touch any pins, otherwise the needle may bend or break. (147)
(148-149) Overcasting stitch
Using the all purpose foot
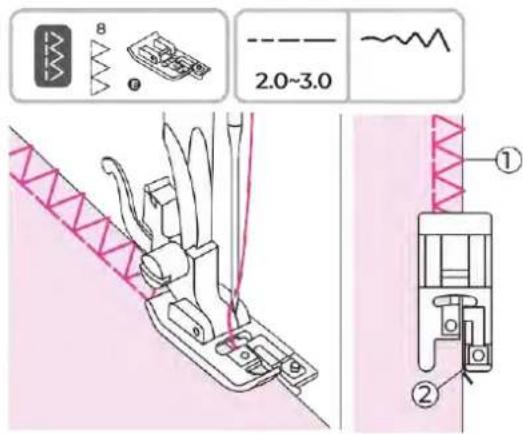
Attach the all purpose foot.Sewing the overcasting along the edge of the fabric so that the needle drops over the edge of the fabric on the right side. (148)
① Needle drop point
Using the overcasting foot
Attach the overcasting foot. Sew the fabric with the fabric edge against the guide of the overcasting foot. (149)
① Needle drop point
② Guide
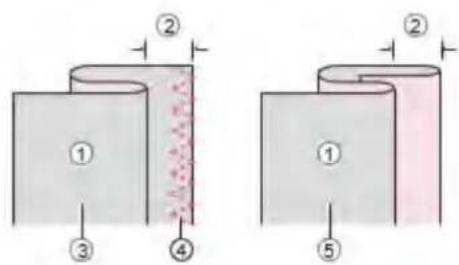
(150-153) Blind Hem
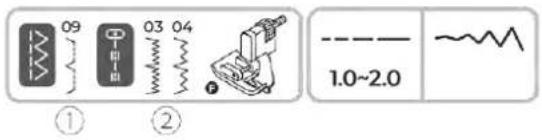
Secure the bottom of skirts and pants with a blind hem, this stitch will sew with invisible stitch on the right side of the fabric.
Using the blind hem foot. (150)
① 9: Blind hem/lingerie for firm fabrics.
② 03/04: Blind hem for stretch fabrics.
• Note: Please use the same fabric of the project and do a sewing test in advance.
Fold the fabric as illustrated with the wrong side up. (151)
① Wrong side
② 5mm
③ For heavy weight fabric
④ Overcasting stitch
⑤ For light/medium weight fabric
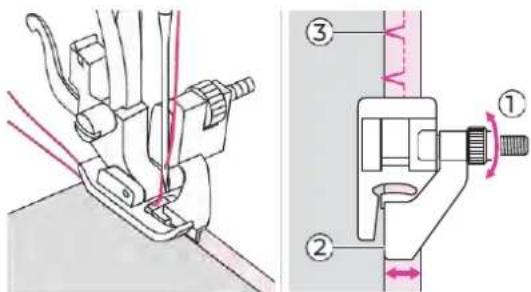
Place the fabric under the foot. Turn the handwheel forwards until the needle swings fully to the left. It should just pierce the fold of the fabric. If it does not, adjust the stitch width accordingly. Adjust the guide by turning the knob so that the guide just rests against the fold. (152)
① Knob
② Guide
③ Needle drop point
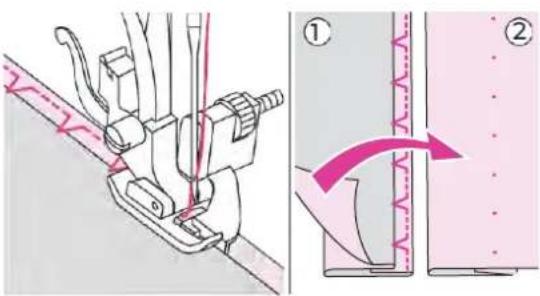
Sew slowly, guiding the fabric carefully along the edge of the guide. (153)
Turn over the fabric.
① Wrong side
② Right side
(154-169) Buttonhole stitch
Buttonholes can be adapted to the size of the button. For stretch fabric or thin fabric, it is recommended to use a stabilizer for a better buttonhole sewing. Slightly reduce upper thread tension to produce better results.
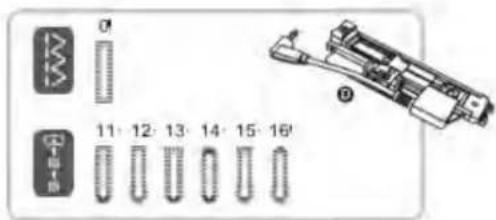
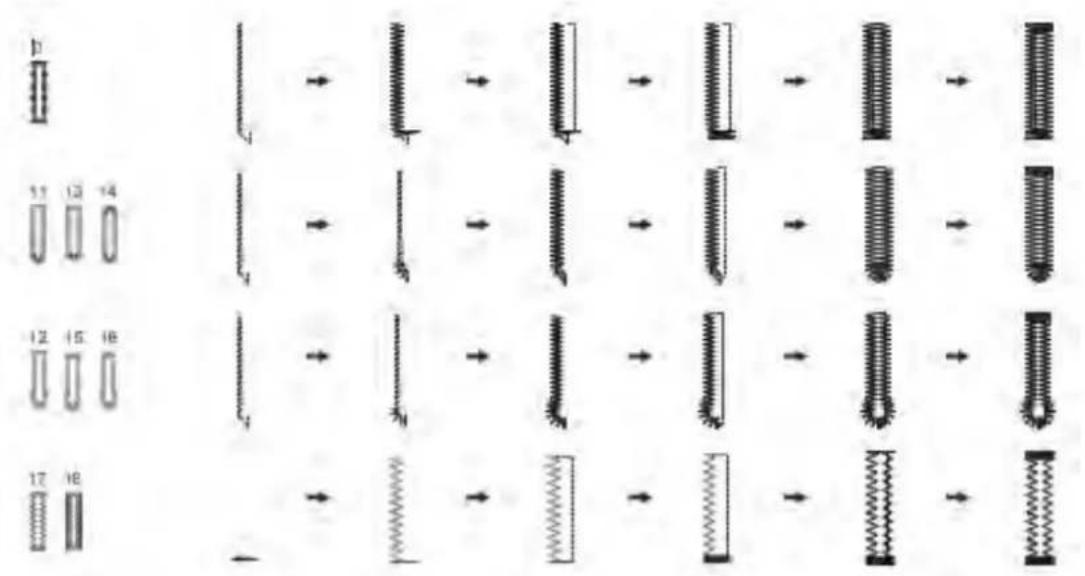
Using the electronic buttonhole foot. 0/11/14: For thin or medium fabric 12/15: For suits or overcoats 13: Heavy-duty buttonholes with vertical bar tacks 16: For jeans or trousers. (154)
Note: Please use the same fabric of the project and do a sewing test in advance. When you select any
buttonhole pattern, the LCD screen will display an icon, to remind to plug in electronic buttonhole's plug into machine's socket. (155)
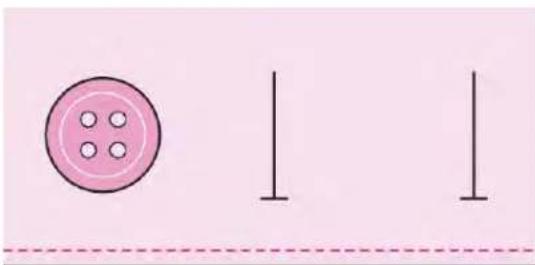
Mark the positions of the buttonhole on the fabric.
The maximum buttonhole length is 3cm. (Total of diameter + thickness of button.)
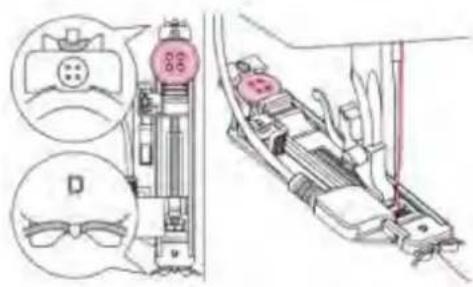
The size of the buttonhole is determined by the button inserted in the button plate. (156)
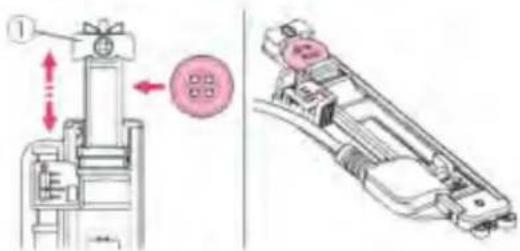
Pull the button holder plate to the back, and place the button in it. Push back the button holder plate against the button to hold it tight. (157)
① Button holder plate
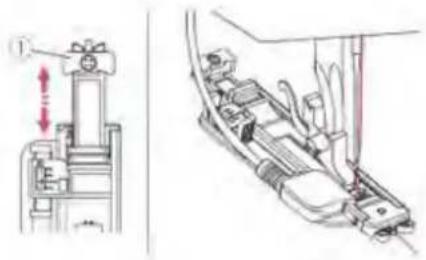
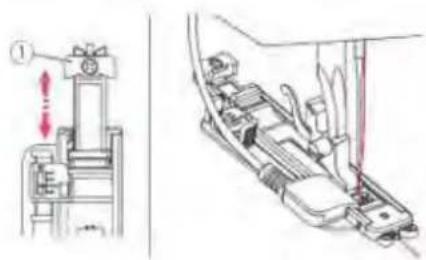
Consider the unique shape of each button, the electronic buttonhole foot allows to adjust the length and width to fit each button. The buttonhole fine tuning adjuster provides
a precise setting for buttonhole, and the buttonhole adjustment button allows to adjust the buttonhole size from Small to Large. (158)
① Buttonhole fine tuning adjuster
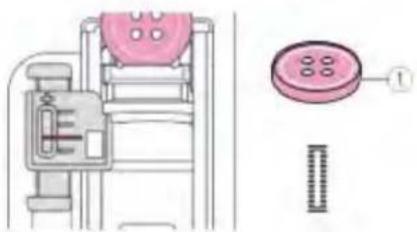
The red mark is the standard setting for regular button, adjust the pointer align with the red mark.
The buttonhole adjustment button provides a further range of buttonhole size adjustment. Please refer to "Buttonhole adjustment button" chapter for more information. (159)
① Regular button
The buttonhole length may need to be increased for thick button, adjust the pointer toward to "+" for fine tuning. (160)
① Thick button
The buttonhole length may need to be decreased for thin button, adjust the pointer toward to "-" for fine tuning. (161)
① Thin button
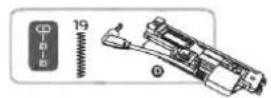
Attach the electronic buttonhole foot and plug the cord into the socket above the presser foot bar. (162)
The upper thread should be passed through the hole of electronic buttonhole foot and bring the upper thread to the front of electronic buttonhole foot. (163)
① Cord
② Socket
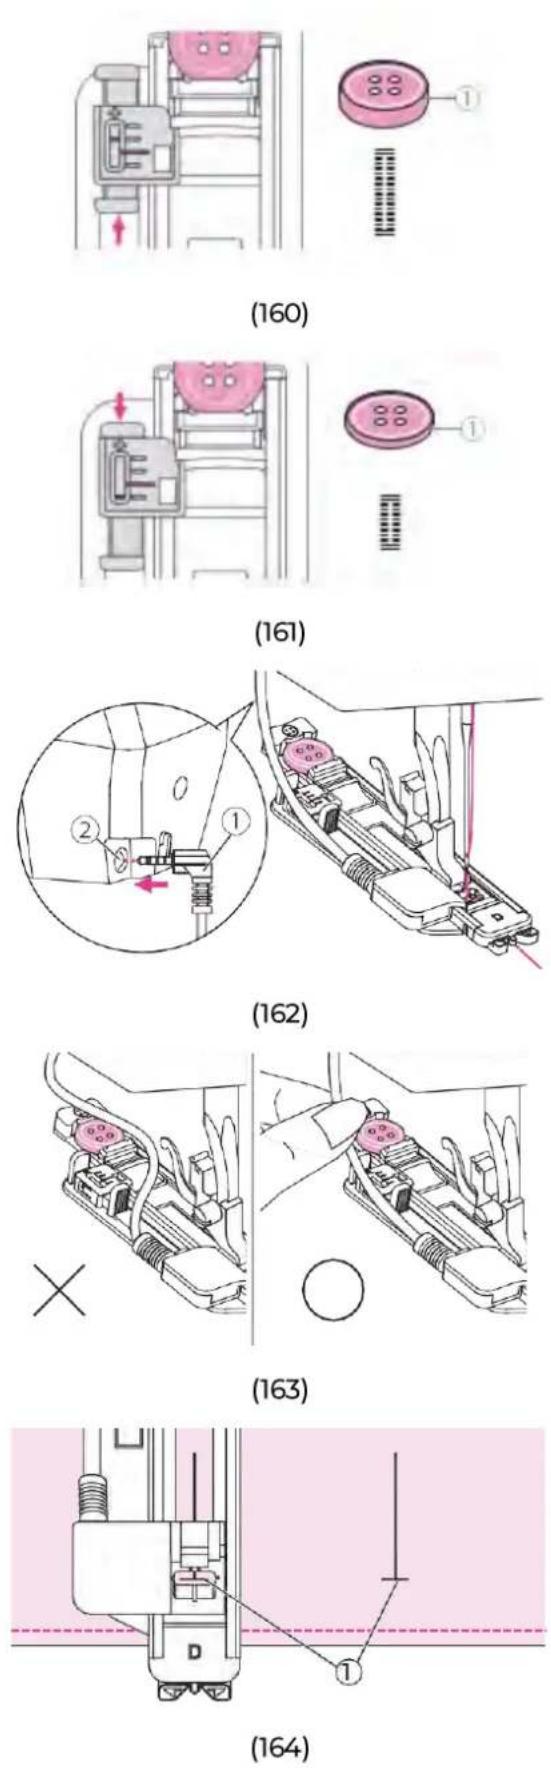
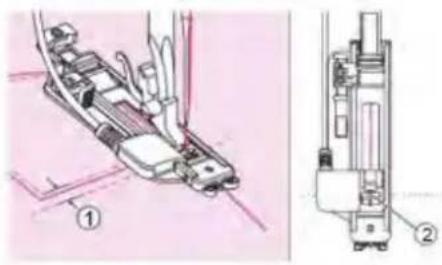
Position the fabric under the presser foot so that the centerline's mark is aligning with the center of the buttonhole foot.
① Starting point
Select the buttonhole stitch. Adjust the stitch width and the stitch length to the desired width and density. (164)
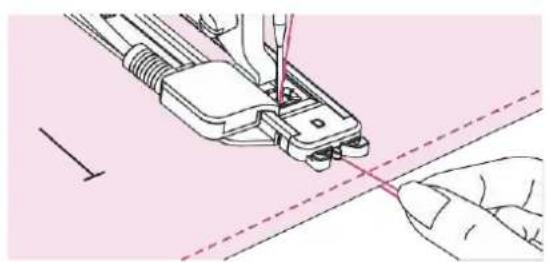
Slightly hold the end of the upper thread and start sewing. Pull two lines together. (165)
Note: Gently feed the fabric by hand. Before stopping, the machine will automatically sew a reinforcement stitch after the buttonhole is sewn.
When you finish sewing, raise the presser foot lifter and cut the thread. To sew over the same buttonhole, raise the presser foot lifter.
Use the seam ripper to cut the center of the buttonhole being careful not to cut any stitches on either side. Use a pin as a stopper at the bar tack so you do not cut too much. (166)
Note: When cutting the buttonhole with the seam ripper, do not place
your hands in the cutting direction, otherwise injuries may result.
Making a buttonhole on stretch fabrics
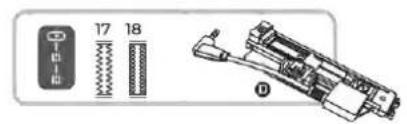
17: For stretch or woven fabric
18: For stretch fabric
When sewing buttonholes on stretch fabric, hook heavy thread or cord under the buttonhole foot.
Attach the electronic buttonhole foot and plug the cord into the socket above the presser foot bar. Bring the gimp thread ends to the front of the foot and insert them into the grooves, then tie them there temporarily. Lower the presser foot lifter and start sewing.
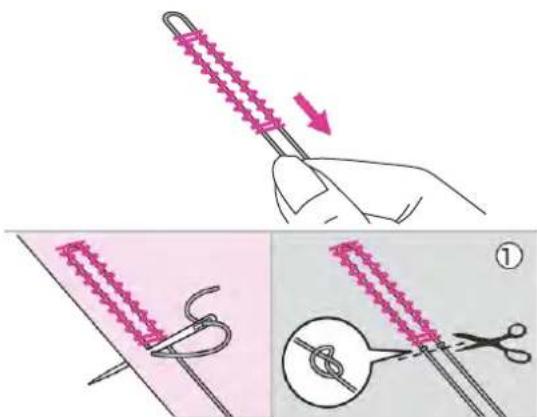
Set the stitch width to match the diameter of the gimp thread. (167)
Once sewing is completed, pull the gimp thread gently to remove any slack. Cross the gimp in front of the needle and thread gimp ends into a large needle, pull to the wrong side and knot ends before cutting excess. (168)
① Wrong side
• Note: It is suggested that you sew with a stabilizer material under the fabric.
Buttonholes are sewn from the front of the presser foot to the back, as shown. (169)
(170-172) Bar tack stitch
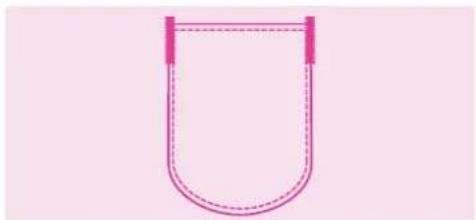
Bar tack stitch is used to reinforce points subject to strain, such as pocket corners and openings.
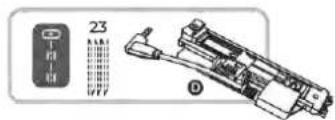
Using the electronic buttonhole foot.
Extend the button holder plate and set to the desire length. Adjust the stitch width
and the stitch length to the desired width and density.
① Button holder plate
Attach the electronic buttonhole foot and plug the cord into the socket above the presser foot bar.
The upper thread should be passed through the hole of electronic buttonhole foot and bring the upper thread to the front of electronic buttonhole foot. (170)
Position the fabric so that the needle is 2mm in front of where you want the sewing to start, and then lower the presser foot lifter.
①2mm
② Starting point
Slightly hold the end of the upper thread and start sewing. (171)
Bar tack stitches are sewn. (172)
Note: It is suggested that you sew with a stabilizer material under the fabric.
(173-178) Darning stitch
Darning a small hole or a tear before it becomes larger can save a garment. Choose a fine thread in a color as color as close to your garment possible.
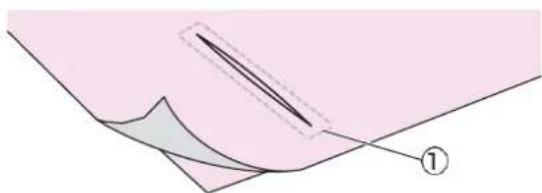
Using the electronic buttonhole foot. Baste the upper fabric and the under fabric together. (173)
① Basting
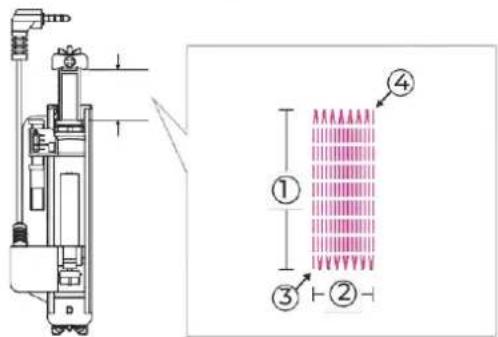
The size of one darn cycle is variable. However, the maximum stitch length is 2.6cm and the maximum stitch width is 7mm. (174)
① The length of sewing
② The width of sewing
③ Start
④ Stop
Extend the button holder plate and set to the desire length. Adjust the stitch width and the stitch length to the desired width and density.
① Button holder plate
Attach the electronic buttonhole foot and plug the cord into the socket above the presser foot bar.
The upper thread should be passed through the hole of electronic buttonhole foot and bring the upper thread to the front of electronic buttonhole foot. (175)
Position the fabric so that the needle is 2mm in front of the area to be darned, and then lower the presser foot lifter. (176)
① 2mm
Slightly hold the end of the upper thread and start sewing.
Darning stitches are sewn from the front of the presser foot to the back, as shown. (177)
- Note: If the fabric does not feed, for example, because it is too thick, increase the stitch length.
If the sewing range is too big to sew, then we suggest you can sew several times (or cross sew) to get better sewing result. (178)
(179-180) Eyelet stitch
Eyelet stitches are used for making belt holes and other similar applications.
Using the satin stitch foot. Press the "+" or "-" stitch width adjustment button to select the eyelet size. (179)
① Small: 5.0mm
② Medium: 6.0mm
③ Large: 7.0mm
Lower the needle into the fabric at the beginning of the stitching, and then lower the presser foot lifter.
Once sewing is completed, the machine automatically sews reinforcement stitches, then stops.
Make a hole at the center using an eyelet punch. (180)
• Note: Eyelet punch is not included with the machine.
Note: When using the eyelet punch, place thick paper or some other protective sheet under the fabric before punching the hole in the fabric. If thin thread is used, the stitching may be coarse. If this occurs, sew the eyelet twice one on top of the other.
(181-185) Button sewing
Buttons can be sewn on with the sewing machine. Buttons with 2 or 4 holes can be attached.
Using the button sewing foot. Move the drop feed lever to lower the feed dogs. (181)
① Lowered position
Put the work under the foot and place the button in desired position, then lower the foot. (182)
Select the buttonhole sewing stitch and adjust the stitch width according to the distance between the two holes of the button.
Turn the handwheel to check that the needle goes cleanly into the left and right holes of the button. (183)
For buttons with 4 holes, sew through the front two holes first, push work forward and then sew through the back two holes. (184)
When you finish the work, move the drop feed lever to raise the feed dogs. (185)
① Raised position
(186-192) Zipper insertion
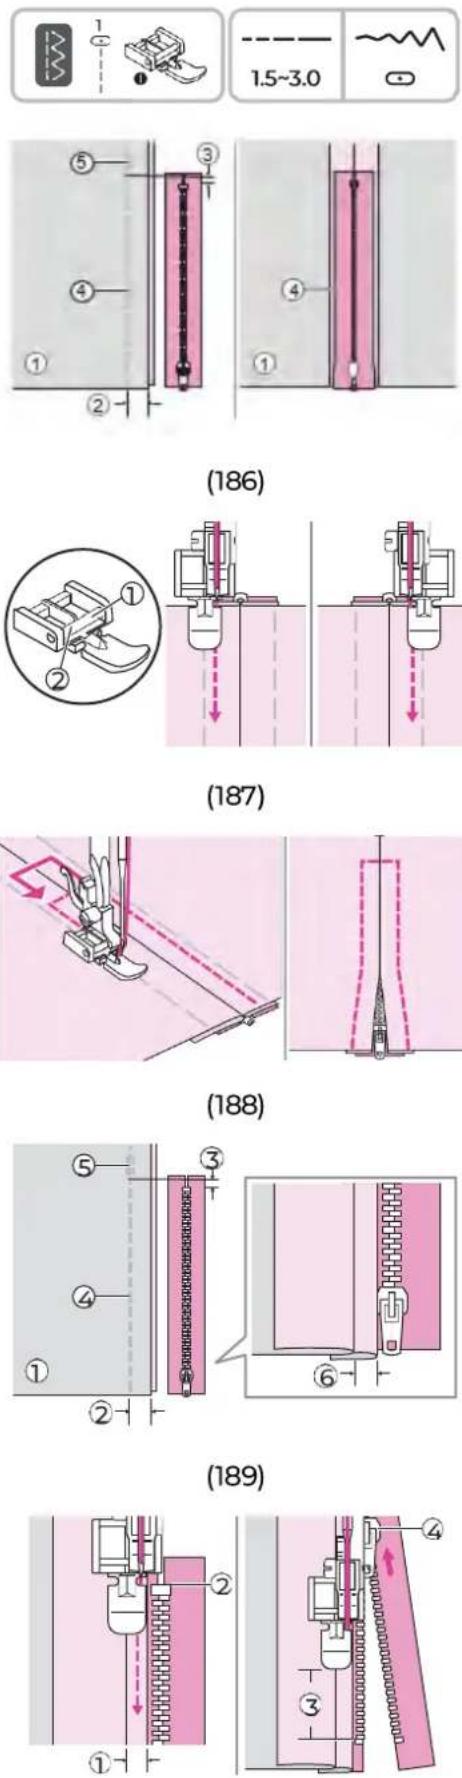
This foot can be set to sew on each side of the zipper, the edge of the foot guides the zipper to ensure straight placement.
Using the zipper foot. (186)
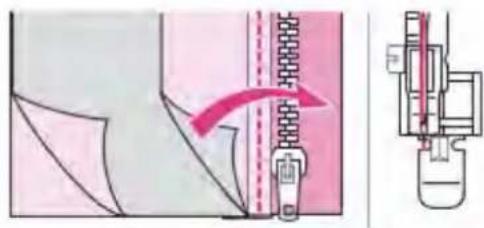
- Attention: Zipper foot should be used for sewing straight stitches only. It is possible that the needle could hit the presser foot and break when sewing other stitches. When sewing, be sure that the needle does not touch the zipper, otherwise the needle may bend or break.
Inserting a centered zipper
Place the right sides of the fabric together. Sew a bottom seam 2cm from the right edge of the zipper bottom stop position. Sew few reverse stitches for fixed. Increase the stitch length to maximum, set the tension below 2 and baste the remaining length of the fabric.
Press open the seam allowance. Place the zipper face down on the seam allowance with the teeth against the seam line. Baste the zipper tape in place. (186)
① Wrong side
② 2cm
③ 5mm
④ Basting
⑤ Reverse stitches
Attach the zipper foot. (187)
① Attach the right pin for sewing the left side of the zipper.
② Attach the left pin for sewing the right side of the zipper.
Stitching around the zipper. Remove the basting and press. (188)
Inserting a side zipper
Place the right sides of the fabric together. Sew a bottom seam 2cm from the right edge of the zipper bottom stop position. Sew few reverse stitches for fixed. Increase the stitch length to maximum, set the tension below 2 and baste the remaining length of the fabric.
Fold back to the left the seam allowance. Turn under the right the seam allowance to form a 3mm fold. (189)
① Wrong side
② 2cm
③5mm
④ Basting
⑤ Reverse stitches
⑥ 3mm
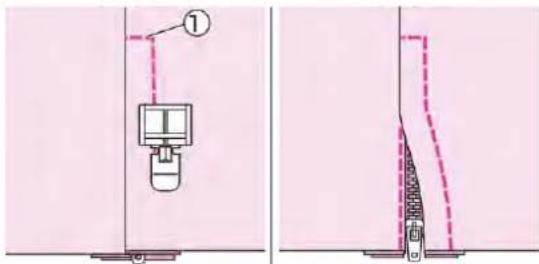
Attach the zipper foot. Attach the right pin for sewing the left side of the zipper. Sew the zipper to the piece of fabric with the extra 3mm, starting from the end of the zipper.
Stop the machine about 5cm from the top of the zipper. Lowered the needle into the fabric, raise the presser foot lifter, and then open the zipper and continue sewing. (190)
①3mm
② The end of zipper
③ 5cm
④ Zipper
Turn the fabric right side out. Attach the left pin for sewing the rightside of the
zipper. (191) Stitch across the lower end and the right side of the zipper. (192)
① Lower end
Stop the machine about 5cm from the top of the zipper. Remove the basting and open the zipper. Stitch the remaining of the seam.
(193) Satin stitch sewing
Using the satin stitch foot.
• Note: When sewing very lightweight fabrics, it is recommended that you use interfacing or stabilizer on the wrong side of the fabric.
This foot has a groove on the underside which allows dense stitching to pass freely underneath.
To sew the satin or decorative stitch, you may adjust the length and width of the stitch.
Experiment with fabric scraps until you get the desired length and width.
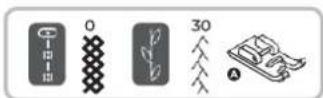
(194-197) Smocking
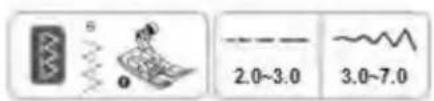
The decorative stitch created by stitching or embroidering over gathers is called "smocking". It is used to decorate the front of blouses or cuffs. The smocking stitch adds texture and elasticity to the fabric.
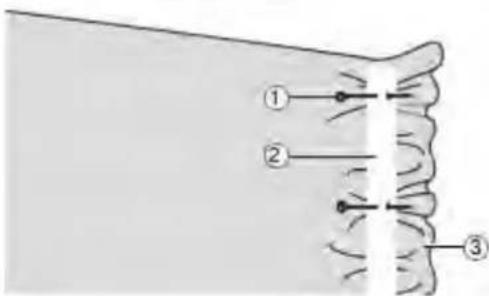
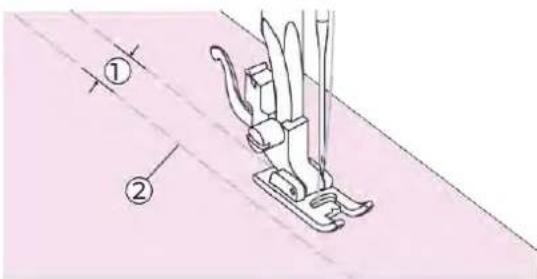
Using the satin stitch foot. Increase the stitch length to maximum, set the tension below 2 and basting lines 1cm across the area to be smocked. (194)
① 1cm
② Basting
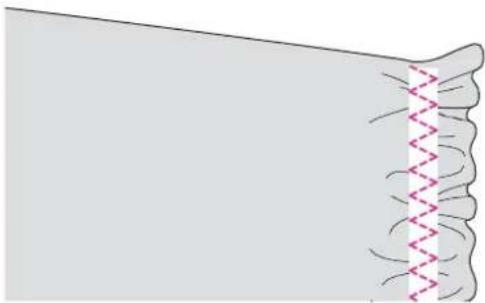
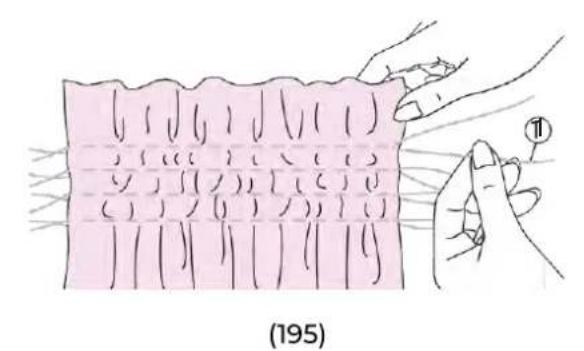
Knot the threads along one edge. Pull the bobbin threads and distribute the gathers evenly. Secure the threads at the other end. (195)
① Bobbin thread
Reduce the tension if necessary and sew decorative stitches between the straight seams. (196)
Pull out the basting. (197)
(198-205) Free motion darning, embroidery and monogramming
Preparation for embroidering and monogramming
- Note Embroidery hoop is not included with the machine.
Using the darning/embroidery foot. Move the drop feed lever to lower the feed dogs. (198)
① Lowered position
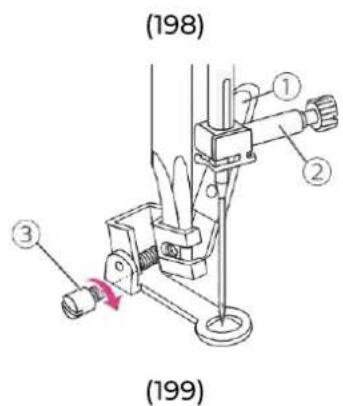
Remove the presser foot holder and attach the darning/embroidery foot. The lever should be behind the needle clamp screw. Press the darning/embroidery foot on firmly from behind with your index finger and tighten the screw. (199)
① Lever
② Needle clamp screw
③ Screw
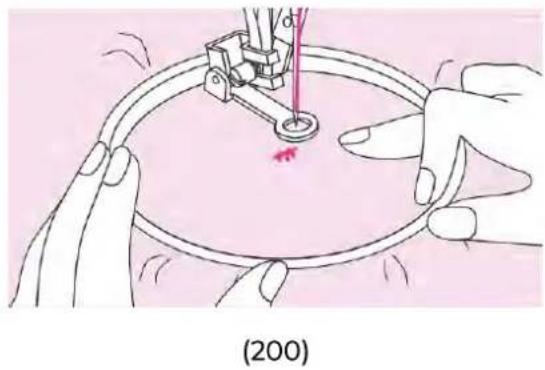
Draw the desired lettering or design on the surface of the fabric. Stretch the fabric between the embroidery hoop as firmly as possible.
Place the fabric under the needle. Make sure the presser foot bar is down to its lowest position.
Turn the handwheel towards you to bring up the bobbin thread through the fabric. Sew a few securing stitches at the starting point.
Hold the hoop with thumb and forefinger of both hands while pressing the material with the middle and third finger and supporting the outside of the hoop with your small finger. (200)
• Attention: Keep fingers away from moving parts, especially needles.
• Note: When you finish the work, move the drop feed lever to raise the feed dogs. (201)
① Raised position
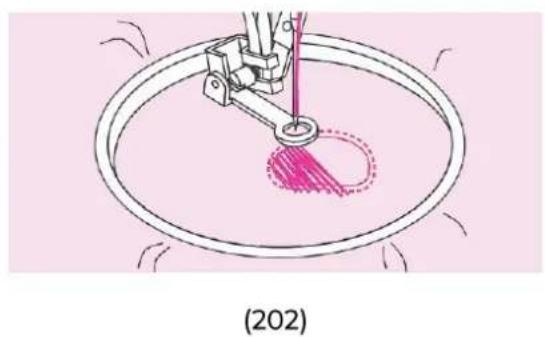
Darning
First sew around the edges of the hole to secure the threads. Working from left to right, sew over the hole in a constant and continuous movement.
Turn the work by 1/4 and sew over the first stitching moving the work slower over the hole to separate the threads and not form big gaps between the threads. (202)
Note: Free motion darning is accomplished without the sewing machine internal feed system. Movement of the fabric is controlled by the operator. It is necessary to coordinate sewing speed and movement of fabric.
Embroidery
Stitch along the outline of the design by moving the embroidery hoop. When sewing, make sure to maintain a constant speed. (203)
Fill in the design working from the outline towards the inside. Keep the stitches close together.
You will get longer stitches by moving the hoop faster and shorter stitches by moving the hoop slower.
Secure with reinforcement stitches at the end of the design. (204)
Monogramming
Sew at constant speed, moving the embroidery hoop slowly along the lettering.
When the letter is finished, secure with reinforcement stitches at the end of the design. (205)
(206-211) Quilting
Sandwich batting between the top and bottom layers of fabric is call "Quilting". The top layer is usually formed by multiple geometrically shaped pieces of materials joined together.
Using the edge/quilting guide
Using the Quilting foot with edge/quilting guide.
- Attention: Only center straight stitches are applicable while using quilting foot.
Attach the edge/quilting guide in the presser foot holder as illustrated and set the space as you desire. (206)
Sew the first row and move over the fabric to sew successive rows with the guide riding along the previous row of stitching. (207)
Joining the pieces of the fabric
Using the all purpose foot.
Place the two pieces of fabric with the right side together and sew with the straight stitch.
Join the pieces of fabric with a seam allowance of 5mm.
Sew with the side of the presser foot aligned with the edge of the fabric. (208)
① Wrong side
② 5mm
Patchwork stitching
Using the all purpose foot or satin stitch foot.
Place the two fabrics, right sides together and sew using a straight stitch. Open the seam allowance and press it flat. (209)
① Wrong side
Working on the right side of the fabric, place the center of the presser foot on the seam line of the joined fabrics and stitch over the seam. (210)
Using the 1/4" Quilting foot.
- Attention: Only center straight stitches are applicable while using quilting foot.
Align the edges of the fabric with inside edge of guide on the side of the foot for accurate 1/4" piecing.
The inside of the toes provides an accurate 1/8" seaming guide.
The foot has 1/4" markings both behind the needle and in front of the needle for accurate pivoting of corners. (211)
① 1/4" inch
(212) Applique
Using the all purpose foot.
Cut out the applique design and baste it on the fabric. Sew slowly around the edge of the design.
① Basting
Trim the excess material outside the stitching. Make sure not to cut any stitches. Remove the basting.
(213-214) Fagoting
Using the all purpose foot. Separate the folded edges of the fabric pieces with a gap of 4mm and baste them onto a piece of
thin paper or water-soluble stabilizer sheet. (213)
①4mm
② Thin paper or water-soluble stabilizer
③ Basting
Align the center of the presser foot with the center of the two pieces of fabric and begin sewing. (214)
After sewing, remove the stabilizer and basting.
(215-217) Scallop stitch
The wave-shaped repeating stitch, that looks like shells, is called "scalloping". It is used to decorate the collar of blouses and the edges of knitting projects.
Scallop edging
Using the satin stitch foot or all purpose foot. Stitch along the edge of the fabric, making sure not to sew directly on the edge of the fabric.
For better results, apply spray starch onto the fabric and press with a hot iron before it is sewn. (215)
Trim the fabric close to the stitching taking care not to cut the stitches.
Scallop hem
Using the all purpose foot. Fold the fabric right side together. Sew along the folded edge as illustrated. (216)
Cut the fabric along the seam leaving an allowance of 3mm for seaming. Notch the allowance.
Turn the fabric over and push out the curved seam to the surface and iron it. (217)
(218-219) Walking foot
Always try to sew first without the walking foot which should be used only when necessary.
It is easier to guide the fabric and you have a better view of the seam when using the standard, regular foot on your machine.
Your sewing machine offers excellent stitch quality on a wide range of fabrics from delicate chiffons to multiple layers of denim.
The walking foot equalizes the feeding of the upper and lower layers of fabric and improves the matching of plaids, stripes and stitches. It also helps to prevent uneven feeding of very difficult fabrics.
Using the walking foot. Remove the presser foot holder and attach the walking foot. The lever should be behind the needle clamp screw. Press the walking foot on firmly from behind with your index finger and tighten the screw. (218)
① Lever
② Needle clamp screw
③ Screw
Draw the bobbin thread up and place both bobbin thread and needle thread behind the walking foot attachment. (219)
(220-224) Twin needle
Using the all purpose foot or satin stitch foot. Insert the twin needle. Please refer to "Replacing the needle" chapter for more information. (220)
- Attention: When using the twin needle, be sure to select the twin needle setting and attach the suggested presser foot which screen appears.
Use only twin needle assemblies with max. 2.5mm needle distance, 80/12 needle size.
Follow the instructions for single-needle threading using the horizontal spool pin. Thread through the left needle.
Set the second spool pin into the hole on the top of the machine. Thread through remaining points, making certain to omit the thread guide above the needle and pass thread through the right needle.(221)
Thread each needle separately. (222)
Note: Make sure that the two threads used to thread the twin needle are of the same weight. You can use one or two colors.
Select a stitch for twin needle. Please refer to "Stitch chart" chapter.
Press the twin needle button, the LCD screen will display the twin needle icon. (223)
The machine automatically reduces the maximum width for the twin needle sewing.
Two lines of stitching are sewn parallel to each other. (224)
• Note: When sewing with twin needle, always proceed slowly, and make sure to maintain a low speed to insure quality stitching.
When twin needle sewing has been selected, it will remain active even the stitch is changed.
Twin needle function cannot be used under memory mode.
If the sewing machine is turned off, the sewing function returns to its default setting.
(225-226) Maintenance
- Attention: Disconnect the power cord from the wall socket before carrying out any maintenance, otherwise injury or electrical shock may result.
Clean the machine surface
If the surface of the sewing machine is dirty, lightly soak a cloth in mild detergent, squeeze it out firmly and then wipe the surface. After cleaning it once in this way, wipe the surface again with a dry cloth.
- Attention: Do not use any organic solvents or detergents.
Clean the hook
If lint and bits of thread accumulate in the hook, this will interfere with the smooth operation of the machine. Check regularly and clean the stitching mechanism when necessary.
Remove the needle, presser foot and presser foot holder. Remove the bobbin cover and bobbin. Remove the screws on the needle plate then remove the needle plate. (225)
① Bobbin cover
② Screws
③ Needle plate
Clean the feed dogs and bobbin case with a brush. And also use a soft and dry cloth to clean them. (226)
(227-231) Warning Function
Warning beeping sound
- Operate correctly: 1 beep.
- Operate incorrectly: 3-short beeps.
- When the sewing machine is in trouble and can't sew: 3-short beeps.
It means that the thread may be twisted or jammed and the handwheel axle can't move. Please look through the "Trouble shooting guide" to find the solution. After the problem has been solved, the machine will be able to sew. (227)
Return bobbin winder spindle to left
When the bobbin thread is full or machine stop, if the bobbin winder spindle is still in the right position, you will hear 3-short beeps by pressing any button until you push the spindle to the left. Return the bobbin winder spindle to the left. (228)
- Note: If the problem is still not solved, please contact your local dealer.
- Attention: During sewing, if the thread has been jammed inside the hook and needle movement stops. If you continue to sew, the machine will stop automatically due to safety. If machine stops, please turn off the machine firstly then turn on again.
Instruction message display: The sewing machine is in trouble
The animation message means that the thread is twisted or jammed and the hand wheel axle cannot move. Please look through the "Trouble shooting guide" to find the solution. When the problem is solved the machine will continue sewing. (229)
Lower the presser foot lever
Lift up the presser foot lever during sewing, the machine will stop sewing immediately and sound an alarm, the alarm screen will flash. (230)
When the presser foot lever is not laid down, there will be no function for start/stop button, needle up/down position button, thread cutter button, auto-lock button and reverse button as well as foot controller. Should the abnormal situation is not eliminated, the alarm screen will flash until the presser foot is laid down. (231)
Trouble shooting guide
Before calling for service, check below trouble shooting guides in advance, if problem still exist, please contact nearest dealer or local service center.
| Problem | Cause | Correction | Reference |
| Upper thread breaks | 1. The machine is not threaded correctly.2. The thread tension is too tight.3. The thread is too thick for the needle.4. The needle is not inserted correctly.5. The thread is wound around the spool holder pin.6. The needle is damaged. | 1. Rethread the upper thread.2. Reduce the thread tension (to lower number).3. Select a larger needle size.4. Remove and reinsert the needle (flat side towards the back).5. Remove the reel and wind up the thread onto the reel.6. Insert a new needle. | 122317161216 |
| Bobbin thread breaks | 1. The bobbin case is not inserted correctly.2. The bobbin case is threaded wrong. | 1. Remove and reinsert the bobbin case and pull on the thread.2. Check both bobbin and bobbin case if on the correct position. | 1111 |
| Skipped stitches | 1. The needle is not inserted correctly.2. The needle is damaged.3. The wrong size needle has been used.4. The presser foot is not attached correctly.5. The machine is not threaded correctly. | 1. Remove and reinsert the needle (flat side towards the back).2. Insert a new needle.3. Choose a needle to suit the thread.4. Check and attach it correctly.5. Rethread the upper thread. | 1616171812 |
| Needle breaks | 1. The needle is damaged.2. The needle is not correctly inserted.3. Wrong needle size for the fabric.4. The wrong presser foot is attached.5. The needle clamp screw is loose.6. The presser foot is not appropriate for the type of stitch that you sew.7. The upper thread tension too tight. | 1. Insert a new needle.2. Insert the needle correctly (flat side towards the back).3. Choose a needle to suit the thread and fabric.4. Select the correct presser foot.5. Use the screwdriver to tighter the screw.6. Attach appropriate presser foot for the type of stitch that you sew.7. Loosen the upper thread tension. | 161617-16-23 |
| Loose stitches | 1. The machine is not correctly threaded. | 1. Check the threading and rethread. | 12 |
| 2. The bobbin case is not threaded correctly. | 2. Thread the bobbin case as illustrated. | 11 | |
| 3. Needle/fabric/thread combination is wrong. | 3. The needle size must suit the fabric and thread. | 17 | |
| 4. The thread tension is wrong. | 4. Correct the thread tension. | 23 | |
| Seam gather or pucker | 1. The needle is too thick for the fabric. | 1. Select a correct needle size. | 17 |
| 2. The stitch length is wrong. | 2. Adjust the stitch length. | 30 | |
| 3. The thread tension is too tight. | 3. Loosen the thread tension. | 23 | |
| Seam puckering | 1. The needle thread tension is too tight. | 1. Loosen the thread tension. | 23 |
| 2. The needle thread is not threaded correctly. | 2. Rethread the machine. | 12 | |
| 3. The needle is too heavy for the fabric being sewn. | 3. Choose a needle to suit the thread and fabric. | 17 | |
| 4. The stitch length is too long for the fabric. | 4. Adjust the stitch length shorter. | 30 | |
| 5. Sewing on thin fabric. | 5. Sew with a stabilizer material under the fabric. | 48 | |
| Stitches are distorted | 1. The presser foot is not suited for the stitch. | 1. Select the correct foot. | - |
| 2. The needle thread tension is too tight. | 2. Loosen the thread tension. | 23 | |
| Thread has jammed | 1. Thread is caught in the hook. | Remove the upper thread and bobbin case, turn the handwhee backwards and forwards and remove the thread remnants. | 80 |
| 2. The feed dogs are packed with lint. | |||
| The machine is noisy | 1. Fluff or oil have collected on the hook or needle bar. | 1. Clean the hook and feed dog. | 80 |
| 2. The needle is damaged. | 2. Insert a new needle. | 16 | |
| 3. Thread is caught in the hook. | Remove the upper thread and bobbin case, turn the handwhee backwards and forwards and remove the thread remands. | 80 | |
| 4. The feed dogs are packed with lint. | |||
| Uneven stitches, uneven feed | 1. Poor quality thread. | 1. Select a better quality thread. | 17 |
| 2. The bobbin case is threaded uncorrect. | 2. Remove the bobbin case and the thread and reinsert them correctly. | 11 | |
| 3. Fabric has been pulled on. | 3. Do not pull on the fabric while sewing, let it be taken up by the machine. | - |
| Problem | Cause | Correction | Reference |
| The sewing machine doesn't operate | 1. The machine is not turned on. | 1. Turn on the machine. | 4 |
| 2. The presser foot lifter is raised. | 2. Lower the presser foot lifter. | 7 | |
| 3. The machine is not plugged in. | 3. Connect the power cord to the electric outlet. | 4 |
20600 Eibar (Guipuzcoa), Spain.

- ES
- FR
- Important safety instructions
- DANGER - To reduce the risk of electric shock:
- WARNING - To reduce the risk of burns, fire, electric shock, or injury to persons:
- Save these instructions
- Warranty Alfa
- Español:
- Français:
- Vista general frontal
- Needle area overview
- Back Overview
- Standard accessories
- Optional accessories
- (6-8) Connecting machine to power source
- Polarized plug information
- Foot control
- Foot controller with needle up and down feature
- (9-11) Sewing table
- (12-13) Two-step presser foot lifter
- (14-15) Install the extension table
- Adjusting the presser foot pressure
- (17-26) Winding the bobbin
- (27-30) Inserting the bobbin
- (31-45) Threading the upper thread
- (46-48) Bringing up the bobbin thread
- (49-52) Replacing the needle
- (53-56) Changing the presser foot
- Remove the presser foot
- Attach the presser foot
- Remove and insert the presser foot holder
- Insert the edge/quilting guide
- (57-67) Attaching the straight stitch needle plate
- Straight stitch needle plate setting
- (77-97) Operation buttons
- ① Start/stop button
- ② Reverse button
- Repeat sewing function (In memory program)
- ③ Auto-lock button
- ④ Needle up/down position button
- ⑤ Thread cutter button
- ⑥ Speed adjustment slider
- ⑦ Pattern group switch button
- ⑧ Stitch width adjustment button
- Needle position adjustment
- ⑨ Stitch length adjustment button
- ⑩ Twin needle button
- ⑪ Direct stitch selection and number buttons
- Straight stitch needle plate setting button
- ⑫ Elongation button
- Buttonhole adjustment button
- ⑬ Mirror button
- Sound button
- (98-101) Selecting stitch
- Memory function buttons
- (103-118) Memory program
- Combine stitches
- Recalling and sewing the memorized stitches
- Inserting stitches
- Editing stitches
- Clearing stitches
- Repeat setting
- (119-123) Stitch chart
- (124-125) Straight-stitch
- Changing the needle position
- (126-127) Zigzag stitch
- (128-131) Starting to sew
- (132-141) Useful skills
- Reverse sewing
- Sewing curves
- Sewing corners
- Sewing stretch fabrics
- Sewing thin fabrics
- Sewing heavy fabric
- Stitch balance adjustment
- Adjusting distorted stretch stitches
- Adjusting distorted letters or numbers
- Adjusting the stitch density for iconhole
- (142-144) Stretch stitch
- Straight stretch stitch
- Zigzag stretch stitch
- (145-147) Sewing stretch fabrics and elastic tape
- (148-149) Overcasting stitch
- Using the all purpose foot
- Using the overcasting foot
- (150-153) Blind Hem
- Making a buttonhole on stretch fabrics
- (170-172) Bar tack stitch
- (173-178) Darning stitch
- (179-180) Eyelet stitch
- (181-185) Button sewing
- (186-192) Zipper insertion
- Inserting a centered zipper
- Inserting a side zipper
- Satin stitch sewing
- (194-197) Smocking
- (198-205) Free motion darning, embroidery and monogramming
- Preparation for embroidering and monogramming
- Darning
- Embroidery
- Monogramming
- (206-211) Quilting
- Using the edge/quilting guide
- Joining the pieces of the fabric
- Patchwork stitching
- Using the 1/4" Quilting foot.
- Applique
- (213-214) Fagoting
- (215-217) Scallop stitch
- Scallop edging
- Scallop hem
- (218-219) Walking foot
- (220-224) Twin needle
- (225-226) Maintenance
- Clean the machine surface
- Clean the hook
- (227-231) Warning Function
- Warning beeping sound
- Return bobbin winder spindle to left
- Instruction message display: The sewing machine is in trouble
- Lower the presser foot lever
- Trouble shooting guide
Brand : ALFA
Model : Core – Heavy Duty
Category : Sewing machine