MAXIMO 10 - Cooker Sonnenkönig - Free user manual and instructions
Find the device manual for free MAXIMO 10 Sonnenkönig in PDF.


User questions about MAXIMO 10 Sonnenkönig
0 question about this device. Answer the ones you know or ask your own.
Ask a new question about this device
Download the instructions for your Cooker in PDF format for free! Find your manual MAXIMO 10 - Sonnenkönig and take your electronic device back in hand. On this page are published all the documents necessary for the use of your device. MAXIMO 10 by Sonnenkönig.
USER MANUAL MAXIMO 10 Sonnenkönig
natural_image
Exterior view of a modern office building (no signage)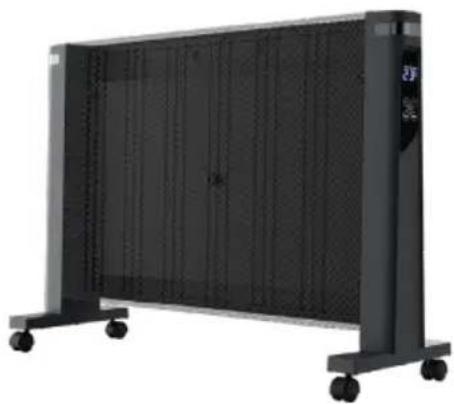
natural_image
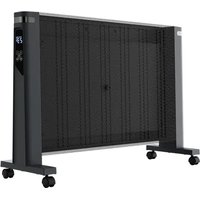
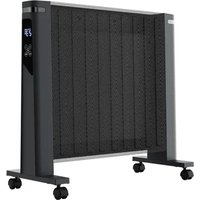
Exterior view of a black rectangular solar panel with wheels and a control panel (no text or symbols visible)MAXIMO 10: 20111312 MAXIMO 20: 20111412
FIRMA
Sonnenkönig of Switzerland
Olensbachstrasse 9-15
CH-9631 Ulisbach
Tel. Int. +41 58 611 60 00
Sonnenkönig of Switzerland
Industriering 9
D-86675 Buchdorf
Tel:01805006435
0.14 Cent/Minute
DIESES PRODUKT IST NUR FÜR GUT ISOLIERTE RÄUME ODER DEN GELEGENTLICHEN GEBRAUCH GEEIGNET.
Version 20.08.2025
natural_image
Exterior view of a black electric heater with labeled components (1, 2, 3), no visible text or symbols on the device itself.text_image
4 On/Off Send + Send - OK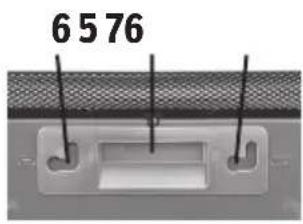
text_image
6576natural_image
Technical line drawing of a heat exchanger or radiator unit with mounting base (no text or symbols)text_image
My Home ... Add Device No Devices Add Device Add Manually Auto Scan Electrician Smart alarm push Stop cabinet standover Briest jump Lighting Large Home ... Small Home ... Kitchen Appliances Heater (200mm) Heater (other) DJ Heater Security & Semports Ozone Window Custain Curtain (200mm) Exercise & Health Current Minder (200mm) Drying Rack Excessive Blanker Video Survey France Gateway Control Maximizing Taper (300+W/N) Curtain (RJG) Curtains (other) Energy Entertain inlet Shoe cabinet Curtain Mirror (Ball Sheet) (R J) Industry & Agriculture... Pat. Others Pot Portable Pat. Static Center Pat. Ball Thrower Cancel EZ Mode Air Reset the device first. Please turn on the device and confirm that indicator is blinking fast. Attention: please complete passing process within 3 minutes after device reset. Reseting Devices > confirm indicator rapidly blank. Nextnatural_image
Exterior view of a modern office building (no signage)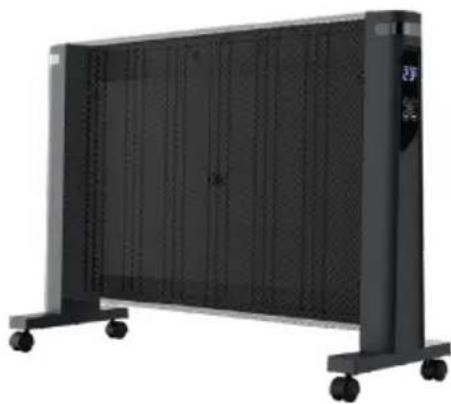
natural_image
Exterior view of a black rectangular solar power heater with wheels and ventilation slots (no text or symbols visible)MAXIMO 10: 20111312 MAXIMO 20: 20111412
MAISON
Sonnenkönig of Switzerland
Olensbachstrasse 9-15
CH-9631 Ulisbach
Tel. Int. +41 58 611 60 00
Sonnenkönig of Switzerland
Industriering 9
D-86675 Buchdorf
Tel:01805006435
0.14 Cent/Minute
CE PRODUIT CONVIENT UNIQUEMENT POUR LES ESPACES BIEN ISOLÉS OU POUR UNE UTILISATION OCCASIONNELLE.
Version 20.08.2025
01 - TABLE DES MATIÈRES
01 - TABLE DES MATIÈRES 14
02 - AVERTISSEMENTS 15
03 - DESCRIPTION 17
04 - DONNÉES TECHNIQUES 17
05 - INSTRUCTIONS DE MONTAGE 18
06 - UTILISATION 19
07 - NETTOYAGE, ENTRETIEN ET MAINTENANCE 22
08 - CONFORMITÉ / ÉLIMINATION 22
DE - DEUTSCH / ALLEMAND / TEDESCO / GERMAN / Duits 1
IT - ITALIENISCH / ITALIEN / ITALIANO / ITALIAN / ITALIAANS 24
EN - ENGLISCH / ANGLAIS / INGLESE / ENGLISH / ENGELS 36
NL - NIEDERLÄNDISCH / NÉERLANDAIS / OLANDESE / DUTCH / NEDERLANDS 48
09 - ERP 60
10 - ERROR - MESSAGE D'ERREUR
62
natural_image
Exterior view of a black electric heater with labeled components (1, 2, 3), no visible text or symbols on the device itself.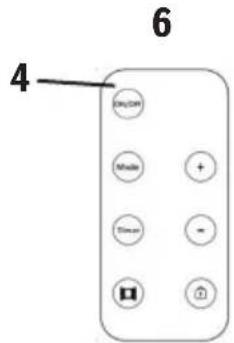
text_image
6 4 OK/OK Mobile + - Timeless -natural_image
Close-up of a mechanical component with three inserted pins and a textured surface (no visible text or symbols)natural_image
Technical line drawing of a heat exchanger or radiator unit with cooling fans and support legs (no text or symbols)text_image
My Home Add Device Add Manually Auto Scan Electronics Lighting Large Home... Small Home... Kitchen Appliances Security & Sensors Exercise & Health Video Surv. enience Geometry Control Energy Entertainment mask Industry & Agriculture... Others Add Devices Reset the device first. Please turn on the device and confirm that indicate labeling fast. Attention: please complete passing process within 3 minutes after device reset. Reseting Devices Confirm indicator rapidly blink NextModifications techniques
natural_image
Exterior view of a modern office building (no signage)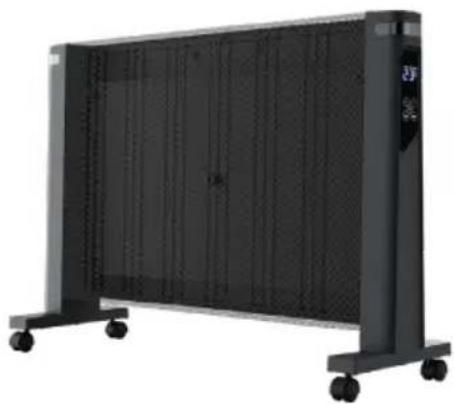
natural_image
Exterior view of a black horizontal solar panel with wheels and ventilation grilles (no text or symbols visible)MAXIMO 10: 20111312 MAXIMO 20: 20111412
DITTA
Sonnenkönig of Switzerland
Olensbachstrasse 9-15
CH-9631 Ulisbach
Tel. Int. +41 58 611 60 00
Sonnenkönig of Switzerland
Industriering 9
D-86675 Buchdorf
Tel:01805006435
0.14 Cent/Minute
natural_image
Exterior view of a black electric heater with labeled components (1, 2, 3), no visible text or symbols on the device itself.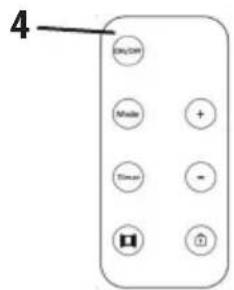
text_image
4 On/Off Send + Send - OKnatural_image
Simple diagram of a rectangular plate with two side handles and a vertical line labeled '7' (no text or symbols beyond the number)natural_image
Technical line drawing of a rectangular device with vertical bars and two hanging supports (no text or symbols)MODE = H-L-ECO-UP-Finestra.
text_image
My Home .. Add Device No devices Add Device Add Manually Auto Scan Electrician Smart alarm clock Shoe cabinet timer/boxer Breast pump Lighting Large Home ... Steve Lamps Heater Heater (BLC) Small Home ... Kitchen Appliances Heater (2Lbire) Heater (other) Off Heater Security & Sensors Dean Window Cartoon Cartoon (2pBHE) Exercise & Health Cartoon Motor (2pBHE) Drying Rack Electric Blanket Video Surveillance Gunsen Table (BLC+MI-IF) Cartoon (BLC) Cartoon (other) Gateway Control Wheezing Table (BLC+MI-IF) Cartoon (BLC) Energy Entertainment Shoe cabinet Cartoon Voice (Roll Clock) (BLC) Industry & Agriculture... Pet Others Pet Roomer Pet Tread Folder Pet Tool Browser Cancel EZ Mode By Reset the device first. Please turn on the device and confirm that indicator is blinking fees. Attention, please complete pairing process within 3 minutes after device reset. Resetting Devices Confirm indicator rapidly blank Nextnatural_image
Exterior view of a modern office building (no signage)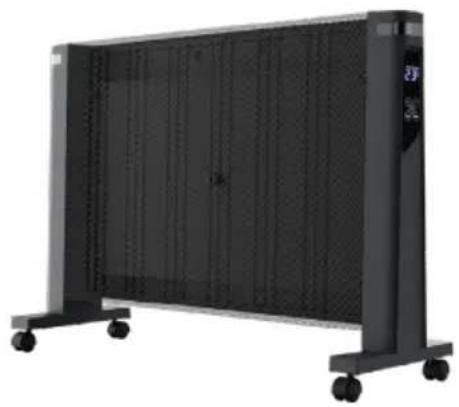
natural_image
Exterior view of a modern office building (no signage)MAXIMO 10: 20111312 MAXIMO 20: 20111412
COMPANY
Sonnenkönig of Switzerland
Olensbachstrasse 9-15
CH-9631 Ulisbach
Tel. Int. +41 58 611 60 00
Sonnenkönig of Switzerland
Industriering 9
D-86675 Buchdorf
Tel:01805006435
0.14 Cent/Minute
THIS PRODUCT IS ONLY SUITABLE FOR WELL INSULATED SPACES OR OCCASIONAL USE.
Version 20.08.2025
01 - CONTENT
01 - CONTENT 38
02 - WARNING NOTICE 39
03 - PART DESCRIPTION 41
04 - TECHNICAL DETAILS 41
05 - ASSEMBLY INSTRUCTIONS 42
08 - CONFORMITY / DISPOSAL 46
DE - DEUTSCH / ALLEMAND / TEDESCO / GERMAN / Duits 1
FR - FRANZÖSISCH / FRANÇAIS / FRANCESE / FRENCH / FRANS 12
Please read and understand these instructions completely before attempting to assemble, operate or install the product.
This manual contains important information about the installation, operation and maintenance of this ceramic heater. General safety information is presented on these first pages and is also found throughout this manual. Retain this manual for future reference and to educate new users of this product. This manual should be read in conjunction with the labeling on the product. Safety precautions are essential when dealing with mechanical or propane powered equipment. These precautions are required when using, storing and maintaining this item. Using this equipment with due respect and caution will reduce the possibility of personal injury or property damage.
Inspect the unit for damage after removing the packaging. If damage is suspected, do not operate the device and contact a specialist. The recyclable packaging material must not be kept or disposed of in a way that is accessible to small children, but must be disposed of properly.
This device may only be used for the purpose for which it was expressly designed. Any other use is to be considered improper and consequently dangerous. The supplier is not liable for any personal injury and/or damage to property resulting from improper or incorrect use.
Repairs to electrical equipment may only be carried out by qualified personnel. Improperly performed repairs and modifications to the equipment may result in dangerous consequences for the user, whereupon warranty claims will be rejected.
The following basic precautions should always be followed when handling electrical equipment:

WARNING: In order to avoid overheating, do not cover the heater.
- When first installed you may experience a burning smell or a little smoke, this is normal and will fade within a few minutes.
- Only connect the product if the voltage indicated on the product label(s) corresponds with the mains voltage.
- Do not disconnect the product by pulling on the cord, to disconnect, pull the plug (if have), not the cord.
- If the supply cord is damaged, it must be replaced by the manufacturer or its service agent or a similarly qualified person in order to avoid a hazard.
- This appliance can be used by children aged from 8 years and above and persons with reduced physical, sensory or mental capabilities or lack of experience and knowledge if they have been given supervision or instruction concerning use of the appliance in a safe way and understand the hazards involved, Children shall not play with the appliance.
- Cleaning and user maintenance shall not be made by children without supervision.
- The heater must not be located immediately below a socket-outlet.
- Do not use this heater in the immediate surroundings of a bath, a shower or a swimming pool.
- To protect against fire, electrical shock and injury, do not immerse the appliance power cord or plug (if have) in water or any other liquids.
- This product has an overheat protection safeguard that turns off the heater. If it does overheat, switch the heater off, disconnect the heater from wall socket and allow to cool for 45 minutes. The heater can then be switched on again. Carefully check prior to use that the reason for overheating was not curtains. Clothing, furniture etc. covering any of the heaters air vents.
-
Turn of the appliance and disconnect when not in use. Allow to cool down prior to cleaning. Use a damp cloth for cleaning and finish with damp cloth. Do not use cleaning chemicals.
-
Children of less than 3 years should be kept away unless continuously supervised or perform user maintenance.
- Children aged from 3 years and less than 8 years shall only switch on/off the appliance provided that it has been placed or installed in its intended normal operating position and they have been given supervision or instruction concerning use of the appliance in a safe way and understand the hazards involved, Children aged from 3 years and less than 8 years shall not plug in, regulate and clean the appliance
- CAUTION: Some parts of this product can become very hot and cause burns, Particular attention has to be given where children and vulnerable people are present.
- This appliance is intended for indoor use only.
- Never use the heater to dry clothing or similar items. Do not handle the plug (if have) with wet hands.
- A means of disconnection from the power supply having a contact opening distance of all poles must be included in the fixed wiring in accordance with the installation requirements.
- Ensure the heater is installed by a qualified tradesman/electrician.
- This product must be installed in accordance with the LEE wiring regulations and current building regulations.
- Ensure the appliance is level and securely fixed to the wall. The appliance should have a minimum air gap of 150 mm on all sides. For disposal, this product must be taken to an authorized site for the recycling of electrical and electronic appliances. By collecting and recycling waste, you help save natural resources and ensure the product is disposed of in a safe and environmentally friendly way.
- CAUTION: Some parts of this product can become very hot and cause burns. Particular attention has to be given where children and vulnerable people are present.
- Do not use this heater if it has been dropped; Do not use if there are visible signs of damage to the heater; use this heater on a horizontal and stable surface, or fix it to the wall, as applicable.
- WARNING: Do not use this heater in small rooms when they are occupied by persons not capable of leaving the room on their own, unless constant supervision is provided.
- WARNING: To reduce the risk of fire, keep textiles, curtains, or any other flammable material a minimum distance of 1 m from the air outlet.
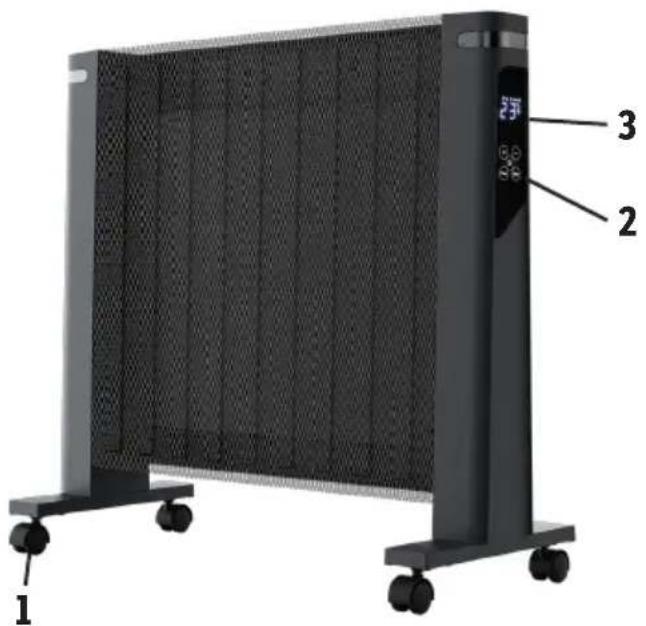
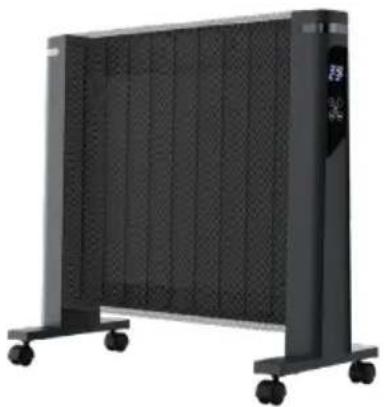
natural_image
Exterior view of a black electric heater with labeled components (1, 2, 3), no visible text or symbols on the device itself.- Casters
- On / off switch
- Display
- Remote
- Handel
- Top hooks
- Mounting bracket
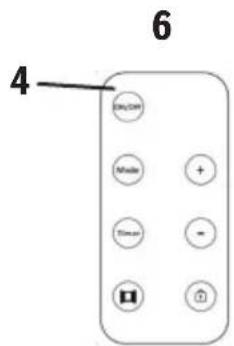
text_image
6 4 OK/OK Cancel + - - OK/OK OK/OK
natural_image
Close-up of a mechanical component with two protruding pins and a mesh texture (no visible text or symbols)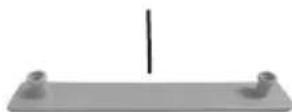
Please use suitable screws for mounting!
04 - TECHNICAL DETAILS
| Model MAXIMO 10 MAXIMO 20 | ||
| Protection class | Overheat protection, childlock, tip over protection, thermal cut out | |
| Voltage | 220-240V ~ 50-60 Hz 220-240V ~ 50-60 Hz | |
| Required power | 1000 W 2000 W | |
| Masse | 610 x 560 x 265 mm 810 x 560 x 265 mm | |
| Weight | 4.36 kg 5.54 kg | |
| WIFI | YES YES | |
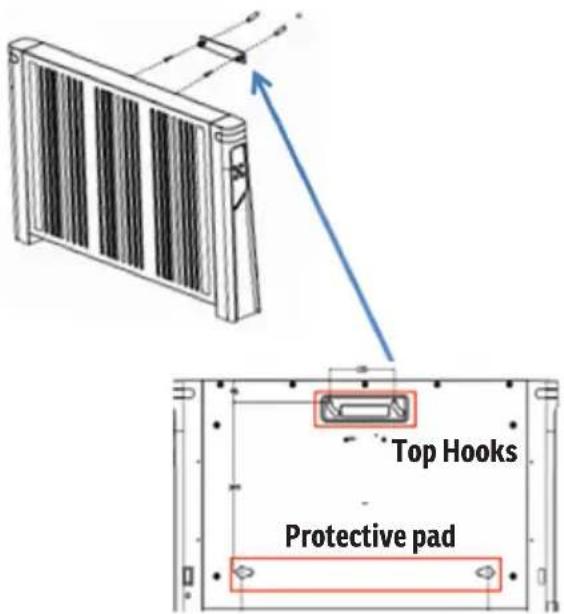
IMPORTANT: This appliance is designed for wall mounting and standing with casters.
Wall mounting
text_image
Top Hooks Protective padStep 1: Securely attach the included metal/plastic mounting plate to the wall in a horizontal position. Mark the positions of the two screw holes at both ends of the plate, then drill into the wall at the marked points.
Step 2: Insert the screws through the holes in the mounting plate and tighten them into the wall, leaving approximately 5 mm of the screw head exposed. Align the two screw heads into the holes of rear housing. The heater is hanged on the wall.
Step 3: Let the protective pad at the bottom of the device come into contact with the wall to form a triangular stable structure
Step 4: Verify that all two contact points (top hooks and protective pad) are firmly secured to the wall. Conduct a power test to ensure proper operation.
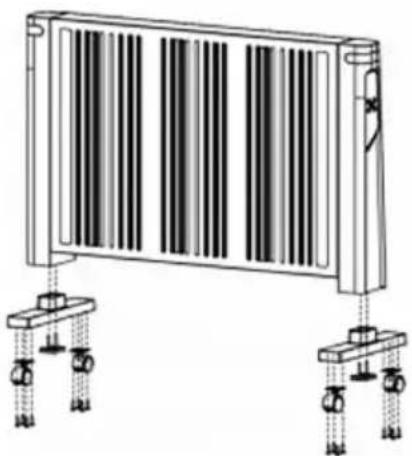
Casters mounting
natural_image
Technical line drawing of a heat exchanger or radiator unit with cooling fans and support legs (no text or symbols)Step 1: Align the two caster brackets with the pre-drilled holes on the bottom of the heater, then securely fasten them using the provided screws (4 screws total).
Step 2: Insert the 4 casters into the slots at the base of the caster brackets and press down firmly.
Step 3: Place the heater on the floor, gently rock the unit to check if all casters are fully in contact with the ground, then push to test smooth movement.
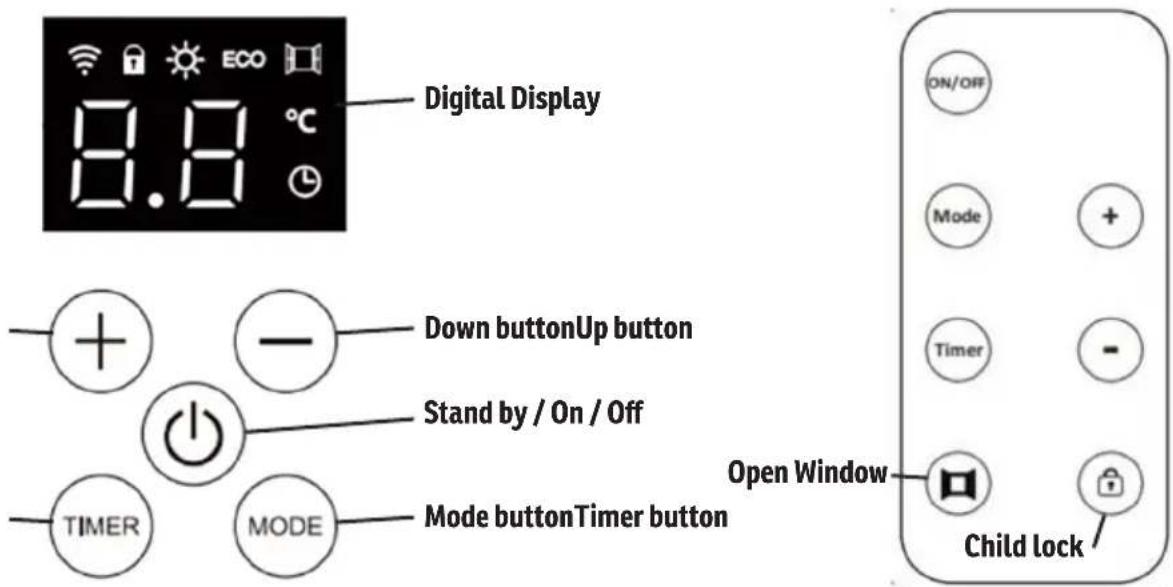
Control Panel Remote
text_image
Digital Display 8.8 °C + - Down buttonUp button Stand by / On / Off TIMER MODE Mode buttonTimer button Open Window ON/OFF Mode + Timer - Child LockATTENTION:
The factory default:
Standby comfort temperature: 20°C, clock: 12:00, Monday, Mode L. In UP mode, the start time of day 1 to day 7 is 00 and the end time is 24:00. The temperature setting is 20°C.
NOTE: If the Wi-Fi is not connected, the clock needs to be set first. If the clock is not set, the unit will operate at 20°C every day. If connected to Wi-Fi, no settings are required because real-time can be obtained
Restore factory settings: The whole machine will enter the standby state. When the heating function has been turned on, press and hold the [Mode] button and the [Up] button for 3 seconds at the same time. The entire machine will enter the standby state. After pressing the power button again to turn it on, the entire machine will restore its factory Settings.
General: When first powering the heater, you will hear a beeping sound. The display shows the ambient temperature. Press Stand by button to turn on the unit and press again to turn off.
Selecting the Work Mode by Mode button: Repeat pressing the [Mode] button to choose modes from, L -> H -> ECO -> UP/WEEK mode -> Open window function -> L to cycle selection;
L mode operation mode: The digital screen displays „L“ and the sun icon remain bright, and the heating element operates at a low power. User can set the temperature from 5\~35°C using “Up” and “Down” buttons, long pressing will change auto.
H mode operation mode: The digital screen displays „H“ and the sun icon, and the heating element operates at a high speed with a high power. User can set the temperature from 5\~35°C using “Up” and “Down” buttons, long pressing will change auto.
ECO Mode: The product will heat the first 2 mins. Then after 2 mins, the heater will heat at high power. User can set the temperature from 5\~35°C using "Up" and "Down" buttons, long pressing will change auto.
Remark: The heater will stop working when the ambient temperature is higher then set temperature. When the ambient temperature is less than or equal to the set temperature by -3 degrees, the electric heater starts to heat again. The error of display temperature and real room temperature ≤ 4 degree
UP / WEEK Mode: The weekly timer can only be set through the APP. So first make a schedule and when you select UP mode on the unit or week mode on the APP, the unit works according to your weekly schedule.
Open window Mode: The digital will display "☐" In this mode, if the appliance detects a rapid drop in temperature (4°C within 30 minutes) it will automatically stop heating, once the temperature recovers by 2°C within 30 minutes the appliance will revert to its high heating mode.
Timer Settings: Press Timer button to choose the Timer with 8 hours during "L mode" "H mode" "ECO mode" and Open window function.
UP/Week mode: Choose UP mode by Mode button. If user has set the weekly program via the APP, the unit will run under the weekly program, same as APP setting. If there is no setting of the weekly plan, it will run according to the default setting of the unit, keep running at 20 degrees everyday, every time.
Calibrating Time & Day: 1. Switch the mode to „Up“, mode and the display will show „Up“.
-
Press the „+“ or „-“ buttons to set the date from the 1st day to the 7th day.
-
Press the „Timer“ button to set the hours. The initial setting is 12 hours. Then press the „+“ or „-“ keys to adjust the timer time, ranging from 00 hours to 23 hours.
-
Press "Timer" button, then press the "+" and "-" keys to set the minutes. The initial setting is 00 minutes. Then press the "+" and "-" keys again to adjust the minutes (ranging from 00 to 59 minutes). Press the "Timer" button again and confirm the timer settings.
Remark: The weekly schedule could be sett by App only, more details on the next page.
Child Lock: 1. To help protect the appliance from unwanted tampering of temperature and schedules a 'Child Lock' function is available. This can be activated and deactivated by holding the [UP] and [Down] buttons for 3 seconds at the same time, icon will be displayed when active. All buttons will be locked. (Except for the power button) In the child lock state, you can press the power button to turn off the device and then turn it on again. The child lock function will not be canceled.
- During the process of button locking, only long press the [UP] and [Down] buttons for 3 seconds at the same time again, the button lock is released, all button operations are valid, and the child lock icon is extinguished.
Light reduction function: 60 seconds after the last button operation, the brightness of the digital screen will be automatically halved; if there is a button operation, the digital screen brightness will be immediately awakened and restored, and the function of the button will be executed.
Light cut-off function: In working state, long press the [Down] button and [Timer] button for 3 seconds, the digital screen will not be bright, and the light cut-off function will be entered; press other buttons except the power button, the digital screen will restore 100% brightness display and execute the function of the button. Press the power button without restoring the brightness but to directly shut down.
Remote control function: same as the PCB function of the main unit:
- The function is consistent with that of the motherboard PCB.
- The remote control distance is greater than 5 meters, and the remote control angle is 30 degrees left and right.
- The remote control has the functions of turning on/off, low heating, high heating, temperature setting, timing, child lock and window opening.
- The plus and minus keys can only adjust the temperature, not the timing.
- Remote control. Press the MODE key to switch the five modes of H-L-ECO-UP-Window.
- Press the „Open Window“ key to switch to the „Open Window“ function. Press the „Open Window“ key again to turn off the „Open Window“ function icon. The default L mode works.
App Connection by WIFI
- Please install the REMOTE KING APP from your mobile APP store;
- Please activate the Bluetooth function on your mobile phone.
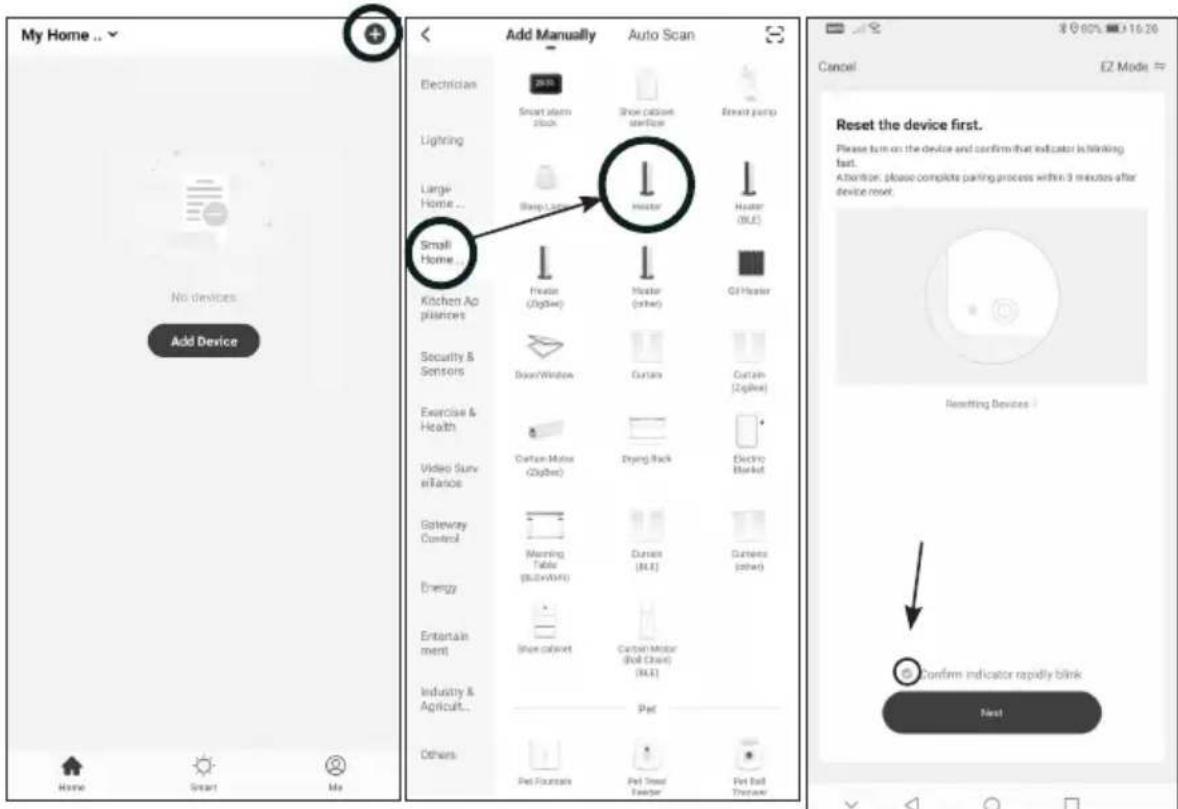
- When in standby or on mode, press and hold the [Power] button for 3 seconds. You will hear a "beep" sound and the WIFI icon will flash. When the network connection is successful, you will hear a "beep" sound and the WIFI icon will change from flashing to flashing for 2 seconds. 4. press the + icon or the "Add Device" button in your app
- Select "Small Home Appliances first and then "Heater".
- Ensure the Ambient Light indicator on the heater is slowly flashing (once per second), then press on the orange button at the bottom of the screen to confirm
- Enter your WIFI password
Clear the WIFI login account
When the phone is connected, press and hold the [Stand by] button for 3 seconds to clear the network connection information (disable the device).
NOTE: If the unit is unplugged, the distribution network will not be lost. Power on again, turn on the Wi-Fi and the device will automatically find the record of the last connection.
text_image
My Home ... Add Device Home Smart Ms Add Manually Auto Scan Electrician 2015 Smart alarm clock Show cablenet earbox Smart pump Lighting Large Home ... Sleep time Master Hunter (RGB) Small Home ... Kitchen Appliances Freeze (Digital) Master (other) Off Heater Security & Sensors DoubleWindow Curtain Curtain (Digital) Exercise & Health Carbon Motor (Digital) Drying Rack Desktop Market Video Surve llance Gateway Control Morning Table (Multi-VOLT) Durant (RGB) Durant (other) Energy Entertainment Show cablenet Carbon Motor (Roll Plate) (RGB) Industry & Agriculture... Pat Others Pat Fountain Pat Treef Heater Pat Dot Throat Cancel EZ Mode = Reset the device first. Please turn on the device and confirm that indicator is blinking fast. Attention: please complete parking process within 3 minutes after device reset. Resetting Devices > Confirm indicator rapidly blink NextPress the on/off "Switch" to turn the unit on. Then, the unit is on. You can adjust your desired temperature from 5-35°C. Once you turn on the heater, the default setting temperature is 20°C.
Select "Mode" to set your desired mode. You can select among H / L / ECO / Week
Select "Setting" button and select Week Program Temp to set your own schedule. You can choose your desired time to turn on / off the unit, the desired days, temperature.
Select "Setting" button and select Child Lock to activate and dis-activate this function. Select "Windows" to turn on and off Open Window function.
In Standby mode or while operation, you can select "Timer" button and choose 1-8h timer off.
Select "Setting" button for more options on your device. You can change your product's name, check device info or share your device with other people. Choose device sharing, add sharing, share with the heater or other options. You can share the product with maximum 20 people.
07 - CLEANING, CARE AND MAINTENANCE
ATTENTION! The general safety conditions must be observed during maintenance and care. To ensure trouble-free operation of the heater, the unit should be cleaned regularly. The following procedure is recommended for this:
- Switch off the heater.
- Then unplug the power cord from the power outlet.
- Remove the accumulated dust using a cloth or vacuum cleaner.
- Wipe the housing with a damp cloth. Never use gasoline, solvents or abrasive agents to clean the plastic parts, as these can damage the plastic surface. Plug the power cord into the power outlet.
- Switch on the device.
- Plug in the cable.
- Adjust the device.
- To avoid danger, a damaged connection cable may only be replaced by the manufacturer, its customer service or a person qualified to do so.
08 - CONFORMITY / DISPOSAL
Warranty
All products are checked from our company before the delivery. In case that there is a lack on your product, please contact the vendor. Please bring your proof of purchase for guarantees. Please save the packaging materials of the unit.
Disposal
Please remove the heater properly. You can bring the product to any specialist dealer fort he removal.
Technical changes
Technical changes in technique and design are possible.
CE declaration of Conformity
This device complies with the following standards
EMC EN IEC 55014-1:2021
EN IEC 55014-2:2021
EN IEC 61000-3-2:2019 + A1:2021 + A2:2024
EN 61000-3-3:2013 + A1:2019 + A2:2021
LVD EN 60335-1:2012 + A11:2014 + A13:2017 + A1:2019 + A14:2019 +
A2:2019 + A15:2021 + A16:2023
EN 60335-2-30:2009 + A11:2012 + A1:2016 + A12:2020 + A2:2021 + A13:2022
EN 62233:2008
LVD 2014/35/EU
EMC 2014/30/EU
Any modifications or repairs to the device must be carried out by a qualified person.
Since the development of the produced devices is constantly progressing, your product may differ minimally from the one described.
DISPOSAL INSTRUCTIONS FOR THE ELECTRICAL PART OF THE PRODUCT
In accordance with Article 26 of the Decree-Law of 14 March 2014 implementing Directive 2012/19/EC, and the Law of 31 March 2015 implementing Directive 2015/863/EU on the reduction of the use of hazardous substances in electrical and electronic equipment and on waste management.
The crossed-out dustbin symbol on the machine or packaging indicates that the waste generated at the end of its useful life must be collected separately from other waste. The user must therefore take the device to the appropriate collection points at the end of its service life. Sort electronic and electrical waste or send back to the retailer when purchasing new, equivalent devices in a one-to-one process. Appropriate separate collection for subsequent commissioning of the equipment to be recycled, treatment and environmentally sound disposal helps to avoid possible adverse effects on the environment and health, and promote the reuse and/or recycling of the materials to which they belong. Misuse of this product by the user will result in the application of the administrative penalties provided for in the applicable legislation. Batteries contained in the device must be disposed of separately in the appropriate containers for the collection of used batteries.
DISPOSAL OF BATTERIES AND ACCUMULATORS
In accordance with Legislative Decree 188 of 20 November 2008 implementing Directive 2006/66/EC on batteries, accumulators and related waste, the symbol of the crossed-out waste bin on the battery indicates that the disposal of used batteries is prohibited in household waste.
Single-use and rechargeable batteries contain substances that are highly polluting for the environment. The user is obliged to dispose of used batteries at collection points in the municipality or in appropriate containers. This service is free. In this way, legal requirements are adhered to and the environment protected. The symbols identifying hazardous materials that may be present in single-use and rechargeable batteries are as follows: Hg = Mercury, Cd = Cadmium, Pb = Lead.
NL
NEDERLANDS
MAXIMO 10/20
HETELUCHTKACHEL
natural_image
Exterior view of a modern office building (no signage)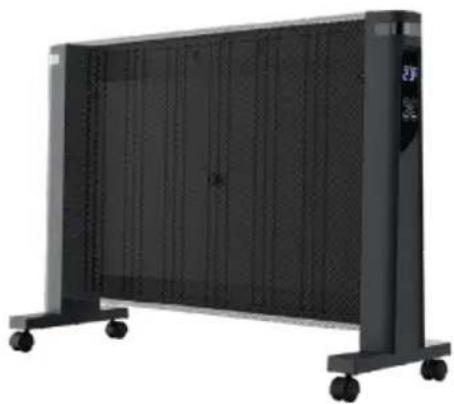
natural_image
Exterior view of a black rectangular solar panel with wheels and a control panel (no text or symbols visible)MAXIMO 10: 20111312 MAXIMO 20: 20111412
BEDRIJF
Sonnenkönig of Switzerland
Olensbachstrasse 9-15
CH-9631 Ulisbach
Tel. Int. +41 58 611 60 00
Sonnenkönig of Switzerland
Industriering 9
D-86675 Buchdorf
Tel:01805006435
0.14 Cent/Minute
DIT PRODUCT IS ALLEEN GESCHIKT VOOR GOED GEÏSOLEERDE RUIMTEN OF INCIDENTEEL GEBRUIK.
Versie 20.08.2025
01 - INHOUDSOPGAVE
01 - INHOUDSOPGAVE 50
02 - WAARSCHUWINGEN 51
03 - BESCHRIJVING 53
natural_image
Exterior view of a black electric heater with labeled components (1, 2, 3), no visible text or symbols on the device itself.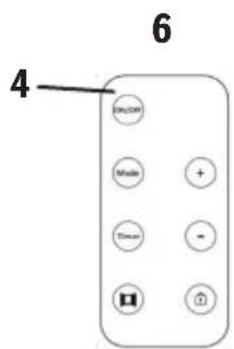
text_image
4 6natural_image
Close-up of a mechanical component with three inserted pins and a textured surface (no visible text or symbols)natural_image
Technical line drawing of a heat exchanger or radiator with cooling fans and support legs (no text or symbols)App-verbinding via WIFI
text_image
My Home ... Add Device No devices Add Manually Electrician Lighting Large Home ... Kitchen Ap plices Security & Sensors Exercise & Health Video Surve balance Gateway Control Energy Entertain main Industry & Agricult... Others Add Manually Smart alarm clock Sleep toilet standbar Sleep Lacer Heater (LBC) Heater (litter) Air Heater Sleep Window Carriage Carriage (Ligree) Carriage Motor (Zigree) Drying Rack Electrici Starter Warning Tacle (BLC+Hi-E) Carriage (BLC) Carriage (BLW) Shoe cabinet Carriage Motor (Bed Over) (BLF) Pet Pet Increase Pet Treat Fader Pet Roll Threader Auto Scan Reset the device first. Please turn on the device and confirm that indicator is blinking first. Attention: please complete pairing process within 3 minutes after device reset. Reseting Devices ? Confirm indicator rapidly blink Next| Table for information requirements for MAXIMO 10 | |||||
| Item | Symbol | Value | Unit | Item | P |
| Heat output Type of heat input, for electric storage local space heaters only (select one) | |||||
| Nominal heat output P | nom 1.000 kW | Manual heat charge control with integrated thermostat [no] | |||
| Minimum heat output (indicative) | Pmin 0.500 kW | Manual heat charge control with room and/or outdoor temperature feedback | [no] | ||
| Maximum continuous heat output | Pmaxc 1.000 kW | Eelectronic heat charge control with room and/or outdoor temperature feedback | [no] | ||
| Power consumption Fan assisted heat output [no] | |||||
| in off mode | Po | 0.00 | kW | Type of heat output/room temperature control (select one) | [no] |
| In standby mode | Psn | 0.23 | kW | single stage heat output and no romm temperature control | [no] |
| In idle mode | Pidle | 0.67 | kW | Two or more manual stages, no room temperature control | [no] |
| In network standby | Pnsm | 067 | kW | with mechanic thermostat romm temperature control | [no] |
| Standby mode with display of information or status | [yes] | with electronic room temperature control | [yes] | ||
| Seasonal space heat - ing energy efficiency in active mode | ns,on | 91.5 | % | Electronic room temperature control plus day timer | [no] |
| Electronic room temperature control plus week timer | [no] | ||||
| Other control options (multiple selections possible) | [yes] | ||||
| Room temperature control, with presence detection | [no] | ||||
| Room temperature control, with open window detection | [yes] | ||||
| distance control option | [yes] | ||||
| adaptive start control | [no] | ||||
| working time limitation | [yes] | ||||
| Black bulb sensor | [no] | ||||
| Self-learning functionality | [no] | ||||
| Control accuracy | [no] | ||||
| Remark: This product is only suitable for well insulated spaces or occasional use. Will be showed on the cover page of the user manual, free-access websites of manufacturer, product packaging | |||||
| Table for information requirements for MAXIMO 20 | |||||
| Item | Symbol | Value | Unit | Item | P |
| Heat output Type of heat input, for electric storage local space heaters only (select one) | |||||
| Nominal heat output P | nom 2.000 kW | Manual heat charge control with integrated thermostat [no] | |||
| Minimum heat output (indicative) | P_min 1.000 kW | Manual heat charge control with room and/or outdoor temperature feedback | [no] | ||
| Maximum continuous heat output | P_max,c | 2.000 kW | Eelectronic heat charge control with room and/or outdoor temperature feedback | [no] | |
| Power consumption Fan assisted heat output [no] | |||||
| in off mode | P_o | 0.00 | kW | Type of heat output/room temperature control (select one) | [no] |
| In standby mode | P_sn | 0.23 | kW | single stage heat output and no romm temperature control | [no] |
| In idle mode | P_idle | 0.67 | kW | Two or more manual stages, no room temperature control | [no] |
| In network standby | P_nsm | 0671 | kW | with mechanic thermostat room temperature control | [no] |
| Standby mode with display of information or status | [yes] | with electronic room temperature control | [yes] | ||
| Seasonal space heat - ing energy efficiency in active mode | n_s,on | 91.5 | % | Electronic room temperature control plus day timer | [no] |
| Electronic room temperature control plus week timer | [no] | ||||
| Other control options (multiple selections possible) | [yes] | ||||
| Room temperature control, with presence detection | [no] | ||||
| Room temperature control, with open window detection | [yes] | ||||
| distance control option | [yes] | ||||
| adaptive start control | [no] | ||||
| working time limitation | [yes] | ||||
| Black bulb sensor | [no] | ||||
| Self-learning functionality | [no] | ||||
| Control accuracy | [no] | ||||
| Remark: This product is only suitable for well insulated spaces or occasional use. Will be showed on the cover page of the user manual, free-access websites of manufacturer, product packaging | |||||
| Fehlermeldung, Message d'erreur, Messaggio di errore, Error message, Foutmelding | Beschreibung, Description, Descrizione, Description, Beschrijving, |
| E1 | Wenn der Thermistor einen offenen Stromkreis hat (auf dem digitalen Display erscheint E1 und blinkt) |
| Lorsque la thermistance est en circuit ouvert (l'écran numérique affiche E1 et clignote) | |
| Quando il termistore è a circuito aperto (lo schermo digitale visualizza E1 e lampeggia) | |
| When the thermistor is open circuit (the digital screen displays E1 and blinks) | |
| Wanneer de thermistor open circuit is (het digitale scherm geeft E1 weer en knippert) | |
| E2 | Kurzschluss (auf dem digitalen Display erscheint die Meldung „E2“ und blinkt) |
| Ccourt-circuit (l'écran numérique affiche E2 et clignote) | |
| Cortocircuito (lo schermo digitale visualizza E2 e lampeggia) | |
| short circuit (the digital screen displays E2 and blinks) | |
| Kkortsluiting (het digitale scherm geeft E2 weer en knippert) | |
| E3 | Wenn die Umgebungstemperatur über 50 Grad liegt (auf dem digitalen Display erscheint E3 und blinkt). |
| Lorsque la température ambiante est supérieure à 50 degrés (l'écran numérique affiche E3 et clignote) | |
| quando la temperatura ambiente è superiore a 50 gradi (il display digi - tale visualizza E3 e lampeggia) | |
| When the ambient temperature is higher than 50 degrees (the digital screen displays E3 and blinks) | |
| Wanneer de omgevingstemperatuur hoger is dan 50 graden (het digitale scherm geeft E3 weer en knippert) | |
| Das Gerät kann unter diesen Bedingungen nicht normal arbeiten und es wird keine Leistung abgegeben. Der Summer ertönt fünfmal hintereinander. Der Fehlercode wird weiterhin angezeigt und die Heizung funktioniert nicht mehr. Der Fehler muss behoben und die Heizung zurückgesetzt werden, um den Betrieb wiederherzustellen. | |
| La machine ne peut pas fonctionner normalement dans ces conditions et ne produit aucune puissance. Le buzzer émet 5 bips consécutifs. Le code d'erreur clignote en continu et le chauffage cesse de fonctionner. Il est nécessaire de résoudre le problème et de réinitialiser le chauffage pour rétablir son fonctionnement. | |
| La macchina non può funzionare normalmente in queste condizioni e non c'è potenza in uscita. Il cicalino suona B per 5 volte in modo continuo. Continua a lampeggiare per visualizzare il codice di guasto e il riscaldatore smette di funzionare. È necessario risolvere il guasto e ripristinare il riscaldatore per ripristinare il funzionamento. | |
| The machine cannot work normally under the conditions and there is no power output. The buzzer sounds B for 5 times continuously. Keep blinking to display the fault code and heater stop working. The faults needs to be solved and reset the heater to restore operation. | |
| De machine kan onder deze omstandigheden niet normaal werken en er wordt geen vermogen afgegeven. De zoemer klinkt B gedurende 5 keer continu. Blijft knipperen om de foutcode weer te geven en het verwarmingselement stopt met werken. De storingen moeten worden verholpen en het verwarmingselement moet worden gereset om de werking te her stellen. | |