
LR10 Professional - Electronic measuring instrument BOSCH - Free user manual and instructions
Find the device manual for free LR10 Professional BOSCH in PDF.

| Product type | Laser receiver |
| Brand | Bosch |
| Model | LR10 Professional |
| Dimensions (L x W x H) | 73 x 28 x 137 mm |
| Weight | 0.15 kg |
| Power supply | 2 x LR6 (AA) 1.5 V batteries |
| Service life | Approx. 40 h (without backlight) |
| Battery type | Alkaline recommended |
| Receivable wavelength | 635 – 650 nm |
| Typical working range | 150 m |
| Reception angle | 45 ° |
| Precision (fine setting) | ± 1 mm |
| Precision (coarse setting) | ± 3 mm |
| Operating temperature | -10 °C to +50 °C |
| Storage temperature | -20 °C to +70 °C |
| Protection degree | IP54 (protected against dust and water splashes) |
| Display | Screen with backlight, directional and center point indicators |
| Audio signal | Yes, 3 volume levels + mute |
| Mounting | Magnets (x2), guide groove for bracket |
| Auto-off | After 10 min without activity or detection |
| Compatibility | Bosch GRL 900-20HV, GRL 1000-20HV |
| Cleaning | Soft damp cloth, without solvents or detergents |
| Repairability | Repair by authorized Bosch service center only |
Frequently Asked Questions - LR10 Professional BOSCH
User questions about LR10 Professional BOSCH
0 question about this device. Answer the ones you know or ask your own.
Ask a new question about this device
Download the instructions for your Electronic measuring instrument in PDF format for free! Find your manual LR10 Professional - BOSCH and take your electronic device back in hand. On this page are published all the documents necessary for the use of your device. LR10 Professional by BOSCH.
USER MANUAL LR10 Professional BOSCH
IMPORTANT: IMPORTANT : IMPORTANTE: Read Before Using Lire avant usage Leer antes de usar

natural_image
Icon of a person reading a book inside a circle (no text or symbols)Operating/Safety Instructions Consignes de fonctionnement/sécurité Instrucciones de funcionamiento y seguridad
LR10
natural_image
Illustration of a Bosch Professional L3.0 electronic device (no text or symbols on the device body)
BOSCH
Call Toll Free for Consumer Information & Service Locations
LR10 General Safety Rules

WARNING
Read all instructions.
Failure to follow all instructions listed below may result in hazardous radiation exposure, electric shock, fire and/or serious injury.

Keep the laser receiver away from cardiac pacemakers. The magnet plate 7 generates a field that can impair the function of cardiac pacemakers.
- Keep the laser receiver from magnetic data medium magnetically sensitive equipment. The effect of the magnet plate 7 can lead to irreversible data loss.
-
Have the laser receiver repaired only through qualified specialists using original spare parts. This ensures that the safety of the laser receiver is maintained.
-
Do not operate the laser receiver explosive environments, such as in the presence of flammable liquids, gases or dusts. Sparks can be created in the laser receiver which may ignite the dust or fumes.
- Read and strictly observe the warnings in the operating instructions of the rotational laser.
Noise Information
The A-weighted sound pressure level of the audio signal at one meter distance is 80 dB(A).
a WARNING
Do not hold the tool close to your ear.
LR10 Intended Use
The laser receiver is intended for swift finding of rotating laser beams in the wavelength listed in the “Technical Data”.
The laser receiver is suitable for indoor and outdoor use.
LR10 Preparation
Inserting/Replacing the Battery
Alkaline batteries are recommended for the laser receiver.
Pull the latch 16 of battery lid outward and open the battery lid 15.
When inserting batteries, pay attention to the correct polarity according to the representation on the inside of the battery compartment.
When the battery low indicator 22 appears for the first time on the display 6, the laser receiver can still be operated for approx. 2 h.
WARNING
Remove the batteries from the laser receiver
when not using it for extended periods.
When storing for extended periods, the batteries can corrode and self-discharge.
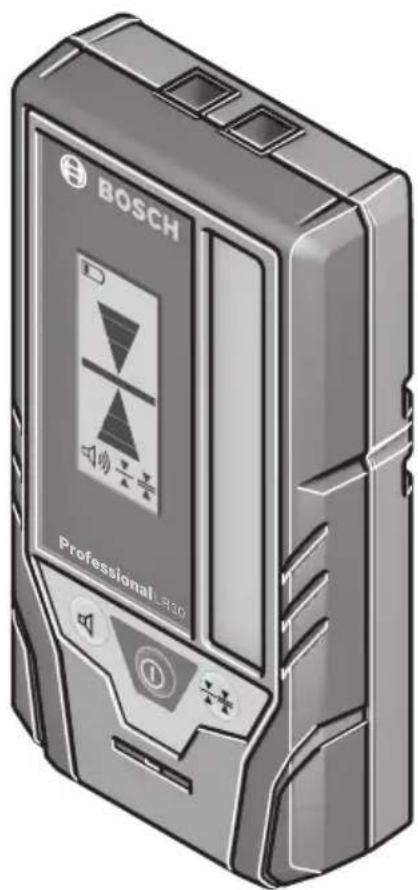
LR10 Features
The numbering of the product features shown refers to the illustration of the measuring tool on the graphic page 2.
1 Speaker
16 Latch of battery lid
2 Button for selecting the accuracy
17 Mounting bracket (1 608 M00 C1L)
3 On/Off button
18 Rotary knob of the mounting bracket
4 Audio signal button
19 Guide rail
5 Reception area for the laser beam
20 Holder latch
6 Display
21 Push-button to release the lock
7 Magnets
8 Guide groove for holder
9 Center-indication LED (rear)
10 Direction LED "move downward"
11 Center mark
12 Direction LED "move upward"
13 Type plate
14 Serial number
15 Battery lid
Display Elements
22 Battery low indicator
23 Direction indicator "move downward"
24 Centre indicator
25 Direction indicator "move upward"
26 Indicator for "Coarse" accuracy
27 Indicator for "Fine" accuracy
28 Audio signal indicator
LR10 Technical Data
| Laser Receiver LR10 | |
| Article number 3601K69N10 | |
| Receivable wavelength 635-650 nm | |
| Suitable for rotational laser level GRL 900-20HV, GRL1000-20HV | |
| Working range1) | 500 ft (150 m) |
| Receiving angle 45° | |
| Receiving rotation speed 150,300,600 min | -1 |
| Accuracy2)3)4)-Setting “fine” | ±1/32 in (±1 mm) |
| -Setting “coarse” | ±1/8 in (±3 mm) |
| Operating temperature 14 °F ~ 122 °F (-10 °C ~ +50 °C) | |
| Storage temperature -4 °F ~ 158 °F (-20 °C ~ +70 °C) | |
| Battery 2 x 1.5V LR6 (AA) | |
| Operating time, approx. 40h | 5) |
| Weight according to EPTA-Procedure 01:2014 | .33 lb (0.15kg) |
| Dimensions | 2.9" x 1.1" x 5.4" (73x28x137 mm) |
| Degree of protection | IP 54 (dust and splash water protected) |
1) The working range (radius) can be reduced due to unfavorable ambient conditions (e.g. direct sunlight).
2) depends on clearance between laser receiver and rotational laser level
3) dependent on laser class and laser type of the rotational laser level
4) The accuracy can be impacted by unfavorable environmental conditions (e.g. direct sun irradiation).
5) With display illumination deactivated.
The laser receiver can be clearly identified with the serial number 14 on the type plate.
LR10 Operation
Initial Operation
- Protect the laser receiver against moisture and direct sunlight.
- Do not subject the laser receiver to extreme temperatures or variations in temperature.
As an example do not leave it in vehicles for a long time. In case of large variations in temperature, allow the laser receiver to adjust to the ambient temperature before putting it into operation. In case of extreme temperatures or variations in temperature, the accuracy of the laser receiver can be impaired.
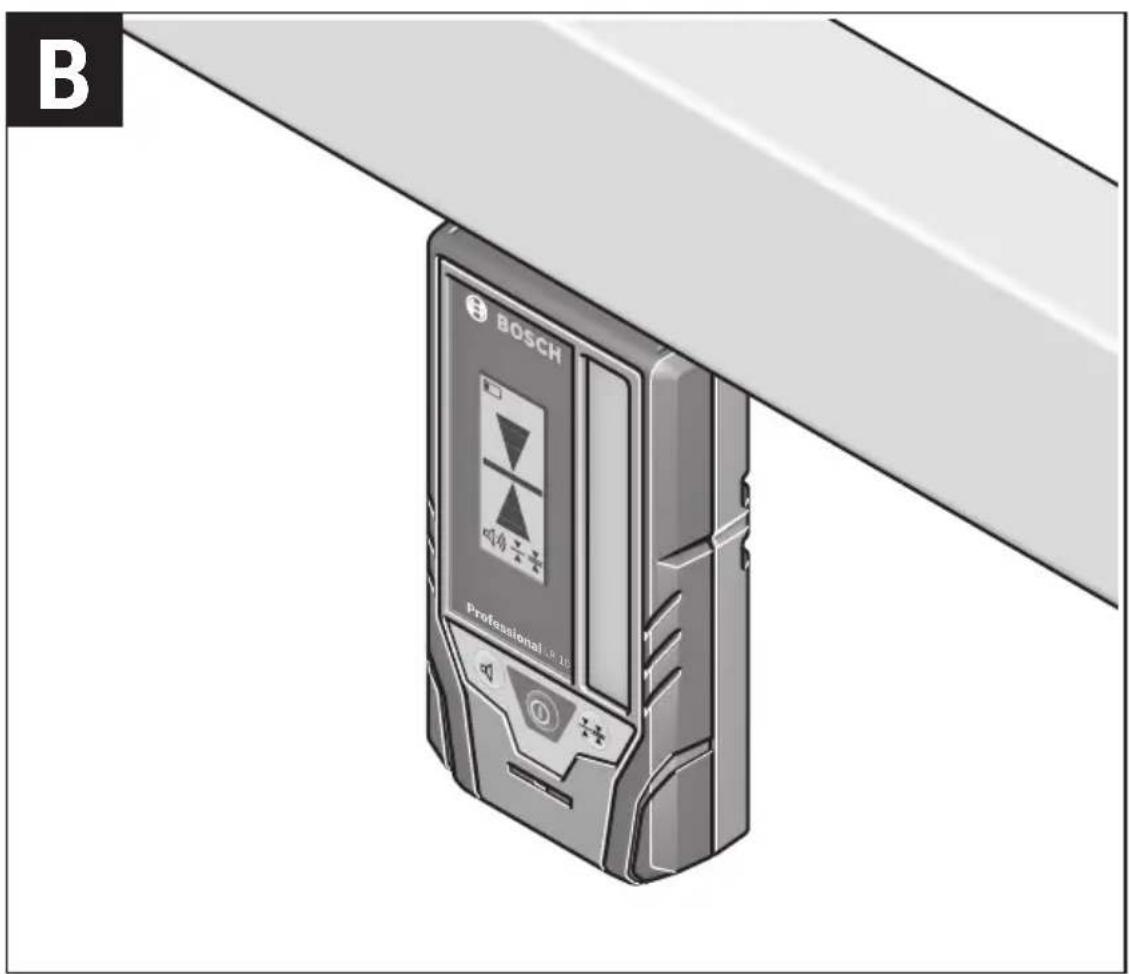
Setting up the Laser receiver (see figure A)
Position the laser receiver at least 20 inches away from the rotational laser.
Position the laser receiver in such a manner that the laser beam can reach the reception area 5. Align the laser receiver in such a manner that the laser beam runs laterally through the reception area (as shown on the figure).
Switching On and Off
• A loud audio signal sounds when switching on the tool. Therefore, keep the tool away from your ear or other people when switching on. The loud audio signal can cause hearing defects.
To switch the laser receiver On, press the On/Off button 3. All display indicators as well as all LEDs light up briefly and an audio signal sounds.
Every time when the laser receiver is switched on, both volume and accuracy settings are stored from the last setting before the receiver was switched off.
To switch the laser receiver Off, press the On/Off button 3 again. All LEDs and all display indicators light up briefly before the receiver switches off, and an audio signal sounds.
If no buttons on the laser receiver are pressed and no laser beam reaches the reception area 5, for approx. 10 mins, the laser receiver switches off automatically to save energy. The switching off is indicated by all LEDs and all display indicators lighting up briefly, and an audio signal sounding.
Selecting the Accuracy setting
With button 2, you can specify with which accuracy the position of the laser beam is indicated on the reception area:
- “Fine” adjustment (indication 27 on the display),
- “Coarse” adjustment (indication 26 on the display).
Every time when the laser receiver is switched on, the accuracy setting is stored from before the receiver was switched off.
Direction Indicators
The position of the laser beam on the reception area 5b is indicated:
- by the direction indicators "move downward" 23, "move upward" 25 or center 24 on the display 6 on the front of the laser receiver,
- by the LEDs "move downward" 10, "move upward" 12 or center 9 on the back of the laser receiver,
- optionally by the audio signal (see "Audio Signal for Indication of the Laser Beam")
Laser receiver too low: If the laser beam runs through the upper half of the reception area 5, the direction indicator 25 on the display and the corresponding LED 12 light up. If the audio signal is switched on, a signal sounds at high frequency. Move the laser receiver upward in the arrow direction.
Laser receiver too high: If the laser beam runs through the lower half of the reception area 5, the direction indicator 23 on the display and the corresponding LED 10 light up. If the audio signal is switched on, a signal sounds at low frequency. Move the laser receiver downward in the arrow direction.
Laser receiver in center position: When the laser beam runs through the reception area 5 at the center mark 11, the center indicator 24 on the display and the corresponding center-indicator LED 9 light up. When the audio signal is switched on, a continuous signal sounds.
Audio Signal for Indication of the Laser Beam
The position of the laser beam on the reception area 5 can be indicated via an audio signal.
The volume level can be increased or switched off.
To change the volume level or switch the audio signal off, push the acoustic signal button 4 until the desired volume level is indicated on the display. At low volume level, the audio signal indicator 28 appears on the display with one bar; at high volume level, the indicator appears with three bars. When the audio signal is set to off, the indicator goes out. Independent of the audio signal setting, a short beep sounds at low volume level each time a button is pressed on the laser receiver.
Every time when the laser receiver is switched on, the volume setting is stored from before the receiver was switched off.
Backlight
The back light of the display is switched on at full strength when the laser receiver is switched on. If no laser beam is detected and no buttons are pressed for 1 minute, the back light switches off automatically.
The backlight also switches off automatically if there is continuous laser detection and no buttons are pressed for 2 minutes. The back light can be switched off manually by pressing the accuracy setting button 2 and the audio signal button 4 simultaneously
Working Advice
Marking
When the laser beam runs through the center of the reception area 5, its height can be marked at the center mark 11 right and left of the laser receiver.
When marking, make sure to align the laser receiver both vertically and horizontally. If this is not done the laser marks will be offset from the laser beam.
Attaching with the Magnet (see figure B)
When a positive-lock attachment is not absolutely required, the magnets 7 on top of the laser receiver can be used to attach the receiver to steel parts.
LR10 Maintenance and Service
Keep the laser receiver clean at all times.
Do not immerse the laser receiver into water or other fluids.
Wipe off debris using a moist and soft cloth. Do not use any cleaning agents or solvents.
If the laser receiver should fail despite the care taken in manufacturing and testing procedures, repair should be carried out by an authorized after-sales service center for Bosch power tools.
In all correspondence and spare parts orders, please always include the 10-digit article number given on the type plate of the tool.
ENVIRONMENT PROTECTION

Recycle raw materials & batteries instead of disposing of waste. The unit, accessories, packaging & used batteries should be sorted for environmentally
friendly recycling in accordance with the latest regulations.
LIMITED WARRANTY OF BOSCH LASER AND MEASURINGTOOLPRODUCTS
Robert Bosch Tool Corporation (“Seller”) warrants to the original purchaser only, that all Bosch lasers and measuring tools will be free from defects in material or workmanship for a period of one (1) year from date of purchase. Bosch will extend warranty coverage to two (2) years when you register your product within eight (8) weeks after date of purchase. Product registration card must be complete and mailed to Bosch (postmarked within eight weeks after date of purchase), or you may register on-line at www.boschtools.com/Service/ProductRegistration. If you choose not to register your product, a one (1) year limited warranty will apply to your product.
30 Day Money Back Refund or Replacement -
If you are not completely satisfied with the performance of your laser and measuring tools, for any reason, you can return it to your Bosch dealer within 30 days of the date of purchase for a full refund or replacement. To obtain this 30-Day Refund or Replacement, your return must be accompanied by the original receipt for purchase of the laser or optical instrument product. A maximum of 2 returns per customer will be permitted.
SELLER'S SOLE OBLIGATION AND YOUR EXCLUSIVE REMEDY under this Limited Warranty and, to the extent permitted by law, any warranty or condition implied by law, shall be the repair or replacement of parts, without charge, which are defective in material or workmanship and which have not been misused, carelessly handled, or misrepaired by persons other than Seller or Authorized Service Center. To make a claim under this Limited Warranty, you must return the complete Bosch laser or measuring tool, transportation prepaid, to any BOSCH Factory Service Center or Authorized Service Center. Please include a dated proof of purchase with your tool. For locations of nearby service centers, please use our on-line service locator or call 1-877-267-2499.
THIS WARRANTY PROGRAM DOES NOT APPLY TO TRIPODS AND RODS. Robert Bosch Tool Corporation (“Seller”) warrants tripods and leveling rods for a period of one (1) year from date of purchase.
THIS LIMITED WARRANTY DOES NOT APPLY TO OTHER ACCESSORY ITEMS AND RELATED ITEMS. THESE ITEMS RECEIVE A 90 DAY LIMITED WARRANTY.
To make a claim under this Limited Warranty, you must return the complete product, transportation prepaid. For details to make a claim under this Limited Warranty please visit www.boschtools.com or call 1-877-267-2499.
ANY IMPLIED WARRANTIES SHALL BE LIMITED IN DURATION TO ONE YEAR FROM DATE OF PURCHASE. SOME STATES IN THE U.S., AND SOME CANADIAN PROVINCES DO NOT ALLOW LIMITATIONS ON HOW LONG AN IMPLIED WARRANTY LASTS, SO THE ABOVE LIMITATION MAY NOT APPLY TO YOU.
IN NO EVENT SHALL SELLER BE LIABLE FOR ANY INCIDENTAL OR CONSEQUENTIAL DAMAGES (INCLUDING BUT NOT LIMITED TO LIABILITY FOR LOSS OF PROFITS) ARISING FROM THE SALE OR USE OF THIS PRODUCT. SOME STATES IN THE U.S., AND SOME CANADIAN PROVINCES DO NOT ALLOW THE EXCLUSION OR LIMITATION OF INCIDENTAL OR CONSEQUENTIAL DAMAGES, SO THE ABOVE LIMITATION MAY NOT APPLY TO YOU.
THIS LIMITED WARRANTY GIVES YOU SPECIFIC LEGAL RIGHTS, AND YOU MAY ALSO HAVE OTHER RIGHTS WHICH VARY FROM STATE TO STATE IN THE U.S., OR PROVINCE TO PROVINCE IN CANADA AND FROM COUNTRY TO COUNTRY.
THIS LIMITED WARRANTY APPLIES ONLY TO PRODUCTS SOLD WITHIN THE UNITED STATES OF AMERICA, CANADA AND THE COMMONWEALTH OF PUERTO RICO. FOR WARRANTY COVERAGE WITHIN OTHER COUNTRIES, CONTACT YOUR LOCAL BOSCH DEALER OR IMPORTER.
© Robert Bosch Tool Corporation 1800 W. Central Road Mt. Prospect, IL 60056-2230
Exportado por: Robert Bosch Tool Corporation Mt. Prospect, IL 60056-2230, E.U.A.
1609730721