GIC5-27 Professional - Video camera BOSCH - Free user manual and instructions
Find the device manual for free GIC5-27 Professional BOSCH in PDF.

| Product type | Digital video inspection camera |
| Brand | Bosch |
| Model | GIC5-27 Professional |
| Dimensions (L × W × H) | 242 mm × 140 mm × 66 mm |
| Weight (with battery) | 0.73 – 0.94 kg |
| Power supply | Bosch lithium-ion battery pack 10.8 V / 12 V max (BAT414, BAT420, GBA12V30, GBA12V60) |
| Battery life | Approx. 6 hours (with BAT414 2.0 Ah) |
| Display | 5-inch color screen (127 mm), resolution 1280 × 720 pixels |
| Camera resolution | 1280 × 720 pixels (photos and videos) |
| Photo format | .JPG |
| Video format | .AVI |
| Video frame rate | 20 fps (without attachment), 7 fps (with) |
| Max number of photos (internal memory) | 30 |
| Field of view | 75° |
| Focus distance | 30 – 80 mm |
| LED light | Adjustable brightness, max 200 lx (at 50 mm) |
| Protection rating (handheld unit) | IP54 |
| Protection rating (camera head and cable) | IP67 |
| Storage | Internal memory + Micro-SD card (not included) |
| Connectivity | USB Type-C® port for data transfer |
| Included accessories | Mirror, magnet, hook, camera cable |
| Operating temperature | -10 °C to +50 °C |
| Maintenance and cleaning | Clean with a soft damp cloth; do not use solvents; do not immerse the device |
| Safety | Read and follow safety instructions; do not use for medical inspection; keep batteries out of reach of children |
| Repairability | Have repairs done at a Bosch authorized service center; do not open the device yourself |
Frequently Asked Questions - GIC5-27 Professional BOSCH
User questions about GIC5-27 Professional BOSCH
0 question about this device. Answer the ones you know or ask your own.
Ask a new question about this device
Download the instructions for your Video camera in PDF format for free! Find your manual GIC5-27 Professional - BOSCH and take your electronic device back in hand. On this page are published all the documents necessary for the use of your device. GIC5-27 Professional by BOSCH.
USER MANUAL GIC5-27 Professional BOSCH
| IMPORTANT Read Before Using | IMPORTANT Lire avant usage | IMPORTANT Leer antes de usar |
| GIC5-27C |
| Safety Symbols The definitions below describe the level of severity for each signal word. Please read the manual and pay attention to these symbols. | |
| ! | This is the safety alert symbol. It is used to alert you to potential personal injury hazards. Obey all safety messages that follow this symbol to avoid possible injury or death. |
| ▲ DANGER | DANGER indicates a hazardous situation which, if not avoided, will result in death or serious injury. |
| ▲ WARNING | WARNING indicates a hazardous situation which, if not avoided, could result in death or serious injury. |
| ▲ CAUTION | CAUTION indicates a hazardous situation which, if not avoided, could result in minor or moderate injury. |
Table of Contents
General Safety Rules 3
Safety Rules for Inspection Camera 4
FCCCaution 5
Industry Canada (IC) 6
Intended Use 6
Symbols. 7
Getting to Know Your GIC5-27C Inspection Camera. 8
Specifications 9
Assembly 10
Power Supply 10
Fitting the Camera Cable 11
Removing the Camera Cable. 11
Fitting the Mirror, Magnet or Hook 11
Operation 12
Product Description 12
Using the Product. 12
Starting Operation 13
Main Menu 13
Saving/Transferring the Recordings 14
Working Advice. 15
Maintenance and Service 16
Maintenance and Cleaning 16
Environment Protection 16
Troubleshooting. 16
Errors - Causes and Corrective Measures 16
Accessories 17
General Safety Rules
WARNING
Read all safety warnings, instructions, illustrations and specifications provided with this tool. Failure to follow all instructions listed below
may result in electric shock, fire and/or serious injury.
SAVE ALL WARNING AND INSTRUCTIONS FOR FUTURE REFERENCE
The term "tool" in the warnings refers to your mains-operated (corded) tool or battery-operated (cordless) tool.
1. Work area safety
a. Keep work area clean and well lit. Cluttered or dark areas invite accidents.
b. Do not operate the tool in explosive environments, such as in the presence of flammable liquids, gases or dusts. Sparks can be created in the tool which may ignite the dust or fumes.
c. Keep children and bystanders away while operating a power tool. Distractions can cause you to lose control.
2. Electrical safety
WARNING
Batteries can explode or leak, cause injury or fire.
To reduce this risk, always follow all instructions and warnings on the battery label and package.
a. DO NOT expose the tool and battery to rain or wet conditions. Water entering tool will increase the risk of fire and personal injury.
b. DO NOT short any battery terminals.
c. DO NOT mix battery chemistries.
d. Dispose of or recycle batteries per local code.
e. DO NOT dispose of batteries in fire.
f. Keep batteries out of reach of children.
g. Remove batteries if the device will not be used for several months.
h. Remove the batteries from the tool when not using it for extended periods. When storing for extended periods, the batteries can corrode and self-discharge.
i. The tool is equipped with a radio interface. Local operating restrictions, e.g. in airplanes or hospitals, are to be observed.
j. Prevent unintentional starting. Ensure the switch is in the off-position before inserting batteries. Accidental energizing tool that have the switch on invites accidents.
3. Personal safety
a. Do not make any modifications to the tool and battery.
b. Stay alert, watch what you are doing and use common sense when operating a tool. Do not use a tool while you are tired or under the influence of drugs, alcohol or medication. A moment of inattention while operating a tool may result in serious personal injury or incorrect measurement results.
c. Use safety equipment. Always wear eye protection. Safety equipment such as dust mask, non-skid safety shoes, hard hat, or hearing protection used for appropriate conditions will reduce personal injuries.
d. Use caution when using tools in the vicinity of electrical haze
4. Use and care
a. Use the correct tool for your application. The correct tool will do the job better and safer.
b. Do not use the tool if the switch does not turn it on and off. Any tool that cannot be controlled with the switch is dangerous and must be repaired.
c. Store idle tool out of the reach of children and do not allow persons unfamiliar with the tool or these instructions to operate the tool. Tools are dangerous in the hands of untrained users.
d. Maintain tools. Check for misalignment or binding of moving parts, breakage of parts and any other condition that may
General Safety Rules
affect the operation. If damaged, repair tool before use. Many accidents are caused by poorly maintained tools.
e. Use the tool, accessories, etc., in accordance with these instructions and in the manner intended for the particular type of tool, taking into account the working conditions and the work to be performed. Use of the tool for operations different from those intended could result in a hazardous situation.
5. Battery tool use and care
a. Recharge only with the charger specified by the manufacturer. A charger that is suitable for one type of battery pack may create a risk of fire when used with another battery pack.
b. Use tool only with specifically designated battery packs. Use of any other battery packs may create a risk of injury and fire.
c. When battery pack is not in use, keep it away from other metal objects like paper clips, coins, keys, nails, screws, or other small metal objects that can make a connection from one terminal to another. Shorting the battery terminals together may cause burns or a fire.
d. Under abusive conditions, liquid may be ejected from the battery; avoid contact. If contact accidentally occurs, flush with water. If liquid contacts eyes, additionally seek medical help. Liquid ejected from the battery may cause irritation or burns.
e. Do not use a battery pack or tool that is damaged or modified. Damaged or modified batteries may exhibit unpredictable behaviour resulting in fire, EXPLOSION or risk of injury.
f. Do not expose a battery pack or tool to fire or excessive temperature. Exposure to fire or temperature above 265^ (130 °C) may cause explosion.
g. Follow all charging instructions and do not charge the battery pack or tool outside the temperature range specified in the instructions. Charging improperly or at temperatures outside the specified range may damage the BATTERY and increase the risk of fire.
h. Disconnect the battery pack from the tool before making any adjustments, changing accessories, or storing the tool. Such preventive safety measures reduce the risk of starting the tool accidentally.
i. Do not modify or attempt to repair the tool or the battery pack except as indicated in the instructions for use and care.
6. Service
a. Have your tool serviced by a qualified repair person using only identical replacement parts. This will ensure that the safety of the tool is maintained.
b. Develop a periodic maintenance schedule for tool. When cleaning a tool be careful not to disassemble any portion of the tool since internal wires may be misplaced or pinched or may be improperly mounted. Certain cleaning agents such as gasoline, carbon tetrachloride, ammonia, etc. may damage plastic parts.
Safety Rules for Inspection Camera
WARNING
Chemical Burn Hazard. Keep batteries away from
children.
This product contains a lithium button/coin cell battery. If a new or used lithium but
ton/coin cell battery is swallowed or enters the body, it can cause severe internal burns and can lead to death in as little as 2 hours. Always completely secure the battery compartment. If the battery compartment does not close securely, stop using the product,
Safety Rules for Inspection Camera
remove the batteries, and keep it away from children. If you think batteries might have been swallowed or placed inside any part of the body, seek immediate medical attention.
All coin cell batteries, even used coin cells, may cause injury. They should be disposed of properly, including keeping them away from children.
Always check the work area before beginning a job. Do not allow cable to contact electrical, chemical, or moving hazards. Shut off circuit breakers to the entire area when probing behind walls. These preventative measures will reduce the risk of explosion, electric shock and property damage.
Do not use this device for personal inspection or medical use in any way. This is not a medical device. Serious personal injury could result.
Do not place the inspection camera anywhere that may contain moving parts. This reduces the risk of entanglement injuries.
Always use appropriate personal protective equipment while handling and using the inspection camera. Appropriate personal protective equipment always includes safety glasses and gloves and may include equipment such as latex or rubber gloves, face shields, goggles, protective clothing, respirators and steel toed footwear. Drains and other areas may contain chemicals, bacteria and other substances that may be toxic, infectious, cause burns or other issues.
Practice good hygiene. Use hot, soapy water to wash hands and other body parts exposed to drain contents after handling or using the inspection camera to inspect drains and other areas that may contain chemicals or bacteria. Do not eat or smoke while operating or handling the inspection camera. This will help prevent contamination with toxic or infectious material.
Do not operate the inspection camera if operator or device is standing in water. Operating an electrical device while in water increases the risk of electrical shock.
Do not use the cable to clear clogs or move obstructions. This is not a drain cleaner.
Do not immerse the handle or the display unit in water. The camera head and the cable are water resistant when the unit is fully assembled, but the video display is not. Such measures reduce the risk of electric shock and damage.
Keep the magnetic accessories away from implants and other medical devices, e.g. pacemakers or insulin pumps. The magnets in the accessories generate a field that can impair the function of implants and medical devices.
Keep the magnetic accessories away from magnetic data storage media and magnetically-sensitive devices. The effect of the magnets in the accessories can lead to irreversible data loss.
FCC Caution
The manufacturer is not responsible for radio interference caused by unauthorized modifications to this equipment. Such modifications could void the user's authority to operate the equipment.
This device complies with Part 15 of the FCC Rules. Operation is subject to the following two conditions:
-
This device may not cause harmful interference, and
-
This device must accept any interference received, including interference that may cause undesired operation.
NOTE! This equipment has been tested and found to comply with the limits for a Class B digital devices, pursuant to Part 15 of the FCC rules. These limits are designed to provide reasonable protection against harmful interference in a residential installation. This equipment generates uses and can radiate radio frequency energy and, if not installed and used in accordance with the instructions, may cause harmful interference to radio communications. To comply with FCC's
FCC Caution
RF radiation exposure limits for general population/uncontrolled exposure, this device must not collect or operate in conjunction with any other antenna or transmitter. However, there is no guarantee that interference will not occur in a particular installation. If this equipment does cause harmful interference to radio or television reception, which can be determined by turning the equipment off and on, the user is encouraged to try to correct the interference by one or more of the following measures:
- Reorient or relocate the receiving antenna.
- Increase the separation between the equipment and receiver.
- Connect the equipment into an outlet on a circuit different from that to which the receiver is connected.
- Consult the dealer or an experienced radio/TV technician for help.
Exposure to Radio Frequency (RF) Signals: The wireless device is a radio transmitter and receiver. It is designed and manufactured not to exceed the emission limit for exposure to radio frequency (RF) energy set by the Ministry of Health (Canada), Safety Code 6. These limits are part of comprehensive guidelines and established permitted levels of RF energy for the general population.
To comply with FCC's RF radiation exposure limits for general population/uncontrolled exposure, this device must not be collocated or operating in conjunction with any other antenna or transmitter.
Industry Canada (IC)
This device complies with Industry Canada's licence-exempt RSSs. Operation is subject to the following two conditions:
-
This device may not cause interference; and
-
This device must accept any interference, including interference that may cause undesired operation of the device.
Intended Use
The digital inspection camera is suitable for inspecting areas that are dark or difficult to access. It is also suitable for moving and removing small and light objects (e.g. small screws) after fitting the supplied accessories on the camera head.
Digital inspection camera must not be used for medical purposes. It is likewise not intended for removing pipe blockages or installing cables.
Symbols
Important: Some of the following symbols may be used on your tool. Please study them and learn their meaning. Proper interpretation of these symbols will allow you to operate the tool better and safer.
| Symbol Designation/Explanation | |
| V Volts | (voltage) |
| A Amperes (current) | |
| Hz Hertz (frequency, cycles per second) | |
| W Watt | (power) |
| lb Pounds | (weight) |
| kg Kilograms | (weight) |
| min Minutes | (time) |
| s Seconds | (time) |
| Class II construction (Designates Double Insulated Construction tools.) | |
| Earthing terminal (grounding terminal) | |
| Designates Li-ion battery recycling program. | |
| Alerts user to read manual. | |
| Alerts user to wear eye protection. | |
| This symbol indicates magnetic field in place. | |
| This symbol designates that the tool complies with FCC Rules. | |
Getting to Know Your GLC5-27C Inspection Camera

Remove detachable battery pack before making any assembly, adjustments or changing accessories. Such preventive safety measures reduce
the risk of starting the tool accidentally.
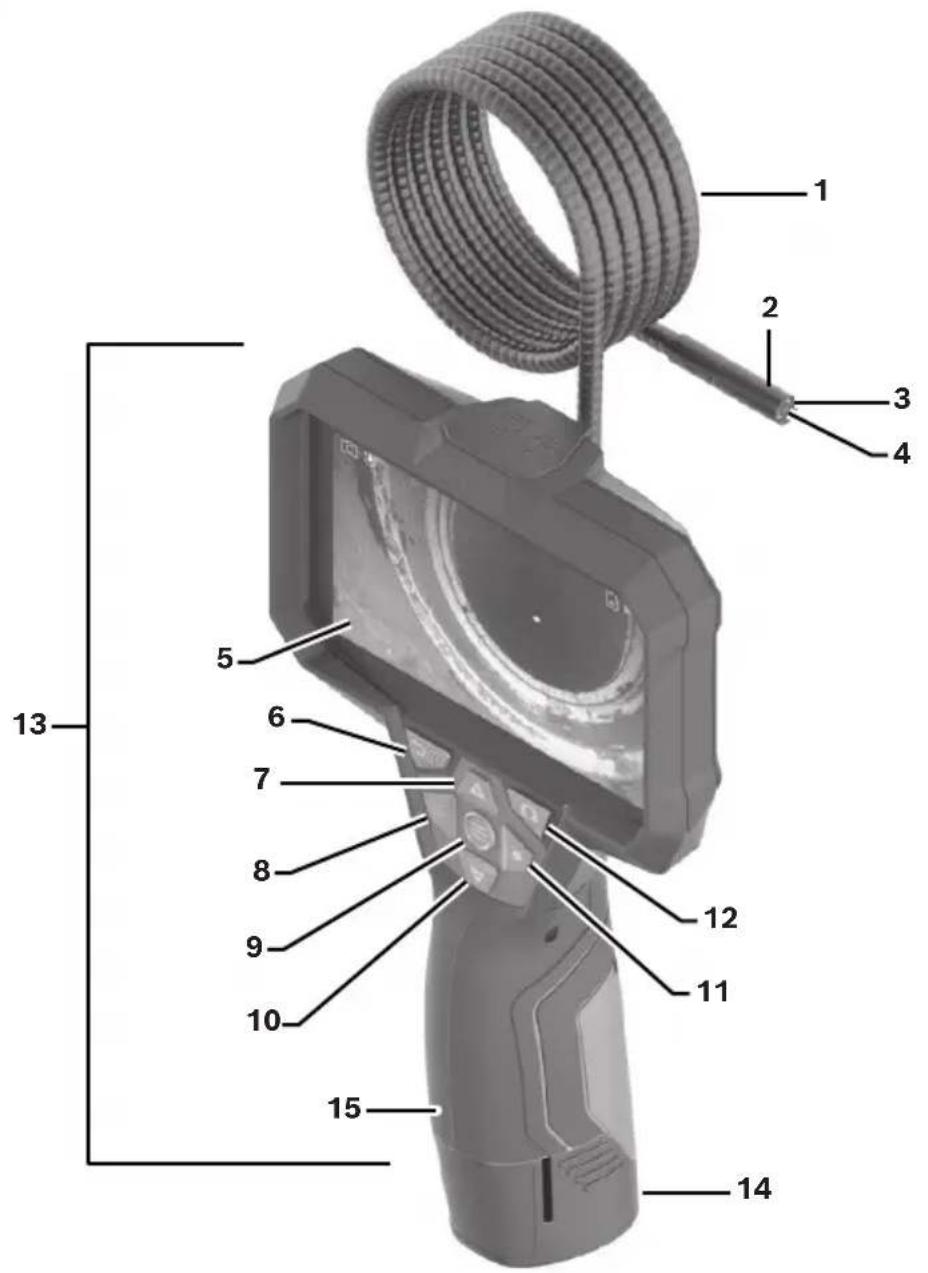
Fig. 1
1 Camera Cable
2 Camera Head
3 Illumination Light
4 Camera Lens
5 Display
6 ON/OFF Button
7 Up Button
8 Left-Hand Button
9 Center Button
10 Down Button
11 Right-Hand Button
12 Photo/Video Recording Button
13 Handheld Device
14 Rechargeable Battery *
15 Battery Compartment
Specifications
| Model Number GIC5-27C | |
| Article number 3 601 B41 4.. | |
| Display size 5 inches (127 mm) | |
| Display resolution 1280px × 720px | |
| Camera resolution, photo and video files 1280px × 720px | |
| Screenshot format.JPG | |
| Video format AVI | |
| Video frame rate - Video Frame rate without Up Indication: - With Up Indication: | 20 fps 7 fps |
| Max. number of photos in internal memory 30 | |
| Field of view 75° | |
| Focus distance 1.18-3.15 in. (30-80 mm) | |
| Max. luminous intensity of the illumination light in the camera head (at 50 mm distance in a dark environment) | 200 lx |
| Max. immersion time for camera head/cable in diesel, engine oil, ethyl alcohol, petrol or salt water (26.5% salt content) | 30 minutes |
| Battery / Charger list - Rechargeable Batteries (Bosch 10.8 V/12 V Max lithium-ion pack): - Chargers: | BAT414 (2.0Ah), BAT420 (4.0Ah), GBA12V30 (3.0Ah), GBA12V60 (6.0Ah) BC330, BC430, GAX1218V-30, GAL12V-20 |
| Backup power supply for saving the time: - Coin cell: - Battery life: | CR2450 (3V, lithium battery) approx. 3 years |
| Operating time, approx., with rechargeable battery (Li-ion) [1, 2]: | 6h |
| Weight according to EPTA-Procedure 01:2014 with rechargeable battery (Li-ion) [3]: 1.61-2.07 lbs. (0.73-0.94 kg) | |
| Dimensions (length × width × height) [1] | 9.52 in. x 5.51 in. x 2.60 in. (242 mm × 140 mm × 66 mm) |
| Protection rating of handheld device (excluding battery compartment) IP54 | |
| Protection rating of camera head and camera cable IP67 | |
| Recommended ambient temperature during charging 32°F to +95°F (0°C to +35°C) | |
| Permitted ambient temperature during operation | 14°F to 122°F (-10°C to +50°C) |
| Permitted ambient temperature during storage | -4°F to 158°F (-20°C to +70°C) |
Notes:
- With BAT414 (2.0Ah) battery pack.
-
With camera display, average display brightness, illumination light with 50% brightness.
-
Depends on battery in use.
Power Supply
The tool can be operated using a Bosch Li-ion rechargeable battery.
Operation with Battery Pack
WARNING Use only Bosch rechargeable lithium-ion battery
packs listed in the specifications section of this manual. Use of other battery packs may increase the risk of fire, personal injury and property damage.
WARNING Remove the batteries from the tool when not
using it for extended periods. When storing for extended periods, the batteries can corrode and self-discharge.
Note: The battery pack is supplied partially charged. To ensure full capacity of the battery pack, completely charge the battery pack in the battery charger before using for the first time.
WARNING Use only Bosch chargers listed in the specifica
tions section of this manual. Use of other chargers may increase the risk of fire, p sonal injury and property damage.
The lithium-ion battery pack can be charged at any time without reducing its service life. Interrupting the charging procedure does not damage the battery pack.
The lithium-ion battery is protected against deep discharge by the Electronic Cell Protection (ECP). A protective circuit switches the laser level off when the battery is drained.
- Following the automatic shut off of the tool, do not continue to press the On/Off button. The battery can be damaged.
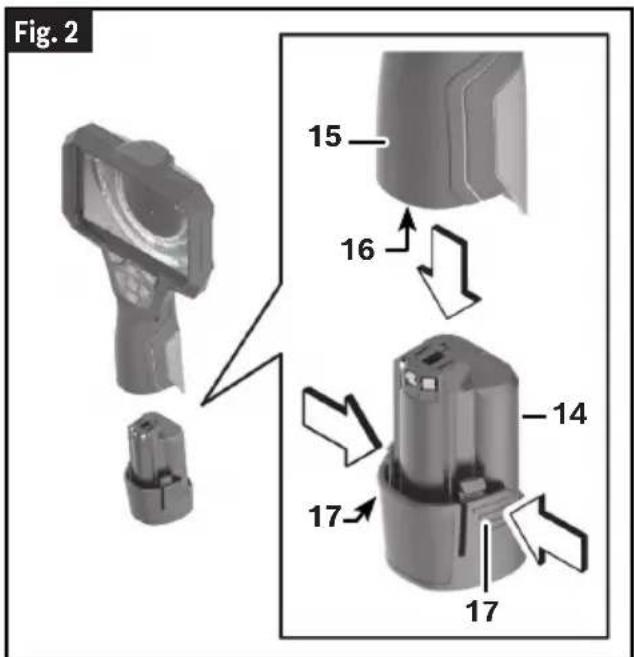
Inserting a Battery Pack
(Fig. 2)
WARNING If battery release tabs are cracked or otherwise
damaged, do not insert into tool. Battery can fall out during operation.
To insert the charged Battery 14, slide it into the Battery Port 16 until you feel it lock into position. Do not use force.
Removing a Battery Pack
(Fig. 2)
To remove the Rechargeable Battery 14, press the Battery Release Tabs 17 and pull the Battery 14 out of the Battery Compartment 15. Do not use force.
Battery Charge Indicator
(Fig. 3)
The Battery Charge Indicator 18 on the Display 5 shows the charging state of the Battery 14.

| Indicator Charge | |
| 100% | |
| 75% | |
| 50% | |
| 25% | |
| Blinking 3 times: there is 15 minutes or less left. | |
Recommendations for Optimal Handling of the Battery
Protect the Battery against moisture and water.
Only store the Battery within a temperature range of -4^ to 158^ (-20^ to +70^) .Do not leave the Battery in your car in the summer, for example.
A significantly reduced operating time after charging indicates that the Battery has deteriorated and must be replaced.
Follow the instructions on correct disposal.
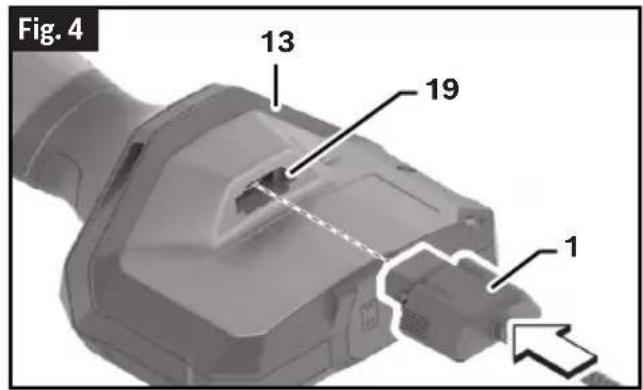
Fitting the Camera Cable
(Fig. 4)
For operation of the inspection camera, the Camera Cable 1 must be fitted on the Hand-held Device 13.
Push the connector of the Camera Cable 1 onto the Camera Connection 19 in the correct position until it clicks into place.
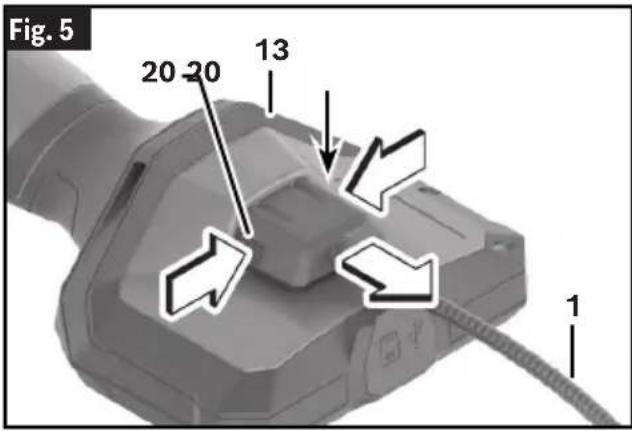
Removing the Camera Cable
(Fig. 5)
To remove the Camera Cable 1, press the Cable's Locking Mechanism 20 and pull the connector out of the Handheld Device 13.
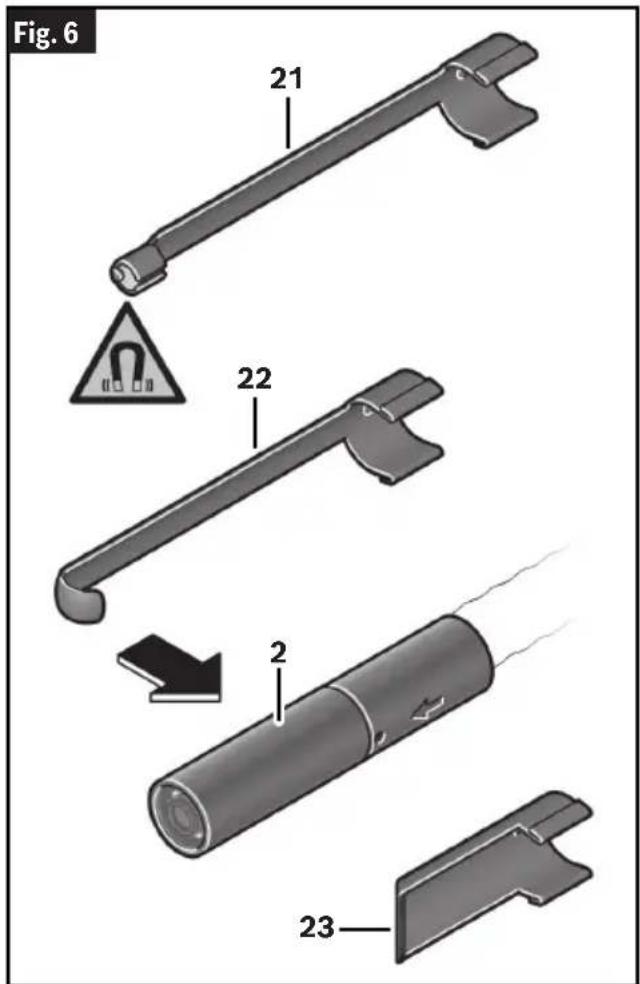
Fitting the Mirror, Magnet or Hook
(Fig. 6)
The Mirror 21, the Hook 22, or the Magnet 23 can be fitted on the Camera Head 2 as accessories.
Push one of the three accessories all the way onto the Camera Head 2.
Note: The Magnet 23 and the Hook 22 are only suitable for moving and removing loose, small and light objects. The inspection camera or the accessory can be damaged with too strong a pull.
Operation
Product Description
(Fig. 1, Fig. 6)
The Product is a hand-held optical inspection device designed to provide the user with the ability to view objects in otherwise inaccessible places. The image is displayed in full color on the viewing screen (the Display 5).
This device is equipped with an imaging and lighting source that features LED light adjustment allowing the user to optimize the lighting conditions for the viewing situation. These features ensure a detailed and accurate visual inspection. The Mirror 21, Hook 22, and Magnet 23 accessories can be attached to the Camera Head 2 to provide application flexibility.
Using the Product
(Fig.1)
To turn the unit on, hold the viewer with the LCD screen facing you. Press the ON/OFF switch to turn on the unit.
Gently insert the camera head and cable into the environment containing the object to be viewed. The intensity of the illumination should be adjusted to give the best image on the viewing screen. In some circumstances less is best (especially if the object is highly reflective).
Protect the Handheld Device 13 and the Rechargeable Battery 14 from direct sunlight. Protect the Rechargeable Battery 14 against moisture. The Camera Cable 1 and Camera Head 2 are watertight if assembled correctly; the Handheld Device 13 is splash-proof. However, the Rechargeable Battery 14 is not protected against water. If it comes into contact with water, there is a risk of electric shock or damage.
Do not use the inspection camera if the lens on the Camera Head 2 has fogged up. Switch the inspection camera on only if the moisture has evaporated. The inspection camera may otherwise become damaged.
Do not use the cable or camera head to modify surroundings, clear pathways or clogged areas, or as anything other than an inspection device.
The hand-held display unit is not water-resistant. The camera head and its covering are water-resistant but are not acid-proof or fireproof. Petroleum-based products will ruin the camera head's protective plastic covering over time. Avoid submersing the camera head into corrosive, oily places.
Do not insert the camera head and cable into any space containing live electric wiring or moving parts.
Do not use this device for medical inspections. This is not a medical device and personal injury could occur.
The Illumination Light 3 can become hot during operation. To avoid burns, do not touch the light.
Do not subject the inspection camera to extreme temperatures or variations in temperature. For example, do not leave it in a car for extended periods of time. In case of large variations in temperature, allow the inspection camera to adjust to the ambient temperature before putting it into operation.
Starting Operation
Switching On and Off
(Fig.1)
To switch on the inspection camera, press the ON/OFF Button 6 or the Center Button 9.
Note: If the Camera Cable 1 is not fitted when switching on, the Display 5 will show an error message.
To switch off the inspection camera, press the ON/OFF Button 6 until the display switches off.
If no button on the inspection camera is pressed for a certain time, then the inspection camera will automatically switch itself off to preserve battery life. You can set the switchoff time in the main menu.
Regulating the Illumination Light in the Camera Head
(Fig.1)
To regulate the Illumination Light 3, press the Left-Hand Button 8 or the Right-Hand Button 11 until it reaches the required brightness or the illumination light has switched off.
- Do not look directly into the Illumination Light 3 and do not direct the Light 3 onto other people. The light can blind your eyes.
Zooming In/Out of the Image in the Display
(Fig.1)
To set the magnification level on the Display 5, press the Up Button 7 or the Down Button 10 until the required magnification level has been reached.
Main Menu
(Fig. 1)
To access the
Navigating in the Menu
(Fig.1)
To scroll through a menu, press the Up Button 7 or the Down Button 10.
To switch to a submenu, press the Center Button 9 or the Right-Hand Button 11.
To confirm a selected menu option, press the Center Button 9.
- To switch a function with a virtual switch on or off either press the Center Button 9, the Right-Hand Button 11 or the Left-Hand Button 8. This will also save the setting.
To return to the previous, higher-level menu, briefly press the ON/OFF Button 6.
- To exit the main menu and return to the camera display, briefly press the ON/OFF Button 6.
Menu Options
(Fig. 1, Fig. 6, Fig. 7, Fig. 8)
: Switch the function on or off.
When the Up Indication function is switched on, the Up Indication Status Indicator 25 displays, and the arrow of the Up Indication Direction Indicator 26 shows where "up" is in the image.

Note: The function is limited if a Mirror 21 is fitted and/or with a vertically aligned Camera Cable 1.
: This is where recorded photos and videos can be accessed.
You can select the required file based on its date using the Down Button 10 or the Up Button 7.
Press the Right-Hand Button 11 or the Center Button 9 to see a preview of the selected photo or video.
To open the selected file, press the Center Button 9.
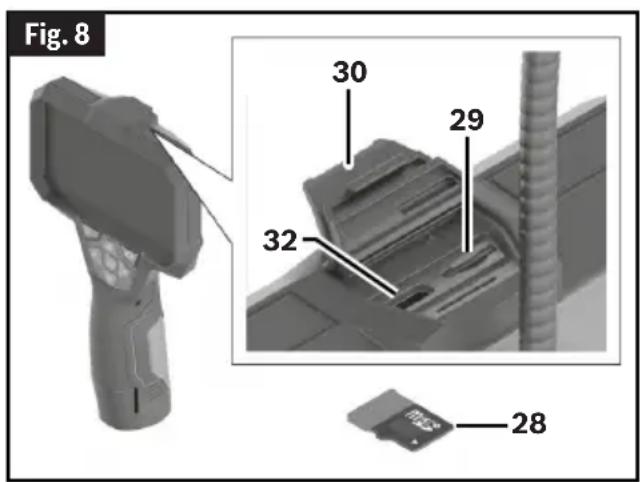
Note: If a Micro-SD Card 28 is inserted into the Micro-SD Card Slot 29 on the Handheld Device 13, only files saved on this Micro-SD Card 28 are displayed. To open photos from the internal storage, you must first remove the Micro-SD Card 28 from the Micro-SD Card Slot 29 under the Top Flap 30.
: Choose between and : Set the required brightness for the display. : Switch between the color view and black/white view of the display.
Device settings>
Note: If the date and time can no longer be saved, the built-in coin cell is drained.
Contact an authorised Bosch-after-sales service center if this happens.
: Here you will find device information, such as the installed software version and legal information. : You can reset all of the menu options to factory settings. This also simultaneously and permanently deletes all of the saved files.
Saving/Transferring the Recordings
Taking Photos/Videos
(Fig. 1, Fig. 7, Fig. 8)
If a Micro-SD Card 28 is inserted into the Micro-SD Card Slot 29, the photos and videos are saved on the card.
If no Micro-SD Card 28 is present, photos are stored on the internal storage on the inspection camera and it is not possible to take videos.
Photo mode: Press the Photo/Video Recording Button 12 to take a photo of the current display view.
Video mode: To start filming a video, press the Photo/Video Recording Button 12. The the Recording Mode Symbol 24 will appear on the Display 5.
To stop recording, press the Photo/Video Recording Button 12 again or the Center Button 9.
You can switch between photo and video mode in the
Operation
Data Transfer Overview
(Fig. 8, Fig. 9)
- Transferring photo files from the internal storage to the Micro-SD Card 28: When a Micro-SD Card 28 is inserted into the Micro-SD Card Slot 29, a request appears in the display asking whether the data saved on the inspection camera's internal storage should be transferred to the Micro-SD Card 28.
- Transferring photo files from the internal storage via USB Type-C: Transfer is only possible if there is no MicroSD Card 28 inserted in the inspection camera.
-
Transferring files from the Micro-SD Card 28: You can transfer files from the inserted Micro-SD Card 28 either via USB Type-C Cable 31* or by removing the Micro-SD Card 28 and inserting it into another device.
-
USB Type-C® and USB-C® are trademarks of USB Implementers Forum.
Inserting the Micro-SD Card
(Fig. 7, Fig. 8)
Open the Top Flap 30 and push the MicroSD Card 28 all the way into the Micro-SD Card Slot 29, paying attention to the correct orientation. The Micro-SD Card Status Indicator 27 will appear on the Display 5. Carefully close the Top Flap 30 again.
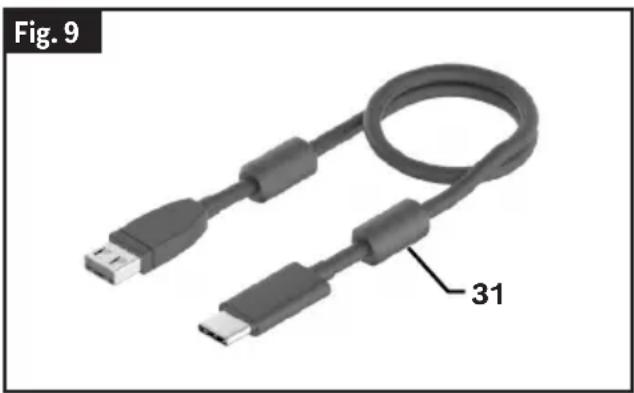
Data Transfer via the USB Type-C® Interface
(Fig. 8, Fig. 9)
Switch on the inspection camera to transfer data via the USB Type-C® interface. Open the Top Flap 30. Connect the USB Type-C® Port 32 to your PC via the USB Type-C® Cable 31*.
- USB Type-C® and USB-C® are trademarks of USB Implementers Forum.
Open the file browser on your PC and select the Bosch_GIC drive. The saved files can be copied from the internal memory or the Micro-SD Card 28 of the inspection camera, moved to your PC or deleted.
As soon as you have completed the required operation, disconnect the drive following the standard procedure.
Note: Always disconnect the Micro-SD Card 28 from the operating system of the PC first (eject drive), as failure to do so may damage the internal memory of the inspection camera.
Then, switch off the inspection camera. Remove the USB Type-C Cable 31 and close the Top Flap 30 for protection against dust and splashing water.
Note: Only use the USB Type-C® Port 32 to connect the inspection camera to a PC. The inspection camera may be damaged if connected to other devices.
Note: The USB Type-C® Port 32 can only be used for data transfer. Rechargeable batteries or other devices cannot be charged by this interface.
Working Advice
(Fig. 1)
Check the environment that you want to inspect, paying particular attention to obstacles or hazardous areas.
Bend the Camera Cable 1 so that the Camera Head 2 can be easily introduced into the environment to be inspected. Carefully introduce the Camera Cable 1.
Adjust the brightness of the camera's illumination Light 3 so that the image is easily recognizable.
When photographing highly reflective objects, for example, you can achieve better results in lower light or using black and white contrast setting.
If objects to be inspected look blurred, then reduce or increase the distance between the Camera Head 2 and the object.
Maintenance and Cleaning
(Fig. 1)
WARNING
Check the tool each time before use. In case of vis
ible damage or loose components inside the measuring tool, safe function can no longer be ensured.
Keep the tool clean at all times. Clean the inspection camera and all accessories particularly thoroughly after you have worked in areas with substances harmful to health.
Wipe off any dirt using a damp, soft cloth. Do not use any detergents or solvents.
Clean the Camera Lens 4 in particular regularly and make sure to check for any lint.
Do not immerse the tool into water or other fluids.
If the tool should fail despite the care taken in manufacturing and testing procedures, repair should be carried out by an authorized after-sales service center for Bosch power tools. Do not open the measuring tool yourself.
In all correspondence and spare parts orders, please always include the 10-digit article number given on the type plate of the tool.
Environment Protection
Recycle raw materials & batteries instead of disposing of waste. The unit, accessories, packaging & used batteries should be sorted for recycling in accordance with the latest regulations.
Troubleshooting
Errors - Causes and Corrective Measures
| Error indicator in the display Cause Corrective Measure | ||
| (yellow warning) | Internal memory almost full | Delete the files from the internal memory or insert a Micro-SD Card 28 (Fig. 8). |
| (red warning) | Internal memory full | Delete the files from the internal memory or insert a Micro-SD Card 28 (Fig. 8). |
| Error in the internal memory | Restart the inspection camera. | |
| If the problem persists, contact an authorised Bosch after-sales service center. | ||
| (yellow warning) | Micro-SD card almost full | Delete the files from the Micro-SD Card 28 (Fig. 8). |
| (red warning) | Micro-SD card full | Delete the files from the Micro-SD Card 28 (Fig. 8). |
| Error in the micro-SD card | Remove the Micro-SD Card 28 (Fig. 8) and insert it again. | |
| Check the Micro-SD Card 28 (Fig. 8) in a different device. | ||
Accessories
Optional accessories and attachments that may or may not be include in the kit:
- Camera Cable 1600 A02 R6M 4.9 ft (1.5 m) / 0.32 in (8.3 mm)
- Camera Cable 1600 A02 R6P 11.5 ft (3.5 m) / 0.32 in 8.3 mm
- Camera Cable (Dual Camera) 1600 A02 Z65 4.9 ft (1.5 m) / 0.32 in (8.3 mm)
- Camera Cable 1600 A02 Z66 4.9 ft (1.5 m) / 0.15 in (3.9 mm)
(Fig.1, Fig.7, Fig.8)
Industry Canada (IC)
For details on the terms of the limited warranty for this product, go to https://rb-pt.io/PowerToolWarranty or call 1-877-BOSCH99.