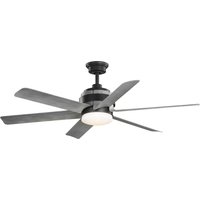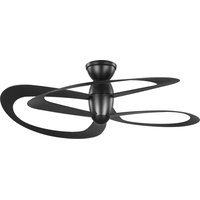
P250063 - Fan Progress Lighting - Free user manual and instructions
Find the device manual for free P250063 Progress Lighting in PDF.


User questions about P250063 Progress Lighting
0 question about this device. Answer the ones you know or ask your own.
Ask a new question about this device
Download the instructions for your Fan in PDF format for free! Find your manual P250063 - Progress Lighting and take your electronic device back in hand. On this page are published all the documents necessary for the use of your device. P250063 by Progress Lighting.
USER MANUAL P250063 Progress Lighting
natural_image
3D rendering of a metallic propeller with three blades and a curved blade, rendered in grayscale (no text or symbols)93133628_A
P250063
Limited Lifetime Warranty
Progress Lighting fan motors are warranted to the original purchaser to be free of electrical and/or mechanical defects for so long as the original purchaser owns the fan. Pull chain switches, reverse switches, capacitors and metal finishes are warranted to be free from defects in materials or workmanship for a period of 1 year from the date of purchase. Warping of wooden or plastic blades is not covered by this warranty nor is corrosion and/or deterioration of any finishes for fans installed within ten miles of any sea coast. Extended warranties for ENERGY STAR ^® qualified products may apply.
Progress Lighting ceiling fans with built-in LED light sources, when properly installed and under normal conditions of use, are warranted to be free from defects in material and workmanship which cause the light sources to fail to operate in accordance with the specifications for (i) five (5) years from the date of purchase on the LED Light modules and electrical components for fans used in single family residences, and (ii) three (3) years from the date of purchase on the LED Light modules and electrical components for fans used in multi-family or commercial applications. LED bulbs supplied by Progress Lighting carry no warranty other than manufacturer's warranty. Non-LED bulbs carry no warranty.
With proof of purchase, the original purchaser may return the defective fan to the place of purchase during the first 30 days for replacement. After 30 days, the original purchaser MUST contact Progress Lighting at (864) 678-1000 for repair or replacement which shall be determined in Progress Lighting's sole discretion and shall be purchaser's sole and exclusive remedy.
Labor and Shipping Excluded. This warranty does not cover any costs or fees associated with the labor (including, but not limited to, electrician's fees) required to install, remove, or replace a fan or any fan parts.
This warranty shall not apply to any loss or damage resulting from (i) normal wear and tear or alteration, misuse, abuse or neglect, or (ii) improper installation, operation, repair or maintenance by original purchaser or a third party, including without limitation improper voltage supply or power surge, use of improper parts or accessories, unauthorized repair (made or attempted) or failure to provide maintenance to the fan.
THE FOREGOING WARRANTIES STATE PROGRESS LIGHTING'S ENTIRE WARRANTY OBLIGATION AND ORIGINAL PURCHASER'S SOLE AND EXCLUSIVE REMEDY RELATED TO SUCH PRODUCTS. PROGRESS LIGHTING IS NOT RESPONSIBLE FOR DAMAGES (INCLUDING INDIRECT, SPECIAL, INCIDENTAL OR CONSEQUENTIAL), DUE TO PRODUCT FAILURE, WHETHER ARISING OUT OF BREACH OF WARRANTY, BREACH OF CONTRACT, OR OTHERWISE. THIS WARRANTY IS GIVEN IN LIEU OF ALL OTHER WARRANTIES, WHETHER EXPRESSED OR IMPLIED, INCLUDING THOSE OF MERCHANTABILITY, FITNESS FOR A PARTICULAR PURPOSE OR NONINFRINGEMENT.
Some states do not allow limitations on how long an implied warranty lasts or the exclusion or limitations of incidental or consequential damages, so the above limitations and exclusions may not apply to you. This warranty gives you specific rights and you may have other rights which vary from state to state.
Date Purchased ____
Store Purchased ____
Model No. ____
Serial No. ____
Vend or No. 126900
785247249398
UPC □ 785247249404
PROGRESS LIGHTING™
Safety Rules....1.
Unpacking Your Fan 2.
Installing Your Fan .... 3.
Installing the Decorative Cover 8.
Operating Your Transmitter 9.
Care of Your Fan ....10.
Wifi Control Setup - Smart Device Control 11.
Wifi Control Setup - Smart Speaker Voice Control 12.
Troubleshooting 13.
Specifications 14.
Table of Contents
- To reduce the risk of electric shock, ensure electricity has been turned off at the circuit breaker or fuse box before beginning.
- All wiring must be in accordance with the National Electrical Code "ANSI/NFPA 70-1999" and local electrical codes. Electrical installation should be performed by a qualified licensed electrician.
- The outlet box and support structure must be securely mounted and capable of reliably supporting a minimum of 35 lbs (15.9 kg) or less. Use only UL-listed outlet boxes marked "FOR FAN SUPPORT."
- The fan must be mounted with a minimum of 7 ft. (2.1m) clearance from the trailing edge of the blades to the floor.
- Avoid placing objects in the path of the blades.
- To avoid personal injury or damage to the fan and other items, be cautious when working around or cleaning the fan.
- Do not use water or detergents when cleaning the fan or fan blades. A dry dust cloth or lightly dampened cloth will be suitable for most cleaning.
- After making electrical connections, spliced conductors should be turned upward and pushed carefully up into the outlet box. The wires should be spread apart with the grounded conductor and the equipment-grounding conductor on one side of the outlet box and ungrounded conductor on the other side of the outlet box.
- All set screws must be checked and retightened where necessary before installation.
1. Safety Rules
- This device complies with Part 15 of the FCC Rules. Operation is subject to the following two conditions:
(1) This device may not cause harmful interference, and (2) this device must accept any interference received, including interference that may cause undesired operation. Please note that changes or modifications not expressly approved by the party responsible for compliance could void the user's authority to operate the equipment.
Note: This equipment has been tested and found to comply with the limits for Class B digital device, pursuant to part 15 of the FCC Rules. These limits are designed to provide reasonable protection against harmful interference in a residential installation. This equipment generates, uses and can radiate radio frequency energy and, if not installed and used in accordance with the instructions, may cause harmful interference to radio or television reception, which can be determined by turning the equipment off and on, the user is encouraged to try to correct the interference by one or more of the following measure.
- Reorient or relocate the receiving antenna.
- Increase the separation between the equipment and the receiver.
- Connect the equipment into an outlet on a circuit different from that to which the receiver is connected. Consult the dealer or an experienced radio/TV technician for help.
WARNING
TO REDUCE THE RISK OF PERSONALL INJURY, DO NOT BEND THE BLADE ARMS (ALSO REFERRED TO AS FLANGES), WHEN INSTALLING THE BRACKETS, BALANCING THE BLADES OR CLEANING THE FAN. DO NOT INSERT FOREIGN OBJECTS IN - BETWEEN ROTATING FAN BLADES.
WARNING
TO REDUCE THE RISK OF FIRE, ELECTRIC SHOCK, OR OTHER PERSONAL INJURY. MOUNT FAN ONLY ON AN OUTLET BOX OR SUPPORTING SYSTEM MARKED ACCEPTABLE FOR FAN SUPPORT OF 35 LBS (159KG) OR LESS AND USE MOUNTING SCREWS PROVIDED WITH THE OUTLET BOX. MOST OUTLET BOXES COMMONLY USED FOR THE SUPPORT OF LIGHTING FIXTURES ARE NOT ACCEPTABLE FOR FAN SUPPORT AND MAY NEED TO BE REPLACED. CONSULT A QUALIFIED ELECTRICIAN IF IN DOUBT.
NOTE
READ AND SAVE THESE INSTRUCTIONS
text_image
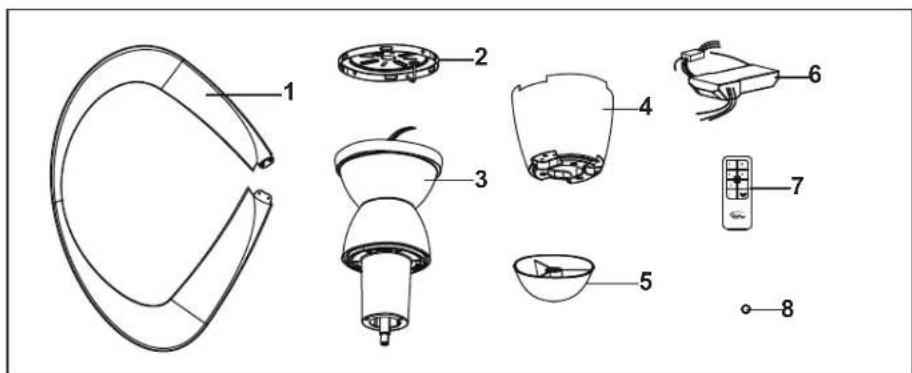
Exploded diagram of a smart home appliance with numbered parts for identificationUnpack your fan and check the contents. You should have the following items:
- Fan blades (3)
- Ceiling bracket assembly
- Motor assembly
- Blade holder ring
-
Decorative cover
-
Receiver with 4 wire nuts
- Transmitter incl. holder + 2 mounting screws
- 3V battery
text_image
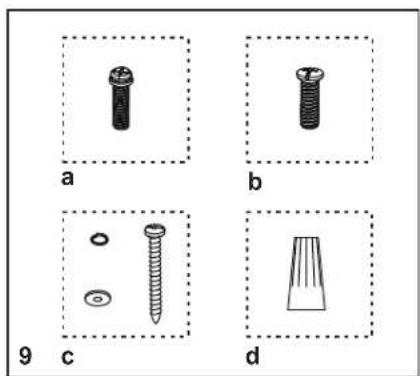
a b 9 c d- Loose parts bag containing:
a. Blade attachment hardware (13 screws)
b. Blade holder screws(4)
c. Cable hardware (1 pcs per item)
d. Mounting hardware
Wire nuts (4)
Unpacking Your Fan 2.
Tools Required
Phillips screw driver, straight slot screw driver, adjustable wrench, step ladder, and wire cutters.
Mounting Options
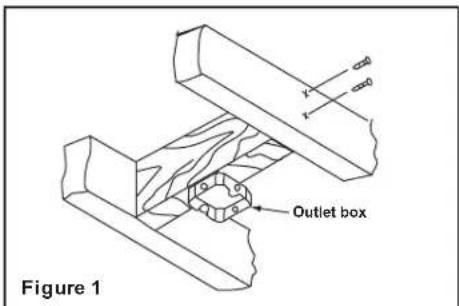
If there isn't an existing UL listed mounting box, then read the following instructions. Disconnect the power by removing fuses or turning off circuit breakers.
Secure the outlet box directly to the building structure. Use appropriate fasteners and building materials. The outlet box and its support must be able to fully support the moving weight of the fan (at least 35 lbs). Do not use plastic outlet boxes.
WARNING
TO REDUCE THE RISK OF FIRE, ELECTRIC SHOCK, OR OTHER PERSONAL INJURY,
MOUNT FAN ONLY TO AN OUTLET BOX MARKED ACCEPTABLE FOR FAN SUPPORT
AND USE THE MOUNTING SCREWS PROVIDED WITH THE OUTLET BOX, OUTLET
BOXES COMMONLY USED FOR THE SUPPORT OF LIGHTING FIXTURES MAY NOT BE ACCEPTABLE FOR FAN SUPPORT AND MAY NEED TO BE REPLACED. CONSULT A QUALIFIED ELECTRICIAN IF IN DOUBT.
text_image
Figure 1 Outlet box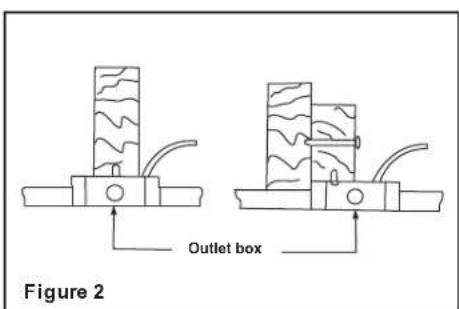
text_image
Figure 2 Outlet box3. Installing Your Fan
Hanging the Fan
REMEMBER to turn off the power. Follow the steps below to hang your fan properly:
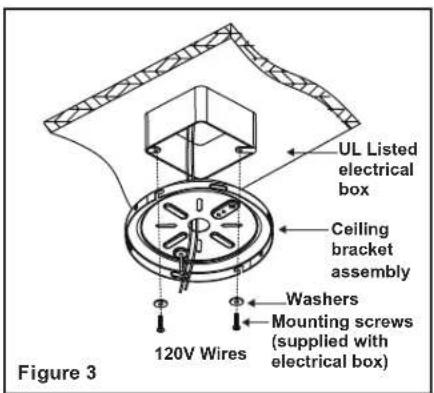
Step 1. Check existing outlet box (not included) to ensure it is securely fastened to at least two points in a structural ceiling member and can support the full weight of the fan.Once verified, install ceiling bracket assembly to the outlet box using the screws and washers provided with the outlet box(Figure 3).
DANGER: A loose outlet box can cause the fan to wobble and increase the fan's potential to fall, which could result in serious injury or death.
Step 2. Remove two diagonal mounting screws on the round holes, keep for later use. And loosen the other two screws (Figure 4).
Step 3. Hang the motor assembly onto the hook from the ceiling bracket assembly. This will allow for hands-free wiring (Figure 5).
text_image
UL Listed electrical box Ceiling bracket assembly Washers Mounting screws (supplied with electrical box) 120V Wires Figure 3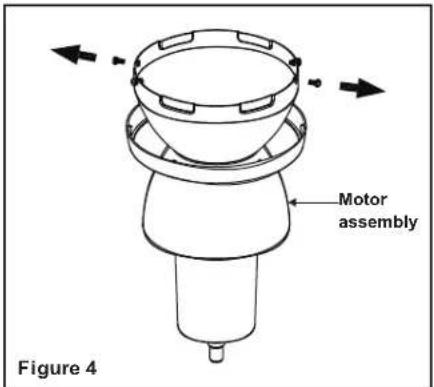
text_image
Motor assembly Figure 4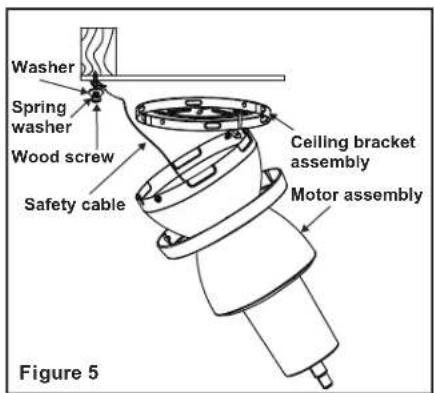
text_image
Washer Spring washer Wood screw Safety cable Ceiling bracket assembly Motor assembly Figure 5Step 4. Drive a wood screw and washers into the side of the brace that holds the outlet box. Leave 3mm (1/8") of space between the support brace and the washer. Insert the safety cable through the Ceiling bracket assembly and one of the holes in the outlet box into the ceiling. Adjust the length of the safety cable to reach the screw and washers by pulling the extra cable through the cable clamp until the overall length is correct, put the end of the cable back through the cable clamp, forming a loop at the end of the cable. Tighten the cable clamp securely. Now, put the loop in the end of the safety cable over the wood screw and under the washer. Tighten the wood screw securely.(Figure 5)
Making the Electrical Connections
NOTE
TO AVOID POSSIBLE ELECTRICAL SHOCK, BE SURE ELECTRICITY IS TURNED OFF AT THE MAIN FUSE BOX BEFORE WIRING.
NOTE
FAN MUST BE INSTALLED AT A MAXIMUM DISTANCE OF 20 FEET FROM THE TRANSMITTING UNIT FOR PROPER SIGNAL TRANSMISSION BETWEEN THE TRANSMITTING UNIT AND THE FAN'S RECEIVING UNIT.
WARNING
CHECK TO SEE THAT ALL CONNECTIONS ARE TIGHT, INCLUDING GROUND, AND THAT NO BARE WIRE IS VISIBLE AT THE WIRE NUTS. EXCEPT FOR THE GROUND WIRE.
If you feel you do not have enough electrical wiring knowledge or experience, have your fan installed by a licensed electrician.
5.
-
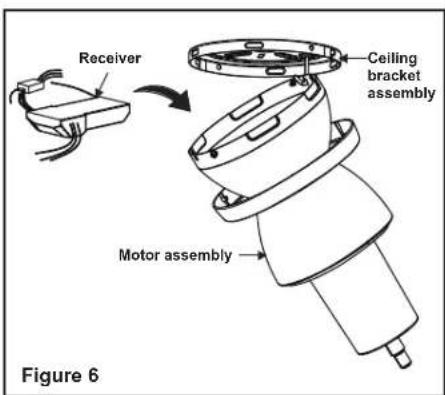
(Figure 6) Insert the receiver into the Ceiling bracket assembly with the flat side of the receiver facing the ceiling.
-
(Figure 7) Motor to receiver electrical connections: Connect the grey wire from the fan to the grey wire from the receiver. Connect the red wire from the fan to the red wire from the receiver. Connect the yellow wire from the fan to the yellow wire from the receiver. Secure the wire connections with the plastic wire connecting nuts provided.
-
(Figure 7) Receiver to house supply wires electrical connections: Connect the black (hot) wire from the ceiling to the black wire marked "AC in L" from the receiver. Connect the white (neutral) wire from the ceiling to the white wire marked "AC in N" from the receiver. Secure the wire connections with the plastic wire connecting nuts provided.
-
(Figure 7) If your outlet box has a ground wire (green or bare copper) connect it to the fan ground wires; otherwise connect the ceiling bracket assembly ground wire to the mounting bracket. Secure the wire connection with a plastic nut provided. After connecting the wires spread them apart so that the green and white wires are on one side of the outlet box and grey/red and yellow wires are on the other side. Carefully tuck the wire connections up into the outlet box.
text_image
Receiver Ceiling bracket assembly Motor assembly Figure 6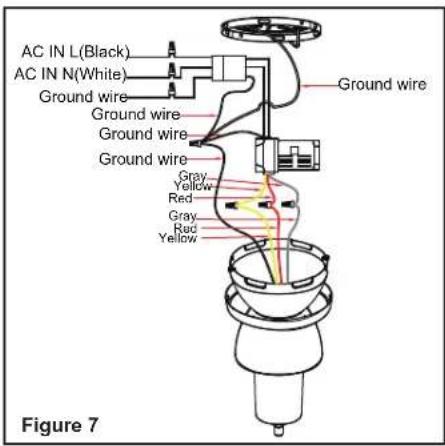
text_image
AC IN L(Black) AC IN N(White) Ground wire Ground wire Ground wire Ground wire Stray Yellow Red Gray Red Yellow Figure 7Finishing the Installation
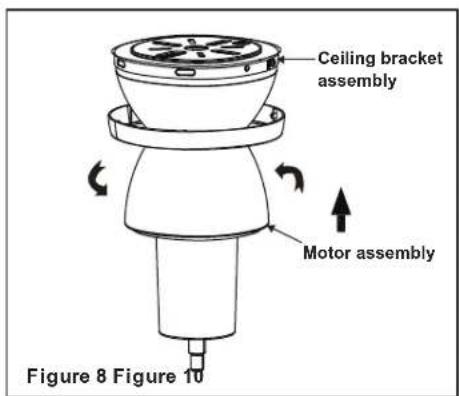
Step 1. After wire connections, take the motor assembly off the hook. Raise the motor assembly up to the ceiling bracket assembly. Align two remained screws on the motor assembly to the keyholes on the ceiling bracket assembly, rotate clockwise until the screw heads engage the keyhole slots fully. Make sure not to break any wire connections (Figure 8).
Step 2. Re-install two mounting screws to the round holes, securely tighten four (4) mounting screws (Figure 9).
Step 3. Lift the trim ring up, aligning four notches on the canopy of motor assembly with raised areas on the inner side of trim ring and pop it into the canopy (Figure 10).
text_image
Ceiling bracket assembly Motor assembly Figure 8 Figure 10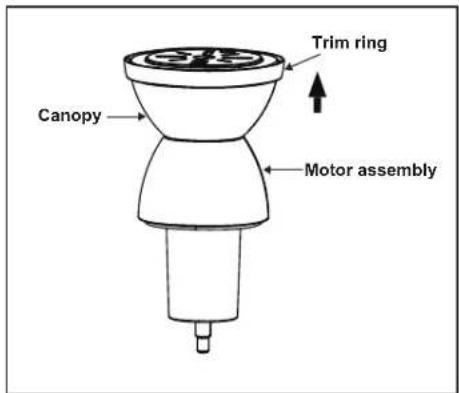
text_image
Trim ring Canopy Motor assembly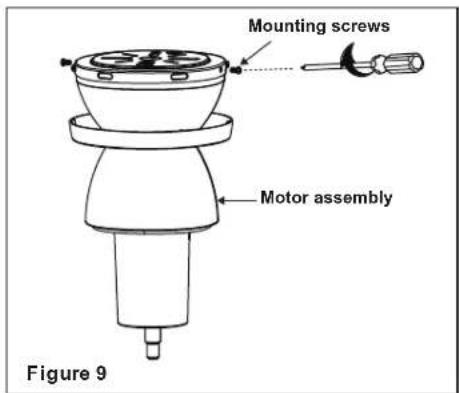
text_image
Mounting screws Motor assembly Figure 9Attaching the Fan Blades
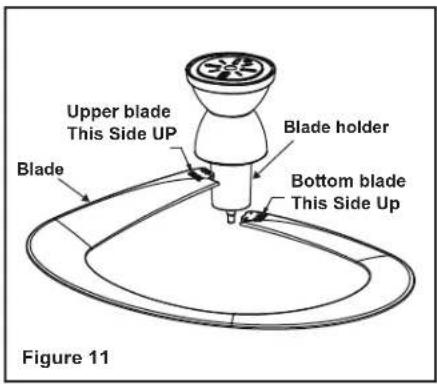
Step 1. Attach the upper blade to the blade holder using the screws as shown in Figure 11 and 12. Repeat it for the remaining blades.
Step 2. Insert the blade holder ring to motor assembly using 3 blade holder ring screws as shown in Figure 13.
Step 3. Attach the bottom blade to blade holder ring using the blade screw as shown in Figure 14. Repeat it for the remaining blades.
text_image
Upper blade This Side UP Blade holder Bottom blade This Side Up Blade Figure 11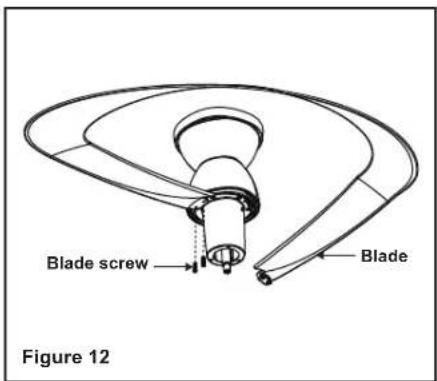
text_image
Blade screw Blade Figure 12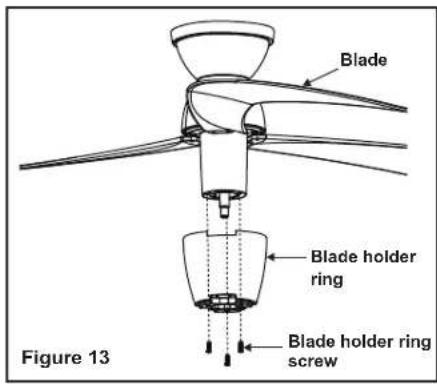
text_image
Blade Blade holder ring Blade holder ring screw Figure 13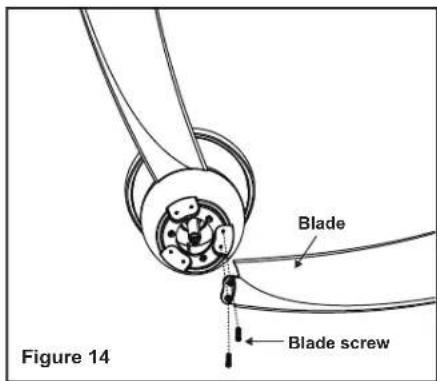
text_image
Blade Blade screw Figure 14Blade Balancing
All blades are grouped by weight. The fan may wobble even though the blades are weighed equally.
The following procedure should correct most fan wobbling problems. Check after each step.
-
Check that all blade and blade arm screws are secure.
-
Most fan wobbling problems are caused when blade levels are unequal. Check this level by selecting a point on the ceiling above the tip of one of the blades. Measure this distance as shown in Figure 14. Rotate the fan until the next blade is positioned for measurement. Repeat for each blade. The distance deviation should be equal within 1/8".
-
Use the enclosed Blade Balancing Kit if the blade wobble is still noticeable.
-
If the blade wobble is still noticeable, interchanging two adjacent (side by side) blades can redistribute the weight and possibly result in smoother operation.

text_image
WARNING TO REDUCE THE RISK OF PERSONAL INJURY, DO NOT BEND THE BLADE HOLDERS WHILE INSTALLING, BALANCING THE BLADES, OR CLEANING THE FAN. DO NOT INSERT FOREIGN OBJECTS BETWEEN ROTATING FAN BLADES.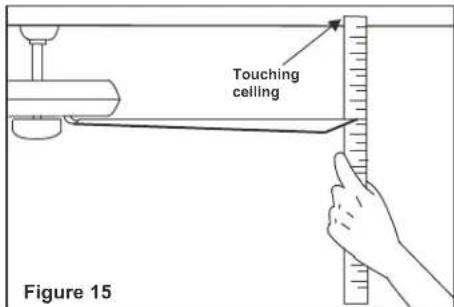
text_image
Touching ceiling Figure 15Installing the Decorative cover
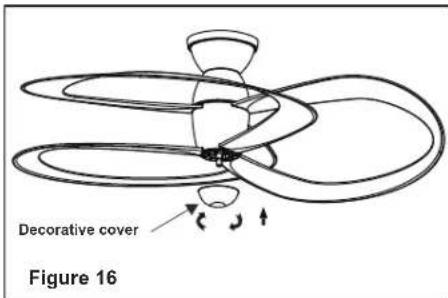
Attach decorative cover and rotate clockwise until it goes all the way up and is tighten (Figure 16).
text_image
Decorative cover Figure 16Installing the Decorative Cover 8.
Restore power to ceiling fan and test for proper operation.
- "0, 1, 2, 3, 4, 5, 6" buttons:
These seven buttons are used to set the fan speed as follows:
0 = Turn the fan ON/OFF
1 = Minimum speed
2 = Low speed
3 = Medium low speed
4 = Medium speed
5 = Medium high speed
6 = High speed
2. “☐” button: No function.
3. " " button: Reverse switch
(control the direction)
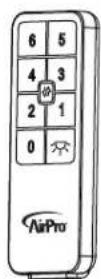
Figure 17
Installing the Remote Control Holder and Battery
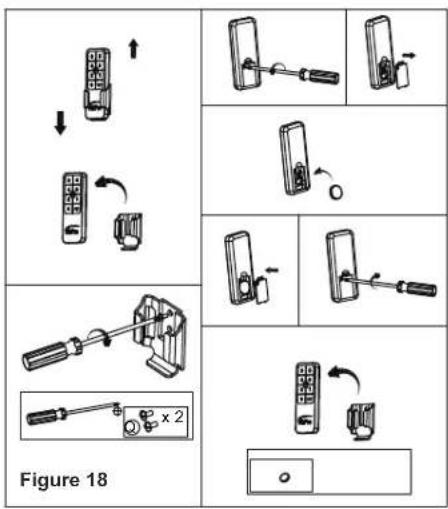
Attach the remote control holder with the remote control holder mounting screw. (Figure 18) Install a 3V battery (included) into the remote control. To prevent damage to the remote control, remove the battery if not use for long periods. (Figure 18)
text_image
Figure 189. Operating Your Transmitter
Speed settings for warm or cool weather depend on factors such as the room size, ceiling height, number of fans, etc.
Warm weather - (Counter-Clockwise direction) A downward air flow creates a cooling effect.(Fig. 19) This allows you to set your air conditioner on a higher setting without affecting your comfort.
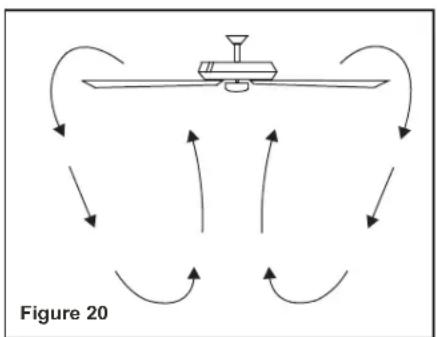
Cool weather - (Clockwise direction) An upward airflow moves warm air off the ceiling area. (Fig. 20) This allows you to set your heating unit on a lower setting without affecting your comfort.
natural_image
Diagram of airflow around a mechanical component, labeled Figure 20 (no text or symbols on diagram itself)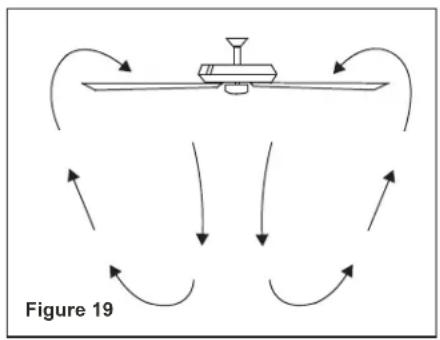
flowchart
graph TD
    A["Top Component"] --> B{Flow Direction}
    B --> C["Bottom Component"]
    C --> D{Flow Direction}
    D --> E["Bottom Component"]
    E --> F["Bottom Component"]
    F --> G["Bottom Component"]
    G --> H["Bottom Component"]
    H --> I["Bottom Component"]
    I --> J["Bottom Component"]
    J --> K["Bottom Component"]
    K --> L["Bottom Component"]
    L --> M["Bottom Component"]
    M --> N["Bottom Component"]
    N --> O["Bottom Component"]
    O --> P["Bottom Component"]
    P --> Q["Bottom Component"]
    Q --> R["Bottom Component"]
    R --> S["Bottom Component"]
    S --> T["Bottom Component"]
    T --> U["Bottom Component"]
    U --> V["Bottom Component"]
    V --> W["Bottom Component"]
    W --> X["Bottom Component"]
    X --> Y["Bottom Component"]
    Y --> Z["Bottom Component"]
    Z --> AA["Bottom Component"]
    AA --> AB["Bottom Component"]
    AB --> AC["Bottom Component"]
    AC --> AD["Bottom Component"]
    AD --> AE["Bottom Component"]
    AE --> AF["Bottom Component"]
    AF --> AG["Bottom Component"]
    AG --> AH["Bottom Component"]
    AH --> AI["Bottom Component"]
    AI --> AJ["Bottom Component"]
    AJ --> AK["Bottom Component"]
    AK --> AL["Bottom Component"]
    AL --> AM["Bottom Component"]
    AM --> AN["Bottom Component"]
Here are some suggestions to help you maintain your fan
- Because of the fan's natural movement, some connections may become loose. Check the support connections, brackets, and blade attachments twice a year. Make sure they are secure. (It is not necessary to remove fan from ceiling.)
- Clean your fan periodically to help maintain its new appearance over the years. Use only a soft brush or lint-free cloth to avoid scratching the finish. The plating is sealed with a lacquer to minimize discoloration or tarnishing. Do not use water when cleaning. This could damage the motor, or possibly cause an electrical shock.
- There is no need to oil your fan. The motor has permanently lubricated bearings.
IMPORTANT
MAKE SURE THE POWER IS OFF AT THE ELECTRICAL PANEL BOX BEFORE YOU ATTEMPT ANY REPAIRS. REFER TO THE SECTION "MAKING ELECTRICAL CONNECTIONS".
Care of Your Fan 10.
Follow these instructions to control your WIFI-enabled fan with a smart device (phone, tablet):
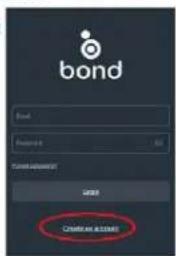
1. Install the BOND HOME app
1.1 To enjoy all the potential of your new device, you will need to download the BOND HOME app (available on the Google Play Store and Apple App Store)
1.2 You can also download the app using this link: http://bondhome.io/app
1.3 After you download the app, create an account. NOTE: Keep your account credential information. You will use this information when you connect with your smart speaker.


Bond Home
text_image
bond Bond Password: 50 FAMM APPSPECT ORDER CREDIT CARD2. Pair the Device to the WIFI
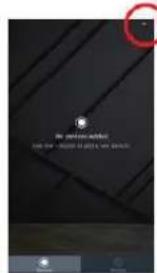
2.1 After you log into the main page, select the "+" symbol (IOS: top right corner of the screen) (Android: bottom center of screen).
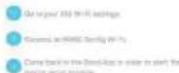
2.2 Next you will see the "Add a new device" screen. Choose the Smart by Bond option in the middle of the screen. Then follow "Connect to Bond Config Wi-Fi" steps to continue pairing.
2.3 After the pairing process with Wi-Fi receiver, then you can control the fan speed, light, functions on the app.
text_image
IN MUNICAPET AND I'm - 2023 to 2024. Your access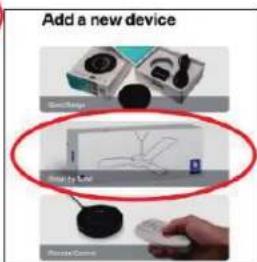
text_image
Add a new device Good Memory Security Life Remote Camera
Connect to Bond Config
Wi-Fi
3. Re-pairing the device (New router or moving the ceiling fan control)
3.1 Within 60 seconds of turning the power on, press and hold the Fan Off (Stop) button for at least 5 seconds. The light will flicker to confirm.
3.2 Follow steps 2.1 to 2.3 to re-pair the device
For the latest instructions and installation video visit www.progresslighting.com/smartfan
For more setup support, access the Help Center in the BondHome App Settings section
11. Wifi Control Setup - Smart Device Control
Follow these instructions to add voice control to your fan with a smart speaker (Amazon Alexa, Google Home):
Setting up and Using Amazon Alexa

-
Open the Bond Home App
-
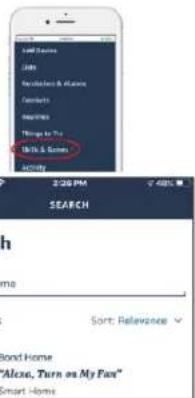
Go to the Amazon Alexa app. Click on the dropdown menu from the top left corner of the screen and choose "Skills & Games".
- Select the magnifying glass on the top of the screen. Type BOND HOME into the search bar and click the search button. Next click on the Bond Home skill and choose to add the skill.
- You should be prompted to enter your BOND username and password.
- You should see a "Discover Devices" pop up. Select the "Discover Devices" option. You should then see your device listed in the "All Devices" section. If your devices are not found select the "+" followed by "Add Device", "Other" and "Discover Devices".
Setting up and Using Google Home

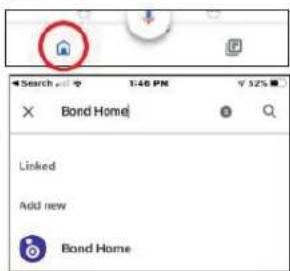
- In the Google Home app, click on the Home icon from the bottom left corner of the screen and select the + symbol in the top left corner of the screen.
- Select "Set up Device". Then select "Works with Google".
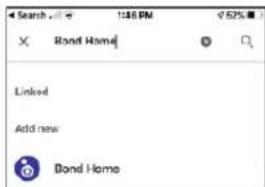
- Select Bond Home from the list of devices. DO NOT select Bond Smart Home as it will not work with the product.
- You should be prompted to enter your BOND username and password to authenticate. Once the pairing is complete, your device should appear.
text_image
Search Alose, Turn on My Fun" Smart Home
text_image
Search .com 1:30 PM Bond Home Linked Add new Bond HomeFan Voice Command Examples:
"Alexa, turn on MY FAN to low" "Ok Google, turn MY FAN to speed 3" "Alexa, turn on MY FAN breeze"
Fan Light Voice Command Examples:
"Ok Google, turn on MY FAN LIGHT" "Alexa, turn MY FAN LIGHT to 80%" "Ok Google, turn off MY FAN LIGHT"
For the latest instructions and installation video visit www.progresslighting.com/smartfan
For more setup support, access the Help Center in the BondHome App Settings section
Wifi Control Setup - Smart Speaker Voice Control 12.
Problem Solution
Fan will not start.
-
Check circuit fuses or breakers.
-
Check line wire connections to the fan and switch wire connections in the switch housing. CAUTION: Make sure main power is off.
Fan sounds noisy.
-
Make sure all motor housing screws are snug.
-
Make sure the screws that attach the fan blade bracket to the motor hub is tight.
-
Make sure wire nut connections are not rubbing against each other or the interior wall of the switch housing. CAUTION: Make sure main power is off.
-
Allow a 24-hour "breaking-in" period. Most noise associated with a new fan disappear during this time.
-
Some fan motors are sensitive to signals from solid-state variable speed controls. If you have installed this type of control, choose and install another type of control.
-
Make sure the upper canopy is a short distance from the ceiling. It should not touch the ceiling.
Remote control malfunction
- Do not connect the fan with wall mounted variable speed control (s).
13. Troubleshooting
| Fan Size Speed | Volts | Amps | Watts | RPM | CFM | N.W. G. | W. C.F. | ||
| 48" | Low | 120 | 0.05 | 1.86 | 51 | 1170.45 | 14.99 | 20.28 | 4.24' |
| High | 120 | 0.24 | 13.58 | 185 | 4564.87 | Ibs | Ibs | ||
These are approximate measures. They do not include Amps and Wattage used by the light kit.
© 2019 Progress Lighting, Inc.
701 Millennium Blvd.,
Greenville, SC 29607
All Rights Reserved
Specifications 14.
PROGRESS LIGHTING™
AirPro®
natural_image
3D rendering of a metallic propeller with three blades and a central hub, rendered in grayscale (no text or symbols)93133628_A
P250063
text_image
Technical diagram of a smart home control device with labeled parts including fan, bulb, and remote control unittext_image
Figure 18natural_image
Diagram of airflow around a mechanical component, showing curved arrows indicating direction (no text or symbols)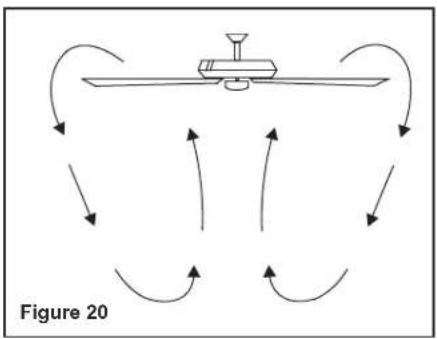
natural_image
Diagram of airflow around a boat with curved arrows indicating direction (no text or symbols)text_image
Add a new device Connect to Bond Config Wi-Fi ● Do you your WiFi Wi-Fi settings ● Remove it in BMO Config Wi-Fi ● Come back to the Bond Help in order to send the BMO Config Wi-Fi©2019 Progress Lighting, Inc.
701 Millennium Blvd.,
Greenville, SC 29607
natural_image
3D rendering of a metallic propeller with three blades and a curved blade, rendered in grayscale (no text or symbols)93133628_A
P250063
text_image
Technical diagram of a smart home control device with labeled parts including fan, bulb, and remote control unit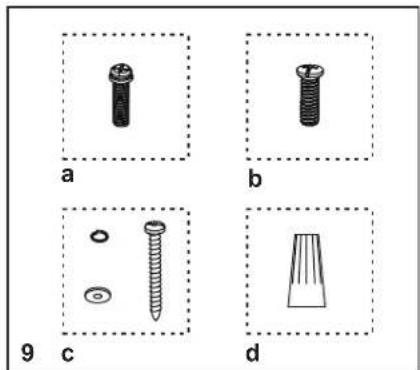
text_image
a b 9 c dnatural_image
Diagram showing airflow around a mechanical component with curved arrows indicating direction (no text or symbols)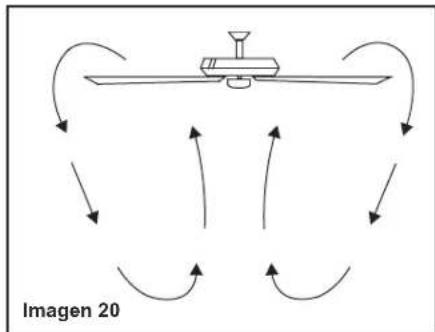
natural_image
Diagram showing airflow around a mechanical component with curved arrows indicating direction (no text or symbols)text_image
Add a new device Sedible Sedible
Connect to Bond Config
Wi-Fi
40.1. 34 yvovor 7008 3951 01 (am25 mgus
Soromilla (P040 Clarity, W F)
(1) Credit bonds to the Banknote and/or its EBITDA
text_image
Add Device Lists Reminders & alarms Contacts Readlines Things to Ty Skills & Games Activity 2:26 PM 7:48% SEARCH Search Bond Home 3 Results Sort: Relevance Bond Home "Alexa, Turn on My Fan" Smart Home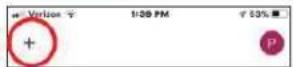
text_image
Search 1:46 PM ¥ 325 Bond Home Linked Add new Bond Home©2019 Progress Lighting, Inc.
701 Millennium Blvd.,
Greenville, SC 29607