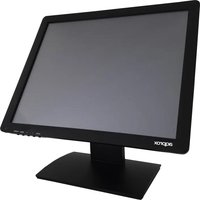
appMT19W5 - Monitor Aqprox - Free user manual and instructions
Find the device manual for free appMT19W5 Aqprox in PDF.


| Product Type | 5-wire resistive touch screen monitor |
| Brand | Aqprox |
| Model | appMT19W5 |
| Screen diagonal | 19 inches (48 cm) |
| Display format | 4:3 standard |
| Maximum resolution | 1280 x 1024 pixels |
| Panel type | TFT LCD |
| Contrast | 350:1 |
| Brightness | 300 cd/m² |
| Response time | 5 ms |
| Horizontal viewing angle | +80° / -80° |
| Vertical viewing angle | +80° / -80° |
| Touch type | 5-wire resistive |
| Video input | VGA (analog RGB 0.7Vp-p) |
| Power supply | Power adapter 100-240V AC / 12V DC 4A |
| Power consumption | Less than 30W |
| Dimensions (W x H x D) | 425 x 355 x 50 mm |
| Weight | Approximately 4.5 kg |
| Operating temperature | 0 to 50 °C |
| Operating humidity | 20 to 80% |
| OSD settings | Contrast, brightness, position, phase, etc. |
| Advanced touch functions | 4/9 point calibration, drawing test, multi-screen support, rotation |
| System compatibility | Windows, Linux, Mac OS, DOS |
| Cleaning | Soft dry cloth without chemicals |
| Safety | Do not open, avoid liquids, unobstructed ventilation |
| Recycling | Comply with WEEE directive (2002/96/EC) |
Frequently Asked Questions - appMT19W5 Aqprox
User questions about appMT19W5 Aqprox
0 question about this device. Answer the ones you know or ask your own.
Ask a new question about this device
Download the instructions for your Monitor in PDF format for free! Find your manual appMT19W5 - Aqprox and take your electronic device back in hand. On this page are published all the documents necessary for the use of your device. appMT19W5 by Aqprox.
USER MANUAL appMT19W5 Aqprox
Touch Screen Monitor
appMT17W5
appMT19W5
User Guide

natural_image
Two solid red circles of different sizes on a white background (no text or symbols)Estimado cliente:
natural_image
Simple diagram with a red crosshair and a circular target on a light background (no text or symbols)Compruebe y reconfigure Check and reconfigure the display mode of the vertical refresh rate of your graphic card to make it compatible with the LCD display.
Asegúrese de que el cable (o adaptador) VGA está bien conectado. Reconfigure the display mode of the vertical refresh rate of your graphics card to make it compatible with the LCD display.
INSTRUCCIONES DE SEGURIDAD, MANTENIMIENTO Y RECICLADO
Thank you very much for your buying and using this Touch Screen Monitor, please check if all the accessories are included when you open box. Please read this User's Manual carefully and remain it for further use before you connect accessories and plug & play.
FEATURES
- Screens serve as POS, PC monitor, portable TV for replay video in RC, car, boat, etc.
• Perfect for use in retail, point-of-sale (POS), VOD system, Juke Box and many other hospitality applications. - Sensitive touch screen recognize touch input from stylus, finger, glovehand, penortool.
• Exceptional and durable touch screen monitor at an excellence value.
PRODUCT SPECIFICATION
| LCD panel type | TFT liquid cristal display |
| Display format | 4:3 standard LCD |
| Max resolution | 1280 x 1024 |
| HxWxD | 380 x 408 x 55 mm. (17") / 425 x 355 x 50 mm. (19") |
| Contrast | 350:1 |
| Brightness | 300 cd/m2 |
| Response time | 5 ms |
| Viewing angle left/right | +80° -80° o +60° -60° |
| Up/down | +80° -80° o +55° o 55° |
| Power consumption | <30W |
| Touch screen type | 5-wire |
| Input signal video signal | RGB analogy 0.7Vp-p |
| Display mode | VGA, SVGA, XGA |
| Front panel control button | Power control switch, LED indicator lamp, OSD option, +/-adjustment button, screen automatic setting, OSD selecting |
| OSD adjusting project | Contrast, brightness, automatic adjusting, picture location, phase, horizontal position, vertical position, input signal, computer VGA |
| Power supply transformer | Alternating current input: 100-240V/1.8A 50-60HzDirect current: 12V / 4A |
| Operating environment | Temperature 0/50°C, humidity 20-80% |
| Store environment | Temperature -20/-60°C, humidity 20-80% |
| Security authentication | FCC, CE, ROHS |
SAFETY NOTES
Problem: Screen has no picture
If LED indicator is off: Check whether the cable is connected firmly.
If LED indicator is in red: Check whether the connection of the video. Sable is firm at the same time and check whether the computer is turned on.
If LED indicator is in green: Check whether horizontal synchronization exceeds the range.
Problem: Picture unstable (miscellaneous wave, shake, etc.)
Check whether updated video of computer matches with this machined.
IMPORTANT NOTICE
Cleaning
- Please use the soft cloth with hair to clean LCD screen, in order to remove dust and stolen goods on screen.
- Should not exert pressure to offer while polishing the screen surface of LCD.
- Please don't use water and other chemical cleance to polish the screen surface of LCD, chemical drug may damage the screen surface of LCD.
Precautions
Before use the product, please read the following precautions in detail and keep it in order to inquire about in
the future properly.
- Do not connect or block heat dissipation hole under machine, so as not to hinder the collective dispelling heat.
- Do not use the sharp things, metal or liquid to stretch into or touch the signal terminal or in the heat dissipation hole, to avoid a short circuit and product damaged.
- Pull out power cable from plug if you don't use the product for a very long time.
- Do not try to resolve it by yourself or dismantle any parts of this product, may lead damage product and injury to human body, and make the products guarantee that you should enjoy lose efficiency.
- Do not touch screen surface with sharp objects, they may damage the screen surface in this way, and very difficult to drive out if oil of skin stay at screen.
- Do not exert pressure to LCD screen, because LCD screen is very exquisite and fragile.
- Please pull out power supply cable of this product in the following situations:
- Have if you not use the product for some time.
- If the cable or outlet/plug is damaged.
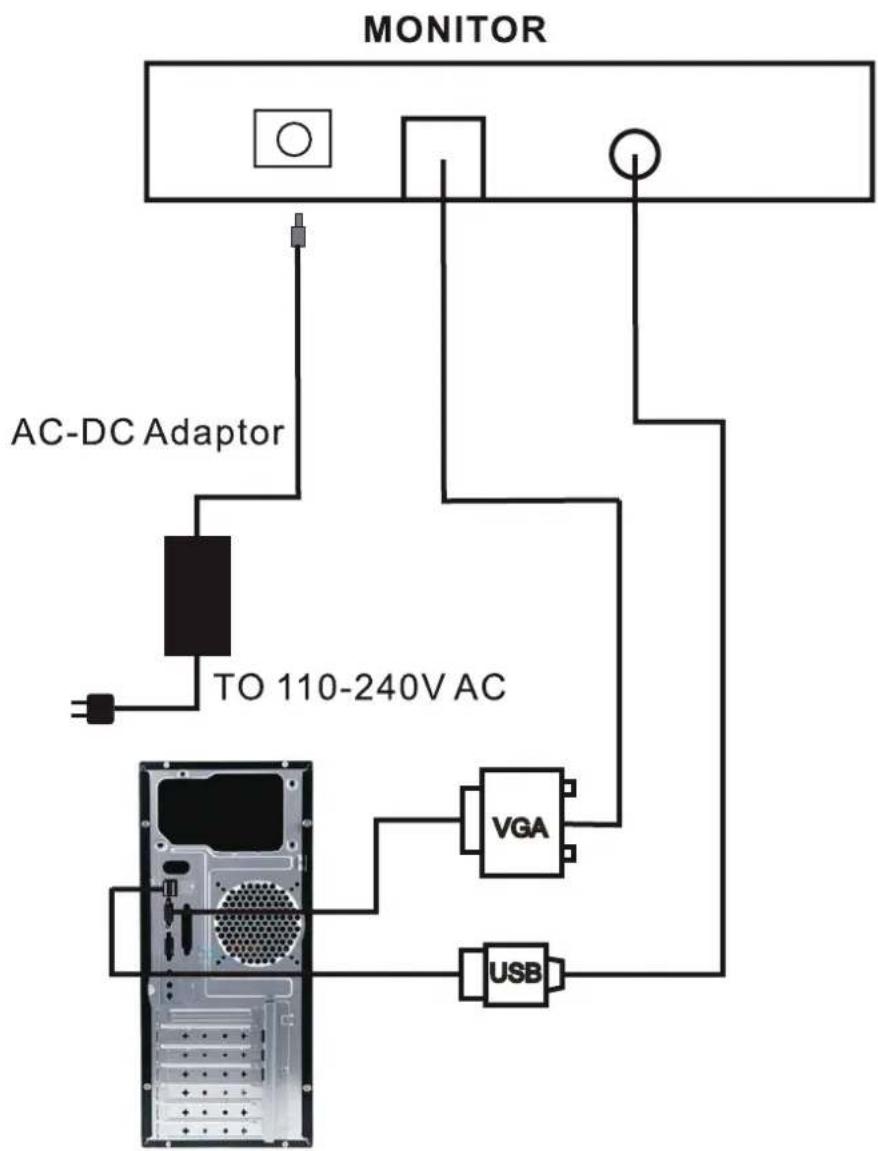
CONNECT OF THE DEVICE
flowchart
graph TD
    A["MONITOR"] --> B["AC-DC Adaptor"]
    B --> C["TO 110-240V AC"]
    C --> D["VGA"]
    C --> E["USB"]
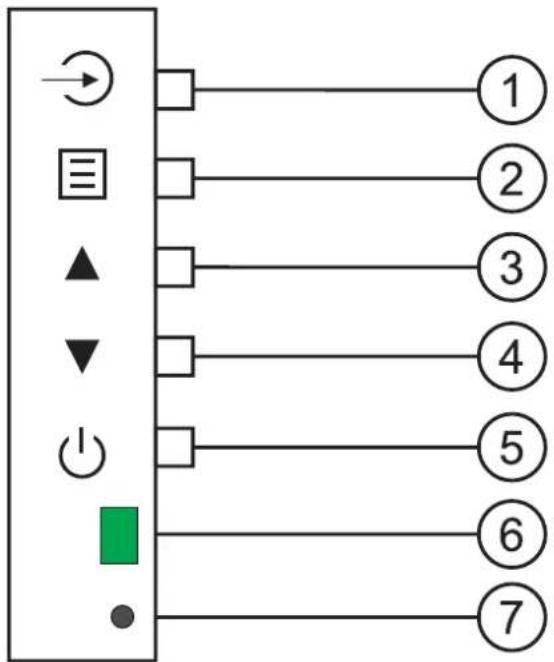
FRONT PANEL OF THE DEVICE
flowchart
graph TD
    A["Power Source"] --> B["Function Key 1"]
    A --> C["Function Key 2"]
    A --> D["Function Key 3"]
    A --> E["Function Key 4"]
    A --> F["Function Key 5"]
    A --> G["Green Indicator"]
    A --> H["●"]
- Automatic setting display parameter
- OSD menu: Exit the present menu if neter again
- Icon right: Project down / Increase choosing adjustment parameter of OSD
- Icon left: Project up / Reduce choosing adjustment parameter of OSD
- Power ON/OFF: Turn on or off unit
- Power supply LED indicator: green light represents work, red light represents wait condition
- Remote control window
BASIC OPERATION
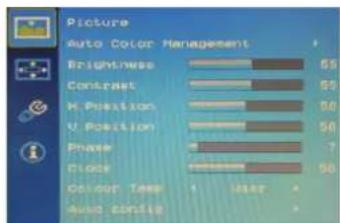
Press MENU button to show the follow menu. Press MENU button again to enter into COLOUR mode, press UP/DOWN button to choose the item, and press MENU button to confirm, then press UP/DOWN button to adjust.
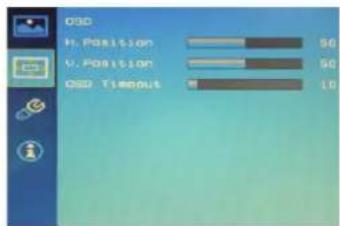
Press MENU button to show the follow menu. Press MENU button again to enter into PICTURE mode, press UP/DOWN button to choose the item, and press MENU button to confirm, then press UP/DOWN button to adjust.
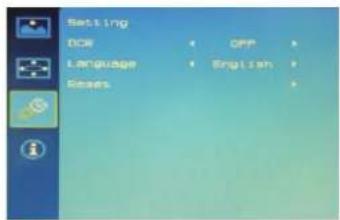
Press MENU button to show the follow menu. Press MENU button again to enter into FUNCTION mode, press UP/DOWN button to choose the item, and press MENU button to confirm, then press UP/DOWN button to adjust.

Press ➤: Automatic setting display parameter.
SETUP OF THE DEVICE
eGalaxyTouch is software, which contains of the touch panel controllers for the specified communication connectors, RS232, PS/2 and USB.
Configuration support
The calibration and draw test of touch panel are done by this utility. Besides, users can add or new RS232 touch panel device.
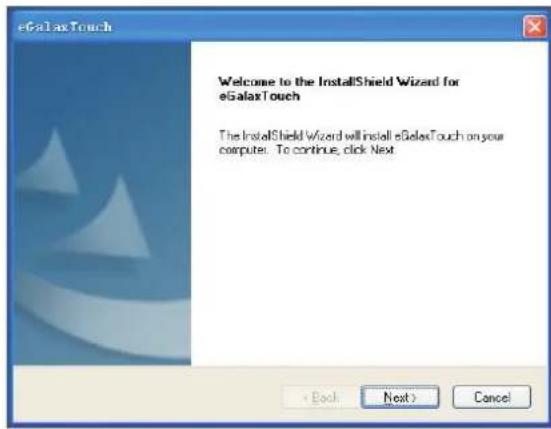
Follow these steps to install eGalaxyTouch.
- Put the eGalaxyTouch CD to CD-Rom.
- Open the Win2000 XP directory.
- Double click the Setup.exe, then windows starts to run the installation program.
- Just click [Next>] button to continue installation.
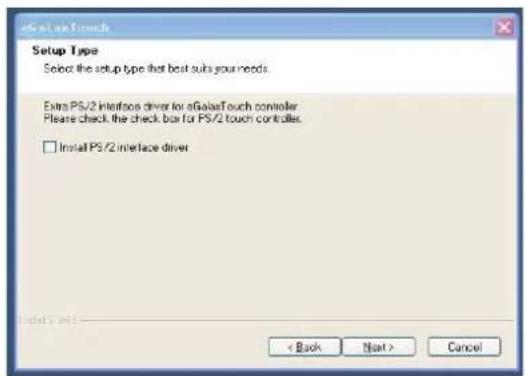
- Check the check box if PS2 touch controller is to be installed. The default setting is unchecked. Then press [Next>] to continue installation.
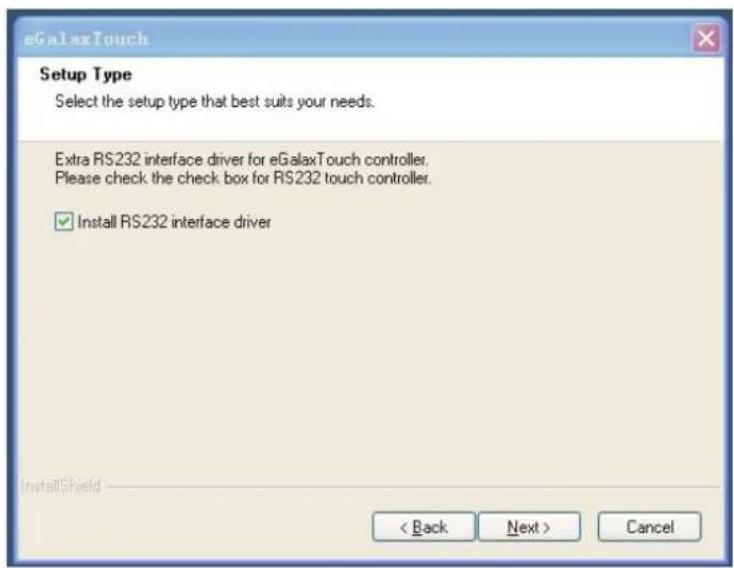
- Choose the setup type that best suits your needs. There is a eGalaxyTouch accessory utility for choosing, Auto 4Pts Calibration Utility. Users can install the utility they want by checking the box. Then press [Next>] to continue installation.
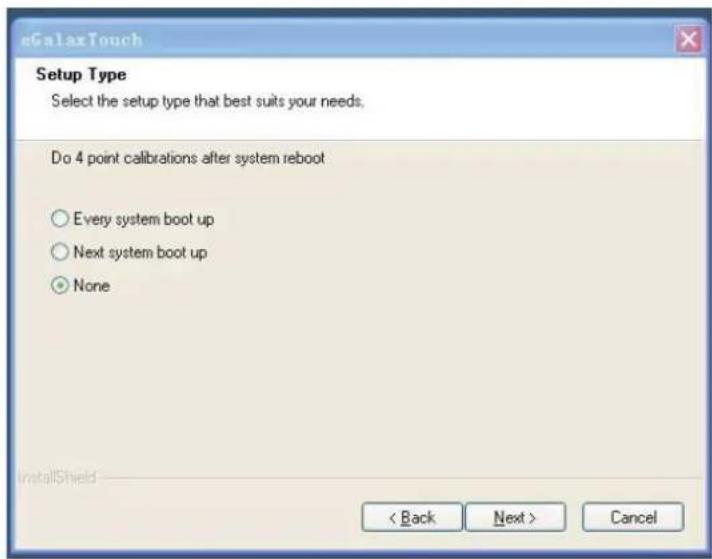
- Please select 4 points calibration mode when system starts. Then press [Next>] to continue installation.
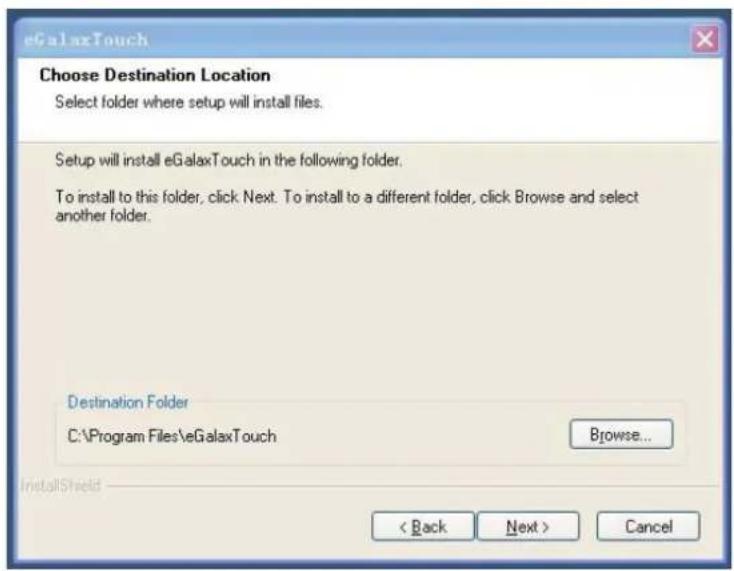
- To choose your special software install path, please press "Browse" button.
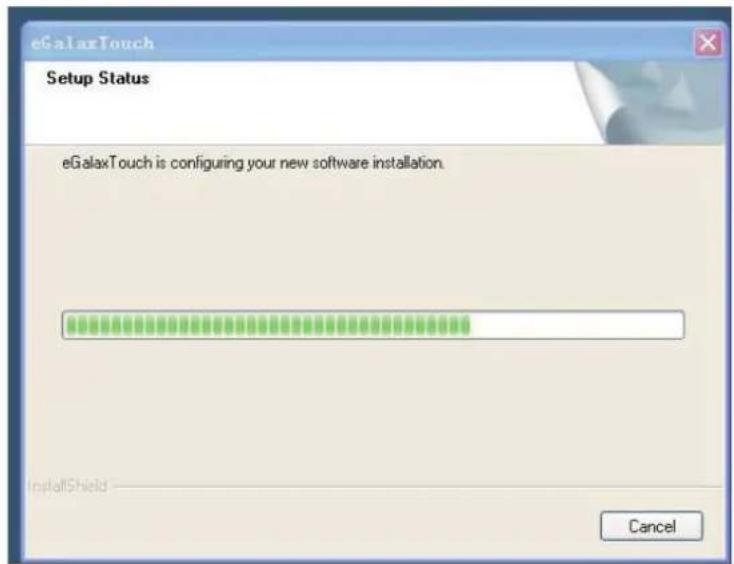
- Select the appropriate folder where setup files will be installed. Then press [Next>] to continue installation.
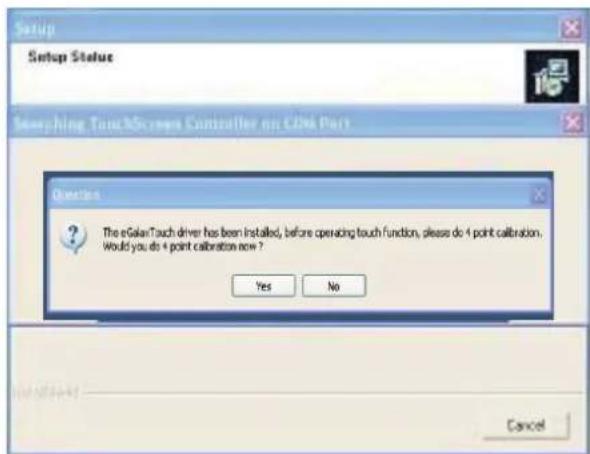
- During installation, the setup program will scan Com port for RS232 eGalaxyTouch controller. Once the controller is scanned, the setup program will display a dialog.
Click Yes to add the controller on the specified COM port automatically.
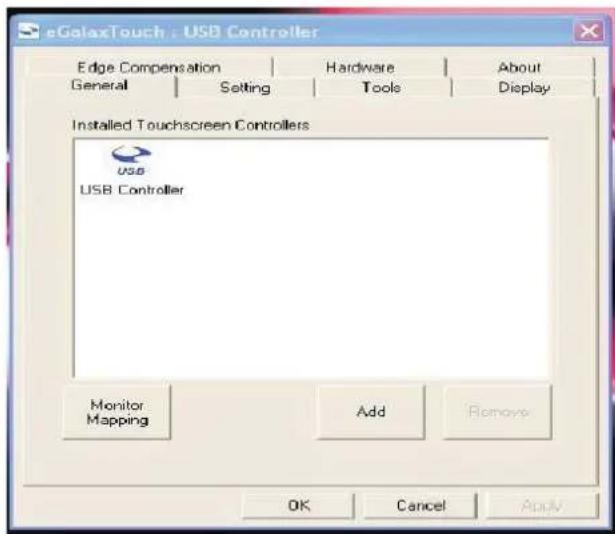
- Setup is complete. After eGalaxyTouch installation, the USB device will be found automatically as soon as it was Plugged into the computer. Then users can see the application program window.
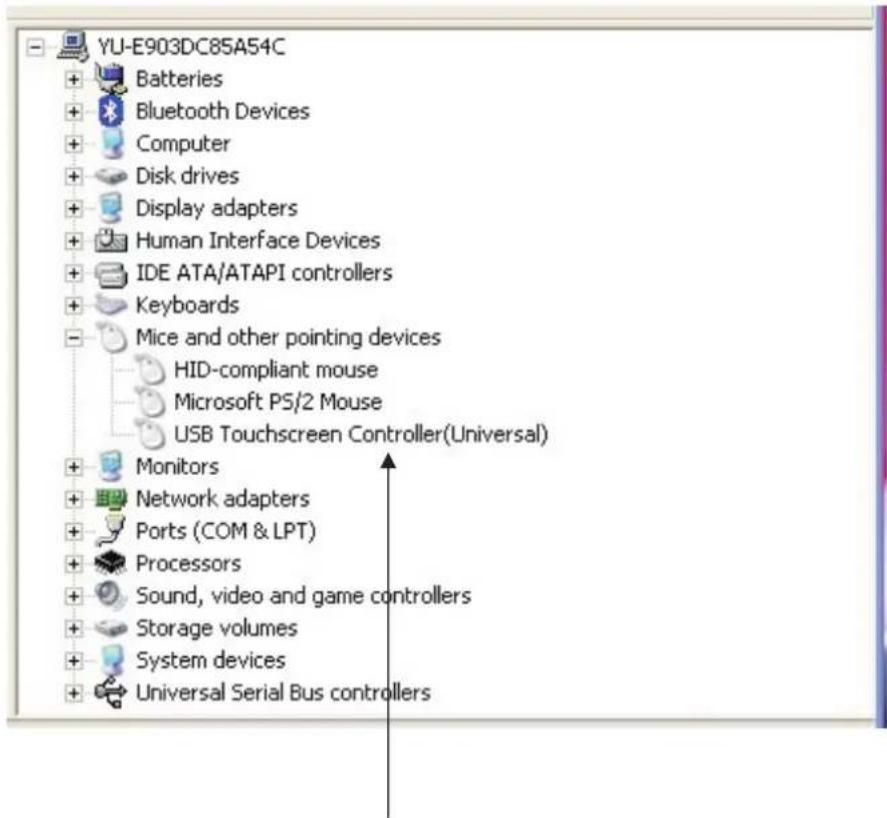
- Users can check the situation of controllers in Device Manager. If the controller is set up well, there will be messages as the picture.
TouchKit controllers works well
CONFIGURATION UTILITY
There are several property pages in eGalaxyTouch utility. Each property page contains different functions to do the adjustments. Therefore, users can easily manage all the eGalaxyTouch controllers through eGalaxyTouch Utility.
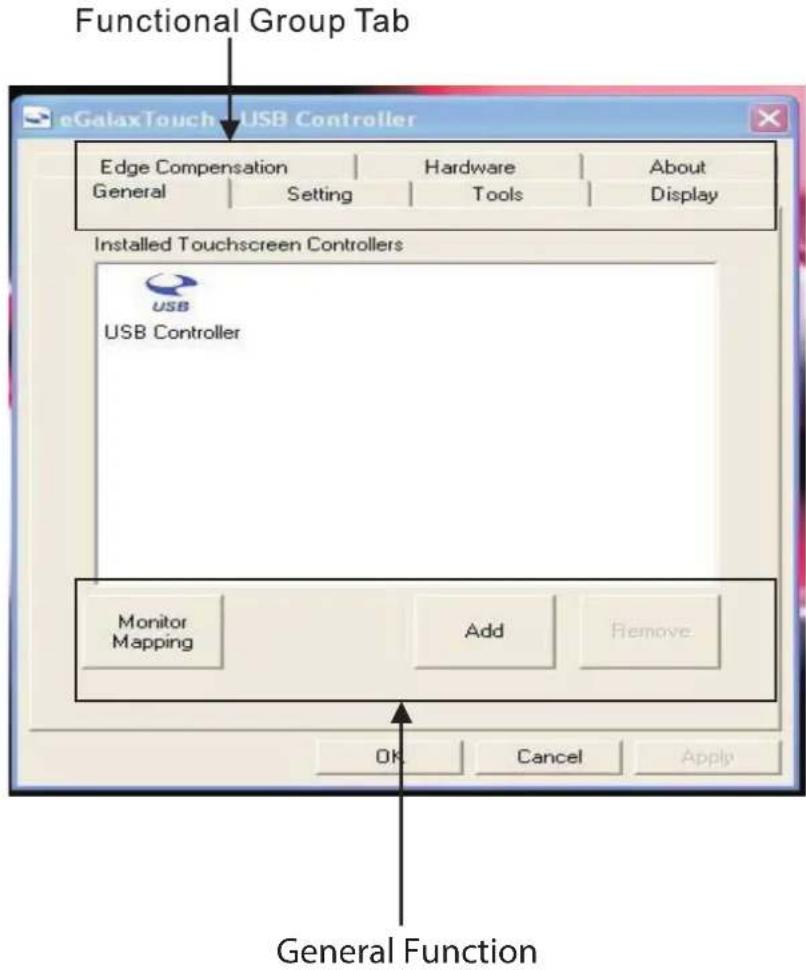
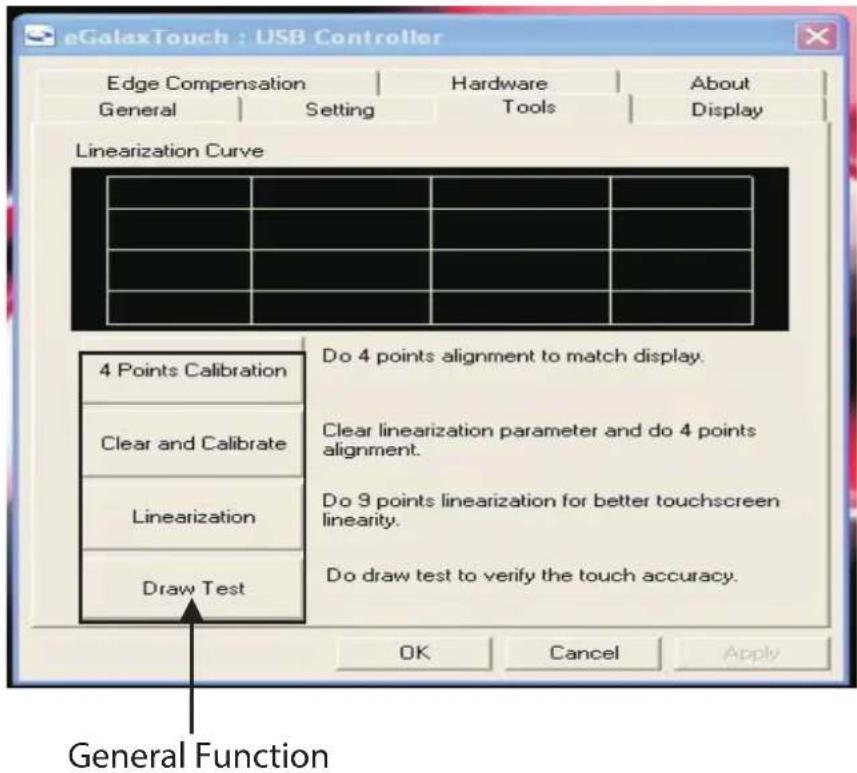
General property page contains the functions of devices Add/Remove Draw Test and Tools property page contains 4 Points Calibration/Clear Calibration/Linearization.
4 Points Calibration
Correct 4 points locations on screen with the panel. Press [4 points calibration], screen display as follows:
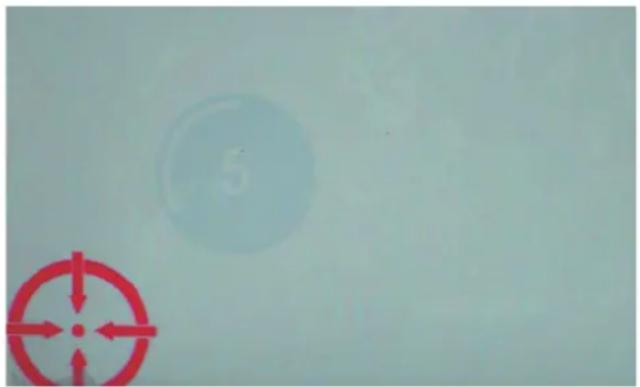
Touch the blinking symbol on panel until beep or stop blinking.
Draw Test
Test the drawing position related to the display screen on panel. Click on the [Draw Test] button. There will be a squared blue display.
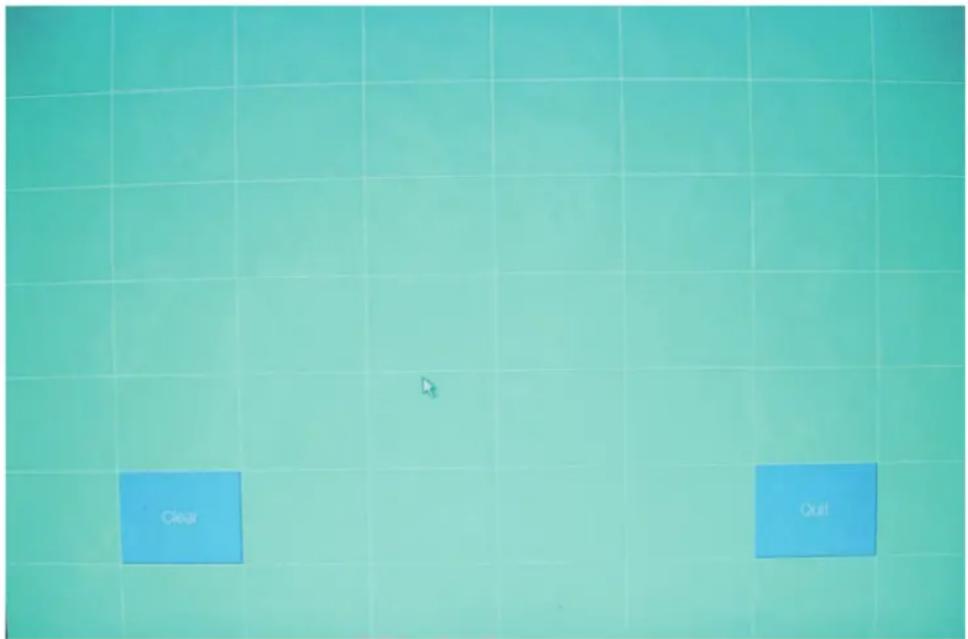
In drawing test window, users can click [Clear] button to clear the window. Also, users can click [Quit] or press mouse right button to quit from the drawing test.
In drawing test window, users can verify the panel linearity, calibration capability, and drawing line quality.
| Power requirements | +5VDC (Maximum 100mA, typical 70mA, 50mV peak to peak maxi-mum ripple) |
| Operating temperature | 0° to 50°C |
| Storage temperature | -40° to 80°C |
| Relative humidity | 95% al 60°C |
| Protocol | USB 2.0 |
| Resolution | 2048x2048 |
| Report rate | Max. 160 points/sec |
| Response time | Resistive, max. 35ms |
| Pin out definition | 5 wire: X+, Y+, X-, Y- |
| Panel resistance | 200-900 ohm |
| Regulatory approvals | FCC-B, CE |
| Calibration | Fast full oriental 4 points position |
| Compensation | Accuracy 25 points linearity verification |
| Draw test | Position and linearity verification |
| Language | Suppor 10 languages for Windows |
| Advanced feature | 1. Support monitor/display rotation2. Suppor multiple monitor/display3. Suppor QVGA and half-VGA function4. Support edge compensation5. Suppor constant touch |
| Controller setting | 1. Support multiple controllers2. Dynamical add/remove controllers3. Change controller interface without reboot |
| Mouse emulator | 1. Right/left button emulation2. Normal/click on touch/click on release mode3. Auto right button |
| Sound notification | 1. Sound option (No sound/touch down/lift up)2. Frecuency adjustment3. Duration adjustment |
| Double click | 1. Configurable double click speed2. Configurable double click area |
| OS support | 1. Windows 95/98/ME/NT4/2000/XP/10/Windows XP Tablet PC Edition2. Windows CE 2.12/3.0/.NET3. Linux (RedHat/Fedora/Mandrake/Suse/YellowDog)5. MS Dos: Support display resolution: 320x200, 640x200, 640x350, 640x480, 800x600, 1024x768 and 1280x1024 |
| COM por support | 1. Support COM 1-COM 256 for Windows and Linux2. Support COM 1-COM 8 for DOS |
VESA DIMENSIONS

TROUBLESHOOTING
The first step in troubleshooting a touchscreen system is to determine whether the problem is related to software, computer hardware or this touchscreen monitor.
Do not confuse computer hardware or software problems with touchscreen problems. The easiest way to verify a computer hardware/software failure is to try the monitor on other computer.
Hardware problems may be caused by the touchscreen, controller, cabling, power supply, or by the integration of the touchscreen components in the display. Software problems are determined by a basic hardware functionally test. If the hardware transmits coordinates correctly, then the problem is with the driver or the calibration software.
Problem: No image appears on screen.
Check that all the I/O and power connectors are correctly installed and well connected as described. Make sure the pins of the connectors are not crooked or broken. Reconfigure the resolution of your computer to make it less than or equal to 1024x768.
Problem: Partial image or incorrectly displayed the image.
Check to see if the resolution of your computer is higher than that of the LCD display. Reconfigure the resolution of your computer to make it less than or equal to 1024x768.
Problem: Image has vertical flickering line bars. Image is unstable and flickering.
Check and reconfigure the display mode of the vertical refresh rate of your graphic card to make it compatible with the LCD display.
Problem: Image is scrolling.
Check and make sure the VGA signal cable (or adapter) is well connected. Check and reconfigure the display mode of the vertical refresh rate of your graphics card to make it compatible with the LCD display.
SAFETY, MAINTENANCE AND RECYCLING INSTRUCTIONS
- Caution: Never open the device, the internal parts are danger, electrical shock.
- Do not install this unit near water, for example, in a wet basement, in an unprotected outdoor installation or in any area classified as a wet.
- Do not insert objects of any kind into this unit through openings as they may touch voltage points and short out parts that could result in fire or electric shock.
- Do not spill any liquid on the unit. Danger of explosion!
- Do not crush power cables, danger of short circuit!
- Always connect to the manufacturer's recommended tension.
- Clean the product with a soft and dry cloth.
- Follow local regulations for disposing of the product.
RECYCLED
AEE REI-RAEE 5548 In this manual, the container (bin) symbol indicates that the product is subject to the European directive 2002/96 / EC, electrical and electronic products, batteries, and batteries and other accessories must necessarily be subject to a selective collection.
At the end of the life of the device, make use of the recycling bins. This gesture Will help reduce the health risks and preserve the environment.
Municipalities and distributors, Will provide essential details on recycling your old device. If this device carries an internal battery, it must be removed and deposited separately for proper management.

Cher client :
RÉSOLUTION DES PROBLÈMES
Siga estes passos para instalar eGalaxyTouch.
natural_image
Simple diagram with a red crosshair and a circular target on a light background (no text or symbols)
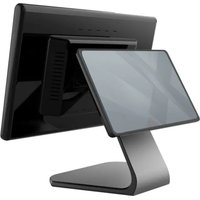
- Touch Screen Monitor
- INSTRUCCIONES DE SEGURIDAD, MANTENIMIENTO Y RECICLADO
- FEATURES
- SAFETY NOTES
- Problem: Screen has no picture
- Problem: Picture unstable (miscellaneous wave, shake, etc.)
- IMPORTANT NOTICE
- Cleaning
- Precautions
- CONNECT OF THE DEVICE
- FRONT PANEL OF THE DEVICE
- BASIC OPERATION
- SETUP OF THE DEVICE
- Configuration support
- CONFIGURATION UTILITY
- Points Calibration
- Draw Test
- TROUBLESHOOTING
- SAFETY, MAINTENANCE AND RECYCLING INSTRUCTIONS
- RECYCLED
- RÉSOLUTION DES PROBLÈMES
Brand : Aqprox
Model : appMT19W5
Category : Monitor