SH22i - Boiler EccoTemp - Free user manual and instructions
Find the device manual for free SH22i EccoTemp in PDF.


User questions about SH22i EccoTemp
0 question about this device. Answer the ones you know or ask your own.
Ask a new question about this device
Download the instructions for your Boiler in PDF format for free! Find your manual SH22i - EccoTemp and take your electronic device back in hand. On this page are published all the documents necessary for the use of your device. SH22i by EccoTemp.
USER MANUAL SH22i EccoTemp
WHOLE-HOME TANKLESS WATER HEATER INSTALLATION, USE AND CARE INSTRUCTIONS
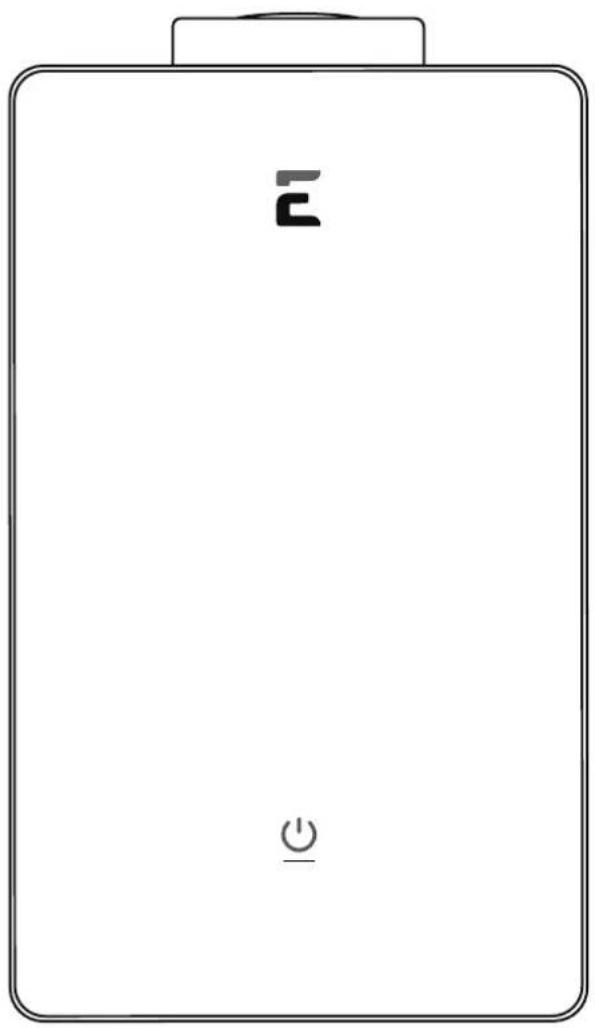
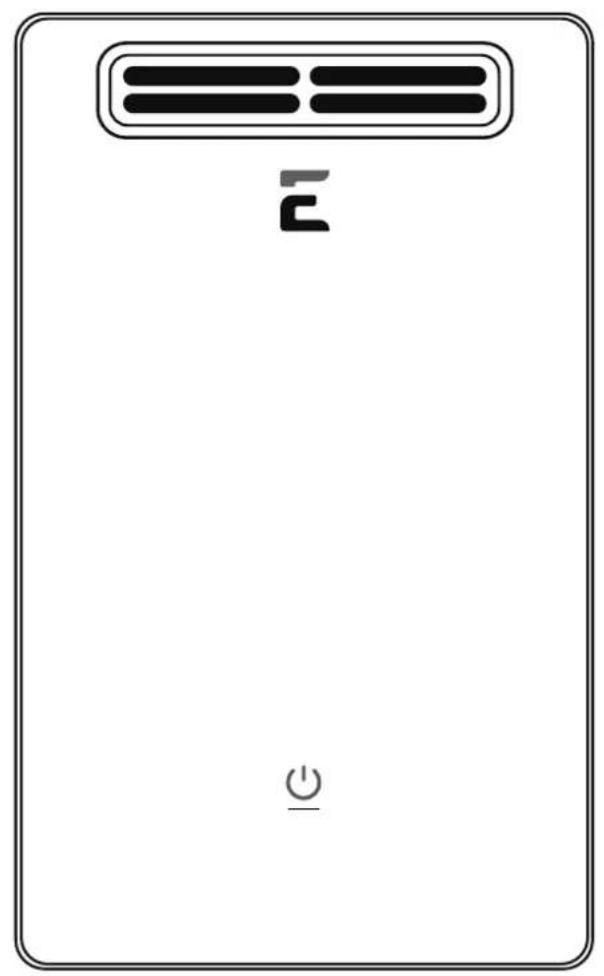
SMART VOICE COMMANDS

"A" RATING EFFICIENCY

SMART ON/OFF BUTTON

ADVANCED ERROR DETECTION

SMARTHOME READY
DIGITAL TEMP CONTROL

SMART APP CONTROL

INTELLIGENT CONTROL BOARD
WARNING: If the information in these instructions is not followed exactly, a fire or explosion may result causing property damage, personal injury or death.
-
Do not store or use gasoline or other flammable vapors and liquids in the vicinity of this or any other appliances.
WHAT TO DO IF YOU SMELL GAS -
Do not try to light any appliances.
- Do not touch any electrical switch; do not use any phone in your building.
- Immediately call your gas supplier from a neighbor's phone. Follow the gas supplier's instructions.
-
If you cannot reach your gas supplier, call the fire department.
-
Installation and service must be performed by a qualified installer, service agency or the gas supplier.



PLEA: 21 IS FOR OUTDOOR PERMANENT INSTALLATIONS ONLY AND SH21 IS FOR INDOOR PERMANENT INSTALLATIONS ONLY. THIS MANUAL AND ALL ECCOTEMP CONTENT IS SUBJECT TO CHANGE WITHOUT NOTICE. PLEASE VISIT SUPPORT.ECCOTEMP.COM FOR MORE INFORMATION.
| ECcotemp Systems, LLC 315-A Industrial Road Summerville, SC 29483 866-356-1992 | ||||
| AUTOMATIC INSTANTANEOUS WATER HEATER | ||||
| MODEL #: | SH22-LP | Maximum Input Rating (Btu per hour): | 140,000 | |
| SERIAL #: | Minimum Input Rating (Btu per hour): | 25,000 | ||
| TYPE GAS: | LIQUID PROPANE | ONLY | Minimum Inlet Gas Pressure: | 11 in. w.c |
| Voltage: | 120 Volts | Maximum Inlet Gas Pressure: | 13.5 in. w.c | |
| Frequency: | 60 Hz | Manifold Pressure: | 4.93 in. w.c (1.23 Kpa) | |
| Amps: | Less than 10 Amps | Maximum Working Pressure: | 150 psi | |
| Recovery Rating: | As used in this standard, the quantity of water obtained by multiplying the manufacturer's input rating in Btu per hour by the thermal efficiency and dividing the product by 825 Btu per gallon. This is based on a 100°F temperature rise, and a nominal specific heat for water of 8.25 Btu per gallon per degree F. | |||
| Not recommended in excess of 2,000 ft. above sea level. | ||||
| Elevation | 0-2000 feet 2000 | 4500 feet |
| Input (btu/hr) | 140,000126,000 | |
| Manifold pressure (in. w.c) | 3.05 | 3.05 |
| CSA/ANSI Z21.10.3 - CSA 4.3-2019 | SUITABLE FOR WATER (POTABLE) HEATING ONLY | |
| FOR YOUR SAFETY Do not store or use gasoline or other flammable vapors and liquids in the vicinity of this or any other appliance | This appliance must be installed in accordance with local codes or, in the absence of local codes, the National Fuel Gas Code, ANSI Z223.1/NFPA S4, and/or CSA B149.1, Natural Gas and Propane Installation Code | |
| The unit must be installed on a fire retardant area, and must be away from all combustible materials. Minimum clearances from combustible construction, 10 inches sides, 0 inches back and 16 inches top. | ||
| The temperature and pressure relief valve provided by the manufacturer shall be installed at the time of installation of the heater in the location specified by the manufacturer. Local codes shall govern installation of relief devices. For safe operation of the water heater, the relief valve must not be removed or plugged. | ||
| This water heater requires a special venting system. Refer to the installation instructions for parts list and method of installation. | ||
OUTDOOR USE ONLY
| ECotemp Systems, LLC 315-A Industrial Road Summerville, SC 29483 866-356-1992 | ||||
| AUTOMATIC INSTANTANEOUS WATER HEATER | ||||
| MODEL #: | SH221-LP | Maximum Input Raing (Btu per hour): | 140,000 | |
| SERIAL #: | Minimum Input Raing (Btu per hour): | 25,000 | ||
| TYPE GAS: | LIQUID PROPANE | ONLY | Minimum Inlet Gas Pressure: | 11 in. w.c |
| Voltage: | 120 Volts | Maximum Inlet Gas Pressure: | 13.5 in. w.c | |
| Frequency: | 60 Hz | Manifold Pressure: | 4.93 in. w.c (1.23 Kpa) | |
| Amps: | Less Than 10 Amps | Maximum Working Pressure: | 150 psi | |
| Recovery Rating: | As used in this standard, the quantity of water obtained by multiplying the manufacturer's input rating in Btu per hour by the thermal efficiency and dividing the product by 825 Btu per gallon. This is based on a 100°F temperature rise, and a nominal specific heat for water of 8.25 Btu per gallon per degree F. | |||
| Not recommended in excess of 2,000 ft., above sea level. | ||||
| CANADIAN HIGH ALTITUDE RATING | ||||
| Elevation | 0-2000 feet 2000 | -4500 feet | ||
| Input (btu/hr) | 1400/1000/126,000 | |||
| Manifold pressure (in. w.c) | 4.955 | 3.69 | ||
| CSA/ANSI 221.10.3 • CSA 4.3-2019 | SUITABLE FOR WATER (POTABLE) HEATING ONLY | |||
| FOR YOUR SAFETY Do not store or use gasoline or other flammable vapors and liquids in the vicinity of this or any other appliance | This appliance must be installed in accordance with local codes or, in the absence of local codes, the National Fuel Gas Code, ANSI Z223.1/NFPA S4, and/or CSA B149.1, Natural Gas and Propane Installation Code | |||
| The unit must be installed on a fire retardant area, and must be away from all combustible materials. Minimum clearances from combustible construction, 10 inches sides, 0 inches back and 16 inches top. | ||||
| The temperature and pressure relief valve provided by the manufacturer shall be installed at the time of installation of the heater in the location specified by the manufacturer. Local codes shall govern installation of relief devices. For safe operation of the water heater, the relief valve must not be removed or plugged. | ||||
| This water heater requires a special venting system. Refer to the installation instructions for parts list and method of installation. | ||||
| INDOOR USE ONLY | ||||
| ECotemp Systems, LLC 315-A Industrial Road Summerville, SC 29483 866-356-1992 | ||||
| AUTOMATIC INSTANTANEOUS WATER HEATER | ||||
| MODEL #: | SH22-NG | Maximum Input Rating (Btu per hour): | 140,000 | |
| SERIAL #: | Minimum Input Rating (Btu per hour): | 25,000 | ||
| TYPE GAS: | NATURAL GAS | ONLY | Minimum Inlet Gas Pressure: | 5.0 in. w.c |
| Voltage: | 120 Volts | Maximum Inlet Gas Pressure: | 10.5 in. w.c | |
| Frequency: | 60 Hz | Manifold Pressure: | 3.05 in. w.c (0.76Kpa) | |
| Amps: | Less than 10 Amps | Maximum Working Pressure: | 150 psi | |
| Recovery Rating: | As used in this standard, the quantity of water obtained by multiplying the manufacturer's input rating in Btu per hour by the thermal efficiency and dividing the product by 825 Btu per gallon. This is based on a 100°F temperature rise, and a nominal specific heat for water of 8.25 Btu per gallon per degree F. | |||
Not recommended in excess of 2,000 ft. above sea level.
| CANADIAN HIGH ALTITUDE RATING | ||
| Elevation | 0-2000 feet | 2000-4500 feet |
| Input (btu/hr) | 140,000 | 126,000 |
| Manifold pressure (in. w.c.) | 3.05 | 3.05 |
| CSA/ANSI Z21.10.3 • CSA 4.3-2019 | SUITABLE FOR WATER (POPTABLE) HEATING ONLY | |
| FOR YOUR SAFETY Do not store or use gasoline or other flammable vapors and liquids in the vicinity of this or any other appliance | This appliance must be installed in accordance with local codes or, in the absence of local codes, the National Fuel Gas Code, ANSI Z223.1/NFPA S4, and/or CSA B349.1, Natural Gas and Propane Installation Code | |
| The unit must be installed on a fire retardant area, and must be away from all combustible materials. Minimum clearances from combustible construction, 10 inches sides, 0 inches back and 16 inches top. | ||
| The temperature and pressure relief valve provided by the manufacturer shall be installed at the time of installation of the heater in the location specified by the manufacturer. Local codes shall govern installation of relief devices. For safe operation of the water heater, the relief valve must not be removed or plugged. | ||
| This water heater requires a special venting system. Refer to the installation instructions for parts list and method of installation. | ||
| OUTDOOR USE ONLY | ||
| ECotemp Systems, LLC 315-A Industrial Road Summerville, SC 29483 866-356-1992 | ||||
| AUTOMATIC INSTANTANEOUS WATER HEATER | ||||
| MODEL #: | SH22I-NG | Maximum Input Rating (Btu per hour): | 140,000 | |
| SERIAL #: | Minimum Input Rating (Btu per hour): | 25,000 | ||
| TYPE GAS: | NATURAL GAS | ONLY | Minimum Inlet Gas Pressure: | 5.0 in. w.c |
| Voltage: | 120 Volts | Maximum Inlet Gas Pressure: | 10.5 in. w.c | |
| Frequency: | 60 Hz | Manifold Pressure: | 3.05 in. w.c (0.76Kpa) | |
| Amps: | Less Than 10 Amps | Maximum Working Pressure: | 150 psi | |
| Recovery Rating: | As used in this standard, the quantity of water obtained by multiplying the manufacturer's input rating in Btu per hour by the thermal efficiency and dividing the product by 825 Btu per gallon. This is based on a 100°F temperature rise, and a nominal specific heat for water of 8.25 Btu per gallon per degree F. | |||
| Not recommended in excess of 2,000 ft. above sea level. | ||||
| CANADIAN HIGH ALTITUDE RATING | ||||
| Elevation | 0-2000 feet 2000 | -4500 feet | ||
| Input (btu/hr) | 1400,000/126,000 | |||
| Manifold pressure (in. w.c) | 8.05 | 3.69 | ||
| CSA/ANSI Z21.10.3 • CSA 4.3-2019 | SUITABLE FOR WATER (POTABLE) HEATING ONLY | |||
| FOR YOUR SAFETY Do not store or use gasoline or other flammable vapors and liquids in the vicinity of this or any other appliance | This appliance must be installed in accordance with local codes or, in the absence of local codes, the National Fuel Gas Code, ANSI Z223.1/NFPA 54, and/or CSA B149.1, Natural Gas and Propane Installation Code | |||
| The unit must be installed on a fire retardant area, and must be away from all combustible materials. Minimum clearances from combustible construction, 10 inches sides, 0 inches back and 16 inches top. | ||||
| The temperature and pressure relief value provided by the manufacturer shall be installed at the time of installation of the heater in the location specified by the manufacturer. Local codes shall govern installation of relief devices. For safe operation of the water heater, the relief valve must not be removed or plugged. | ||||
| This water heater requires a special venting system. Refer to the installation instructions for parts list and method of installation. | ||||
| INDOOR USE ONLY | ||||
PLEA: 12 IS FOR OUTDOOR PERMANENT INSTALLATIONS ONLY AND SH22I IS FOR INDOOR PERMANENT INSTALLATIONS ONLY. THIS MANUAL AND ALL ECCOTEMP CONTENT IS SUBJECT TO CHANGE WITHOUT NOTICE. PLEASE VISIT SUPPORT.ECCOTEMP.COM FOR MORE INFORMATION.
SMARTHOME TANKLESS WATER HEATER Use & Care Manual
With Installation Instructions for the Installer
APPLICATION
Whole Home
INSTALLATION
Indoor/Outdoor
BTU'S
140,000
FLOW RATE
6.8 GPM
WARNING: This water heater may not be suitable for use in manufactured (mobile) homes! Please check local code restrictions pertaining to permanent/ fixed installations in manufactured homes in your area.
The purpose of this manual is twofold: one, to provide the installer with the basic directions and recommendations for the proper installation and adjustment of the water heater; and two, to the owner-operator, to explain the features, operation, safety precautions, maintenance and troubleshooting of the water heater. This manual also includes a parts list.
It is imperative that all persons who are expected to install, operate or adjust this water heater read the instructions carefully so they may understand how to perform these operations. If you don't understand these instructions or any terms within it, seek professional advice.
Any questions regarding the operation, maintenance, service or warranty of this water heater should be directed to the seller from whom it was purchased. If additional information is required, refer to the section on If You Need Service.
Do not destroy this manual. Please read carefully and keep in a safe place for future reference.
Recognize this symbol as an indication of Important Safety Information!
WARNING: California Proposition 65 Warning: This product contains chemicals known to the State of California to cause cancer, birth defects or other reproductive harm.
WARNING: If the information in these instructions is not followed exactly, a fire or explosion may result causing property damage, personal injury or death.
FOR YOUR SAFETY!
Improper installation, adjustment, alteration, service or maintenance can cause property damage, personal injury, or death. Refer to this manual. Installation and service must be performed by a qualified installer, service agency or the gas supplier.
DO NOT store or use gasoline or other flammable vapors or liquids or other combustible materials in the vicinity of this or any other appliance. To do so may result in an explosion or fire.
WHAT TO DO IF YOU SMELL GAS
- DO NOT try to light any appliances.
DO NOT touch any electrical switch; do not use any phone in your building. - Immediately call your gas supplier from a neighbor's phone. Follow the gas supplier's instructions.
- If you cannot reach your gas supplier, call the fire department.
DO NOT return to your home until authorized by the gas supplier or fire department.
PLEA: 21 IS FOR OUTDOOR PERMANENT INSTALLATIONS ONLY AND SH21 IS FOR INDOOR PERMANENT INSTALLATIONS ONLY. THIS MANUAL AND ALL ECCOTEMP CONTENT IS SUBJECT TO CHANGE WITHOUT NOTICE. PLEASE VISIT SUPPORT.ECCOTEMP.COM FOR MORE INFORMATION.
TABLE OF CONTENTS
Safety Information
Safety Precautions 1-8
SH22 Installation Instructions
Typical Installation 9-11
Water Connections 12
Gas Supply 12
Relief Valve 13
Leak Testing 14
Electrical Connection 15
Pipe Insulation 16
Mounting 17
Installation Checklist 18
SH22i Installation Instructions
Typical Installation 19-22
Water Connections 23-24
Gas Supply 24
Relief Valve 25
Leak Testing 25
Venting 26-32
Electrical Connection 33
Pipe Insulation 34
Mounting 35
Installation Checklist 36
Operating Instructions
Starting Instructions 37
Lighting the Heater 38
Water Temperature 39
Remote Control 40
Smart App 41-42
Care and Cleaning
Maintenance 43
Housekeeping 43-44
Extended Shut-Down 44
Anti-Freezing 44
Draining 44-46
Troubleshooting Tips
Before You Call 47
Error Code Guide 48
Customer Service
Parts List 49-50
Warranty Info 51-52

FOR YOUR RECORDS
Write the model and serial numbers here:
You can find them on a label on the water heater and/or packaging.
Staple sales slip or canceled check here.
Proof of the original purchase date is needed to obtain service under the warranty.

READ THIS MANUAL
Inside you will find many helpful hints on how to use and maintain your water heater properly. A little preventive care on your part can save you time and money over the life of your water heater. You'll find many answers to common problems in the Troubleshooting Guide. If you review the chart of Troubleshooting Tips first, you may not need to call for service.

READ THE SAFETY INFORMATION
Your safety and the safety of others are very important. There are many important safety messages in this manual and on your water heater. Always read and obey all safety messages. This is the safety alert symbol. Recognize this symbol as an indication of Important Safety Information! This symbol alerts you to potential hazards that can kill or hurt you and others.
All safety messages will follow the safety alert symbol and either the word "DANGER", "WARNING", "CAUTION" or "NOTICE".
These words mean:

DANGER: An imminently hazardous situation that will result in death or serious injury.

WARNING: A potentially hazardous situation that could result in death or serious injury and/or damage to property.

CAUTION: A potentially hazardous situation that may result in minor or moderate injury.

NOTICE: Attention is called to observe a specified procedure or maintain a specific condition.
IMPORTANT SAFETY INFORMATION READ ALL INSTRUCTIONS BEFORE USING
Be sure to read and understand the entire Use and Care Manual before attempting to install or operate this water heater. It may save you time and money. Pay particular attention to the Safety Instructions. Failure to follow these warnings could result in serious bodily injury or death. Should you have problems understanding the instructions in this manual, or have any questions, STOP, and get help from a qualified service technician, or the local gas utility.
DANGER! PROPERLY INSTALL WATER HEATER
Failure to properly install the water heater outdoors as outlined in the Installation Instructions in this manual can result in unsafe operation of the water heater. To avoid the risk of fire, explosion, or asphyxiation from carbon monoxide, never operate this water heater unless it is installed properly and has an adequate air supply for proper operation. Be sure to inspect the flue terminal for proper installation at initial start-up; and at least annually thereafter. Refer to the Care and Cleaning section of this manual for more information regarding flue terminal inspection.
WARNING!
Gasoline, as well as other flammable materials and liquids (adhesives, solvents, paint thinners etc.), and the vapors they produce are extremely dangerous. DO NOT handle, use or store gasoline or other flammable or combustible materials anywhere near or in the vicinity of a water heater or any other appliance. Be sure to read and follow the labels on the water heater, as well as the warnings printed in this manual. Failure to do so can result in property damage, bodily injury or death.

DANGER
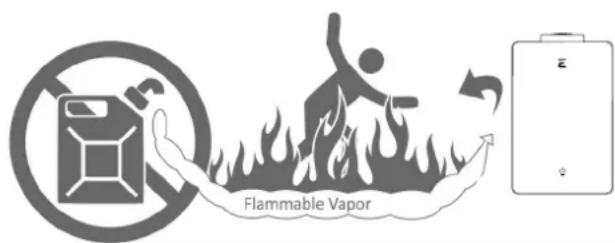
Vapors from flammable liquids will explode and catch fire causing death or severe burns.
Do not use or store flammable products such as gasoline, solvents or adhesives In the same room or area near the water heater.
Keep flammable products : 1. Far away from heater 2. In approved containers
4. Out of children's reach
Water heater has a main burner flame. The main burner flame
- Can come on at any time and 2. Will ignite flammable vapors.
Vapors:
- Cannot be seen
- Are heavier than air
- Go a long way on the floor
- Can be carried from other rooms to the main burner flame by air currents.
Installation:
Do not install water heater where flammable products will be stored or used unless the main burner flame is at least 18^ above the floor. This will reduce, but not eliminate, the risk of vapors being ignited by the main burner flame.
Read and follow water heater warnings and Instructions. If owners manual is missing, contact the retailer or manufacturer.
PLEA: 21 IS FOR OUTDOOR PERMANENT INSTALLATIONS ONLY AND SH21 IS FOR INDOOR PERMANENT INSTALLATIONS ONLY. THIS MANUAL AND ALL ECCOTEMP CONTENT IS SUBJECT TO CHANGE WITHOUT NOTICE. PLEASE VISIT SUPPORT.ECCOTEMP.COM FOR MORE INFORMATION.
IMPORTANT SAFETY INFORMATION READ ALL INSTRUCTIONS BEFORE USING
DANGER!
WATER TEMPERATURE SETTING
Safety and energy conservation are factors to be considered when selecting the water temperature setting. Water temperatures above 125^ can cause severe burns or death from scalding. The thermostat is adjusted to its lowest temperature position when shipped from the factory. Be sure to read and follow the warnings outlined on the label pictured below.

DANGER
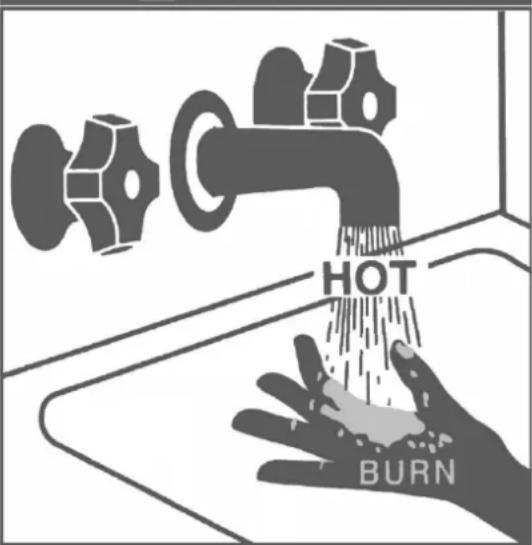
Water temperature over 125^ can cause severe burns instantly or death from scalds. Children, disabled and elderly are at highest risk of being scalded. See instruction manual before setting temperature at water heater. Feel water before bathing or showering. Temperature limiting valves are available, see manual.
Time/temperature relationship for burns
| Water Temperature | Time To Produce a Serious Burn |
| 120°F | More than 5 minutes |
| 125°F | 1 1/2to 2 minutes |
| 130°F | About 30 seconds |
| 135°F | About 10 seconds |
| 140°F | Less than 5 seconds |
| 145°F | Less than 3 seconds |
| 150°F | About 1 1/2 seconds |
| 155°F | About 1 second |
Table courtesy of Shriners Burn Institute
The chart shown above may be used as a guide in determining the proper water temperature for your home.
DANGER: Households with small children, disabled, or elderly persons may require a 120^ or lower temperature setting to prevent contact with "HOT" water.
Maximum water temperature occurs while burner is on. To find water temperature being delivered, turn on a hot water faucet and place a thermometer in the water stream and read the thermometer.
The temperature of the water at the outlet of the water heater can be regulated by setting the temperature on the Eccotemp Smart App (pg. 41-42) or by using the included remote (pg. 40). The default temperature was set at 110^ before it was shipped from the factory.
A NOTICE: When this water heater is supplying general purpose hot water requirements for use by individuals, a thermostatically controlled mixing valve for reducing point of use water temperature is recommended to reduce the risk of scald injury. Contact a licensed plumber or the local plumbing authority for further information.
NOTICE: The factory recommended operating temperatures are between 90^ and 140^ .
PLEA: 21 IS FOR OUTDOOR PERMANENT INSTALLATIONS ONLY AND SH21 IS FOR INDOOR PERMANENT INSTALLATIONS ONLY. THIS MANUAL AND ALL ECCOTEMP CONTENT IS SUBJECT TO CHANGE WITHOUT NOTICE. PLEASE VISIT SUPPORT.ECCOTEMP.COM FOR MORE INFORMATION.
IMPORTANT SAFETY INFORMATION READ ALL INSTRUCTIONS BEFORE USING
WARNING!
For your safety, the information in this manual must be followed to minimize the risk of fire or explosion, electric shock, or to prevent property damage, personal injury, or loss of life.
FOR INSTALLATIONS IN THE STATE OF CALIFORNIA
California Law requires that residential water heaters must be braced, anchored or strapped to resist falling or horizontal displacement due to earthquake motions. For residential water heaters up to 52 gallon capacity, a brochure with generic earthquake bracing instructions can be obtained from: Office of the State Architect, 400 P Street, Sacramento, CA 95814 or you may call 916-445-8100 or ask a water heater dealer.
However, applicable local codes shall govern installation. For residential water heaters of a capacity greater than 52 gallons or tankless style, consult the local building jurisdiction code for acceptable bracing procedures.
SAFETY PRECAUTIONS
Have the installer show you the location of the gas shut off valve and how to shut it off if necessary. Turn off the manual shut off valve if the water heater has been subjected to overheating, fire, flood, physical damage or if the gas supply fails to shut off.
- Read this manual entirely before installing or operating the water heater.
- Use this water heater only for its intended purpose as described in this Use and Care Manual.
- Be sure your water heater is properly installed in accordance with local codes and the provided installation instructions.
- All other servicing should be referred to a qualified technician.
READ AND FOLLOW THIS SAFETY INFORMATION CAREFULLY.
SAVE THESE INSTRUCTIONS
This water heater must be installed in accordance with these instructions, local codes, utility company requirements, and/or in the absence of local codes, use the latest edition of the American National Standard/National Fuel Gas Code. A copy can be purchased from either the American Gas Association, 400 North Capitol Street Northwest, Washington, DC 20001 as ANSI standard Z223.1 or National Fire Protection Association, 1 Batterymarch Park, Quincy, MA 02269 as NFPA 54. In Canada, the latest edition of the CSA B149.1 Natural Gas and Propane Installation, and the Canadian Electrical Code, CSA C22.1Part1, in the absence of local codes.
PLEA: 21 IS FOR OUTDOOR PERMANENT INSTALLATIONS ONLY AND SH21 IS FOR INDOOR PERMANENT INSTALLATIONS ONLY. THIS MANUAL AND ALL ECCOTEMP CONTENT IS SUBJECT TO CHANGE WITHOUT NOTICE. PLEASE VISIT SUPPORT.ECCOTEMP.COM FOR MORE INFORMATION.
DANGER!
NATURAL GAS AND LIQUEFIED PETROLEUM MODELS
Both LPG and natural gas have an odorant added to aid in detecting a gas leak. Some people may not physically be able to smell or recognize this odorant. If you are unsure or unfamiliar with the smell of LPG or natural gas, ask the gas supplier. Other conditions, such as "odorant fade", which causes the odorant to diminish in intensity, can also hide or camouflage a gas leak. Always check with commercial leak detector or soapy water.
- Gas detectors are recommended in LPG and natural gas applications and their installation should be in accordance with the detector manufacturer's recommendations and/or local laws, rules, regulations or customs.
- Water heaters utilizing LPG are different from natural gas models. A natural gas water heater will not function safely on LPG and vice versa.
- No attempt should ever be made to convert the water heater from natural gas to LPG. To avoid possible equipment damage, personal injury or fire, do not connect the water heater to a fuel type not in accordance with the unit data plate; propane for propane units and natural gas for natural gas units. These units are not certified for any other fuel type.
- LPG water heaters should not be installed below grade (for example, in a basement) if such installation is prohibited by federal, state and/or local laws, rules, regulations or customs.
- Propane or LPG must be used with great caution. It is heavier than air and will collect first in lower areas making it hard to detect at nose level.
- Before attempting to light the water heater, make sure to look and smell for gas leaks. Use a soapy solution to check all gas fittings and connections. Bubbling at a connection indicates a leak that must be corrected. When smelling to detect a gas leak, be sure to sniff near the floor also.
- It is recommended that more than one method, such as soapy solution, gas detectors, etc., be used to detect leaks in gas applications.
NOTICE: If a gas leak is present or suspected:
- DO NOT attempt to find the cause yourself.
- DO NOT try to light any appliances.
- DO NOT touch any electrical switch.
- DO NOT use any phone in your building.
- Leave the house immediately and make sure your family and pets leave also.
- Leave the doors open for ventilation and contact the gas supplier, a qualified service agency or the fire department.
- Stay away from the house (or building) until the service call has been made, the leak is corrected and a qualified agency has determined the area to be safe.
PLEA: 21 IS FOR OUTDOOR PERMANENT INSTALLATIONS ONLY AND SH21 IS FOR INDOOR PERMANENT INSTALLATIONS ONLY. THIS MANUAL AND ALL ECCOTEMP CONTENT IS SUBJECT TO CHANGE WITHOUT NOTICE. PLEASE VISIT SUPPORT.ECCOTEMP.COM FOR MORE INFORMATION.
Installing the SH22 Water Heater
Location
The SH22 water heater is for OUTDOOR installation ONLY! Please refer to the SH22i section of this manual for installation of the indoor version of this product.
Make sure before installation that the gas type you will use is the same type on the data plate.
The water heater unit should be installed by professionals from your local gas company. Please don't attempt installation by yourself. Improper installation may cause failure or dangerous conditions such as gas leaking or explosion.
This water heater is an outdoor model and must be mounted on a vertical wall. It must not be installed indoors or in a confined space. The water heater should be installed close to the most frequently used outlet and its position chosen with safety and service in mind.
Make sure people (particularly children, disabled, and elderly) will not touch the hot water outlet or the flue terminal. The flue terminal and air inlet must be clear of obstruction and shrubbery.
If installed in a public corridor, please assure that the surrounding area is free of debris, obstruction and flammable materials.
The unit must be installed on a fire retardant area, and must be away from all flammable materials. Clearance should be 10 ft to the left and right side of flammable materials, and 6.75 ft to the front.
The unit should be installed in open area where strong currents are not prevalent
This unit is of high power and will consume a lot of oxygen when working, so the installation area must be well ventilated, and air in and out of the area has no blockage.
The outdoor unit should not be installed in a corridor with rooms on the both sides or in the closed corridor.
Take measures to avoid direct wind, rain and snow. The installation area should be constructed of fire retardant materials. The power socket connecting the water heater should be properly grounded.
The water heater must be located so it is not subject to physical damage, for example, by moving vehicles, area flooding, etc.
The water heater must be installed vertically with the water, gas, and power connections on the underside, pointing toward the ground.
Failure to properly install the water heater outdoors as outlined in this manual can result in unsafe operation.
Hot and cold water lines should be insulated to conserve water and energy.
DO NOT install water heater where subject to vibrations.
DO NOT install the water heater near vents for heating or cooling. A minimum of 4 feet should be maintained.
Install the water heater according to clearances stated on the Warning Label, located on the front/ sides of the water heater.
WARNING: Combustible construction refers to adjacent walls and ceilings and should not be confused with combustible or flammable products and materials. Combustible and/or flammable products and materials should never be stored in the vicinity of this or any gas appliances.
WARNING: The SH22 is to be installed outdoors only. In some climates the ambient air temperature will fall below the temperature in which water freezes 32^ (0^) . DO NOT use the SH22 water heater in unsafe freezing conditions because it could damage the water heater or cause other property damage.
PLEA: 21 IS FOR OUTDOOR PERMANENT INSTALLATIONS ONLY AND SH21 IS FOR INDOOR PERMANENT INSTALLATIONS ONLY. THIS MANUAL AND ALL ECCOTEMP CONTENT IS SUBJECT TO CHANGE WITHOUT NOTICE. PLEASE VISIT SUPPORT.ECCOTEMP.COM FOR MORE INFORMATION.
Installing the SH22 Water Heater
Proper operation of the water heater requires air for combustion and ventilation. Provisions for combustion and ventilation air must comply with referenced codes and standards.
Combustion and Ventilation Air
This water heater is for OUTDOOR installation ONLY.
It must NOT be installed indoors or in a confined space.
Corrosive Atmospheres
The air in beauty shops, dry cleaning establishments, photo processing labs, and storage areas for liquid and powdered bleaches or swimming pool chemicals often contain such halogenated hydrocarbons.
A NOTICE: The water heater should not be installed near an air supply containing halogenated hydrocarbons.
An air supply containing halogenated hydrocarbons may be safe to breathe, but when it passes through a gas flame corrosive elements are released that will shorten the life of any gas burning appliance.
Propellants from common spray cans or gas leaks from A/C and refrigeration equipment are highly corrosive after passing through a flame.
The water heater warranty is voided when failure of the heater is due to operation in a corrosive atmosphere.
Inspect Shipment
Inspect the water heater for possible damage. Check the markings on the rating plate of the water heater to be certain the type of gas supplied corresponds to the water heater requirements. Verify all included parts are present (see below).
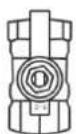
Gas Appliance Shut Off
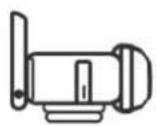
Pressure Relief Valve (Canada Shipments Only)
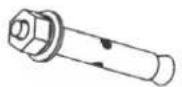
Expositive Screw x 2 pieces
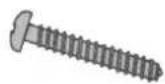
Wood Screw x 4 pieces

Washer x 2 pieces
Use & Care Manual
PLEA: 21 IS FOR OUTDOOR PERMANENT INSTALLATIONS ONLY AND SH21 IS FOR INDOOR PERMANENT INSTALLATIONS ONLY. THIS MANUAL AND ALL ECCOTEMP CONTENT IS SUBJECT TO CHANGE WITHOUT NOTICE. PLEASE VISIT SUPPORT.ECCOTEMP.COM FOR MORE INFORMATION.
Installing the SH22 Water Heater
Typical Installation (Some Items May Not Apply)
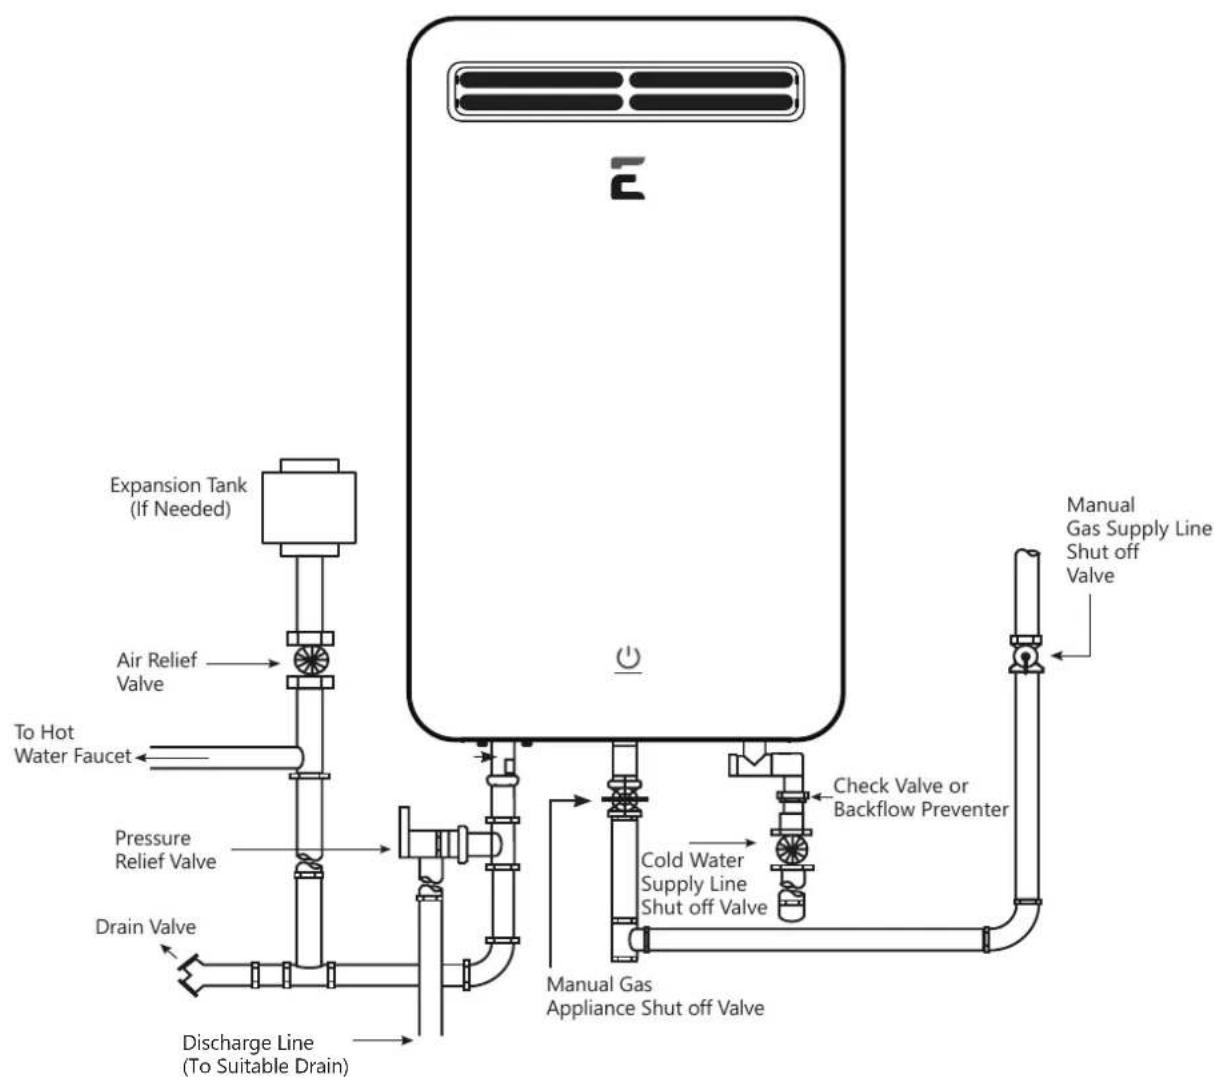
NOTICE: The National Fuel Gas Code (NFGC) mandates a manual gas shut-off valve: See (NFGC) for complete instructions. Local codes or plumbing authority requirements may vary from the instructions or diagrams provided and take precedent over these instructions.
PLEA: 21 IS FOR OUTDOOR PERMANENT INSTALLATIONS ONLY AND SH22I IS FOR INDOOR PERMANENT INSTALLATIONS ONLY. THIS MANUAL AND ALL ECCOTEMP CONTENT IS SUBJECT TO CHANGE WITHOUT NOTICE. PLEASE VISIT SUPPORT.ECCOTEMP.COM FOR MORE INFORMATION.
Water Supply Connections
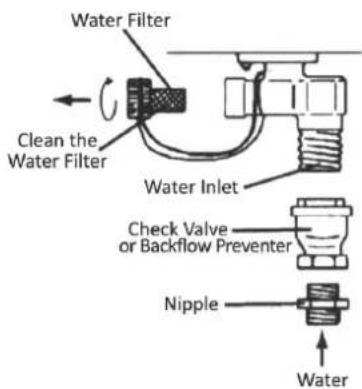
If a water heater is installed in a closed water supply system, such as one having a backflow preventer in the cold water supply line, means shall be provided to control thermal expansion. Contact the water supplier or local plumbing inspector on how to control this situation. Install a shutoff valve near the inlet of the water heater for service and draining purposes.
Before connecting the water supply pipe to the water heater, open the shutoff valve and clean out sand, debris, air, caulking material, etc. inside the pipe. Connect to the water inlet, then check water flow.
Close the shutoff valve and clean the water filter.
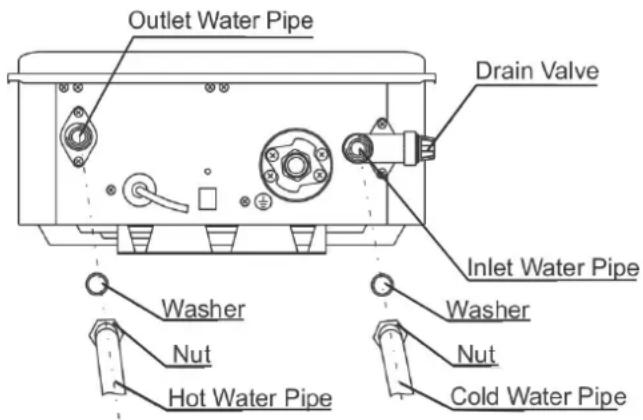
Be sure to connect the water inlet and the hot water outlet as shown on the water heater. If reversed, the water heater will not function.
Installation of unions or flexible copper connections are recommended on the HOT and COLD water lines, so that the water heater may disconnect easily for servicing if necessary.
Install a check valve between the water heater and the water shutoff valve. (See illustration to the top left).
In regards to the HOT WATER OUTLET:
Connections between the water heater and point(s) of use should be as short and direct as possible.
DO NOT use lead or non-approved plastic pipe.
A NOTICE: The flow rate of hot water may vary when more than two faucets (appliances, fixtures, etc.) are being used simultaneously.
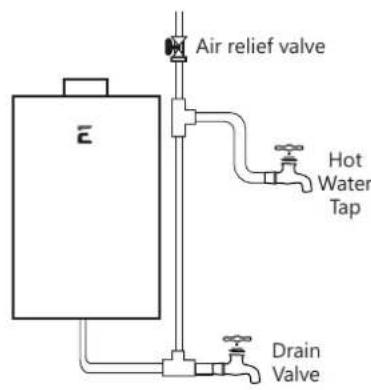
A NOTICE: The pipes MUST be completely drainable. If the hot water faucets are located at a point higher than the water heater, place a drain valve at the lowest point (see illustration to the bottom left).
Gas Supply
WARNING: Do not attempt to convert this water heater for use with a different type of gas other than the type shown on the rating plate. Such conversion could result in hazardous operating conditions. Please have a professional connect the gas pipe.
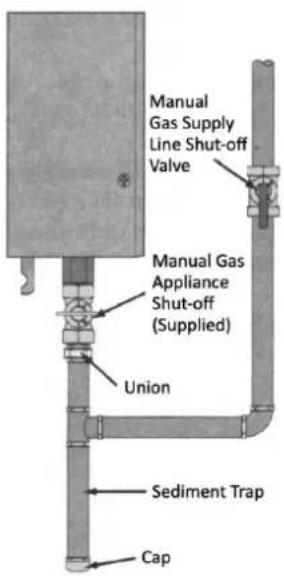
A manual gas appliance shutoff valve must be installed at the gas connection of the water heater at the time of installation (see diagram to the left). The branch gas supply line to the water heater should be clean black steel pipe or other approved gas piping material.
A ground joint union or ANSI design certified semi-rigid or flexible gas appliance connector should be installed in the gas line close to the water heater. The National Fuel Gas Code (NFGC) mandates a manual gas shut off valve: See (NFGC) for complete instructions.
If flexible connectors are used, the maximum length shall not exceed 36^ . The minimum BTU requirement for flex and/or gas lines is 1^ of black steel, flex rated at 199K BTU.
If lever type gas shut offs are used, they shall be T-Handle type.
Compound used on the threaded joints of the gas piping must be of the type resistant to the action of LPG gas. Use compound sparingly on male threads only.
A sediment trap should be installed at the bottom of the gas line.
Do not use excessive force (over 31.5 ft lbs.) in tightening the pipe, particularly if pipe-tape compound is used, as the unit may be damaged.
The inlet gas pressure to the water heater must not exceed 10.5 w.c. for natural or 14^ w.c. for LPG. For purposes of input adjustment, the minimum inlet gas pressure (with main burner on) is shown on the water heater rating plate. If high or low gas pressures are present, contact your gas supplier for correction.
PLEA: 12 IS FOR OUTDOOR PERMANENT INSTALLATIONS ONLY AND SH22I IS FOR INDOOR PERMANENT INSTALLATIONS ONLY. THIS MANUAL AND ALL ECCOTEMP CONTENT IS SUBJECT TO CHANGE WITHOUT NOTICE. PLEASE VISIT SUPPORT.ECCOTEMP.COM FOR MORE INFORMATION.
Relief Valve
A new pressure relief valve, complying with the Standard for relief Valves and Automatic Gas shut off Devices for Hot Water Supply Systems, ANSI Z21.22, must be installed at the hot water outlet connection of the water heater at the time of installation. Local codes shall govern the installation of relief valves. For safe operation of the water heater, be sure that:
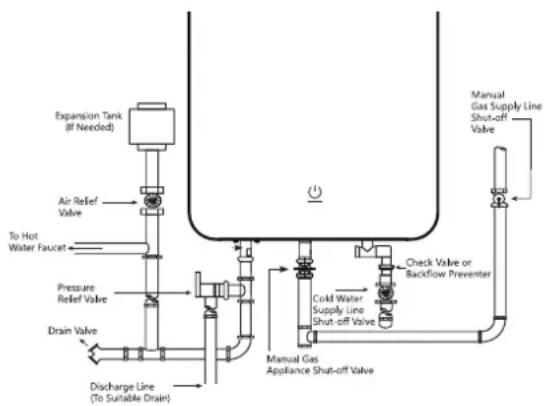
A NOTICE: The above illustrates a pressure only relief valve. If local codes require a combination temperature and pressure relief valve be installed, an extension piece may be needed.
- The pressure rating of the relief valve must not exceed 150 psi, the maximum working pressure of the water heater as marked on the rating plate.
- The BTUH rating of the relief valve must equal or exceed the BTUH input of the water heater as marked on its rating plate.
- No valve of any type should be installed between the relief valve and the water heater.
- Discharge from the relief valve should be piped to a suitable drain to eliminate potential water damage.
Piping used should be of a type approved for the distribution of hot water.
- Hot and cold water lines should be insulated up to the water heater.
- The discharge line must be NO SMALLER than the outlet of the valve and must pitch downward to allow complete drainage (by gravity) of the relief valve and discharge line.
- The end of the discharge line should not be threaded or concealed and should be protected from freezing. No valve of any type, restriction or reducer coupling should be installed in discharge line.
NOTICE: Local codes govern the installation of relief valves. If local codes require that a temperature and pressure relief valve should be installed the manufacturer recommends a type 40XL Watts T&P relief valve or an equivalent model be used.
NOTICE: Manual operation of relief valves should be performed at least once a year. Turn off the electrical power and gas shut off valve. Lift and release lever on the relief valve and check the manual operation of the relief valve. You should take precaution to avoid contact with the hot water coming out of the relief valve and to prevent water damage.
NOTICE: If the relief valve on the system discharges periodically, this may be due to thermal expansion in a closed water supply system. Contact the water supplier or local plumbing inspector on how to correct this situation. Do not plug the relief valve.
Pressure Testing the Gas Supply System
WARNING: Install a gas pressure regulator, in the gas supply line, which does not exceed the maximum supply pressure.
DO NOT use an industrial type gas regulator.
Failure to isolate heater during pressure test can damage internal components voiding warranty. The water heater and its individual shutoff valve must be disconnected from the gas supply piping system during any pressure testing of that system at testy pressures in excess of 1/2 psi. The water heater must be isolated from the gas piping system by closing the manual gas shut off valve during any pressure testing of the gas supply piping at test pressures equal to or less than 1/2 psi (14'w.c.).
PLEA: 21 IS FOR OUTDOOR PERMANENT INSTALLATIONS ONLY AND SH21 IS FOR INDOOR PERMANENT INSTALLATIONS ONLY. THIS MANUAL AND ALL ECCOTEMP CONTENT IS SUBJECT TO CHANGE WITHOUT NOTICE. PLEASE VISIT SUPPORT.ECCOTEMP.COM FOR MORE INFORMATION.
Leak Testing
WARNING: Never use an open flame to test for gas leaks, as property damage, personal injury, or death could result.
The water heater and its gas connections must be leak tested at normal operating pressures before it is placed in operation.
- Turn on the gas shut off valve(s) to the water heater.
- Use a commercial leak detector or soapy water solution to test for leaks at all connections and fittings. Bubbles indicate a gas leak that must be corrected.
The factory connections should also be leak tested after the water heater is placed in operation.
High Altitude
Ratings of gas water heaters are based on sea level operation and need not be changed for installations at elevations up to 2,000 feet. Unit not recommended for elevations in excess of 2,000 feet.
Installing the Water Heater
Flue Terminal Location
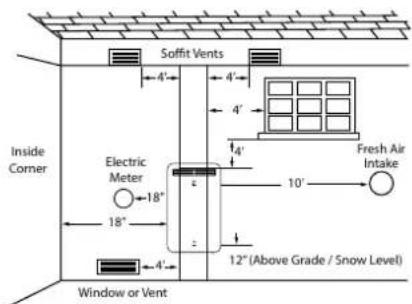
The location of the vent terminal depends on the following minimum clearances and considerations (see illustration):
Additional Considerations
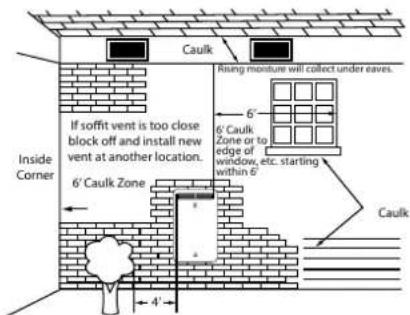
WARNING: Moisture in the flue gas will condense as it leaves the vent terminal. In cold weather this condensate can freeze on the exterior wall, under the eaves and on surrounding objects. Some discoloration to the exterior of the building is to be expected. However, improper location or installation can result in severe damage to the structure or exterior finish of the building. Code requirements are subject to change and may vary by location.
Twelve (12) inches above grade level and above normal snow levels.
- Four (4) feet below, or four (4) feet horizontally from any door, window, soffit, under eave vent or gravity air inlet to the building or other appliances, or from gas or electric meters. Do not locate vent above walkways, doors, windows, air inlets, gas or electric meters or other equipment.
- Ten (10) feet from any forced air inlet to the building. Any fresh or make-up air inlet such as for a dryer or furnace area is considered to be a forced air inlet.
Eighteen (18) inches from an inside corner formed by two exterior walls.
- DO NOT install vent terminal under any patio/deck or too close to shrubbery, as flue gases or condensate vapor may become a nuisance or hazard and may cause property damage. Condensate vapor could cause damage and be detrimental to the operation of regulators, relief valves, or other equipment.
- To help prevent moisture from freezing on walls and under eaves, do not locate vent terminal on the side of a building with prevailing winter winds. The water heater must be located as close as possible to a chimney or gas vent.
- Caulk all cracks, seams and joints within six (6) feet of vent terminal.
- All painted surfaces should be primed to lessen the chance of physical damage. Painted surfaces will require maintenance.
- Use of cellular core PVC (ASTM F891), cellular core CPVC, or Radel (polyphenylsulfone) in non-metallic venting systems is prohibited. Covering non-metallic vent pipe and fittings with thermal insulation is prohibited.
- DO NOT connect to a chimney flue serving a separate appliance designed to burn solid fuel.
PLEA: 12 IS FOR OUTDOOR PERMANENT INSTALLATIONS ONLY AND SH21 IS FOR INDOOR PERMANENT INSTALLATIONS ONLY. THIS MANUAL AND ALL ECCOTEMP CONTENT IS SUBJECT TO CHANGE WITHOUT NOTICE. PLEASE VISIT SUPPORT.ECCOTEMP.COM FOR MORE INFORMATION.
Electrical Connections
WARNING: Field wiring connections and electrical grounding must comply with local codes, or in the absence of local codes, with the latest edition of the National Electrical Code, ANSI/NFPA 70, or in Canada, Canadian Electrical Code, CSA C22.1Part1.
ELECTRICAL CONNECTION POWER CORD:
The electric power supply requirement for this water heater is 120 VAC/60HZ, 2 Amps.
- The water heater comes with a three (3) pin power supply cord. Use only a power outlet with a ground terminal.
- The installation of an electric leakage breaker is recommended. (GFCI)
- Keep any excess of the power supply cord on the outside of the water heater.
- If local codes require hardwiring, see instructions for "Hardwiring the Electrical Connections".
WARNING: Shock hazard line voltage is present. Before servicing the water heater, turn off the electrical power to the water heater at the main disconnect or circuit breaker. Failure to do so could result in severe personal injury or death.
HARDWIRING THE ELECTRICAL CONNECTIONS:
- Wiring should be carried out by a qualified electrician in accordance with local codes.
The water heater requires 120 VAC/60Hz and should be properly grounded. - DO NOT connect grounding wire to water pipes, gas pipes, telephone cables, lightning conductor circuits and to grounding circuit of other equipment that carry a ground-fault interrupter.
An ON/OFF switch must be provided and installed for the incoming 120VAC power. - Wire the water heater exactly as shown below. A wiring diagram is also found inside of the cover panel.
A green screw is provided in the junction box for grounding connection. - Connect the live wire to black leg wire and the neutral wire to the white neutral wire.
CAUTION: Label all wires prior to disconnection when servicing controls. Wiring errors can cause improper and dangerous operation. Verify correct operation after servicing.
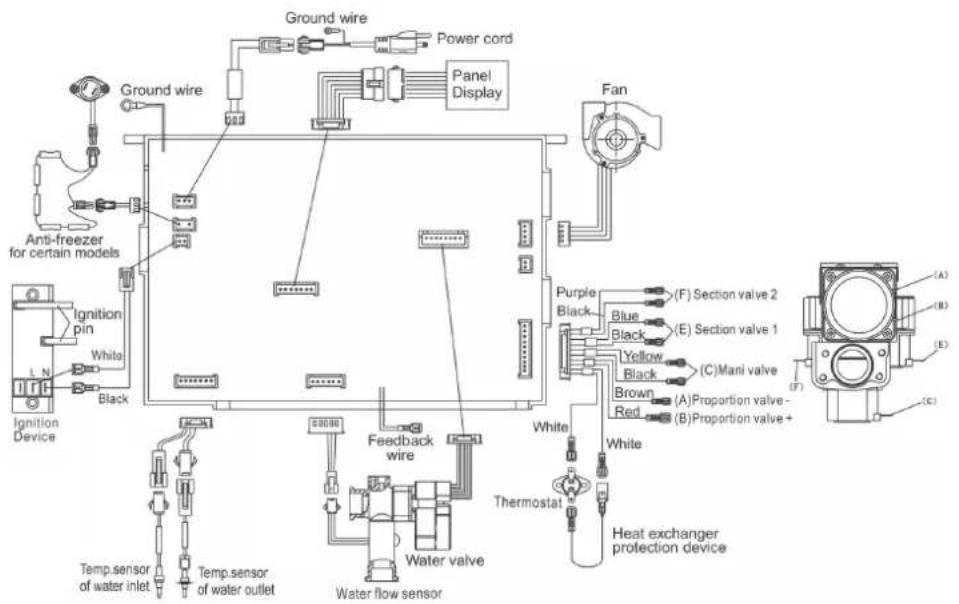
Electric Wiring Diagram
PLEA: 12 IS FOR OUTDOOR PERMANENT INSTALLATIONS ONLY AND SH22I IS FOR INDOOR PERMANENT INSTALLATIONS ONLY. THIS MANUAL AND ALL ECCOTEMP CONTENT IS SUBJECT TO CHANGE WITHOUT NOTICE. PLEASE VISIT SUPPORT.ECCOTEMP.COM FOR MORE INFORMATION.
Insulation Blankets
Insulation blankets, available to the general public, for external use on gas water heaters are not necessary. The purpose of an insulation blanket is to reduce the standby heat loss encountered with storage tank heaters. This water heater does not store water, making an insulation blanket unnecessary.
The manufacturer's warranty does not cover any damage or defect caused by installation, attachment or use of any type of energy saving or other unapproved devices (other than those authorized by the manufacturer) into, onto or in conjunction with the water heater.
The use of unauthorized energy saving devices may shorten the life of the water heater and may endanger life and property. The manufacturer disclaims any responsibility for such loss or injury resulting from the use of such unauthorized devices.
WARNING: If local codes require external application of insulation blanket kits the manufacturer's instructions included with the kit must be carefully followed.
Pipe Installation
Inlet Pipe and Outlet Pipe Installation
Use pressure resistant pipe to connect the inlet and outlet water pipes of the water heater and the local water pipe (Make sure to place the rubber ring). Before connecting the inlet water pipe, flush the inside of the pipe.
Hot and Cold Pipe Insulation Installation
For increased energy efficiency, use pipe insulation. Please install the insulation, according to the illustrations above, making sure to insulate all the way to the top. Do not cover any drain or pressure valve(s).
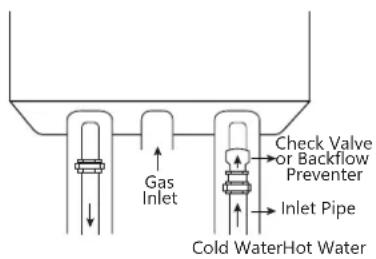
A NOTICE: The hot and cold pipes should be insulated as shown to help provide additional freeze protection
During Installation of this Water Heater...
Do's
- DO check inlet gas pressure to ensure that it is within the range specified on the rating plate.
DO provide adequate air for combustion and ventilation as discussed in the Use & Care Manual and the National Gas Code (CAN/CGA B 149 in Canada).
DO maintain proper clearances to combustibles as specified by applicable code. - DO ensure that the flue terminal location complies with the guidelines found in the Use & Care Manual and National Fuel Gas Code (CAN/CGA B 149 in Canada).
Dont's
- DON'T block or restrict air intake opening located on the back side of the water heater.
- DON'T remove the front cover unless absolutely necessary. This should only be done after being examined by a qualified service technician.
- DON'T install this product where standing water may occur.
PLEA: 21 IS FOR OUTDOOR PERMANENT INSTALLATIONS ONLY AND SH21 IS FOR INDOOR PERMANENT INSTALLATIONS ONLY. THIS MANUAL AND ALL ECCOTEMP CONTENT IS SUBJECT TO CHANGE WITHOUT NOTICE. PLEASE VISIT SUPPORT.ECCOTEMP.COM FOR MORE INFORMATION.
Mounting the SH22 Water Heater
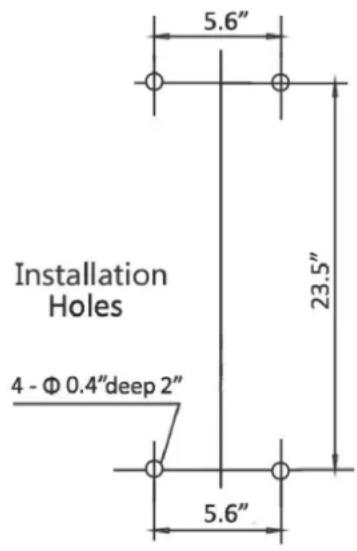
Make sure the location of the water heater allows for easy access and operation. The water heater should be located in an area where leakage of the tank or connections will not result in damage to the area adjacent to the water heater or to lower floors of the structure. When such locations cannot be avoided, it is recommended that a suitable drain pan, adequately drained, be installed under the appliance. The pan must not restrict combustion air flow.
In case of dry wall or concrete wall use dry wall anchors or lag bolts.
The water heater requires 120VAC/60Hz. Have a receptacle with ground terminal near the water heater. The length of the power supply cord is 5 feet.
Drill the holes as per the sizes in the figure to the left, put 2 expansion screws into the top holes, and 2 rubber screws into the bottom holes.
Hang up the water heater unit, tighten the expansion screws, and put 2 wood thread screws into the bottom holes.
When being installed directly on carpeting, the water heater shall be installed on a metal or wood panel extending beyond the full width and depth of the water heater by at least 3 in (76.2mm) in any direction, or if the water heater is installed in an alcove or closet, the entire floor shall be covered by the panel. The panel must be strong enough to carry the weight of the heater when full of water.
CAUTION: Reinforcement of the wall is required in case the wall is not strong enough to hold the water heater.
Water Supply Connections
Plumbing should be carried out by a qualified plumber in accordance with local codes.
Use approved plumbing materials and tools only.
To conserve energy and to prevent freezing, insulate both cold and hot water supply lines. DO NOT cover the drain valves.
To ensure proper operation of the water heater, the following water pressure guidelines should be followed:
Operation of the water heater requires the minimum water pressure of 14 psi and a minimum water flow rate of 0.75gpm
- Additional water pressure is required for long pipe runs and outlet fitting(s) water pressure drops.
- To maintain proper performance, ensure sufficient water supply pressure. The Required Water Pressure = Min. Operating Water Pressure (14 psi) + Pipe Pressure Loss + Faucet and Shower Pressure Loss + Safety Margin (more than 5 psi).
To supply hot water to upper floors, additional water pressure (0.44 psi/ft) must be ensured. The measurement should be calculated by the distance between the water inlet of the water heater (ground level) to the hot water faucet (upper floor level).
Well water systems should be set at a range of 50-60 psi.
- When the water is supplied from a water supply tank, the height of the tank and the diameter of the pipes and their relation to water pressure, should be taken into consideration. Gravity water pressure is not recommended.
A NOTICE: If the water flow resistance of a shower head is too high, the burner in the water heater will fail to ignite. Keep the shower head clean from debris that could cause additional pressure drop.
A NOTICE: If using mixing valves on the outlet, choose one which prevents cold water pressure from overcoming hot water line pressure.
IMPORTANT: Do not apply heat to the HOT or COLD water connections. Any heat applied to the water supply fittings will permanently damage the internal components of the water heater.
A CAUTION: This water heater must only be used with the following water supply system conditions:
- With clean, potable water free of corrosive chemicals, sand, dirt, or other contaminates.
- With inlet water temperatures above 32^ , but not exceeding 120^ .
- Free of lime and scale deposits.
DO NOT reverse the hot and cold water connections. The water heater will not operate.
PLEA: 21 IS FOR OUTDOOR PERMANENT INSTALLATIONS ONLY AND SH21 IS FOR INDOOR PERMANENT INSTALLATIONS ONLY. THIS MANUAL AND ALL ECCOTEMP CONTENT IS SUBJECT TO CHANGE WITHOUT NOTICE. PLEASE VISIT SUPPORT.ECCOTEMP.COM FOR MORE INFORMATION.
Installing the SH22 Water Heater
Installation Check List
A. Water Heater Location
- Installed OUTDOORS
- Close to area of mostly used outlet
- Protected from freezing temperatures
- Proper clearance from combustible surfaces observed
- Sufficient fresh air supply for proper operation of water heater
Air supply free of corrosive elements and flammable vapors - Provisions made to protect area from water damage
- Sufficient room to service heater
- Combustible materials, such as clothing, cleaning materials, rags, etc. clear of the heater and vent piping
Water heater is properly attached to the wall
B. Water Supply
Water supply has sufficient pressure
Air purged from water heater and piping
Water connections tight and free of leaks
Water filter is clean and in place
- Materials used are as instructed in this manual
Water pipes are insulated
C. Gas Supply
Gas type matches rating plate
Gas supply pressure is sufficient for the water heater
Gas line equipped with shut off valve, union and sediment trap
Approved pipe joint compound used
- Commercial leak detector or soap and water solution used to check all connections and fittings for possible gas leak
Gas company inspected installation (if required)
D. Relief Valve
- Pressure relief valve properly installed and discharge line run to open drain
- Discharge line protected from freezing
E. Electrical Wiring
Voltage matches rating plate
Water heater is properly grounded
- Wiring meets all local codes
- GFCI protection where required
PLEA: 21 IS FOR OUTDOOR PERMANENT INSTALLATIONS ONLY AND SH21 IS FOR INDOOR PERMANENT INSTALLATIONS ONLY. THIS MANUAL AND ALL ECCOTEMP CONTENT IS SUBJECT TO CHANGE WITHOUT NOTICE. PLEASE VISIT SUPPORT.ECCOTEMP.COM FOR MORE INFORMATION.
Installing the SH22i Water Heater
Indoor Location
- Installation distances may vary by local code. It is the installer's responsibility to verify installation requirements.
- Make sure before installation that the gas type you will use is the same type on the data plate.
- The water heater unit should be installed by professionals. Improper installation may cause failure or dangerous conditions such as gas leaking or explosion.
- Water heater cannot be installed in an UN-VENTED bathroom, bedroom, basement, living room, closet, outdoor, stairway or an exit area. If installed in an exit area, it must be at least 16.5 ft. or more away from the exit.
- Vent pipe should extend from the wall at least 2^ . The terminal must be at least 1.64 ft. away from obstruction and must be well vented.
- Vent pipe should slope 3^ downward, to avoid condensing water and protect from rain entering.
- Vent pipe should avoid direct, strong wind because the downdraft will cause malfunction.
- The water heater should be installed far from any blockage, and with plenty of enough space for installation and maintenance. Adequate clearances for servicing must be provided.
- The water heater should not be installed in the same room with a gas stove.
- When determining the floor clearance, a clearance of 12 inches must be maintained between the vent pipe and combustible material. A side wall clearance of 10 inches and a top clearance of 16 inches must be maintained.
- The vent pipe can be up to 32 ft. in length with one elbow.
- The vent pipe should be installed with a flame retardant wall thimble. Owner must refer to vent manufacturer's instructions and specifications. Z-Flex information can be found at www.novaflex.com, please refer to page 31 for additional links. Installation guidelines for venting provided by NovaFlex, who is solely responsible for venting installation accuracy.
- The power socket connecting the water heater should be grounded properly with a GFCI circuit protector.
- The water heater should not be located in an area where leakage of the heat exchanger or connections will result in damage to the area adjacent to it or to lower floors of the structure. When such areas cannot be avoided it is recommended that a suitable catch pan, adequately drained, must be installed under the water heater. The pan must not restrict combustion airflow.
- The water heater should be installed as close as practical to the vent termination to minimize vent length and the number of elbows required for venting.
- A gas fired water heater or any other appliance should not be installed in a space where liquids which give off flammable vapors are to be used or stored. Such liquids include gasoline, LPG (butane or propane), paint or adhesives and their thinners, solvents or removers.
- The water heater should be installed far from heat sources, flammable and dangerous materials. Because of natural air movement in a room or other enclosed space, flammable vapors can be carried some distance from where their liquids are being used or stored. The open flame of the water heater's main burner can ignite these vapors causing an explosion or fire which may result in severe burns, death or property damage.
PLEA: 21 IS FOR OUTDOOR PERMANENT INSTALLATIONS ONLY AND SH21 IS FOR INDOOR PERMANENT INSTALLATIONS ONLY. THIS MANUAL AND ALL ECCOTEMP CONTENT IS SUBJECT TO CHANGE WITHOUT NOTICE. PLEASE VISIT SUPPORT.ECCOTEMP.COM FOR MORE INFORMATION.
Installing the SH22i Water Heater Continued...
- Raising the water heater will reduce, but NOT eliminate the possibility of lighting the vapor of any flammable liquids which may be improperly stored or accidentally spilled.
- If the water heater is installed in a garage, it should be installed so that the direct ignition system and main burner are no less than 18 inches above the garage floor.
- Hot and cold water lines should be insulated to conserve water and energy.
- The water heater must be located so it is not subject to physical damage, for example, by moving vehicles, area flooding, etc.
- The water heater should be installed with the proper venting materials and termination suitable for Category III venting. Failure to install and properly vent the water heater to the outdoors as outlined in the Venting Section of this manual can result in unsafe operation. Owner must refer to vent manufacturer's instructions and specifications. Z-Flex information can be found at www.novaflex.com, please refer to page 31 for additional links.
- For other than a direct vent appliance, the appliance must be located as close as practicable to a chimney or gas vent.
- DO NOT install water heater where subject to vibrations or on the road use.
- Eccotemp does not recommend this water heater to have its gas, water or power turned on and or connected while driving or moving any Recreational Vehicles, Mobile Homes, Boats and/or other Watercraft. Doing so could cause damage to your water heater and/or Recreational Vehicle, Mobile Home, Boat and/or Watercraft. Eccotemp will not be liable for any damages to either. We always recommend you check with local municipalities or agencies for complete rules and regulations.
- DO NOT install the water heater near vents for heating or cooling. A minimum of 4 feet should be maintained.
- If the clearances stated on the Instruction/Warning Label, located on the front/side of the water heater differ, install the the water heater according to the clearances stated on the label.
WARNING: Combustible construction refers to adjacent walls and ceilings and should not be confused with combustible or flammable products and materials. Combustible and/or flammable products and materials should never be stored in the vicinity of this or any gas appliance.
The vent for this appliance shall not terminate:
- Over public walkways; or
- Near soffit vents or crawl space vents or other areas where condensate or vapor could create a nuisance or hazard or cause property damage; or
- Where condensate vapor could cause damage or could be detrimental to the operation of regulators, relief valves, or other equipment.
Installing the SH22i Water Heater Continued...
Proper operation of the water heater requires air for combustion and ventilation. Provisions for combustion and ventilation air must comply with referenced codes and standards.
Combustion and Ventilation Air
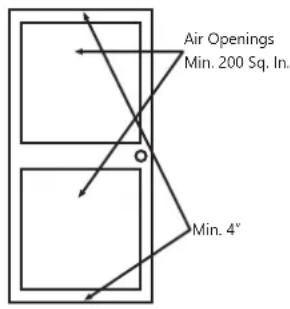
A confined space is one having a volume of less than 50 cubic feet per 1,000 BTUH of the aggregate input of all appliances within that space.
The air must be supplied through two permanent openings of equal area. One is to be located within 12^ above the floor and the other is to be located within 12^ below the ceiling.
The minimum net free area of each opening must not be less than one square inch per 1,000 BTUH of the total input rating of all the appliances in the enclosure (but not less than 100 square inches), if each opening communicates with other unconfined areas inside the building.
Buildings of unusually tight construction shall have the combustion and ventilation air supplied from outdoors, or a freely ventilated attic or crawl space. If air is supplied from outdoors, directly or through vertical ducts, there must be two openings located as specified above and each must have a minimum net free area of not less than one square inch per 4,000 BTUH of the total input rating of all the appliances in the enclosure.
If horizontal ducts are used to communicate with the outdoors, each opening must have a minimum net free area of not less than one square inch per 2,000 BTUH of the total input rating of all the appliances in the enclosure. If ducts are used, the minimum dimensions of rectangular air ducts shall not be less than 4^
NOTICE: If the water heater is installed in an unconfined space within a building of conventional frame, masonry or metal construction, infiltration air is normally adequate for proper combustion and ventilation. If the water heater is installed in a confined space, provisions for combustion and ventilation air must be made.
A NOTICE: If the duct openings which supply combustion and ventilation air are to be covered with a protective screen or grill, the net free area (openings in the material) of the covering material must be used in determining the size of the openings. Protective screening for the openings MUST NOT be smaller than 1/4'' to prevent clogging by lint or other debris.
Corrosive Atmospheres
The air in beauty shops, dry cleaning establishments, photo processing labs, and storage areas for liquid and powdered bleaches or swimming pool chemicals often contain such halogenated hydrocarbons.
An air supply containing halogenated hydrocarbons may be safe to breathe, but when it passes through a gas flame corrosive elements are released that will shorten the life of any gas burning appliance.
Propellants from common spray cans or gas leaks from A/C and refrigeration equipment are highly corrosive after passing through a flame.
The water heater warranty is voided when failure of the heater is due to operation in a corrosive atmosphere.
NOTICE: The water heater should not be installed near an any air supply containing halogenated hydrocarbons.
Inspect Shipment
Inspect the water heater for possible damage. Check the markings on the rating plate of the water heater to be certain the type of gas supplied corresponds to the water heater requirements. Verify all included parts are present (see below).

Pressure Relief Valve (Canada Shipments Only)

Gas Appliance Shut Off

Wood Screw × 4 pieces

Washer x2 pieces
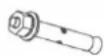
Exposive Screw x2 pieces
Jse & Car Manual
PLEA: 21 IS FOR OUTDOOR PERMANENT INSTALLATIONS ONLY AND SH21 IS FOR INDOOR PERMANENT INSTALLATIONS ONLY. THIS MANUAL AND ALL ECCOTEMP CONTENT IS SUBJECT TO CHANGE WITHOUT NOTICE. PLEASE VISIT SUPPORT.ECCOTEMP.COM FOR MORE INFORMATION.
Installing the SH22i Water Heater
Typical Installation (Some Items May Not Apply)
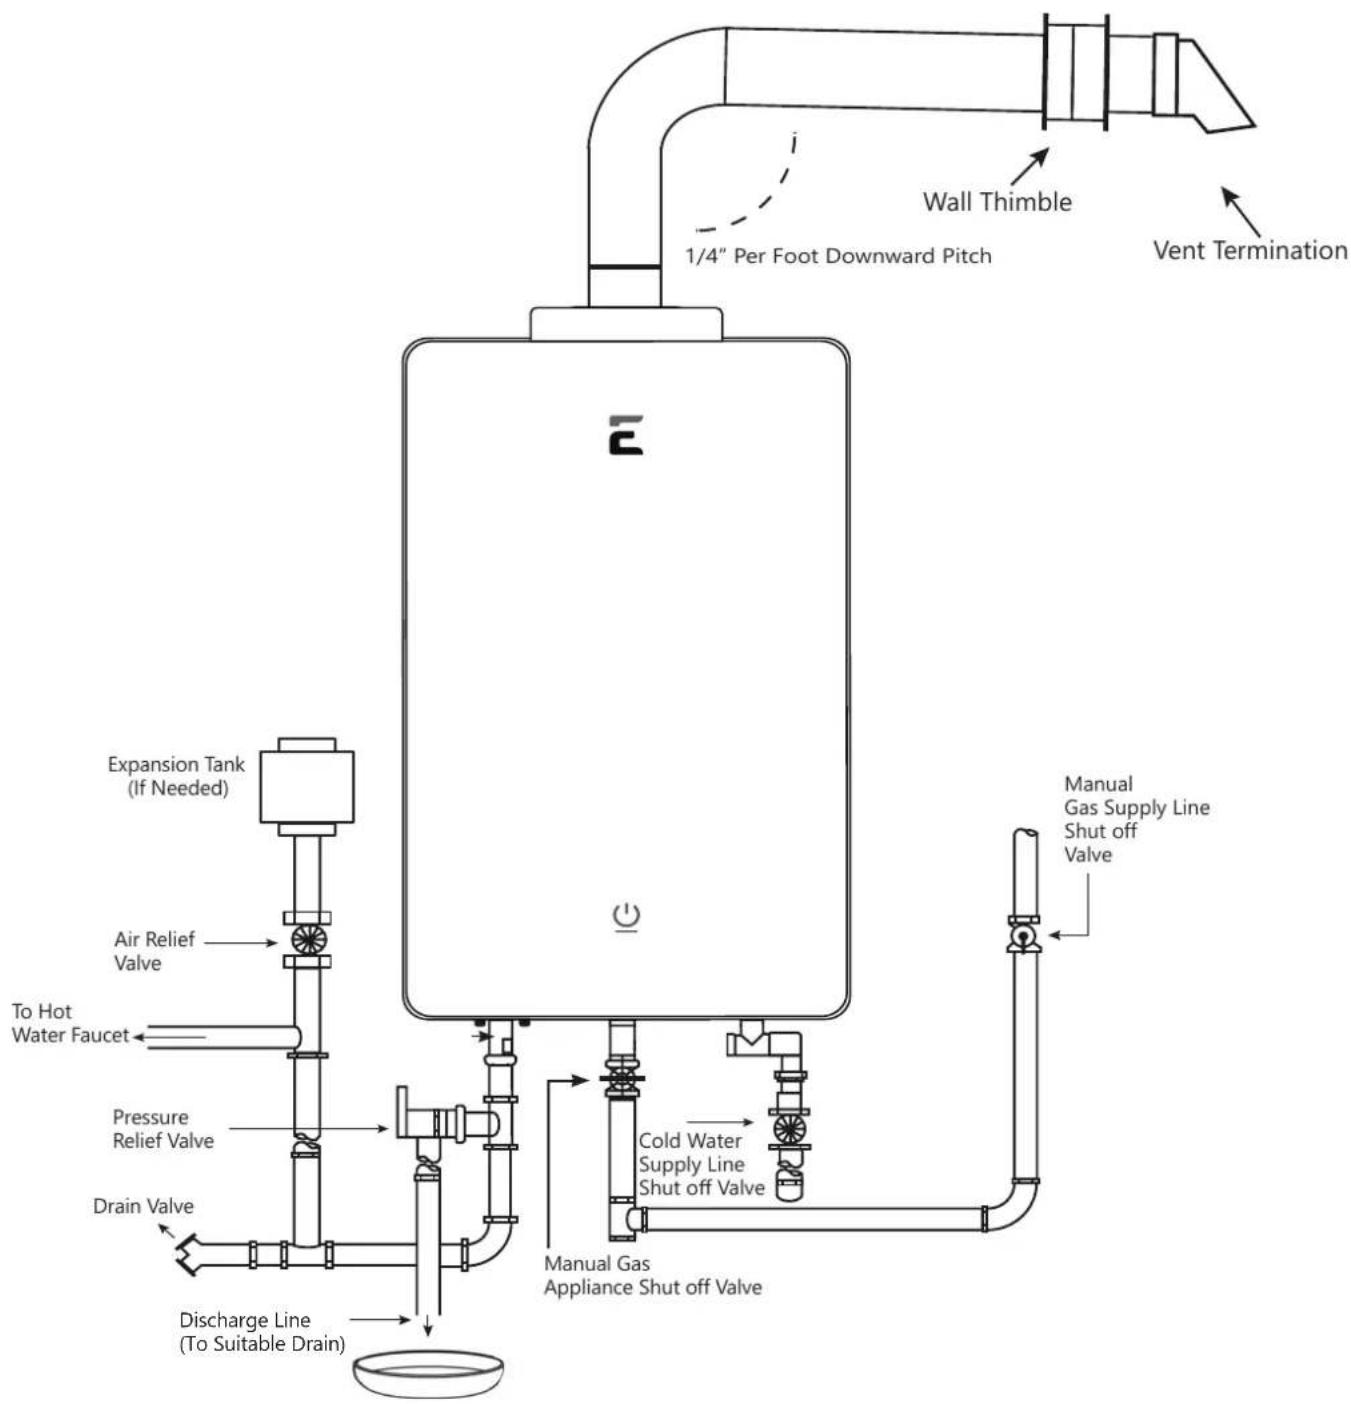
NOTICE: The National Fuel Gas Code (NFGC) mandates a manual gas shut-off valve: See (NFGC) for complete instructions. Local codes or plumbing authority requirements may vary from the instructions or diagrams provided and take precedent over these instructions.
PLEA: 21 IS FOR OUTDOOR PERMANENT INSTALLATIONS ONLY AND SH21 IS FOR INDOOR PERMANENT INSTALLATIONS ONLY. THIS MANUAL AND ALL ECCOTEMP CONTENT IS SUBJECT TO CHANGE WITHOUT NOTICE. PLEASE VISIT SUPPORT.ECCOTEMP.COM FOR MORE INFORMATION.
Water Supply Connections
Plumbing should be carried out by a qualified plumber in accordance with local codes. Use approved plumbing materials and tools only. Install a check valve between the water heater and the water shutoff valve. (See illustration below).
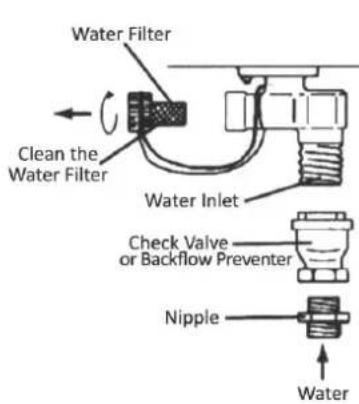
To conserve energy and to prevent freezing, insulate both cold and hot water supply lines. DO NOT cover the drain valves. Install a shutoff valve near the inlet of the water heater for service and draining purposes. Before connecting the water supply pipe to the water heater, open the shutoff valve and clean out sand, debris, air, caulking material, etc. inside the pipe. Connect to the water inlet, then check water flow. Close the shutoff valve and clean the water filter.
If a water heater is installed in a closed water supply system, such as one having a backflow preventer in the cold water supply line, means shall be provided to control thermal expansion. Contact the water supplier or local plumbing inspector on how to control this situation.
CAUTION: This water heater must only be used with the following water supply system conditions:
- With clean, potable water free of corrosive chemicals, sand, dirt, or other contaminates.
- With inlet water temperatures above 32^ , but not to exceed 90^ .
Free of lime and scale deposits.
DO NOT reverse the hot and cold water connections. The water heater will not operate.
To ensure proper operation of the water heater, the following water pressure guidelines should be followed:
Operation of the water heater requires the minimum water pressure of 14 psi and a minimum water flow rate of 0.75gpm
- Additional water pressure is required for long pipe runs and outlet fitting(s) water pressure drops.
- To maintain proper performance, ensure sufficient water supply pressure. The Required Water Pressure = Min. Operating Water Pressure (14 psi) + Pipe Pressure Loss + Faucet and Shower Pressure Loss + Safety Margin (more than 5 psi).
- To supply hot water to upper floors, additional water pressure (0.44 psi/ft) must be ensured. The measurement should be calculated by the distance between the water inlet of the water heater (ground level) to the hot water faucet (upper floor level).
Well water systems should be set at a range of 50-60 psi.
- When the water is supplied from a water supply tank, the height of the tank and the diameter of the pipes and their relation to water pressure, should be taken into consideration. Gravity water pressure is not recommended.
IMPORTANT: Do not apply heat to the HOT or COLD water connections. Any heat applied to the water supply fittings will permanently damage the internal components of the water heater.
A NOTICE: If the water flow resistance of a shower head is too high, the burner in the water heater will fail to ignite. Keep the shower head clean from debris that could cause additional pressure drop.
Notice: If using mixing valves on the outlet, choose one which prevents cold water pressure from overcoming hot water line pressure.
DO NOT use pipes with smaller diameters than the water supply connection of the water heater.
Be sure to connect the water inlet and the hot water outlet as shown on the water heater. If reversed, the water heater will not function.
Installation of unions or flexible copper connections are recommended on the HOT and COLD water lines, so that the water heater may disconnect easily for servicing if necessary.
PLEA: 21 IS FOR OUTDOOR PERMANENT INSTALLATIONS ONLY AND SH221 IS FOR INDOOR PERMANENT INSTALLATIONS ONLY. THIS MANUAL AND ALL ECCOTEMP CONTENT IS SUBJECT TO CHANGE WITHOUT NOTICE. PLEASE VISIT SUPPORT.ECCOTEMP.COM FOR MORE INFORMATION.
Water Supply Connections Continued...
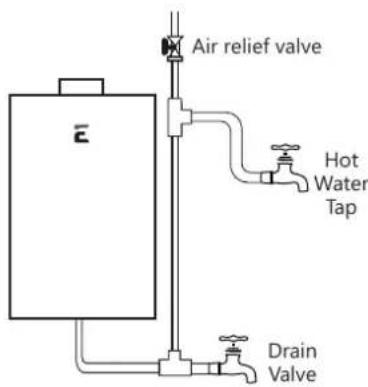
In regards to the HOT WATER OUTLET:
- Connections between the water heater and point(s) of use should be as short and direct as possible.
DO NOT use lead or non-approved plastic pipe. - To conserve energy and minimize heat loss, insulation of hot water piping is recommended.
A NOTICE: The flow rate of hot water may vary when more than two faucets (appliances, fixtures, etc.) are being used simultaneously.
A NOTICE: The pipes MUST be completely drainable. If the hot water faucets are located at a point higher than the water heater, place a drain valve at the lowest point (see diagram to the left).
Gas Supply
WARNING: Do not attempt to convert this water heater for use with a different type of gas other than the type shown on the rating plate. Such conversion could result in hazardous operating conditions. Please have a professional connect the gas pipe.
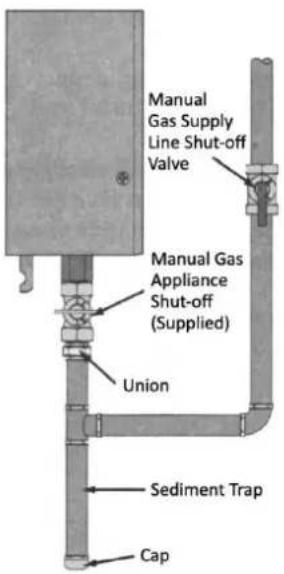
The supplied Manual Gas Appliance Shutoff Valve must be installed at the gas connection of the water heater at the time of installation (see diagram to the left).
The branch gas supply line to the water heater should be clean black steel pipe or other approved gas piping material. The minimum BTU requirement for flex and/or gas lines is 1^ of black steel, flex rated at 199K BTU. A ground joint union or ANSI design certified semi-rigid or flexible gas appliance connector should be installed in the gas line close to the water heater.
The National Fuel Gas Code (NFGC) mandates a manual gas shut off valve: See (NFGC) for complete instructions.
A sediment trap should be installed at the bottom of the gas line. The inlet gas pressure to the water heater must not exceed 10.5 in. w.c. for natural or 13.5 in. w.c. for LPG. For purposes of input adjustment, the minimum inlet gas pressure (with main burner on) is shown on the water heater rating plate. If high or low gas pressures are present, contact your gas supplier for correction
The water heater and its individual shutoff valve must be disconnected from the gas supply piping system during any pressure testing of that system at test pressures in excess of 1/2 psi (3.5kPa) . The water heater must be isolated from the gas supply piping system by closing its individual manual shutoff valve during any pressure testing of the gas supply piping system at test pressures equal to or less than 1/2 psi (3.5kPa) .
DO NOT use excessive force (over 31.5 ft lbs.) in tightening the pipe, particularly if pipe compound is used, as the unit may be damaged.
Compound used on the threaded joints of the gas piping must be of the type resistant to the action of LPG. Use compound sparingly and use on male threads only.
PLEA: 21 IS FOR OUTDOOR PERMANENT INSTALLATIONS ONLY AND SH21 IS FOR INDOOR PERMANENT INSTALLATIONS ONLY. THIS MANUAL AND ALL ECCOTEMP CONTENT IS SUBJECT TO CHANGE WITHOUT NOTICE. PLEASE VISIT SUPPORT.ECCOTEMP.COM FOR MORE INFORMATION.
Relief Valve
A new pressure relief valve, complying with the standard for relief valves and automatic gas shut off devices for hot water supply systems, ANSI Z21.22, must be installed at the hot water outlet connection of the water heater at the time of installation. Local codes shall govern the installation of relief valves.
For safe operation of the water heater, be sure that:
- The pressure rating of the relief valve must not exceed 150 psi, the maximum working pressure of the water heater as marked on the rating plate.
- The BTUH rating of the relief valve must equal or exceed the BTUH input of the water heater as marked on its rating plate.
- No valve of any type should be installed between the relief valve and the water heater.
- Discharge from the relief valve should be piped to a suitable drain to eliminate potential water damage. Piping used should be of a type approved for the distribution of hot water.
- Hot and cold water lines should be insulated up to the water heater.
- The discharge line must be NO SMALLER than the outlet of the valve and must pitch downward to allow complete drainage (by gravity) of the relief valve and discharge line.
- The end of the discharge line should not be threaded or concealed and should be protected from freezing. No valve of any type, restriction or reducer coupling should be installed in discharge line.
A NOTICE: The diagram below illustrates a pressure only relief valve. If local codes require a combination temperature and pressure relief valve be installed, an extension piece may be needed.
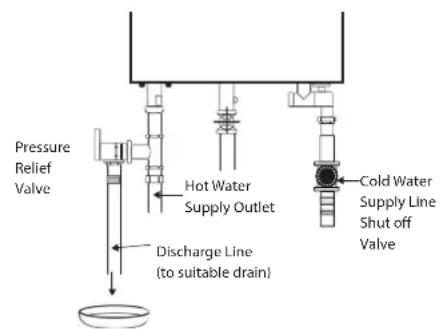
A NOTICE: Local codes govern the installation of relief valves. If local codes require that a temperature and pressure relief valve should be installed the manufacturer recommends a type 40XL Watts T&P relief valve or an equivalent model be used.
A NOTICE: Manual operation of relief valves should be performed at least once a year. Turn off the electrical power and gas shut off valve. Lift and release lever on the relief valve and check the manual operation of the relief valve. You should take precaution to avoid contact with the hot water coming out of the relief valve and to prevent water damage.
A NOTICE: If the relief valve on the system discharges periodically, this may be due to thermal expansion in a closed water supply system. Contact the water supplier or local plumbing inspector on how to correct this situation. Do not plug the relief valve.
Leak Testing
WARNING:
Never use an open flame to test for gas leaks, as property damage, personal injury, or death could result.
The water heater and its gas connections must be leak tested at normal operating pressures before it is placed in operation.
- Turn on the gas shut off valve(s) to the water heater.
- Use a commercial leak detector or soapy water solution to test for leaks at all connections and fittings. Bubbles indicate a gas leak that must be corrected.
All connections should also be leak tested after the water heater is placed in operation.
Pressure Testing the Gas Supply System
WARNING: Install a gas pressure regulator, in the gas supply line, which does not exceed the maximum supply pressure. DO NOT use an industrial type gas regulator.
The water heater must be isolated from the gas piping system by closing the manual gas shut off valve during any pressure testing of the gas supply piping at pressures equal to or less than 1/2 psi (14'w.c.).
High Altitude
Ratings of gas appliances are based on sea level operation and need not be changed for installations at elevations up to 2,000 feet. Unit not recommended for elevations in excess of 2,000 feet.
PLEA: 21 IS FOR OUTDOOR PERMANENT INSTALLATIONS ONLY AND SH21 IS FOR INDOOR PERMANENT INSTALLATIONS ONLY. THIS MANUAL AND ALL ECCOTEMP CONTENT IS SUBJECT TO CHANGE WITHOUT NOTICE. PLEASE VISIT SUPPORT.ECCOTEMP.COM FOR MORE INFORMATION.
Installing the SH22i Water Heater
DANGER: Failure to install the vent adapter and properly vent the water heater to the outdoors as outlined in the Venting section of this manual will result in unsafe operation of the water heater causing death, serious injury, explosion, or fire. To avoid the risk of fire, explosion, or asphyxiation from carbon monoxide, NEVER operate the water heater unless it is properly vented and has adequate air supply for proper operation as outlined in the Venting section of this manual.
WARNING: Use UL approved Category III Stainless Steel vent material only. No other vent material is permitted. Owner must refer to vent manufacturer's instructions and specifications. Z-Flex information can be found at www.novaflex.com.
WARNING: Refer to pages 19-21 for clearances to combustible material.
Venting
The installation of venting must comply with national codes, local codes, and the vent manufacturer's instructions. Owner must refer to vent manufacturer's instructions and specifications. Z-Flex information can be found at www.novaflex.com.
The water heater must be vented to the outdoors as described in these instructions. DO NOT connect this water heater to an existing Vent or Chimney, it must be vented separately from all other appliances.
All vent components (adapters, pipe, elbows, terminals, etc.) should be UL 1738 Certified Stainless Steel Venting Material (e.g. AL29-4C).
The specified vent termination must be used. The termination should be a 90^ elbow type with screen. (Refer to page 35).
Use a vent pipe with an antidisconnection structure.
The use of a High Temperature Silicone (500^) may be required to seal vent connections. To prevent accidental gas exhaust leakage, apply a 1 / 4'' wide bead approximately 1 / 4'' from the end and another bead against the joint side of the stop bead.
Follow vent manufacturer's installation instructions.
The unit can be vented either horizontally or vertically.
Vent pipe runs must be adequately supported along both horizontal and vertical runs.
The maximum recommended unsupported span should be no more than five (5) feet. Support isolation hanging bands should be used. DO NOT use wire. (See diagram below).
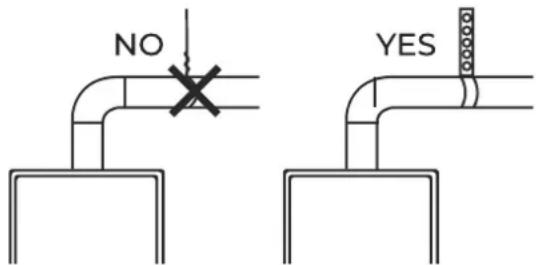
Venting Through Closed Spaces
If the vent piping passes through a closed space, wrap the vent pipe with inflammable insulation material that is at least 3/4'' thick. DO NOT let the insulation material make contact with flammable materials. A minimum clearance of 6'' between the vent pipe and ceiling should be maintained. Follow local codes.
For maintenance and inspection purposes, the following holes are required to be made:
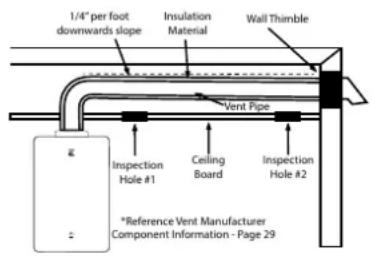
- Two (2) inspection openings that allow access to venting. One (1) of these openings should be close to where the vent pipe enters the ceiling. The other opening should be near the vent termination.
- A ventilation hole with a 16 sq. in. opening should be made at least every 10 feet.
NOTICE: Vent pipes must be completely insulated with inflammable material when installed in alcoves, closets, and garages and must not touch any flammable material.
PLEA: 21 IS FOR OUTDOOR PERMANENT INSTALLATIONS ONLY AND SH21 IS FOR INDOOR PERMANENT INSTALLATIONS ONLY. THIS MANUAL AND ALL ECCOTEMP CONTENT IS SUBJECT TO CHANGE WITHOUT NOTICE. PLEASE VISIT SUPPORT.ECCOTEMP.COM FOR MORE INFORMATION.
Installing the SH22i Water Heater, Continued...
Venting Lengths
MAXIMUM VENT LENGTH
Owner must refer to vent manufacturer's instructions and specifications. Z-Flex information can be found at www.novaflex.com.
One (1) 90^ Elbow is Equivalent to 5 Feet of Straight Pipe
| Number of 90° elbows (bends) | Maximum Length of Straight Pipe |
| 1 | 32' |
| 2 | 27' |
| 3 | 22' |
The system will not operate if there is excessive restriction (pressure drop) in the venting system. A maximum of 32 feet of vent pipe may be used provided there is only one 90^ elbow in the system. If additional elbows are required: two elbows can be used with 27 feet, and three elbows can be used with 22 feet of vent pipe.
A 90^ elbow is equivalent to 5 feet of straight pipe. A 45^ elbow is equivalent to 2 feet 6 inches of straight pipe.
The termination elbow does not count as an elbow when determining total vent lengths.
The vent must be installed with a slight downward slope of 1/4'' per foot of horizontal run toward the vent terminal (see diagram below). This ensures that any condensate formed during operation of the unit is evacuated from the water heater.
A 1/4'' per foot upward slope is acceptable when it is not possible to vent with a downward slope, however, a UL approved Category III Stainless Steel condensate trap MUST be installed at the beginning of the horizontal run (See page 22 "Typical Horizontal Termination w/ 1/4'' per foot UPWARD Slope" or page 16, "Standard Vertical Vent Termination" for examples).
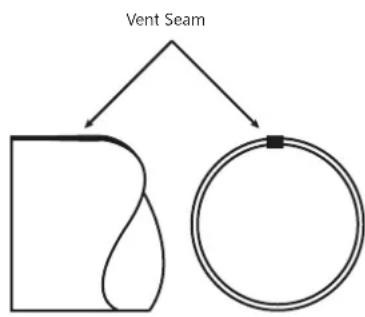
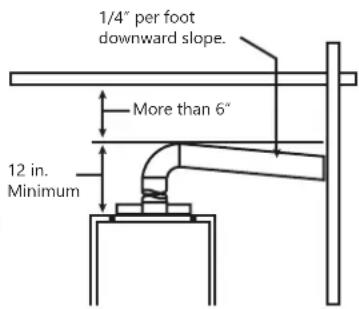
MINIMUM VENT LENGTH
The venting may be as short as 12^ provided one vent termination is installed to the outdoors through a sidewall, one 90^ elbow is included in the installation, and the wall thimble is installed.
NOTICE: Make sure that the seam of the vent pipe in horizontal runs is toward the top of the installation (see illustration to the left).
PLEA: 21 IS FOR OUTDOOR PERMANENT INSTALLATIONS ONLY AND SH21 IS FOR INDOOR PERMANENT INSTALLATIONS ONLY. THIS MANUAL AND ALL ECCOTEMP CONTENT IS SUBJECT TO CHANGE WITHOUT NOTICE. PLEASE VISIT SUPPORT.ECCOTEMP.COM FOR MORE INFORMATION.
Installing the SH22i Water Heater, Continued...
Special Notes, Regulations, and Cautions Regarding Venting
For Category II, III and IV water heaters, the venting system shall be installed in accordance with the water heater manufacturer's instructions and, if applicable, the venting system manufacturer's instructions. The SH22i is a Category III water heater. Please find detailed instructions for installation of the SH22i and venting on pages 26-32.
The instructions for the installation of the venting system shall specify that the horizontal portions of the venting system shall be supported to prevent sagging; the methods of and intervals for support shall be specified. These instructions shall also specify that the venting system:
ii) for Category III and IV appliances, slope of a horizontal venting system shall be as specified in the appliance manufacturer's instructions; These instructions can be found on page 26-32.
If an appliance is marked, "Category III", the installation manuals shall specify the venting system to be used on page 26-32.
When an existing Category III appliance is removed or replaced, the original venting system may no longer be sized to properly vent the attached appliances. Instructions shall also indicate effects of an improperly sized venting system (formation of condensate, leakage, spillage, etc.) All approved Installation Instructions for the SH22i can be found on pages 19-22.
Be sure to periodically clean the screens in the vent terminal where applicable.
Before you begin installation, ensure that you have a vent port available that will terminate at least 12 inches above the ground and at least 12 inches above normal amounts of snow. Please ensure that the vent termination point is clear of debris, blockages, and snow before using the SH22i.SH
Installing the SH22i Water Heater, Continued...
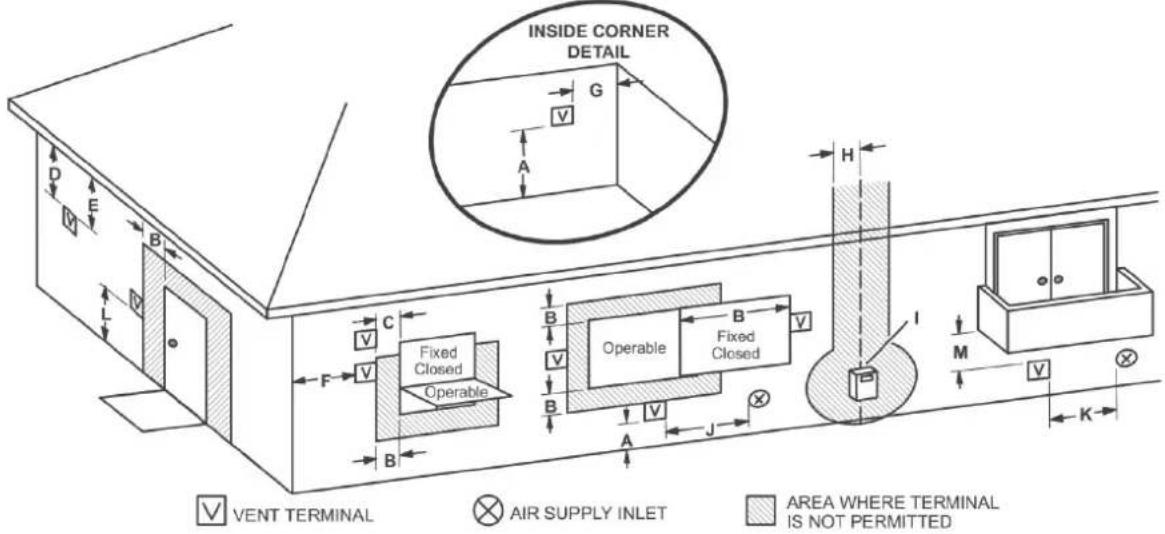
VENT TERMINATION CLEARANCES
FOR NON-DIRECT VENT INSTALLATIONS IN THE US AND CANADA
| US Installations1 Canadian I | Installations2 | ||
| A = C | Clechararecabeauvegrade,veranda, porch, deck,or balcony | 12 in (30 cm) 12 in (30 cm) | |
| B = D | Clechararectotowithouw ordoor that may be opened | 4 ft (1.2 m) below or toside of opening; 1 ft (300mm) above opening | 6 in (15 cm) forappliances ≤ 10,000 BTUH(3 kW), 12 in (30 cm) forappliances > 10,000 BTUH(3 kW) and ≤ 100,000BTUH (30 kW), 36 in(91 cm) for appliance >100,000 BTUH (30 kW) |
| C = E | Clechararectotepperammenthlyclosed window | * | |
| D = F | Vehiitadlehararectotoventilated soffit locatedabove the terminalwithin a horizontaldistance of 2 feet (61 cm)from the center line ofthe terminal | * | |
| E = G | Clechararectortowwithtilatedsoffit | * |
PLEA: 21 IS FOR OUTDOOR PERMANENT INSTALLATIONS ONLY AND SH22I IS FOR INDOOR PERMANENT INSTALLATIONS ONLY. THIS MANUAL AND ALL ECCOTEMP CONTENT IS SUBJECT TO CHANGE WITHOUT NOTICE. PLEASE VISIT SUPPORT.ECCOTEMP.COM FOR MORE INFORMATION.
| F = C | Cleshaene tunsitbide corner | * | |
| G = C | Cleshaene cctotionside corner | * | |
| H = C | Cleshaene cctoteazchidize of center line extended above meter/regulator assembly | * 3 ft (91 cm) within | 3 ft (91 cm) within a height 15 ft above the meter/regulator assembly |
| I = C | Cleshaanse terservice regulator vent outlet | * 3 ft (91 cm) | 3 ft (91 cm) |
| J = C | Cleshaanse to nonmechanical air supply inlet to building or the combustion air inlet to any other appliance | 4 ft (1.2 m) below or to side of opening; 1 ft (300 mm) above opening | 6 in (15 cm) for appliances ≤ 10,000 BTUH (3 kW), 12 in (30 cm) for appliances > 10,000 BTUH (3kW) and ≤ 100,000 BTUH (30 kW), 36 in (91 cm) for appliances > 100,000 BTUH (30 kW) |
| K = C | Cleshaanse to a mechanical air supply inlet | 3 ft (91 cm) above if within 10 ft (3 m) horizontally | 6 feet (1.83 m) |
| L = C | Cleshaanse beapaded sidewalk or paved driveway located on public property | * 7 ft (2.13 m) | 7 ft (2.13 m) |
| M = | Cleshaanse endeveranadala, porch, deck or balcony | * 12 in (30) | 12 in (30) |
- For clearances not specified in ANSI Z223.1 / NFPA 54 or CSA-B149.1, one of the following shall be indicated:
A) A minimum clearance value determined by testing in accordance with Clause 5.20, or;
B) A reference to the following footnote:
"Clearance in accordance with local installation codes and the requirements of the gas supplier."
- A vent shall not terminate directly above a sidewalk or paved driveway that is located between two single family dwellings and serves both dwellings.
- Permitted only if veranda, porch, deck, or balcony is fully open on a minimum of two sides beneath the floor.
Notes:
1) In accordance with the current CSA B149.1 Natural Gas and Propane Installation Code
2) In accordance with the current ANSI Z223.1 / NFPA 54 National Fuel Gas Code
PLEA: 21 IS FOR OUTDOOR PERMANENT INSTALLATIONS ONLY AND SH21 IS FOR INDOOR PERMANENT INSTALLATIONS ONLY. THIS MANUAL AND ALL ECCOTEMP CONTENT IS SUBJECT TO CHANGE WITHOUT NOTICE. PLEASE VISIT SUPPORT.ECCOTEMP.COM FOR MORE INFORMATION.
Ventilation Parts
Owner must refer to vent manufacturer's instructions and specifications by visiting www.novaflex.com. Installation guidelines for venting is provided by NovaFlex, who is solely responsible for venting installation accuracy.
Z-Flex parts are available for purchase by visiting www.eccotemp.com.
Z-Flex Installation Instructions: www.novaflex.com/information_centre/zflex/032-Vent%20Residential/Z-Vent%20Installation%2Guide% 20CURRENT.pdf
Z-Flex Ventilation Parts: https://www.eccotemp.com/installation
| Part # Description | |
| 2SVSTEX0490 90 Termination | E80Termination Elbow |
| 2SVSTB04 Termination Box | |
| 2VSHTX04 Termination Hood |
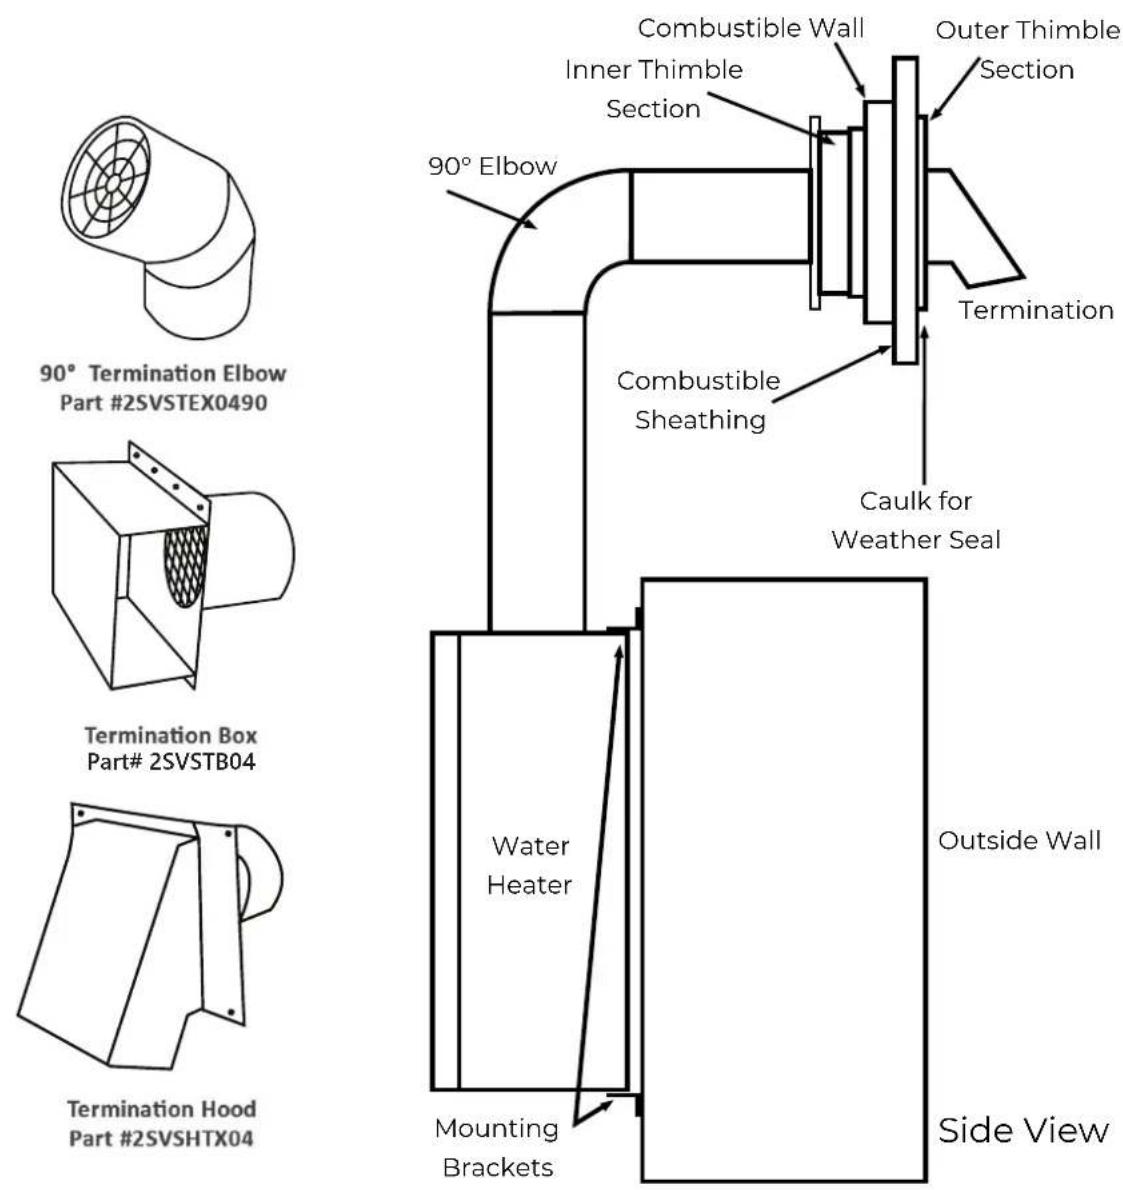
PLEA: 21 IS FOR OUTDOOR PERMANENT INSTALLATIONS ONLY AND SH22I IS FOR INDOOR PERMANENT INSTALLATIONS ONLY. THIS MANUAL AND ALL ECCOTEMP CONTENT IS SUBJECT TO CHANGE WITHOUT NOTICE. PLEASE VISIT SUPPORT.ECCOTEMP.COM FOR MORE INFORMATION.
Installing the SH22i Water Heater, Continued...
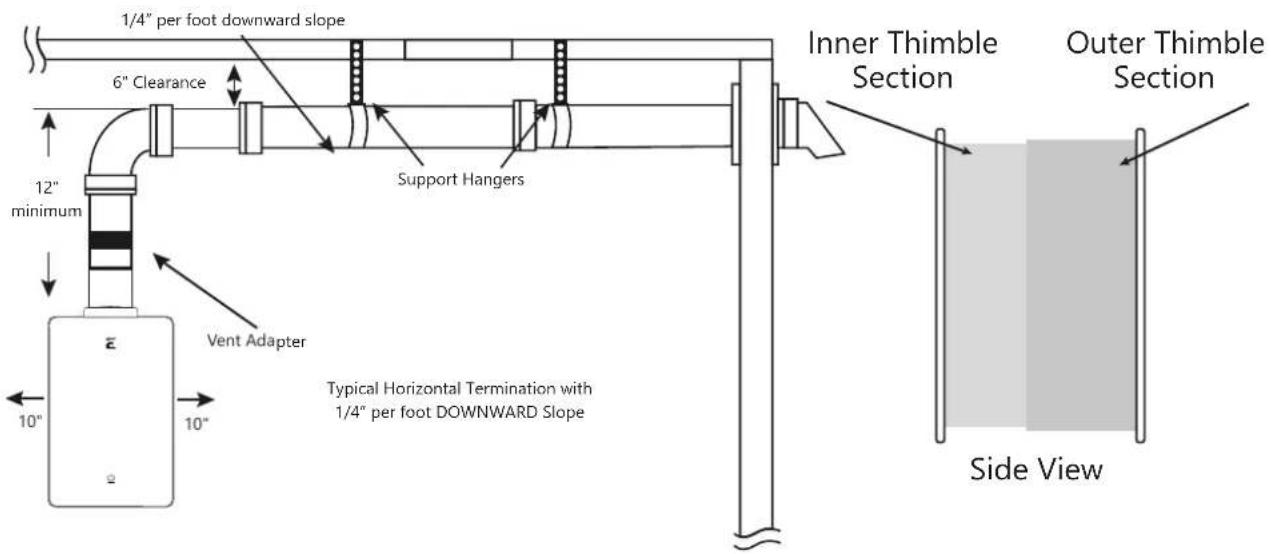
WARNING: Use UL approved Category III vent material only. No other vent material is permitted. Owner must refer to vent manufacturer's instructions and specifications. Z-Flex information can be found at www.novaflex.com.
CAUTION: Follow the vent manufacturers installation instructions as design might vary from manufacturer to manufacturer.
Components for Low Temperature Operation
In Canada, all components and/or controls affecting the safety of the appliance shall be individually certified for the lower ambient operating temperature of the outdoor appliance, or enclosed in a supplementary heated compartment.
All operating components and or controls not affecting the safety of the appliance will be reviewed for their acceptance in the particular application, bearing in mind their certified temperature limitations and the affect that any malfunction may produce.
The heated compartment shall not rely solely on recirculating air for supplementary heat. It is not advised to operate the water heater if the ambient temperature is at or below 32^ / 0^ to prevent damage to the water heater, to property, or to people.
PLEA: 12 IS FOR OUTDOOR PERMANENT INSTALLATIONS ONLY AND SH22I IS FOR INDOOR PERMANENT INSTALLATIONS ONLY. THIS MANUAL AND ALL ECCOTEMP CONTENT IS SUBJECT TO CHANGE WITHOUT NOTICE. PLEASE VISIT SUPPORT.ECCOTEMP.COM FOR MORE INFORMATION.
WARNING: Field wiring connections and electrical grounding must comply with local codes, or in the absence of local codes, with the latest edition of the National Electrical Code, ANSI/NFPA 70, or in Canada, Canadian Electrical Code, CSA C22.1Part1.
ELECTRICAL CONNECTION POWER CORD:
The electric power supply requirement for this water heater is 120 VAC/60HZ, 2 Amps.
- The water heater comes with a three (3) pin power supply cord. Use only a power outlet with a ground terminal.
- The installation of an electric leakage breaker is recommended. (GFCI)
- Keep any excess of the power supply cord on the outside of the water heater.
- If local codes require hardwiring, see instructions for "Hardwiring the Electrical Connections".
WARNING: Shock hazard line voltage is present. Before servicing the water heater, turn off the electrical power to the water heater at the main disconnect or circuit breaker. Failure to do so could result in severe personal injury or death.
HARDWIRING THE ELECTRICAL CONNECTIONS:
- Wiring should be carried out by a qualified electrician in accordance with local codes.
- The water heater requires 120 VAC/60Hz and should be properly grounded.
- DO NOT connect grounding wire to water pipes, gas pipes, telephone cables, lightning conductor circuits and to grounding circuit of other equipment that carry a ground-fault interrupter.
- An ON/OFF switch must be provided and installed for the incoming 120VAC power.
- Wire the water heater exactly as shown below. A wiring diagram is also found inside of the cover panel.
- A green screw is provided in the junction box for grounding connection.
- Connect the live wire to black leg wire and the neutral wire to the white neutral wire.
CAUTION: Label all wires prior to disconnection when servicing controls. Wiring errors can cause improper and dangerous operation. Verify correct operation after servicing.
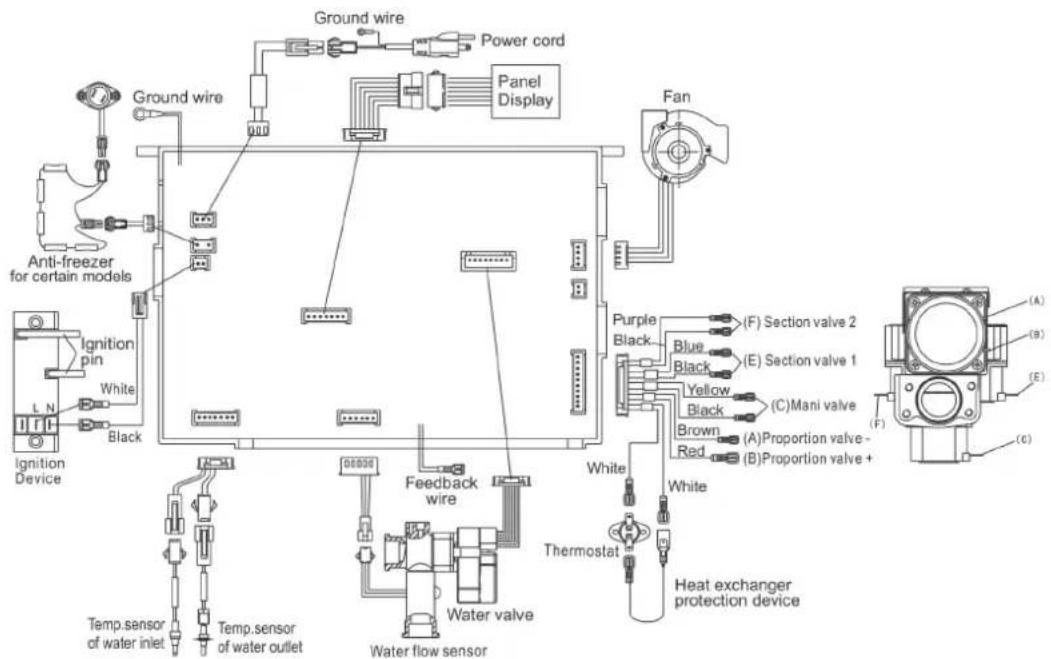
Electric Wiring Diagram
PLEA: 21 IS FOR OUTDOOR PERMANENT INSTALLATIONS ONLY AND SH221 IS FOR INDOOR PERMANENT INSTALLATIONS ONLY. THIS MANUAL AND ALL ECCOTEMP CONTENT IS SUBJECT TO CHANGE WITHOUT NOTICE. PLEASE VISIT SUPPORT.ECCOTEMP.COM FOR MORE INFORMATION.
Insulation Blankets
WARNING: If local codes require external application of insulation blanket kits the manufacturer's instructions included with the kit must be carefully followed.
Insulation blankets, available to the general public, for external use on gas water heaters are not necessary. The purpose of an insulation blanket is to reduce the standby heat loss encountered with storage tank heaters. This water heater does not store water making an insulation blanket unnecessary.
The manufacturer's warranty does not cover any damage or defect caused by installation, attachment or use of any type of energy saving
or other unapproved devices (other than those authorized by the manufacturer) into, onto or in conjunction with the water heater.
The use of unauthorized energy saving devices may shorten the life of the water heater and may endanger life and property.
The manufacturer disclaims any responsibility for such loss or injury resulting from the use of such unauthorized devices.
Pipe Installation
Inlet Pipe and Outlet Pipe Installation
Use pressure resistant pipe to connect the inlet and outlet water pipes of the water heater and the local water pipe (Make sure to place the rubber ring). Before connecting the inlet water pipe, flush the inside of the pipe.
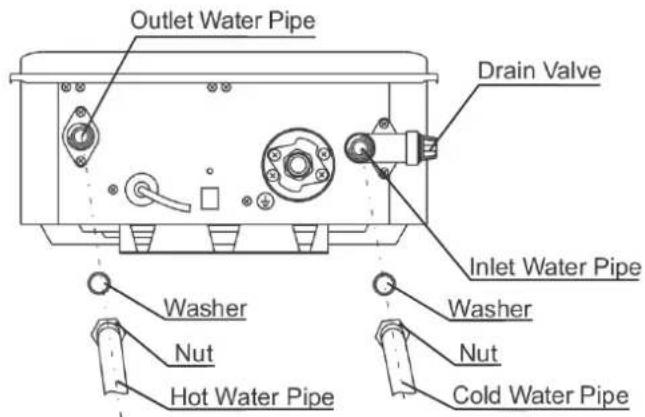
Hot and Cold Pipe Insulation Installation
For increased energy efficiency, use pipe insulation. Please install the insulation, according to the illustrations above, making sure to insulate all the way to the top. Do not cover any drain or pressure valve(s).
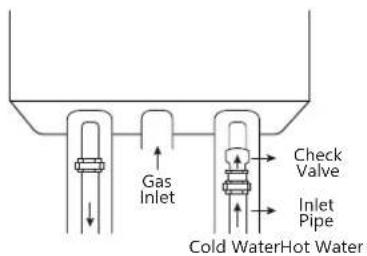
A NOTICE: The hot and cold pipes should be insulated as shown help to provide additional freeze protection
PLEA: 21 IS FOR OUTDOOR PERMANENT INSTALLATIONS ONLY AND SH21 IS FOR INDOOR PERMANENT INSTALLATIONS ONLY. THIS MANUAL AND ALL ECCOTEMP CONTENT IS SUBJECT TO CHANGE WITHOUT NOTICE. PLEASE VISIT SUPPORT.ECCOTEMP.COM FOR MORE INFORMATION.
Mounting the SH22i Water Heater
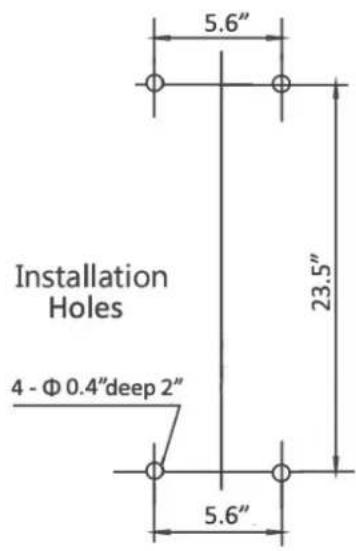
Make sure the location of the water heater allows for easy access and operation.
In case of dry wall or concrete wall use dry wall anchors or lag bolts.
The water heater requires 120VAC/60Hz. Have a receptacle with ground terminal near the water heater. The length of the power supply cord is 5 feet.
Drill the holes as per the sizes in the figure to the left, put 2 expansion screws into the top holes, and 2 rubber screws into the bottom holes.
Hang up the water heater unit, tighten the expansion screws, and put 2 wood thread screws into the bottom holes.
CAUTION: Reinforcement of the wall is required in case the wall is not strong enough to hold the water heater.
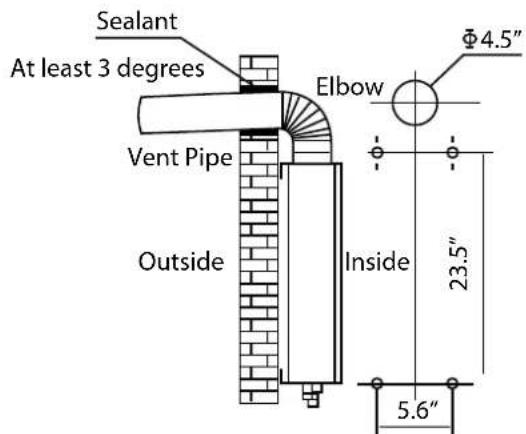
Back Installation
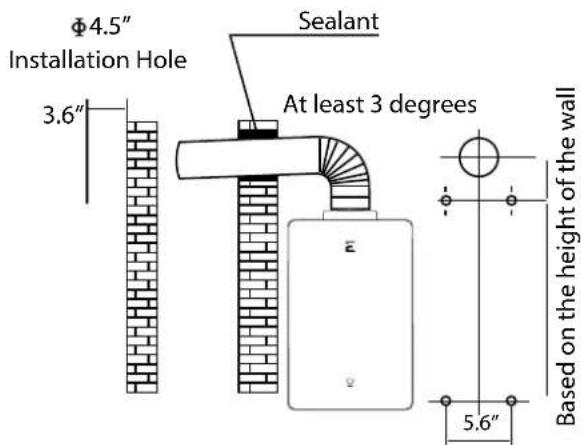
*Reference Vent Manufacturer Component Information - Page 29
Indoor unit must be installed with CAT 3 vent pipe in accordance with vent supplier/ manufacturer in accordance with local code.
Owner must refer to vent manufacturer's instructions and specifications. Z-Flex information can be found at www.novaflex.com.
A. BACK INSTALLATION
- Insert the vent pipe through the installation holes in the wall with the terminal sticking out.
- Connect the elbow to the vent pipe and water heater, moving straight backwards until the expansion screws go into the holes of the water heater. Screw the nuts tight (pay attention to the direction of the elbow).
B. SIDE INSTALLATION:
- Aim the holes in the water heater onto the expansion screws, hang it up and screw the nuts tightly.
- Put the vent pipe through the holes in the wall, and connect the elbow with the water heater and vent pipe.
C. VERTICAL INSTALLATION
Please refer to local installation professional or venting manufacturer:
The installation hole in the wall needs to be sealed by fire-retardant material or wall thimble, making sure the water heater is tight and will not come off.
PLEA: 21 IS FOR OUTDOOR PERMANENT INSTALLATIONS ONLY AND SH21 IS FOR INDOOR PERMANENT INSTALLATIONS ONLY. THIS MANUAL AND ALL ECCOTEMP CONTENT IS SUBJECT TO CHANGE WITHOUT NOTICE. PLEASE VISIT SUPPORT.ECCOTEMP.COM FOR MORE INFORMATION.
Installing the SH22i Water Heater
Installation Check List
A. Water Heater Location
- Installed indoors
- Close to area of mostly used outlet
- Protected from freezing temperatures
- Proper clearance from combustible surfaces observed
- Sufficient fresh air supply for proper operation of water heater
Air supply free of corrosive elements and flammable vapors - Provisions made to protect area from water damage
- Sufficient room to service heater
- Combustible materials, such as clothing, cleaning materials, rags, etc. clear of the heater and vent piping
Water heater is properly attached to the wall
B. Water Supply
Water supply has sufficient pressure
Air purged from water heater and piping
Water connections tight and free of leaks
Water filter is clean and in place
- Materials used are as instructed in this manual.
Water pipes are insulated
C. Gas Supply
Gas type matches rating plate
Gas supply pressure is sufficient for the water heater
Gas line equipped with shut off valve, union and sediment trap
Approved pipe joint compound used
- Commercial leak detector or soap and water solution used to check all connections and fittings for possible gas leak
Gas company inspected installation (if required)
D. Relief Valve
- Pressure relief valve properly installed and discharge line run to open drain
- Discharge line protected from freezing
E. Electrical Wiring
- Voltage matches rating plate
Water heater is properly grounded - Wiring meets all local codes
- GFCI protection where required
PLEA: 21 IS FOR OUTDOOR PERMANENT INSTALLATIONS ONLY AND SH21 IS FOR INDOOR PERMANENT INSTALLATIONS ONLY. THIS MANUAL AND ALL ECCOTEMP CONTENT IS SUBJECT TO CHANGE WITHOUT NOTICE. PLEASE VISIT SUPPORT.ECCOTEMP.COM FOR MORE INFORMATION.
Operating the Water Heater
Use the Smart Power Button to power on and off your tankless water heater, and to quickly check the status of your water heater. If there is an error it will also indicate what kind. Learn more on page 48.
Use the included wireless remote to adjust water temperature from anywhere in your home. Learn more about the remote on page 40.
The Eccotemp Smart App gives you complete control over temperature, on/off settings, timers, statistics and more. See pages 41 & 42 for more information.
Turning on the Water Heater
- Make sure the gas type you will use is same as the type on the data plate.
- Turn on the main gas valve, plug in the power cord (be sure the socket is well grounded), and press the Smart Button on the bottom center of the front cover. Set temperature to 120^ F.
- Turn on the faucet, and the fan will begin working. You will hear the ignition sound after a few seconds. The burner will ignite, and hot water will come out. If the burner is not ignited successfully, the ignition sound will last a few seconds. If the burner still fails to ignite, turn off the faucet and wait for 10-20 seconds, and repeat the above procedures.
For first use and/or if the water heater has not been used for a considerable period of time, the repeat of the above procedures may be required, due to accumulated air inside the gas pipe.
Safety Precautions
If there is any difficulty in understanding or following the Operating Instructions or the Care and Cleaning section, it is recommended that a qualified person or serviceman perform the work.
- Turn off manual gas shut off valve if water heater has been subjected to over heating, fire, flood, physical damage or if the gas supply fails to shut off.
DO NOT turn on water heater unless water and gas supplies are fully opened. - DO NOT turn on water heater if cold water supply shut off valve is closed.
-
DO NOT allow combustible materials such as newspaper, rags or mops to accumulate near water heater.
-
DO NOT store or use gasoline or other flammable vapors and liquids, such as adhesives or paint thinner, in vicinity of this or any other appliance. If such flammables must be used, open doors and windows for ventilation, and all gas burning appliances in the vicinity should be shut off including their pilot lights, to avoid vapors lighting.
NOTICE: Flammable vapors can be drawn by air currents from surrounding areas to the water heater
PLEA: 21 IS FOR OUTDOOR PERMANENT INSTALLATIONS ONLY AND SH21 IS FOR INDOOR PERMANENT INSTALLATIONS ONLY. THIS MANUAL AND ALL ECCOTEMP CONTENT IS SUBJECT TO CHANGE WITHOUT NOTICE. PLEASE VISIT SUPPORT.ECCOTEMP.COM FOR MORE INFORMATION.
FOR YOUR SAFETY BEFORE USING THE WATER HEATER
WARNING: If you do not follow these instructions exactly, a fire or explosion may result causing property damage, personal injury or loss of life.
A. This water heater does not have a pilot. It is equipped with an ignition device which automatically lights the burner. Do not try to light the burner by hand.
B. BEFORE OPERATING smell all around the water heater area for gas. Be sure to smell next to the floor because some gas is heavier than air and will settle on the floor. Test all connections with a commercial leak detector or soapy water.
WHAT TO DO IF YOU SMELL GAS
- DO NOT try to light any appliance. DO NOT touch any electric switch; DO NOT use any phone in your building. Immediately call your gas supplier from a neighbor's phone. Follow the gas supplier's instructions. If you cannot reach your gas supplier or fire department. DO NOT return to your home until authorized by the gas supplier or fire department.
C. Use only your hand to push in or turn the gas control knob. Never use tools. If the knob will not push in or turn by hand, don't try to repair it, call a qualified service technician. Force or attempted repair may result in a fire or explosion.
D. DO NOT use this water heater if any part has been under water. Immediately call a qualified service technician to inspect the water heater and to replace any part of the control system and any gas control which has been under water.
OPERATING INSTRUCTIONS
- STOP! Read the safety information above on this label.
- Turn off all electric power to the water heater.
- Set the thermostat to lowest setting.
- DO NOT attempt to light the burner by hand.
- Turn the Gas shut off Valve located on the outside of the unit clockwise to the "OFF" position.
- Wait five (5) minutes to clear out any gas. If you smell gas, STOP! Follow "B" in the safety information above on this label. If you don't smell gas, go to the next step.
- Turn the gas shut off valve located on outside of the unit counterclockwise to the "ON" position.
- Turn on all electric power to the water heater.
- Set thermostat to desired setting.
- If the water heater will not operate, follow the instructions "To Turn Off Gas To Water Heater" and call your service technician or gas supplier.
TO TURN OFF GAS TO WATER HEATER
- Turn off all electric power to the water heater if service is to be performed.
- Turn the gas shut off valve located on the outside of the unit clockwise to the "OFF" position.
PLEA: 21 IS FOR OUTDOOR PERMANENT INSTALLATIONS ONLY AND SH21 IS FOR INDOOR PERMANENT INSTALLATIONS ONLY. THIS MANUAL AND ALL ECCOTEMP CONTENT IS SUBJECT TO CHANGE WITHOUT NOTICE. PLEASE VISIT SUPPORT.ECCOTEMP.COM FOR MORE INFORMATION.
Water Temperature Setting
DANGER: There is a hot water scald potential if the temperature is set too high. Households with small children, disabled, or elderly persons may require a 120^ or lower temperature setting to prevent contact with HOT water.
Time/temperature relationship for burns
| Water Temperature | Time To Produce a Serious Burn |
| 120°F | More than 5 minutes |
| 125°F | 1 1/2to 2 minutes |
| 130°F | About 30 seconds |
| 135°F | About 10 seconds |
| 140°F | Less than 5 seconds |
| 145°F | Less than 3 seconds |
| 150°F | About 1 1/2 seconds |
| 155°F | About 1 second |
Table courtesy of Shriners Burn Institute
Output temperature of water is regulated by setting the temperature on app or with the remote control.
Safety factors should be considered when selecting the water temperature setting of the water heater's remote control. The remote control was set at 110^ before the water heater was shipped from the factory. This is the recommended starting point.
Water temperatures above 120^ can cause severe burns or death from scalding. The thermostat is adjusted to its lowest temperature position when shipped from the factory.
Be sure to read and follow the warnings outlined in this manual and on the label located on the water heater.
Mixing valves are available for reducing point of use water temperature by mixing hot and cold water in branch water lines.
Procedures for adjusting the thermostat for energy efficient operation at the minimum water temperature setting consistent with the consumer's needs.
Contact a licensed plumber or the local plumbing authority for further information. See page 6 for details.
SH22 / SH22i Remote
Control your Eccotemp SMARTHOME water heater using the included remote.
The SMARTHOME remote has an easy to use control panel that allows you to control functions such as ON/OFF, temperature settings and connection modes. The remote control is compatible with your SH22 / SH22i SMARTHOME water heater and gives you the ability to change settings from a distance.
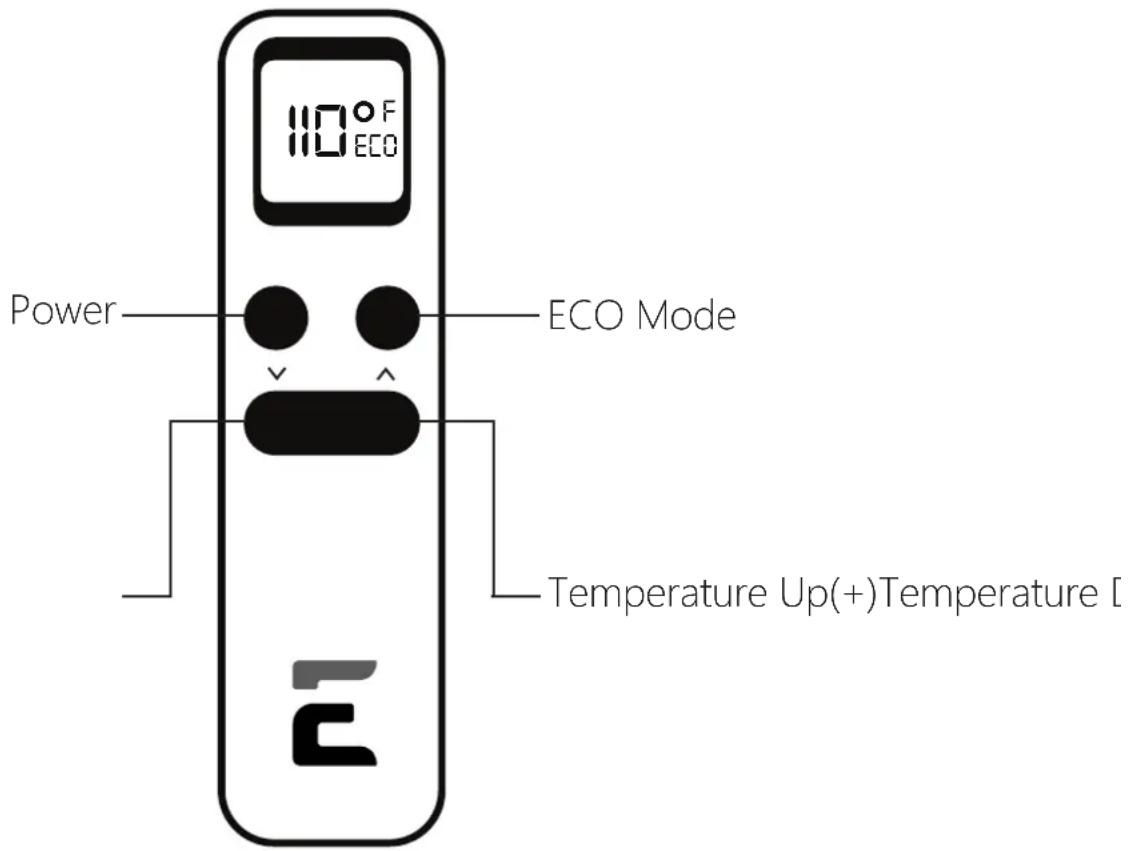
PLEA: 21 IS FOR OUTDOOR PERMANENT INSTALLATIONS ONLY AND SH21 IS FOR INDOOR PERMANENT INSTALLATIONS ONLY. THIS MANUAL AND ALL ECCOTEMP CONTENT IS SUBJECT TO CHANGE WITHOUT NOTICE. PLEASE VISIT SUPPORT.ECCOTEMP.COM FOR MORE INFORMATION.
Eccotemp SMARTHOME Mobile App
Connect your Eccotemp SMARTHOME Water Heater to your Smart Devices
The Eccotemp SMARTHOME water heater app lets you adjust temperature, turn Eccotemp water heaters ON/OFF, set timers and schedules, and view usage statistics. You can also connect SMARTHOME water heater to technology such as Amazon Alexa and Google Assistant to use voice commands.
Once connected with Google Assistant and Amazon Alexa you will be able to use voice commands to adjust your SMARTHOME water heater. A broad range of commands can be used to control water temperature, check heater status, and to set schedules and timers. Let our Eccotemp SMARTHOME app tell you exactly how much money you save heating water.

ECO Mode
This mode allows for up to 33% less gas usage when using the device.
Temperature
The temperature of the SMARTHOME water heater can be remotely changed from the Eccotemp app.

Instant Statistics
Observe water and electricity usage easily by checking the statistics page. Here you can see how much it costs to use your SMARTHOME water heater, and how much you are saving.


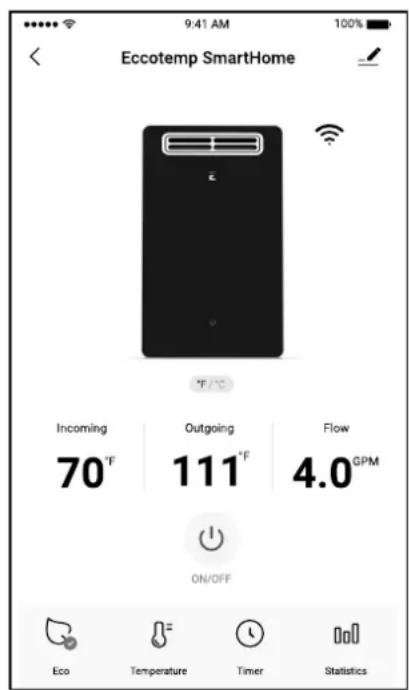
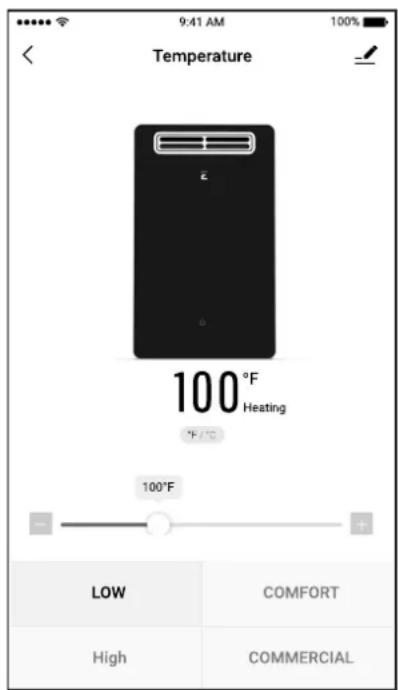
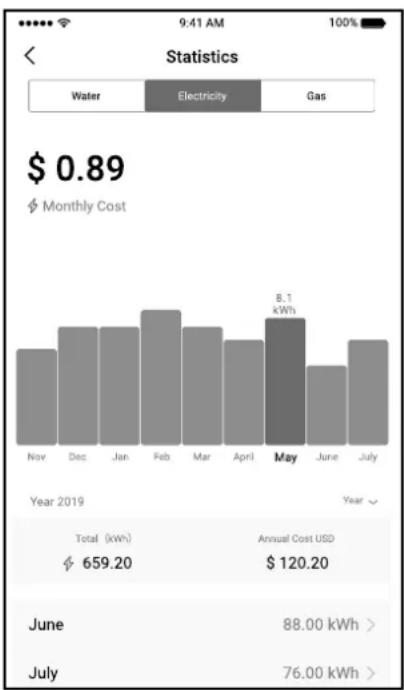
PLEA: 21 IS FOR OUTDOOR PERMANENT INSTALLATIONS ONLY AND SH221 IS FOR INDOOR PERMANENT INSTALLATIONS ONLY. THIS MANUAL AND ALL ECCOTEMP CONTENT IS SUBJECT TO CHANGE WITHOUT NOTICE. PLEASE VISIT SUPPORT.ECCOTEMP.COM FOR MORE INFORMATION.
Eccotemp SMARTHOME Mobile App Continued...

Timer
The timer can be used to allow hot water for set time periods, each time your SMARTHOME water heater is turned ON/OFF. With the scheduler, you are also able to set schedules for specific days and times to allow hot water usage.

Scheduler
When a timer and a schedule are both set, the scheduler function takes priority. Hot water is produced only during the selected schedule, regardless of the timer that is set. For example, if a timer is set to allow 15 minutes of hot water, but a schedule is also set to only allow 10 minutes of hot water on a specific day, your SMARTHOME water heater will stop heating water after 10 minutes on that specific day. The user can then turn the SMARTHOME water heater OFF and back ON again, but the water will not warm because the scheduled time to allow hot water has passed.

Error Codes
The Eccotemp SMARTHOME water heater app has a troubleshooter to diagnose any device errors, which will help keep your SMARTHOME water heater running in top shape.

Network Error
The built in network troubleshooter will tell you if there is a wifi problem.
Have a problem with your Eccotemp water heater? The Eccotemp SMARTHOME app can tell you exactly what the problem is. Download it today to unlock your SMARTHOME water heater's full capabilities. Simply search for "Eccotemp" on the Apple App Store or Google Play.
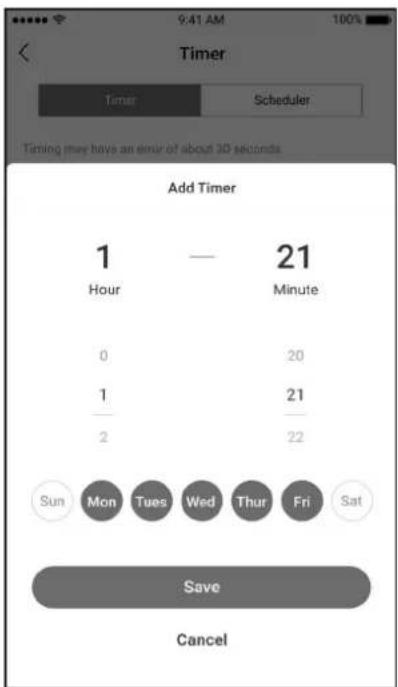

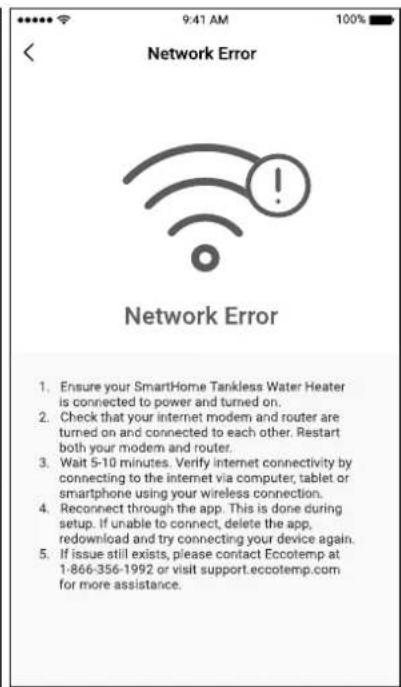
PLEA: 12 IS FOTDOR PERMANENT INSTALLATIONS ONY AND SH21 IS FOR INDOOR PERMANENT INSTALLATIONS ONLY. THIS MANUAL AND ALL ECCOTEMP CONTENT IS SUBJECT TO CHANGE WITHOUT NOTICE. PLEASE VISIT SUPPORT.ECCOTEMP.COM FOR MORE INFORMATION.
Care and Cleaning of the Water Heater
Routine Preventative Maintenance
DANGER: Before manually operating the relief valve, make certain no one will be exposed to the danger of the hot water released by the valve. The water may be hot enough to create a scald hazard. The water should be released into a suitable drain to prevent injury or property damage.
DANGER: Hotter water increases the potential for hot water scalds.
DANGER: Failure to perform the recommended routine preventative maintenance can harm the proper operation of this water heater, which can cause carbon monoxide dangers, excessive hot water temperatures and other potentially hazardous conditions.
Properly maintained, your water heater will provide years of dependable trouble-free service. It is recommended that a periodic inspection of the burner, relief valve, water filter and venting system should be made by service personnel qualified in gas appliance repair.
It is suggested that a routine preventive maintenance program be established and followed by the user.
At least once a year, lift and release the lever handle on the pressure relief valve, located in the hot outlet piping of the water heater, to make certain the valve operates freely. Allow several gallons to flush through the discharge line to an open drain.
Rapid closing of faucets or solenoid valves in automatic water using appliances can cause a banging noise heard in a water pipe. Strategically located risers in the water pipe system or water hammer arresting devices can be used to minimize the problem.
Inspect the area around the water heater to ensure a safe operating environment. Keep water heater area clear and free from combustible materials, gasoline, and other flammable vapors and liquids. Ensure the unit has not been damaged. If damage or denting is present, contact a service personnel to verify proper operation.
Check for any abnormal sounds during normal operation of the water heater.
All piping should be checked for gas and/or water leaks. Refer to page 14 of this manual for instructions on leak testing.
The air intake and cold water supply filters should be cleaned monthly. Refer to the "Housekeeping" section for further information.
DO NOT operate the water heater if you feel something is wrong with the unit.
DO NOT allow children to operate or otherwise handle the unit.
A NOTICE: If the pressure relief valve on the hot water heater discharges periodically, this may be due to a problem in the water system. Contact the water supplier or your plumbing contractor on how to correct this. DO NOT plug the relief valve outlet.
A NOTICE: After inspection, maintenance, and/ or cleaning, ensure proper operation by turning on a hot water faucet.
Housekeeping
HOW TO CLEAN THE WATER FILTER:
- Make sure the unit is OFF and the electrical power supply has been disconnected.
- Turn the water supply OFF to the heater.
- Unscrew the water filter, and slide the filter out.
- DO NOT tap the filter as it may deform and/or damage the filter.
- To remove severe dust, use a soft brush and wash with running water.
- Return the filter to the water heater and screw in the filter.
- Turn the electrical power supply and cold water supply ON to the water heater.
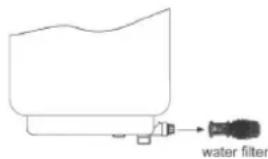
6 MONTH CLEANING ROUTINE
To prevent water scale, lime or rust deposit buildup and ensure your Eccotemp tankless SMARTHOME water heater is running as efficiently as possible it is highly recommended that you clean your Eccotemp tankless water heater every 6 months. To do this we recommend that you use our Eccotemp EZ-Flush System Descaler Kit. For more information and to purchase please visit us at www.eccotemp.com or call 1-866-356-1992.
PLEA: 21 IS FOR OUTDOOR PERMANENT INSTALLATIONS ONLY AND SH21 IS FOR INDOOR PERMANENT INSTALLATIONS ONLY. THIS MANUAL AND ALL ECCOTEMP CONTENT IS SUBJECT TO CHANGE WITHOUT NOTICE. PLEASE VISIT SUPPORT.ECCOTEMP.COM FOR MORE INFORMATION.
Housekeeping Continued...
Before performing any Housekeeping tasks to this water heater, be sure to turn the unit off and disconnect the power supply.
Vacuum around the water heater for dust, dirt and lint on a regular basis. Clean the water heater and remote control by using a damp soft cloth with a few drops of mild detergent and gently wiping the surfaces of the unit. Wipe any remaining moisture with a dry soft cloth.
To ensure sufficient ventilation and combustion air supply, proper clearances must be maintained. The water filters should be cleaned on a monthly basis. Combustion system is fan-assisted.
CLEANING THE WATER HEATER AND REMOTE CONTROL(S):
- Make sure the unit is OFF and the electrical power supply has been disconnected.
DO NOT scrub the appliance with a brush. - Use only mild soapy water, other cleaners may damage the surface of the water heater.
DO NOT remove any label including the rating plate while cleaning or servicing.
DO NOT splash water on the remote controls when cleaning.
DANGER: Shock Hazard. Make sure the electrical power to the water heater is off to avoid potential serious injury or damage to components.
DANGER: Combustible materials, such as clothing, cleaning materials, or flammable liquids, etc., must not be placed against or next to the water heater.
Vacation and Extended Shut-Down
If the water heater is to remain idle for an extended period of time, the power and water to the appliance should be turned off.
The water heater and piping should be drained if they might be subjected to freezing temperatures.
After a long shut-down period, the water heater's operation and controls should be checked by qualified service personnel.
Anti-Freezing
While the Anti-Freezers will help to protect from cold temperatures, they will in no way guarantee protection from freeze damage. DO NOT rely on the Anti-Freezers to fully protect the unit from freezing, take all precautions to prevent cold damage.
- Freezing anywhere in the plumbing system can result in damage to the water heater, such as a rupture in your Heat Exchanger. All pipes must be adequately protected from freezing.
A NOTICE: The anti-freezing device works
for the water heater with Anti-FreezerJhatsewith Antinfatiezeehiaegdavatandawillheating device and will help unit only, and not freeze damage, tousbhiel paoee nastage,kept the preaeingunllackeot on. Freezing will occur the inlet and oute power. In very stwth arepoaveed wheerytheolrapss and ishendtheir temperature is under 32^, or water pipes. in event of an ice stomeveetzifogawiteostumasfthezinegtingpwoperabirtieheating power limit is exceeded. If these conditions take place, please follow the procedures
Draining Procedure
When the temperature falls below 32^ , water in your plumbing system or water heater can turn to ice and then expand causing damage to the water heater. This damage is not covered under your manufacturer's warranty. If these conditions are anticipated, please drain the water heater as follows to help but not guarantee from freezing:
- Shut off the main gas valve and power
- Shut off the inlet water valve
- Open all faucets
- Take off the drain valve, and allow water to drain for 3 minutes or until the unit is empty.
- Making sure all water is out, replace the drain valve, and shut off the faucets.
PLEA: 21 IS FOR OUTDOOR PERMANENT INSTALLATIONS ONLY AND SH21 IS FOR INDOOR PERMANENT INSTALLATIONS ONLY. THIS MANUAL AND ALL ECCOTEMP CONTENT IS SUBJECT TO CHANGE WITHOUT NOTICE. PLEASE VISIT SUPPORT.ECCOTEMP.COM FOR MORE INFORMATION.
Care and Cleaning of the SH22 Water Heater
Draining the Water Heater
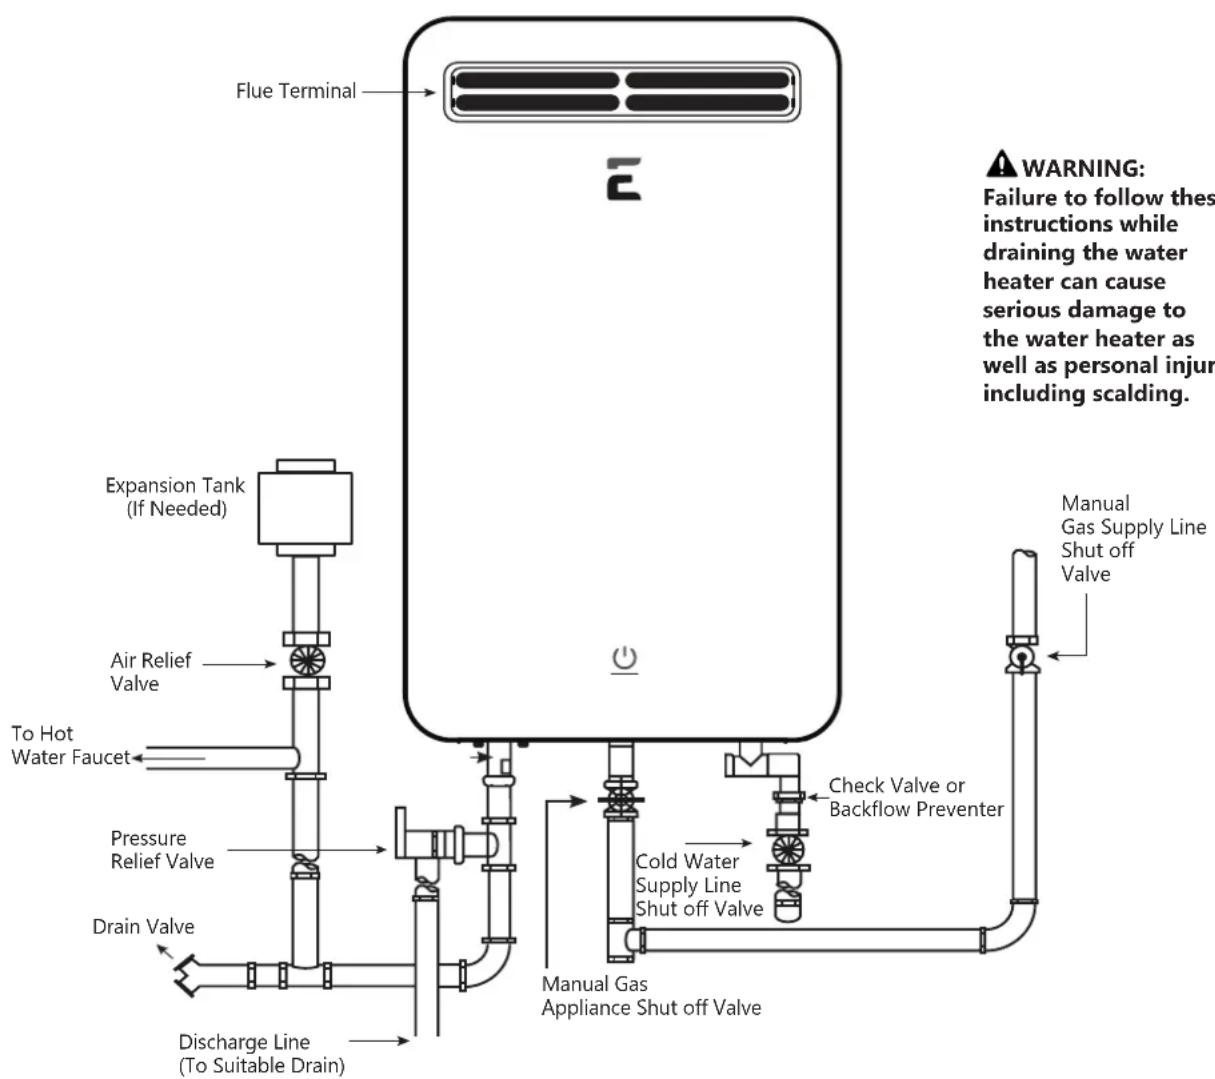
Below are instructions for draining water out of the water heater.
- Turn off the switch on the remote control.
- Close the gas shut off valve(s).
- Close the water shut off valve.
- Turn the on/off switch to the OFF position and disconnect breaker at least 10 seconds after step #1.
- Open drain valve.
- Open all hot water faucets. Before proceeding to the next step, make sure that COLD water is coming out of all hot water faucets.
- To put the water heater back into operation after draining, follow the steps below.
- Reinstall the water filter. Close the hot water outlet drain valve.
- Open the water shut off valve and close again after making sure that water comes out from hot water faucets.
(This step is to remove air from the water lines.)
- Reconnect the breaker and turn the on/off switch to the ON position, fully open the gas shut off valve and the water shut off valve.
A NOTICE: The water heater may not operate unless the above procedure is followed correctly.
PLEA: 21 IS FOR OUTDOOR PERMANENT INSTALLATIONS ONLY AND SH21 IS FOR INDOOR PERMANENT INSTALLATIONS ONLY. THIS MANUAL AND ALL ECCOTEMP CONTENT IS SUBJECT TO CHANGE WITHOUT NOTICE. PLEASE VISIT SUPPORT.ECCOTEMP.COM FOR MORE INFORMATION.
Care and Cleaning of the SH22i Water Heater
Draining the Water Heater
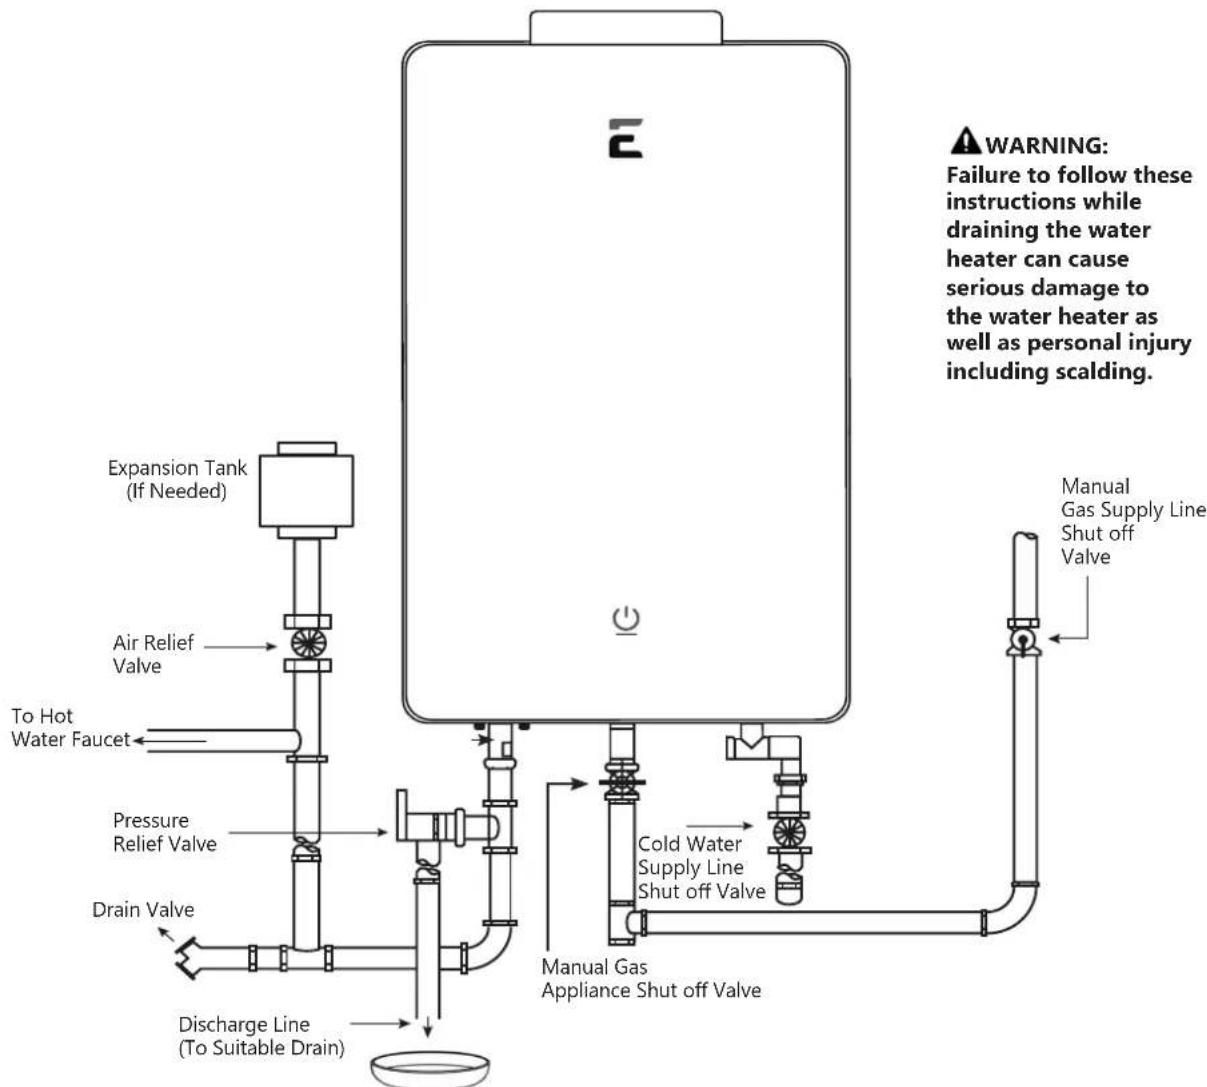
Below are instructions for draining water out of the water heater.
- Turn off the switch on the remote control.
- Close the gas shut off valve(s).
- Close the water shut off valve.
- Turn the on/off switch to the OFF position and disconnect breaker at least 10 seconds after step #1.
- Open drain valve.
- Open all hot water faucets. Before proceeding to the next step, make sure that COLD water is coming out of all hot water faucets.
- To put the water heater back into operation after draining, follow the steps below.
- Reinstall the water filter. Close the hot water outlet drain valve.
- Open the water shut off valve and close again after making sure that water comes out from hot water faucets.
(This step is to remove air from the water lines.)
- Reconnect the breaker and turn the on/off switch to the ON position, fully open the gas shut off valve and the water shut off valve.
A NOTICE: The water heater may not operate unless the above procedure is followed correctly.
PLEA: 21 IS FOR OUTDOOR PERMANENT INSTALLATIONS ONLY AND SH21 IS FOR INDOOR PERMANENT INSTALLATIONS ONLY. THIS MANUAL AND ALL ECCOTEMP CONTENT IS SUBJECT TO CHANGE WITHOUT NOTICE. PLEASE VISIT SUPPORT.ECCOTEMP.COM FOR MORE INFORMATION.
Before You Call For Service
Troubleshooting Tips

Save time and money! Review the charts on the following pages first and you may not need to call for service.
This water heater incorporates a variety of shut off devices that prevents the operation of the water heater down if undesirable combustion conditions occur. Such as the presence of a blockage of the combustion air vent insufficient gas or pressure which can impact the safe operation of the water heater. Please contact a qualified service technician if this occurs.
| Problem | Possible Cause | What To Do |
| Not enough or no hot water | Water shutoff valve is not fully opened. | Check shutoff valve and open fully. |
| Hot water faucet is not fully opened | Open hot water faucet completely. (The main burner goes off when incoming water volume is inadequate. | |
| Water piping is frozen Allow | piping to thaw. | |
| No electricity or water supply is cut off. | Check that proper power is being supplied and/or water supply is adequate. | |
| Unit is not "ON". | Turn the unit "ON" by the button on the remote control. | |
| The temperature may be set too low | Increase the temperature setting. | |
| Mixing Valve malfunction (if applicable). | Check and replace if necessary. | |
| Error code displayed on remote control panel | See instructions for Error Code and if required, contact a dealer for service. | |
| Water not hot enough.. | The temperature may be set too low. | Increase the temperature setting. |
| The gas valve is not fully opened. | Check and open the gas valve fully. | |
| Water too hot | The temperature is set too high | Decrease the temperature setting. |
| Water shutoff valve is not fully opened. | Check shutoff valve and open fully. | |
| Small amount of water has been heated. | Allow more water to flow. | |
| Water filter is clogged Clea | the filter with a tooth brush. | |
| Fan continues to rotate after hot water faucet is closed. | This function is to purge unburned gas 10-15 seconds. | Normal operation. There is no need to call for service. Check for error code. |
PLEA: 21 IS FOR OUTDOOR PERMANENT INSTALLATIONS ONLY AND SH21 IS FOR INDOOR PERMANENT INSTALLATIONS ONLY. THIS MANUAL AND ALL ECCOTEMP CONTENT IS SUBJECT TO CHANGE WITHOUT NOTICE. PLEASE VISIT SUPPORT.ECCOTEMP.COM FOR MORE INFORMATION.
Error Code Guide
When an error code is displayed:
- Close the hot water faucet, turn off the switch on the remote control.
- Wait for about 5 minutes before turning the switch on again.
- Open the hot water faucet.
A NOTICE: If an error code other than those listed below is displayed, immediately turn off the hot water faucet, take note of the error code, turn off the switch on the remote control and call the customer assistance number.
If the error code remains shown:
- Close the hot water faucet and turn off the switch on the remote control.
- Take the proper action shown below and attempt operation of the water heater again.
- If the error code is still shown:
- Turn off the hot water faucet and turn off the switch on the remote control.
Take note of the error code displayed and call the customer service assistance number in the "If You Need Service"
| Error Code | Error Description | Blink Pattern Possible Cause | What to Do | |
| E1 Outlet | Temperature Sensor | BLUE light blinks 1 time, pauses for 2 seconds, then repeats | Junction port loose, short circuit Call for Service | |
| E2 Ignition | Flame Failure | BLUE light blinks 2 times, pauses for 2 seconds, then repeats | The gas valve is not opened or fully opened, water shut off valve is not open, junction port is loose | Check & open gas fully, Check & open water valve, Call for service |
| E3 Thermostat | Sensor | BLUE light blinks 3 times, pauses for 2 seconds, then repeats | There is flame, but no water is coming in | Check & open water valve fully, Call for service |
| E4 Over | Heating Protection | BLUE light blinks 4 times, pauses 2 seconds, then repeats | Over temperature sensor shuts the water heater off. Outlet water temperature sensor detects the outlet water temperature is over the limit and sends a signal to the main controller to shut off the water heater. | Lower the outlet water temperature, Call for service |
| E5 Inlet | Temperature Sensor Failure | BLUE light blinks 5 times, pauses 2 seconds, then repeats | Problem with sensor, problem with sensor's plug or socket, none of the above | Replace the sensor, fix it, replace the computer board |
| E6 Fan Motor | Voltage Error | BLUE light blinks 6 times, pauses 2 seconds, then repeats | Motor problem, voltage of power supply is too low | Call for service |
| E7 Soler | Oid Valve Error | BLUE light blinks 7 times, pauses 2 seconds, then repeats | Open circuit of the valve, short circuit of the valve, none of the above | Connect the valve, replace the valve, replace the computer board |
| E8 Vent | Pipe Block | BLUE light blinks 8 times, pauses 2 seconds, then repeats | Vent pipe is blocked Clean the pipe |
A CAUTION: For your safety DO NOT attempt repair off gas piping, smutte conthol, blunners, wett connectors or other safety devices. Refer repairs to qualified service personnel.
A CAUTION: Make certain power to water heater is "OFF" before removing protective cover FDR ANN REASON.
A CAUTION: Label all wires prior to disconnection when servicing controls. Wiring errors can cause improper and dangerous operation. VERIFY PROPER OPERATION AFTER SERVICING.
PLEA: 12 IS FOR OUTDOOR PERMANENT INSTALLATIONS ONLY AND SH22I IS FOR INDOOR PERMANENT INSTALLATIONS ONLY. THIS MANUAL AND ALL ECCOTEMP CONTENT IS SUBJECT TO CHANGE WITHOUT NOTICE. PLEASE VISIT SUPPORT.ECCOTEMP.COM FOR MORE INFORMATION.
SH22 Replacement Parts
Typical Installation (Some Items May Not Apply)
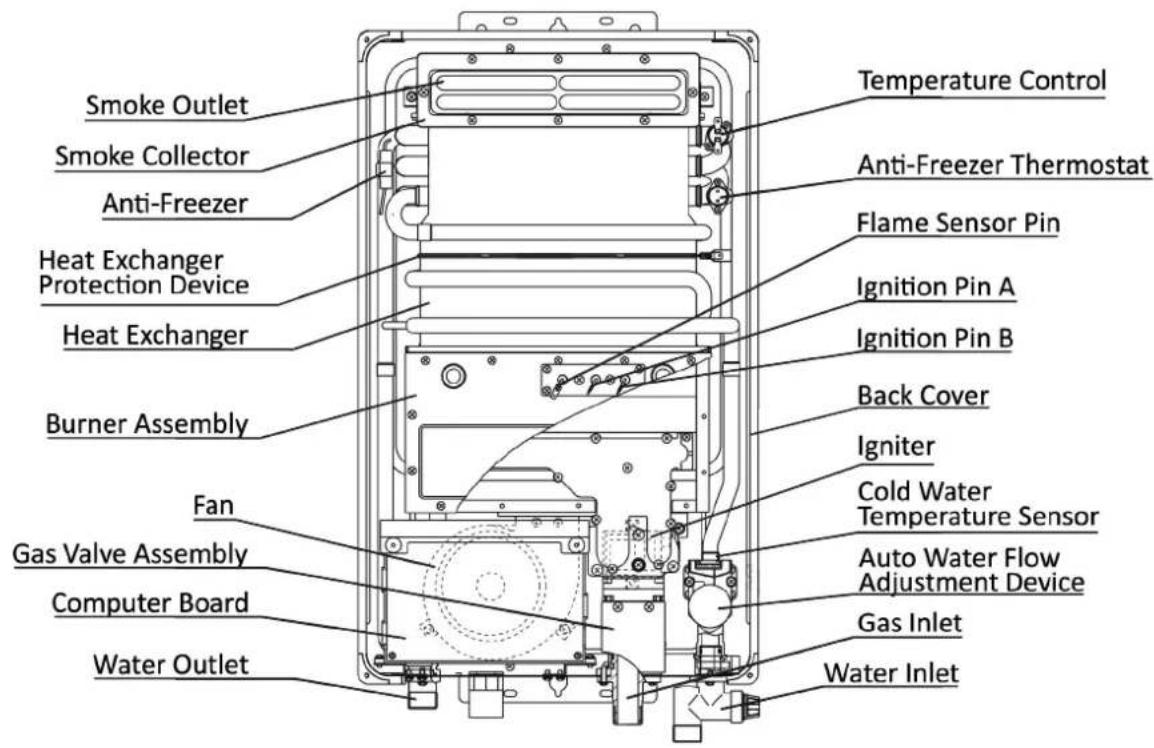
Notice: The Anti-Freezer and it's thermostat are for the outdoor unit and the indoor unit which has the Anti-Freezing function only.
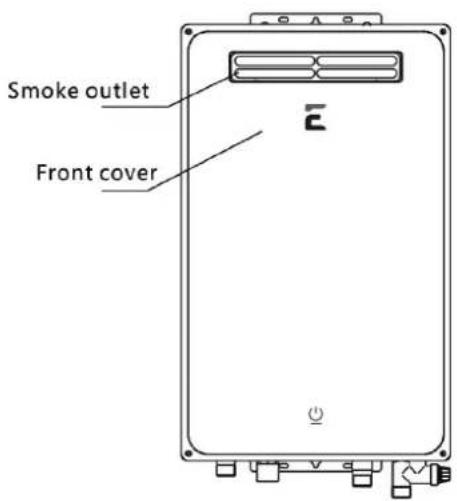
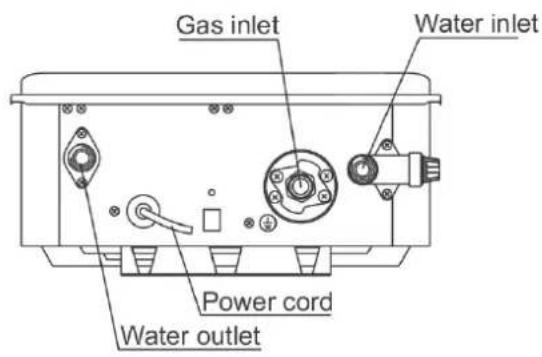
NOTICE: The National Fuel Gas Code (NFGC) mandates a manual gas shut-off valve: See (NFGC) for complete instructions. Local codes or plumbing authority requirements may vary from the instructions or diagrams provided and take precedent over these instructions.
PLEA: 21 IS FOR OUTDOOR PERMANENT INSTALLATIONS ONLY AND SH22I IS FOR INDOOR PERMANENT INSTALLATIONS ONLY. THIS MANUAL AND ALL ECCOTEMP CONTENT IS SUBJECT TO CHANGE WITHOUT NOTICE. PLEASE VISIT SUPPORT.ECCOTEMP.COM FOR MORE INFORMATION.
SH22i Replacement Parts
For models using natural gas or LPG
Instructions for placing a parts order
Address parts orders to the distributor or store from where the water heater was purchased.
WARNING: For your safety, DO NOT attempt to disassemble this unit for any reason.
All parts orders should include:
- The model and serial number of the water heater from the rating plate.
- Specify type of gas (natural or LPG) as marked on the rating plate.
- Part description (as noted below) and number of parts desired.
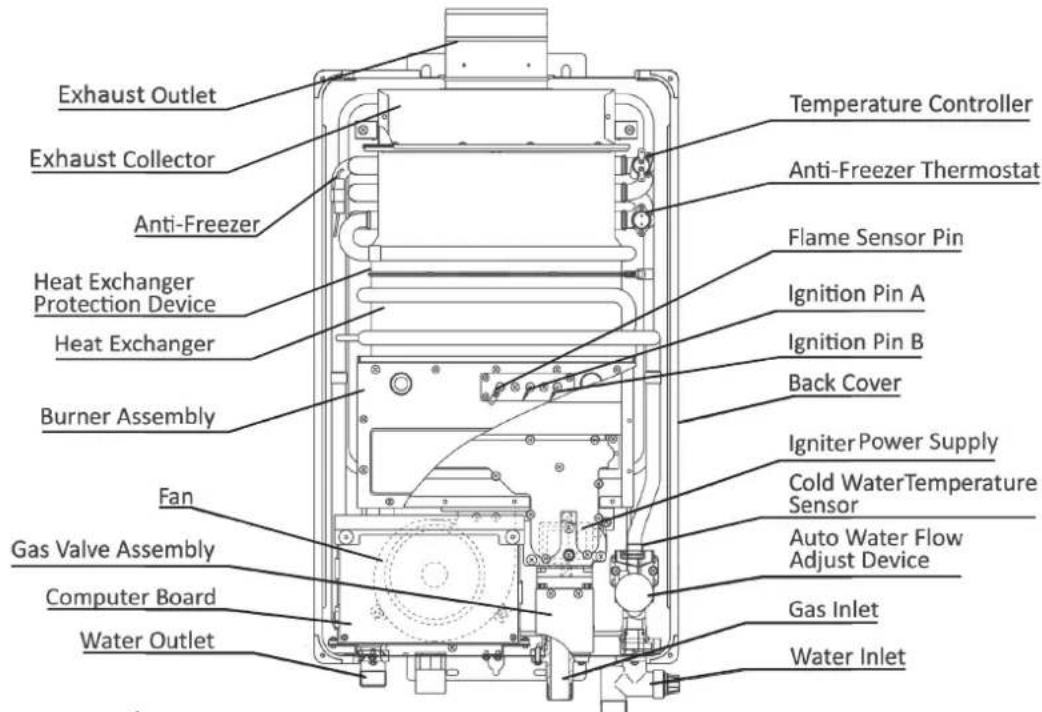
Notice: The Anti-Freezer and it's thermostat are for the outdoor unit and the indoor unit which has the Anti-Freezing function only.
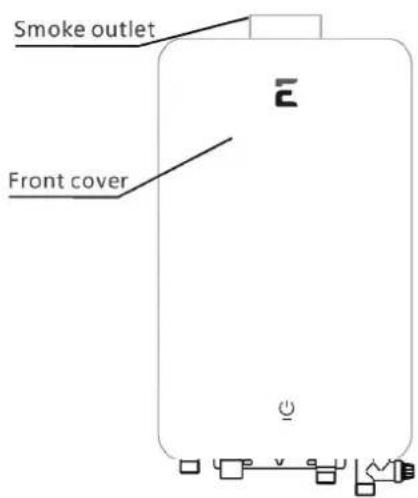
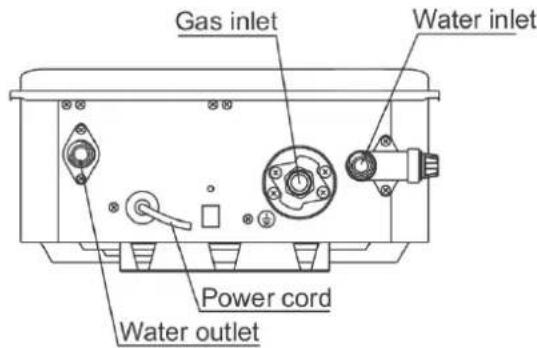
CAUTION: For your safety, DO NOT attempt repair of electrical wiring, gas piping, burners, or other safety devices. Refer repairs to qualified service personnel.
PLEA: 12 IS FOR OUTDOOR PERMANENT INSTALLATIONS ONLY AND SH21 IS FOR INDOOR PERMANENT INSTALLATIONS ONLY. THIS MANUAL AND ALL ECCOTEMP CONTENT IS SUBJECT TO CHANGE WITHOUT NOTICE. PLEASE VISIT SUPPORT.ECCOTEMP.COM FOR MORE INFORMATION.
Eccotemp Systems ,LLC Limited Warranty Information
Model (s): SH22-LP/NG & SH22i-LP/NG Tankless Whole Home Water Heater
I. LIMITED WARRANTY
Subject to the terms below, Eccotemp Systems, LLC ("Eccotemp") provides this limited warranty (the "Limited Warranty") to cover the following Products and Covered Components:
PRODUCT NAME COVERED COMPONENTS
SH22-LP/NG & SH22i-LP/NG Tankless Whole Home Water Heater
SH22-LP/NG & SH22i-LP/NG Tankless Whole Home Water Heater: fittings, accessories, and mounting hardware
This Limited Warranty is being provided to the original purchaser and subsequent owners (the "Owner"), but only while the Product remains as the site of the original installation.
II. LIMITED WARRANTY PERIOD
The term of this Limited Warranty (the "Warranty Period") begins on the date of purchase and ends as set forth below:
2 YEAR WARRANTY
The covered components, except for the Heat Exchanger, in the Product are warranted by Eccotemp for a period of two (2) years from the date of purchase when installed according to Eccotemp's Installation and Operating Instructions.
5 YEAR WARRANTY
The Heat Exchanger in the Product is warranted by Eccotemp for a period of five (5) years from the date of purchase when installed according to Eccotemp's Installation and Operating Instructions.
30 DAY WARRANTY
All accessories that have been provided with the Product at no cost are warranted by Eccotemp for a period of thirty (30) days from the date of purchase when installed according to Eccotemp's Installation and Operating Instructions.
III. WARRANTY COVERAGE
If, during the Warranty Period, a component in the Product fails because of a manufacturing defect, Eccotemp will repair, replace, or refund the Product to the Owner at Eccotemp's sole discretion and as determined to be appropriate by the Eccotemp Support Team. As set forth in Section IV, the Owner may be responsible for all shipping, freight, and handling charges, as well as all fees and costs associated with the warranty service, including, but not limited to, all labor and other costs involved in diagnostic calls or in removing, repairing, servicing, or replacing any component. Eccotemp's sole responsibility under this Limited Warranty is to repair, replace, or refund the cost of the Product at Eccotemp's sole discretion. In the event that an exact replacement component is no longer available, Eccotemp will, at its option, provide a substitute component that Eccotemp deems suitable for the Product. If the Owner reports a subsequent issue with any covered component in the Product, the Owner may be responsible for retaining the failed component(s) for 90 days after a warranty claim is filed and must surrender the component(s) at the request of Eccotemp.
Both Eccotemp and the Owner of the Product are bound by this Limited Warranty.
IV. MAKING A WARRANTY CLAIM
To make a warranty claim through this Limited Warranty, the Owner must contact Eccotemp's Customer Service team at support@eccotemp.com, schedule a call or live chat on the Eccotemp support page at http://support.eccotemp.com. It is within Eccotemp's sole discretion when a repair, replacement, or refund will be issued. Any return for refund must be approved by Eccotemp's Customer Service team prior to shipping the Product back to Eccotemp. Please refer to Returning Your Product For Repair or Refund Policy provided with the Product.
Within the first 45 days of purchase, Eccotemp will cover all ground shipping costs for warranty related issues in the US and Canada, excluding Alaska, Hawaii and any location outside of the continental US and Canada. After the first 45 days of purchase, the Owner is responsible for all shipping to Eccotemp, regardless of reason or circumstance. Eccotemp will cover the warranty related shipping costs when returning the Product to the Owner after repair/inspection. The method for warranty related shipping will be ground equivalent with the provider within Eccotemp's sole discretion.
What information you will need for processing of your warranty claim:
Proof of purchase
Serial number
Photos of the installation
Photos of the damage point (if there is one)
All shipments of any type of product coming to Eccotemp for any reason must have a Return Goods Authorization ("RGA") number for any repairs to be made. Please contact Eccotemp to obtain an RGA number prior to shipping anything to Eccotemp. Failure to do so could result in loss of Product. Eccotemp will not be responsible for replacement due to loss or damage if these steps are not properly followed.
Any returns to Eccotemp must be sent in the original packaging. If your returned product does not have the original packaging and/or is missing any of the components that came with the product, there will be a nonnegotiable 15% restock fee.
PLEA: 21 IS FOR OUTDOOR PERMANENT INSTALLATIONS ONLY AND SH22I IS FOR INDOOR PERMANENT INSTALLATIONS ONLY. THIS MANUAL AND ALL ECCOTEMP CONTENT IS SUBJECT TO CHANGE WITHOUT NOTICE. PLEASE VISIT SUPPORT.ECCOTEMP.COM FOR MORE INFORMATION.
Eccotemp Systems ,LLC Limited Warranty Information
Model (s): SH22-LP/NG & SH22i-LP/NG Tankless Whole Home Water Heater
V. DISCLAIMER OF WARRANTYES AND RESPONSIBILITY FOR DAMAGES
EXCEPT AS PROVIDED IN THIS LIMITED WARRANTY, ECCOTEMP MAKES NO WARRANTY, EXPRESS OR IMPLIED, TO ANYONE AS TO FITNESS FOR ANY PURPOSE, MERCHANTABILITY, DESIGN, CONDITION, CAPACITY, PERFORMANCE, OR ANY OTHER ASPECT OF THE PRODUCT OR ITS MATERIAL OR WORKMANSHIP. ALL IMPLIED WARRANTYES WHICH MAY EXIST, NOTWITHSTANDING THIS DISCLAIMER, ARE LIMITED TO THE DURATION OF THIS LIMITED WARRANTY. THIS LIMITED WARRANTY IS MADE IN LIEU OF ALL OTHER GUARANTEES, WARRANTYES, REPRESENTATIONS, CONDITIONS, OBLIGATIONS, OR LIABILITIES, EXPRESS OR IMPLIED.
ECCOTEMP SHALL NOT BE LIABLE, EITHER IN CONTRACT OR TORT, FOR ANY DIRECT, INDIRECT, INCIDENTAL OR CONSEQUENTIAL DAMAGES, OR ANY LOSS, DAMAGE, OR INJURY TO PERSONS, INCLUDING DEATH, PROPERTY, OR THINGS, OR FOR DAMAGES OF ANY KIND OR NATURE INCLUDING BUSINESS INTERUPTION, INCONVENIENCE OR LOSS OF ANTICIPATED PROFITS OR SAVINGS OCCASIONED BY OR ASING OUT OF THE USE, MISUSE, NONUSE, REPAIR, REPLACEMENT OR DELAY IN DELIVERY OF THE PRODUCT. ECCOTEMP SHALL NOT BE LIABLE FOR THE COST OF ANY WORK DONE BY PURCHASER OR OTHERS TO THE PRODUCT.
This Limited Warranty gives specific legal rights. Some jurisdictions do not allow the exclusion or limitation of implied warranties or incidental or consequential damages. In such jurisdictions, the limitations or exclusions do not apply to the Owner. The Owner may also have other rights that may vary by jurisdiction.
VI. EXCLUSIONS
The following exclusions apply to this Limited Warranty:
- A repair, replacement, or refund will not be provided under this Limited Warranty unless the Product containing the defective component is properly installed and maintained according to Eccotemp's Installation Manual and Use & Care Manual and in compliance with all applicable federal, state/province, and local laws, regulations, codes, policies, and licensing requirements. Any abuse, misuse, alteration, neglect, or misapplication of the Product will render this Limited Warranty null and void.
- A repair, replacement, or refund will not be provided if the Product is damaged by services performed by third party service providers other than Eccotemp Systems.
- Eccotemp systems is not responsible for any expenses arising from labor services, including but not limited to, installation or removal services due to a warranty claim.
- A repair, replacement, or refund will not be provided if the Product is used in a hot water circulation loop, in series with a circulation system, where an on-demand recirculation system is incorporated, or in any other corrosive or otherwise destructive environment where the Product is not intended to be used as set forth in Eccotemp's Installation Manual and Use & Care Manual.
- A repair, replacement, or refund will not be provided if the Product is damaged as a result of improper installation, including improper ventilation materials, sizing, length, elevation, condensation drainage, or inadequate airflow.
- A repair, replacement, or refund will not be provided if the Product is damaged as a result of improper use, including freezing within the unit or surrounding piping, incorrect sizing for the application, scale build up, or incorrect gas and/or water pressure.
- This Product shall not be used as a pool or spa heater. Use of the Product as a pool or spa heater shall be considered misuse and will render this Limited Warranty null and void.
- A repair, replacement, or refund will not be provided if the Product is damaged by the use of non-potable, untreated or poorly treated well water, or water with high PH levels or hardness levels in excess of 12 grains per gallon (200 mg/L).
- A repair, replacement, or refund will not be provided under this Limited Warranty if the original serial number on the Product has been removed or altered in a way that causes the serial number to not be readily determined.
- Eccotemp will not pay electricity or fuel costs, or increases in electricity or fuel costs, for any reason whatsoever, including additional or unusual use of supplemental electrical heat.
- Eccotemp will not be responsible for any default or delay in performance under this Limited Warranty caused by any factor or contingency outside of its control.
VII. MISCELLANEOUS
No agent, employee or representative of Eccotemp has any authority to bind Eccotemp to any representation or warranty concerning the Product not contained in this Limited Warranty. Eccotemp reserves the right and authority to change, modify or alter this warranty at any given time.
VIII. FOR CUSTOMERS WITH A HOME WARRANTY
Often your home warranty will assist in covering some of the fees related to your home appliances, such as your water heater. Be sure to check with your home warranty company for assistance prior to reaching out to Eccotemp.
PLEA: 21 IS FOR OUTDOOR PERMANENT INSTALLATIONS ONLY AND SH21 IS FOR INDOOR PERMANENT INSTALLATIONS ONLY. THIS MANUAL AND ALL ECCOTEMP CONTENT IS SUBJECT TO CHANGE WITHOUT NOTICE. PLEASE VISIT SUPPORT.ECCOTEMP.COM FOR MORE INFORMATION.
ECCOTEMP
HEATING WATER SMARTER
SH22 MANUEL
CHAUFFE-EAU SANS RÉSERVOIR POUR Toute LA MAISON INSTRUCTIONS D'INSTALLATION, D'UTILISATION ET D'ENTRETIEN
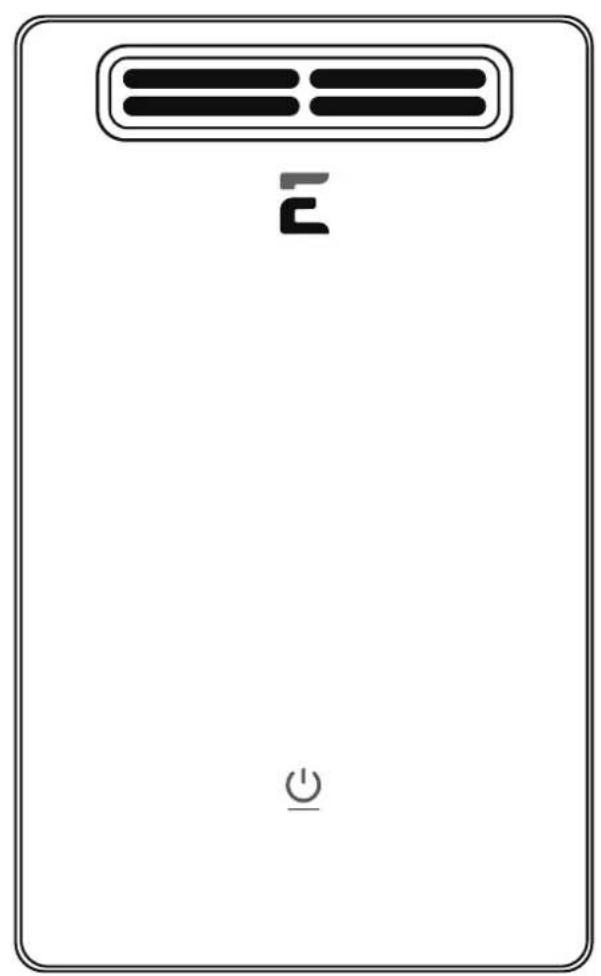
VOIX INTELLIGENTE COMMANDES
"UNE ÉVALUATION EFFICACITE

MARCHE/ARRÉTINTELLIGENT BOUTON

ERREUR AVANCEDE DETECTION

MAISON INTELLIGENTE PRÉT
TEMPERATURE NUMÉRIQUE CONTROLER
Typical Installation 9-11
Installation Typique 12

Vis explosive 2 pieces
www.novaflex.com/information_centre/zflex/032-Vent%20Residential/Z-Vent%20Installation%2Guide%20CURRENT.pdf
https://www.eccotemp.com/installation.
Allumer le chauffe-eau
Allumer le Chauffe-eau
Available on the App Store

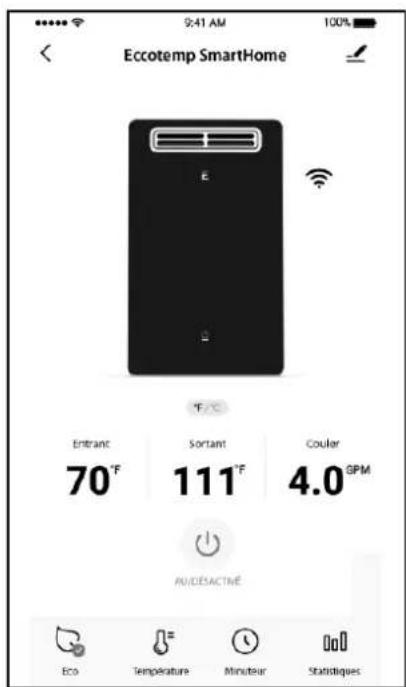
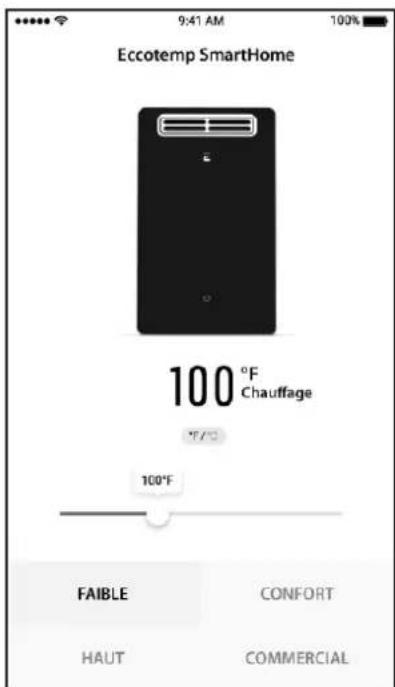
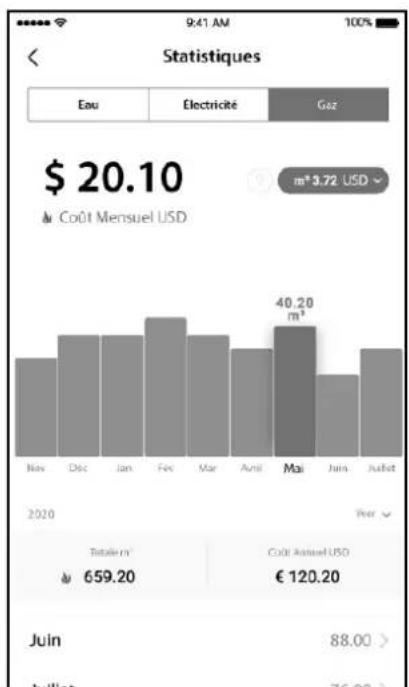
VEUILLEZ NOTER : SH22 EST POUR LES INSTALLATIONS PERMANENTES EXTERIEURES UNIQUEMENT ET SH221 EST POUR LES INSTALLATIONS PERMANENTES INTÉRIÉURES UNIQUÉMENT. CE MANUEL ET TOUT LE CONTENU D'ECOTEMP PEUMPÉT ÉTRÉ MODIFIÉS SANS PREAVIS. VEUILLEZ CONSULTER SUPPORT. ECCOTEMP.COM POUR PLUS D'INFORMATIONS.
Application Mobile Eccotemp MAISONINTELLIGENTE Suite...

Timer
HEATING WATER SMARTER