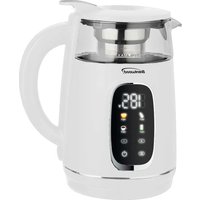
KT-2300DBK - Kettle Brentwood - Free user manual and instructions
Find the device manual for free KT-2300DBK Brentwood in PDF.

User questions about KT-2300DBK Brentwood
0 question about this device. Answer the ones you know or ask your own.
Ask a new question about this device
Download the instructions for your Kettle in PDF format for free! Find your manual KT-2300DBK - Brentwood and take your electronic device back in hand. On this page are published all the documents necessary for the use of your device. KT-2300DBK by Brentwood.
USER MANUAL KT-2300DBK Brentwood
© 2025 Brentwood Appliances, Inc.
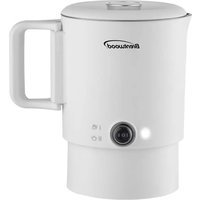
DIGITAL HOT WATER DISPENSER
DISPENSADOR DE AGUA CALIENTE DIGITAL DISTRIBUTEUR D'EAU CHAUDE NUMÉRIQUE
ITEM NO:
KT-2300DBK
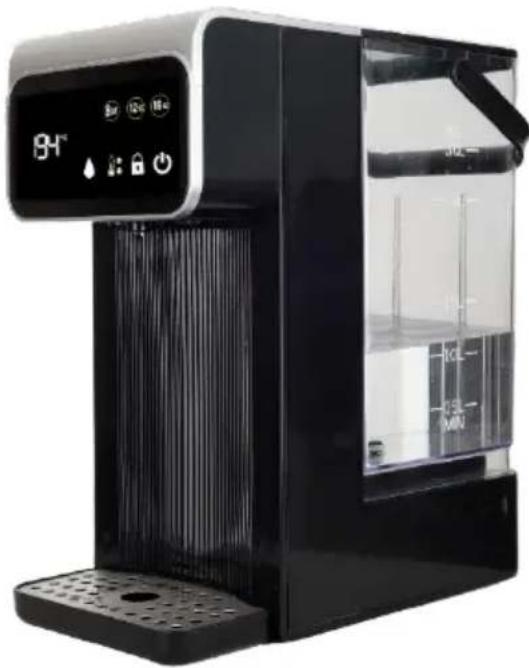
natural_image
Exterior view of a modern black water dispenser with digital display and control buttons (no visible text or symbols)Operating and Safety Instructions
FOR INDOOR HOUSEHOLD USE ONLY
When using this or any other electrical appliance, always follow these basic safety precautions, especially when children are present.
READ ALL INSTRUCTIONS BEFORE USE.
WARNING: To reduce the risk of fire, electric shock, serious personal injury, and property damage, please note the following:
- Upon initial use, a smoky smell may occur as protective coatings or films on the dispenser's parts burn off. This process is normal and ensures proper product function and safety.
- Use a properly grounded wall outlet to reduce the risk of electric shock or fire and never use a two-prong adapter or remove the ground prong from the plug.
- Always plug the dispenser directly into a wall outlet. Extension cords may not handle the current required and can overheat, posing a fire hazard.
- Ensure the cord does not dangle where it can be tugged accidentally. Never allow the cord to encounter hot surfaces or sit in pooled water.
- Ensure the dispenser sits evenly to prevent tipping, spilling, or vibrations during operation. Avoid placing it on carpets or soft surfaces that might trap heat.
- Leave space around the dispenser so steam can dissipate, and heat can escape safely. This also helps prevent moisture buildup around walls or cabinets.
- Steam rising from the dispenser can damage overhead shelves or cupboards, especially if wood or laminated.
- Using filtered water reduces mineral buildup inside the unit, improving both water taste and the lifespan of the dispenser.
- Before each use, inspect the dispenser for any visible damage. If any parts are broken or damaged, do not use the dispenser and refer to the warranty policy on page 9 for guidance.
- Overfilling can cause water to spill or leak out during heating, leading to electrical shorts or burns. Use the water level indicator and never exceed the maximum fill line.
- Avoid attempting to heat liquids like milk, soup, or broths. These can cause clogs, bacteria growth, or damage to the internal heating components.
- The dispenser can release boiling water instantly, posing a severe burn risk. Child lock features should always be engaged, and the dispenser should be positioned where curious hands or paws can't reach it.
-
The spout can get very hot. During and after dispensing, avoid any contact with the nozzle or freshly boiled water to prevent scalding.
-
Give the dispenser some time to cool down before refilling or relocating to avoid steam burns and spilling hot water accidentally.
- Disconnecting the dispenser ensures complete safety from accidental electric shocks or unexpected activation during maintenance.
- Avoid spraying water or submerging any part of the dispenser. Wipe spills immediately to prevent moisture from entering the dispenser.
- The drip tray can collect residue, becoming a breeding ground for mold or bacteria. Clean it with mild soap and water regularly.
- Mineral deposits can clog the spout. Use a soft brush or a clean cloth to gently wipe around the nozzle. Do not insert sharp objects into it.
- Depending on water hardness, limescale can build up quickly, affecting heating efficiency and water taste. Use a manufacturer-approved descaling solution or white vinegar periodically.
SPECIAL INSTRUCTIONS: A short power supply cord is provided to reduce the risk of becoming entangled in or tripping over a longer cord. Using an extension cord with the dispenser is not recommended. However, if one must be used:
- The marked electrical rating of the extension cord must be at least as great as that of the dispenser.
- Arrange the extension cord so that it does not drape over the countertop or tabletop where it can be tripped over or pulled.
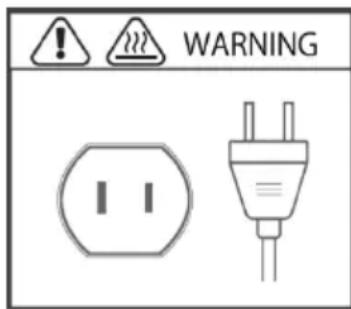
WARNING: The dispenser is equipped with a polarized plug (one blade is wider than the other) to reduce the risk of electrical shock, which is a safety feature. The plug is designed to fit into a polarized outlet in only one direction. If you are unable to insert the plug into the outlet, try reversing it. If the plug still does not fit, contact a qualified electrician. Never use the plug with an extension cord unless you can fully insert the plug into the extension cord. Do not alter the plug or attempt to bypass its safety features.
text_image
WARNINGFOR HOUSEHOLD USE ONLY! PLEASE READ INSTRUCTIONS BEFORE USE & SAVE FOR FUTURE REFERENCE.
text_image
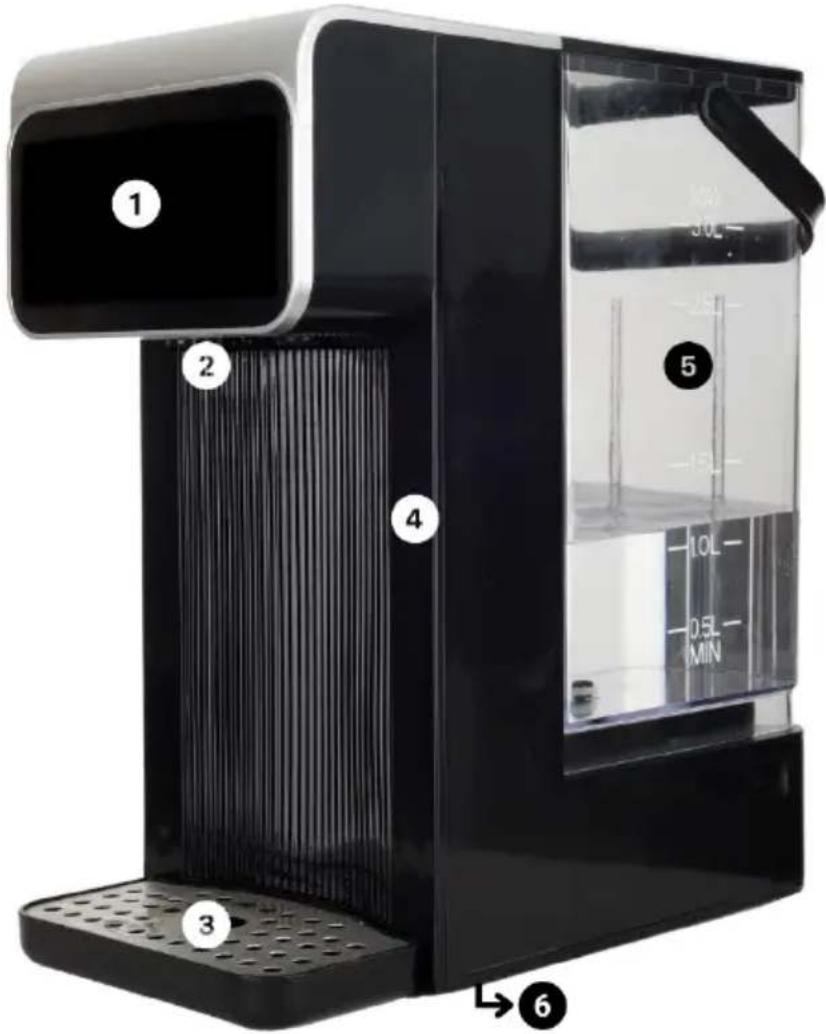
① ② ③ ④ ⑤ -30L- -25L- -15L- -10L- 0.3L- MIN ⑥| 1 | Control Panel | 4 | Cool-Touch Exterior |
| 2 | Nozzle with Night Light 5 | Removable Cool-Touch Water Tank with Handle | |
| 3 | Drip Tray | 6 | Drain Outlet (at the bottom) |
| Control Panel | ||
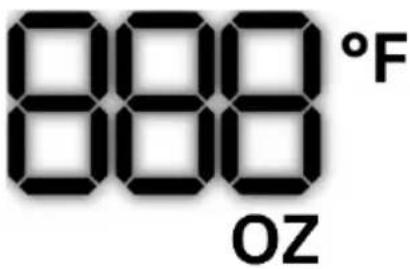 | Volume and Temperature Display Icon | The icon displays the water volume and temperature. |
  | Volume Buttons | Select and press the desired water volume (8oz, 12oz, or 16oz) to begin dispensing.For continuous dispensing, skip the water volume selection—just select the water temperature, then press the dispense button. |
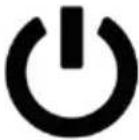 | Power Button | Press and hold the power button for 1 second to turn the dispenser on or off. |
 | Child Lock Button | The dispenser enters lock mode automatically when powered on; press and hold the child lock button for 3 seconds to unlock.If the dispenser is idle for 10 seconds, it will automatically return to lock mode. |
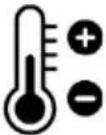 | Temperature Button | Press the temperature button to select your desired water temperature.Available temperature settings: 104°F, 122°F, 140°F, 158°F, 176°F, 194°F, and 212°F. |
| *000°F indicates no water heating. | ||
 | Dispense Button | Press the dispense button to release hot water.To stop dispensing, press the dispense button again. |
BEFORE USING THE DIGITAL HOT WATER DISPENSER
- Ensure all parts are included and inspect each one for any visible damage, cracks, or missing components.
- Take off the water tank from the main unit and remove the drip tray from the front.
- Wash the water tank and drip tray with mild dish soap and warm water, rinse thoroughly, and dry completely with a clean towel or by air-drying.
WARNING: Only the water tank and drip tray are dishwasher safe.
- Wipe the main unit with soft, damp cloth, taking care not to submerge it or let water enter any openings.
- At the bottom of the main unit, pull out the silicone cover from the drain outlet, drain any residual water, and then replace the cover to securely seal the outlet.
WARNING: Double-check that the drain outlet is covered with the silicone cover and is properly sealed.
- Once everything is dry, carefully slide the water tank onto the back of the main unit until it clicks into place, then attach the drip tray to the front, ensuring proper alignment—both the main unit and drip tray use built-in magnets to snap the drip tray into position.
USING THE DIGITAL HOT WATER DISPENSER
IMPORTANT: Upon initial use, a smoky smell may occur as protective coatings or films on the dispenser's parts burn off. This process is normal and ensures proper product function and safety.
- Put the dispenser on a flat, stable surface.
- Remove the water tank from the back of the main unit, fill it with clean water, and slide it back into place to reattach.
WARNING: Do not exceed the maximum volume of 3 liters.
-
Connect the power cord to a wall outlet; the power button will light up and beep to indicate the dispenser is powered on.
-
Position a mug or cup on the drip tray under the nozzle.
-
Press and hold the power button for 1 second; the child lock button will light up and beep to indicate the dispenser is now in lock mode for safety.
-
To unlock lock mode, press and hold the child lock button for 3 seconds until you hear a beep, and the rest of the control buttons light up.
-
To dispense hot water:
a. To dispense a set amount of hot water:
i. Select your desired volume and temperature.
ii. Then, press the dispense button to automatically release water based on your settings.
b. To dispense continuous hot water:
i. Skip the volume selection.
ii. Choose the temperature.
iii. Press the dispense button to start and press it again to stop when you have enough water.
IMPORTANT: When the digital display shows E7, it indicates that the water tank is low and needs to be refilled.
- When you are done:
a. To turn off the dispenser:
i. Press and hold the power button for 1 second.
ii. Unplug the power cord from the wall.
b. To activate lock mode:
i. Press the child lock button for 3 seconds.
ii. If the dispenser is left idle for 10 seconds, it will automatically enter lock mode.
c. To turn off while in lock mode:
i. Press and hold the child lock button for 3 seconds to unlock.
ii. Press and hold the power button for 1 second to turn the dispenser off.
CLEANING AND MAINTENANCE
-
Take off the water tank from the main unit and remove the drip tray from the front.
-
Wash the water tank and drip tray with mild dish soap and warm water, rinse thoroughly, and dry completely with a clean towel or by air-drying.
WARNING: Only the water tank and drip tray are dishwasher safe.
-
Wipe the main unit with soft, damp cloth, taking care not to submerge it or let water enter any openings.
-
Pull out the silicone cover from the drain outlet, drain any residual water, and then replace the cover to securely seal the outlet.
WARNING: Double-check that the drain outlet is covered with the silicone cover and is properly sealed.
-
Once everything is dry, carefully slide the water tank onto the back of the main unit until it clicks into place, then attach the drip tray to the front, ensuring proper alignment.
-
Store the dispenser in a cool, dry place, away from heat sources or moisture, until you need to use it again.
DESCALING THE DIGITAL HOT WATER DISPENSER
IMPORTANT: Descale the dispenser every 1 to 3 months, depending on the hardness of your water. If you have very hard water, you may need to descale more frequently.
- To make the descaling solution:
a. To descale with vinegar, mix a 1:1 ratio of white distilled vinegar and water. For example, use 1 cup of vinegar and 1 cup of water.
b. To descale with citric acid, dissolve 1-2 tablespoons of citric acid in about 2 cups of water. The exact amount may vary depending on the level of buildup.
c. To descale with a commercial descaling solution, read and follow the instructions provided by the manufacturer of the commercial descaling product. Typically, you will mix a specific amount of descaling solution with water.
-
Pour the solution into the water tank. Fill it up according to the capacity of the tank, but do not exceed the maximum fill line.
-
Dispense the solution through the dispenser as you would with regular hot water. Allow the solution to run through the system to dissolve any mineral buildup.
-
If there is significant buildup, you can let the solution sit inside the dispenser for about 15–30 minutes to break down the minerals.
-
After dispensing the solution, remove the tank, empty it, rinse it thoroughly, then refill with clean water and run the dispenser to flush out any remaining solution, repeating until no trace of the solution remains.
-
While descaling, it is a good idea to clean the nozzle and exterior with a soft cloth to remove any mineral buildup that may have accumulated.
-
Once the dispenser is fully rinsed, reassemble it, plug it in, and test it to make sure it is functioning properly.
ONE YEAR LIMITED WARRANTY
Write down the following information about your product to better help you obtain assistance or service if you ever need it.
CUSTOMER RECORD
Date of Purchase: ____ Store/Dealer: ____
Model/Item No: ____
THIS WARRANTY APPLIES TO PRODUCTS PURCHASED AND USED IN THE CONTINENTAL U.S. AND CANADA ONLY. This is the only express warranty for this product and is in lieu of any other warranty or condition. This product is warranted to be free from defects in material and workmanship for a period of one (1) year from the date of original purchase. During this period, your exclusive remedy is repair or replacement of this product, at our option. However, you are responsible for all costs associated with returning the product to us and for the return of a product or component under this warranty to you. If the product or component is no longer available, we will replace it with a similar one of equal or greater value. This warranty does not cover glass, filters, wear from normal use, use not in conformity with the printed directions, or damage to the product resulting from accident, alteration, abuse, or misuse. THIS WARRANTY EXTENDS ONLY TO THE ORIGINAL CONSUMER PURCHASER. KEEP THE ORIGINAL SALES RECEIPT, AS PROOF OF PURCHASE IS REQUIRED TO MAKE A WARRANTY CLAIM. This warranty is void if the product is used for other than single-family household use or subjected to any voltage and waveform other than what is specified on the rating label (e.g., 120V\~60Hz). We exclude all claims for special, incidental, and consequential damages caused by breach of express or implied warranty. All liability is limited to the amount of the purchase price. Every implied warranty, including any statutory warranty or condition of merchantability or fitness for a particular purpose, is disclaimed except to the extent prohibited by law, in which case such warranty or condition is limited to the duration of this written warranty. This warranty gives you specific legal rights. You may have other legal rights that vary depending on where you live. Some states do not allow limitations on implied warranties or special, incidental, or consequential damages, so the foregoing limitations may not apply to you. To make a warranty claim, do not return this product to the store.
TO OBTAIN WARRANTY SERVICE AND/OR TROUBLESHOOTING INFORMATION:
Call Customer Service at 1-888-903-0060 in the U.S.
Monday through Friday: 9:00am – 5:00pm PST.
U.S. Customers Please Email: warranty@brentwoodus.com
Canadian Customers Please Email: canada.warranty@brentwoodus.com
Go Online at www.brentwoodus.com
PRECAUCIONES IMPORTANTES

text_image
① ② ③ ④ ⑤ ⑥ 10L- 10L- 0.5L- MINtext_image
① ② ③ ④ ⑤ -30L- -25L- -15L- -10L- 0.3L- MIN ⑥© 2025 Brentwood Appliances, Inc.