Videro E2-P - Grill plate Rösle - Free user manual and instructions
Find the device manual for free Videro E2-P Rösle in PDF.

User questions about Videro E2-P Rösle
0 question about this device. Answer the ones you know or ask your own.
Ask a new question about this device
Download the instructions for your Grill plate in PDF format for free! Find your manual Videro E2-P - Rösle and take your electronic device back in hand. On this page are published all the documents necessary for the use of your device. Videro E2-P by Rösle.
USER MANUAL Videro E2-P Rösle
natural_image
Illustration of a VIDEROP24 electric heater with control panel and power outlet (no text or symbols on body)
EN Operation and assembly instructions 12
text_image
M N1, N2 L K J H G 2x PH 2 F E A B 4x C 4x D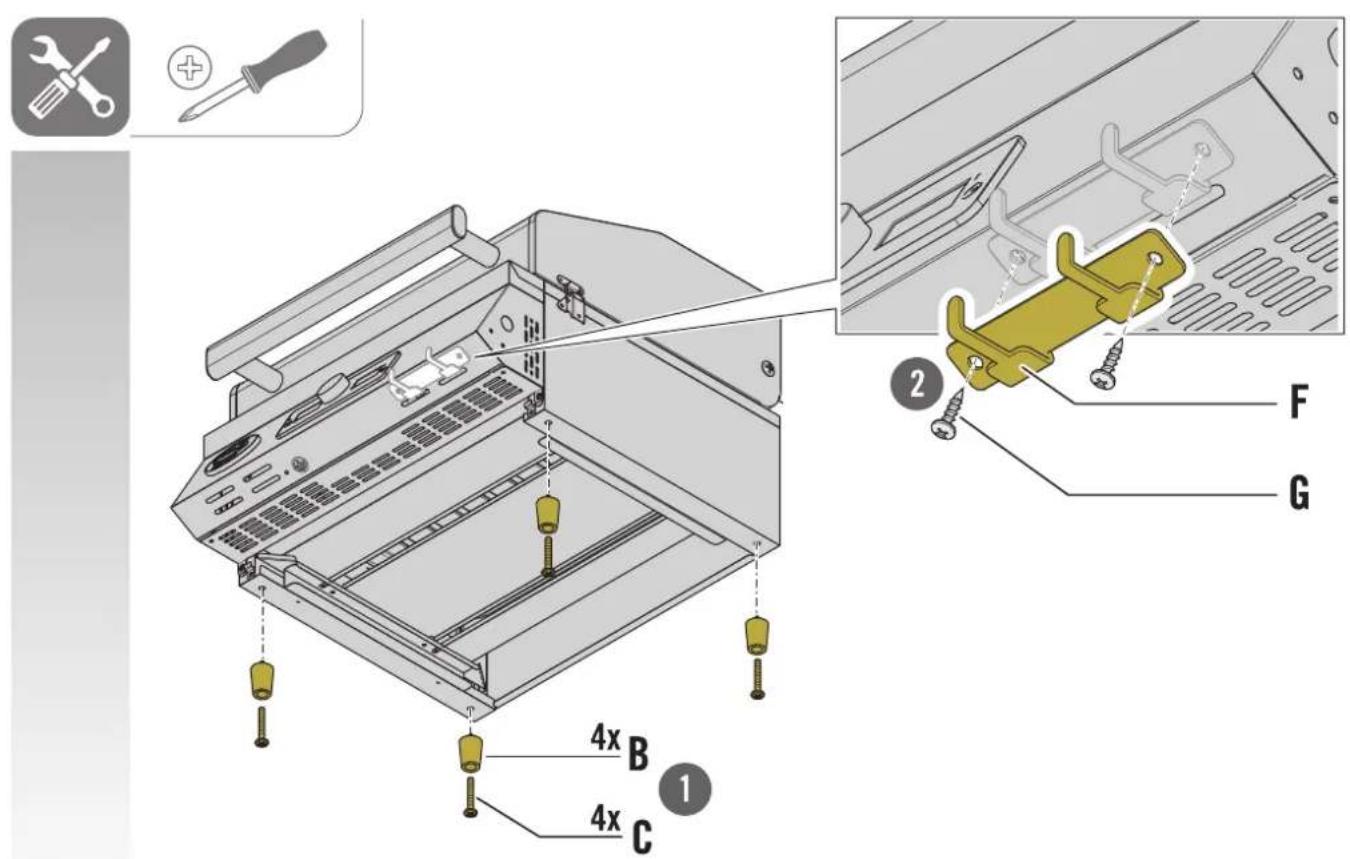
text_image
1 2 3 4x B 4x C F G
text_image
① J M N₁ N₂
natural_image
Blank white image with no visible content, text, or symbols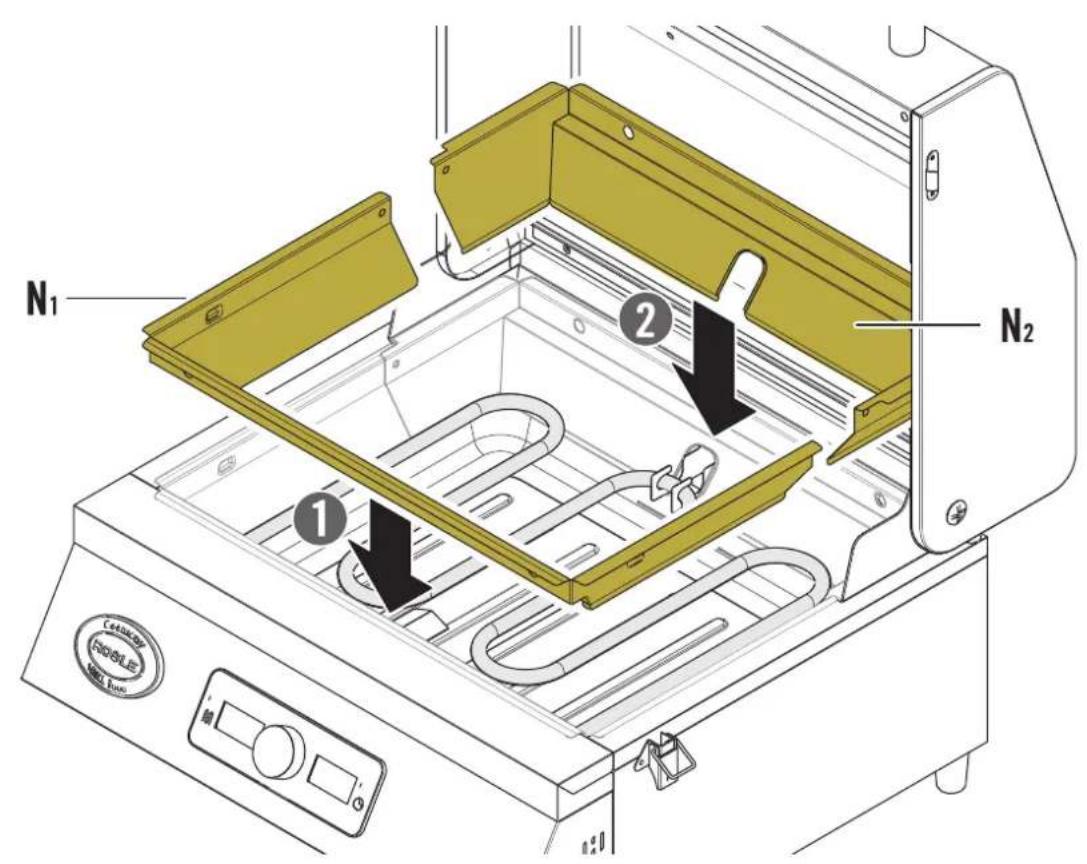
text_image
N₁ ① ② N₂ CABLES ROGLE MILKi
natural_image
Technical line drawing of a bamboo grating machine with cooling panel and control panel (no text or symbols)
text_image
Technical diagram showing a rack-mounted appliance with labeled parts and assembly instructions in Chinese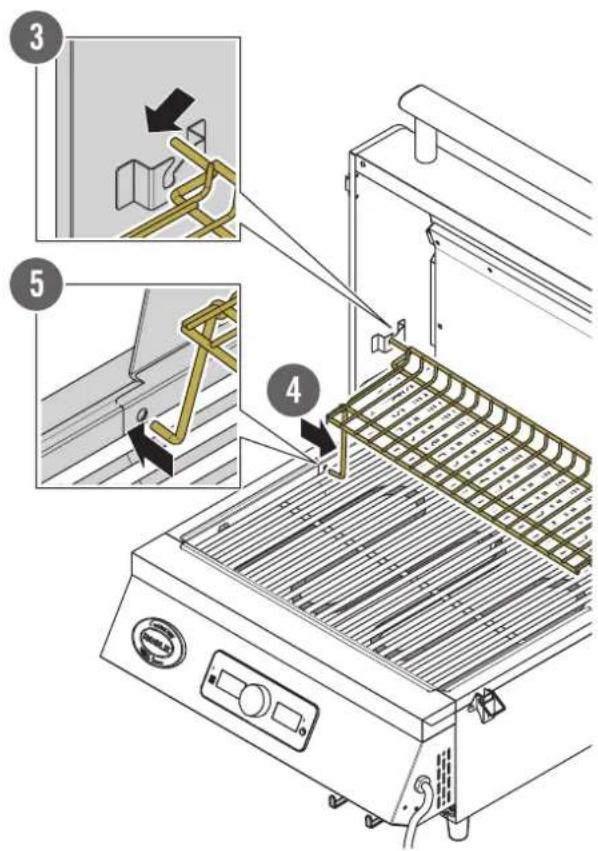
text_image
Technical diagram showing a kitchen grater with labeled parts and directional arrows indicating assembly stepsi
natural_image
Illustration of a kitchen grater with a tray and control panel, showing a yellow tray being inserted (no text or symbols)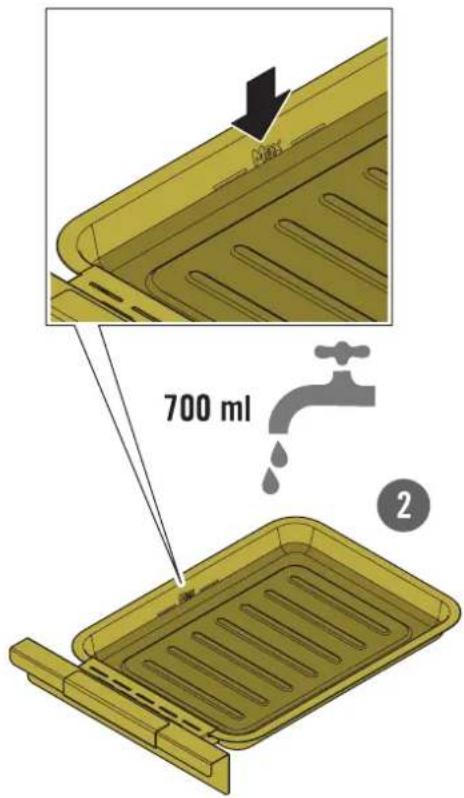
text_image
700 ml 211.2022
text_image
Technical diagram of a portable kitchen appliance with labeled parts and directional arrow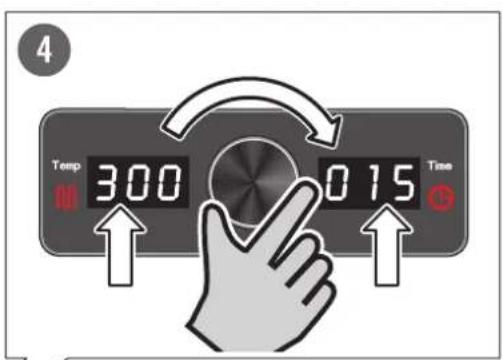
text_image
4 Temp 300 015 Time ↑ ↑text_image
Temp 3s TimeCongratulations! You have chosen a high-quality grill from RÖSLE.
A good choice – and a smart decision for a long-lasting, superior-quality product.
About this manual

Before operating the grill, read this manual in its entirety and follow all instructions.
This manual contains important information on the safe use of the product. Failure to do so may result in serious injury or death, or property damage due to fire or explosion.
This manual is considered part of the product – be sure to keep it for future reference. Pass on all documents when transferring ownership of the product.
The manufacturer accepts no liability for damage caused by improper handling and failure to observe the safety precautions.
- Symbols used
 | Warning |
 | Note(in text) |
 | Scope of delivery |
 | Assembly |
 | Start-up information(graphic pages) |
 | Dispose of the product separately from unsorted municipal waste. |

Safety
Personal safety
Only operate the grill when you are awake and fully alert. The use of alcohol, drugs or medication may impair the ability to operate the product safely.
This appliance can be used by children aged from 8 years and above and persons with reduced physical, sensory or mental capabilities or lack of experience and knowledge if they have been given supervision or instruction concerning use of the appliance in a safe way and understand the hazards involved.
Children shall not play with the appliance. Cleaning and user maintenance shall not be made by children without supervision.
▶ Wear suitable protective gloves and clothing during operation and cleaning. Protective gloves reduce the risk of injury. Avoid loose clothing, loose hair and wearing jewellery while operating the grill.
Scope of application
During operation, keep at least 1.5 m away from combustible materials such as wooden decks, wooden structures, textiles, trees or bushes. Additional clearance is recommended when the product is placed near vinyl siding, large window fronts or house façades. There is a risk of fire.
Place the product only on a level, firm and heat-resistant surface. Do not move the product during use. The grill may otherwise tip over – resulting in a risk of fire and injury.
▶ Ensure that the product is protected from the wind.
▶ Use the grill only with approved and intact original components and original accessories.
Electrical safety
Only connect the product to a properly installed grounded power outlet with a mains voltage in accordance with the technical data ( "Technical data" on page 14).
The appliance is to be connected to a socket-outlet having an earthing contact.
▶ Operate the product only through a residual current device (RCD) that has a tripping current of no more than 30mA.
▶ Only use extension cords that are suitable for outdoor use.
▶ Always protect the connection cable and power cord from moisture, hot surfaces, sharp edges and damage. There is a risk of electric shock due to defective cables.
If the supply cord is damaged, it must be replaced by the manufacturer, its service agent or similarly qualified persons in order to avoid a hazard.
Do not carry the product by the connection cable. The product may be damaged.
Do not pull the power cord or the connection cable out of the power outlet with wet or greasy hands. There is a risk of electric shock.
Lay the connection cable and, if necessary, the extension cable in such a way that no one can trip over it and accidentally pull it out of the power outlet. There is a risk of injury and damage to property.
▶ Always unplug the power cord from the power outlet after use to avoid accidentally turning on the product.
Use and handling of the grill
Before each use, inspect the product for visible damage, improper installation of components, or loose components. In case of damage, contact your seller or RÖSLE Customer Service at www.roesle.com/service/.
Keep the grill surface free of flammable vapours and liquids, e.g., alcohol and other flammable mixtures. There is a risk of explosion.
▶ Always keep the slots and exhaust openings at the back of the hood clear.
As a precaution, keep a fire extinguisher (class F) ready during operation.
▶ Close the lid tightly on both sides with the fasteners every time it is transported.
Store the product in a dry, safe place, out of reach of children.
If the product will not be used for a long period (e.g., over winter):
Wrap the grill grates in paper and store them in a well-ventilated, dry place
▶ Lightly oil metal parts (e.g., hinges)
At the beginning of the next barbecue season or after prolonged storage:
Read this manual again carefully.
▶ Check that all components of the grill are properly attached, clean and in working order.
Avoiding grease fires
The following measures help to avoid a possible grease fire:
Clean the grill thoroughly at regular intervals. Remove grease build-up and deposits in the grease drip tray, on the funnel elements, grill grates and grill plates.
▶ Never line the grill chamber or grease drip tray with aluminium foil or sand. Lining prevents the fat from draining off. This increases the risk of a grease fire. In addition, there is a risk of property damage due to heat build-up.
2. Measures in case of fire
In the event of a grease fire or flash fire:
- Move nearby persons to safety.
-
Then, if it is possible to do so without endangering yourself:
-
Turn off the grill.
- Unplug the power cord.
- Remove grilled food from the grill grate.
- If possible, leave the lid open until the fire is out.
In the case of intense flames:
-
Attempt to extinguish the fire with a suitable extinguishing agent (fire extinguisher).
-
Observe the information on the fire extinguisher.
-
Never pour water into the grill.
-
Turn off the grill.
- Call the fire department if necessary.
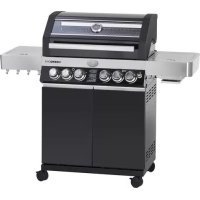
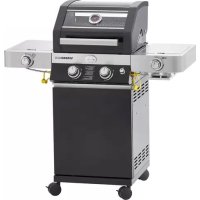
Product information
1. Intended use
This electric grill is designed for grilling and reheating food such as meat, fish or vegetables and is designed for household and outdoor use only.
Any alternative use is considered contrary to the intended use and may entail hazards, for example:
use as a "fireplace" (with charcoal or similar substances) or heating source
use indoors, in garages, in covered or enclosed places such as roofed or covered porches or terraces, in or on caravans, tents or water craft
commercial use
▶ unsupervised use
▶ use of a rebuilt or modified product. Alterations and modifications to the product will invalidate the warranty.
2. Components shown
The letters of the components shown refer to the illustration of the electric grill on the diagram.
Scope of delivery pg. 2.
A – lid with glass insert
B - power cord
C - foot (4x)
D - screws (4x) for foot
E – buckle for closing the lid
F – hook bar for cutlery
G – screws (2x) for hook bar
H – control knob and display
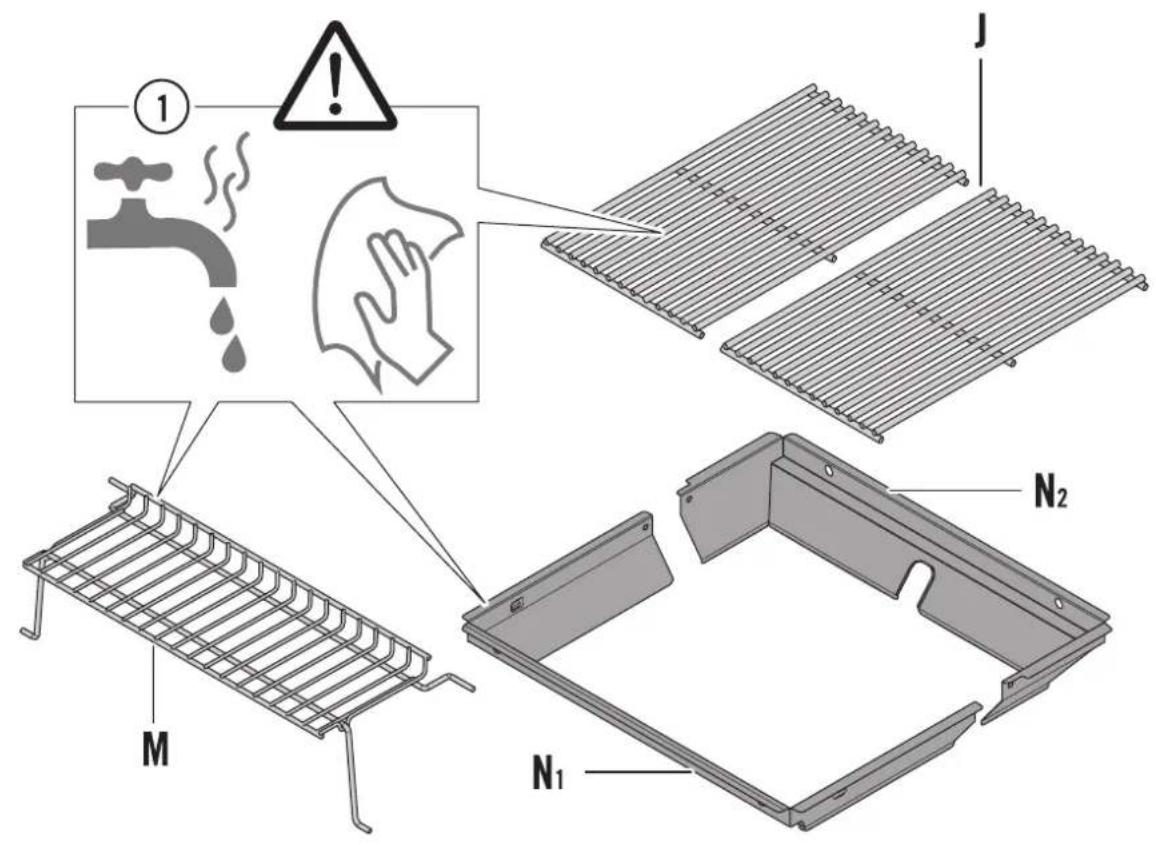
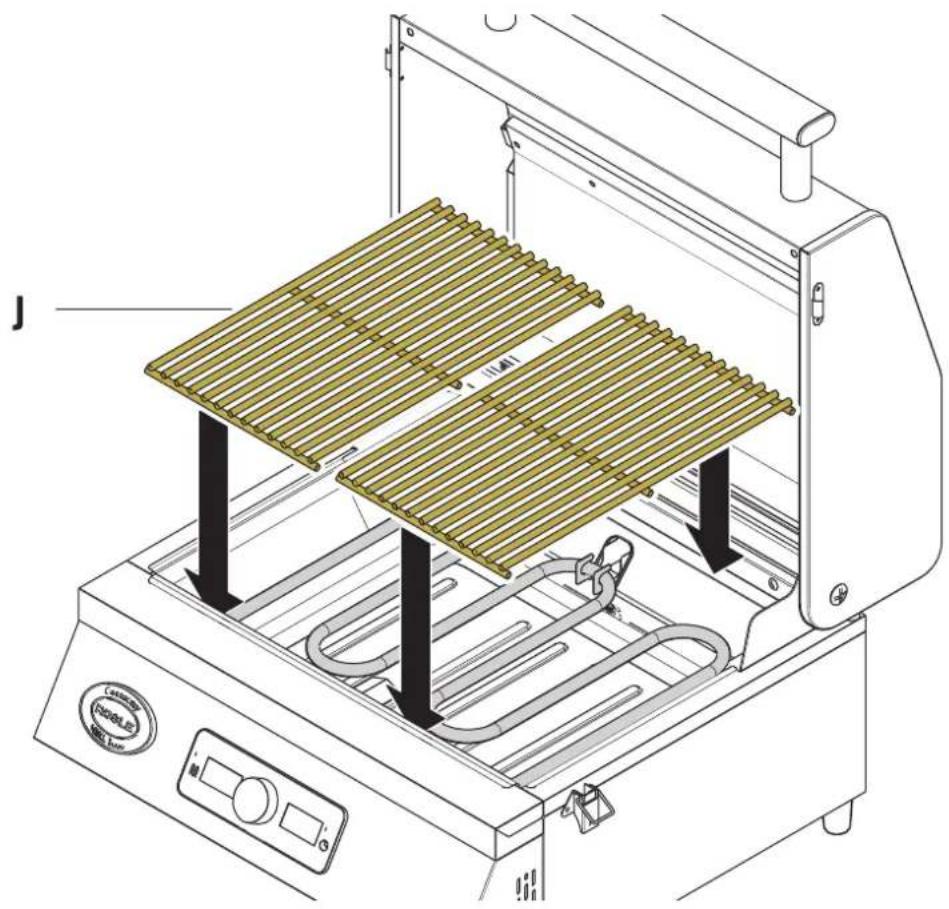
J - Two-piece main grill grate
K – heating coil
L – grease drip tray
M – warming grate
N_1, N_2 – funnel element in two parts
3. Technical data
Model Videro E2-P/Videro Pro E2-P
Item no: 25582 / 25589
Power connection: 220–240 V / 50-60 Hz
Maximum wattage 2800 W
Device protection class IPX4
Power cord protection class IP44
Weight 13,9 kg
Dimensions W 49.7 x H 34.4 x L 46,6 cm
Assembly
Assemble the grill as described on the graphic "Assembly" on pg. 2.
Before first use
▶ Wear suitable protective gloves to protect against scalding.
Prepare the grill for first use as described below and on the diagrams starting on pg. 3.
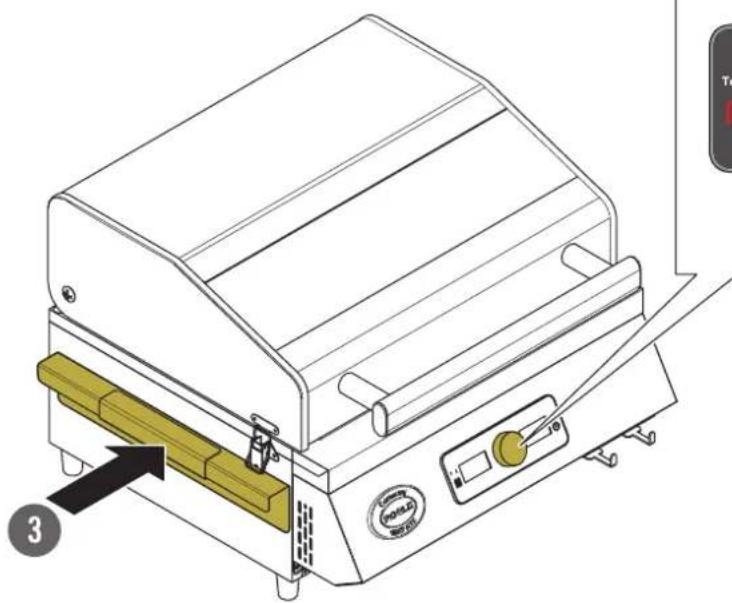
- Remove the main grill grate, warming grate, two-piece funnel and grease drip tray.
- Clean the parts with hot water and dry them thoroughly.
- Replace the parts in the following order: Funnel (two-part, first the rear part), main grill grate, warming grate.
▶ Fill the grease drip tray with water up to the max. mark (approx. 700 ml).
▶ Heat the unit for approx. 15 minutes on the highest setting.
There may be a slight temporary emission of smoke due to the combustion of manufacturing residues.
Operation
▶ Wear suitable protective gloves (grilling gloves) during operation and only touch the grill at the points intended for operation. There is a risk of injury from hot surfaces.
▶ Cover a maximum of 80% of the grill surface with grill food, grill plates, drip trays, pizza stones, etc., to avoid accumulated heat in the lower area of the grill chamber.
Keep an eye on the water level during operation and top up water in the grease drip tray promptly as needed. Never pour water directly onto the heating elements.
Before each use, check drains leading to the grease drip tray for grease accumulation. Remove excessive grease and deposits to avoid a grease fire.
1. Preparation
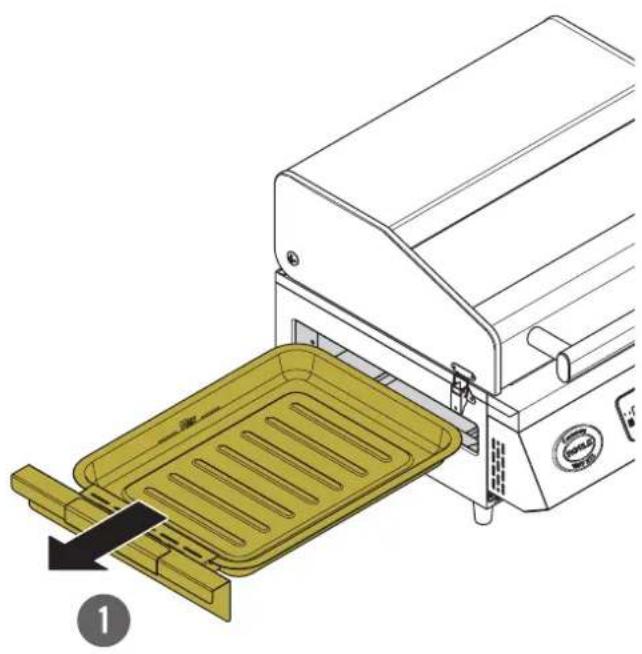
- Slightly pull out the grease drip tray from the side and fill water into the grease drip tray up to the max. mark (approx. 700 ml).
- Carefully push the grease drip tray filled with water back in.
- Connect the power cord to the power outlet.
The display lights up briefly after plugging in, a short signal tone sounds (standby mode)
i Refill the evaporated water promptly. The water in the grease drip tray reduces smoke development and facilitates subsequent cleaning.
2. Switch on
text_image
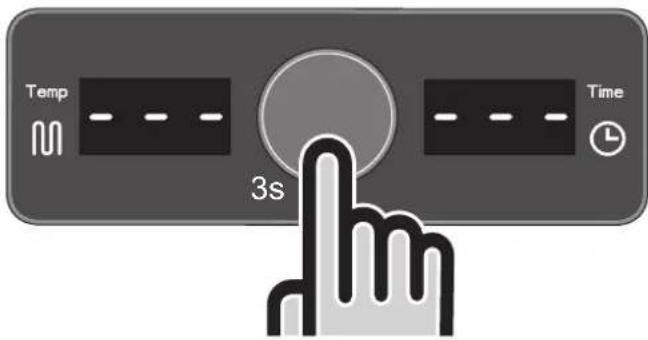
Temp 3s Time- To switch on, press and hold the control knob for 3 seconds
The LED display turns on, the grill is in operation mode (display "---").
3. Setting the temperature and timer
For best grilling results, preheat the grill for 20–25 minutes.
The heating time varies depending on outdoor conditions such as air temperature and wind.
For safety reasons, we recommend always using the timer function.
Follow the instructions under → "Electrical safety" on page 12).
text_image
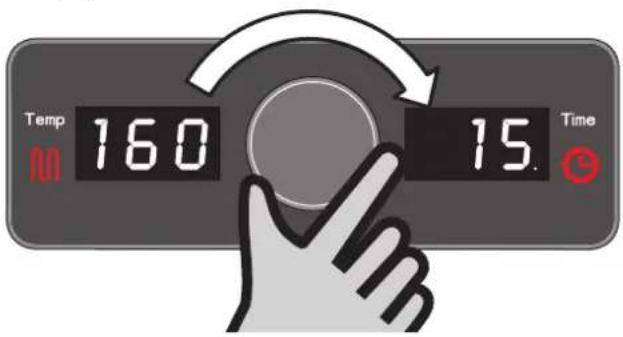
Temp 160 Time 15.-
Press the control knob briefly.
-
Turn the control knob to the right to set the desired grilling temperature (120–300 °C).
The temperature display flashes.
- Briefly press the control knob again to confirm the selected temperature.
The temperature display lights up continuously and an acoustic signal sounds.
The display changes to the standby mode for the timer setting.
- For the timer setting turn the control knob to the right to select the desired time preset (0–240 minutes; optional setting).
The minute number flashes (standby mode).
- Briefly press the control knob again to confirm the set time.
An acoustic signal sounds (long beep).
The "heating coil" and "clock" symbols light up red, the minute display now lights up continuously.
The grill heats up while the temperature display flashes. The dot next to the minute number flashes, the display counts down the time.
As soon as the temperature is reached, the temperature display lights up constantly and the colour of the "heating coil" symbol changes to white. The "heating coil" symbol switches off after reaching the target temperature.
The heating coil will switch on and off as required during the operating time until the set target temperature is reached.
When the set time has elapsed, the display shows "END" and an acoustic signal sounds (double beep).
4. Switching off
-
Press the control knob for 3 seconds to switch off the power supply to the grill and the operation mode.
-
Unplug the grill from the power outlet and allow the grill to cool.
Cleaning
1. Removing parts
To clean the electric grill thoroughly, it is necessary to remove the components to be cleaned. Stubborn dirt and grease deposits can best be removed in this way. The RÖSLE electric grill has been designed so that the components can be quickly removed in just a few steps and cleaned by hand or with the dishwasher.
Generally speaking:
▶ Always unplug the power cord before cleaning.
▶ Only clean the grill when it has cooled down completely.
▶ Use a mild detergent and water. Rinse thoroughly with clean water and dry the surfaces. Do not use abrasive or acidic stainless steel polishes, cleaners or scouring pads.
Clean the heating coil only with a slightly damp cloth. Ensure that the heating coil is not treated with any liquids.
Remove the parts in this order:
- Main grill grate
- Warming grate
- Funnel (first front insert, then rear)
- Grease drip tray.
2. Cleaning the grill chamber
-
Use oven cleaner or another suitable grill cleaner to clean the grill chamber.
-
Rinse thoroughly with clean water.
-
Dry the surfaces well afterwards.
3. Cleaning the grill and warming grate
- To remove burnt-on food residues, soak the grate in hot soapy water for several minutes.
- Then promptly remove the soiling gently with a suitable soft stainless steel or brass brush, e.g., the RÖSLE Barbecue Cleaning Brush. Do not use an unalloyed steel brush, steel wool or abrasive cleaners. Wipe with a damp cloth.
- Rinse thoroughly with clean water afterwards.
- Dry the grate well after cleaning.
4. Cleaning the grease drip tray
Clean the grease drip tray regularly, and more frequently if the grill is used heavily. Adjust your care plan according to usage. An accumulation of grease and oil in the grill can lead to a grease fire.
- Remove the grease drip tray.
- Remove excess grease.
- Then clean the grease drip tray with warm soapy water and rinse with clean water.
- Alternatively, the grease drip tray can be cleaned in the dishwasher.
5. Re-assembling the parts
Put the parts back in the following order:
- Grease drip tray
- Funnel (first rear insert, then front)
- Warming grate
- Main grill grate
Care and storage
With outdoor equipment made of steel, a little rust on the surface must be expected from time to time. If your grill is always covered, clean and dry, you have already done a great deal to prevent rust.
If you follow these tips, you will enjoy your RÖSLE electric grill for years to come:
Grill surfaces should be kept clean and dry after grilling – especially after grilling with marinades. These contain salt and corrode the surface.
Lightly grease the grill grate surfaces and any cast iron parts with cooking oil after use.
Light surface rust can be easily removed with a rag soaked in vinegar essence or with a commercial rust remover. Follow the instructions of the cleaning agent manufacturer.
Do not leave your grill outside unprotected. Once the grill has cooled down completely, you should store it in a dry place in the corresponding RÖSLE carrying bag. Do not store the grill next to road salt.
Do not store your grill wet. First, dry it carefully.
Troubleshooting
Problem 1: The grill does not function or cannot be switched on.
Cause: Power cord not plugged in.
Troubleshooting: Check the power supply at the power outlet.
Problem 2: Grill turns off again after a short time.
Cause: Too many consumers connected to one power outlet via a power adapter
Troubleshooting: Disconnect unnecessary consumers from the power outlet. If that does not help, check the fuse box.
Warranty
This item is covered by the statutory warranty. The warranty refers to defects in the item that are based on a material or manufacturing defect. Please keep the proof of purchase as evidence.
No liability will be accepted for product damage in the following cases:
▶ Defects due to improper transport
▶ Defects resulting from improper or negligent use
▶ Defects due to natural or normal wear and tear
for common signs of use
for defects due to weathering, chemical, physical, electrochemical or electrical influences
for defects caused by failure to comply with the regulations and manufacturer's instructions on the handling, maintenance, cleaning and care of the item
▶ Defects due to improperly performed repairs
▶ Defects due to the installation of non-original spare parts and accessories
If you have any questions or complaints, please contact the seller from whom you purchased your product.
Disposal
Your new appliance has been protected by the packaging during its journey to you. All packaging materials used are environmentally friendly and recyclable. Please help by disposing of the packaging in an environmentally friendly way. For information on current disposal methods, please contact your dealer or your municipal waste disposal facility.
Do not allow children to play with the packaging and its parts. There is a risk of suffocation from plastic film and other packaging materials.
Owners of old appliances from private households can return them free of charge to the collection points of the public waste management authorities or to the take-back points set up by manufacturers or distributors as defined by the ElektroG.
Declaration of Conformity
CE We declare that this product complies with the following Union legislation:
Directive 2014/35/EU, Directive 2014/30/EU and Regulation (EC) 1935/2004.
Chère cliente, cher client RÖSLE,
text_image
Temp 3s TimeGentile cliente RÖSLE,
text_image
Temp 3s Timetext_image
Temp 3s TimeJ – Todelt grillrist
K – Varmelegeme
L – Fedtdrypbakke
M - Varmerist
N_1, N_2 – justeringselement i to dele
3. Tekniske data
Model Videro E2-P / Videro Pro E2-P
Art.nr.: 25582 / 25589
Nettilslutning: 220–240 V / 50-60 Hz
Maksimal watt 2800 W
text_image
Temp 3s Timetext_image
Temp 3s Time- Slå på apparatet ved å holde inne dreieknappen i 3 sekunder