
Total Eclipse - Basket Klarstein - Free user manual and instructions
Find the device manual for free Total Eclipse Klarstein in PDF.

| Product type | Wall-mounted decorative hood |
| Brand | Klarstein |
| Model | Total Eclipse |
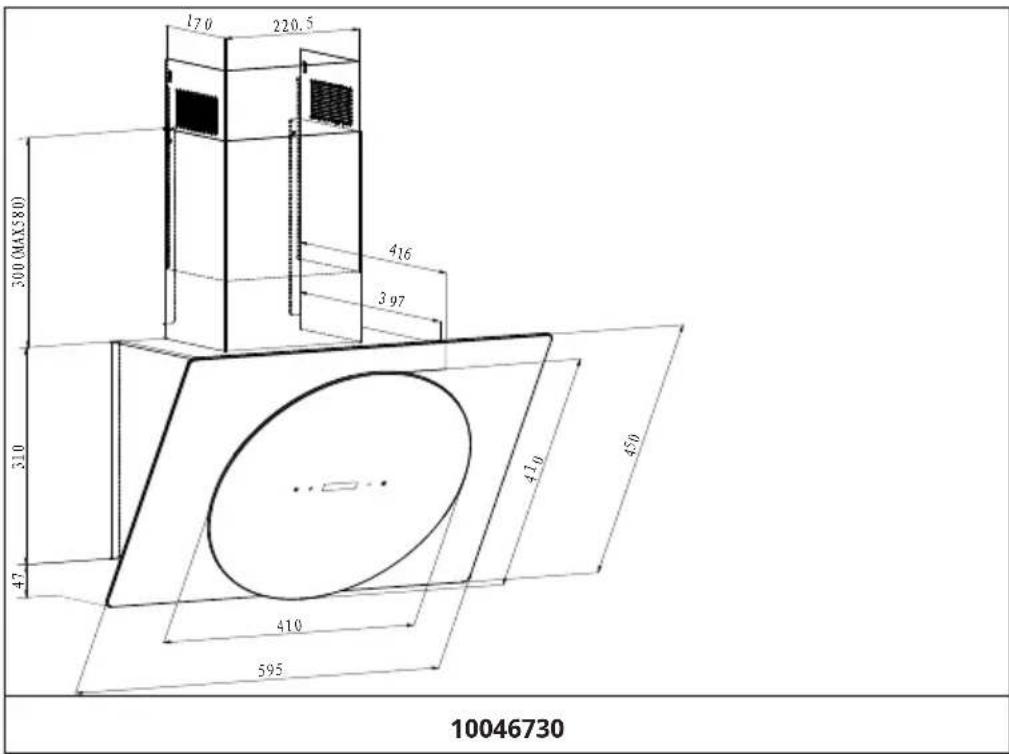
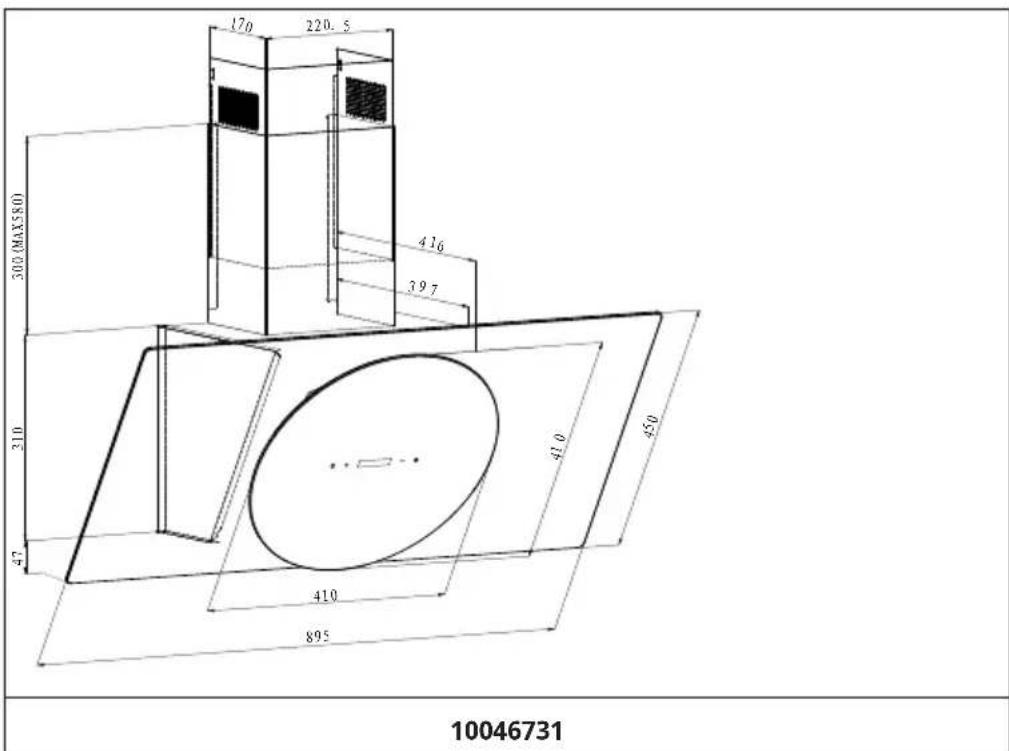
| References | 10046730 (60 cm), 10046731 (90 cm) |
| Width | 595 mm (60 cm model) / 895 mm (90 cm model) |
| Adjustable chimney height | 300 to 580 mm |
| Depth | 450 mm (estimate from dimensions) |
| Power supply | 220-240 V ~ 50 Hz |
| Energy efficiency class | A |
| Annual energy consumption | 35.9 kWh/year |
| Airflow (min/max) | 410 / 541 m³/h |
| Noise level (min/max) | 57 / 64 dB(A) |
| Lighting | Integrated LED, adjustable color temperature (hold 3 s) |
| Luminous efficacy | 33 Lux/W (60 cm model) / 30 Lux/W (90 cm model) |
| Grease filter | Dishwasher-safe metal filter |
| Activated carbon filter (optional) | Ref. 10032843, replace approximately every year |
| Grease filtration efficiency | 64.5 % (60 cm model) / 68.0 % (90 cm model) |
| Controls | Touch panel: timer, speed setting, lighting |
| Operating modes | Air extraction or recirculation (with charcoal filter) |
| Minimum distance above cooking surface | 65 to 75 cm |
| Standby consumption | 0.77 W |
| Environmental information | Recycling according to local regulations |
Frequently Asked Questions - Total Eclipse Klarstein
User questions about Total Eclipse Klarstein
0 question about this device. Answer the ones you know or ask your own.
Ask a new question about this device
Download the instructions for your Basket in PDF format for free! Find your manual Total Eclipse - Klarstein and take your electronic device back in hand. On this page are published all the documents necessary for the use of your device. Total Eclipse by Klarstein.
USER MANUAL Total Eclipse Klarstein
KLARSTEIN
www.klarstein.com

area
| Category | Value | | -------- | ----- | | 1 | 100 | | 2 | 100 | | 3 | 100 | | 4 | 100 | | 5 | 100 | | 6 | 100 | | 7 | 100 | | 8 | 100 | | 9 | 100 | | 10 | 100 | | 11 | 100 | | 12 | 100 | | 13 | 100 | | 14 | 100 | | 15 | 100 | | 16 | 100 | | 17 | 100 | | 18 | 100 | | 19 | 100 | | 20 | 100 | | 21 | 100 | | 22 | 100 | | 23 | 100 | | 24 | 100 | | 25 | 100 | | 26 | 100 | | 27 | 100 | | 28 | 100 | | 29 | 100 | | 30 | 100 | | 31 | 100 | | 32 | 100 | | 33 | 100 | | 34 | 100 | | 35 | 100 | | 36 | 100 | | 37 | 100 | | 38 | 100 | | 39 | 100 | | 40 | 100 | | 41 | 100 | | 42 | 100 | | 43 | 100 | | 44 | 100 | | 45 | 100 | | 46 | 100 | | 47 | 100 | | 48 | 100 | | 49 | 100 | | 50 | 100 | | 51 | 100 | | 52 | 100 | | 53 | 100 | | 54 | 100 | | 55 | 100 | | 56 | 100 | | 57 | 100 | | 58 | 100 | | 59 | 100 | | 60 | 100 | | 61 | 100 | | 62 | 100 | | 63 | 100 | | 64 | 100 | | 65 | 100 | | 66 | 100 | | 67 | 100 | | 68 | 100 | | 69 | 100 | | 70 | 100 | | 71 | 100 | | 72 | 100 | | 73 | 100 | | 74 | 100 | | 75 | 100 | | 76 | 100 | | 77 | 100 | | 78 | 100 | | 79 | 100 | | 80 | 100 | | Note: The actual values are not provided in the code. I have used the label 'Value' as a placeholder for the value detection. You would need to run the code to get the actual values from the code list. Please note that the actual values would be the result of this example. You would need to run the code to get the actual values from the code list. You would need to run the code to get the actual values from the code list. You would need to run the code to get the actual values from the code list. You would need to run the code to get the actual values from the code list. You would need to run the code to get the actual values from the code list. You would need to run the code to get the actual values from the code list. You would need to run the code to get the actual values from you would need to run the code. You would need to run the code to get the actual values from you would need to run the code.INHALT
Technische Daten 3
natural_image
Simple line drawing of a mechanical setup with a cylindrical component and a base, no text or symbols present.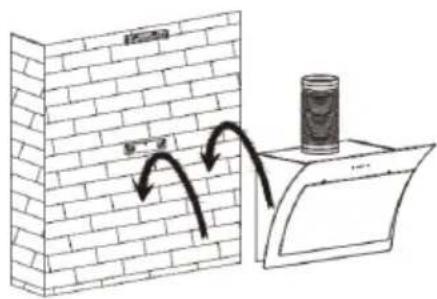
Abbildung 3
natural_image
Diagram of a wall-mounted air purifier mounted on a cabinet against a brick wall (no text or symbols)Name: Customer service
Website: https://www.elektronik-star.de/lnfo/Impressum/
E-Mail-Adresse: info@electronic-star.de
Telefonnummer: +49303001385500
Anschrift:
Wallstraße 16
10179 berlin
Deutschland
Name: Customer service
Website: https://www.elektronik-star.de/lnfo/Impressum/
E-Mail-Adresse: info@electronic-star.de
Telefonnummer: +49303001385500
Anschrift:
Wallstraße 16
10179 berlin
Deutschland
natural_image
Symbol of a trash bin with crossed lines indicating no waste or restriction, and a solid black rectangle below (no text or labels)Berlin Brands Group UK Limited
PO Box 42
272 Kensington High Street
London, W8 6ND
United Kingdom
Dear Customer,
Congratulations on purchasing this device. Please read the following instructions carefully and follow them to prevent possible damages. We assume no liability for damage caused by disregard of the instructions and improper use. Scan the QR code to get access to the latest user manual and more product information.

CONTENTS
Technical Data 21
Safety Instructions 22
Dimensions 24
Installation 26
Install Activated Carbon Filter (Optional) 29
Cleaning and Care 30
Troubleshooting 32
Product Data Sheets 33
Disposal Considerations 35
Manufacturer & Importer (UK) 35
TECHNICAL DATA
| Item number 10046730, 10046731 | |
| Power supply 220-240 V ~ 50 Hz | |
| Note: You can also purchase an activated carbon filter for this cooker hood under item number 10030983. To do so, visit our website: www.klarstein.co.uk | |
SAFETY INSTRUCTIONS
- Read all instructions carefully before use and keep the user manual in a safe place for future reference.
- The installation work may only be carried out by an electrician or a qualified person. Before using the cooker hood, make sure that the voltage (V) and frequency (Hz) indicated on the cooker hood correspond to the voltage and frequency of the power supply in your household.
- We accept no liability for damage caused by improper use or installation.
• Children under 8 years of age must not use the cooker hood. - The device is not intended for commercial use, only for household and similar use.
- Clean the appliance and the filter regularly to keep the appliance working efficiently.
• Always disconnect the power plug from the socket before cleaning. - Clean the appliance exactly as indicated in the operating instructions.
- Do not use an open fire under the extractor hood.
- If the unit is not functioning normally, contact the manufacturer or a specialist company.
- Children from the age of 8 years and mentally, sensory and physically impaired persons may only use the device if they have been informed in detail about the functions and safety precautions by a supervisor responsible for them beforehand and understand the associated risks.
- If the power cord is damaged, it must be replaced by the manufacturer, an authorised specialist company or a similarly qualified person.
- If the cooker hood is used with cookers that burn gas or other fuels, there must be adequate ventilation in the room.
- Do not flambé under the extractor hood.
- Caution: The surface of the unit may become hot during operation.
Important instructions for installation
- The air must not be discharged into a flue used for extracting flue gases from gas or other fuels (does not apply to appliances that only return the air to the room).
- Observe all regional regulations for the installation of ventilation systems.
Important notes on exhaust air operation

WARNING
Danger of poisoning from recirculated exhaust gases! Do not operate the appliance in extract air mode if it is operated together with a room air-dependent fireplace and sufficient air circulation is not guaranteed.
Room air-dependent fireplaces such as gas, oil, wood or coal heaters, boilers or instantaneous water heaters draw the air from the room and lead it outdoors through an exhaust pipe or chimney. In extract air mode, air is extracted from the kitchen and neighbouring rooms. Without sufficient supply air, negative pressure is created. Toxic gases from the chimney or exhaust pipe can be sucked back into the living rooms.
- Make sure that sufficient fresh air supply is guaranteed and that the air can circulate.
- A supply air/exhaust air wall box is not sufficient to ensure compliance with the limit value.
Safe operation is only possible if the negative pressure at the location of the fireplace does not exceed 4 Pa (0.04 mbar). This can be achieved if the air required for combustion can flow in through non-closable openings in doors and windows in conjunction with a supply air / exhaust air wall box. In any case, have a master chimney sweep advise you and assess the entire ventilation system of the house. If necessary, they can tell you the necessary measure for ventilation.
If the cooker hood is used exclusively in recirculation mode, operation is possible without restriction.
Important note on dismantling the unit
- Disassembly is the same as installation/assembly in reverse order.
- Have a second person help you during disassembly to avoid injury.
DIMENSIONS
Control Panel

 | Timer | |
 | Increase | |
 | Display | |
 | Decrease | |
 | Light/ Press and hold the button for 3 seconds to adjust the colour temperature of the ambient light. | |
INSTALLATION
Important information before installing the appliance
- Clean the surrounding area thoroughly before and after installation so that no dust or construction debris can be sucked in during commissioning.
- Only place the appliance in a suitable location.
- Check the wall for its load-bearing capacity.
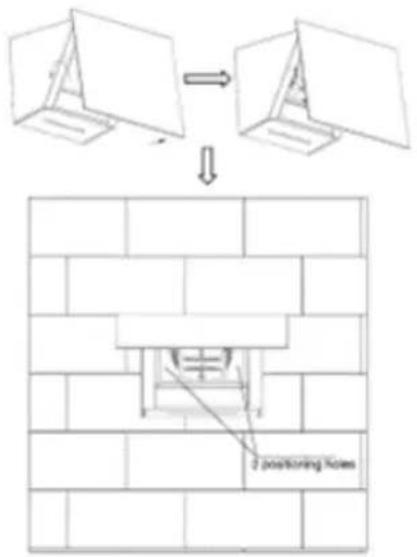
- Check the routing of electrical and other cables on and in the wall or ceiling so that they are not drilled into. Figure 1
- Check the condition and load-bearing capacity of the electrical cables.
• Installation of the unit by a specialist is recommended. - The extractor bonnet should be installed at a height of 65-75 cm above the hob. When installing, strictly observe the minimum distance between the hob and the extractor bonnet and follow the description of the work steps in the „Wall mounting“ section and all other instructions.
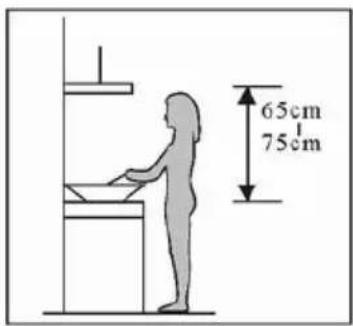
Pic1
Once the height of the chimney has been determined, place the hook and internal chimney support in a suitable location and keep it in line. Use screws to secure to the wall (see Figure 2).
Interior chimney bracket
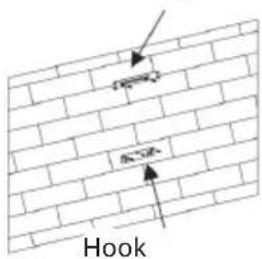
Figure 2
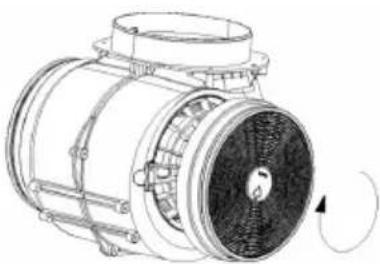
Fit the extension tube to the hood and place the hood on the bracket (see Figure 3).
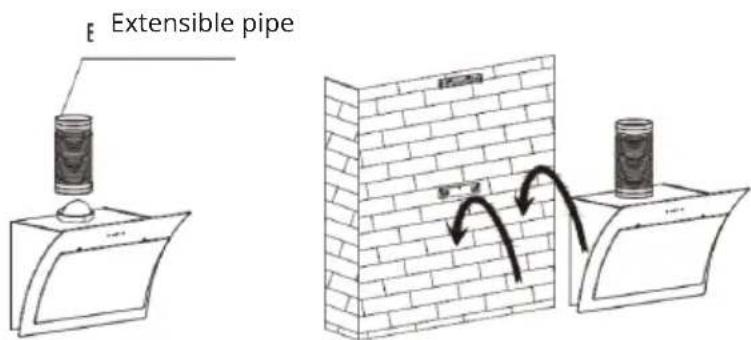
Figure 3
Fix the extendable tube to the hole and then place the two chimneys together on the hood body (see Figure 4).
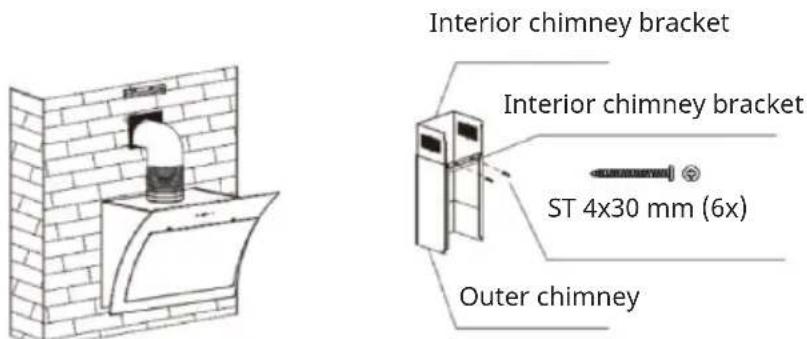
Figure 4
Screw the inner chimney to the chimney bracket and secure the body with the safety screws (see Figure 5).
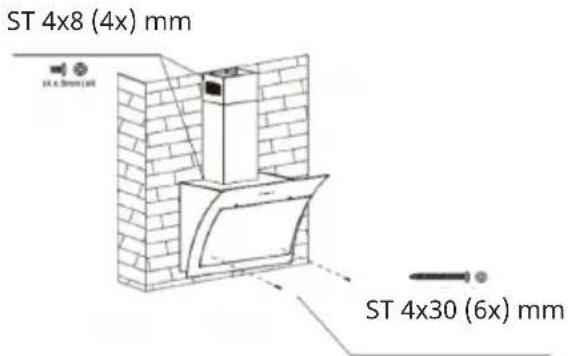
Figure 5
Important notes on installation
- The cooker hood cannot share the same air ventilation pipe with other appliances such as gas pipe, warm air pipe and hot air pipe.
- The bend of the ventilation pipe should be ≥ 120^ , parallel or above the starting point and should be connected to the outside wall.
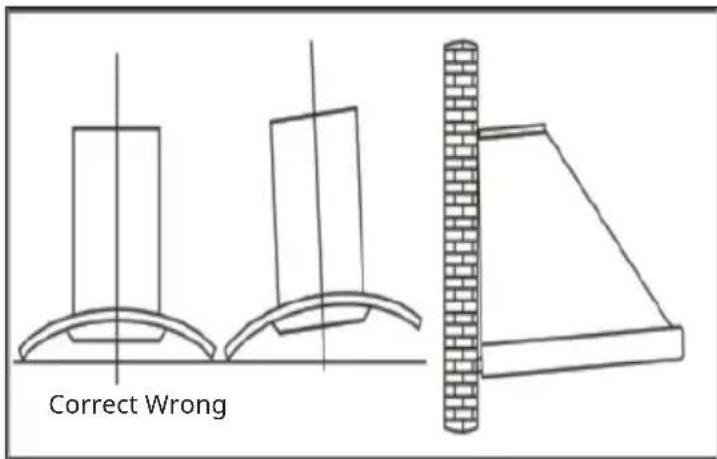
• After installation, ensure that the chimney is level to avoid grease accumulation at one end.
INSTALL ACTIVATED CARBON FILTER (OPTIONAL)
Note: You can purchase an additional activated charcoal filter for this cooker bonnet under item number10030983). To do so, visit our website: www.klarstein.co.uk
- Remove the metal grease filter.
- The carbon filter is mounted in two parts to the right and left of the motor. Check that the teeth correspond with the direction of rotation of the respective side.
- Turn the activated carbon filter onto the motor housing (usually clockwise).
| 1 | 2 |
 |  |
| Activated carbon filter can be used to trap odours. | In order to install the activated carbon filter, the grease filter should be detached first. Press the lock and pull it downward. |
| 3 | |
 | Plug the activated carbon filter into the unit and turn it in clockwise direction. Repeat the same on the other side. Make sure the filter is securely locked. Otherwise, it would loosen and cause dangerous. When activated carbon filter attached, the suction power will be lower. |
Note: The illustrations are for reference only. The actual product may differ from these.
CLEANING AND CARE
Annual Cleaning for Activated Filter
Apply solely to unit that installed as a recirculation unit (not vented to the outside). This filter traps odours and must be replaced at least once a year depending on how frequent the cooker hood used.
Monthly Cleaning for Grease Filter
Clean the filter every month can prevent any risk of fire. The filter collects grease, smoke and dust, so the filter is directly affecting the efficiency of the cooker hood. If not cleaned, the grease residue (potential flammable) will saturate on the filter. Clean it with household cleaning detergent.
Removing the front panel of the hood, to clean or change the grease filter:
- Inspect the front panel of the wall-mounted hood to identify the mechanisms holding it in place. These could be screws, clips, or other fasteners located along the edges or corners of the panel.
- Depending on the type of retaining mechanisms, use the appropriate tools. For screws, you'll need a screwdriver compatible with the screw head type. For clips, a flathead screwdriver or a similar tool may be required for prying them open.
- If there are screws, carefully loosen and remove them by turning them counter clockwise until they are fully disengaged from the panel. If there are clips, gently pry them open to release the panel.
- Once the retaining mechanisms are loosened or removed, gently pull the front panel away from the hood. Apply even pressure and avoid forcing it to prevent damage to the panel or the hood itself. If the panel is stuck, gently wiggle it back and forth while pulling it away from the hood until it comes free.
- After removing the front panel, set it aside in a safe location where it won't be damaged. Take note of its orientation and any specific instructions for reinstallation.
- With the front panel removed, you now have access to the interior components of the hood for maintenance or repairs. Clean the panel thoroughly if necessary and inspect the interior for any debris or damage that may require attention.
TROUBLESHOOTING
| Fault Possible Cause Solution | ||
| Light on, but motor does not work. | The leaf blocked. Get rid of the blocking. | |
| The capacitor damaged. Replace capacitor. | ||
| The motor jammed bearing damaged. | Replace motor. | |
| The internal with of motor off or a bad smell from the motor. | Replace motor. | |
| Light does not work, motor does not work. | Light damaged. Replace lights. | |
| Power cord looses. Connect the wires as per the electric diagram. | ||
| Shake of the body. The leaf | damaged and causes shaking. | Replace the leaf. |
| The motor is not tightly hanged. | Lock the motor tightly. | |
| The body is not tightly hanged. | Fixed the body tightly. | |
| Insufficient suction. The distance between the body and the gas top too long. | Readjust the distance. | |
| Too much ventilation from open doors or windows. Choose a new place and resemble the machine. | ||
Product fiche
Delegated Regulation (EU) 65/2014
| Supplier name or trademark Klarstein | |
| Model identifier 10046730 | |
| Annual Energy Consumption 35,9 kWh/annum | |
| Energy Efficiency Class A | |
| Fluid Dynamic Efficiency 26,7 | |
| Fluid Dynamic Efficiency class B | |
| Lighting Efficiency 33,0 Lux/W | |
| Lighting Efficiency class A | |
| Grease Filtering Efficiency 64,5 % | |
| Grease Filtering Efficiency class E | |
| Air flow (min speed normal use) 410 m3/h | |
| Air flow (max speed normal use) 541 m3/h | |
| Airborne acoustical A-weighted sound power emissions (min speed normal use) | 57 dB |
| Airborne acoustical A-weighted sound power emissions (max speed normal use) | 64 dB |
| Power consumption in standby mode (W) 0,77 W |
Model placed on the Union market from 01/01/2025.

EPREL registration number: 2191023
https://eprel.ec.europa.eu/qr/2191023
Supplier: Chal -Tec GmbH (Authorised representative)
Website:
Customer care service:
Name: Customer service
Website: https://www.elektronik-star.de/lnfo/Impressum/
Email: info@electronic-star.de
Phone: +49303001385500
Address:
Wallstraße 16
10179 berlin
Germany
Product fiche
Delegated Regulation (EU) 65/2014
| Supplier name or trademark Klarstein | |
| Model identifier 10046731 | |
| Annual Energy Consumption 35,9 kWh/annum | |
| Energy Efficiency Class A | |
| Fluid Dynamic Efficiency 26,7 | |
| Fluid Dynamic Efficiency class B | |
| Lighting Efficiency 30,0 Lux/W | |
| Lighting Efficiency class A | |
| Grease Filtering Efficiency 68,0 % | |
| Grease Filtering Efficiency class D | |
| Air flow (min speed normal use) 410 m^3/h | |
| Air flow (max speed normal use) 541 m^3/h | |
| Airborne acoustical A-weighted sound power emissions (min speed normal use) | 57 dB |
| Airborne acoustical A-weighted sound power emissions (max speed normal use) | 64 dB |
| Power consumption in off mode (W) 0,47 W | |
| Power consumption in standby mode (W) 0,77 W |
Model placed on the Union market from 01/01/2025.

EPREL registration number: 2212277
https://eprel.ec.europa.eu/qr/2212277
Supplier: Chal -Tec GmbH (Authorised representative)
Website:
Customer care service:
Name: Customer service
Website: https://www.elektronik-star.de/lnfo/Impressum/
Email: info@electronic-star.de
Phone: +49303001385500
Address:
Wallstraße 16
10179 berlin
Germany
DISPOSAL CONSIDERATIONS
natural_image
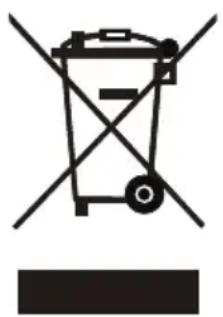
Symbol of a trash bin with crossed lines and a horizontal bar below (no text or labels)If there is a legal regulation for the disposal of electrical and electronic devices in your country, this symbol on the product or on the packaging indicates that this product must not be disposed of with household waste. Instead, it must be taken to a collection point for the recycling of electrical and electronic equipment. By disposing of it in accordance with the rules, you are protecting the environment and the health of your fellow human beings from negative consequences. For information about the recycling and disposal of this product, please contact your local authority or your household waste disposal service.
MANUFACTURER & IMPORTER (UK)
Manufacturer:
Chal-Tec GmbH, Wallstrasse 16, 10179 Berlin, Germany.
info@electronic-star.de
Importer for Great Britain:
Berlin Brands Group UK Limited
PO Box 42
272 Kensington High Street
London, W8 6ND
United Kingdom
Estimado cliente:
ÍNDICE
Datos técnicos 37
natural_image
Symbol of a trash bin with crossed x and y axes, no text or labels presentBerlin Brands Group UK Limited PO Box 42
272 Kensington High Street
London, W8 6ND
United Kingdom
Chère cliente, cher client,
SOMMAIRE
Fiche technique 53
DÉPANNAGE
Nom: Customer service
Site web: https://www.elektronik-star.de/lnfo/Impressum/
Courriel: info@electronic-star.de
Téléphone: +49303001385500
Adresse:
Wallstraße 16
10179 berlin
Allemagne
Fiche de produit
Nom: Customer service
Site web: https://www.elektronik-star.de/lnfo/Impressum/
Courriel: info@electronic-star.de
Téléphone: +49303001385500
Adresse:
Wallstraße 16
10179 berlin
Allemagne
REMARQUES SUR LA PROTECTION DE L'ENVIRONNEMENT
natural_image
Symbol of a trash bin with crossed lines indicating no waste, and a solid black rectangle below (no text or labels)Berlin Brands Group UK Limited
PO Box 42
272 Kensington High Street
London, W8 6ND
United Kingdom
Gentile cliente,
INDICE
Dati tecnici 69
Efficienza luminosa 33,0 lux/W
Nome: Customer service
Sito web: https://www.elektronik-star.de/lnfo/Impressum/
E-mail: info@electronic-star.de
Nome: Customer service
Sito web: https://www.elektronik-star.de/lnfo/Impressum/
E-mail: info@electronic-star.de
natural_image
Symbol of a trash bin with crossed lines indicating no waste, and a solid rectangle below (no text or labels)Berlin Brands Group UK Limited
PO Box 42
272 Kensington High Street
London, W8 6ND
United Kingdom
KLARSTEIN

- INHALT
- Dear Customer,
- CONTENTS
- TECHNICAL DATA
- SAFETY INSTRUCTIONS
- Important instructions for installation
- Important notes on exhaust air operation
- WARNING
- Important note on dismantling the unit
- Control Panel
- INSTALLATION
- Important information before installing the appliance
- Important notes on installation
- INSTALL ACTIVATED CARBON FILTER (OPTIONAL)
- CLEANING AND CARE
- Annual Cleaning for Activated Filter
- Monthly Cleaning for Grease Filter
- Removing the front panel of the hood, to clean or change the grease filter:
- TROUBLESHOOTING
- Product fiche
- DISPOSAL CONSIDERATIONS
- MANUFACTURER & IMPORTER (UK)
- Manufacturer:
- Importer for Great Britain:
- Estimado cliente:
- ÍNDICE
- Chère cliente, cher client,
- SOMMAIRE
- REMARQUES SUR LA PROTECTION DE L'ENVIRONNEMENT
- Gentile cliente,
- INDICE
- KLARSTEIN
Brand : Klarstein
Model : Total Eclipse
Category : Basket