
1A-EG932 - Choppers Vevor - Free user manual and instructions
Find the device manual for free 1A-EG932 Vevor in PDF.
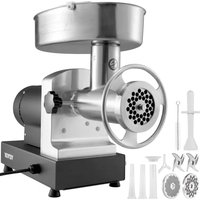


| Product Type | Electric Meat Grinder |
| Brand | Vevor |
| Model | 1A-EG932 |
| Power Supply | 230 V / 50 Hz |
| Power | 750 W |
| Grinding Capacity | ≥ 9.5 kg/min |
| Continuous Operation Time | 4 hours |
| Grinder Head Material | Stainless Steel |
| Motor Housing Material | Steel and Plastic |
| Included Grinding Plates | 4.5 mm and 10 mm |
| Included Stuffing Accessories | Stuffing Tubes (3 pieces), plastic connector |
| Meat Tray | Yes, included |
| Pusher | Yes, included |
| Cleaning Brush | Yes, included |
| Sausage Stuffing Function | Yes, with accessories |
| Electrical Safety | Grounded plug (3 prongs) |
| Overheat Protection | Manual shutdown recommended after 4h |
| Recommended Maintenance | Hand wash, lubrication with food-grade silicone spray |
| Warranty | Electronic warranty via www.vevor.com/support |
Frequently Asked Questions - 1A-EG932 Vevor
User questions about 1A-EG932 Vevor
0 question about this device. Answer the ones you know or ask your own.
Ask a new question about this device
Download the instructions for your Choppers in PDF format for free! Find your manual 1A-EG932 - Vevor and take your electronic device back in hand. On this page are published all the documents necessary for the use of your device. 1A-EG932 by Vevor.
USER MANUAL 1A-EG932 Vevor
Technical Support and E-Warranty Certificate www.vevor.com/support
ELECTRIC MEAT GRINDER
MODEL: 1A-EG808/1A-EG812/1A-EG822/1A-EG832
We continue to be committed to provide you tools with competitive pricing. "Save Half", "Half Price" or any other similar expressions used by us only to estimate of savings you might benefit from buying certain tools with us major top brands and does not necessarily mean to cover all categories of 1 by us. You are kindly reminded to verify carefully when you are placing an you are actually saving half in comparison with the top major brands
VEVOR®
TOUGH TOOLS, HALF PRICE
ELECTRIC MEAT GRINDER
MODEL: 1A-EG808/1A-EG812/1A-EG822/1A-EG832
8 & 12 Meat Grinding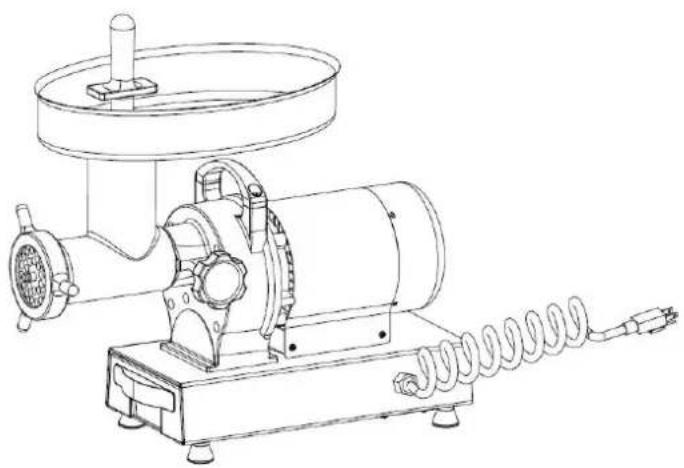
22 & 32 Meat Grinding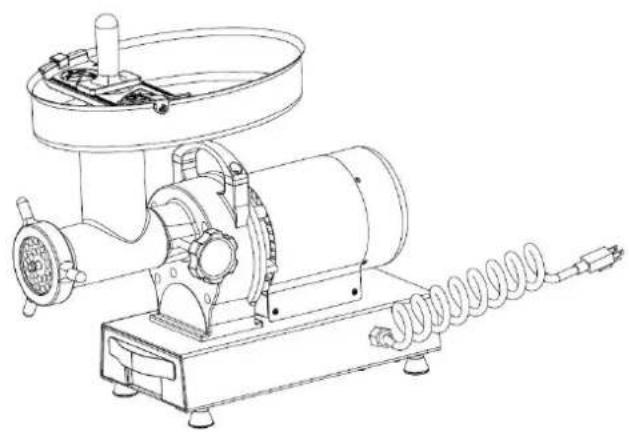
NEED HELP? CONTACT US!
Have product questions? Need technical support? Please feel free to contact us Technical Support and E-Warranty Certificate
www.vevor.com/support
This is the original instruction, please read all manual instructions carefully before VEVOR reserves a clear interpretation of our user manual. The appearance of shall be subject to the product you received. Please forgive us that we won't again if there are any technology or software updates on our product.
WARNING
When using electrical appliances, basic safety precautions should always be followed including the following:
- READ ALL OPERATING INSTRUCTIONS AND PRODUCT SAFETY LABELS!
- CHECK FOR DAMAGED PARTS: Before using the grinder, check that all parts are operating properly and performing the intended functions. Check for alignment of moving parts, binding of moving parts, mounting, and any other conditions that may affect the operation. If any parts, the power cord, or the grinder are damaged, call the Customer Service number shown in this manual.
- Always unplug the power cord from the outlet when not in use, before putting on or taking off parts or accessories, and before cleaning. After unplugging the unit, turn the power switch ON then OFF to ensure that all power has been discharged from the grinder.
- This appliance is NOT intended for use by children or by persons with reduced physical, sensory, or mental capabilities, or lack of experience and knowledge. This appliance is not to be used by children!
- NEVER LEAVE THE GRINDER UNATTENDED WHILE IT IS RUNNING!
- ALWAYS USE THE PROVIDED STOMPER, NEVER FEED FOOD BY HAND. KEEP FINGERS CLEAR OF THE AUGER AND CUTTING BLADES AT ALL TIMES. NEVER REACH INTO THE GRINDER, doing so may cause serious injury.
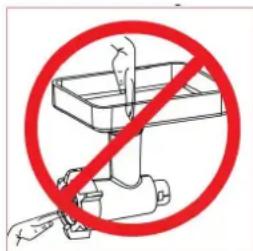
- Always keep the tray guard in place while operating (Note: tray guard is installed on #32 models only).
- AVOID contact with moving parts. NEVER USE YOUR FINGERS TO SCRAPE FOOD AWAY FROM THE CUTTING BLADE WHILE IT IS IN OPERATION. While the grinder is in operation, SEVERE INJURY MAY RESULT.
- Wait until all moving parts have stopped and turn off power before removing any part from the grinder or before switching the grinder in reverse.
- TIE BACK loose hair, clothing, or any loose objects and roll up long sleeves before operating the grinder.
- REMOVE ties, rings, watches, bracelets, or other jewelry before operating the grinder.
- DO NOT operate the grinder, or any other electrical equipment, with a damaged cord or plug, or after the unit malfunctions. DO NOT ATTEMPT TO REPLACE THE CORD. Call Customer Service to arrange to return the grinder for examination, repair, or adjustment. DO NOT use outdoors. This product is intended for INDOOR USE ONLY.
- DO NOT let the cord hang over the edge of a table or counter, come into contact with edges, or touch hot surfaces. DO NOT let the cord become kinked, trapped under the unit, or let it wind around the grinder.
- DO NOT pull the power cord to disconnect.
- DO NOT USE WITH EXTENSION CORD. Always plug directly into a grounded wall
receptacle.
- This grinder uses a grounded, three-prong plug (hot, neutral, and ground), which should be connected directly to a grounded 120 Volt, 60 Hz three-prong grounded wall outlet receptacle. Grounded plugs are used on metal-encased electric appliances in order to provide protection from electric shock. DO NOT change or alter the plug in any way. NEVER break off a grounding prong from a 3-conductor plug. Doing so voids the warranty and can result in electric shock.
- Place the grinder on a firm and stable surface. Ensure that the grinder is not placed near the edge of the worktop, where it can be easily pushed off or fall.
- The Gear Housing and the Motor Cover may become HOT during operation. This is normal. DO NOT TOUCH these parts while operating.
- DO NOT attempt to operate the grinder if the Grinding, Motor, and Gear Box are cold. Grinder, Motor, and Gear Box temperature should be at least 45°F (7°C) before beginning.
- To reduce the risk of unintentional starting, check that the control is OFF before plugging the cord into wall outlet. To disconnect, turn the control to OFF, then remove plug from wall outlet. DO NOT operate your grinder under a wall cabinet. When storing, always unplug the unit from the electrical outlet. Not doing so could create a risk of fire, especially if the appliance touches the walls of the garage or the door touches the unit as it closes.
- NEVER plug the grinder in where water may flood the area.
- To protect against risk of electrical shock, DO NOT submerge the grinder in water or other liquids. Be sure the grinder is disconnected from the power source before cleaning. NEVER rinse the Grinding Motor under running water, only use a moist cloth to clean the Grinding Motor Unit.
- DO NOT operate grinder with wet hands or while standing on a wet floor.
- The use of attachments or parts not specifically recommended or sold by the manufacturer for this grinder will void the warranty and may cause fire, electric shock or injury. WASH ALL PARTS BY HAND! DO NOT USE DISHWASHER. Never put the unit near a hot burner, in an oven, or in a dishwasher.
- NEVER use abrasive cleaning agents or abrasive cloths when cleaning the grinder.
- DO NOT use the grinder for other than intended use. DO NOT RUN Grinder without meat in the Grinding Head. Severe damage to the Head and Auger may occur. Never turn on and run the meat grinder for more than 10 seconds dry with no meat inside the machine. The friction between the auger and grinder head will result with high heat causing the meat to stick to the inside of the grinder assembly. NEVER OPERATE DRY. Damage from dry operation will void the warranty.
- Be sure the Grinder is on a stable work surface. Be sure all the Grinder Feet are stable.
- DO NOT attempt to grind bones, nuts or other hard items. 35. WEAR EYE PROTECTION. Wear safety glasses. Everyday eye glasses are not safety glasses. Safety glasses conform to ANSI Z87.1 requirements. Note: approved safety glasses have Z87 printed or stamped on them.
- The Manufacturer disclaims any responsibility in the case of improper use of Grinding. Improper use of the Grinding voids the warranty.
- DO NOT use Grinding while under influence of drugs or alcohol.
- DO NOT REMOVE WARNING LABELS FROM THE GRINDER. Doing so will void the
product warranty and may result in serious personal injury.
- This appliance must be grounded while in use to protect the operator from electrical shock. This grinder uses a grounded, three prong plug that should be connected directly to a grounded 120V (US)/230V (EC), three prong grounded wall outlet receptacle. Grounded plugs are used on metal-encased electric appliances in order to provide protection from electric shock. DO NOT change or alter the plug in anyway. NEVER break off a ground prong from a 3-conductor plug. Doing so voids the warranty and may result in electric shock.
TECHNICAL PARAMETER
| MODEL | SPECIFICATION | RATINGS | Capacity | Continuous working time | |
| 1A-EG808GS | #8 Grinding | 230V/50Hz | 350W | ≥2.7KG/min | 4hours |
| 1A-EG812GS | #12 Grinding | 230V/50Hz | 550W | ≥4.0KG/min | 4hours |
| 1A-EG822GS | #22 Grinding | 230V/50Hz | 750W | ≥6.3KG/min | 4hours |
| 1A-EG832GS | #32 Grinding | 230V/50Hz | 1,100W | ≥9.5KG/min | 4hours |
PARTS LIST
1A-EG808GS #8 Meat Grinding
1A-EG812GS #12 Meat Grinding
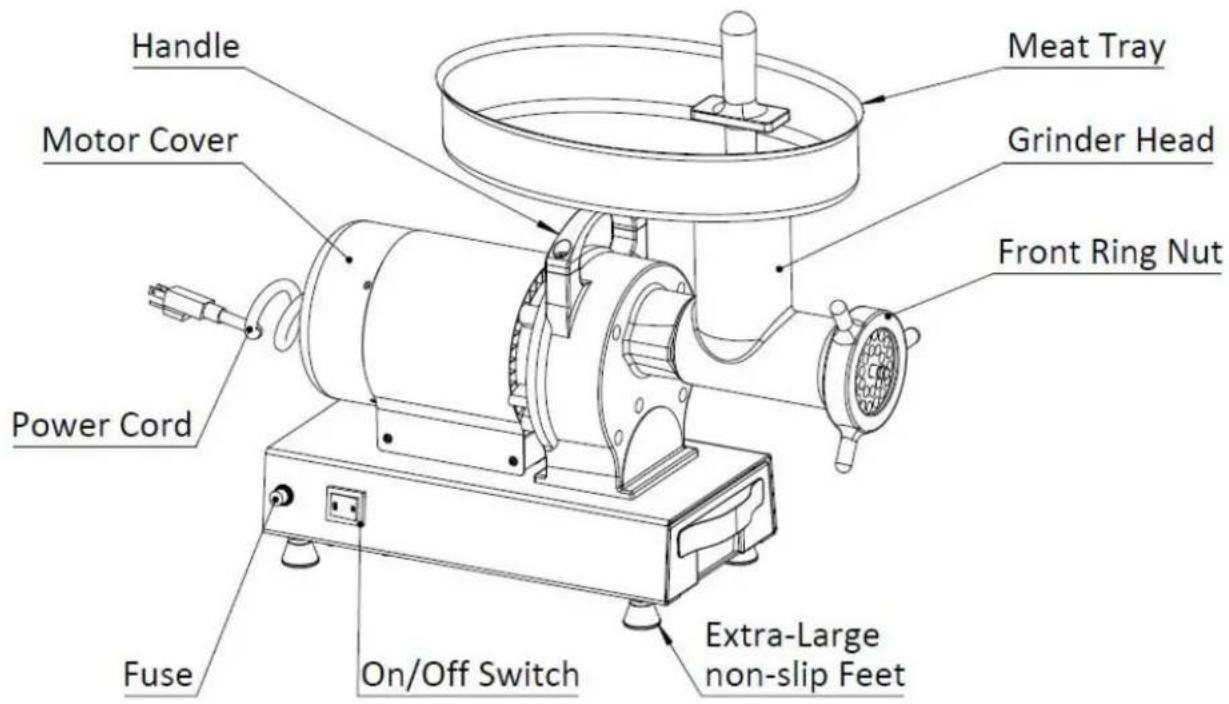
1A-EG822GS #22 Meat Grinding
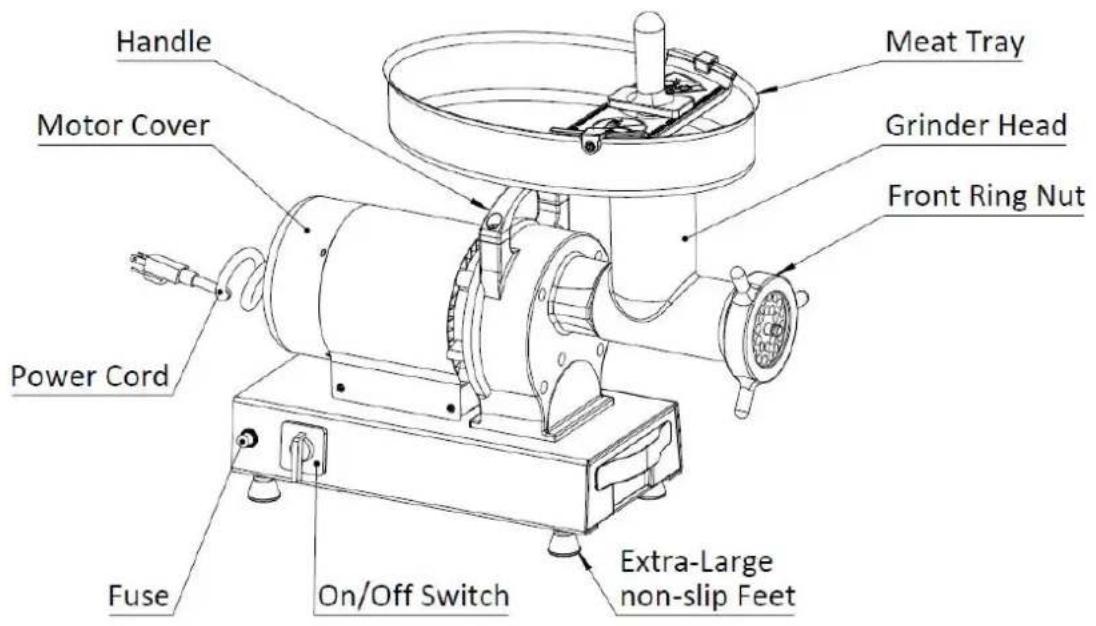
1A-EG832GS #32 Meat Grinding
1A-EG808UL & 1A-EG812UL Product explosion diagram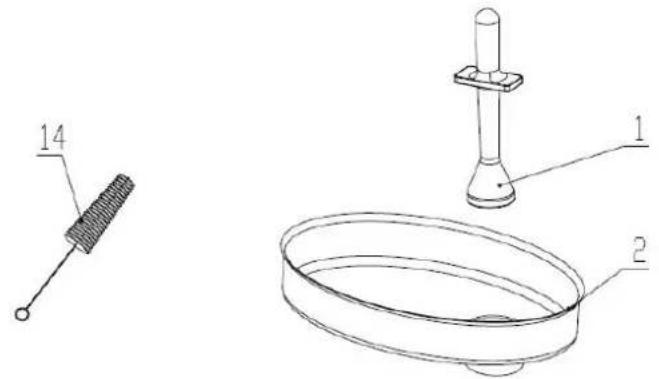
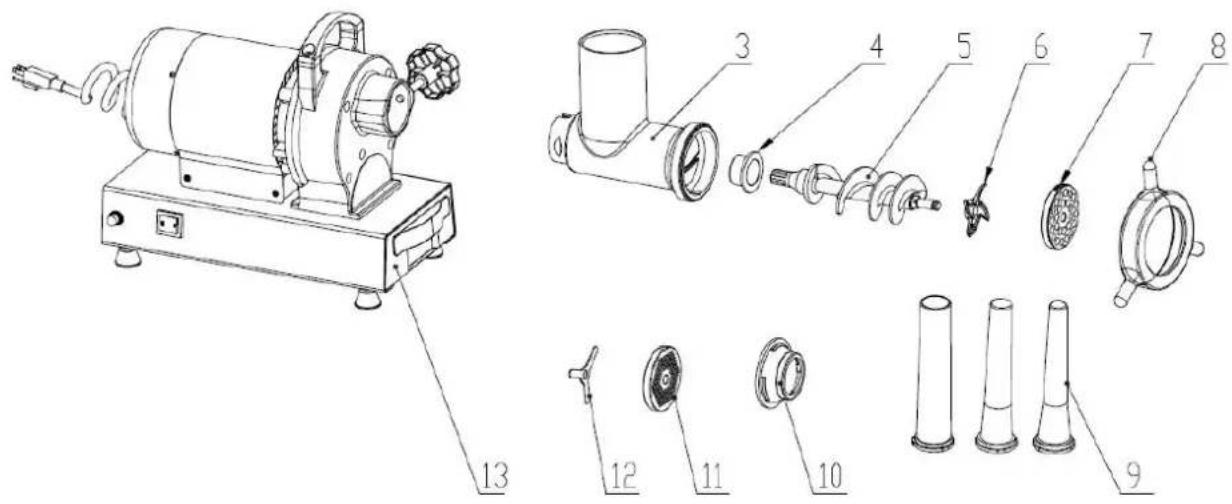
| Part No. | Part Description | Part No. | Part Description |
| 1 | MEAT STOMPER | 8 | FRONT RING NUT |
| 2 | MEAT TRAY | 9 | STUFFING TUBE SET (3 PIECE |
| 3 | GRINDER HEAD | 10 | PLASTIC STUFFING CONNECTO |
| 4 | NYLON SLEEVE | 11 | 4.5MM MEAT PLATE |
| 5 | AUGER | 12 | STUFFING KNIFE |
| 6 | KNIFE | 13 | BASE |
| 7 | 10MM MEAT PLATE | 14 | BRUSH |
1A-EG822UL & 1A-EG832UL Product explosion diagram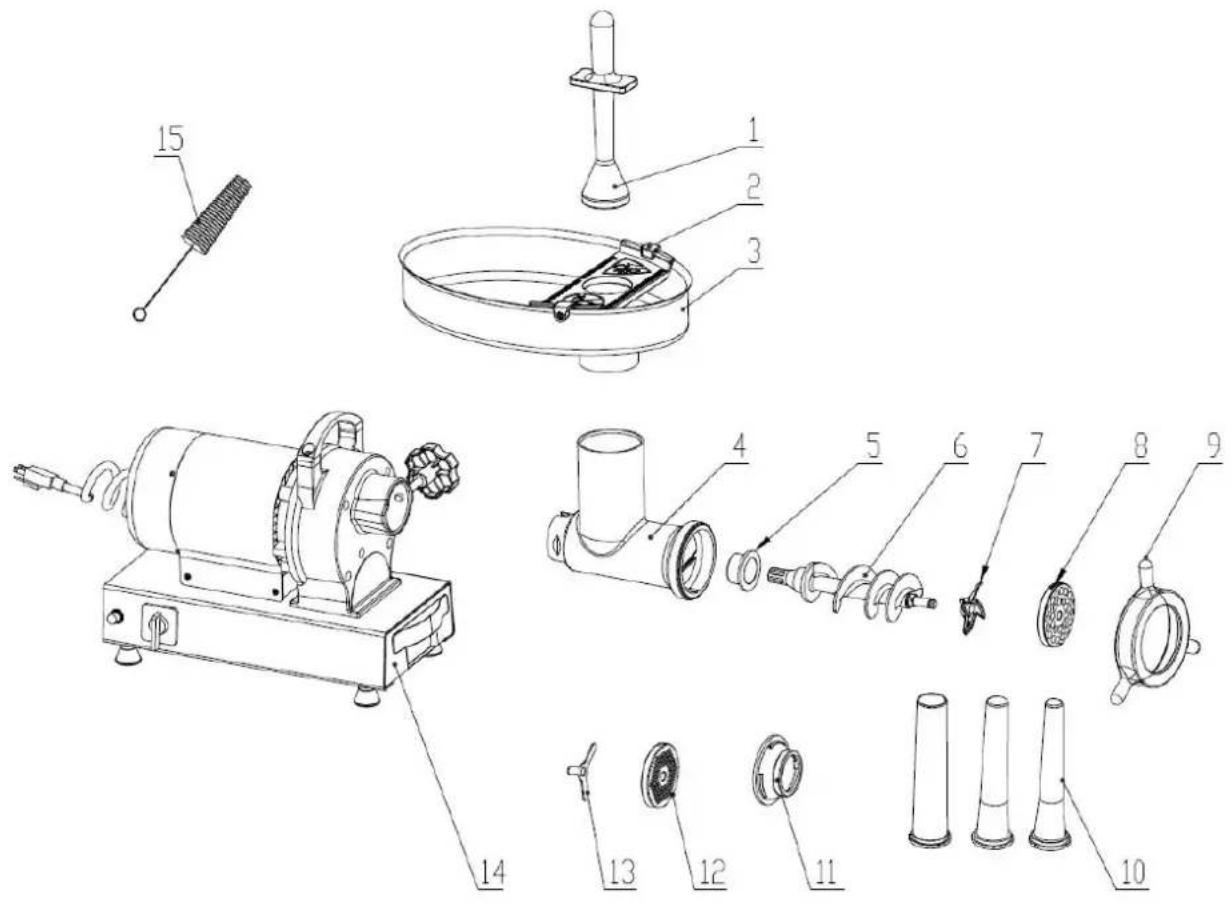
| Part No. | Part Description | Part No. | Part Description |
| 1 | MEAT STOMPER | 9 | FRONT RING NUT |
| 2 | PROTECTION PLATE | 10 | STUFFING TUBE SET (3 PIECE |
| 3 | MEAT TRAY | 11 | PLASTIC STUFFING CONNECTOI |
| 4 | GRINDER HEAD | 12 | 4.5MM MEAT PLATE |
| 5 | NYLON SLEEVE | 13 | STUFFING KNIFE |
| 6 | AUGER | 14 | BASE |
| 7 | KNIFE | 15 | BRUSH |
| 8 | 10MM MEAT PLATE |
ASSEMBLY INSTRUCTIONS
IMPORTANT: BEFORE ASSEMBLING, MAKE SURE THE GRINDER IS NOT PLUGGED IN.
- Loosen the Black Grinding Head Locking Knob until the threads are not exposed inside the Motor Housing opening and insert the Grinding Head into the Motor Housing with the Feed Chute facing straight up. Turn clockwise until the slot on the top of the Grinding aligns with the Pin inside the Motor Housing. Be sure the Head is seated fully into the Housing. Tighten the Grinding Head Locking Knob to lock the Grinding Head into place.
- Insert the Auger by aligning the Auger Spline with the Drive Shaft of the Grinding. Turn the auger clockwise until it seats into gear housing.
- Place the Cutting Knife onto the square portion of the Auger Pin. Note that the Cutting Knife is a ONE-WAY-FIT design that ensures that the flat side of the blade edges will face outward.
- Place the Grinding Plate onto the Auger Pin and align the slotted notch in the Grinding Plate with the bottom notch in the Grinding Head opening. NOTE: The cutting plate will fit one way and will protrude approx. 1/8" out of the grinder head.
*NOTE: IT IS RECOMMENDED TO ALWAYS USE THE COURSE (10mm) PLATE FOR THE FIRST GRIND.
- Attach Front Head Ring Nut and turn the Front Ring Nut clockwise until it is snug against the Grinding Plate.
- Place the neck of the Meat Tray into the Grinding Feed Chute Opening and press on until secure.
SAUSAGE STUFFING INSTRUCTIONS
WARNING! Before cleaning, assembling or disassembling the Grinder, make sure the PLUG IS REMOVED FROM THE OUTLET POWER SOURCE! ALWAYS unplug the Grinder when not in use. After unplugging the unit, turn power switch ON, then OFF to ensure that all power has been discharged from the grinder.
IMPORTANT: While one person can stuff sausage with this Grinder, it is recommended that two people perform this operation. One person to operate the grinder and push meat into the chute with the Stomper while the other person manages the output into the sausage casing.
WARNING! NEVER RUN GRINDER DRY WITHOUT MEAT! It can cause damage to the unit. Meat becomes a lubricant when passing through the grinder. If you run out of meat, turn the grinder off immediately.
TO BEGIN STUFFING:
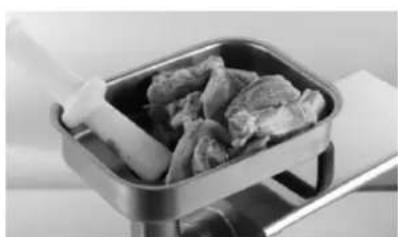
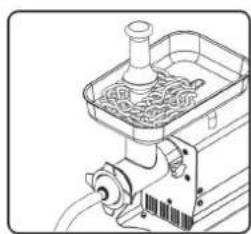
- Place seasoned ground meat into the Meat Tray. Do not overfill the Tray; place just enough meat to leave the Feed Chute area open. (Figure 1)
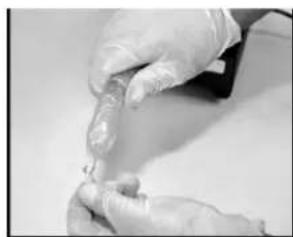
- Slide a sausage casing over the Stuffing Funnel. (Figure 2) 3. Pull 4 - 6" (10 - 15 cm) of casing out at the end of the Stuffing Funnel Tube and tie a knot in the end of the casing. (Figure 3).
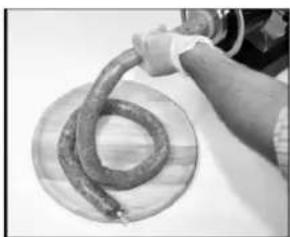
- Make sure the Grinding is in the "OFF" position. Attach the Grinding to the power supply. 5. Press the "ON" button (on models #8 and #12) or turn the "FWD" switch to the forward "FWD" position (Models #22, #32). Carefully start feeding ground meat into the Feed Chute. ONLY USE THE STOMPER TO PUSH MEAT INTO THE HEAD, DO NOT USE YOUR FINGERS OR ANY OTHER OBJECT. 6. Hold the casing in place with one hand while feeding the sausage mixture through the Grinder. As the meat fills the casing, gently lay it on a clean, dry surface. (Figure 4) 7. Do not fill the last 4 - 6" (10 - 15 cm) of casing. After the entire length of casing has been stuffed, twist the open end to close, then tie off the ends of the casing tightly to close. Twist into links if desired.
- Whenever stuffing sausage, fill the casing slowly to avoid air pockets. If air pockets do appear in the sausage, use a pin to prick the bubbles. The small holes will seal naturally.
CLEANING, MAINTENANCE & STORAGE
CLEANING INSTRUCTIONS
IMPORTANT: BEFORE CLEANING MAKE SURE THE POWER IS TURNED OFF AND THE UNIT IS UNPLUGGED. Disassemble the Grinding Head and wash parts that come in contact with meat thoroughly in hot soapy water, taking particular care to remove all grease and oil from surfaces. Rinse and dry all parts thoroughly before reassembling.
- Wash all parts that have come in contact with meat in hot soapy water. BE SURE TO CLEAN IMMEDIATELY AFTER USE. DO NOT IMMERSE THE MOTOR IN WATER OR OTHER LIQUIDS!
- Rinse the Grinding parts with clear hot water, and then dry them IMMEDIATELY.
- Fully lubricate the Head, Auger, Plates and the Knife with a food-grade silicone spray before and after each use.
- Clean the Motor Cover and Gear Housing with a damp towel and wipe dry. DO NOT IMMERSE THE MOTOR IN WATER OR OTHER LIQUIDS!
IMPORTANT: Any metal parts must be coated with a food-safe silicone spray to prevent rusting; if not properly protected, these parts will begin to rust very quickly.
FOOD SAFETY
WHEN HANDLING FOOD, THE BASIC RULES TO FOLLOW ARE: COOK
It's crucial to cook food to a safe internal temperature to destroy bacteria that are present. The
The safety of hamburgers and other foods made with ground meat has been receiving a lot of attention lately, and with good reason. When meat is ground, the bacteria present on the surface are mixed throughout the ground mixture. If this ground meat is not cooked to at least 160°F to 165°F (71°C to 74°C), bacteria will not be destroyed and there's a good chance you will get sick. Solid pieces of meat like steaks and chops don't have dangerous bacteria like E. coli on the inside, so they can be served rarer. Still, any beef cut should be cooked to an internal temperature of at least 145°F (63°C) (medium rare). The safe temperature for poultry is 180°F (82°C) and solid cuts of pork should be cooked to 160°F (71°C). Eggs should be thoroughly cooked too. If you are making a meringue or other recipe that uses uncooked eggs, buy specially pasteurized eggs or use prepared meringue powder.
SEPARATE
Occurs when raw meats or eggs come in contact with foods that will be eaten uncooked. This is a major source of food poisoning. Always double-wrap raw meats and place them on the lowest shelf in the refrigerator so there is no way juices can drip onto fresh produce. Then use the raw meats within 1-2 days of purchase, or freeze for longer storage. Defrost frozen meats in the refrigerator, not on the counter. When grilling or cooking raw meats or fish, make sure to place the cooked meat on a clean platter. Don't use the same platter you used to carry the food out to the grill. Wash the utensils used in grilling after the food is turned off or the last time on the grill, as well as spatulas and spoons used for stir-frying or turning meat as it cooks. Make sure to wash your hands after handling raw meats or raw eggs. Wash hands with soap and water, or using a pre-moistened antibacterial towelette is absolutely necessary after you have touched raw meat or raw eggs. Not washing hands and surfaces while cooking is a major cause of cross-contamination.
CLEAN
Wash your hands and work surfaces frequently when you are cooking. Washing with soap and warm water for at least 15 seconds, then dry with a paper towel.
CHILL
Chilling food is very important. The danger zone where bacteria multiply is between 40°F and 140°F (4°C and 60°C). Your refrigerator should be set to 40°F (4°C) or below; your freezer should be 0°F (-17°C) or below. Simple rule: serve hot foods hot, cold foods cold. Use chafing dishes or hot plates to keep food hot while serving. Use ice water baths to keep cold foods cold. Never let any food sit at room temperature for more than 2 hours - 1 hour if the ambient temperature is 90°F (32°C) or above. When packing for a picnic, make sure the foods are already chilled when they go into the insulated hamper. The hamper won't chill food - it just keeps food cold when properly packed with ice. Hot cooked foods should be placed in shallow containers and immediately refrigerated so they cool rapidly. Make sure to cover foods after they are cool.
NOTE: Special considerations must be made when using venison or other wild game, since it can become heavily contaminated during field dressing. Venison is often held at temperatures that could potentially allow bacteria to grow, such as when it is being transported. Refer to the USDA Meat and Poultry Department for further questions or information on meat and food safety.
ENVIRONMENTAL PROTECTION

This product is subject to the provision of European Directive 2012/19/EC. The
symbol showing a wheelie bin crossed through indicates that the product requires separate refuse collection in the European Union. This applies to the product and all accessories marked with this symbol. Products marked as such may not be discarded with normal domestic waste, but must be taken to a collection point for recycling electrical and electronic devices.
VEVOR®
TOUGH TOOLS, HALF PRICE
Technical Support and E-Warranty Certificate
www.vevor.com/support
VEVOR®
TOUGH TOOLS, HALF PRICE
Technical assistance and electronic warranty certificate www.vevor.com/support
www.vevor.com/support
www.vevor.com/support
www.vevor.com/support
VEVOR®
TOUGH TOOLS, HALF PRICE
www.vevor.com/support
www.vevor.com/support
www.vevor.com/support
NEED HELP? CONTACT US!
www.vevor.com/support
www.vevor.com/support
1A-EG832GS #32 Kottkarn
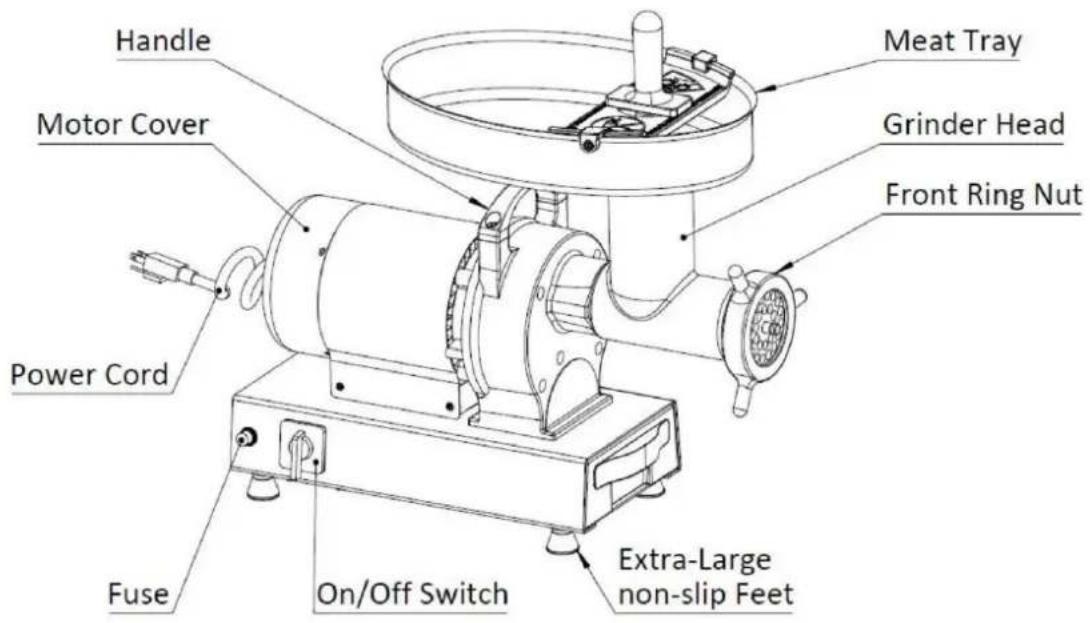
1A-EG808UL & 1A-EG812UL Product Explosion Diagram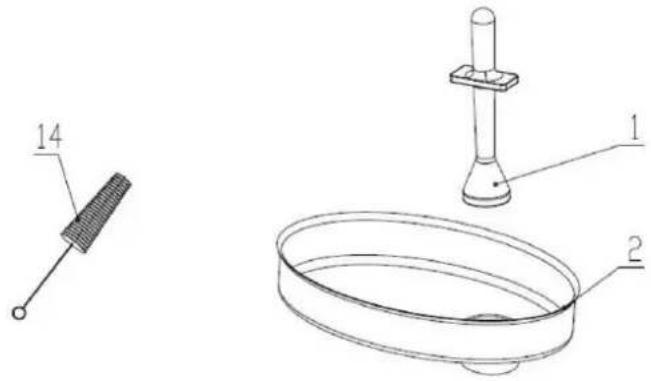
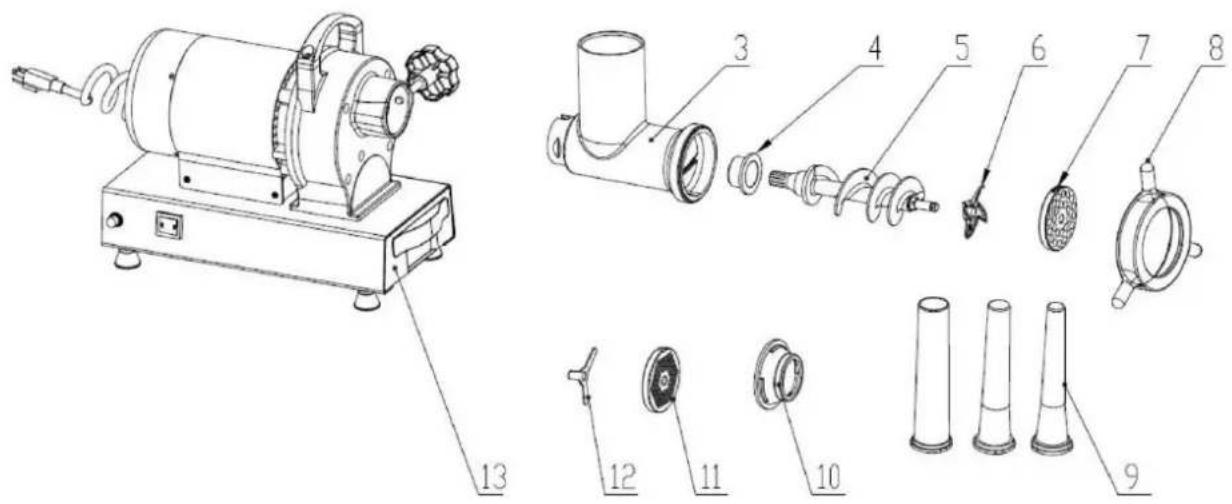
| Del nr 1 2 | Delbeskrivning | Del nr 8 9 | Delbeskrivning |
| KÖTTSTÖMARE | FRAMRE RINGMUTTER | ||
| 3 | KÖTTBRAKA | STÄLLNINGSRÖRSSET (3 DELAR) | |
| GRINDER HUVUD | 10 | PLASTFYLLNINGSKONTAKT | |
| 4 | NYLONÄRM | 11 | 4,5MM KÖTTPLATTA |
| 5 | BORR | 12 | PAPPNINGSKNIV |
| 6 | KNIV | 13 | BAS |
| 7 | 10MM KÖTTPLATTA | 14 | BORSTA |
1A-EG822UL & 1A-EG832UL Product Explosion Diagram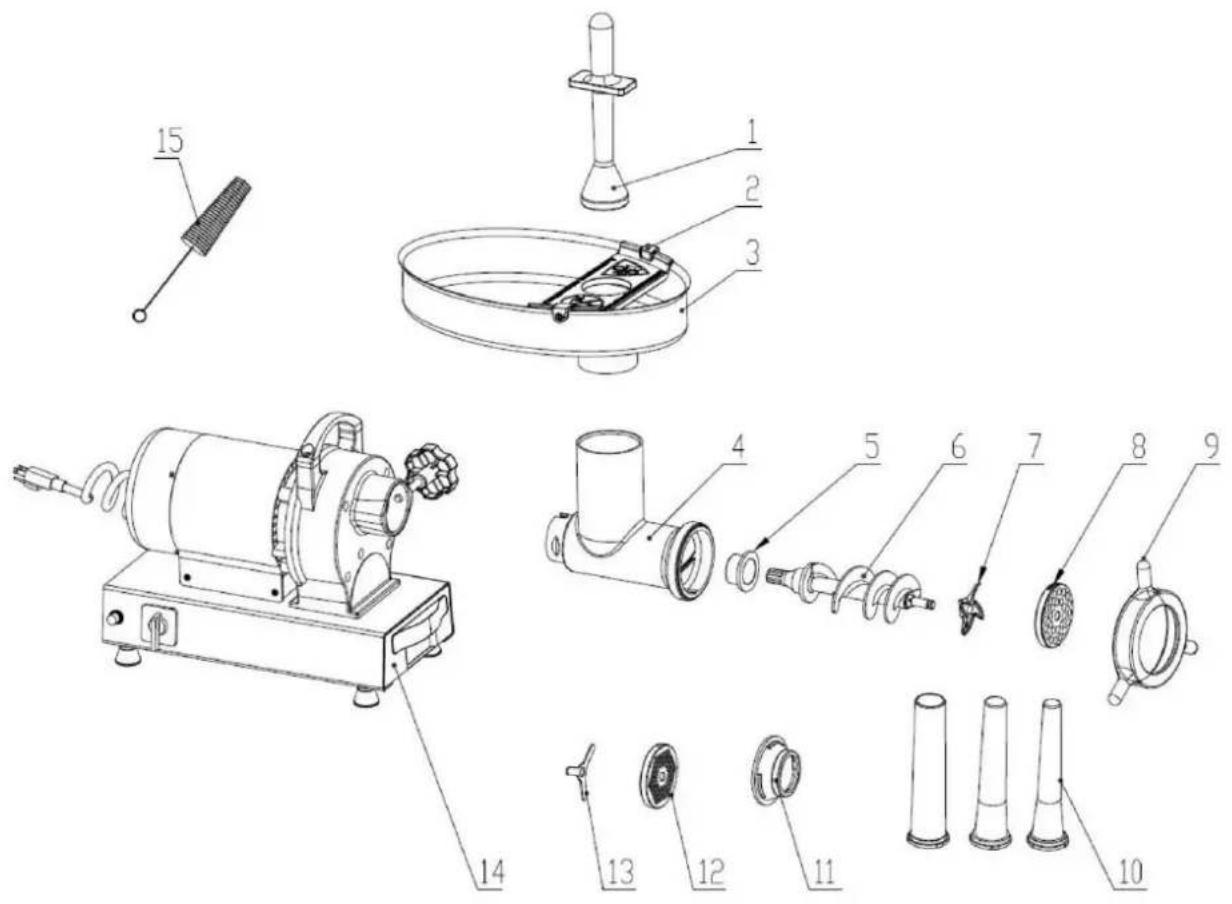
| Delnr. | Delbeskrivning | Artikelnummer | Delbeskrivning |
| 1 | KÖTTSTÖMARE | 9 | FRAMRE RINGMUTTER |
| 2 | SKYDDSPLATA | 10 | STÄLLNINGSRÖRSSET (3 DELAR) |
| 3 | KÖTTBRAKA | 11 | PLASTFYLLNINGSKONTAKT |
| 4 | GRINDER HUVUD | 12 | 4,5MM KÖTTPLATTA |
| 5 | NYLONÄRM | 13 | PAPPNINGSKNIV |
| 6 | BORR | 14 | BAS |
| 7 | KNIV | 15 | BORSTA |
| 8 | 10MM KÖTTPLATTA |
ASSEMBLY INSTRUCTIONS
IMPORTANT: BEFORE ASSEMBLY, MAKE SURE THE CLIPS ARE NOT INSERTED.
www.vevor.com/support

- ELECTRIC MEAT GRINDER
- VEVOR®
- MODEL: 1A-EG808/1A-EG812/1A-EG822/1A-EG
- NEED HELP? CONTACT US
- WARNING
- PARTS LIST
- ASSEMBLY INSTRUCTIONS
- SAUSAGE STUFFING INSTRUCTIONS
- TO BEGIN STUFFING
- CLEANING, MAINTENANCE & STORAGE
- CLEANING INSTRUCTIONS
- FOOD SAFETY
- WHEN HANDLING FOOD, THE BASIC RULES TO FOLLOW ARE: COOK
- SEPARATE
- CLEAN
- CHILL
- ENVIRONMENTAL PROTECTION
- TOUGH TOOLS, HALF PRICE
Brand : Vevor
Model : 1A-EG932
Category : Choppers