XZ-20 - Pasta machine Vevor - Free user manual and instructions
Find the device manual for free XZ-20 Vevor in PDF.

| Product Type | Automatic Dough Divider |
| Brand | Vevor |
| Model | XZ-20 |
| Division Capacity | 36 or 20 pieces per cycle |
| Weight per portion | 30 to 100 g (for 36 pieces) / 60 to 260 g (for 20 pieces) |
| Power Supply | 220-240 V, 50 Hz (estimated) |
| Main Material | Stainless steel and food-grade plastic |
| Dimensions (L × W × H) | Approximately 60 × 40 × 40 cm (estimated) |
| Net Weight | Approximately 30 kg (estimated) |
| Main Functions | Automatic division of dough into equal portions, pre-lubrication with sunflower oil |
| Safety | Grounding, safety switches, do not immerse, keep fingers away from moving parts, use by children over 8 years under supervision |
| Maintenance and Cleaning | Unplug before cleaning, clean accessories by hand, do not immerse in water |
| Spare Parts and Repairability | Use original spare parts, contact Vevor support |
| General Information | User manual included, technical support at www.vevor.com/support |
Frequently Asked Questions - XZ-20 Vevor
User questions about XZ-20 Vevor
0 question about this device. Answer the ones you know or ask your own.
Ask a new question about this device
Download the instructions for your Pasta machine in PDF format for free! Find your manual XZ-20 - Vevor and take your electronic device back in hand. On this page are published all the documents necessary for the use of your device. XZ-20 by Vevor.
USER MANUAL XZ-20 Vevor
Technical Support and E-Warranty Certificate www.vevor.com/support
DOUGH DIVIDER
MODEL:XZ-20
We continue to be committed to provide you tools with competitive price. "Save Half", "Half Price" or any other similar expressions used by us only represent of savings you might benefit from buying certain tools with us compared top brands and does not necessarily mean to cover all categories of tools offered are kindly reminded to verify carefully when you are placing an order with us actually saving half in comparison with the top major brands.
MODEL:XZ-20
natural_image
Exterior view of a modern industrial machine with a dome-shaped top and control panel (no visible text or symbols)NEED HELP? CONTACT US!
Have product questions? Need technical support? Please feel fr contact us:
Technical Support and E-Warranty Certificate www.vevor.com/support
This is the original instruction, please read all manual instruction carefully before operating. VEVOR reserves a clear interpretation user manual. The appearance of the product shall be subject to product you received. Please forgive us that we won't inform you there are any technology or software updates on our product.
■ SAFETY INSTRUCTIONS

Read the operating instructions carefully before putting the appliance into operation and keep the instructions for future reference.
- Never dip machine into any liquid and sharp edges. Do not use the appliance with wet hands. If the appliance is humid or wet, unplug it immediately.
- This appliance can be used by children aged from 8 years and ab and persons with reduced physical, sensory or mental capabilities or I of experience and knowledge if they have been given supervision or instruction concerning use of the appliance in a safe way and unders the hazards involved. Children shall not play with the appliance. Clear and user maintenance shall not be made by children without supervisi
- Always disconnect the machine from the supply if it is left unattend before assembling, disassembling or cleaning.
- If the supply cord is damaged, it must be replaced by the manufacture of its service agent or a similar qualified person in order to avoid a hazard.
- Keep your finger away from moving parts and fitted tools. Never put fingers etc in hinge mechanism.
- Use only original spare parts.
- In order to ensure your children's safety, please keep all packaging (plastic bags, boxes, polystyrene etc.) out of their reach.
Do not interfere with any safety switches. - Place the machine on a smooth, flat and stable working surface. Be very careful when you handle the blades or inserts. Be especially careful when you remove them from machine, their cutting edges are sharp.
- Wait until moving parts stop running before you remove the lid of machine.
- Do not exceed the maximum content indicated on the accessories.
■ BEFORE CONNECTING TO POWER
- Before connecting to the power, recheck the type of supply and the mains voltage match with the details given on the rating label on the appliance.
- Using for the first time, rip off all wrapping paper and plastic bags the fittings.
SAVE THESE INSTRUCTIONS
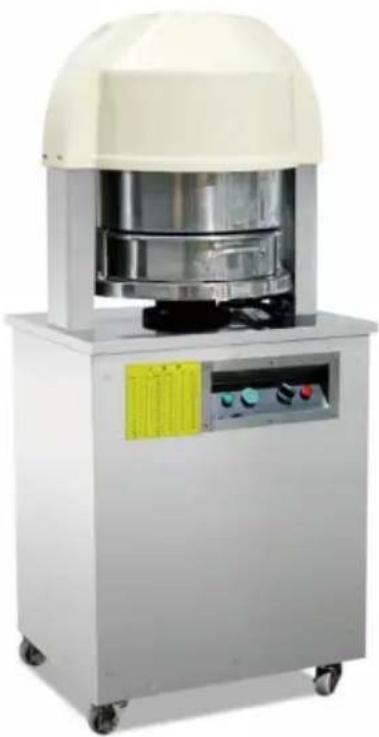
I.Product overview
This machine is an automatic dividing machine that divides large dough into equal pieces 36 pieces /20 pieces. It is simple to operate, conve to use, accurate in dividing weight, can save a lot of labor and show working time. It can be divided into 36 pieces /20 pieces at a time, weight of each small piece does not exceed 30 grams to 100 grams to 260 grams. The specific figure can be calculated according or 20 small pieces to determine the weight of the large dough when weight of each small piece does not exceed 100 grams /260 grams. are four direction wheels on the bottom of the machine which can be moved arbitrarily on the flat ground, and the direction wheel can be to fix the machine.
2. Install
The machine should be placed on a flat ground, and the environment should not be wet to prevent machine rust and leakage.
Principle statement
The machine adopts mechanical structure to partition. The motor drives worm gear reducer, and the worm gear reducer drives the crank slide mechanism to push the dividing basin to the fixed cutter head for div. Because the cutter is fixed, the stroke of the crank slider is also ce the machine can not adjust the machine after adjusting, otherwise the consequences are their own.
3.Circuit principle
The motor uses AC contactor to connect and disconnect with the power
supply, and self-lock. The machine has three switches to control the and stop of the motor. When the distributing basin is put into the w surface, make the -SQ1 normally open switch press and close, and t operate the big circle press twist -SB on the box surface to turn on contactor, the motor starts and locks itself through the contactor norm open contact -KM and the normally closed micro switch -SQ2 controlled the crankshaft. When the dividing is completed, the contacts on the crankshaft will cut off -SQ2, and the motor will stop running after po failure.
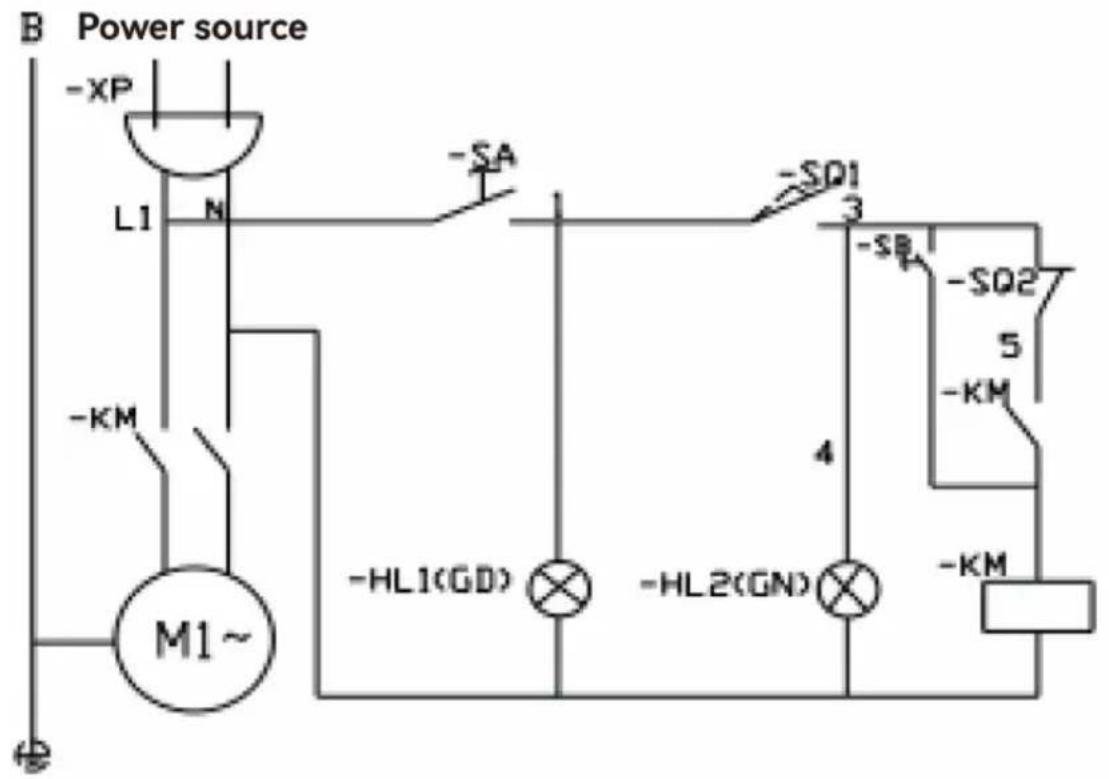
| M motor | A Power switch | KM AC contactor | SB Start button | FR Thermal protection relay |
| -SQ1 Connects to the electric microswitch | SQ2 work stop microswitch | -XP power plug | -HL1 Control power indicator | -XP2 Working power indicator |
| E Ground cable |
4. Operation instruction
a) Plug the machine into the power socket and turn on the power s the machine (the knob with a white horizontal bar in the button box) b) The green signal is on, indicating that the power supply is conned. Put the empty separator basin into the lifting work table, the yellow s light, if not bright, can push the separator basin inward, so that the press the round big button table will drive the separator basin rise, f It indicates that the machine works normally and can be put into production.
c) Before formal use, put 1KG of sunflower seed oil into the dividing and place the dividing basin on the lifting work table. According to the procedure of "1" above, start and run several times to lubricated the and plastic bracket. Never use salad oil instead of sunflower oil.
d) Ferment the mixed dough for about 10 minutes, multiply the weight of the dough by 36 to get the weight of the dough, and relax the dividing dough for another 15 minutes.
e) Evenly coat the dividing basin with cooking oil, put loose dough in basin, and use your hands to flatten the dough and fill the basin. The thickness of the dough should be uniform everywhere, and then apply thin layer of cooking oil on the dough.
f) Put the dividing basin with dough into the work table, and can see yellow light, if the light is not on, it should be adjusted to make it g) Press the big circle button workbench to rise, fall, and stop after segmentation. The dividing basin must not be pulled out when the workbench has not stopped moving.
h) Take off the dividing basin and pour out the divided dough for th work.
i) Please close it after finishing the work.
CORRECT DISPOSAL
This product is subject to the provision of European Directive 2012/19/EC. The symbol showing a wheelie bin crossed through indicates that the product requires separate refuse collection in the European Union. This applies to the product and all
accessories marked with this symbol. Products marked as such may be discarded with normal domestic waste, but must be taken to a co-point for recycling electrical and electronic devices
VEVOR®
TOUGH TOOLS, HALF PRICE
Technical Support and E-Warranty Certificate
www.vevor.com/support
VEVOR®
TOUGH TOOLS, HALF PRICE
natural_image
Exterior view of a modern industrial machine with a dome-shaped top and control panel (no visible text or symbols)BESOIN D'AIDE? CONTACTEZ-NOUS!
natural_image
Exterior view of a modern industrial machine with a dome-shaped top and control panel (no visible text or symbols)www.vevor.com/support
VEVOR®
TOUGH TOOLS, HALF PRICE
natural_image
Exterior view of a modern industrial machine with a dome-shaped top and control panel (no visible text or symbols)elettronica www.vevor.com/support
VEVOR®
TOUGH TOOLS, HALF PRICE
natural_image
Exterior view of a modern industrial machine with a dome-shaped top and control panel (no visible text or symbols)natural_image
Exterior view of a modern industrial machine with a dome-shaped top and control panel (no visible text or symbols)POTRZEBUJESZ POMOCY? SKONTAKTUJ SIĘ Z NAMI!
natural_image
Exterior view of a modern industrial machine with a dome-shaped top and control panel (no visible text or symbols)HULP NODIG? NEEM CONTACT MET ONS OP!
garantiecertificaat www.vevor.com/support
VEVOR®
TOUGH TOOLS, HALF PRICE
natural_image
Exterior view of a modern industrial machine with a dome-shaped top and control panel (no visible text or symbols)BEHÖVER HJÄLP? KONTAKTA OSS!
www.vevor.com/support