MT10B - Musical instrument Vevor - Free user manual and instructions
Find the device manual for free MT10B Vevor in PDF.

| Product Type | Electronic Drum Kit |
| Brand | Vevor |
| Model | MT10B |
| Power Supply | AC adapter 100-240 V AC |
| Number of Drums/Cymbals | 15 (kick, snare, 3 toms, crash, ride, hi-hat, 2 pedals) |
| Timbres | 150 timbres |
| Demo Songs | 10 |
| Recording | Yes, 1 track |
| Metronome | 9 types, tempo 30-250 BPM |
| Display | Three-digit LED |
| Interfaces | USB-MIDI, audio input (3.5 mm), audio/headphone output (3.5 mm), DC IN |
| Pad Settings | Sensitivity, threshold, crosstalk, velocity curve, individual volume |
| Equalizer (EQ) | 3 bands (low, mid, high) |
| Effects (EFX) | 3 types (Room, Plate, Hall) |
| Preset Drum Kits | 15 kits |
| Parameter Save | Yes (long press REC) |
| Factory Reset | Yes (long press replace button) |
| MIDI Compatibility | GM standard, channel 10, via USB |
| Maintenance | Soft cloth moistened with water and neutral detergent, avoid solvents |
| Safety | Do not disassemble, use specified power cord, avoid water and heat |
| Spare Parts / Repairability | Contact Vevor support for any repairs |
| Warranty | Electronic warranty certificate included |
Frequently Asked Questions - MT10B Vevor
User questions about MT10B Vevor
0 question about this device. Answer the ones you know or ask your own.
Ask a new question about this device
Download the instructions for your Musical instrument in PDF format for free! Find your manual MT10B - Vevor and take your electronic device back in hand. On this page are published all the documents necessary for the use of your device. MT10B by Vevor.
USER MANUAL MT10B Vevor
Technical Support and E-Warranty Certificate
www.vevor.com/support
ELECTRONIC DRUM SET
USER MANUAL
MODEL: MT10B
We continue to be committed to provide you tools with competitive price.
"Save Half", "Half Price" or any other similar expressions used by us only represents an estimate of savings you might benefit from buying certain tools with us compared to the major top brands and does not necessarily mean to cover all categories of tools offered by us. You are kindly reminded to verify carefully when you are placing an order with us if you are actually Saving Half in comparison with the top major brands.
MODEL:MT10B
(The picture is for reference only, please refer to the actual object)
NEED HELP? CONTACT US!
Have product questions? Need technical support? Please feel free to contact us:
Technical Support and E-Warranty Certificate www.vevor.com/support
This is the original instruction, please read all manual instructions carefully before operating. VEVOR reserves a clear interpretation of our user manual. The appearance of the product shall be subject to the product you received. Please forgive us that we won't inform you again if there are any technology or software updates on our product.
Thank you for purchasing our electronic drum set. The elegant and exquisite electronic drum set is a perfect combination of modern new electronic technology.
Please read this manual carefully before using this instrument.
- Bass drum kick, Snare drum, Tom drum1-3, Crash cymbal, Ride cymbal, Hi-hat cymbal, Hi-hat control pedal
15drumsets,150timbres
10 songs, 1 recording
Support the sensitivity parameter adjustment of each drum - Speed control: 30 ~ 250 beats / minute
- Metronome: 1 9 kinds
- Other functions: parameter storage, reset and recording
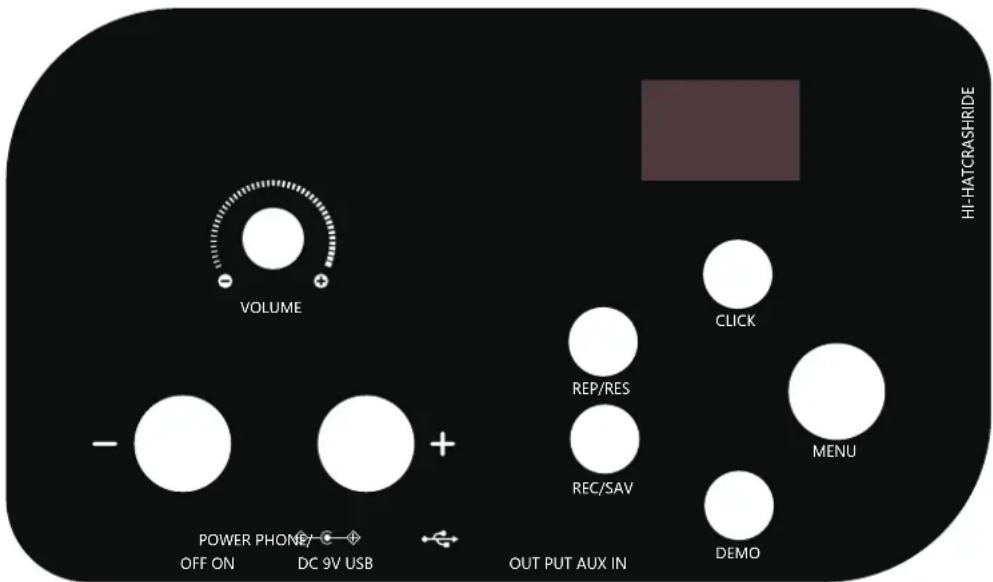
Three digit led display - Interface: power dc, usbidi, earphone, audio input, audio output
Note!
- This product is an electronic electro-acoustic musical instrument. It is normal that the speakers or earphones to have a little current sound after power on. During using, please stay away from "radio, TV, antenna receiver, router, refrigerator, TV, electrical appliances with motors and other sources of radio frequency electrical interference"
FUNCTION INTRODUCTION 1
CONTENTS 2
INSTALLATION GUIDE 3
Check the enclosed items 3
Mounting stand 4
Drum and cymbal installation 4
Sound module installation 5
Insert connection cable 5
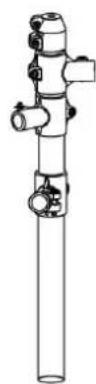
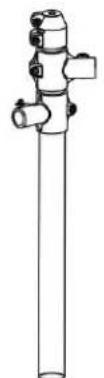
SOUND MODULE PORT DIAGRAM 6
Power adapter connection 6
USB MIDI port 6
Audio input port 6
Sound module control switch 6
Audio output /Earphone jack 6
OPERATION GUIDE 7
Power 7
Volume 7
Drum kit selection 7
MENU 7
7
KIT setting 8
EQ setting -8
EFX setting 8
Recording and playing function 8
CLICK function- 8
DEMO song function 8
Drum parameter setting- 9
Parameter saving and resetting 9
APPENDIX 10
Drum timbre 10
Presetdrumkit 10
Demo song 11
PRODUCT MAINTENANCE 11
SAFETY PRECAUTIONS 11
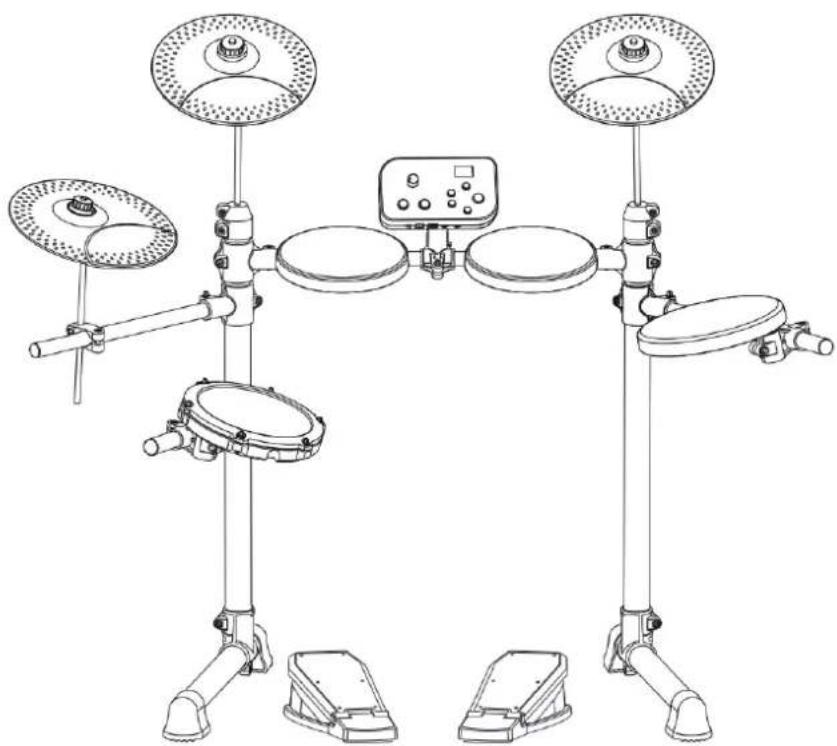
01 Check the enclosed items
- After opening the package, please check immediately whether it contains all the parts or not. If there is anything missing, please contact with the dealer.
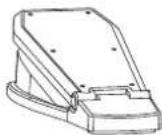
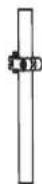
Sound module

Module bracket
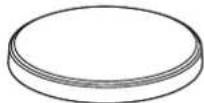
Cymbal*3
Drums*3

Snare
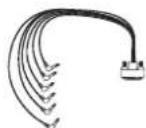
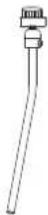
Connection cable power adapter

Pedal*2
Crash/Ride cymbal arm(2pcs)

Hi-hat cymbal arm
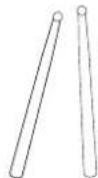
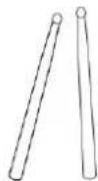
Drumstick

Drum key


Right riserLeft rlesft fodat suppRght foot tube tube

Middle support bar
bar

Snare/Tom support bar*2
02 Mounting stand
The stand must to be installed in place, and screw down the screws by the drum key.
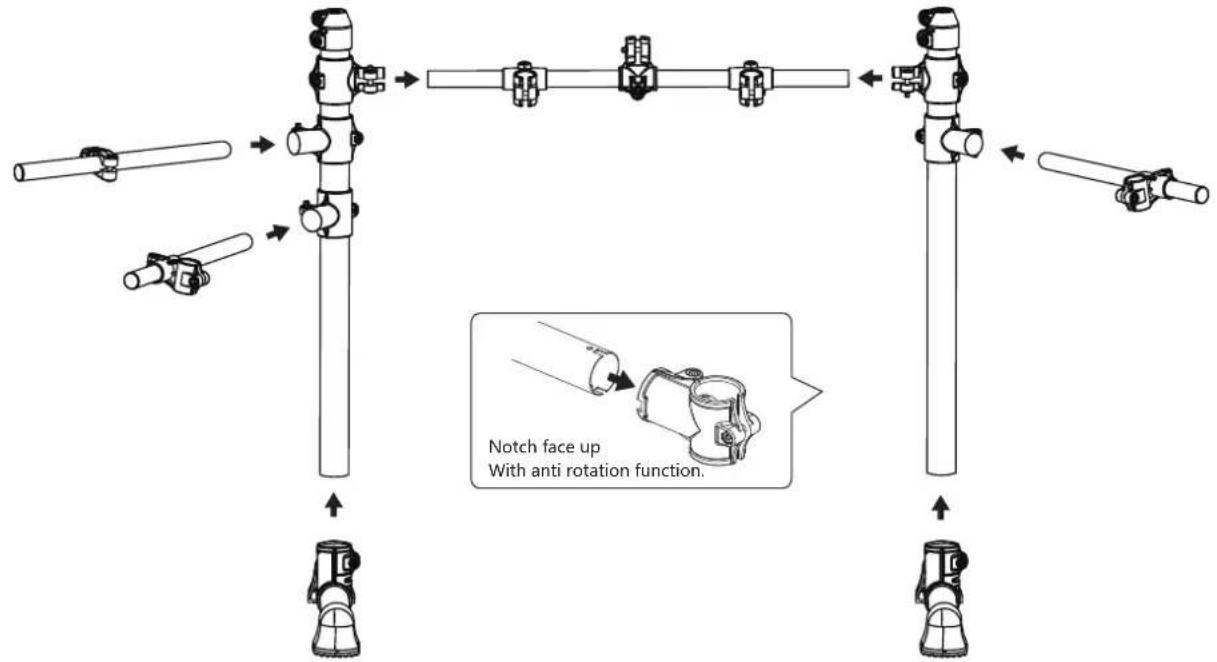
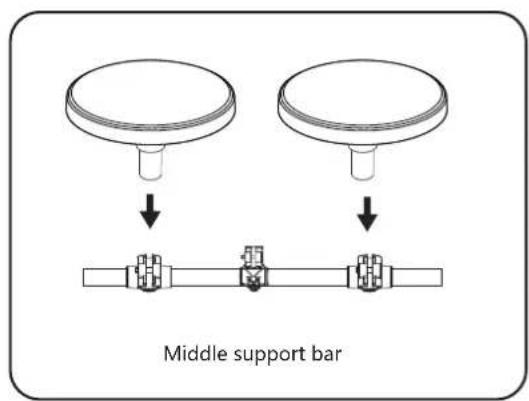
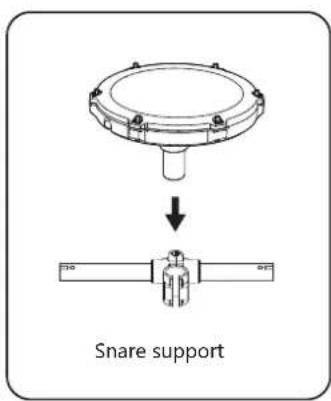
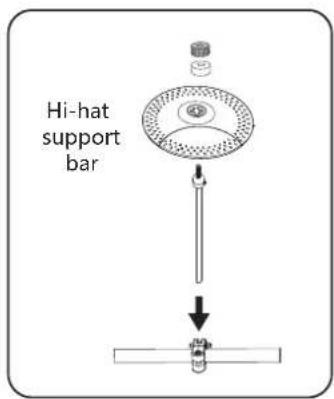
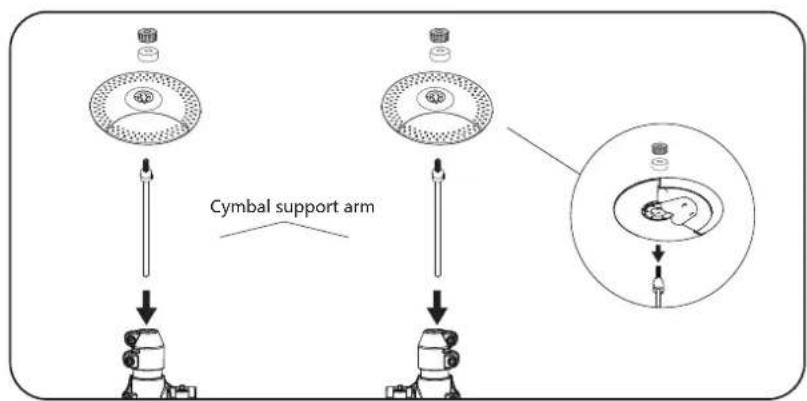
03 Drum and cymbal installation
- install the tom/snare and cymbal on the support bar.
- Attach the three cymbals to the cymbal arms as shown using the felt washers and cymbals nuts. Be sure not to tighten the cymbals too tightly and leave some space for them to shaking.
04
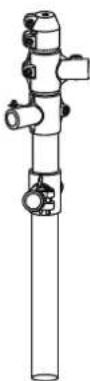
Sound module Installation
- Assemble the sound module with the stand before attaching it to the drum kit.
Insert the main box bracket against the sound module track, and you will hear the clicking piece pop up when you insert it to the bottom.
05
Insert connection cable
- Please insert the corresponding socket as indicated on the line.

SOUND MODULE PORT DIAGRAM
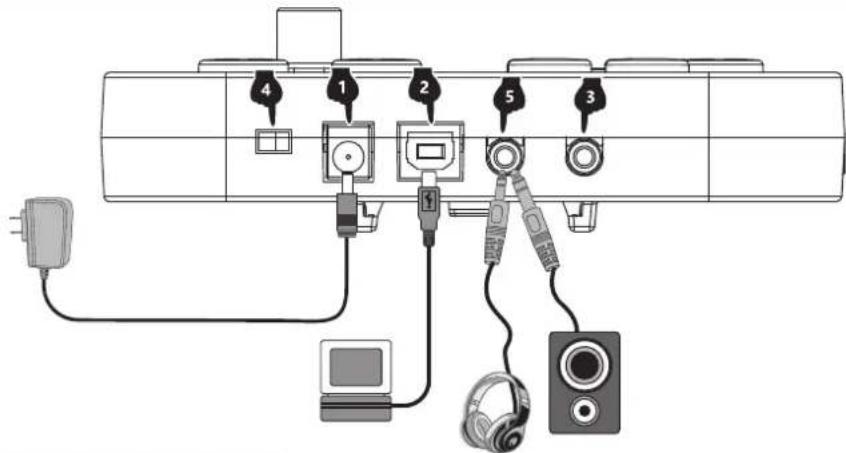
1 Power adapter connection
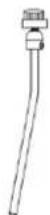
- Connect the power adapter as the shown figure, insert one end into the power port of the sound module, and insert the other end into a 100-240V household power port.
- When this product is not work for a long time, please pull out the power plug and keep it properly.
2 USB MIDI port
- This product has MIDI audio output / input function of USB port.
- The drum device can be connected with MIDI in/out function through USB cable. It can also be used as a hard sound source.
- It can be used as MIDI device on any DAW software though the USB cable connect with the USB interface of PC or Mac. Or connect with the drum set game and electronic drum software which can supply the MIDI device.
Warm Tips: This product is a standard GM MIDI communication format, and the channel selected for MIDI signals is the default MIDI Channel 10 percussion channel. MIDI stands for Digital Musical Instrument Interface and is the most widely used music standard format in the arranger world. It uses digital control signals of musical notes to record music. Therefore, MIDI transmits not sound signals but instructions such as notes, control parameters, etc., through instructions to tell the MIDI device which note to play, the duration of the performance, the volume, etc.
3 Audio input port
Audio input port can connect the sound source playback device to the sound module for playback (such as MP3, mobile phone and other audio signal input).
4 Sound module control switch
The sound module switch off/on controls the opening and closing of the sound module
5 Audio output /Earphone jack
- The audio output jack can be externally connected with active speakers (special drum speakers are required) and large audio equipment.
- Connecting earphone can monitor the details of performance changes, and will not disturb others.
Note!
- In order to prevent failure or damage the equipment, please make sure the volume is low and turn off all the equipment before connecting.
- External device is not the standard accessories, you should play for it if you want.
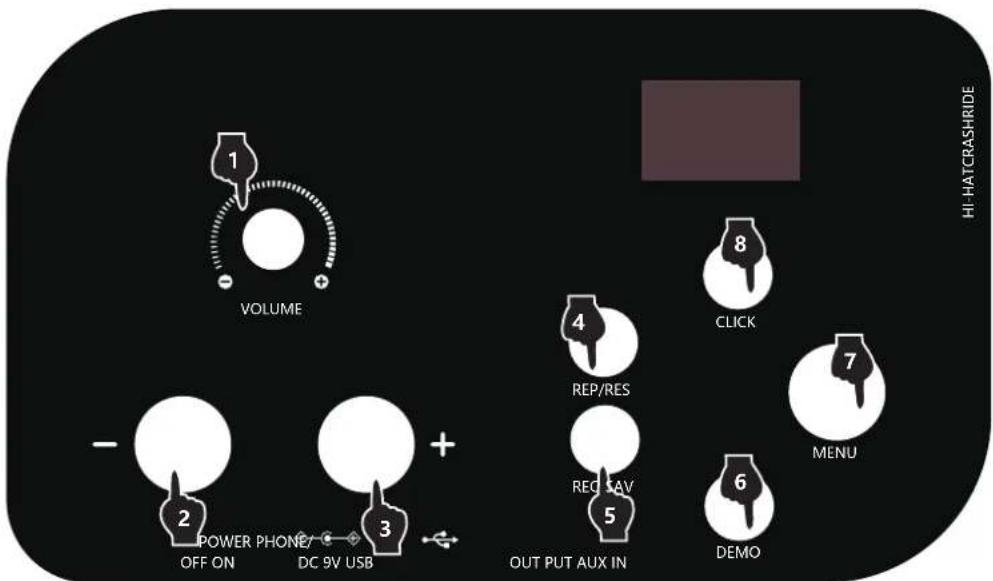
1 Power
- Slide the switch < on > , the display will light up, and sound module is on
- Slide the switch < off>,the display goes out and sound module is turned off
Volume
Press the volume potentiometer to adjust the volume.
3 Drum kit selection
After startup, the default drum kit is displayed. You can directly press the "+" "-" key to switch your favorite drum kit (the position of the point below the number represents this mode).
4 Menu
Menu is used as the selection key to switch the kit/click/eq/efx parameter items.
5 Click setting
- Press the menu key several times until the screen displays c.-4. At this time, the display position of the screen point is above the click, indicating that the metronome parameter adjustment mode is entered. Press the "+" -"key to switch the number of metronome beats.
Press to save the value and save it after power off.
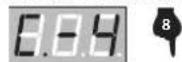
Click is set with C-1/C-2/C-3/C-4/C-5/C-6/C-7/C-8/C-9


- C stands for click metronome, 9 groups of metronome types
- C-1 is 1/4 beat, C-2 is 2/4 beat, and so on (the default is C-4, 4/4 beat)
The boot defaults to kit setting. Directly press the "+" "-" key to switch the drum kit, or press the menu key several times to display the display number (drum kit serial number) and press the "+" "-" key to switch the drum kit
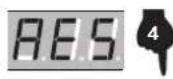
Press the menu key several times until the screen displays at this time, the display position of the screen point is above EQ, indicating that it enters the reverberation parameter adjustment mode. Press the "+" - "key to choose EQ settings, and the EQ parameters are set to (EQ low, EQ middle, EQ high)
The display is
respectively, and the default is E-2
-
Press the menu key several times until the screen displays . At this time, the display position of the screen point is above the EFX, indicating that the reverberation parameter adjustment mode is entered. Press the "+" - "key to switch the EFX setting
-
EFX parameters are set to reverse (room, plate, Hall) respectively, The display is f-1/f-2/f-3 (the default is F-1), and the three effects are fixed parameters
-
Press rec to start recording, and the screen displays flashing. In order to wait for the recording process, wait for the drum to trigger. The first time is to start recording, the metronome sounds, and the screen displays . At this time, recording begins
-
Press rec key again to stop recording
-
Press the click button, the light will light up, and the metronome will sound at the same time. Press the second time to turn off the metronome sound
-
In click mode, press / to adjust the metronome speed. The p parameter is 30-250, and the default is 120.
-
Press the demo button, the light will light up, and the demo song will sound at the same time. Press the second time to turn off the demo function.
-
In demo mode, press the "+" - "key to select demo songs. There are 10 kits of demo songs, which can be played at the same time when selected
12
Drum parameter setting
- Long press menu to enter the drum parameter setting interface
7
- Press the < + > < -> key to select the parameters to be set: s (drum sensitivity), t (drum threshold), C (crosstalk value), R (repeated trigger value), u (force curve), I (drum volume)
- Briefly press menu to enter the parameter adjustment. At this time, the interface flashes (you can tap the drum and select the drum to be adjusted). Press the < + > < -> key to adjust the parameters
- After adjusting the parameters, briefly press menu to exit the parameter adjustment, return to the drum setting interface, and select other parameters to be adjusted. At this time, the interface stops flashing
- Long press menu to exit the drum parameter setting interface
13
Parameter saving and resetting
- Press and hold the rec button for 2 seconds to save the current setting, and SAV will be displayed after saving successfully
- Press and hold the replace button for 2 seconds to restore the factory settings, and successfully display the res MIDI function. The USB interface outputs standard MIDI signals, supporting
Android, apple, Microsoft system tablets and computers.

APPENDIX
Drum timbre
Kick
1 Funk Kick
2 Original Kick
3 Poprock Kick
4 Rock Kick
5 Seesion Kick
6 SpeedMetal Kick
7 ClassicDry Kick
8 Modern Kick
9 Jazz Kick
10 Blues Kick
11 Popular Kick
12 Modern Kick
13 Dancehall Kick
14 Synthgaze Kick
15 Standard Kick
Snare
16 Funk Snare
17 Original Snare
18 Poprock Snare
19 Rock Snare
20 Seesio n Snare
21 SpeedMetal Snare
22 ClassicDry Snare
23 Modern Snare
24 Jazz Snare
25 Blues Snare
26 Popular Snare
27 Modern Snare
28 Dancehall Snare
29 Synthgaze Snare
30 Standard Snare
Tom
31 Funk Tom1
32 Original Tom1
33 Poprock Tom1
34 Rock Tom1
35 Session Tom1
36 SpeedMetal Tom1
37 ClassicDry Tom1
38 Modern Tom1
39 Jazz Tom1
40 Blues Tom1
41 Popular Tom1
42 Modern Tom1
43 Dancehall Tom1
44 Synthgaze Tom1
45 Standard Tom1
46 Funk Tom2
47 Original Tom2
48 Poprock Tom2
49 RockTom2
50 Seesion Tom2
51 SpeedMetal Tom2
52 ClassicDry Tom2
53 Modem Tom2
54 Jazz Tom2
55 Blues Tom2
56 Popular Tom2
57 Modem Tom2
58 Dancehall Tom2
59 Synthgaze Tom2
60 Standard Tom2
61 Funk Tom3
62 Original Tom3
63 Poprock Tom3
64 Rock Tom3
65 Seesion Tom3
66 SpeedMetal Tom3
67 ClassicDry Tom3
68 Modern Tom3
69 Jazz Tom3
70 Blues Tom3
71 Popular Tom3
72 Modem Tom3
73 Dancehall Tom3
74 Synthgaze Tom3
75 Standard Tom3
Crash
76 Funk Crash
77 Original Crash
78 Poprock Crash
79 Rock Crash
80 Seesion Crash
81 SpeedMetal Crash
82 ClassicDry Crash
83 Modern Crash
84 Jazz Crash
85 Blues Crash
86 Popular Crash
87 Modern Crash
88 Dancehall Crash
89 Synthgaze Crash
90 Standard Crash
Ride
91 Funk Ride
92 Original Ride
93 Poprock Ride
94 Rock Ride
95 Session Ride
96 SpeedMetal Ride
97 ClassicDry Ride
98 Modern Ride
99 Jazz Ride
100 Blues Ride
101 Popular Ride
102 Modern Ride
103 Dancehall Ride
104 Synthgaze Ride
105 Standard Ride
Hi-Hat
106 Funk Hi-Hat Open
107 Original Hi-Hat Open
108 Poprock Hi-Hat Open
109 Rock Hi-Hat Open
110 Session Hi-Hat Open
111 SpeedMetal Hi-Hat Open
112 ClassicDry Hi-Hat Open
113 Modern Hi-Hat Open
114 Jazz Hi-Hat Open
115 Blues Hi-Hat Open
116 Popular Hi-Hat Open
117 Modern Hi-Hat Open
118 Dancehall Hi-Hat Open
119 Synthgaze Hi-Hat Open
120 Standard Hi-Hat Open
121 Funk Hi-Hat Close
122 Original Hi-Hat Close
123 Poprock Hi-Hat Close
124 Rock Hi-Hat Close
125 Session Hi-Hat Close
126 SpeedMetal Hi-Hat Close
127 ClassicDry Hi-Hat Close
128 Modern Hi-Hat Close
129 Jazz Ride Hi-Hat Close
130 Blues Ride Hi-Hat Close
131 Popular Hi-Hat Close
132 Modern Hi-Hat Close
133 Dancehall Hi-Hat Close
134 Synthgaze Hi-Hat Close
135 Sta ndard Hi-Hat Close
136 Funk Hi-Hat Pedal
137 Original Hi-Hat Pedal
138 Poprock Hi-Hat Pedal
139 Rock Hi-Hat Pedal
140 Seesion Hi-Hat Pedal
141 SpeedMetal Hi-Hat Pedal
142 ClassicDry Hi-Hat Pedal
143 Modern Hi-Hat Pedal
144 Jazz Hi-Hat Pedal
145 Blues Hi-Hat Pedal
146 Popular Hi-Hat Pedal
147 Modern Hi-Hat Pedal
148 Dancehall Hi-Hat Pedal
149 Synthgaze Hi-Hat Pedal
150 Standard Hi-Hat Pedal
Preset drum kit
01 Funk
02 Original
03 Poprock
04 Rock
05 Session
06 SpeedMetal
07 ClassicDry
08 Modern
09 Jazz
10 Blues
User defined drum kit
11 Popular
12 Modern
13 Dancehall
14 Synthgaze
15 Standard
Demo song
Song 001
Song 002
Song 003
Song 004
Song 005
Song 006
Song 007
Song 008
Song 009
Song 010
Careful maintenance and protection of this product plays an important role in prolonging the service life of the product and reducing the failure.
1 AVOID HEATING, DAMPNESS OR DIRECT SUNLIGHT
Do not over expose the product to direct sunlight, or place it near air conditioning or extremely hot place.
2 DO NOT USE NEAR THE TV OR RADIO
This product may cause video or audio interference to the reception of TV and radio. If this happens, the product should be removed from the TV or radio.
3 NO DILUENTS OR SIMILAR CHEMICALS SHOULD BE USED FOR CLEANING
Clean the product with a soft cloth wetted with weak water solution and neutral detergent. Soak the cloth in a solution and wring it dry until it approaches drying.
4 DO NOT SHAKE, AVOID COLLISION
When moving, the product should be handled carefully and lightly. Violent vibration and collision are strictly prohibited in order to avoid damage to the shell or internal electronic components.

SAFETY PRECAUTIONS
POWER SUPPLY
This product can be powered by standard indoor wall sockets. Please only use the power cord specified in this product. When not in use, please turn off the power supply. When not in use for a long time, pull out the power cord and keep it properly.

SIGN
To ensure that you use this product safely and correctly, to prevent harm to users and others and financial damage, this manual and products are marked with a series of safety signs. The various signs and their meanings are as follows:

WARNING
This sign indicates that there is a potential risk of death or serious injury if this mark is ignored and the product is mishandled.

BE CAREFUL
This sign indicates that there is a potential danger of injury to personnel or other financial damage if this sign is ignored and the product is operated incorrectly.
EXAMPLE OF LOGO

This triangle sign () indicates what users should pay attention to. (The left example is careful shocks)

A circular sign () with an oblique line indicates prohibitions. The icons in or beside the logo indicate the contents specifically prohibited. (The example on the left is no disassembly)

The round black bottom sign (业) indicates what must be observed. The diagrams in this sign indicate the contents of the specific matters that must be observed. (The example on the left is that the power plug must be pulled out of the socket)

WARNING
Smoke, odor, overheating
When the product smokes, smells or overheats, there is a danger of fire and electric shock when it is used continually. In case of the above situation, the following operations should be performed immediately:
- Turn off the power supply.
- Pull the plug out of the power outlet.
- Contact your dealer.
Power cord
-
The improper use of power cord may cause fire and electric shock. The following precautions must be observed:
-
The special power cord designated for this product must be used.
The AC power supply with output voltage within the rated voltage range for household use must be used. -
Do not overload power sockets and extension lines.
-
The improper treatment of power line will lead to its damage or breakage, which will cause fire and electric shock hazards. The following precautions must be observed:
-
Do not place or heat heavy objects on power lines.
- Do not attempt to alter or bend the power cord too much.
- Do not twist or pull the power cord.
-
If the power cord or plug is damaged, please replace the same type of power cord.
-
Do not touch the power cord and plug with wet hands, otherwise there is a danger of electric shock.
- Please use the power cord where the water will not splash. Water is in danger of causing fire and electric shock.
- Never place vases or any other container containing water on this product. Water is dangerous of causing fire and electric shock.
- Do not allow minors to unplug and touch power lines or connection boards. Minors have no common sense of electricity safety, which may cause electric shock.


BE CAREFUL
The improper use of power cord may cause fire and electric shock. The following precautions must be observed:
- Never put the power cord near the oven or other heat source.
- Do not pull the cable when pulling out of the power socket. The main body of the plug must be grasped.
- The power cord plug must be inserted in the socket to the end.
- Make sure the power supply is off before connecting or disconnecting it.
- When thunderstorms occur or before traveling or other long-term departure, disconnect the power cord from the wall outlet.
- At least once a year, remove the power cord from the wall outlet and clean the dust accumulated around the plug.
Do not burn this product
Do not put this product in the fire, otherwise it will lead to product combustion and explosion of internal electronic components, which will cause fire and personnel injury.


Water and foreign bodies
Water, other liquids and (metal sheets, etc.) entering this product are in danger of causing fire and electric shock. In case of the above situation, the following operations shall be performed immediately:
- Turn off the power supply.
- If you are using a power cord for power supply, unplug it from the wall outlet.
- Contact your distributor.
Disassembly and transformation
Do not disassemble or transform the product in any way, otherwise there is a risk of electric shock, scald or other personal injury. All internal inspection, adjustment and maintenance operations should be entrusted to your distributor.


SAFETY PRECAUTIONS
Falling or colliding
If the product falls or is damaged by strong impact, it will be in danger of causing fire and electric shock. In case of the above situation, the following operations shall be performed immediately:
- Turn off the power supply.
- If you are using a power cord for power supply, you need to unplug it from the wall outlet.
- Contact your distributor.
Plastic bag
Do not let anyone put plastic bags for this product on his head or in his mouth. Otherwise, there is a risk of asphyxia. Families with young children should pay special attention to it.

Keep a distance from the product and the bracket
Climbing the bracket is dangerous of overturning or damage. Families with young children should pay special attention to it.

Put
Avoid placing the product on an uneven surface or any other unstable place. Otherwise, it will cause the product to fall down, which will lead to the risk of injury.

Product Mobility
Before moving this product, you must unplug the power cord plug from the wall outlet and pull out all other cables and connecting wires. Otherwise, it will lead to damage of power or connection wires, resulting in fire and electric shock.

clean
Before cleaning this product, you must unplug the power cord plug from the wall outlet, otherwise there is a risk of fire and electric shock.

Jack
The socket of this product can only be connected to the designated equipment and devices. Connecting non-designated equipment or devices is dangerous of causing fire and electric shock.


Location selection
It should be avoided to place the product in the following places, otherwise there is a risk of fire and electric shock.

- High temperature or dusty places.
- Kitchen or other places with lampblack.
- Where the product is exposed to direct sunlight, or any other place where the product will produce high temperature.
Volume
Don't play music long and loud. Pay special attention when using headphones. Excessive volume can damage your hearing.

Heavy
Do not place heavy objects on this product. Otherwise, the top of the product will be overweight, causing the product to overturn or drop objects on it, which will lead to the risk of injury.

Correct assembly of scaffolds
The incorrect assembly of the bracket may overturn, causing the product to fall off and posing a risk of injury to personnel. Therefore, it must be assembled according to the instructions in the attached installation guide to ensure that the product is properly mounted on its bracket.

| Warning-To reduce the risk of injury, user must read instructions manual carefully. | |
| This device complies with Part 15 of the FCC Rules. Operation is subject to the following two conditions:(1)This device may not cause harmful interference, and (2)this device must accept any interference received, including interference that may cause undesired operation. | |
| This product is subject to the provision of European Directive 2012/19/EC. The symbol showing a wheelie bin crossed through indicates that the product requires separate refuse collection in the European Union. This applies to the product and all accessories marked with this symbol. Products marked as such may not be discarded with normal domestic waste, but must be taken to a collection point for recycling electrical and electronic devices |
Manufacturer: Shanghaiuxinmuyeyouxiangonsi
Address: Shuangchenglu 803nong11hao1602A-1609shi, baoshanqu, shanghai 200000 CN.
Imported to AUS: SIHAO PTY LTD, 1 ROKEVA STREETEASTWOOD NSW 2122 Australia
Imported to USA: Sanven Technology Ltd., Suite 250, 9166 Anaheim Place, Rancho Cucamonga, CA 91730

E-CrossStu GmbH
Mainzer Landstr.69, 60329 Frankfurt am Main.

YH CONSULTING LIMITED.
K/O YH Consulting Limited Office 147, Centurion House,
London Road. Staines-upon-Thames. Surrey. TW18 4AX
VEVOR®
TOUGH TOOLS, HALF PRICE
Technical Support and E-Warranty Certificate www.vevor.com/support
VEVOR®
TOUGH TOOLS, HALF PRICE
www.vevor.com/support
INTRODUCTION DES FONCTIONS
INTRODUCTION DES FONCTIONS
CONTENU 2
GUIDE D'INSTALLATION 3
C/O YH Consulting Limited Bureau 147, Centurion House, London Road, Staines-upon-Thames, Surrey, TW18 4AX
VEVOR
TOUGH TOOLS, HALF PRICE
Assistance technique et certificat de garantie electronique www.vevor.com/support
VEVOR®
TOUGH TOOLS, HALF PRICE
C/O YH Consulting Limited Office 147, Centurion House, London Road, Staines-upon-Thames, Surrey, TW18 4AX
VEVOR
TOUGH TOOLS, HALF PRICE
elettronica www.vevor.com/support
BATTERIA ELETTRONICA
MANUALE D'USO
MODELLO:MT10B
Importato in AUS: SIHAO PTY LTD, 1 ROKEVA STREETEASTWOOD NSW 2122Australia
YH CONSULENZA LIMITATA.
C/O YH Consulting Limited Ufficio 147, Centurion House, London Road, Staines-upon-Thames, Surrey, TW18 4AX
VEVOR
TOUGH TOOLS, HALF PRICE
www.vevor.com/support
Importado a AUS: SIHAO PTY LTD, 1 ROKEVA STREETEASTWOOD NSW 2122 Australia
Importado a EE. UU.: Sanven Technology Ltd., Suite 250, 9166 Anaheim Place, Rancho Cucamonga, CA 91730

E-CrossStu GmbH
Mainzer Landstr.69, 60329 Francfort del Meno.

YH CONSULTING LIMITADO.
C/O YH Consulting Limited Oficina 147, Centurion House, London Road, Staines upon Thames, Surrey, TW18 4AX
VEVOR
TOUGH TOOLS, HALF PRICE
Soporte专业技术o y certificate de garantia electrònica www.vevor.com/support
VEVOR®
TOUGH TOOLS, HALF PRICE
Import do AUS: SIHAO PTY LTD, 1 ROKEVA STREETEASTWOOD NSW 2122 Australii
Import do USA: Sanven Technology Ltd., Suite 250, 9166 Anaheim Place, Rancho Cucamonga, CA 91730
E-CrossStu GmbH
Mainzer Landstr.69, 60329 Frankfurt nad Menem.

YH CONSULTING SPOLKA Z OGRANICZONA ODPOWIEDZIALNOSCIA.
C/O YH Consulting Limited Office 147, Centurion House, London Road, Staines-upon-Thames, Surrey, TW18 4AX
VEVOR
TOUGH TOOLS, HALF PRICE
www.vevor.com/support
VEVOR®
TOUGH TOOLS, HALF PRICE
Technische ondersteuning en e-garantiecertificaat www.vevor.com/support
ELEKTRONISCH DRUMSET HANDLEIDING
MODEL: MT10B
HULP NODIG? NEEM CONTACT MET ONS OP!
112 ClassicDry Hi-Hat Open
113 Moderne hital open
114 Jazz hihat open
115 Blues hithal open
116 Populaire hhat open
117 Moderne hihat open
118 Dancehall HiHat Open
119 Synthgaze hhat open
WEES VOORZICTIGWAAPCSUWING
C/O YH Consulting Limited Kantoor 147, Centurion House, London Road, Staines-upon-Thames, Surrey, TW18 4AX
VEVOR
TOUGH TOOLS, HALF PRICE
Technische ondersteuning en e-garantiecertificaat www.vevor.com/support
VEVOR®
TOUGH TOOLS, HALF PRICE
INSTALLATIONSGUIDE 3
Kontrollera de bifogade foremalen 3
Monteringsstativ 4
Crash/Ride cymbalarm (2st)

Hi-hat cymbal arm
Kycklingben

Trumnyckel
Vänster stigare
Höger stigare

Vander fort ror

Höger fotror

Hi-hat stodstangMtad/Tom bar stod bar*2

INSTALLATIONSGUIDE

Montering av stativ
107 Original Hi-Hat Open
108 Pop Rock Hi-Hat Open
109 Rock Hi Hat Open
110 Session Hi-Hat Open
111 SpeedMetal Hi-Hat Open
112 ClassicDry Hi-Hat Open
113 Modem Hi-Hat Open
114 Jazz Hi-Hat Open
115 Blues Hi-Hat Open
116 Populara Hi Hat Open
117 Modem Hi-Hat Open
118 Dancehall Hi-Hat Open
119 Synthgaze Hi-Hat Open
120 Standard Hi-Hat Open
145 Blues Hi-Hat Pedal
146 Popular Hi-Hat Pedals
147 Modem hi-hatpadal
148 Dancehall Hi-Hat Pedal
149 Synthgaze Hi-Hat Pedal
150 Standard Hi-Hat Pedal
C/O YH Consulting Limited Office 147, Centurion House, London Road, Staines-upon-Thames, Surrey, TW18 4AX
VEVOR
TOUGH TOOLS, HALF PRICE
www.vevor.com/support