
BJJ-8510 - Wall mount Vevor - Free user manual and instructions
Find the device manual for free BJJ-8510 Vevor in PDF.
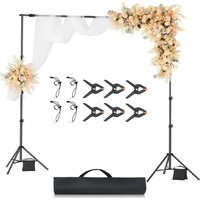


| Product Type | Wall Mount for Backdrop |
| Brand | VEVOR |
| Model | BJJ-8510 |
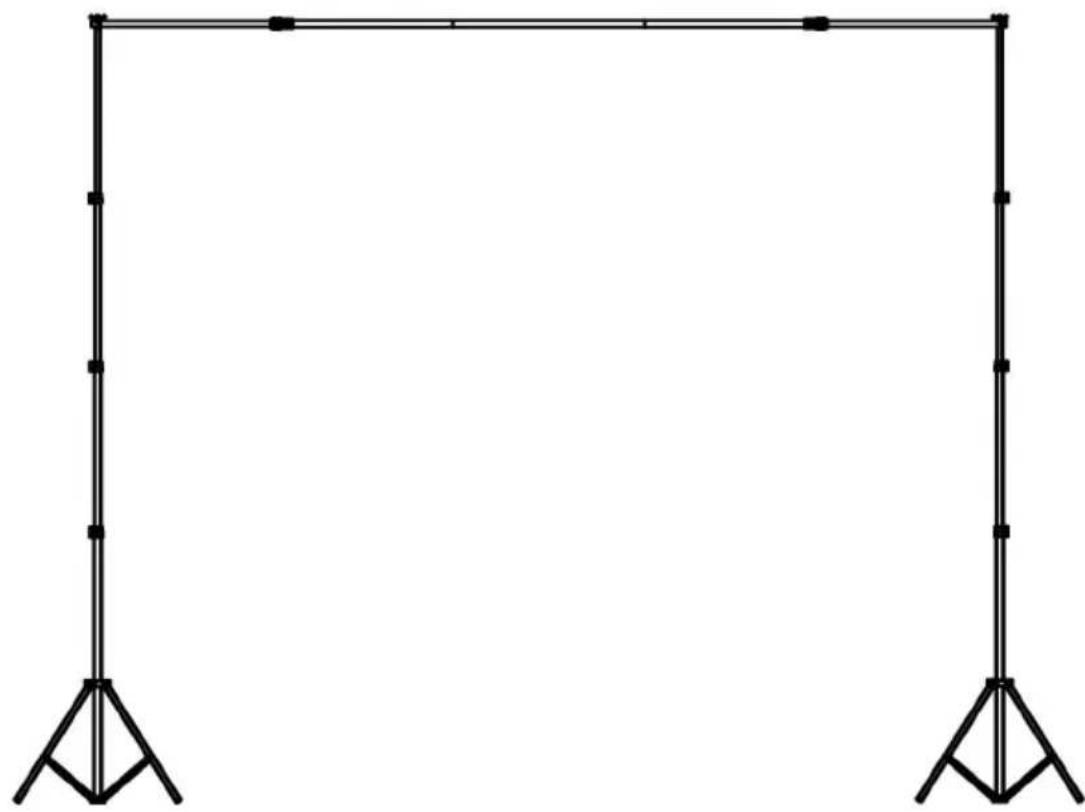
| Dimensions (W x D x H) | 3540 x 540 x 2600 mm |
| Net Weight | Approximately 2.77 kg |
| Main Material | Aluminum and steel |
| Maximum Load Capacity | Not specified, use with caution |
| Recommended Use | Indoor and outdoor on flat, hard ground |
| Assembly Required | Yes, follow the provided instructions |
| Tools Required | Not included, Allen key or screwdriver depending on parts |
| Package Contents | Parts A (x2), B (x1), C (x1), D (x1), E (x6), F (x2), G (x4) |
| Warranty | Technical support and electronic warranty certificate |
| Maintenance | Clean with a dry, non-abrasive cloth |
| Safety | Wear glasses and gloves during assembly; do not exceed load capacity |
| Reparability | Spare parts available upon request from the manufacturer |
| Main Functions | Adjustable backdrop stand, height and width adjustable |
| Approvals | ANSI approved safety glasses recommended |
| Country of Origin | China (American brand) |
Frequently Asked Questions - BJJ-8510 Vevor
User questions about BJJ-8510 Vevor
0 question about this device. Answer the ones you know or ask your own.
Ask a new question about this device
Download the instructions for your Wall mount in PDF format for free! Find your manual BJJ-8510 - Vevor and take your electronic device back in hand. On this page are published all the documents necessary for the use of your device. BJJ-8510 by Vevor.
USER MANUAL BJJ-8510 Vevor
Technical Support and E-Warranty Certificate www.vevor.com/support
BACKDROP STAND
USER MANUAL
MODEL NO.: BJJ-8510
We continue to be committed to provide you tools with competitive price. "Save Half", "Half Price" or any other similar expressions used by us only represents an estimate of savings you might benefit from buying certain tools with us compared to the major top brands and does not necessarily mean to cover all categories of tools offered by us. You are kindly reminded to verify carefully when you are placing an order with us if you are actually saving half in comparison with the top major brands.
VEVOR®
TOUGH TOOLS, HALF PRICE
Backdrop Stand
MODEL NO.: BJJ-8510
NEED HELP? CONTACT US!
Have product questions? Need technical support? Please feel free to contact us:
Technical Support and E-Warranty Certificate www.vevor.com/support
This is the original instruction. Please read all manual instructions carefully before operating. VEVOR reserves a clear interpretation of the user manual. The appearance of the product shall be subject to the product you received. Please forgive us that we won't inform you again if there are any technology or software updates on our product.
WARNING:
Please read this manual carefully before using the product. Failure to do so may result in serious injury.
ASSEMBLY PRECAUTIONS
- Assemble only according to these instructions. Improper assembly can create hazards.
- Wear ANSI-approved safety goggles and heavy-duty work gloves during assembly.
- Keep the assembly area clean and well-lit.
- Keep bystanders out of the area during assembly.
- Do not assemble when tired or when under the influence of alcohol, drugs, or medication.
- The product capabilities apply to properly and completely assembled products only.
- Assemble on a flat, level, hard, and smooth surface capable of safely supporting the Backdrop Stand.
- For additional information regarding the parts listed in the following pages, please refer to the Assembly Diagram of this manual. Unwrap and separate all parts in a clean work area.
SAVE THESE INSTRUCTIONS
USE PRECAUTIONS
TO PREVENT SERIOUS INJURY AND DEATH FROM TIPPING:
- This product is not a toy. Do not allow children to play with or near this item.
- Do not exceed weight capacities before moving.
- Use only on a flat, hard, and smooth surface capable of safely supporting a fully loaded Backdrop Stand.
- Use as intended only.
- Inspect before every use; do not use if parts are loose or damaged.
TECHNICAL SPECIFICATIONS
| Model | BJJ-8510 |
| Product Dimensions (LxWxH)(mm) | 3540*540*2600 |
| Net Weight(kg) | About 2.77 |
*Products such as specifications, appearance, and design are subject to modification without prior notice.
PACKAGE CONTENTS
| A | 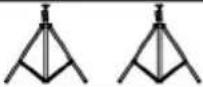 | 2 | E |  | 6 | |
| B |  | 1 | F | 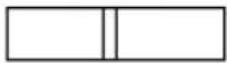 | 2 | |
| C |  | 1 | G | 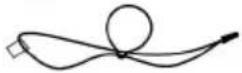 | 4 | |
| D |  | 1 |
ASSEMBLY STEPS
STEP 1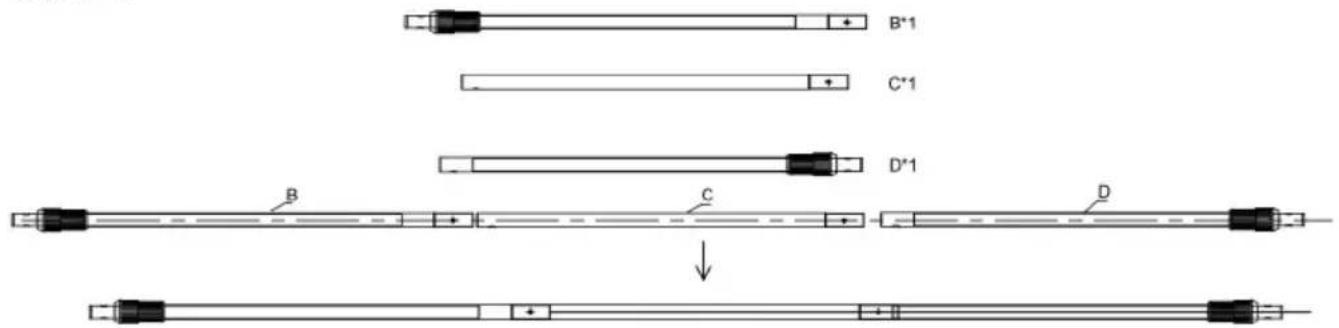
Take one piece of B, one piece of C, and one piece of D, and connect them in the order shown in the figure.
STEP 2
Take tripod A and unscrew the claw screw at the top.
STEP 3
Two people place the tripods at a proper distance, use the crossbar assembled in step 1 to locate the two tripods, and put the crossbar on the ground, with both ends of the crossbar at the positioning points (as shown in the figure).
STEP 4
After two people place the tripod at a proper distance, install the crossbar assembled in step 1.
STEP 5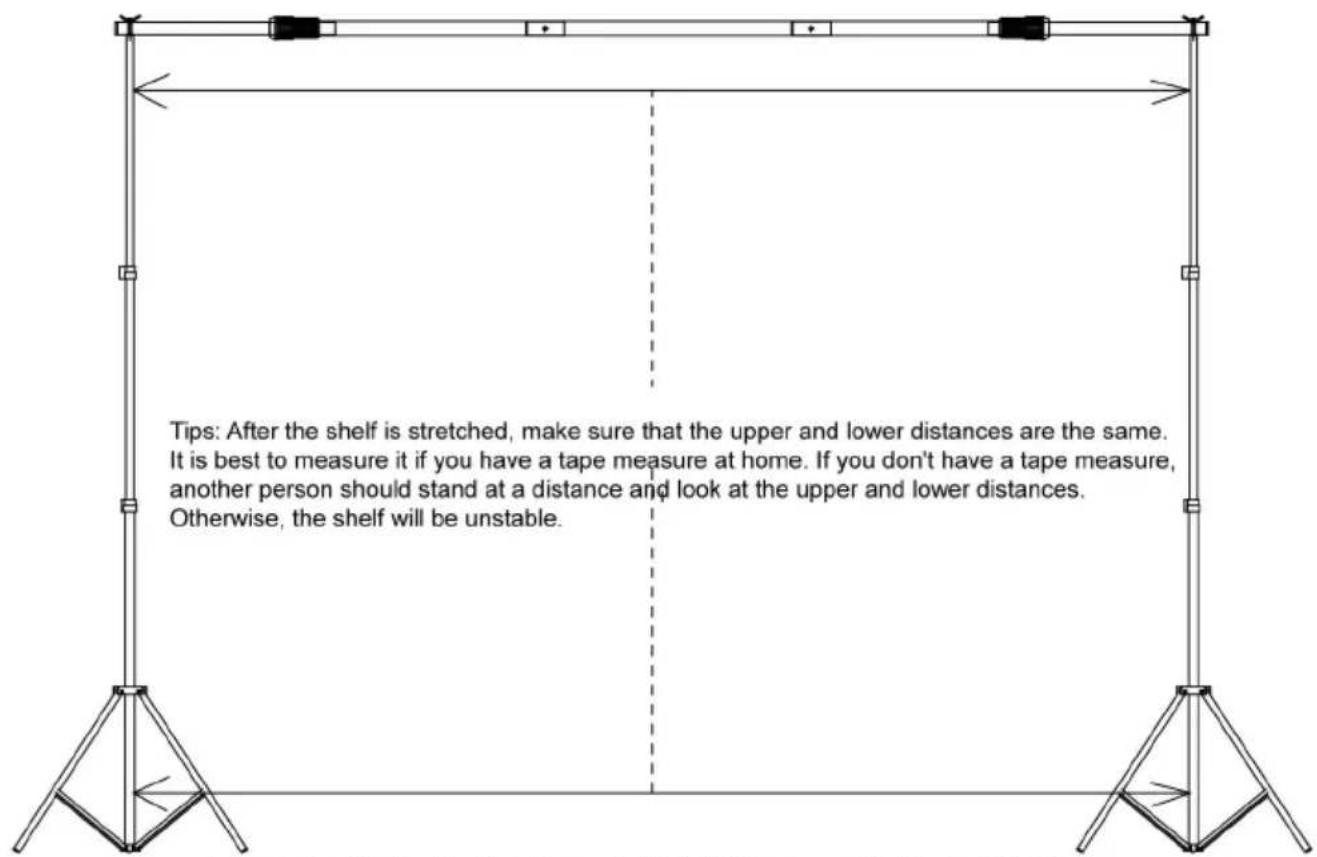
Two people will raise the tripod to a suitable height to ensure that the height of both sides is consistent and the crossbar is horizontal.
STEP 6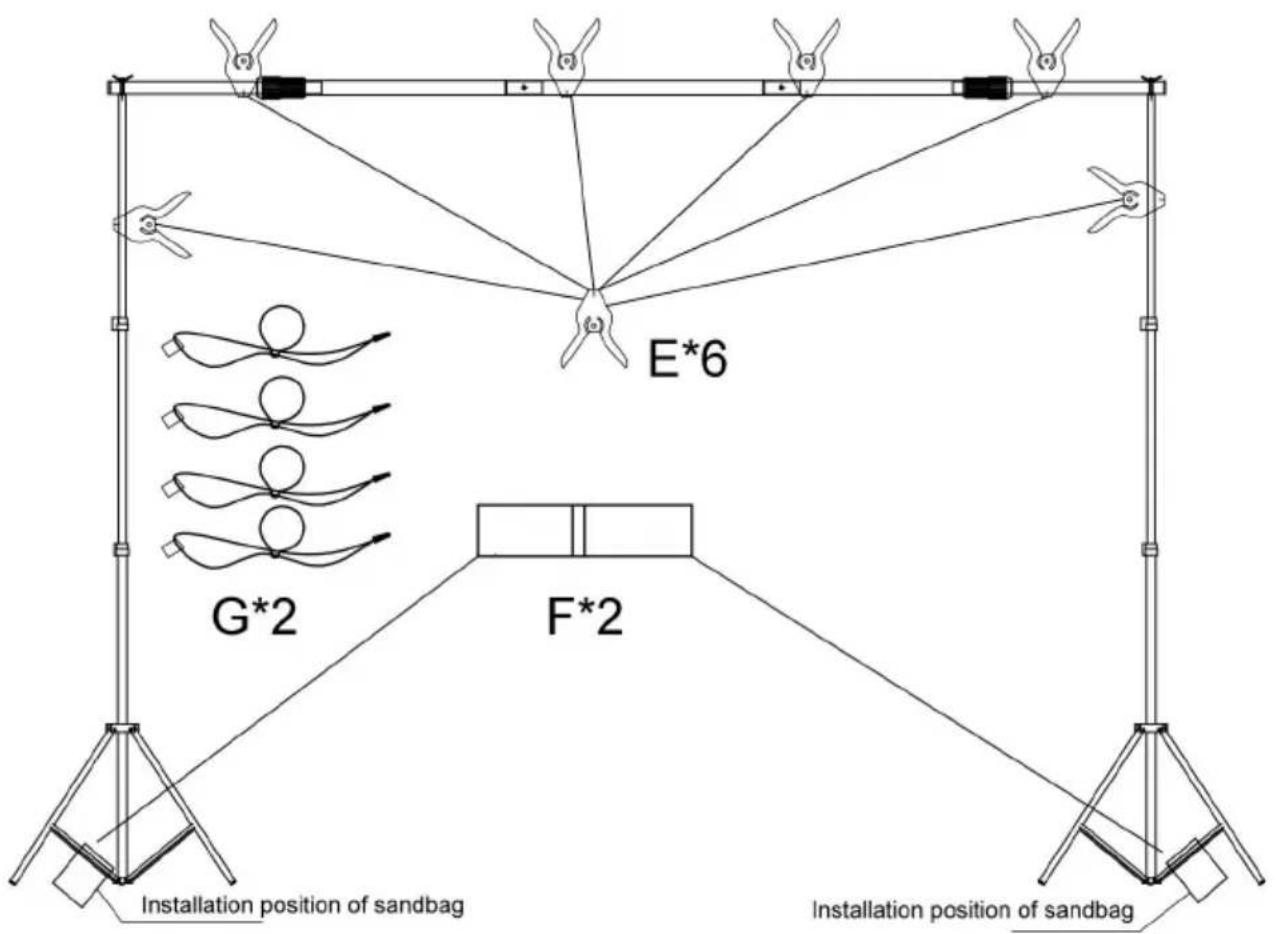
2 sandbags, placed as shown in the figure after loading sand, to ensure the stability of the shelf; Six clips and four cloth clips are used according to the actual situation.
COMPLETION
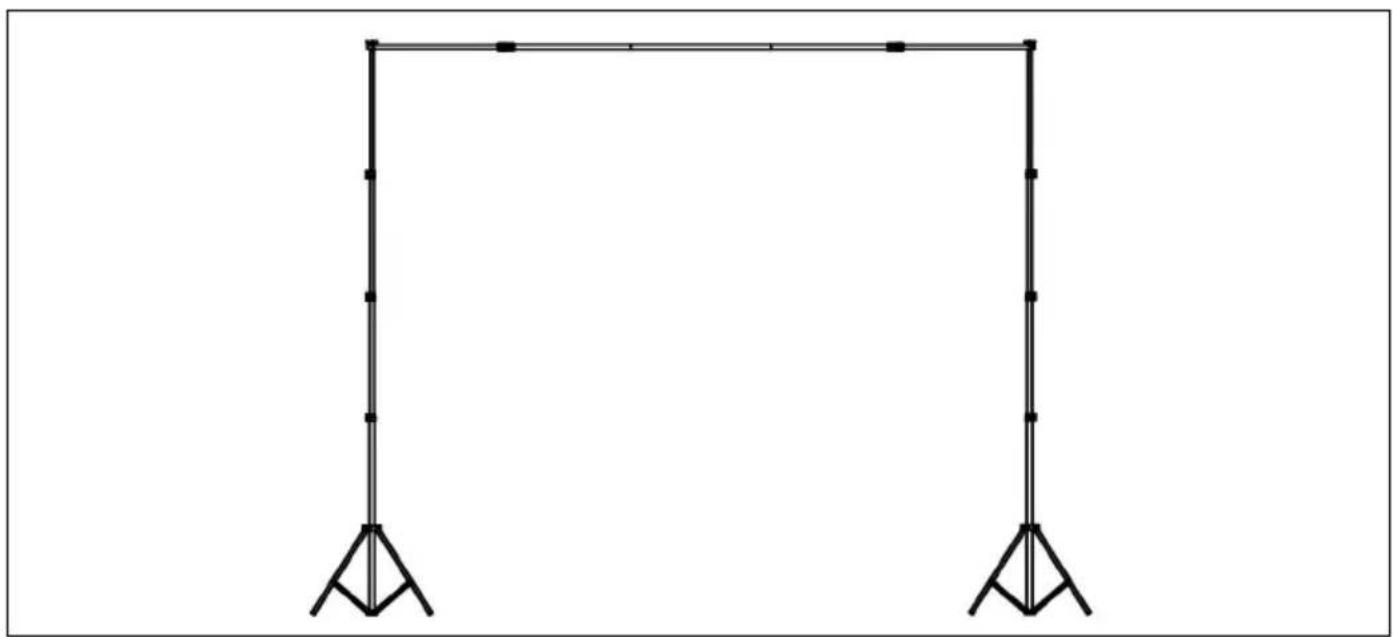
Manufacturer: Shanghaimuxinmuyeyouxiangongsi
Address: Shuangchenglu 803nong11hao1602A-1609shi, baoshanqu, shanghai 200000 CN.
Imported to AUS: SIHAO PTY LTD. 1 ROKEVA STREETEASTWOOD NSW 2122 Australia
Imported to USA: Sanven Technology Ltd. Suite 250, 9166 Anaheim Place, Rancho Cucamonga, CA 91730
| UK | REP |
YH CONSULTING LIMITED. C/O YH Consulting
Limited Office 147, Centurion House, London
Road, Staines-upon-Thames, Surrey, TW18 4AX
| EC | REP |
E-CrossStu GmbH
Mainzer Landstr.69,
60329 Frankfurt am Main.
VEVOR®
TOUGH TOOLS, HALF PRICE
Technical Support and E-Warranty Certificate
www.vevor.com/support
VEVOR®
TOUGH TOOLS, HALF PRICE
NEED HELP? CONTACT US!
Take one piece of B, one piece of C, and one piece of D, and connect them in the order shown in the figure.
STEP 2
Take tripod A and unscrew the claw screw at the top.
STEP 3
Two people put the tripods at a proper distance, use the cross bar assembled in step 1 to locate the two tripods, and put the cross bar on the ground, with both ends of the cross bar at the positioning points (as shown in the figure).
STEP 4
After two people put the tripod at a proper distance, install the crossbar assembled in step 1.
STEP 5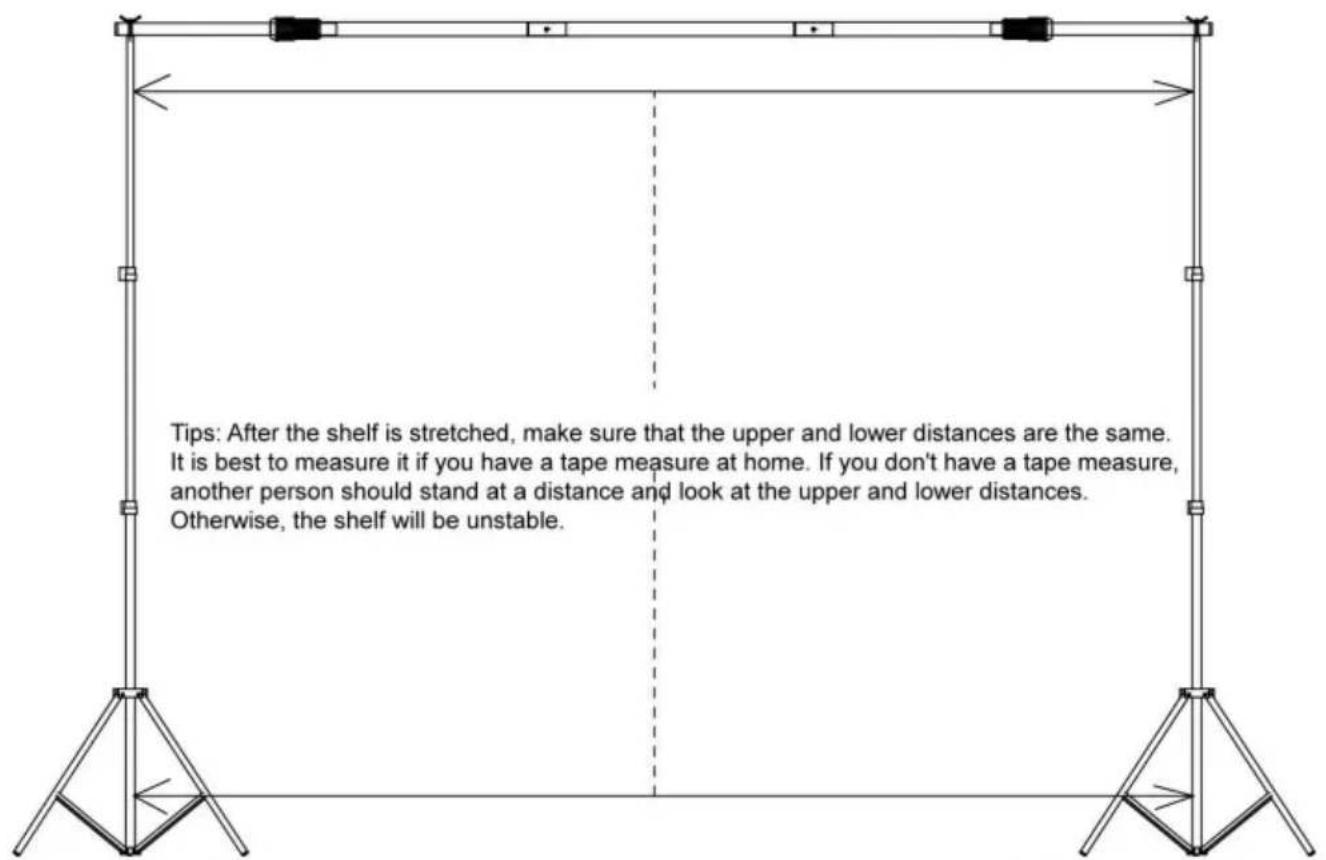
Two people will raise the tripod to a suitable height to ensure that the height of both sides is consistent and the crossbar is horizontal.
STEP 6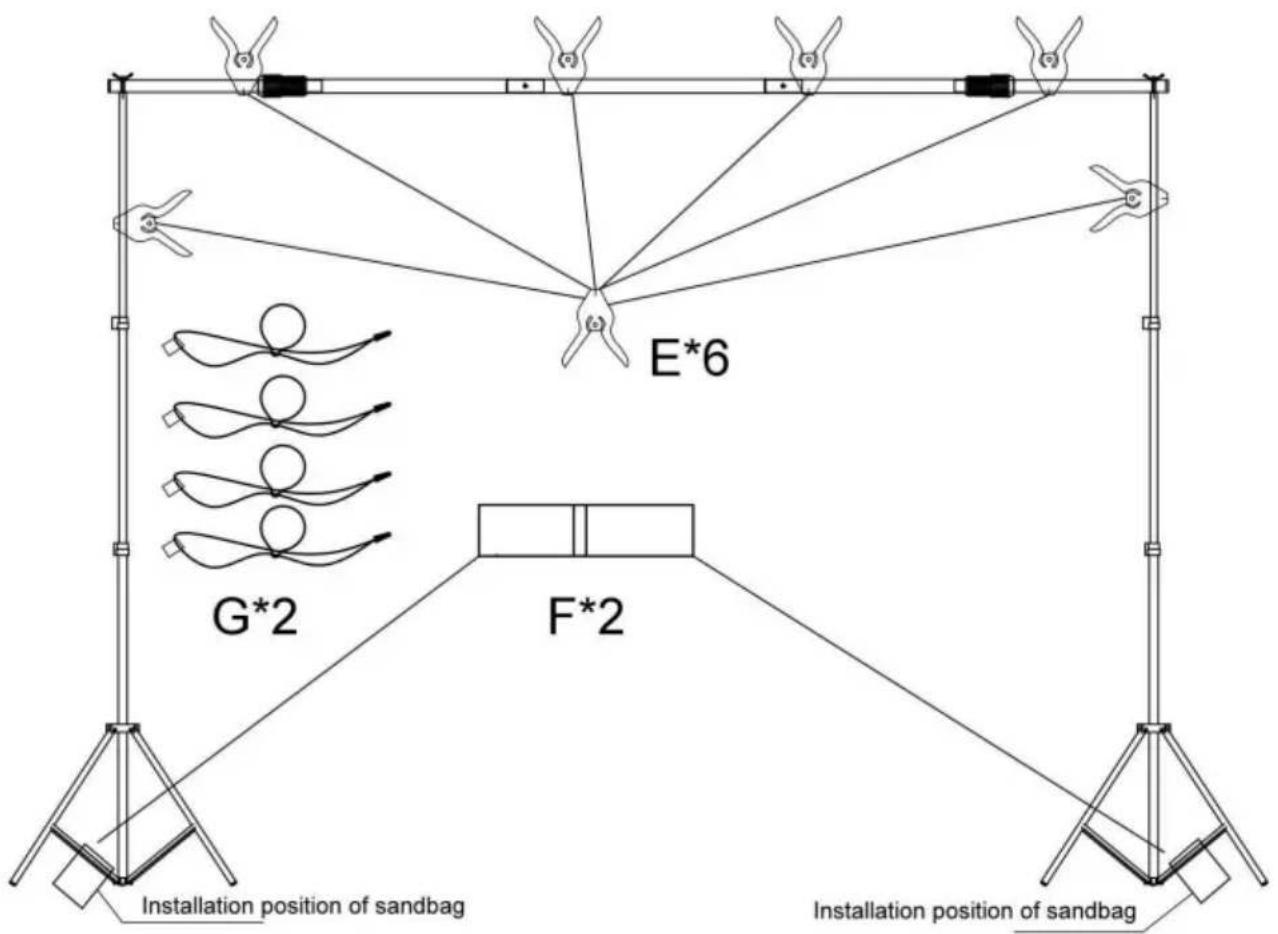
2 sandbags, placed as shown in the figure after loading sand, to ensure the stability of the shelf; Six clips and four cloth clips are used according to the actual situation.
COMPLETION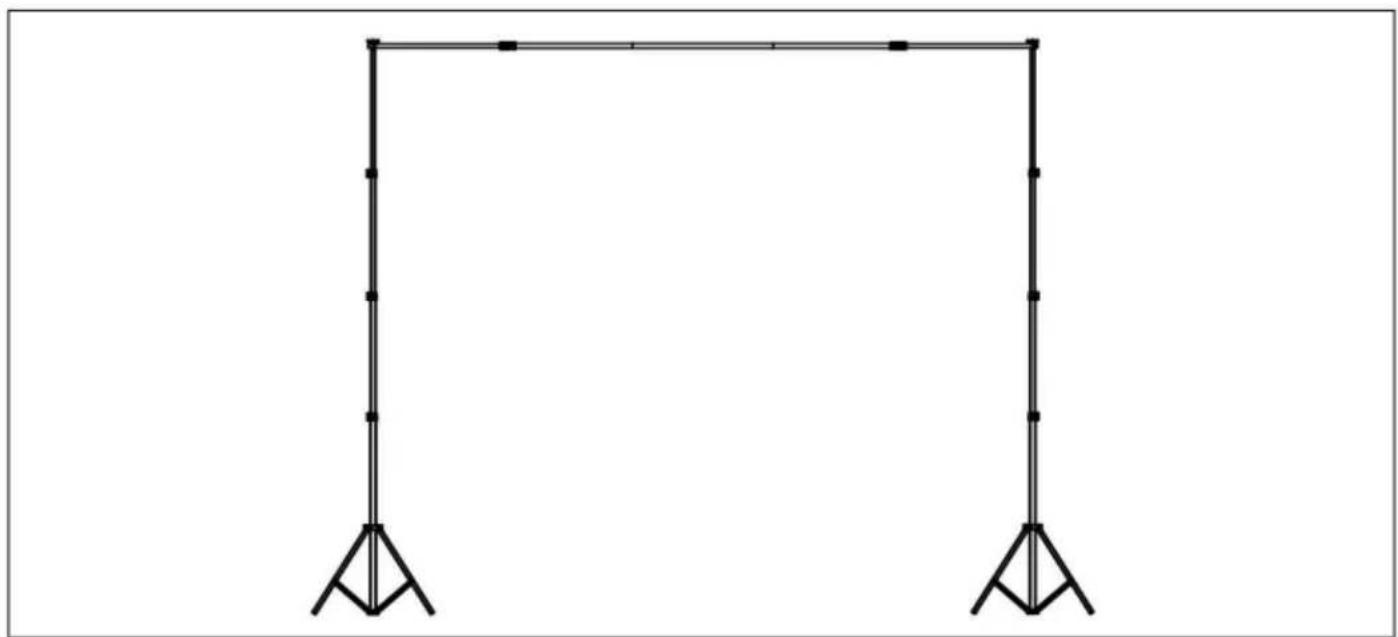
Manufacturer: Shanghaimuxinmuyeyouxiangongsi Address:
Shuangchenglu 803nong11hao1602A-1609shi, baoshanqu, shanghai 200000 CN.
Imported into Australia: SIHAO PTY LTD. 1 ROKEVA STREETEASTWOOD NSW 2122 Australia
YH CONSULTING LIMITED. C/O YH Consulting
Limited Bureau 147, Centurion House, London
Road, Staines-upon-Thames, Surrey, TW18 4AX
E-CrossStu GmbH
Mainzer Landstr.69,
www.vevor.com/support
BACKGROUND STAND
USER MANUAL
MODEL NO.: BJJ-8510
Take one piece of B, one piece of C, and one piece of D, and connect them in the order shown in the figure.
STEP 2
Take tripod A and unscrew the claw screw at the top.
STEP 3
Two people place the tripods at a proper distance, use the crossbar assembled in step 1 to locate the two tripods, and put the crossbar on the ground, with both ends of the crossbar at the positioning points (as shown in the figure).
STEP 4
After two people place the tripod at a proper distance, install the crossbar assembled in step 1.
STEP 5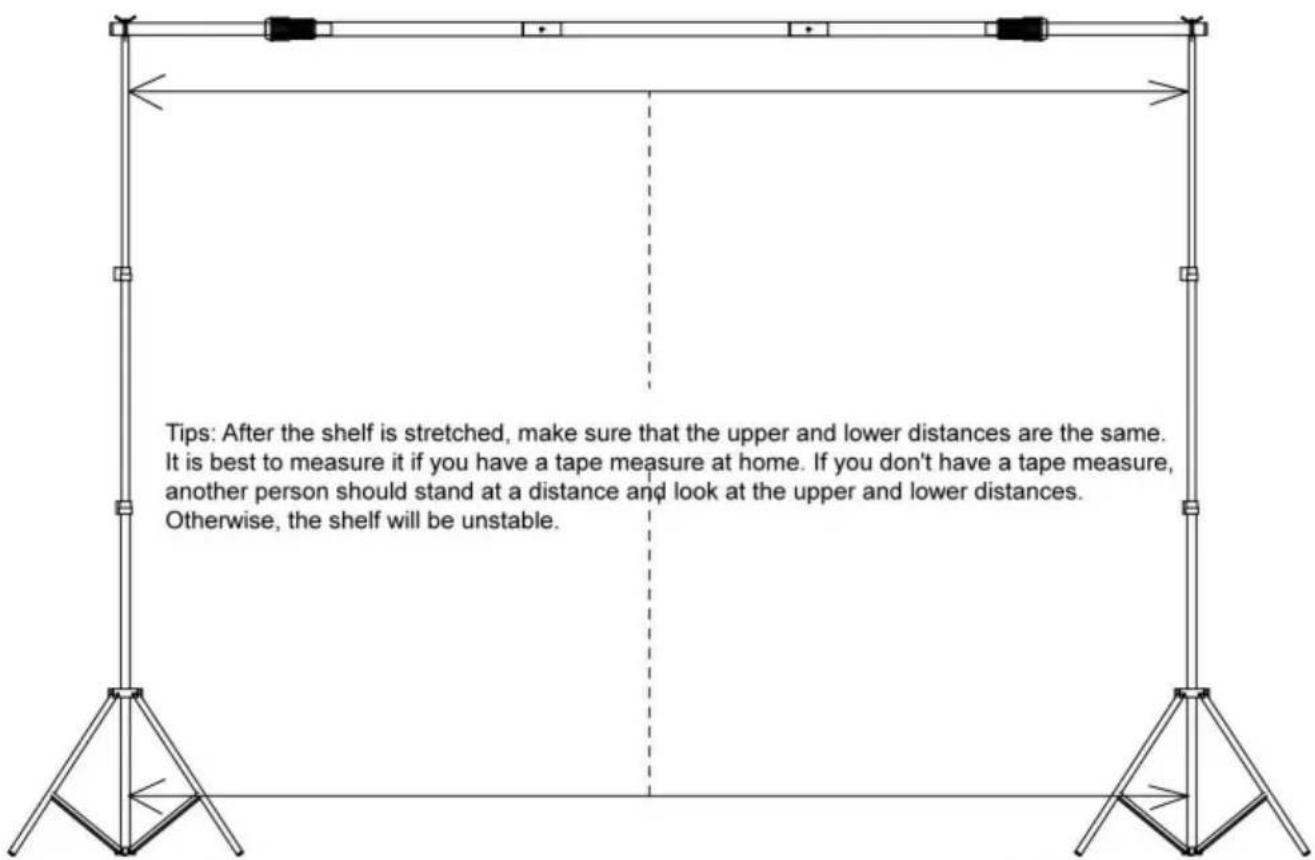
Two people will raise the tripod to a suitable height to ensure that the height of both sides is consistent and the crossbar is horizontal.
STEP 6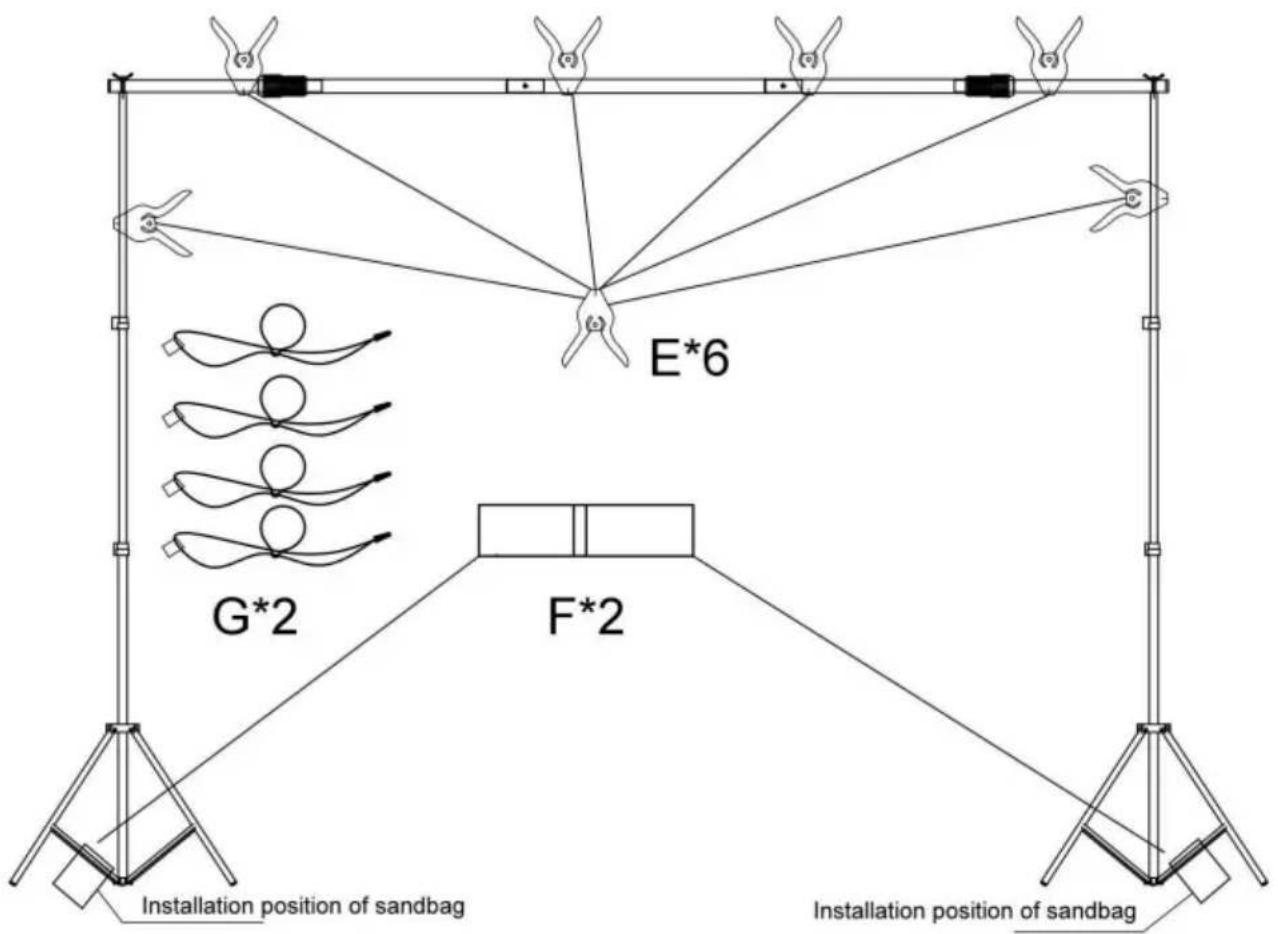
2 sandbags, placed as shown in the figure after loading sand, to ensure the stability of the shelf; Six clips and four cloth clips are used according to the actual situation.
COMPLETION
Manufacturer: Shanghaimuxinmuyeyouxiangongsi Address:
Shuangchenglu 803nong11hao1602A-1609shi, baoshanqu, Shanghai 200000 CN.
Imported into Australia: SIHAO PTY LTD. 1 ROKEVA STREETEASTWOOD NSW 2122 Australia
Imported into the USA: Sanven Technology Ltd. Suite 250, 9166 Anaheim Place, Rancho Cucamonga, CA 91730
| UK | REP |
YH CONSULTING LIMITED. C/O YH Consulting
Limited Office 147, Centurion House, London
Road, Staines-upon-Thames, Surrey, TW18 4AX
www.vevor.com/support
VEVOR®
TOUGH TOOLS, HALF PRICE
BASE SUPPORT
USER MANUAL
MODEL NO.: BJJ-8510
Take one piece of B, one piece of C, and one piece of D, and connect them in the order shown in the figure.
STEP 2
Take tripod A and unscrew the claw screw at the top.
STEP 3
Two people place the tripods at a proper distance, use the crossbar assembled in step 1 to locate the two tripods, and put the crossbar on the ground, with both ends of the crossbar at the positioning points (as shown in the figure).
STEP 4
After two people place the tripod at a proper distance, install the crossbar assembled in step 1.
STEP 5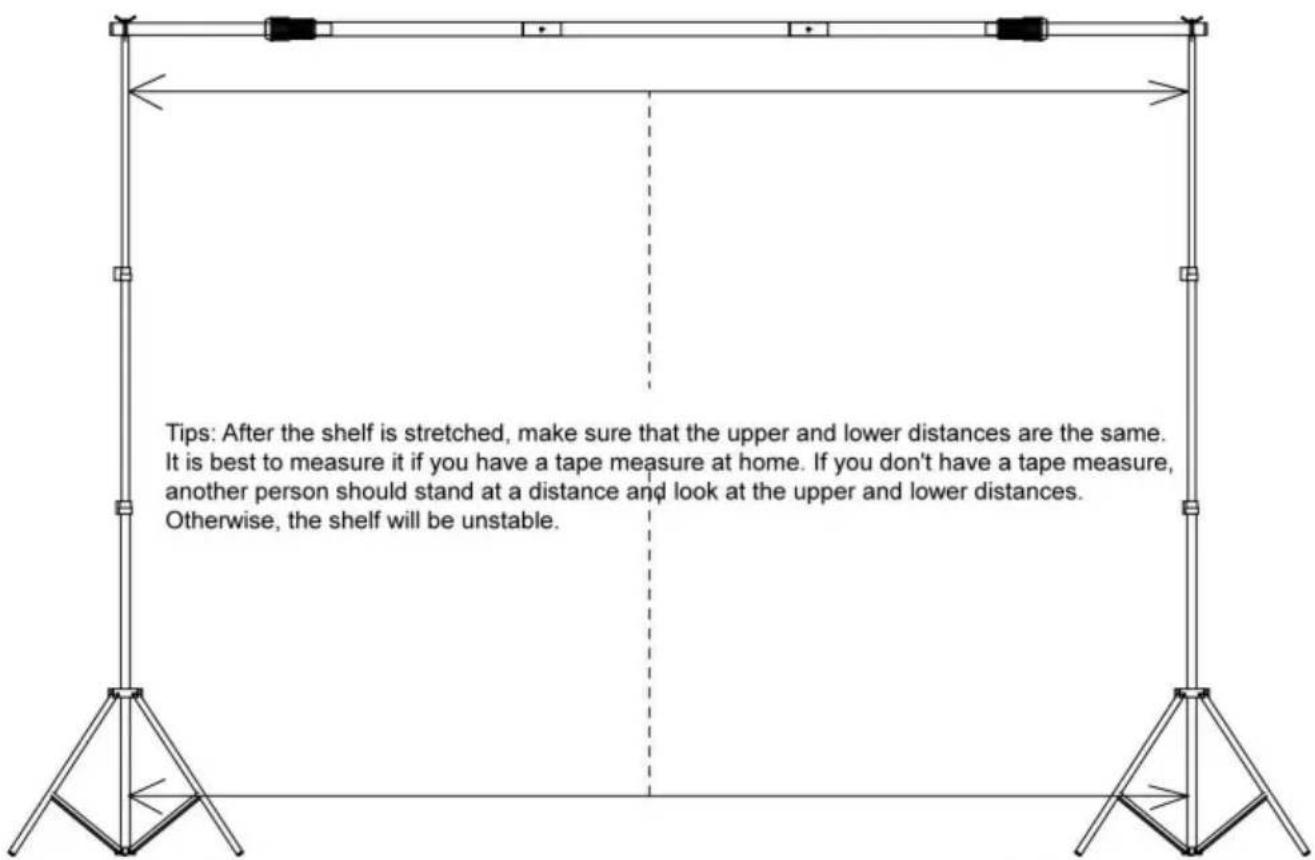
Two people will raise the tripod to a suitable height to ensure that the height of both sides is consistent and the crossbar is horizontal.
STEP 6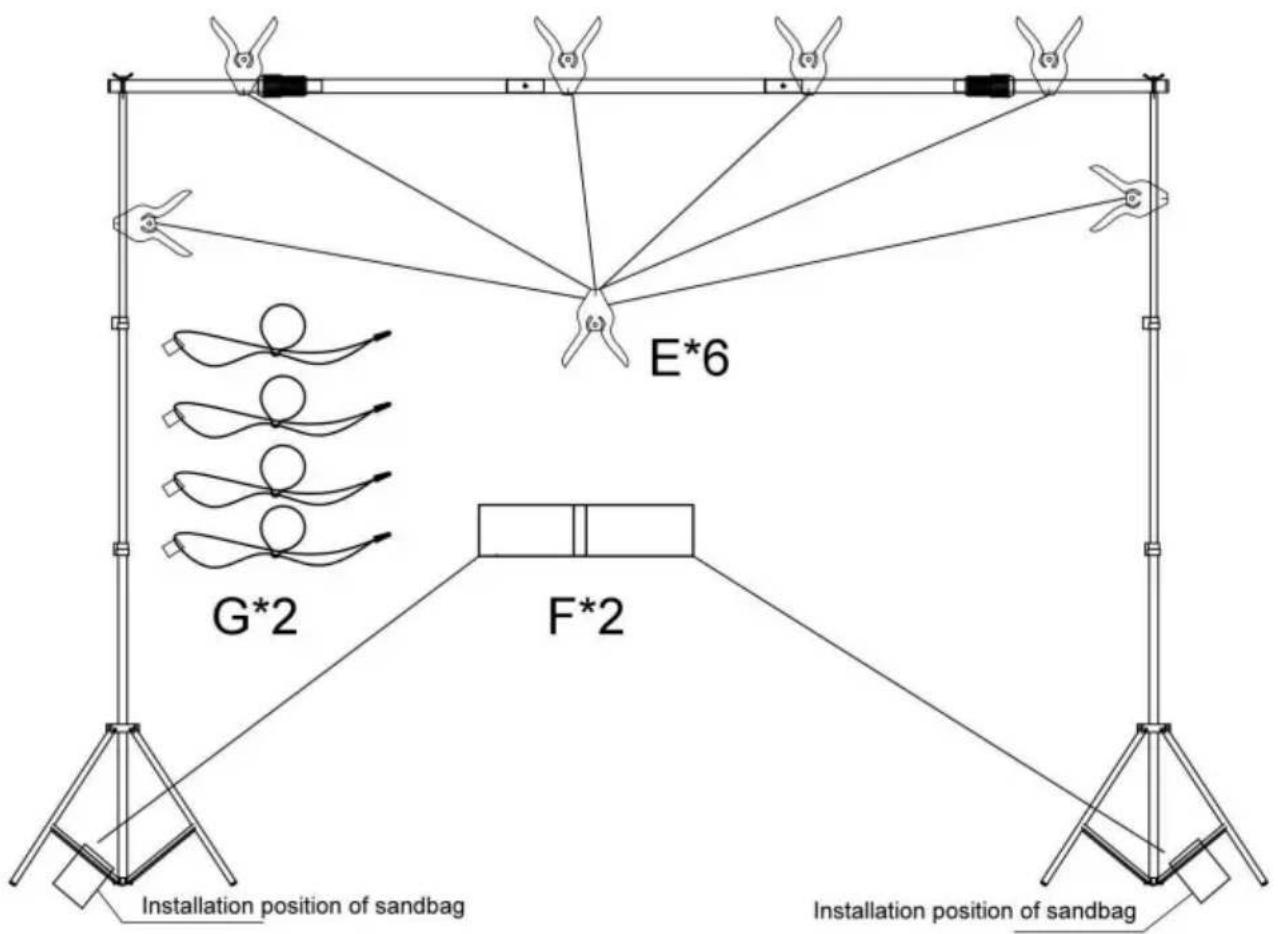
2 sandbags, placed as shown in the figure after loading sand, to ensure the stability of the shelf; Six clips and four cloth clips are used according to the actual situation.
COMPLETION
Imported into AUS: SIHAO PTY LTD. 1 ROKEVA STREET EASTWOOD NSW 2122 Australia
Imported into USA: Sanven Technology Ltd. Suite 250, 9166 Anaheim Place, Rancho Cucamonga, CA 91730
YH CONSULTING LIMITED. C/O YH Consulting
Limited Office 147, Centurion House, London
Road, Staines-upon-Thames, Surrey, TW18 4AX
www.vevor.com/support
VEVOR®
TOUGH TOOLS, HALF PRICE
www.vevor.com/support
BACK SUPPORT
USER MANUAL
MODEL NUMBER: BJJ-8510
Take one piece of B, one piece of C, and one piece of D, and connect them in the order shown in the figure.
STEP 2
Take tripod A and unscrew the claw screw at the top.
STEP 3
Two people put the tripods at a proper distance, use the cross bar assembled in step 1 to locate the two tripods, and put the cross bar on the ground, with both ends of the cross bar at the positioning points (as shown in the figure).
STEP 4
After two people put the tripod at a proper distance, install the crossbar assembled in step 1.
STEP 5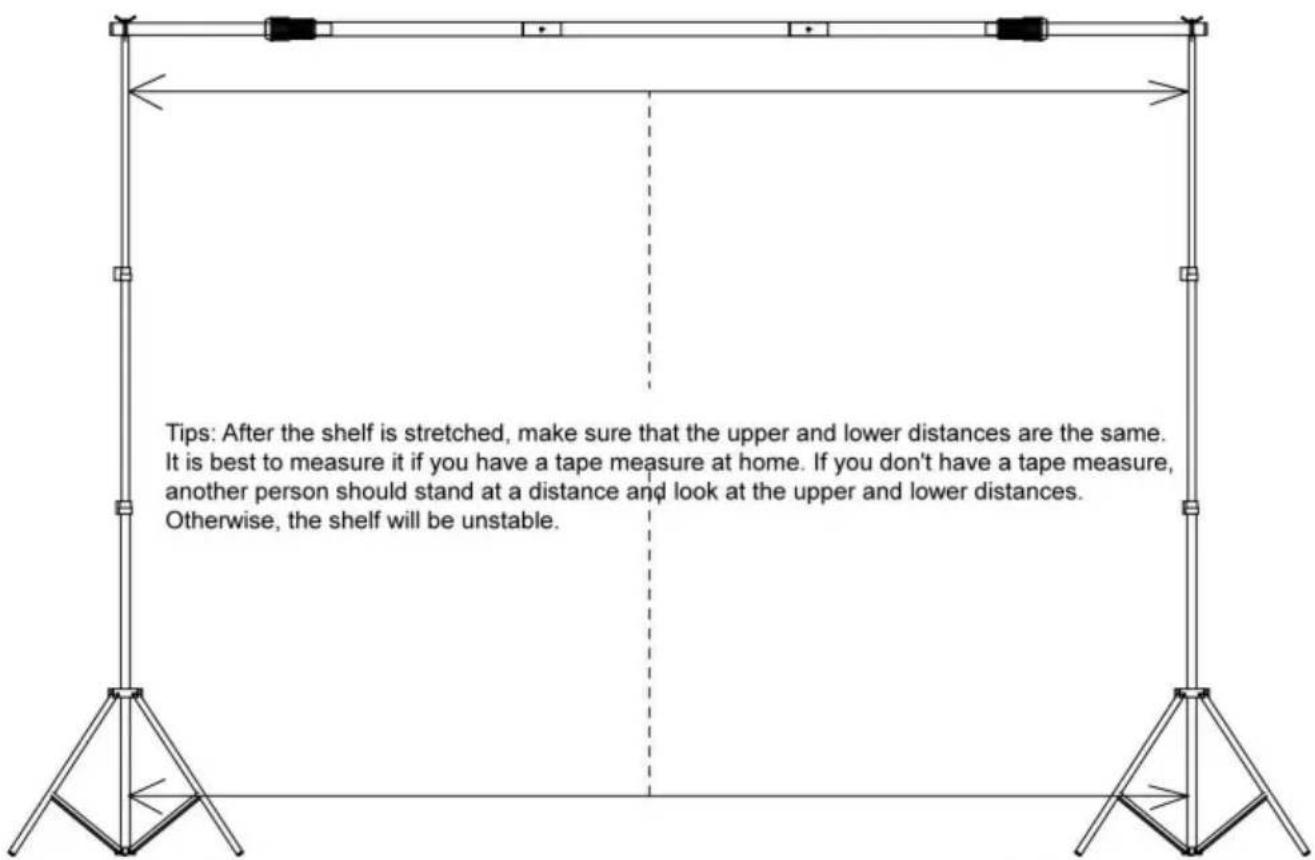
Two people will raise the tripod to a suitable height to ensure that the height of both sides is consistent and the crossbar is horizontal.
STEP 6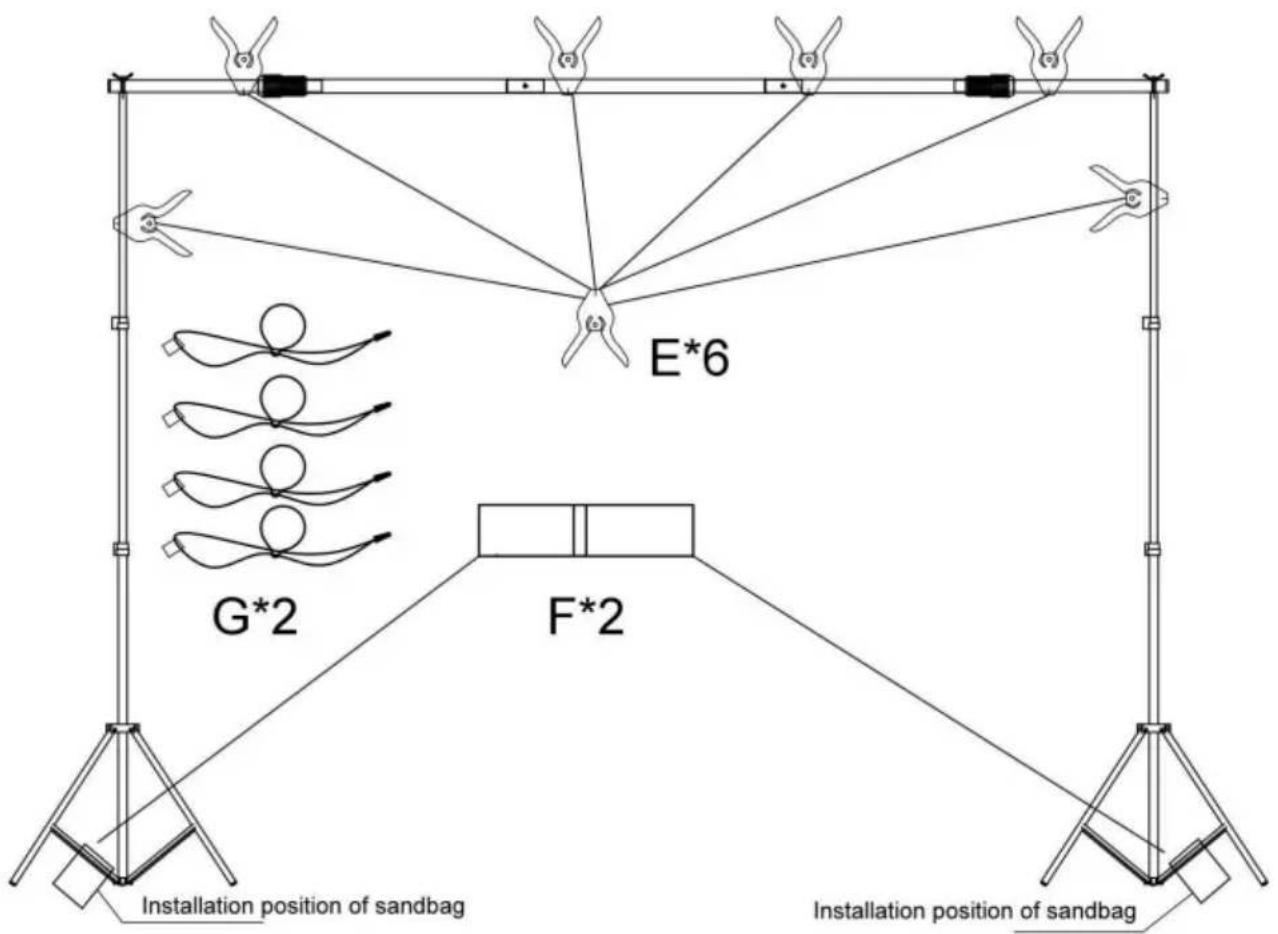
2 sandbags, placed as shown in the figure after loading sand, to ensure the stability of the shelf; Six clips and four cloth clips are used according to the actual situation.
COMPLETION
Road, Staines-upon-Thames, Surrey, TW18 4AX
E-CrossStu GmbH
www.vevor.com/support
VEVOR®
TOUGH TOOLS, HALF PRICE
NEED HELP? CONTACT US!
Take one piece of B, one piece of C, and one piece of D, and connect them in the order shown in the figure.
STEP 2
Take tripod A and unscrew the claw screw at the top.
STEP 3
Two people place the tripods at a proper distance, use the crossbar assembled in step 1 to locate the two tripods, and put the crossbar on the ground, with both ends of the crossbar at the positioning points (as shown in the figure).
STEP 4
After two people place the tripod at a proper distance, install the crossbar assembled in step 1.
STEP 5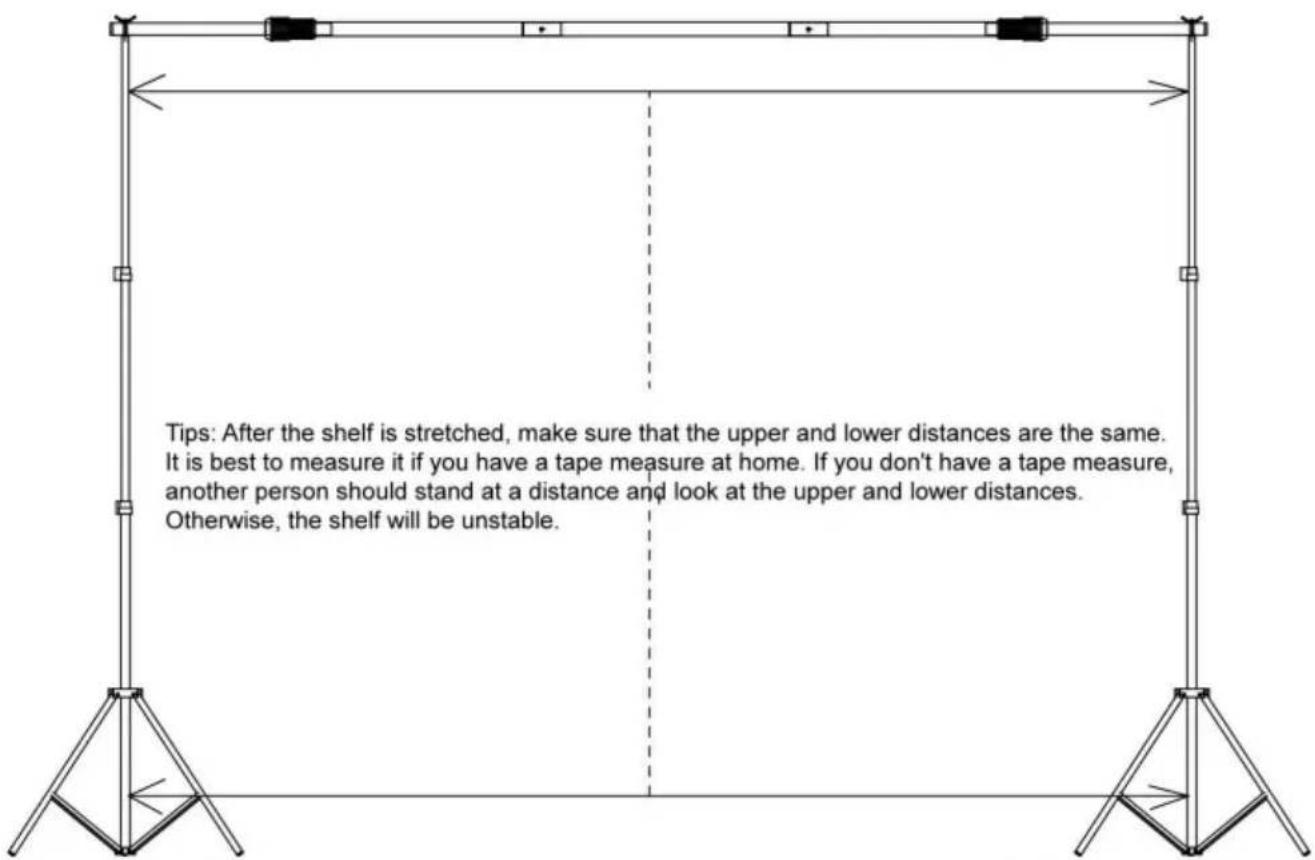
Two people will raise the tripod to a suitable height to ensure that the height of both sides is consistent and the crossbar is horizontal.
STEP 6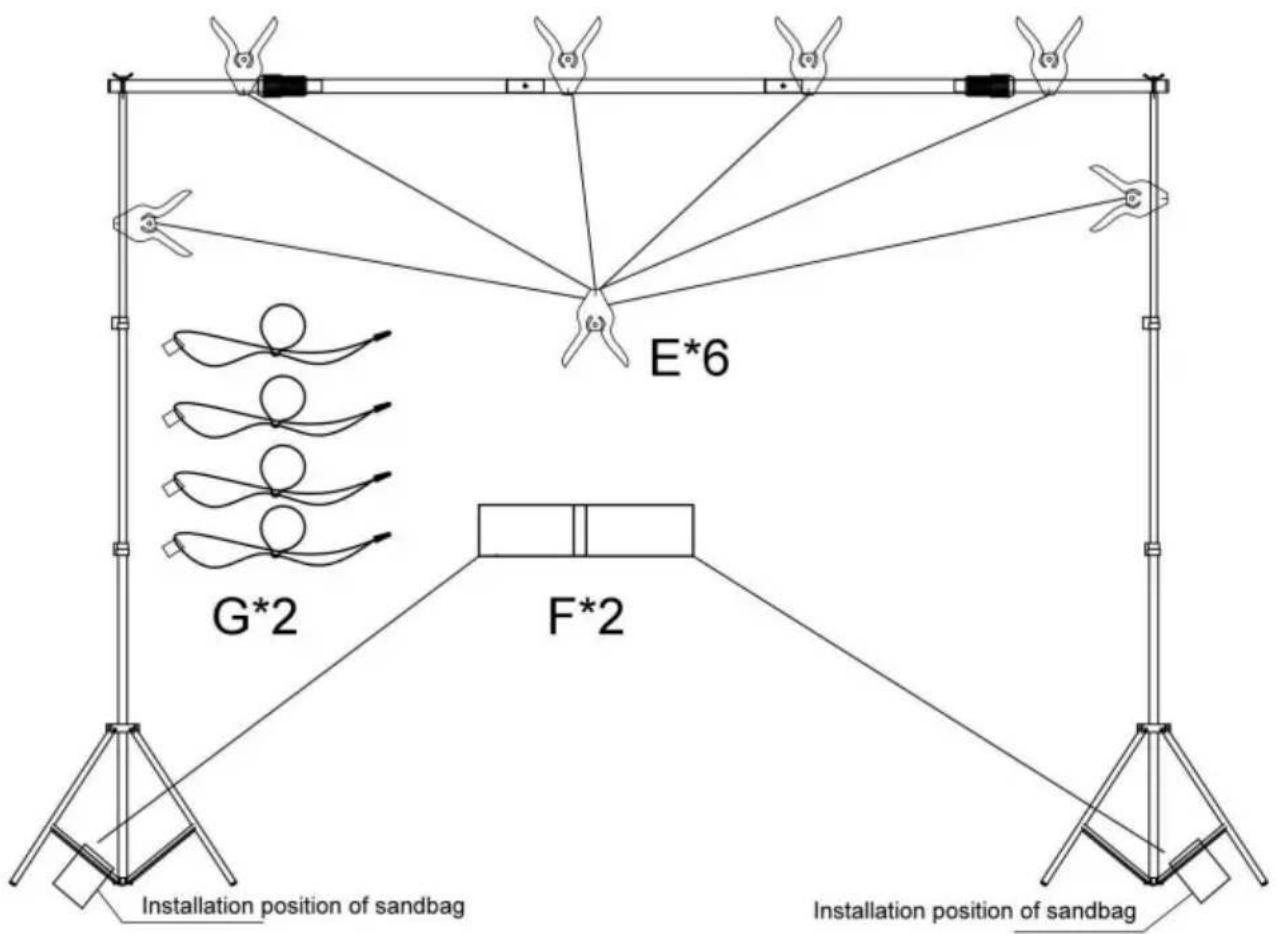
2 sandbags, placed as shown in the figure after loading sand, to ensure the stability of the shelf; Six clips and four cloth clips are used according to the actual situation.
COMPLETION
Manufacturer: Shanghaimuxinmuyeyouxiangongsi Address:
Shuangchenglu 803nong11hao1602A-1609shi, baoshanqu, Shanghai 200000 CN.
Imported into AUS: SIHAO PTY LTD. 1 ROKEVA STREET EASTWOOD NSW 2122 Australia
Imported into USA: Sanven Technology Ltd. Suite 250, 9166 Anaheim Place, Rancho Cucamonga, CA 91730
| REP WIEL KIEJ BRYTANII |
YH CONSULTING LIMITED. C/O YH Consulting Limited
Office 147, Centurion House, London Road, Staines-upon-Thames, Surrey, TW18 4AX
| Przedstawiciel UE |
E-CrossStu GmbH
Mainzer Landstr.69,
60329 Frankfurt am Main.
VEVOR®
TOUGH TOOLS, HALF PRICE
www.vevor.com/support
VEVOR®
TOUGH TOOLS, HALF PRICE
www.vevor.com/support
BACKGROUND STANDARD
USER MANUAL
MODEL NUMBER: BJJ-8510
NEED HELP? CONTACT US!
Take one piece of B, one piece of C, and one piece of D, and connect them in the order shown in the figure.
STEP 2
Take tripod A and unscrew the claw screw at the top.
STEP 3
Two people put the tripods at a proper distance, use the crossbar assembled in step 1 to locate the two tripods, and put the crossbar on the ground, with both ends of the crossbar at the positioning points (as shown in the figure).
STEP 4
After two people put the tripod at a proper distance, install the crossbar assembled in step 1.
STEP 5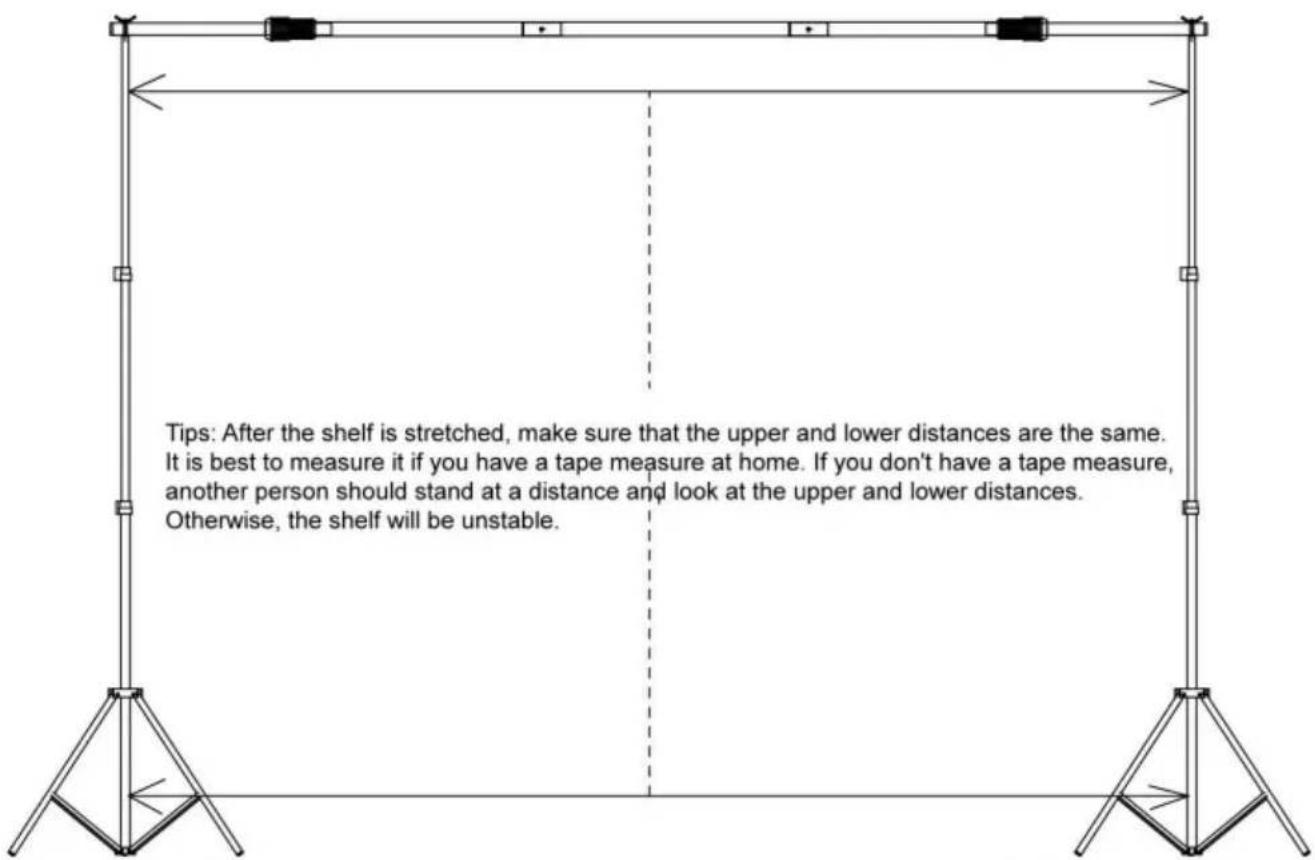
Two people will raise the tripod to a suitable height to ensure that the height of both sides is consistent and the crossbar is horizontal.
STEP 6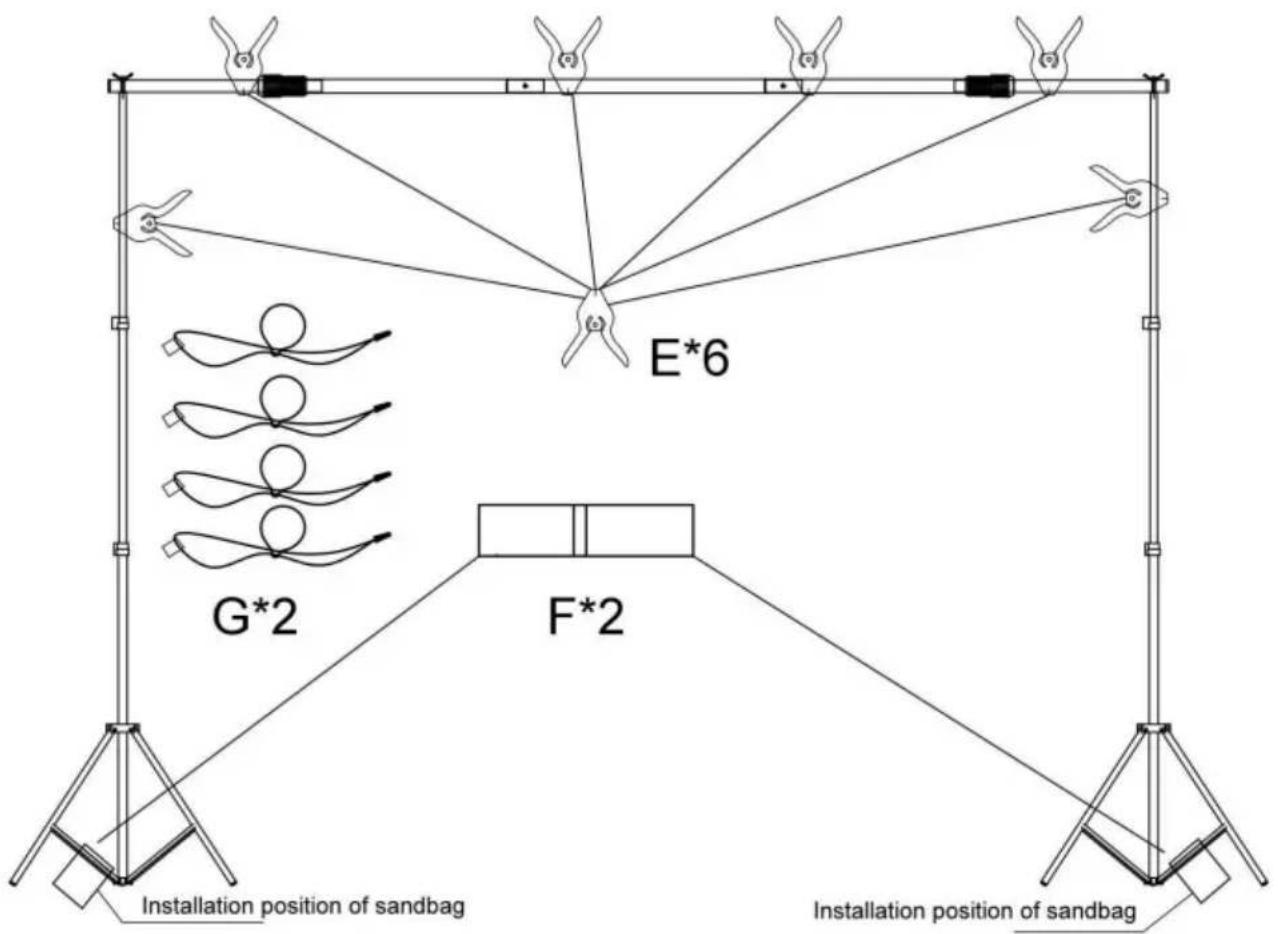
2 sandbags, placed as shown in the figure after loading sand, to ensure the stability of the shelf; Six clips and four cloth clips are used according to the actual situation.
COMPLETION
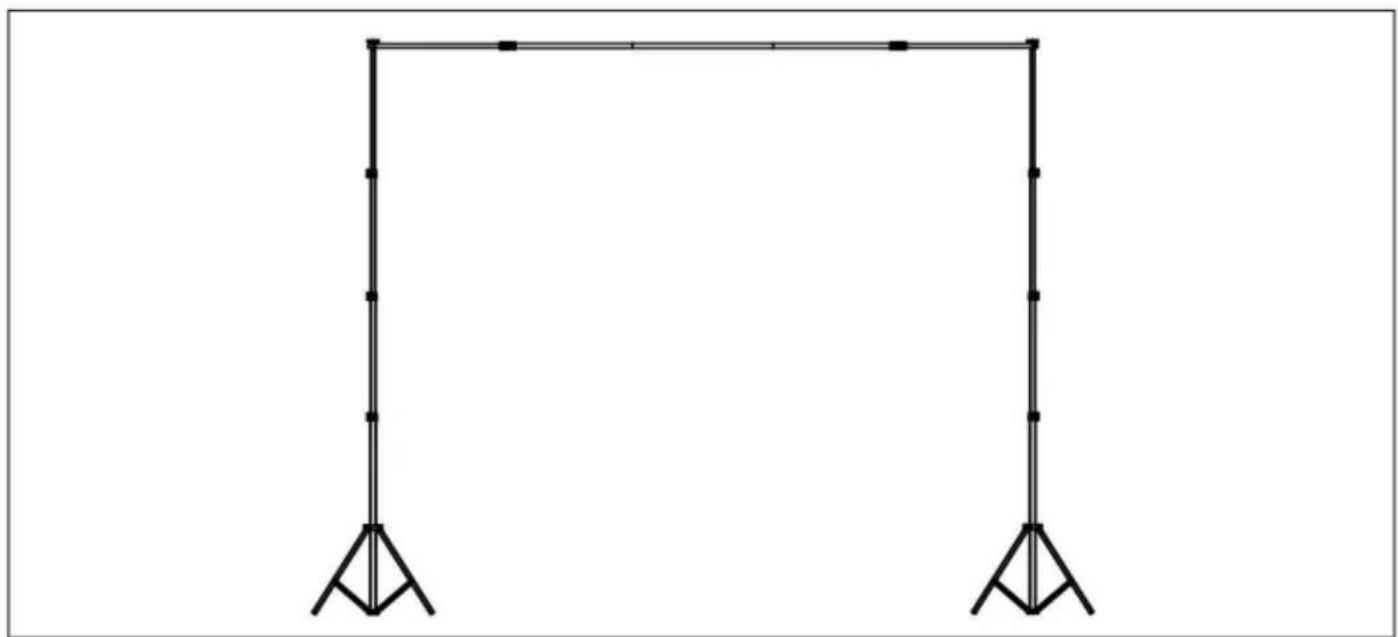
Manufacturer: Shanghaimuxinmuyeyouxiangongsi Address:
Shuangchenglu 803, Nong 11, Hao 1602A-1609 Shi, Baoshan Qu, Shanghai 200000, CN.
YH CONSULTING LIMITED, C/O YH Consulting
Limited, Kantoor 147, Centurion House, London
Road, Staines-upon-Thames, Surrey, TW18 4AX
E-CrossStu GmbH
Mainzer Landstr. 69,
www.vevor.com/support
VEVOR®
TOUGH TOOLS, HALF PRICE
www.vevor.com/support
BACKGROUND
USER MANUAL
MODEL NO: BJJ-8510
NEED HELP? CONTACT US!
Take one piece of B, one piece of C, and one piece of D, and connect them in the order shown in the figure.
STEP 2
Take tripod A and unscrew the claw screw at the top.
STEP 3
Two people put the tripods at a proper distance, use the cross bar assembled in step 1 to locate the two tripods, and put the cross bar on the ground, with both ends of the cross bar at the positioning points (as shown in the figure).
STEP 4
After two people put the tripod at a proper distance, install the crossbar assembled in step 1.
STEP 5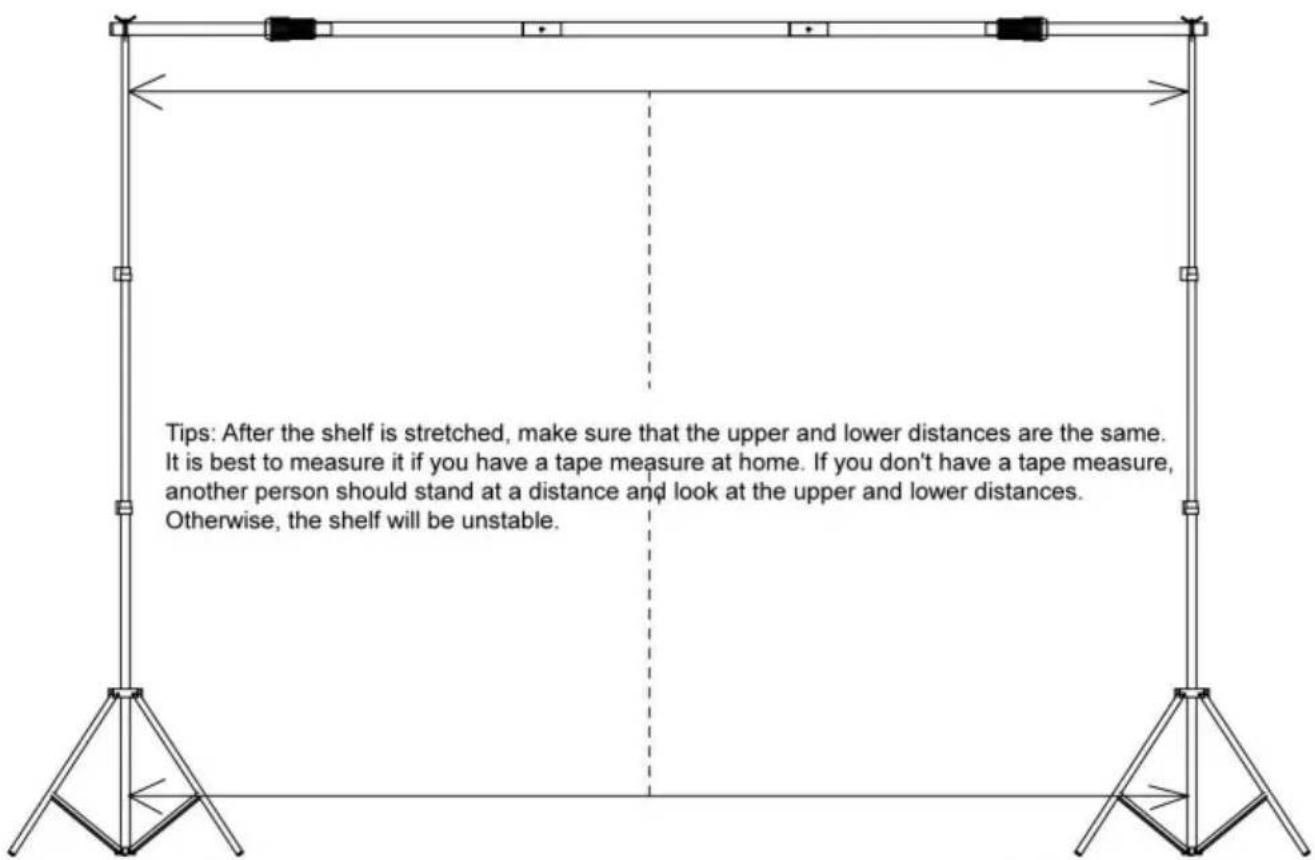
Two people will raise the tripod to a suitable height to ensure that the height of both sides is consistent and the crossbar is horizontal.
STEP 6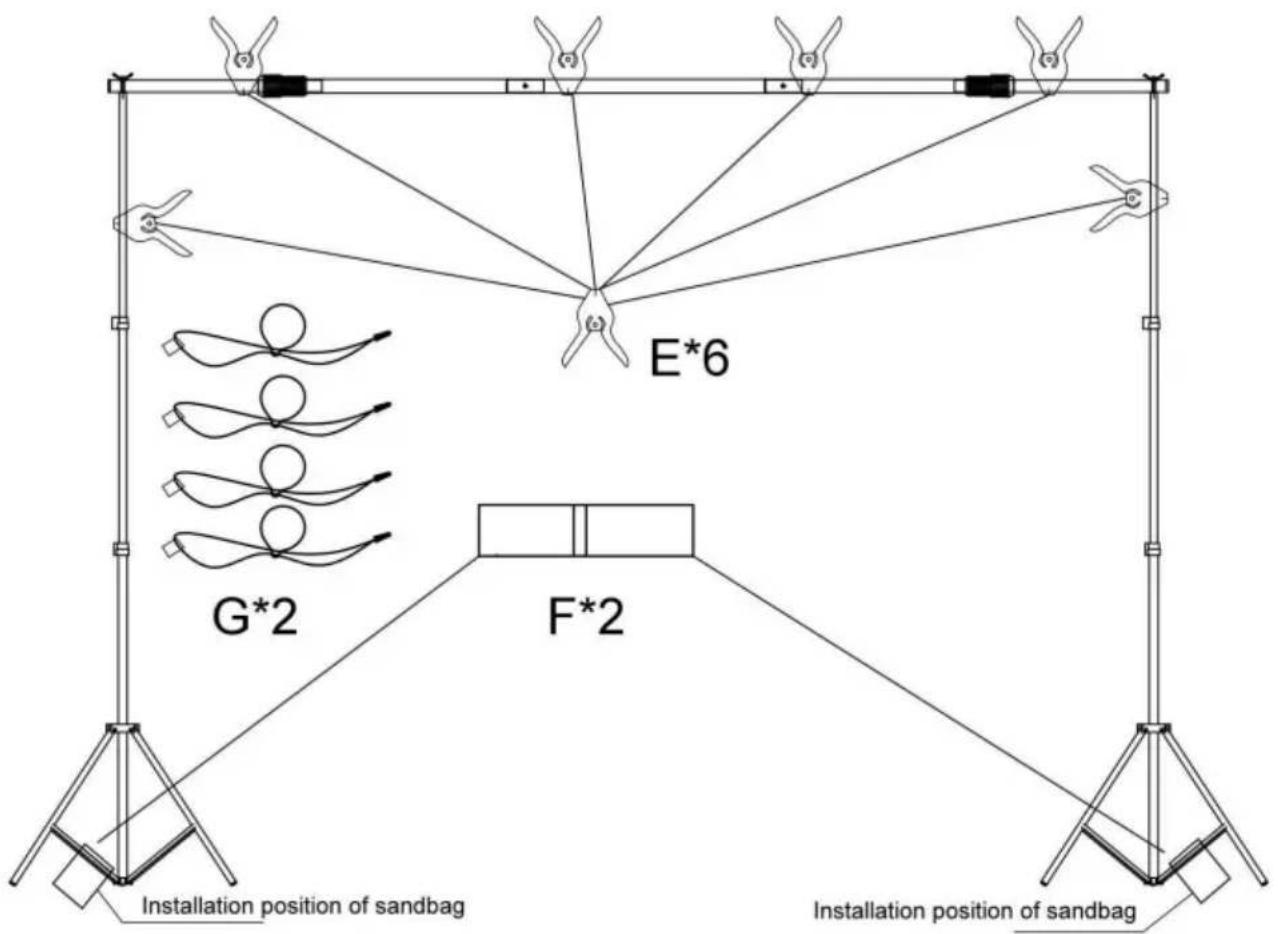
2 sandbags, placed as shown in the figure after loading sand, to ensure the stability of the shelf; Six clips and four cloth clips are used according to the actual situation.
COMPLETION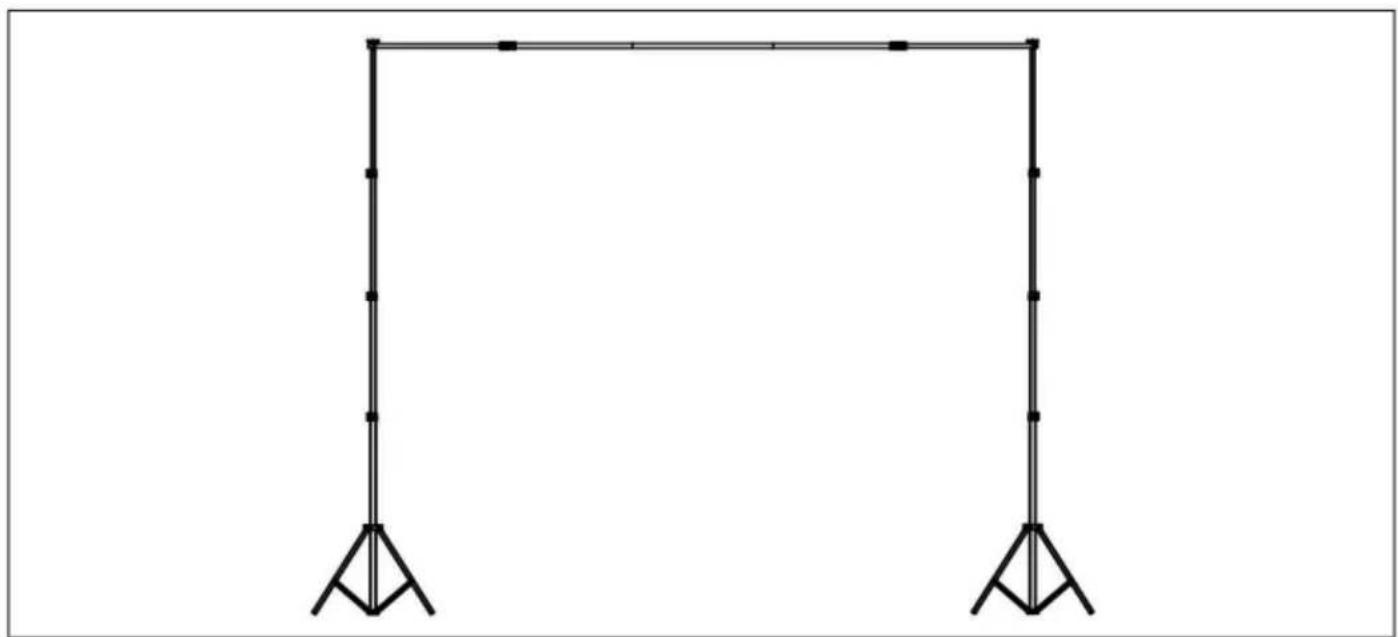
Manufacturer: Shanghaimuxinmuyeyouxiangongsi Address:
Shuangchenglu 803nong11hao1602A-1609shi, baoshanqu, shanghai 200000 CN.
Imported to AUS: SIHAO PTY LTD. 1 ROKEVA STREETEASTWOOD NSW 2122 Australia
Imported to USA: Sanven Technology Ltd. Suite 250, 9166 Anaheim Place, Rancho Cucamonga, CA 91730
| UK | REP |
YH CONSULTING LIMITED. C/O YH Consulting
Limited Office 147, Centurion House, London
Road, Staines-upon-Thames, Surrey, TW18 4AX
| EC | REP |
E-CrossStu GmbH
Mainzer Landstr.69,
60329 Frankfurt am Main.
VEVOR®
TOUGH TOOLS, HALF PRICE
www.vevor.com/support
- BACKDROP STAND
- USER MANUAL
- VEVOR®
- NEED HELP? CONTACT US
- WARNING
- ASSEMBLY PRECAUTIONS
- USE PRECAUTIONS
- TO PREVENT SERIOUS INJURY AND DEATH FROM TIPPING
- PACKAGE CONTENTS
- ASSEMBLY STEPS
- COMPLETION
- TOUGH TOOLS, HALF PRICE
- BACKGROUND STAND
- MODEL NO.: BJJ
- BASE SUPPORT
- BACK SUPPORT
- BACKGROUND STANDARD
- BACKGROUND
Brand : Vevor
Model : BJJ-8510
Category : Wall mount