BW2111 - Saw Vevor - Free user manual and instructions
Find the device manual for free BW2111 Vevor in PDF.

User questions about BW2111 Vevor
0 question about this device. Answer the ones you know or ask your own.
Ask a new question about this device
Download the instructions for your Saw in PDF format for free! Find your manual BW2111 - Vevor and take your electronic device back in hand. On this page are published all the documents necessary for the use of your device. BW2111 by Vevor.
USER MANUAL BW2111 Vevor
Affordable. Reliable. Home Improvement.
PORTABLE BAND SAW
MODEL: BW2111
Technical Support and E-Warranty Certificate
www.vevor.com/support
VEVOR
Affordable. Reliable. Home Improvement.
PORTABLE BAND SAW
MODEL: BW2111

natural_image
Technical line drawing of a mechanical device with no visible text or symbolsThis is the original instruction, please read all manual instructions carefully before operating. VEVOR reserves a clear interpretation of o user manual. The appearance of the product shall be subject to the product you received. Please forgive us that we won't inform you ag there are any technology or software updates on our product.
 | Warning-To reduce the risk of injury, user must read instructi manual carefully. |
 | This device complies with Part 15 of the FCC Rules. Operat subject to the following two conditions:(1)This device may not harmful interference, and (2)this device must accept any inter received, including interference that may cause undesired oper |
 | This product is subject to the provision of European Directive 2012/19/EC. The symbol showing a wheelie bin crossed throu indicates that the product requires separate refuse collection i European Union. This applies to the product and all accesso marked with this symbol. Products marked as such may not discarded with normal domestic waste, but must be taken to collection point for recycling electrical and electronic devices |
TECHNICAL SPECIFICATIONS
| Model Number | BW2111 |
| Voltage | 20V |
| Blade FPM | 0-2.0m/s |
| Blade Dimensions | 1141(L)x13(W)x0.65(Thick) |
| Cutting Capacity | 127*115mm |
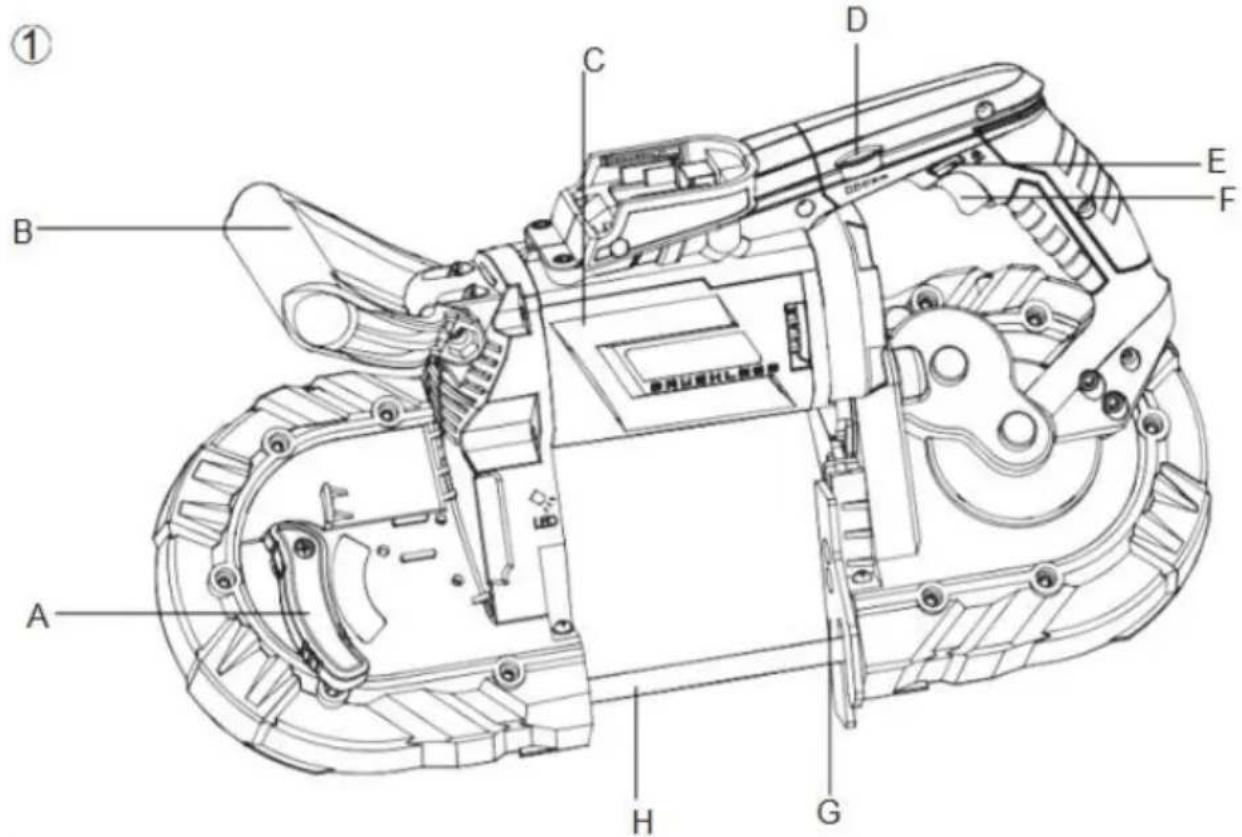

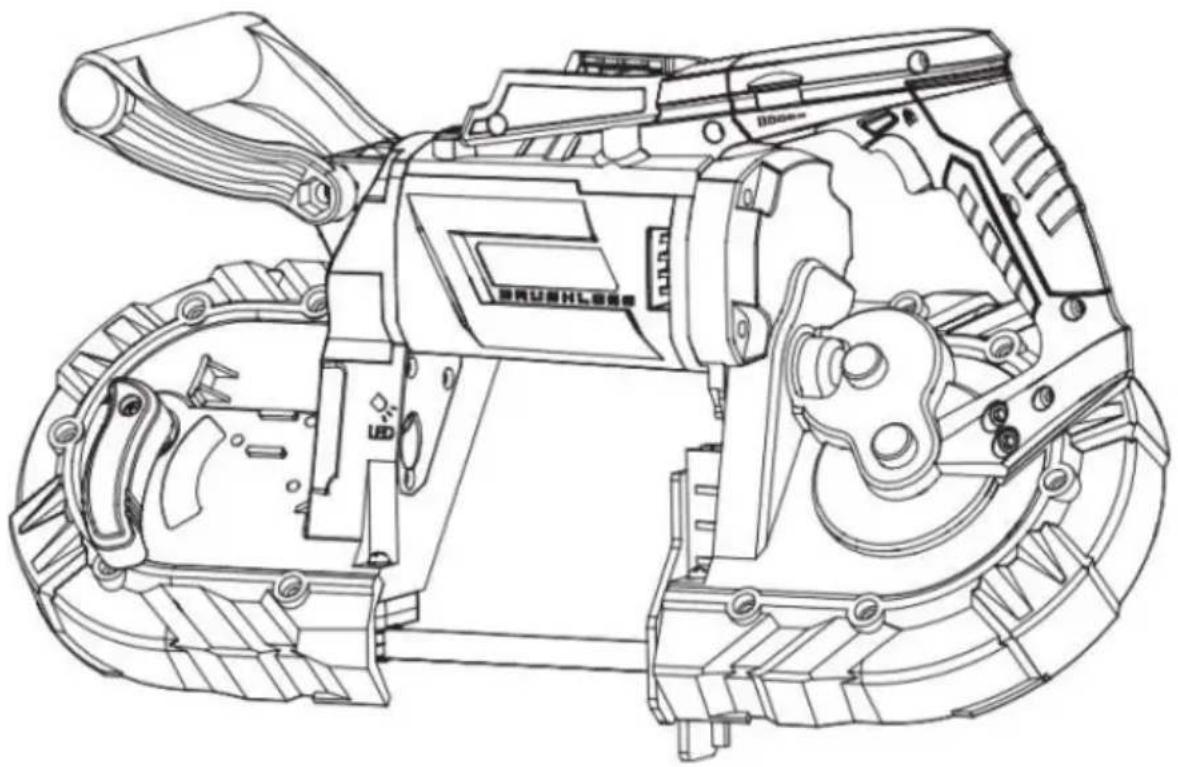
A Tension handle
B Auxiliary handle
C Motor housing
D Speed dial
E Safety lock button
F On/Off switch
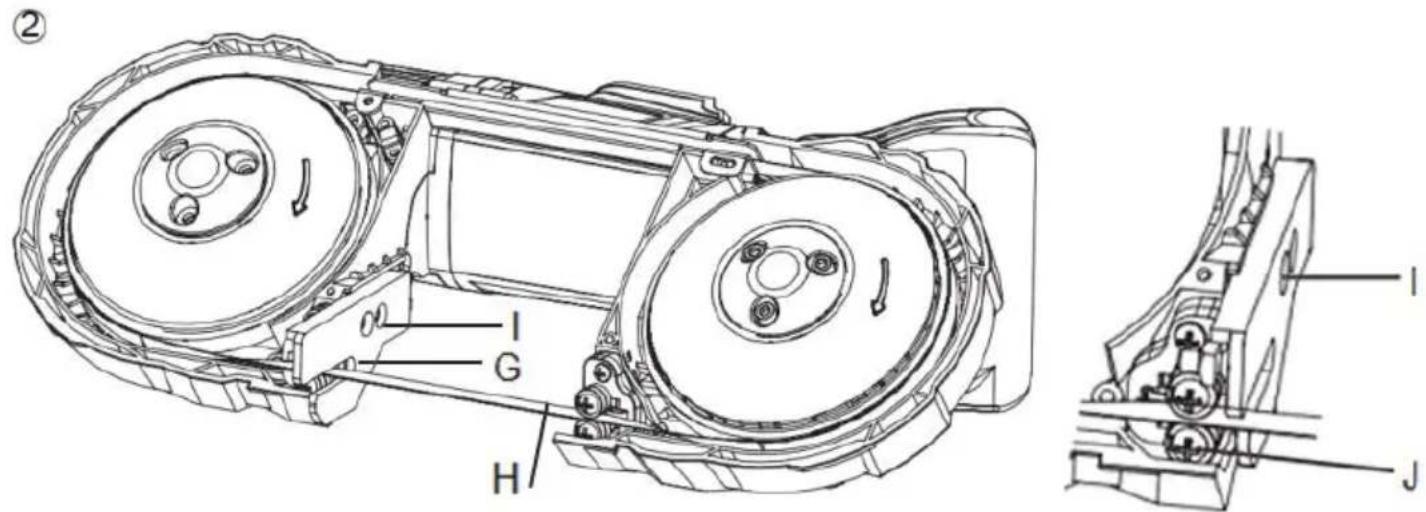
G Guide bar
H Blade
I Screw
J Guide Bearing
K LED light

WARNING! Read all safety warnings and all instructions. Failure to follow the warning and instruction may result in electric shock, fire and/or serious injury.

WARNING: To reduce the risk of injury, read the instruction manual
GENERAL POWER TOOL SAFETY WARNINGS

WARNING! Read all safety warnings and all instructions may result in electric shock, fire and /or serious injury.
SAVE ALL WARNINGS AND INSTRUCTIONS FOR FUTURE REFERENCE
The term 'power tool' in the warnings refers to your mains-operated (corded) power tool or battery-operated(cordless) power tool.
1. Work Area Safety
Keep work area clean and well lit. Cluttered or dark areas invite accidents
Do not operate power tools in explosive atmospheres, such as in the presence of flammable liquids, gases or dust. Power tools create sparks that may ignite the dust of fumes.
keep children and bystanders away while operating a power tool. Distractions can cause you to lose control.
2. Electrical Safety
Power tool plugs must match the outlet. Never modify the plug in any Do not use any adapter plugs with earthed (grounded) power tools. Unmodified plugs and matching outlets will reduce risk of electric shock.
void body contact with earthed or grounded surfaces such as pipes, radiators, ranges and refrigerators. There is an increased risk of electric sh if your body is earthed or grounded.
Do not expose power tools to rain or wet conditions. Water entering a tool will increase the risk of electric shock.
Do not abuse the cord. Never use the cord to carry, pull or unplugg power tool. Keep cord away from heat, oil, sharp edges or moving parts. Damaged or entangled cords increase the risk of electric shock.
When operating a power tool outdoors, use an extension cord suitable outdoor use. Use of a cord suitable for outdoor use reduces the risk of ele shock.
If operating a power tool in a damp location is unavoidable, use a res current device (RCD) protected supply. Use of an RCD reduces the risk of electric shock.
3. Personal safety
Stay alert, watch what you are doing and use common sense when operating a power tool. Do not use a power tool while you are tired or the influence of drugs, alcohol or medication. A moment of inattention whi operating power tools may result in serious personal injury.
Use personal protective equipment. Always wear eye protection. Protective equipment such as dust mask, non-skid safety shoes, hard hat, or hearing protection used for appropriate conditions will reduce personal injuries.
Prevent unintentional starting. Ensure the switch is in the off position before connecting to power source and/or battery pack, picking up or carrying the tool. Carrying power tools with your finger on the switch or energising power tools that have the switch on invites accidents.
Remove any adjusting key or wrench before turning the power tool on. A wrench or a key left attached to a rotating part of the power tool may re personal injury.
Do not overreach. Keep proper footing and balance at all times. This is better control of the power tool in unexpected situations.
Dress properly. Do not wear loose clothing or jewellery. Keep your hair clothing and gloves away from moving parts. Loose clothes, jewellery or hair can be caught in moving parts.
If devices are provided for the connection of dust extraction and collect facilities, ensure these are connected and properly used. Use of dust collection can reduce dust-related hazards.
Do not let familiarity gained from frequent use of tools allow you to be complacent and ignore tool safety principles. A careless action can cause severe injury within a fraction of a second.
4. Power tool use and care
Do not force the power tool. Use the correct power tool for your appli The correct power tool will do the job better and safer at the rate for which designed..
Do not use the power tool if the switch does not turn it on and off. tool that cannot be controlled with the switch is dangerous and must be repa
Disconnect the plug from the power source and/or remove the battery if detachable, from the power tool before making any adjustments, change accessories, or storing power tools. Such preventive safety measures reduce the risk of starting the power tool accidentally.
Store idle power tools out of the reach of children and do not allow unfamiliar with the power tool or these instructions to operate the power. Power tools are dangerous in the hands of untrained users.Maintain power tools and accessories. Check for misalignment or binding of moving parts, breakage of parts and any other condition that may affect the power tool's operation. If damaged, have the power tool repaired before use. Many accidents are caused by poorly maintained power tools.
Keep cutting tools sharp and clean. Properly maintained cutting tools with sharp cutting edges are less likely to bind and are easier to control.
Use the power tool, accessories and tool bits etc., in accordance with instructions taking into account the working conditions and the work to performed. Use of the power tool for operations different from those intended could result in a hazardous situation.
Keep handles and grasping surfaces dry, clean and free from oil and g Slippery handles and grasping surfaces do not allow for safe handling
5. Battery tool use and care
Recharge only with the charger specified by the manufacturer. A charger is suitable for one type of battery pack may create a risk of fire when used another battery pack.
Use power tools only with specifically designated battery packs. Use of other battery packs may create a risk of injury and fire.
When battery pack is not in use, keep it away from other metal object paper clips, coins, keys, nails, screws or other small metal objects that make a connection from one terminal to another. Shorting the battery term together may cause burns or a fire.
Under abusive conditions, liquid may be ejected from the battery; avoid contact. If contact accidentally occurs, flush with water. If liquid contacts eyes, additionally seek medical help. Liquid ejected from the battery may occur irritation or burns.
Do not use a battery pack or tool that is damaged or modified. Damage modified batteries may exhibit unpredictable behaviour resulting in fire, explosion or risk of injury.
Do not expose a battery pack or tool to fire or excessive temperature. Exposure to fire or temperature above 130 °C may cause explosion.
Follow all charging instructions and do not charge the battery pack or outside the temperature range specified in the instructions. Charging improperly or at temperatures outside the specified range may damage the ba and increase the risk of fire.
6. Service
Have your power tool serviced by a qualified repair person using only identical replacement parts. This will ensure that the safety of the power to maintained.
Never service damaged battery packs. Service of battery packs should only performed by the manufacturer or authorized service providers.
Residual Risks
In spite of the application of the relevant safety regulations and the implement of safety devices, certain residual risks cannot be avoided. These are:
- Impairment of hearing.
- Risk of personal injury due to flying particles.
- Risk of burns due to accessories becoming hot during operation. Risk of personal injury due to prolonged use.
- A concentration of dust which is harmful to health when working in an are not sufficiently ventilated.
Electrical Safety
The electric motor has been designed for one voltage only. Always check that battery pack voltage corresponds to the voltage on the rating plate. Also make sure that the voltage of your charger corresponds to that of your mains.
SAVE THESE INSTRUCTIONS
Important Safety Instructions for All Battery Chargers
SAVE THESE INSTRUCTIONS: This manual contains important safety and operating instructions for compatible battery chargers (refer to Technical Data). Before using charger, read all instructions and cautionary markings on charger battery pack, and product using battery pack.
WARNING: Shock hazard. Do not allow any liquid to get inside charger. Electric shock may result.
WARNING: We recommend the use of a residual current device with a residue current rating of 30mA or less.
CAUTION :Burn hazard. To reduce the risk of injury, charge only POWERPLL rechargeable batteries. Other types of batteries may burst causing personal inj and damage.
CAUTION: Children should be supervised to ensure that they do not play with appliance.
NOTICE: Under certain conditions, with the charger plugged into the power supply, the exposed charging contacts inside the charger can be shorted by foreign material. Foreign materials of a conductive nature such as, but not limited to, wool, aluminum foil or any buildup of metallic particles should be kept away
charger cavities. Always unplug the charger from the power supply when then no battery pack in the cavity. Unplug charger before attempting to clean.
DO NOT attempt to charge the battery pack with any chargers other than ones in this manual. The charger and battery pack are specifically designed work together
These chargers are not intended for any uses other than charging Our rechargeable batteries. Any other uses may result in risk of fire, electric shock electrocution.
Do not expose charger to rain or snow.
Pull by plug rather than cord when disconnecting charger. This will reduce risk of damage to electric plug and cord.
Make sure that cord is located so that it will not be stepped on, tripp or otherwise subjected to damage or stress.
Do not place any object on top of charger or place the charger on a surface that might block the ventilation slots and result in excessive intake heat. Place the charger in a position away from any heat source. The charge ventilated through slots in the top and the bottom of the housing.
Do not operate charger with damaged cord or plug—have them replaced immediately.
Do not operate charger if it has received a sharp blow, been dropped, or otherwise damaged in any way. Take it to an authorised service centre.
Do not disassemble charger; take it to an authorised service centre where service or repair is required. Incorrect reassembly may result in a risk of e-shock, electrocution or fire.
In case of damaged power supply cord the supply cord must be replaced immediately by the manufacturer, its service agent or similar qualified person prevent any hazard.
Disconnect the charger from the outlet before attempting any cleaning. This will reduce the risk of electric shock. Removing the battery pack will not reduce risk.
NEVER attempt to connect two chargers together.
- The charger is designed to operate on standard household electrical power. Do not attempt to use it on any other voltage. This does not apply to the charger.
Charging a Battery
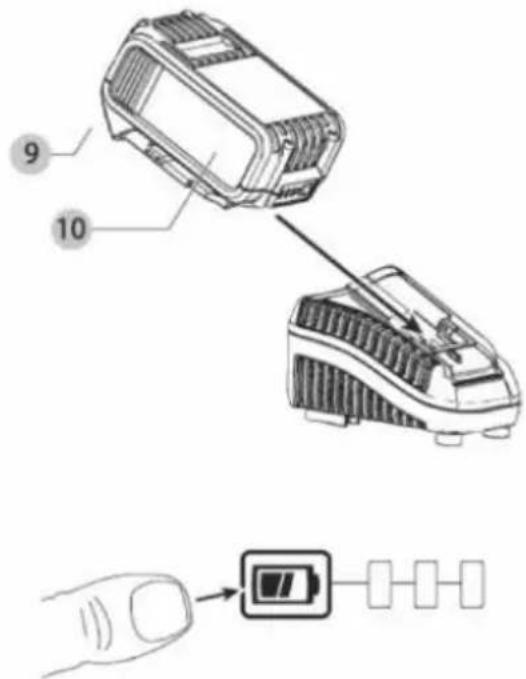
- Plug the charger into an appropriate outlet before inserting battery pack
- Insert the battery pack 10 into the charger, making sure the battery pack is fully seated in the charger. See the red light is on indicating that the charging process has started.
- The completion of charge will be indicated by the green light is on. The battery pack is fully charged and may be used at this time or left in the charger. To remove the battery pack from the charger, push the battery release button 9 on the battery pack.
NOTE: To ensure maximum performance and life of lithium-ion battery packs, charge the battery pack fully before first use.
* If the charger blinks red or blinking red and green alternately, the charger battery pack is faulty.
SAFETY INSTRUCTIONS FOR PORTABLE BAND SAW
Hold power tool by insulated gripping surfaces, when performing an operation where the cutting accessory may contact hidden wiring. Cutting accessories contacting a “live” wire may make exposed metal parts of the power tool “liv could give the operator an electric shock.
Never leave the Bandsaw unattended while it is running. Do not put the Badown until the blade comes to a complete stop.
Before each use, make sure the Tension Handle is in the tightened position (making the blade taut).
Cutting Material. Make sure cutting material is securely fastened down before operating the Bandsaw. Work slowly and carefully when cutting corners, sharp edges, ragged welds, etc., to avoid snagging.
Cutting material and the motor housing can get very hot during operation. S work until unit cools down to safe temperature. Spray a coolant or water onl blade.
Maintain labels and nameplates on the tool. These carry important safety information. If unreadable or missing, contact us for a replacement.Avoid unintentional starting. Prepare to begin work before turning on the too
Do not lay the tool down until it has come to a complete stop. Moving pa grab the surface and pull the tool out of your control.
When using a handheld power tool, maintain a firm grip on the tool with b hands to resist starting torque.
This product is not a toy. Keep it out of reach of children.
People with pacemakers should consult their physician(s) before use. Electromagnetic fields in close proximity to heart pacemaker could cause pacemaker interference or pacemaker failure. In addition, people with pacemaker should: Avoid operating alone.
WARNING: Some dust created by power sanding, sawing, grinding, drilling, a other construction activities, contains chemicals to cause cancer and birth defects or other reproductive harm. Some examples of these chemicals are: L from lead-based paints Crystalline silica from bricks and cement or other mas products Arsenic and chromium from chemically treated lumberYour risk from these exposures varies, depending on how often you do this type of work. The reduce your exposure to these chemicals: work in a well ventilated area, and with approved safety equipment, such as those dust masks that are specially designed to filter out microscopic particles.
The warnings, precautions, and instructions discussed in this instruction manu cannot cover all possible conditions and situations that may occur. It must be understood by the operator that common sense and caution are factors which cannot be built into this product, but must be supplied by the operator.
Vibration Safety
This tool vibrates during use. Repeated or long-term exposure to vibration may cause temporary or permanent physical injury, particularly to the hands, arms shoulders. To reduce the risk of vibration-related injury:
Anyone using vibrating tools regularly or for an extended period should first examined by a doctor and then have regular medical check-ups to ensure m problems are not being caused or worsened from use. Pregnant women or p who have impaired blood circulation to the hand, past hand injuries, nervous system disorders, diabetes, or Raynaud's Disease should not use this tool. If feel any symptoms related to vibration (such as tingling, numbness, and white blue fingers), seek medical advice as soon as possible.
Do not smoke during use. Nicotine reduces the blood supply to the hands and fingers, increasing the risk of vibration-related injury.
Wear suitable gloves to reduce the vibration effects on the user.
Use tools with the lowest vibration when there is a choice.
Include vibration-free periods each day of work.
Grip tool as lightly as possible (while still keeping safe control of it). Let the work.
To reduce vibration, maintain the tool as explained in this manual. If any all vibration occurs, stop use immediately.
GENERAL
• This tool should not be used by people under the age of 16 years
- This tool is not intended for use by persons (including children) with reduced physical, sensory or mental capabilities, or lack of experience and knowledge, unless they have been given supervision or instruction concerning use of the by a person responsible for their safety
- Ensure that children do not play with the tool
• Always disconnect plug from power source before making any adjustmer or changing any accessory
USE
Blade Installation and Replacement
Turn the Tension Handle A clockwise to release Blade tension
Set the blade into both Guide Bearings J, making sure the Blade is centered them. Hold the blade on the guides and push in. Make sure the blade even around the wheels.
Turn the Tension Handle A until the blade is taut and the handle “Tight”. Plug in the tool and put on your ear/eye protection, and turn on the tool. In the blade and make sure it runs steady and evenly around the wheels, and teeth are pointed in the correct direction.
Guide Bar Assembly
Assemble the Guide Bar G to the bandsaw before operation Release the Sci on the Frame.
Install the Guide Bar G around the blade as shown 3 , then lock the screw
Switching the machine on and off
Push the safety lock button (E) to release the machine switch first, turn on portale band saw by switch F, Adjust the speed by turning the speed dial D can choose different speed for different cutting materials.
Cutting Operations
Make sure that the Switch is in the off-position, then plug in the tool. Secur workpiece to a workbench or other solid surface.
Make sure the cord is out of the way.
Set the Guide Bar against the workpiece, keeping blade at a 90^ angle com to the workpiece.
Turn on the Band saw and allow it to come up to full speed before starting. Adjust speed by turning the speed dial E.
Tilt the unit so that the blade is vertical as shown in. To start a cut, use force to start a groove. Once groove is started, allow the rest of the blade into workpiece. Doing this will prevent blade from moving from side-to-side du cutting.
CAUTION! Do not apply force to the tool by pressing too hard v your hands or leaning into it. The weight of the tool itself create enough force to make a clean cut. Forcing or leaning on the tool may break the blade, damaging the saw and possibly causing injury.As you r the end of your workpiece, finish off the cut by slightly raising the unit bringing the blade up.
MAINTENANCE / SERVICE
- Protect the tool from impact, shock and grease
• Always keep tool and cord clean (especially ventilation slots I)
! disconnect the plug before cleaning
! do not attempt to clean ventilation slots by inserting pointed objects through openings
ENVIRONMENT
- Do not dispose of electric tools, accessories and packaging together with household waste material (only for EU countries)
- in observance of European Directive on waste of electric and electronic equipment and its implementation in accordance with national law, electric tool that have reached the end of their life must be collected separately and return to an environmentally compatible recycling facility
Manufacturer: Shanghaimuxinmuyeyouxiangongsi
Address: Shuangchenglu 803nong11hao1602A-1609shi, baoshanqu, shanghai 200000 CN.
Imported to AUS: SIHAO PTY LTD. 1 ROKEVA STREETEASTWOOD NSW 2122 Australia
Imported to USA: Sanven Technology Ltd. Suite 250, 9166 Anaheim Place, Rancho Cucamonga, CA 91730
| UK | REP |
YH CONSULTING LIMITED. C/O YH Consulting
Limited Office 147, Centurion House, London
Road, Staines-upon-Thames, Surrey, TW18 4AX
| EC | REP |
E-CrossStu GmbH
Mainzer Landstr.69,
60329 Frankfurt am Main.

Technical Support and E-Warranty Certificate www.vevor.com/support
VEVOR
Affordable. Reliable. Home Improvement.
SCIE À RUBAN PORTATIVE
MODÈLE : BW2111
www.vevor.com/support
MODÈLE : BW2111

natural_image
Technical line drawing of a mechanical device with no visible text or symbols
A Tension handle
B Auxiliary handle
C Motor housing
D Speed dial
E Safety lock button
F On/Off switch
G Guide bar
H Blade
I Screw
J Guide Bearing
K LED light

YH CONSULTING LIMITED. C/O YH Consulting
Limited Office 147, Centurion House, London
Road, Staines-upon-Thames, Surrey, TW18 4AX
| EC | REP |
E-CrossStu GmbH
Mainzer Landstr.69,
60329 Frankfurt am Main.

Affordable. Reliable. Home Improvement.
TRAGBARE BANDSÄGE
MODELL:BW2111
www.vevor.com/support
MODELL:BW2111
natural_image
Technical line drawing of a mechanical device with no visible text or symbols
A Tension handle
B Auxiliary handle
C Motor housing
D Speed dial
E Safety lock button
F On/Off switch
G Guide bar
H Blade
I Screw
J Guide Bearing
K LED light
YH CONSULTING LIMITED. C/O YH Consulting Limited Office 147, Centurion House, London Road, Staines-upon-Thames, Surrey, TW18 4AX
| EC | REP |
Affordable. Reliable. Home Improvement.
SEGA A NASTRO PORTATILE
MODELLO: BW2111
www.vevor.com/support
MODELLO: BW2111

natural_image
Technical line drawing of a mechanical device with no visible text or symbols
A Tension handle
B Auxiliary handle
C Motor housing
D Speed dial
E Safety lock button
F On/Off switch
G Guide bar
H Blade
I Screw
J Guide Bearing
K LED light

YH CONSULTING LIMITED. C/O YH Consulting
Limited Office 147, Centurion House, London
Road, Staines-upon-Thames, Surrey, TW18 4AX
| EC | REP |
E-CrossStu GmbH
Mainzer Landstr.69,
60329 Frankfurt am Main.

Affordable. Reliable. Home Improvement.
SIERRA DE CINTA PORTÁTIL
MODELO: BW2111
www.vevor.com/support
VEVOR
Affordable. Reliable. Home Improvement.
PORTABLE BAND SAW
MODELO: BW2111

natural_image
Technical line drawing of a mechanical device with no visible text or symbols
A Tension handle
B Auxiliary handle
C Motor housing
D Speed dial
E Safety lock button
F On/Off switch
G Guide bar
H Blade
I Screw
J Guide Bearing
K LED light

YH CONSULTING LIMITED. C/O YH Consulting
Limited Office 147, Centurion House, London
Road, Staines-upon-Thames, Surrey, TW18 4AX
| EC | REP |
E-CrossStu GmbH
Mainzer Landstr.69,
60329 Frankfurt am Main.

Affordable. Reliable. Home Improvement.
www.vevor.com/support
MODEL: BW2111

natural_image
Technical line drawing of a mechanical device with multiple gears and housing (no text or symbols)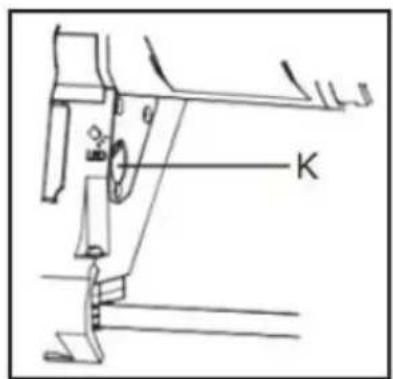
A Tension handle
B Auxiliary handle
C Motor housing
D Speed dial
E Safety lock button
F On/Off switch
G Guide bar
H Blade
I Screw
J Guide Bearing
K LED light

YH CONSULTING LIMITED. C/O YH Consulting Limited Office 147, Centurion House, London Road, Staines-upon-Thames, Surrey, TW18 4AX
| EC | REP |
Affordable. Reliable. Home Improvement.
DRAAGBARE LINTZAAG
MODEL: BW2111
www.vevor.com/support
VEVOR
Affordable. Reliable. Home Improvement.
PORTABLE BAND SAW
MODEL: BW2111

natural_image
Technical line drawing of a mechanical device with multiple components and no visible text or symbols
A Tension handle
B Auxiliary handle
C Motor housing
D Speed dial
E Safety lock button
F On/Off switch
G Guide bar
H Blade
I Screw
J Guide Bearing
K LED light

REDDEN ALLE WAARSCHUWING S EN INSTRUCTIES VOOR TOEKOMST REFERENTIE
YH CONSULTING LIMITED. C/O YH Consulting
Limited Office 147, Centurion House, London Road, Staines-upon-Thames, Surrey, TW18 4AX
| EC | REP |
Affordable. Reliable. Home Improvement.
BÄRBAR BANDSÅG
MODELL: BW2111
www.vevor.com/support
MODELL: BW2111

natural_image
Technical line drawing of a mechanical device with multiple components and no visible text or symbols
A Tension handle
B Auxiliary handle
C Motor housing
D Speed dial
E Safety lock button
F On/Off switch
G Guide bar
H Blade
I Screw
J Guide Bearing
K LED light

YH CONSULTING LIMITED. C/O YH Consulting
Limited Office 147, Centurion House, London
Road, Staines-upon-Thames, Surrey, TW18 4AX
| EC | REP |
E-CrossStu GmbH
Mainzer Landstr.69,
60329 Frankfurt am Main.