1A-PG612G - Mincer Vevor - Free user manual and instructions
Find the device manual for free 1A-PG612G Vevor in PDF.

| Product Type | Electric Meat Grinder |
| Brand | Vevor |
| Model | 1A-PG612G |
| Power Supply Voltage | 120 V / 60 Hz or 230 V / 50 Hz |
| Power | 575 W |
| Grinding Capacity | ≥ 3 kg/min |
| Continuous Working Time | ≤ 15 min |
| Number of Grinding Plates | 2 (coarse 10 mm, fine 4.5 mm) |
| Stuffing Function | Yes (with stuffing plate and tube) |
| Included Accessories | Meat tray, pusher, brush, stuffing tube (3) |
| Material of Food Contact Parts | Stainless steel (plate, knife, head) |
| Plug Type | Polarized (one wider blade) |
| Safety | Overload protection, reverse button |
| Cleaning | Hand wash with warm soapy water (not dishwasher safe) |
| Maintenance | Silicone spray lubrication recommended |
| Warranty | Electronic warranty certificate via www.vevor.com/support |
| Country of Origin | Not specified (estimation: China) |
Frequently Asked Questions - 1A-PG612G Vevor
User questions about 1A-PG612G Vevor
0 question about this device. Answer the ones you know or ask your own.
Ask a new question about this device
Download the instructions for your Mincer in PDF format for free! Find your manual 1A-PG612G - Vevor and take your electronic device back in hand. On this page are published all the documents necessary for the use of your device. 1A-PG612G by Vevor.
USER MANUAL 1A-PG612G Vevor
Technical Support and E-Warranty Certificate www.vevor.com/support
ELECTRIC MEAT GRINDER
Model:1A-PG612G
We continue to be committed to provide you tools with competitive price "Save Half", "Half Price" or any other similar expressions used by us only re estimate of savings you might benefit from buying certain tools with us comp major top brands and does not necessarily mean to cover all categories of t by us. You are kindly reminded to verify carefully when you are placing an i you are actually saving half in comparison with the top major brands
Model:1A-PG612G
natural_image
Line drawing of a manual kitchen tool with no text or symbolsNEED HELP? CONTACT US!
Have product questions? Need technical support? Please feel free to contact us
Technical Support and E-Warranty Certificate
www.vevor.com/support
This is the original instruction, please read all manual instructions carefully before VEVOR reserves a clear interpretation of our user manual. The appearance of shall be subject to the product you received. Please forgive us that we won't again if there are any technology or software updates on our product.
WARNINGS
When using electrical appliances, basic safety precautions should always be followed including the following:
-
Read and follow all instructions before using the grinder.
-
To protect against risk of electrical shock do not submerse in water or other liquid. U moist cloth to clean the motor housing.
-
Close supervision is necessary when any appliance is used by or near children.
-
Unplug from outlet when not in use, before putting on or taking off parts, and before cleaning.
-
Avoid contacting moving parts.
-
Do not operate any appliance with a damaged cord or plug or after the appliance malfunctions, or is dropped or damaged in any manner. Return appliance to the nearest authorized service facility for examination, repair or electrical or mechanical adjustment.
-
The use of attachments not sold by the manufacturer is not recommended and may cause fire, electric shock or injury.
8.Do not use outdoors.
-
Do not allow cord to hang over edge of table or counter.
-
Never feed food by hand. Always use a meat stomper.
-
Do not use fingers to scrape food away from grinding plate while appliance is opera injury may result.
12.Thoroughly hand-wash all grinder parts in warm soapy water prior to use.
- Never run the grinder unattended.
14.Do not attempt to grind bones, nuts or other hard items.
- This appliance has a polarized plug (one blade is wider than the other.) To reduce risk of electrical shock, this plug will fit in a polarized outlet, only one way. If the plug not fit fully into the outlet reverse the plug. If it still does not fit, contact a qualified electrician. Do not modify the plug in any way.
TECHNICAL PARAMETER
| MODEL | SPECIFICATION | RATINGS | Capacity | Continuous working time | |
| 1A-PG612 | 12# | 120V/60Hz | 575W | ≥3KG/min | ≤15min |
| 230V/50Hz | |||||
Note: Please purchase a machine that is suitable for the local voltage.
PARTS LIST
| A | Main Body |  | 1 |
| B | Meat Pan |  | 1 |
| C | Worm Gear Auger | 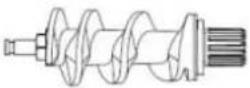 | 1 |
| D | Grinder Knife |  | 2 |
| E | Coarse Grinding Plate-10mm |  | 1 |
| F | Fine Grinding Plate-4.5mm |  | 1 |
| G | Stuffing Plate |  | 1 |
| H | Grinder head | 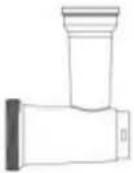 | 1 |
| I | Retaining Ring |  | 1 |
| J | Meat Stomper |  | 1 |
| K | Stuffing Tube |  | 3 |
| L | Brush |  | 1 |
ASSEMBLY INSTRUCTIONS
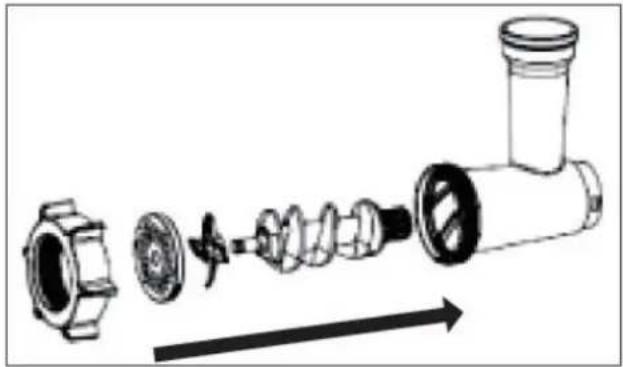
Step 1:
- Insert the worm gear/auger into the grinder head, the geared end first.
- Place the grinder knife onto the auger stud. (The cutting edges should be facing out flat against the grinder plate when properly installed.)
natural_image
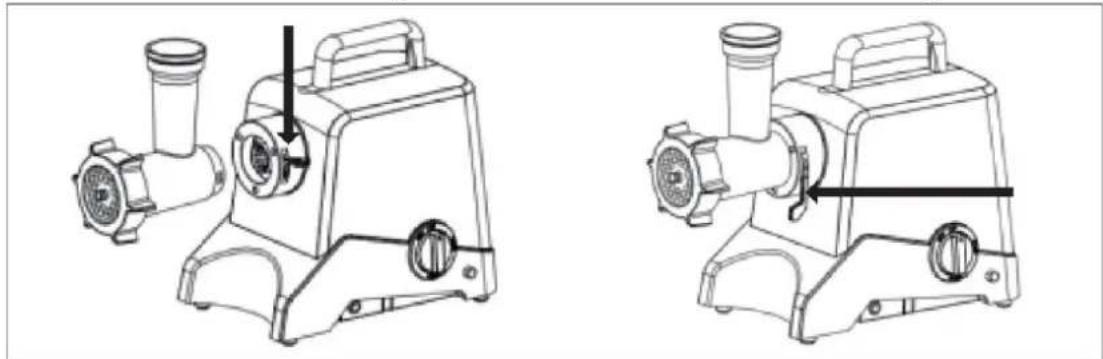
Exploded view diagram of a kitchen tool showing internal components and assembly (no text or labels)Step 2:
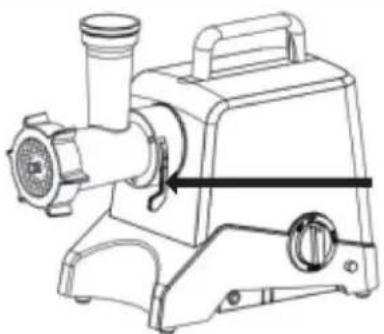
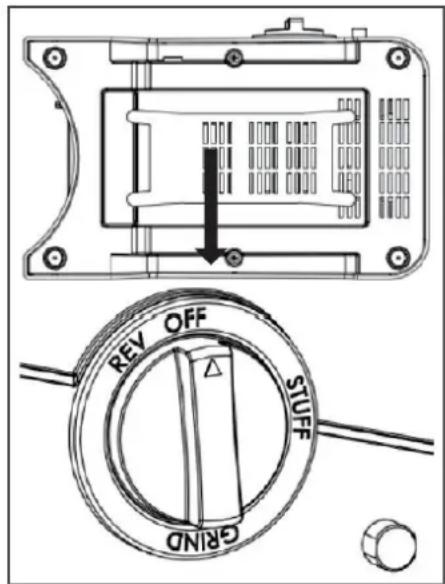
- Attach the grinder head to the motor housing.
- Press down the locking handle to make sure that the grinder head is locked firmly.
natural_image
Technical line drawings of two types of kitchen equipment with no visible text or symbolsStep 3:
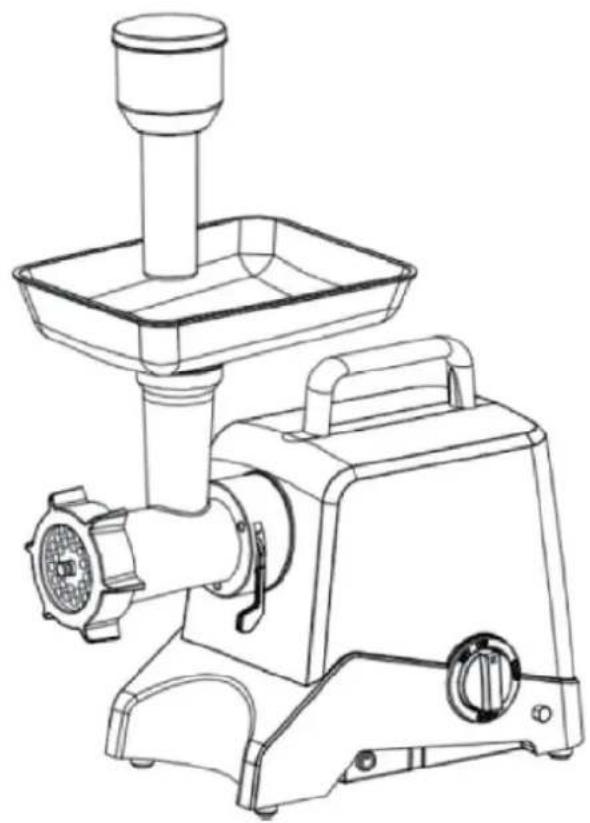
- Screw the retaining ring onto the grinder head until tight.
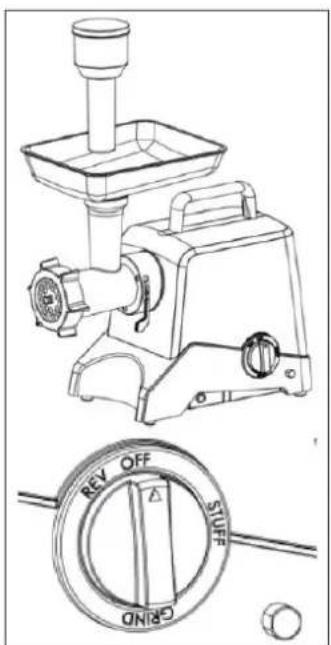
- Place the meat tray on the upright part of the grind
• Now the grinder is ready for grinding.
Grinding
- Cut the meat into 4" x 3/4 strips. Make sure to ren bones, gristle and sinew.
- Put the meat in the meat tray. Turn the knob switch GRIND position. Use the meat stomper to gently push meat into the grinder head. Do not force the meat too allow the grinder to do the job.
NOTE: Never operate the grinder without the grinder k one of the grinder plates in the head. Doing so may meat back into the motor.
OPERATION INSTRUCTIONS - STUFFING
| 1. Insert the worm gear/auger into the grinder head, the geared end first. Then place stuffing plate, stuffing tube and retaining ring one by one. | 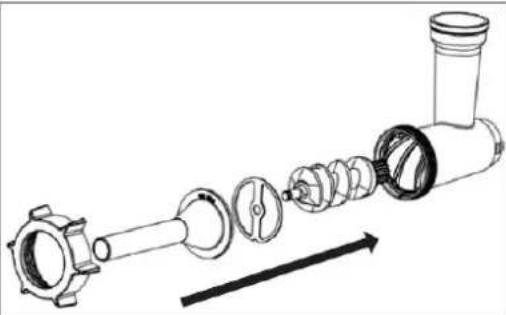 |
| 2. Attach the grind head to the motor housing. | 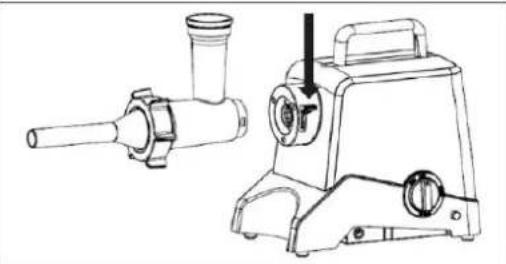 |
| 3. Press the locking handle to make sit that the grinder head is locked firmly. | 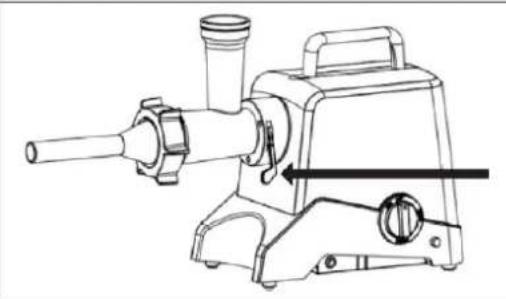 |
| 4. Screw the retaining ring onto the grind head until it is hand tight.5. Place the meat tray on the upright the grinder head.6. Now the grinder is ready for stuffing sausages.Making Sausages• Slide casing of choice onto stuffing to• Mix the course ground meat with the seasonings and add to the meat tray.the knob switch to STUFF position.• Use the meat stomper to gently push meat into the grinder head.• Do not force the meat too quickly, a grinder to do the job. | 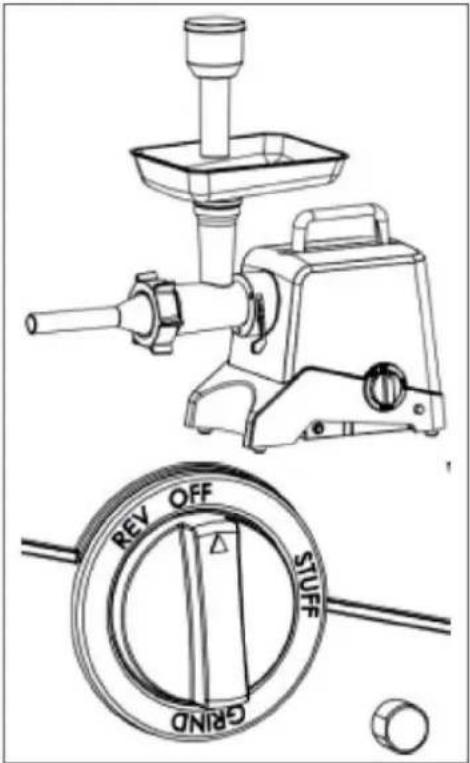 |
CARE AND MAINTENANCE
Tips
- Store the electric cord storage is under housing.
- If the grinder is locked, turn grinder off press the reverse button. If this does not unlock the grinder, turn the unit off, unplug electrical cord from the outlet and disassen the grinder head and remove the obstructive Reassemble and continue grinding.
- Make sure that the over load protector i active. If the over load protector button bo up, please press it down to keep it active Warning! Please always stop machine or ma sure the “GRIND/OFF” switch is on “OFF” position before you press reverse button, otherwise that would damage machine.
How to clean your grinder:
Meat left behind in the grinder head may be removed by passing a slice of bread through the grinder head
- Before cleaning up of the grinder, switch the appliance off and unplug from electrical socket.
- Remove the meat stomper and meat tray.
- Lift up the lock handle to release the grinder head from the main body.
- Unscrew the retaining ring and remove all parts from the grinder head. Hand wash in warm soapy water. Grinder parts are not dishwasher safe. CLEAN IMMEDIATELY AFTER USE.
- Rinse with clear hot water and hand-dry IMMEDIATELY.
6.We advise you to lubricate the knife and the grinding plates with silicon spray.
ENVIRONMENTAL PROTECTION
This product is subject to the provision of european Directive 2012/19/EC. The
symbol showing a wheelie bin crossed through indicates that the product requires separate refuse collection in the European Union. This applies to the product and all accessories marked with this symbol. Products marked as such may not be discarded with normal domestic waste, but must be taken to a collection point for recycling electrical and electro devices.
©
VEVOR®
TOUGH TOOLS, HALF PRICE
natural_image
Line drawing of a manual kitchen tool with no text or symbolsBESOIN D'AIDE? CONTACTEZ-NOUS!
www.vevor.com/support
natural_image
Exploded view diagram of a kitchen tool showing internal components and motion direction (no text or labels)Étape 2 :
natural_image
Technical line drawings of two types of kitchen equipment with arrows indicating motion or assembly (no text or symbols present)Étape 3 :
natural_image
Line drawing of a manual kitchen tool with no text or symbolswww.vevor.com/support
natural_image
Exploded view diagram of a kitchen tool showing internal components and motion direction (no text or labels)Schritt 2:
natural_image
Technical line drawing of a manual kitchen tool with no visible text or symbols
natural_image
Line drawing of a manual kitchen tool with handle and control knob (no text or symbols)Schritt 3:
www.vevor.com/support
VEVOR®
TOUGH TOOLS, HALF PRICE
natural_image
Line drawing of a manual kitchen tool with no text or symbolswww.vevor.com/support
natural_image
Exploded view diagram of a mechanical component showing internal parts and assembly (no text or labels)Fase 2: •
natural_image
Technical line drawing of a manual kitchen tool with no visible text or symbols
natural_image
Line drawing of a manual kitchen tool with handle and control knob (no text or symbols)Fase 3: •
natural_image
Line drawing of a manual kitchen tool with no text or symbolswww.vevor.com/support
natural_image
Exploded view diagram of a mechanical component showing internal parts and assembly (no text or labels)Paso 2: •
natural_image
Technical line drawing of a manual kitchen tool with no visible text or symbols
natural_image
Line drawing of a manual kitchen tool with handle and control knob (no text or symbols)Paso 3: •
natural_image
Line drawing of a manual kitchen feeder with no text or symbols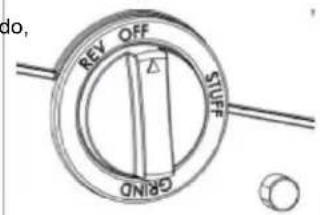
INSTRUCCIONES DE FUNCIONAMIENTO - RELLENO
natural_image
Line drawing of a manual kitchen tool with no text or symbolsPOTRZEBUJESZ POMOCY? SKONTAKTUJ SIĘ Z NAMII
www.vevor.com/support
natural_image
Exploded view diagram of a mechanical component showing internal parts and assembly (no text or labels)Krok 2: •
natural_image
Technical line drawing of a manual kitchen tool with no visible text or symbols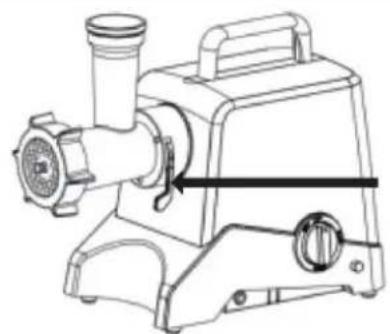
natural_image
Line drawing of a manual kitchen tool with handle and control knob (no text or symbols)Krok 3: •
natural_image
Line drawing of a manual kitchen tool with no text or symbolsHULP NODIG? NEEM CONTACT MET ONS OP!
www.vevor.com/support
natural_image
Exploded view diagram of a mechanical component showing internal parts and assembly (no text or labels)Stap 2:
natural_image
Technical line drawings of two types of kitchen utensils, showing mechanical components and adjustment arrows (no text or symbols)Stap 3:
natural_image
Line drawing of a manual kitchen tool with no text or symbolsBEHÖVER HJÄLP? KONTAKTA OSS!
www.vevor.com/support
natural_image
Exploded view diagram of a mechanical component showing internal parts and assembly (no text or labels)Steg 2:
natural_image
Technical line drawing of a manual kitchen tool with no visible text or symbols