65700 - Barbecue Louisiana Grills - Free user manual and instructions
Find the device manual for free 65700 Louisiana Grills in PDF.


User questions about 65700 Louisiana Grills
0 question about this device. Answer the ones you know or ask your own.
Ask a new question about this device
Download the instructions for your Barbecue in PDF format for free! Find your manual 65700 - Louisiana Grills and take your electronic device back in hand. On this page are published all the documents necessary for the use of your device. 65700 by Louisiana Grills.
USER MANUAL 65700 Louisiana Grills
natural_image
Close-up of a roasted meat dish with potatoes, red peppers, and sauce (no visible text or symbols)
natural_image
Close-up of raw meat cuts with powdered sugar, served on a dark surface (no text or symbols visible)7 SERIES / 7 SÉRIE / SERIE 7
WOOD PELLET VERTICAL SMOKERWOOD
IMPORTANT, RETAIN FOR FUTURE REFERENCE: READ CAREFULLY MANUAL MUST BE READ BEFORE OPERATING!
FUMOIR VERTICAL À GRANULÉS DE BOIS
IMPORTANT : À CONSERVER POUR DE FUTURS BESOINS DE REFERENCE : À LIRE SOIGNEUSEMENT. VOUS DEVEZ LIRE CE GUIDE AVANT D'UTILISER LE BARBECUE !
AHUMADOR VERTICAL DE PELLAS DE MADERA
natural_image
Close-up of a pile of brown, irregularly shaped plant material (no text or symbols visible)ASSEMBLY AND OPERATION ASSEMBLAGE ET FONCTIONNEMENT MONTAJE Y OPERACIÓN
WARNING: PLEASE READ THE ENTIRE MANUAL BEFORE INSTALLATION AND USE OF THIS ELECTRIC, PELLET FUEL-BURNING APPLIANCE. FAILURE TO FOLLOW THESE INSTRUCTIONS COULD RESULT IN PROPERTY DAMAGE, BODILY INJURY OR EVEN DEATH. CONTACT LOCAL BUILDING OR FIRE OFFICIALS ABOUT RESTRICTIONS AND INSTALLATION INSPECTION REQUIREMENTS IN YOUR AREA.
AVERTISSEMENT : VEUILLEZ LIRE L'INTÉGRALITÉ DU MANUEL AVANT L'INSTALLATION ET L'UTILISATION DE CET APPAREIL ÉLECTRONIQUE À GRANULES. LE NON-RESPECT DE CES INSTRUCTIONS PEUT ENTRAÎNER DES DOMIMAGES AUX BIENS, DES BLESSURES OU MÊME LA MORT. COMMUNIQUEZ AVEC LES AUTORITÉS LOCALES EN MATIÈRE D'INCENDIE ET DE BÂTIMENT CONCERNANT LES RESTRICTIONS ET LES EXIGENCES D'INSTALLATION DANS VOTRE RÉGION.
natural_image
Exterior view of a Louisiana air fryer with open doors and side dishes, no visible text or symbols on the main body.FOR OUTDOOR AND HOUSEHOLD USE ONLY. NOT FOR COMMERCIAL USE. FUEL AND ACCESSORIES NOT INCLUDED.
Please read and understand this entire manual before attempting to assemble, operate or install the product. This will ensure you receive the most enjoyable and trouble-free operation of your new wood pellet smoker. We also advise you retain this manual for future reference.
DANGERS AND WARNINGS
You must contact your local home association, building or fire officials, or authority having jurisdiction, to obtain the necessary permits, permission or information on any installation restrictions, such as any smoker being installed on a combustible surface, inspection requirements or even ability to use, in your area.
- A minimum clearance of 457mm (18 inches) from combustible constructions to the sides of the smoker, and 457mm (18 inches) from the back of the smoker to combustible constructions must be maintained. Do not install appliance on combustible floors, or floors protected with combustible surfaces unless proper permits and permissions are obtained by authorities having jurisdiction. Do not use this appliance indoors, in an enclosed or unventilated area, inside homes, vehicles, tents, garages. This wood pellet appliance must not be placed under overhead combustible ceiling or overhang. Keep your grill in an area clear and free from combustible materials, gasoline and other flammable vapors and liquids.
Should a grease fire occur, turn the smoker off and leave the cabinet door closed until the fire is out. Do not unplug the power cord. Do not throw water on this unit. Do not try to smother the fire. Use of an all-class (class ABC) approved fire extinguisher is valuable to keep on site. If an uncontrolled fire does occur, call the Fire Department.
- Keep electrical supply cords and the fuel away from heated surfaces. Do not use your smoker in the rain or around any water source.
- After a period of storage, or non-use, check the burn pot for obstructions, the hopper for foreign objects, and any air blockage around the fan intake or rear barrel exhaust holes. Clean before use. Regular care and maintenance is required to prolong the lifespan of your unit. If the smoker is stored outside during the rainy season or seasons of high humidity, care should be taken to insure that water does not get into the hopper. When wet or exposed to high humidity, wood pellets will expand greatly, decompose, and may jam the feed system. Always disconnect the power, before performing any service or maintenance.
Do not transport your smoker while in use or while the smoker is hot. Ensure the fire is completely out and that the smoker is completely cool to the touch before moving.
- It is recommended to use heat-resistant barbecue mitts or gloves when operating the smoker. Do not use accessories not specified for use with this appliance. Do not put a barbecue cover or anything flammable under the barbecue.
- To prevent fingers, clothing or other objects from coming in contact with the auger feed system, the appliance is equipped with a metal safety screen, mounted to the interior of the hopper. This screen must not be removed unless directed by Customer Service or an authorized dealer.
This appliance is not recommended for children, persons with reduced physical, sensory or mental capabilities, or lack of experience and knowledge, unless they are under direct supervision or instruction by a person responsible for their safety.
-
Parts of the barbecue may be very hot, and serious injury may occur. Keep young children and pets away while in use.
-
Do not enlarge igniter holes or burn pot. Failure to follow this warning could lead to a fire hazard and bodily harm and will void your warranty.
- Product may have sharp edges or points. Contact may result in injury. Handle with care.
DISPOSAL OF ASHES
Ashes should be placed in a metal container with a tight-fitting lid. The closed container of ashes should be placed on a non-combustible floor or on the ground, well away from all combustible materials, pending final disposal. When ashes are disposed by burial in soil, or otherwise locally dispersed, they should be retained in a closed container until all cinders have thoroughly cooled.
WOOD PELLET FUEL
This pellet cooking appliance is designed and approved for pelletized, all natural, wood fuel only. Any other type of fuel burned in this appliance will void the warranty and safety listing. You must only use all natural wood pellets, designed for burning in pellet barbecue grills. Do not use fuel with additives.
Do not use spirit, petrol, gasoline, lighter-fluid or kerosene for lighting or refreshing a fire in your grill. Keep all such liquids well away from the appliance when in use.
At this time of printing, there is no industry standard for barbecue wood pellets, although most pellet mills use the same standards to make wood pellets for domestic use. Further information, can be found at www.pelletheat.org or the Pellet Fuel Institute.
Contact your local dealer on the quality of pellets in your area, and for information on brand quality. As there is no control over the quality of pellets used, we assume no responsibility to damage caused by poor quality of fuel.
CREOSOTE
Creosote, or soot, is a tar-like substance. When burning, it produces black smoke with a residue which is also black in color. Soot or creosote is formed when the appliance is operated incorrectly, such as: blockage of the combustion fan, failure to clean and maintain the burn area, or poor air-to-fuel combustion.
It is dangerous to operate this appliance should the flame become dark, sooty, or if the burn pot is overfilled with pellets. When ignited, this creosote makes an extremely hot and uncontrolled fire, similar to a grease fire. Should this happen, turn the unit OFF, let it cool completely, then inspect for maintenance and cleaning. It commonly accumulates along exhaust areas.
If creosote has formed within the unit; allow the unit to warm up at a low temperature, turn off the appliance, then wipe away any formation with a hand towel. Similar to tar, it is much easier to clean when warm, as it becomes liquid.
CARBON MONOXIDE ("THE SILENT KILLER")
Carbon monoxide is a colorless, odorless, tasteless gas produced by burning gas, wood, propane, charcoal or other fuel. Carbon monoxide reduces the blood's ability to carry oxygen. Low blood oxygen levels can result in headaches, dizziness, weakness, nausea, vomiting, sleepiness, confusion, loss of consciousness or death. Follow these guidelines to prevent this colorless, odorless gas from poisoning you, your family, or others:
• See a doctor if you or others develop cold or flu-like symptoms while cooking or in the vicinity of the appliance. Carbon monoxide poisoning, which can easily be mistaken for a cold or flu, is often detected too late.
- Alcohol consumption and drug use increase the effects of carbon monoxide poisoning.
Carbon monoxide is especially toxic to mother and child during pregnancy, infants, the elderly, smokers, and people with blood or circulatory system problems, such as anemia, or heart disease.
SAFETY LISTING
In accordance with the procedures and specifications listed in the UL Subject 2728-2009 "pellet fuel cooking appliances" and ULC/ORD C2728-13 "for electrical features of fuel burning equipment." Louisiana Grills® pellet cooking appliances have been independently tested and listed by Intertek (an accredited testing laboratory) to ETL, UL, ULC and CSA standards.


COPYRIGHT NOTICE
Copyright 2021. All right reserved. No part of this manual may be copied, transmitted, transcribed, stored in a retrieval system, in any form or by any means without expressed written permission of,
DANSONS
3411 North 5th Avenue, Suite 500, Phoenix, AZ, USA 85013
CUSTOMER SERVICE
USA: (480) 923-9632 Canada (Toll Free): 1-877-942-2246
www.louisiana-grills.com
TABLE OF CONTENTS
Safety Information 2
Parts & Specs....6
Assembly Preparation....7
Assembly Instructions
Mounting The Support Legs To Main Cabinet....7
Securing The Control Panel To Support Legs 7
Mounting The Support Panels 8
Securing The Support Bar......8
Mounting The Grease Exhaust Tube 8
Attaching The Heat Shield 8
Mounting The Power Cord Bracket....9
Securing The Grease Tray Brackets....9
Placing The Grease Tray....9
Attaching The Hopper Clean-Out Door Knob 9
Mounting The Back Handle 10
Securing The Chimney....10
Installing The Lid Stopper 10
Mounting The Cabinet Door Handle, Door Latches .....10
Installing The Cooking Components .....11
Connecting To A Power Source....12
Operating Instructions
Smoker Environment....12
Smoker Temperature Ranges....13
Understanding The Control Board 14
Understanding The Probes 14
Hopper Priming Procedure 15
First Use – Smoker Burn-Off 15
Automatic Start-Up Procedure.... 15
Manual Start-Up Procedure 16
Shutting Off Your Smoker 16
Care & Maintenance 17
Using Wood Pellet Fuel....18
Cooking Guidelines....18
Tips & Techniques 20
Troubleshooting 21
Electrical Wire Diagram 23
Replacement Parts
Smoker Replacement Parts 24
Electrical Replacement Parts 25
Warranty
Conditions....25
Exceptions....26
Ordering Replacement Parts 26
Contact Customer Service 26
Warranty Service 26
Accessories Sold Separately 27
Recipes 28
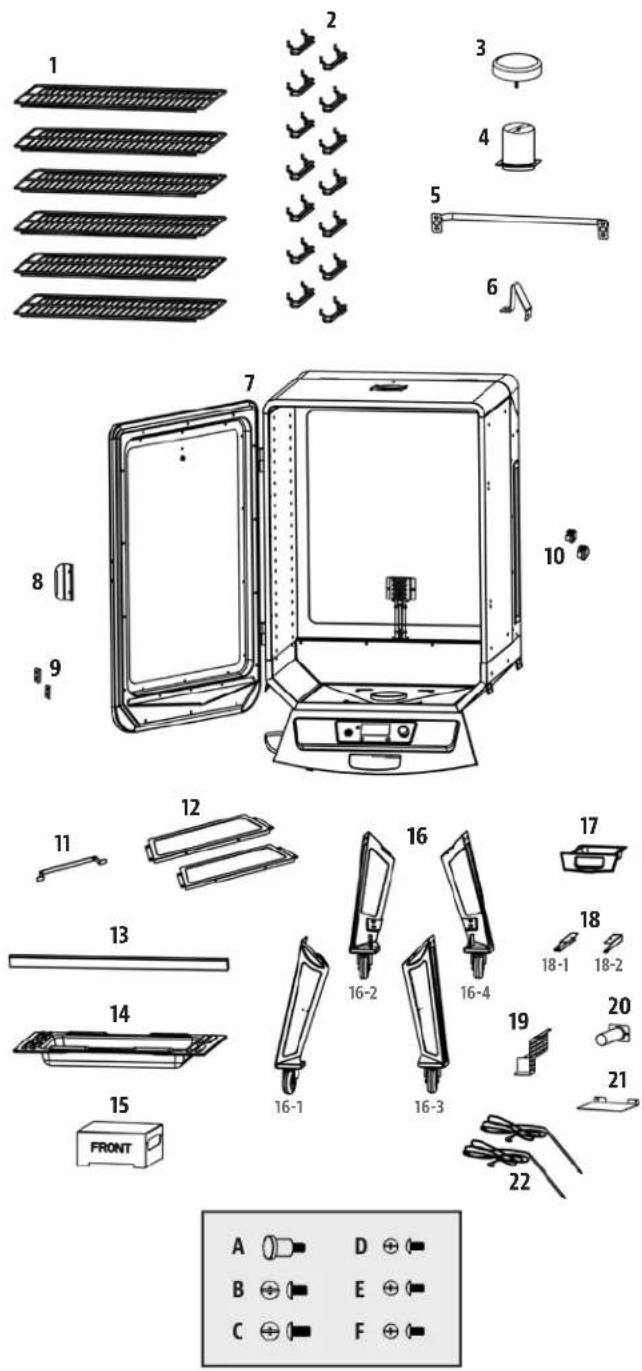
PARTS & SPECS
| Part# | Description |
| 1 | Cooking Grids (x6) |
| 2 | Cooking Grid Support Brackets (x14) |
| 3 | Chimney Cap (x1) |
| 4 | Chimney Stack (x1) |
| 5 | Back Handle (x1) |
| 6 | Lid Stopper (x1) |
| 7 | Main Cabinet (x1) |
| 8 | Cabinet Door Handle (x1) |
| 9 | Cabinet Door Latch Hook (x2) |
| 10 | Cabinet Door Latch (x2) |
| 11 | Power Cord Bracket (x1) |
| 12 | Support Panel (x2) |
| 13 | Support Bar (x1) |
| 14 | Water Pan (x1) |
| 15 | Flame Tamer (x1) |
| 16 | Support Leg With Wheel (x4) |
| 17 | Grease Tray (x1) |
| 18 | Grease Tray Brackets (x2) |
| 19 | Wire Components Housing (x1) |
| 20 | Grease Exhaust Tube (x1) |
| 21 | Heat Shield (x1) |
| 22 | Meat Probe (x2) |
| A | Door Knob (x1) |
| B 1⁄4-20x 12 " Stainless Steel Screw (x12) | |
| C 1⁄4-20x 58 " Stainless Steel Screw (x4) | |
| D | #10-24x 12 " Screw (x12) |
| E #10-24x 12 " Stainless Steel Screw (x28) | |
| F #10-24x 13 " Screw (x2) | |
NOTE: Due to ongoing product development, parts are subject to change without notice. Contact Customer Service if parts are missing when assembling the unit.
LG - ELECTRIC REQUIREMENTS
110-120V, 60Hz, 250W, 3-PRONG GROUNDED PLUG
| MODEL | UNIT ASSEMBLCD (WxHxD) | UNIT WEIGHT | COOKING AREA | TEMP. RANGE | DIGITAL FEATURES | |
| LG | LGV7PC1 | 735mm x 1,467mm x 710mm / 28.9" x 57.7" x 27.9" | 65.0 kg/ 143.3 lb | Cubic Cooking: 0.17 m ^3 / 6.2 ft ^3 TOTAL - 13,283 cm ^2 / 2,059 sq. in. | 65-215°C/ 149-419°F | Ten temperature presets, start-up and cool-down cycles, electric igniter |
ASSEMBLY PREPARATION
Parts are located throughout the shipping carton, including underneath the grill. Inspect the unit, parts, and hardware blister pack after removing from the protective shipping carton. Discard all packaging materials from inside and outside of the grill before assembly, then review and inspect all parts by referencing the parts list. If any part is missing or damaged, do not attempt to assemble. Shipping damage is not covered under warranty. Contact your dealer or Louisiana Grills® Customer Service for parts.
www.louisiana-grills.com | USA: (480) 923-9632 | Canada (Toll Free): 1-877-942-2246
IMPORTANT: To ease installation, using two people is helpful (but not necessary) when assembling this unit.
Tools required for assembly: screwdriver and level. Tools not included.

ASSEMBLY INSTRUCTIONS
IMPORTANT: It is advised to read each step entirely before starting assembly on instructions. Do not tighten screws completely until all screws for that step have been installed, or unless otherwise mentioned.
1. MOUNTING THE SUPPORT LEGS TO MAIN CABINET
Parts Required:
1 x Main Cabinet (#7)
4 x Support Leg With Wheel (#16)
12 x 14-20×12 " Stainless Steel Screw(B)
Installation:
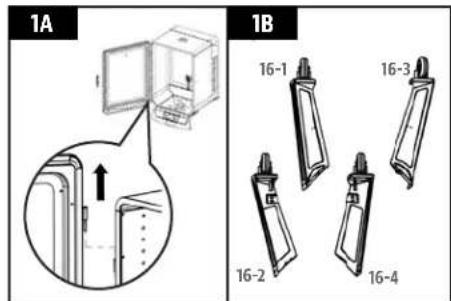
- Place a piece of cardboard on the floor to prevent scratching the unit and parts during assembly. First, lift the main cabinet door off the hinges, and place aside. Note illustration 1A.
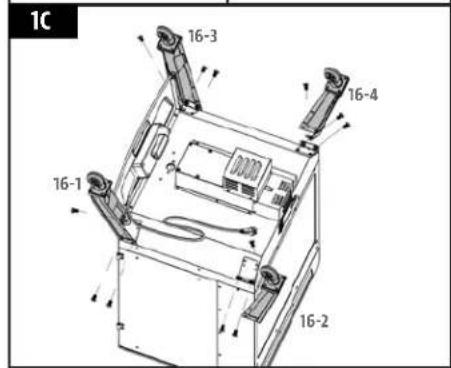
- Next, flip the main cabinet, bottom side pointed upward, on the cardboard. Prepare the four support legs for installation, arranging the labelled legs as shown in illustration 1B.
IMPORTANT: The four support legs must be arranged correctly to be able to properly install the support panels and support bar in a later assembly step.
- Mount one support leg to the smoke cabinet using three screws. Repeat installation for the other three support legs. Note illustration 1C.
2. SECURING THE CONTROL BOARD TO SUPPORT LEGS
Parts Required:
2 x #10-24x ^1/2 " Screw(#D)
Installation:
- Near the Control Board, loosen the two pre-assembled screws connecting the front panel to the main cabinet. Note 2A.
- Next, using another two screws ( #D), secure the front panel sides to the front-facing support legs. Once these screws are tight, re-tighten the two screws that were previously loosened in 2A. Note 2B.
text_image
1C 16-3 16-4 16-1 16-2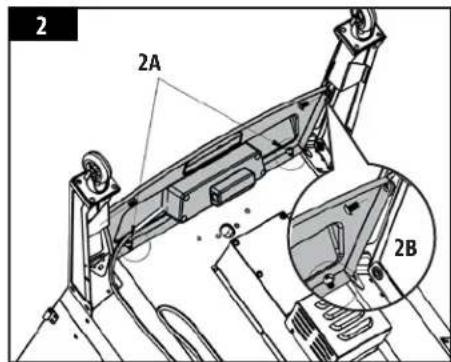
text_image
2 2A 2B3. MOUNTING THE SUPPORT PANELS
Parts Required:
2 x Support Panel (#12)
8 x #10-24x ^1/2 " Stainless Steel Screw(#E)
Installation:
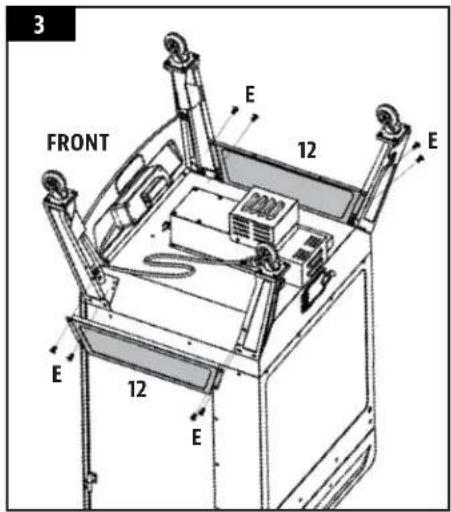
- Install one support panel to the side of the unit between a front and back support leg. Secure using two screws on each side. Ensure the flat side of the support panel is facing outwards. Repeat the same installation to mount the other support panel. Note illustration for support panel arrangement.
NOTE: The support panel with two holes along the bottom should be on the same side of the unit as the power cord exits the control board (left side). This is important for later steps.
4. SECURING THE SUPPORT BAR
Parts Required:
1 x Support Bar (#13)
4 x #10-24x ^1/2 " Stainless Steel Screw(#E)
Installation:
- Install the support bar to the back of the unit between the two back support legs. Secure using two screws on each side. Ensure the support bar is placed on the underside of the main cabinet, facing inwards. Note illustration for support bar arrangement.
5. MOUNTING THE GREASE EXHAUST TUBE
Parts Required:
1 x Grease Exhaust Tube (#20)
2 x #10-24x ^1/3 " Screw (#F)
Installation:
- Mount the grease exhaust tube to the underside of the main cabinet using two screws.
IMPORTANT: Ensure there is a good seal to the main cabinet, as grease will come from the main cabinet, flow through the exhaust tube, and exit into the grease tray.
6. ATTACHING THE HEAT SHIELD
Parts Required:
1 x Heat Shield (#21)
2 x #10-24x ^1/2 " Screw(#D)
Installation:
- Position the heat shield between the control board and the grease exhaust tube. Secure using a screw on each side.
IMPORTANT: If this part is not installed correctly, the heat and/or splatter from the grease exhaust tube may cause damage to the control board. Grease damage to the rear of control board is not covered by warranty.
text_image
3 FRONT E 12 E E 12 E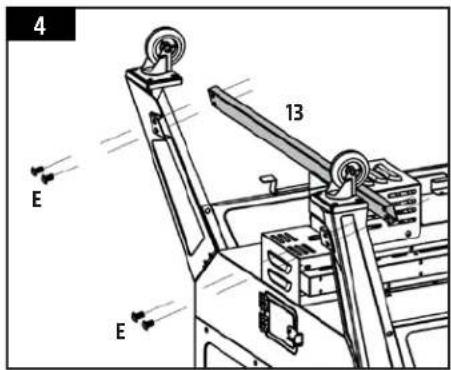
text_image
4 13 E E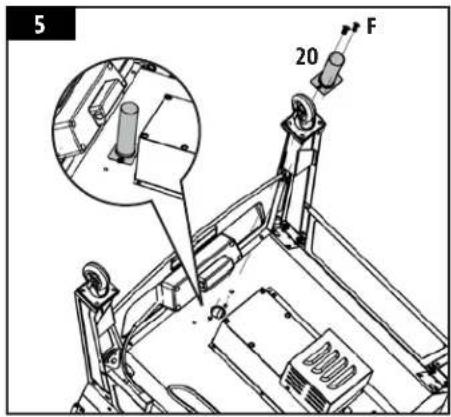
text_image
5 20 F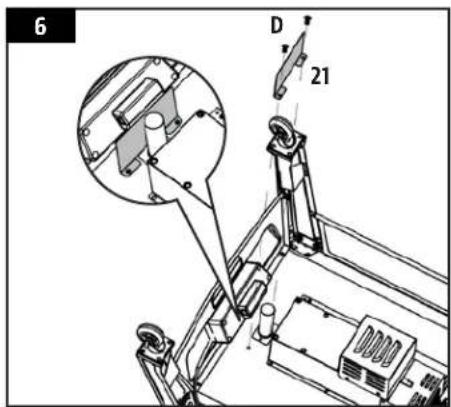
text_image
6 D 217. MOUNTING THE POWER CORD BRACKET
Parts Required:
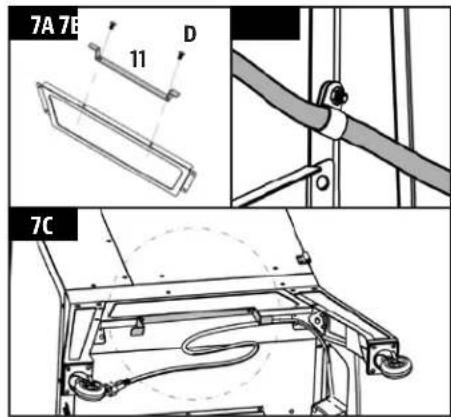
1 x Power Cord Bracket (#11)
2 x #10-24x ^1/2 " Screw(#D)
Installation:
- Locate the two holes on the bottom of the (left side) support panel. Mount the power cord bracket to the support panel using two screws, as shown in 7A.
- Next, loosen the nut on the pre-mounted clip bracket and guide the power cord through the clip bracket. Once through, tighten the nut, and wrap the power cord on the bracket until unit is in use. Note 7B, 7C.
8. SECURING THE GREASE TRAY BRACKETS
Parts Required:
1 x Wire Components Housing (#19)
2 x Grease Tray Brackets (#18)
6 x #10-24x ^1/2 " Screw(#D)
Installation:
- First, mount the wire components housing onto the base of the auger housing using two screws in each bracket. Note 8A.
- Secure the grease tray brackets onto the base of the auger housing and the wire components housing using two screws in each bracket. Note illustration 8B for proper placement.
NOTE: The diveted end of the brackets should face the control board.
- Fully-tighten all screws on the cart base. Next, carefully turn the unit into an upright position, with the wheels on the bottom. Ensure its level.
9. PLACING THE GREASE TRAY
Parts Required:
1 x Grease Tray (#17)
Installation:
- Slide the grease tray into the grease tray brackets on the front underside of the main cabinet, under the control board.
NOTE: The grease tray is completely inserted once the front of the tray is pushed in as far as it can go, with no gap between the grease tray and the front panel.
10. ATTACHING THE HOPPER CLEAN-OUT DOOR KNOB
Parts Required:
1 x Door Knob (#A)
Installation:
- Attach the door knob to the hopper clean-out door by rotating the part into the hole on the door. Rotate until completely fastened and clean-out door latch is secured.
NOTE: To use the hopper clean-out feature, simply loosen the door knob, raise the clean-out door latch and open the door.
text_image
7A 7B 11 D 7C
text_image
8A 19 8B 18-1 18-2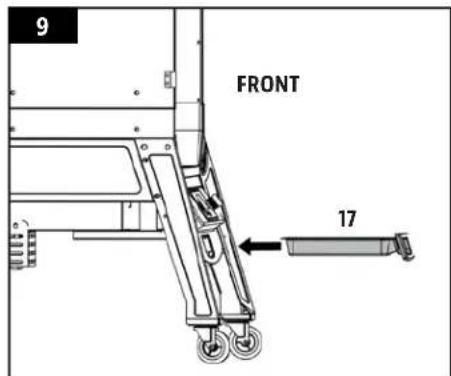
text_image
9 FRONT 17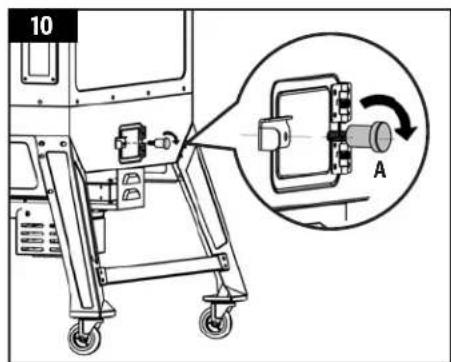
text_image
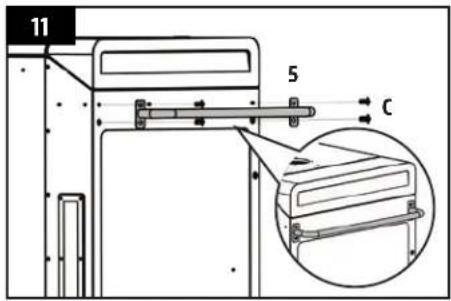
10 A11. MOUNTING THE BACK HANDLE
Parts Required:
1 x Back Handle (#5)
4 x 14-20x58 " Stainless Steel Screw (#C)
Installation:
- Mount the back handle onto the back side of the hopper using four screws (#C). Note illustration.
12. SECURING THE CHIMNEY
Parts Required:
1 x Chimney Cap (#3)
1 x Chimney Stack (#4)
4 x #10-24x ^1/2 " Stainless Steel Screw(#E)
Installation:
- Locate the chimney opening on the top of the main cabinet. From the outside, secure the chimney stack to the top of the main cabinet using four screws. The screw will fasten to the self-clinching nuts on the inside of the cabinet. Next, twist the chimney cap onto the top of the chimney stack.
NOTE: Adjust the chimney cap to affect the airflow inside the main cabinet. If cooking at low temperature, keep the cap more open.
13. INSTALLING THE LID STOPPER
Parts Required:
1 x Lid Stopper (#6)
2 x #10-24x ^1/2 " Stainless Steel Screw(#E)
Installation:
- Install the lid stopper onto the top of the main cabinet near the hopper lid. Use one screw to secure on the top side, then open the lid and secure one screw on the inside edge between the hopper lid hinges.
14. MOUNTING THE CABINET DOOR HANDLE, DOOR LATCHES
Parts Required:
1 x Cabinet Door Handle (#8)
2 x Cabinet Door Latch Hook (#9)
2 x Cabinet Door Latch (#10)
10 x #10-24x ^1/2 " Stainless Steel Screw(#E)
Installation:
- First, re-install the cabinet door to the main cabinet by aligning and securing both door hinges. Ensure the cabinet door is mounted correctly by testing that it opens and swings freely. Note 14A.
- Mount the cabinet door handle onto the centre of the front side cabinet door using two screws. Next, mount the two cabinet door latch hooks (one above, one below) the cabinet door handle, securing each with two screws. Note correct direction of handle and positioning of cabinet door latch hooks in illustration 14B.
text_image
11 5 C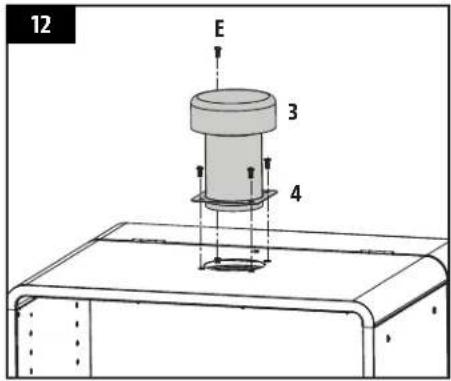
text_image
12 E 3 4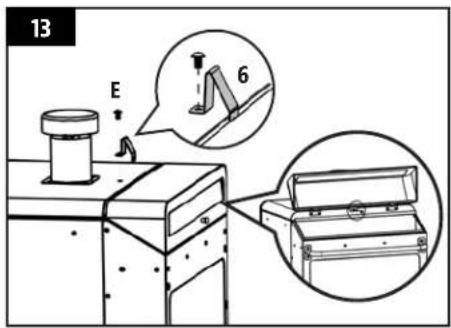
text_image
13 E 6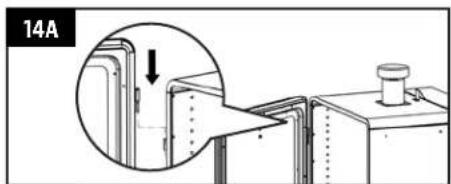
natural_image
Diagram of a mechanical device with an inset showing a close-up of a component (no text or symbols visible)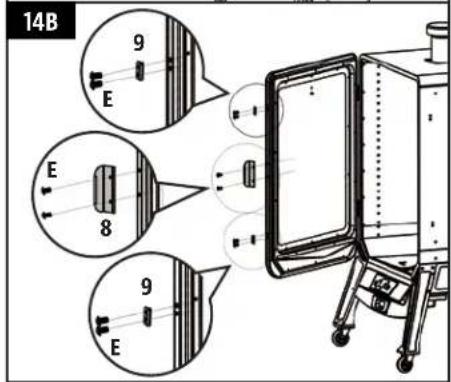
text_image
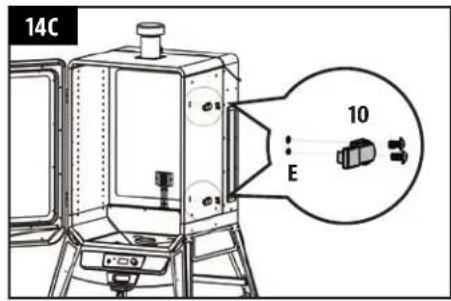
14B 9 E 8 9 E- Mount the two cabinet door latches onto the exterior side of the main cabinet using two screws each. Note 14C.
IMPORTANT: Fine tune and test the cabinet door latches and hooks to ensure they align properly and there is a proper seal while the door is closed. Poor alignment may result in heat loss and leaks during use.
15. INSTALLING THE COOKING COMPONENTS
Parts Required:
14 x Cooking Grid Support Bracket
6 x Cooking Grids(#1)
1 x Water Pan (#14)
1 x Flame Tamer (#15)
Installation:
- Insert seven cooking grid support brackets into the holes along the left side wall of the interior main cabinet. Once positioned in the holes, tilt downward to secure into position. Repeat the same process, matching the same heights, for the right side wall. Note illustration 15A.
- Place the flame tamer over the burn pot at the bottom of the interior main cabinet. To ensure proper positioning, align the flame tamer into the grooves along the bottom of the base panel. Note illustration 15B.
IMPORTANT: The ventilation windows on the sides of the flame tamer box must not face forward, towards the cabinet door. This may cause damage to the control board if flames are too large.
- Next, insert the water pan into the lowest grid support brackets of the interior cabinet. Fill your water pan about 34 full of water.
IMPORTANT: Keep water in the water pan at all times while cooking. It will catch grease and drippings from your cooks and allow for easier clean up. If smoking for an extended period of time, move water pan up higher to allow water to last longer.
- Last, place the cooking grids, one-by-one, on the grid support brackets inside the main cabinet. Note illustration 15C.
- The unit is now completely assembled.
text_image
14C E 10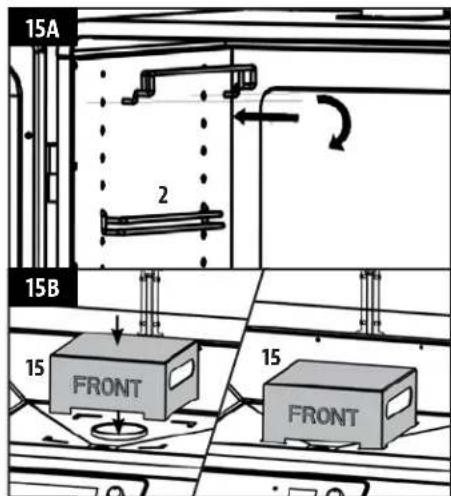
text_image
15A 2 15B 15 FRONT 15 FRONT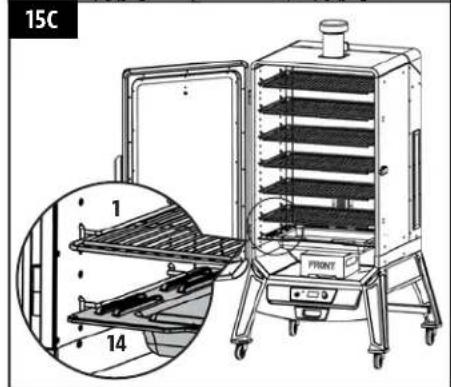
text_image
15C 1 14 FRONT16. CONNECTING TO A POWER SOURCE
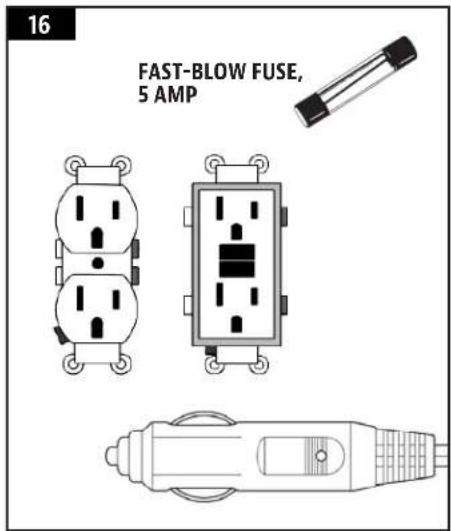
NOTE: Before plugging your unit into any electrical outlet, ensure the temperature dial is in the SMOKE position. Disconnect when not in use.
• STANDARD OUTLET
This unit requires 110-120 volt, 60Hz, 250w. It must be a 3-prong grounded plug. Ensure grounded end is not broken off. The control uses a 110-120 volt, fast-blow fuse to protect the board from the igniter.
GFCI OUTLETS
This appliance will work on most GFCI outlets, with a recommended size of 15 amp service. If your GFCI outlet is highly sensitive to power surges, it will likely trip during the start-up phase of operation. During the start-up phase, the igniter draws 200-700 watts of electricity which can be too much power for a GFCI outlet to handle. The quality of the GFCI does not matter, but rather the sensitivity; each time it trips, it increases in sensitivity. If the GFCI keeps tripping, replace the outlet or change to a non-GFCI outlet.
ON THE ROAD
Disconnect the igniter from the main wiring harness. Use the manual start-up procedure. A Louisiana Grills® unit can operate using a 12 volt, 100 watt inverter plugged into your automobile outlet. To use the automatic igniter, it is recommended to use a minimum of a 1000 watt inverter.
text_image
16 FAST-BLOW FUSE, 5 AMPOPERATING INSTRUCTIONS
With today's lifestyle of striving to eat healthy and nutritious foods, a factor to consider is the importance of reducing fat intake. One of the best ways to cut down on fat in your diet is to use a low fat method of cooking, such as smoking. As a pellet smoker uses natural wood pellets, the savory wood flavor is cooked into the meats, reducing the need for high sugar-based sauces.
SMOKER ENVIRONMENT
1. WHERE TO SET-UP THE SMOKER
With all outdoor appliances, outside weather conditions play a big part in the performance of your smoker and the cooking time needed to perfect your meals. The Louisiana Grills ^® , because of its double wall construction, should be considered as a 3 season smoker, depending on where you live. All Louisiana Grills ^® units should keep a minimum clearance of 457mm (18 inches) from combustible constructions, and this clearance must be maintained while the smoker is operational. This appliance must not be placed under overhead combustible ceiling or overhang. Keep your smoker in an area clear from combustible materials, gasoline and other flammable vapors and liquids.
2. COLD WEATHER COOKING
As it becomes cooler outside, that does not mean that the outdoor cooking season is over! The crisp cool air and heavenly aroma of smoked foods will help cure your winter blues. Follow these suggestions on how to enjoy your smoker throughout the cooler months:
• If smoking at low temperatures fails, increase the temperature slightly to achieve the same results.
- Organize – Get everything you require ready in the kitchen before you head outdoors. During the winter, move your smoker to an area that is out of the wind and direct cold. Check local bylaws regarding the proximity of your smoker in relation to your home and/or other structures. Put everything you need on a tray, bundle up tight, and get it done!
- To help keep track of the outside temperature, place an outdoor thermometer close to your cooking area. Keep a log or history of what you cooked, the outdoor temperature, and the cooking time. This will help later down the road to help you determine what to cook and how long it will take.
- In very cold weather, increase your preheating time by at least 20 minutes.
- Avoid opening the smoke cabinet door any more than necessary. Cold gusts of wind can completely cool your internal temperature. Be flexible with your serving time; add about 10 – 15 minutes extra cooking time each time you open the door.
- Have a heated platter or a dish cover ready to keep your food warm while making the trip back inside.
- Ideal foods for winter cooking are those that require little attention, such as roasts, whole chickens, ribs, and turkey. Make your meal preparation even easier by adding simple items such as vegetables and potatoes.
3. HOT WEATHER COOKING
As it becomes warmer outdoors, the cooking time will decrease. Proper dress is important when it gets really hot: shorts, shirt, shoes, hat, apron and a generous slab of suntan lotion is recommended. Follow these few suggestions on how to enjoy your smoker throughout the hot months:
- Adjust your cooking temperatures downward. This helps to avoid unwanted flare-ups.
- Use a meat thermometer to determine the internal temperature of your foods. This helps in preventing your meat from over cooking and drying out.
- Even in hot weather, keep the smoke cabinet door closed at all times.
- You can keep foods hot by wrapping them in foil, and placing them in an insulated cooler. Stuff crumpled up newspaper around the foil and this will keep food hot for 3 to 4 hours.
SMOKER TEMPERATURE RANGES
Temperature readouts on the control board may not exactly match the thermometer. All temperatures listed below are approximate and are affected by the following factors: outside ambient temperature, the amount and direction of wind, the quality of pellet fuel being used, the cabinet door being opened, and the quantity of food being cooked.
• HIGH TEMPERATURE (190-215°C / 375-419°F)
This range is used to grill at high heat, without any contact with flame. High temperature is also used as the burn-off temperature to clean off the cooking grids after use. Additionally, high heat can be used in extreme cold weather conditions to compensate for the contrast of temperatures between outside and inside the unit.
• MEDIUM TEMPERATURE (135-177°C / 275-350°F)
This range is best for baking, roasting, and finishing off that slow smoked creation. Cooking at these temperatures will greatly reduce the chances of a grease flare-up. Great range for cooking anything wrapped in bacon, or where you want versatility with control.
This range is used to slow roast, increase smoky flavor, and to keep foods warm. Infuse more smoke flavor and keep your meats juicy by cooking longer at a lower temperature (also known as low and slow). Highly recommended for the big turkey at Thanksgiving, juicy ham at Easter, or the huge holiday feast.
Smoking is a variation on true barbecuing and is truly the main advantage of a smoker. There are two types of smoking: hot smoking and cold smoking.
- Hot smoking, another name for low and slow cooking, is generally done at 82-122°C / 180-250°F. Hot smoking works best when longer cooking time is required, such as large cuts of meats, fish, or poultry.
- Cold smoking is when the food is located so far away from the fire that it smokes without cooking, and at temperatures of 15-32°C / 60-90°F.
TIP: To intensify that savory flavor, switch to SMOKE (low) temperature range immediately after putting your food in the smoker. This allows the smoke to penetrate the meats, before the pores of the meat close at 49^ C / 120^ F.
The key is to experiment with the length of time you allow for smoking, before the meal is finished cooking. Some outdoor chefs prefer to smoke at the end of a cook, allowing the food to keep warm until ready to serve. Practice makes perfect!
UNDERSTANDING THE CONTROL BOARD
text_image
F/C PROBE 1 888 888 FC COOK ACTUAL PROBE 2 888 FC 8.8.8 FC PRIME LOUISIANA® GRILLS SMOKE HIGH 225° 250° 275° 200° 300° 175° 350° 150° 400° HIGH| CONTROL DESCRIPTION | |
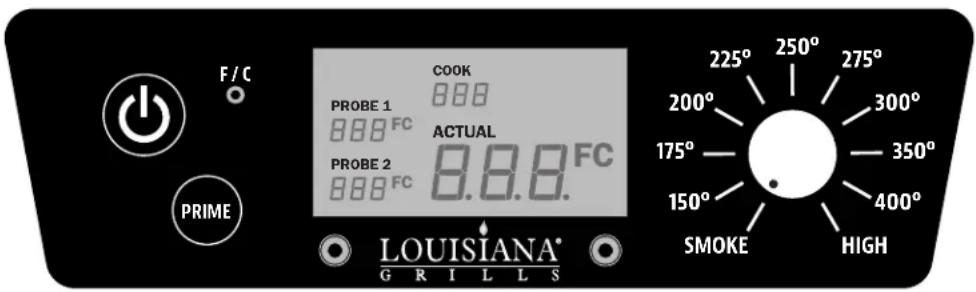
 | Press thePower Buttonto power on the unit. Once connected to a power source and the Power Button is pressed, the Digital LCD Screen with light up, displaying that it is ready to operate. Press and hold the button for two seconds to turn the unit off. |
 | TheTemperature Control Dialallows you to set your desired smoking temperature. Select from any of the ten preset temperatures on the dial control, between 65-215°C / 149-419°F. The desired Set temperature is shown on the Digital LCD Screen for few seconds, then returns to the Actual temperature. |
 | TheTemperature Switch Buttonis used to change the temperature readout on the LCD Screen. Press the button to switch to Celsius (°C) or to Fahrenheit (°F), as preferred. Default is set to Celsius. |
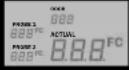 | TheDigital LCD Screenis used as the information center for your unit. The LCD screen will display your Desired Cook Temperature, Actual Cook Temperature, and Meat Probe Temperatures (if connected). If only one Meat Probe is connected, only one reading will be displayed. Temperature can be displayed in either Fahrenheit or Celsius. |
 | Press and hold thePrime Buttonto activate an extra feed of pellets to the burn pot. This can be used to add more fuel to the fire just before opening the smoke cabinet door, resulting in a quicker heat recovery time. It can also be used to add more fuel while smoking, to increase the intensity of clean smoke flavor. Requested from the competition cookers. |
 | TheSmoke Settingon the Temperature Control Dial operates unit at the lowest temperature, without the fire going out. |
 | The plug-in connection port(s) on the front of the Control Board are for aMeat Probe(s).When a meat probe is connected, the temperature is displayed on the LCD Screen. When not in use, disconnect the meat probe from the connection port.Compatible with Louisiana Grills®branded meat probes only. 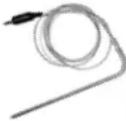 |
UNDERSTANDING THE PROBES
- GRILL PROBE
Located inside the cabinet, on the rear wall along the bottom is the Grill Probe. It is a small vertical piece of stainless steel. The Grill Probe measure the internal temperature of the unit. This internal temperature is displayed on the digital LCD Screen as "ACTUAL" temperature.
IMPORTANT: The temperature of your unit is highly affected on ambient outdoor weather, quality of pellets used, flavor of pellets, and the quantity of food being cooked.
MEAT PROBE
The meat probe measures the internal temperature of your meat in the smoke cabinet, similar to your indoor oven. Plug-in the meat probe adapter to the meat probe connection port and insert the stainless steel meat probe into the thickest portion of your meat and the temperature will be displayed on the control board. To ensure the meat probe is connected properly to the connection port, feel and hear it snap into place.
IMPORTANT: When placing the meat probe into your meat, ensure the meat probe and meat probe wires avoid direct contact with flame or excess heat. This can result in damage to your meat probe. Run the excess wire out the front main cabinet door, along the edge. When not in use, disconnect from the meat probe connection port, and place aside to keep it protected and clean.
HOPPER PRIMING PROCEDURE
These instructions should be followed the first time the smoker is ignited, and each time the smoker runs out of pellets in the hopper. The auger must be primed to allow pellets to travel through the length of the auger, and fill the burn pot. If not primed, the igniter will timeout before the pellets are ignited. Follow these steps to prime:
- Open the hopper lid. Make sure there are no foreign objects in the hopper or blocking the auger feed system at the bottom.
- Remove all cooking components from the interior of the smoker. Locate the burn pot in the bottom of the smoke cabinet.
-
Plug the power cord into a power source. Press the Power Button to turn the unit ON, and ensure the Temperature Control Dial is in the SMOKE position. Check the following items:
-
That you can hear the auger turning. Place your hand above the burn pot and feel for air movement. Do not place your hand or fingers inside the burn pot. This can cause injury.
-
After approximately a minute, you should smell the igniter burning and begin to feel the air getting warmer in the burn pot. The igniter tip does not glow red hot. Do not touch the igniter. This item gets extremely hot and will burn.
-
Once verified that all electric components are working correctly, press and hold the Power Button for two seconds to turn the unit OFF.
- Fill the hopper with all natural barbecue wood pellets. Monitor the pellet level using the sight-glass along the side.
- Press the Power Button to turn the unit ON. Keeping the Temperature Control Dial at the SMOKE position, press and hold the Prime Button until you see pellets entering the burn pot. Once pellets begin to drop into the burn pot, release the Prime Button. Allow the pellets to ignite and create flame. Once flames are coming out of the burn pot, press and hold the Power Button for two seconds to turn the control board OFF, and let the smoker cool down.
- After the smoker has cooled, re-install the cooking components into the main cabinet. The smoker is now ready to use!
FIRST USE - SMOKER BURN-OFF
Once your hopper has been primed and before using your smoker for the first time with food, it is important to complete a burn-off. Starting the smoker and operating at 177^ C / 350^ F with the cabinet door closed for 30 to 40 minutes will burn-off the unit and rid it of any foreign matter.
AUTOMATIC START-UP PROCEDURE
- Ensure the Temperature Control Dial is in the SMOKE position. Plug the power cord into a grounded power source.
- Check the burn pot to ensure there is no obstruction for proper ignition. Open the hopper lid. Ensure there are no foreign objects in the hopper or auger feed system entry at the bottom of the cabinet. Fill or top-up the hopper with dry, all natural barbecue hardwood pellets. Fill the water pan 34 with water, and monitor during your cook; re-fill frequently.
- Press the Power Button to turn the unit on. This will activate the start-up cycle. The auger feed system will begin to turn, the igniter will begin to glow and the fan will supply air to the burn pot. The smoker will begin to produce smoke while the start-up cycle is taking place. The cabinet door must remain open during the start-up cycle. To confirm the start-up cycle has begun properly, listen for a torchy roar, and notice some heat being produced.
- Close the cabinet door. Turn the Temperature Control Dial to 177^ C / 350^ F, to allow the unit to preheat for approximately 15 to 20 minutes.
- After preheating is complete, you are ready to enjoy your smoker at your desired temperature!
IMPORTANT: When selecting SMOKE or a low temperature setting after preheating, the auger will continue to turn and feed pellets. This will momentarily raise the temperature, but temperature will eventually decrease and stabilize. Remember that you are trying to regulate a fire, so time is necessary to achieve your desired temperature.
IGNITER FAILURE PROCEDURE
If for any reason your electric igniter fails, check the following steps, or start your grill using the manual method.
- Ensure the Temperature Control Dial is in the SMOKE position and the unit is turned off. Open the cabinet door. Remove the cooking components from inside. Remove all unburnt pellets and ash from the burn pot. Avoid touching the igniter to avoid injury, as it may be extremely hot.
- Once all cooking components are removed and cleaned, press the Power Button to turn the unit on. Check the following:
- Visually confirm that the igniter is working by placing your hand above the burn pot and feeling for heat.
- Visually confirm that the igniter is protruding approximately 13mm / 0.5 inches in the burn pot.
- Visually confirm that the auger is dropping pellets into the burn pot.
- Confirm that the combustion fan is working by listening for a torchy roar.
- Visually confirm that the igniter is working by placing your hand above the burn pot and feeling for heat.
- Visually confirm that the igniter is protruding approximately 13mm / 0.5 inches in the burn pot.
- Visually confirm that the auger is dropping pellets into the burn pot.
-
Confirm that the combustion fan is working by listening for a torchy roar.
-
If any of the above points are not working, follow Troubleshooting instructions.
MANUAL START-UP PROCEDURE
- Ensure the Temperature Control Dial is in the SMOKE position. Plug the power cord into a grounded power source.
- Check burn pot to ensure there is no obstruction for proper ignition. Open the hopper lid. Ensure there are no foreign objects in the hopper or auger feed system. Fill hopper with dry, all natural hardwood barbecue pellets.
- Open the cabinet door. Remove the cooking components to expose the burn pot. Place a generous handful of pellets into the burn pot. Squirt a gelled fire starter, or other appropriate pellet starter, over the top of the pellets. A small amount of solid fuel fire starter, such as one composed of sawdust and wax, or wood shavings, is also appropriate. Add another small amount of pellets over the burn pot.
NOTE: Do not use spirit, petrol, gasoline, lighter-fluid or kerosene for lighting or refreshing a fire in your grill. - Light the contents of the burn pot using a long match or long-nosed lighter. Allow the starter to burn for 3 to 5 minutes. Do not attempt to add more starter into the burn pot. This can cause injury.
- Quickly and carefully replace the cooking components to the inside of the smoke cabinet. The cabinet door must remain open during the start-up cycle.
- Continue start-up by following steps three through five of Automatic Start-Up Procedure
- When finished cooking, turn the temperature dial to 177^ C / 350^ F and close the cabinet door. Let your smoker run for 5 to 10 minutes to go through its normal cleaning method. If you have been preparing foods that are extra greasy, allow the smoker to burn-off for an extra 10 to 20 minutes. This will reduce the chance of causing a grease fire for the next start-up.
- Once the burn-off is complete, keep the cabinet door closed and turn the temperature dial down to 93^ C / 200^ F for five minutes to allow any remaining pellets to burn out.
- After five minutes, with the cabinet door remaining closed, press and hold the Power Button for two seconds to turn the unit OFF. The smoker will begin its automatic cool-down cycle. The auger system will stop feeding fuel, the flame will burn out, and the fan will continue to run until the cool-down cycle is complete.
CARE AND MAINTENANCE
Any Louisiana Grills ^® unit will give you many years of flavorful service with minimum cleaning. An important step is allowing the smoke cabinet and cooking grids to self-clean by running the smoker at a high temperature for 5 to 10 minutes after each use. Follow these cleaning and maintenance tips to service your smoker:
1. HOPPER ASSEMBLY
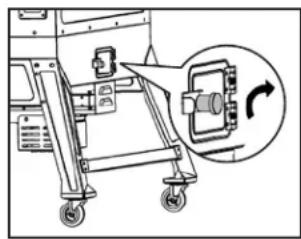
- The hopper includes a clean-out feature to allow for ease of cleaning and change out of pellet fuel flavors. To empty, locate the clean-out door of the drop chute on the back side of the hopper. Place a clean, empty pail under the clean-out door, then slowly loosen the door knob, raise the door latch, and allow the pellets to empty.
NOTE: Use a long handled brush or shop-vac to remove excess pellets, sawdust, and debris for a complete clean-out.
natural_image
Mechanical assembly diagram showing a motor with wheels and a rotating component (no text or symbols)- Check and clean off any debris from the fan air intake vent, found on the rear underside of the smoke cabinet. For an extensive cleaning, carefully wipe off any grease build-up directly on the fan blades (see Electric Wire Diagram for access to electric components). This ensures airflow is sufficient to the feed system.
2. PROBES
- Kinks or folds in the probe wires may cause damage. A meat probe not in use should be rolled up in a large, loose coil.
Although both probes are stainless steel, do not place in the dishwasher or submerge in water. Water damage to the internal wires will cause a probe to short-out, causing false readings. If a probe is damaged, it should be replaced.
3. INSIDE SURFACES
- It is recommended to clean your burn pot after every few uses. This will ensure proper ignition and avoid any hard build-up of debris or ash in the burn pot.
- Use a long-handled grill cleaning brush (brass or soft metal), remove any food or build-up from the cooking grids. Best practice is to do this while they are still warm from the previous cook. Grease fires are caused by too much fallen debris on the cooking components of the smoker. Clean the inside of your smoker on a consistent basis. In the event you experience a grease fire, keep the smoke cabinet door closed to choke out the fire. If the fire does not go out quickly, carefully remove the food, turn the smoker off, and shut the cabinet door until the fire is completely out. Another way to extinguish a fire is to wrap aluminum foil around the smoke stack, closing off air to the interior. Lightly sprinkle baking soda, if available. Check your grease tray often, and clean out as necessary. Keep in mind the type of cooking you do. Ensure the grease exhaust tube is clear of any blockages.
IMPORTANT: The water pan may accumulate grease. Line the water pan with aluminum foil for easier clean up after cooks. Refill and replace the water in the water pan often.
- The glass of the cabinet door is tempered and will not break with high heat; however, excessive build-up may cause the door to not close if not cleaned regularly. Smoke and debris can be removed with frequent cleaning of the glass.
4. OUTSIDE SURFACES
- Wipe your smoker down after each use. Use warm soapy water to cut the grease. Do not use oven cleaner, abrasive cleansers or abrasive cleaning pads on the outside cabinet surfaces. All painted surfaces are not covered under warranty, but rather are part of general maintenance and upkeep. For paint scratches, wearing, or flaking of the finish, all painted surfaces can be touched up using high heat BBQ paint.
- Use a cover to protect your smoker for complete protection! A cover is your best protection against weather and outside pollutants. When not in use or for longterm storage, keep the unit under a cover in a garage or shed.
CLEANING FREQUENCY TIME TABLE (NORMAL USE)
| ITEM CLEANING FREQUENCY | CLEANING METHOD | |
| Main Cabinet Glass Door Every | 2-3 Smoke Sessions Mix Baking | Soda & Vinegar, Scrub with Steel Wool (Fine) |
| Bottom of Main Cabinet Every | 5-6 Smoke Sessions Scoop Out | Shop-Vac Excess Debris |
| Burn Pot After Each Smoke Session Scoop Out, Shop-Vac Excess Debris | ||
| Cooking Grids After Each Smoke Session Burn Off Excess, Brass Wire Brush | ||
| Water Pan After Each Smoke Session Scrub Pad & Soapy Water | ||
| Grease Tray After Each Smoke Session Scrub Pad & Soapy Water | ||
| Grease Exhaust Tube Every 5-6 Smoke Sessions Scrub Pad & Soapy Water | ||
| Auger Feed System When Pellet Bag is Empty Allow Auger to Push Out Sawdust, Leaving Hopper Empty | ||
| Electric Components Once A Year Dust Out Interior, Wipe Fan Blades with Soapy Water | ||
| Air Intake Vent | Every 5-6 Smoke Sessions Dust, Scrub Pad & Soapy Water | |
| Grill Probe | Every 2-3 Smoke Sessions | Scrub Pad & Soapy Water |
USING WOOD PELLET FUEL
They appear no thicker than the eraser on the end of a pencil. People who see them for the first time think they look like rabbit food; however, there is nothing small about the heat or flavor in barbecue wood pellet fuel. These clean-burning barbecue wood pellets generate about 8200 BTU's per pound with very little ash, a low moisture content (5-7%), and are carbon neutral.
Barbecue wood pellets are produced by pure raw material (sawdust) being pulverized with a hammer-mill, and the material is pushed through a die with pressure. As the pellet is forced through the die, it is cut, cooled, screened, vacuumed, and then bagged for consumer use. Check with your local dealer for flavors available in your area.
HICKORY BLEND

Rich with a smoky bacon-like flavor. Highly recommended for roasts and smoking your favorite meats.
PECAN BLEND

Smoky, bacon-like flavor. Similar to Hickory, but less strong.
MESQUITE BLEND
Strong aroma with a tangy and spicy flavor. The perfect level of bold taste to compliment your Tex-Mex cuisine.
APPLE BLEND

Smoky with a mild sweetness flavor. Highly recommended for baking and pork.
CHERRY BLEND

Slightly sweet with a hint of tart. Gives your light meats a rosy tint that is incomparable in appearance and taste.
WHISKEY BARREL BLEND

Sweet and smoky with an aromatic tang. A premium blend of oak, and perfect for all your red meats.
COMPETITION BLEND

An ideal blend of sweet, savory and tart. A combination of maple, hickory and cherry – perfectly versatile for all your cooking needs. Used by many professional grillers.
NOTE: Always store wood pellets in a dry area. Avoid any contact or exposure to moisture will result in lower heat output or cause the pellets to swell and break apart. Use a moisture proof, resealable tub or bucket for proper storage.
COOKING GUIDELINES
Smoking and grilling styles of cooking can give you different results based on time and temperature. For best results, keep a record of what you cooked, at what temperature, how long you cooked for, and the results. Adjust to your taste for the next time. Practice makes perfect. The culinary art of hot smoking refers to longer cooking times, but results in more natural wood flavor (and a sought-after Pink Ring) on your meats. Higher temperatures result in a shorter cooking time, locking in less smoke flavor.
TIP: For best results, allow time for meats to rest after cooking. This allows the natural juices to migrate back into the meat fiber, giving a much juicer, flavorful cut. Resting times can be as little as 3 minutes and up to 60 minutes, depending on the size of the protein.
| COOKING STYLE | HOT SMOKING(Very Low) | ROAST(Low) | BAKING(Medium) | GRILL(Medium/High) |
| Temperature Range | 93-135°C / 200-275°F | 135-162°C / 275-325°F | 162-190°C / 325-375°F | 204-232°C / 400-450°F |
| APPROXIMATE COOKING TIME | ||||
| BEEF | Size Rare - 54°C / 130°F | Medium - 60°C / 140°F Well Done - 65°C / 150°F | ||
| Rib-eye Roast, boneless | 2.26 - 2.72 kg / 5 - 6 lbs. 1 12 - 2 hours | |||
| Rib Roast 5.44 - 6.35 kg / 12 - 14 lbs. 2 12 - 2 34 hours | ||||
| Sausage (fresh) | All sizes 4 - 5 hours | |||
| Roast (bone-in) | All sizes 4- 5 Hours | |||
| Ribs All sizes Cook until meat pulls from the bone (approx 4 - 6 hours) | ||||
| Brisket | 7.25 - 3.62 kg / 16 -18 lbs. | Cook until internal temperature reaches 91°C / 195°F | ||
| PORK | Size | Reheat - 60°C / 140°F | Medium - 66°C / 150°F | Well Done - 71°C / 160°F |
| Ham (cooked) | All sizes | 2 - 2 34 hours | ||
| Ham (fresh) | 4.53-5.44 kg / 10-12 lbs. | 7 - 8 hours | ||
| Sausage (fresh) | All sizes 4 - 5 hours | |||
| Loin Roast | 1.36-1.81 kg / 3 - 4 lbs. | 1 - 2 hours | 2 - 3 hours | |
| Rib Crown Roast | 1.81-2.26 kg / 4 - 5 lbs. | 1 12 - 2 hours | 2 - 3 hours | |
| Boston Butt(Pork Shoulder) | 3.62-4.53 kg / 8-10 lbs. | 93 - 98°C / 200 - 210°FInternal Temperature | ||
| Ribs | All sizes | Cook until meat pulls from the bone (approx 4 - 6 hours) | ||
| Chop (loin, rib) | All sizes Cook until meat | pulls from the bone (approx 4 - 6 hours) | ||
| LAMB | Size | Rare - 54°C / 130°F | Medium - 60°C / 140°F | Well Done - 71°C / 160°F |
| Roast (fresh) | 2.26 - 2.72 kg / 5 - 6 lbs. | 6 -6 Hours |
| POULTRY | Size | Rare - 54°C / 130°F | Medium - 60°C / 140°F | Well Done - 82°C / 180°F |
| Turkey (whole) | 4.53-5.44 kg / 10-12 lbs. | 7 - 8 Hours | ||
| Chicken (whole) | All sizes | 5 -6 Hours | ||
| Drumsticks, Breasts | All sizes | 4 -5 Hours | ||
| Small Game Birds | All sizes | 4 -5 Hours | ||
| Duck | 1.36-2.26 kg / 3-5 lbs. | 5 -6 Hours |
| FISH | Size | Rare - 54°C / 130°F | Medium - 60°C / 140°F | Well Done - 82°C / 180°F |
| Whole | All sizes | 2 -3 Hours, until flaky | ||
| Filets | All sizes | 1 -2 Hours, until flaky |
| WILD GAME | Size | Rare - 60°C / 140°F | Medium - 71°C / 160°F | Well Done - 77°C / 170°F |
| Roast (fresh) | 2.26 - 2.72 kg / 5 - 6 lbs. | 5 -6 Hours | ||
| Large Cuts (fresh) | 3.62-4.53 kg / 8-10 lbs. | 7 - 8 Hours |
TIPS & TECHNIQUES
Follow these helpful tips and techniques, passed on from Louisiana Grills ^® owners, our staff, and customers just like you, to become more familiar with your smoker:
1. FOOD SAFETY
- Keep everything in the kitchen and cooking area clean. Use different platters and utensils for the cooked meat than the ones you used to prepare or transport the raw meat out to the smoker. This will prevent cross contamination of bacteria. Each marinade or basting sauce should have its own utensil.
- Keep hot foods hot (above 60^ / 140^ ), and keep cold foods cold (below 3^ / 37^ ).
- A marinade should never be saved to use at a later time. If you are going to use it to serve with your meat, be sure to bring it to a boil before serving.
- Cooked foods should not be left out in the heat for more than an hour. Do not leave hot foods out of refrigeration for more than two hours.
- Defrost and marinade meats by refrigeration. Do not thaw meat at room temperature or on a counter top. Bacteria can grow and multiply rapidly in warm, moist foods. Wash hands thoroughly with hot, soapy water before starting any meal preparation and after handling fresh meat, fish and poultry.
2. COOKING PREPARATION
- When switching from a high temperature to a low temperature, open the cabinet door and leave it open until the actual temperature is close to your desired temperature. This speeds up the process and ensures the fire will not go out.
- Be prepared, or Mise en Place. This refers to preparing the cooking recipe, fuel, accessories, utensils, and all ingredients you require at your side before you start cooking. Also, read the entire recipe, start to finish, before lighting the smoker.
- A BBQ floor mat is very useful. Due to food handling accidents and cooking splatter, a BBQ floor mat would protect a deck, patio, or stone platform from the possibility of grease stains or accidental spills.
3. SMOKING TIPS AND TECHNIQUES
- To infuse more smoke flavor into your meats, cook longer and at lower temperatures (also known as low and slow). Meat will close its fibers after it reaches an internal temperature of 49°C / 120°F. Misting, or mopping, are great ways to keep meat from drying out.
- Always use a meat thermometer to determine the internal temperature of the foods you are cooking. Smoking foods with hardwood pellets will turn meats and poultry pink. The band of pink (after cooking) is referred to as a smoke ring and is highly prized by outdoor chefs.
- Sugar-based sauces are best applied near the end of cooking to prevent burning and flare-ups.
- Leave open space between the foods and the extremities of the smoke cabinet for proper heat flow. Food on a crowded smoker will require more cooking time.
- Use a set of long-handled tongs for turning meats, and a spatula for softer items like fish and cheese. Using a piercing utensil, such as a fork, will prick the meat and allow the juices to escape.
- Foods in deep casserole dishes will require more time to cook than a shallow baking pan.
It's a good idea to put cooked food onto a heated platter, keeping the food warm. Red meats, such as tenderloins and roasts, benefit from resting for several minutes before serving. It allows the juices that were driven to the surface by heat to ease back to the center of the meat, adding more flavor.
TROUBLESHOOTING
Proper cleaning, maintenance and the use of clean, dry, quality fuel will prevent common operational problems. When your Louisiana Grills ^® smoker is operating poorly, or on a less frequent basis, the following troubleshooting tips may be helpful. For FAQ, please visit www.louisiana-grills.com. You may also contact Louisiana Grills ^® Customer Service for assistance.
WARNING: Always disconnect the electrical cord prior to opening the smoker for any inspection, cleaning, maintenance or service work. Ensure the smoker is completely cooled to avoid injury.
| Problem Cause SOLUTION | ||
| No Power Lights On The Control Board | Power Button Press the | Power Button. Try another attempt and hold for two seconds to verify connection. |
| Not Connected To Power Source, GFCI Outlet Has Tripped | Ensure smoker is plugged into a working power source. Reset breaker. Ensure GFCI is a minimum 10 Amp service (seeElectric Wire Diagramfor access to electric components). Ensure all wire connections are firmly connected and dry. | |
| Fuse Blown On The Control Board | Remove cooking components from the main smoke cabinet. Turn the unit onto its side, and remove the screws on the rear side of the Control Board. Check the fuse for a broken wire or if the transparent fuse tubing has turned black. If yes, manually replace with a new fuse. | |
| Faulty Control Board Control Board needs to be replaced. Contact Customer Service for a replacement part. | ||
| Fire In Burn Pot Will Not Light | Auger Not Primed Before | the unit is used for the first time or anytime the hopper is completely emptied out, the auger must be primed to allow pellets to fill the burn pot. If not primed, the igniter will timeout before the pellets ignite. FollowHopper Priming Procedure. |
| Auger Motor Is Jammed | Remove cooking components from the main smoke cabinet. Press the Power Button to turn the unit on, turn Temperature Control Dial to SMOKE, and inspect the auger feed system. Visually confirm that the auger is dropping pellets into the burn pot. If not operating properly, call Customer Service for assistance or a replacement part. | |
| Igniter Failure Remove | cooking components from the main smoke cabinet. Press the Power Button to turn the unit on, turn Temperature Control Dial to SMOKE, and inspect the igniter. Visually confirm that the igniter is working by placing your hand above the burn pot and feeling for heat. Visually confirm that the igniter is protruding approximately 13mm / 0.5 inches in the burn pot. If not operating properly, followManual Start-up Procedureto continue use of smoker; however, call Customer Service for assistance or a replacement part. | |
| Flashing Dots On LCD Screen | The Igniter Is On This is | not an error that effects the unit. Used to show that the unit has power and is in Start-Up mode (igniter is on). The igniter will turn off after five minutes. Once the flashing dots disappear, the unit will begin to adjust to the desired temperature selected. |
| Flashing Temperature On LCD Screen | Unit Temperature Is Below 65°C /150°F | This is not an error that effects the unit; however, it is used to show that there is some risk that the fire could go out. Check hopper for sufficient fuel or if there is an obstruction in the feed system. Remove pellets and followCare and Maintenanceinstructions. Check Grill Probe and followCare and Maintenanceinstructions if dirty. Check burn pot for ash build-up or obstructions, and followCare and Maintenanceinstructions for ash build-up. Check fan. Ensure it is working properly and air intake is not blocked. FollowCare and Maintenanceinstructions if dirty. Check auger motor to confirm operation (rotation), and ensure there is no blockage in the auger tube. |
| "ErH" Error Code The | Smoker Has Overheated, Possibly Due To Grease Fire Or Excess Fuel. | Press and hold the Power Button for two seconds to turn the unit off, and allow smoker to cool. FollowCare and Maintenanceinstructions. After maintenance, remove pellets, and confirm positioning of all component parts. Once cooled, press the Power Button to turn the unit on, then select desired temperature. If error code still displayed, contact Customer Service. |
| "Er1" Error Code Grill | Probe Wire Not Making Connection | Access the electrical components on the base of the unit (seeElectric Wire Diagram) and check for any damage to the Grill Probe wires. Ensure the Grill Probe connectors are firmly connected, and connected correctly, to the Control Board. |
| "noP" Error Code Bad | Connection At Connection Port | Disconnect meat probe from connection port on the Control Board, and reconnect. Ensure the meat probe adapter is firmly connected. Check for signs of damage to the adapter end. If still failed, call Customer Service for replacement part. |
| Meat Probe Damaged | Check for signs of damage to the wires of the meat probe. If damaged, call Customer Service for replacement part. | |
| Faulty Control Board | Control Board needs to be replaced. Contact Customer Service for a replacement part. | |
| Smoker Will Not Achieve Or Maintain Stable Temperature | Insufficient Air Flow Through Burn Pot | Check burn pot for ash build-up or obstructions. FollowCare and Maintenanceinstructions for ash build-up. Check fan. Ensure it is working properly and air intake is not blocked.FollowCare and Maintenanceinstructions if dirty. Check auger motor to confirm operation, and ensure there is no blockage in the auger tube. Once all the above steps have been done, start the smoker, set temperature to SMOKE and wait for 10 minutes. Check that the flame produced is bright and vibrant. |
| Lack Of Fuel, Poor Fuel Quality, Obstruction In Feed System | Check hopper to check that fuel level is sufficient, and replenish if low. Should the quality of wood pellets be poor, or the length of the pellets too long, this may cause an obstruction in the feed system. Remove pellets and followCare and Maintenanceinstructions. | |
| Grill Probe Check status | of Grill Probe. FollowCare and Maintenanceinstructions if dirty. Contact Customer Service for a replacement part if damaged. | |
| Smoker Produces Excess Or Discolored Smoke | Grease Build-Up Follow | Care and Maintenanceinstructions. |
| Wood Pellet Quality Remove moist wood pellets from hopper. Followclean out. Replace with dry wood pellets. | Care and Maintenanceinstructions to Hopper Priming Procedure. | |
| Burn Pot Is Blocked Clearburn pot of moist wood pellets. Follow | ||
| Insufficient Air Intake For Fan | Check fan. Ensure it is working properly and air intake is not blocked. FollowCare and Maintenanceinstructions if dirty. | |
| Frequent Flare-Ups | Cooking Temperature At | tempt cooking at a lower temperature. Grease does have a flash point. Keep the temperature under 176°C / 350°F when cooking highly greasy food. |
| Grease Build-Up On Cooking Components | FollowCare and Maintenanceinstructions. | |
ELECTRICAL WIRE DIAGRAM
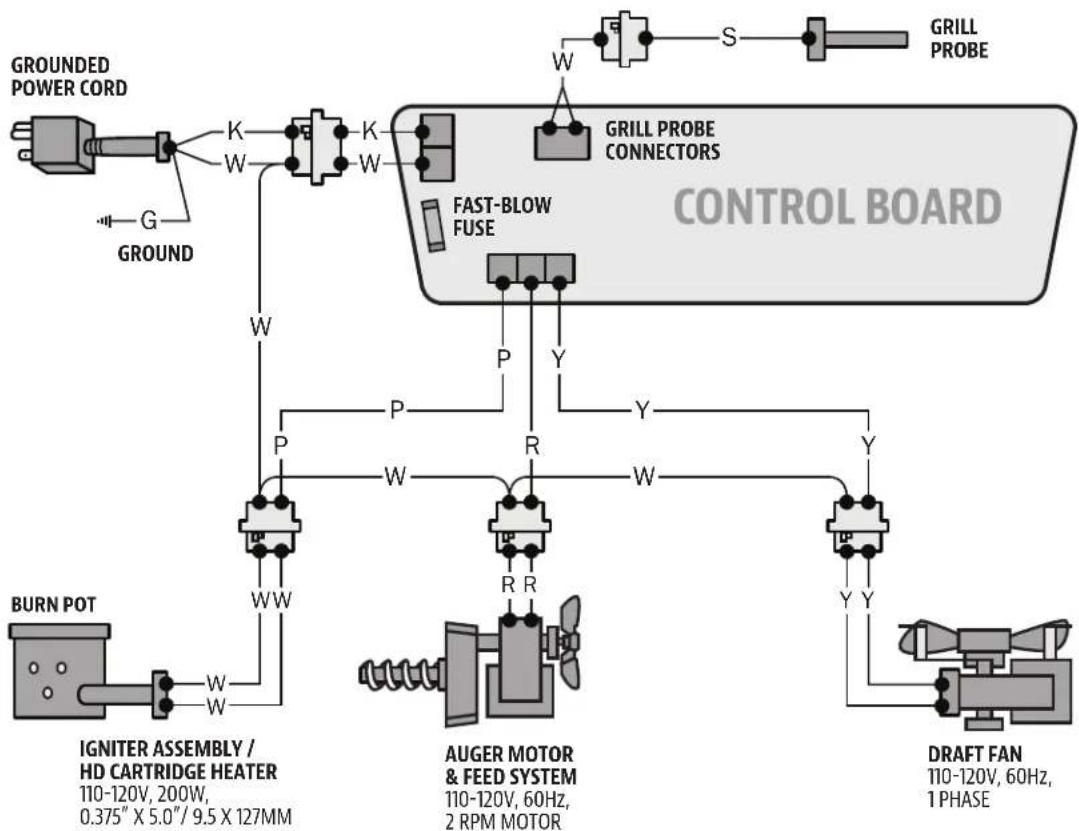
The Control Board system is an intricate and valuable piece of technology. For protection from power surges and electrical shorts, consult the wire diagram below to ensure your power source is sufficient for the operation of the unit.
LG - ELECTRIC REQUIREMENTS
110-120V, 60Hz, 250W, 3-PRONG GROUNDED PLUG
NOTE: Electrical components, passed by product safety testing and certification services, comply with a testing tolerance of ± 5-10 percent.
1 DISCONNECT POWER SUPPLY BEFORE SERVICE OR MAINTENANCE.

② REMOVE TWO GREASE TRAY BRACKETS FROM UNDERSIDE OF UNIT.
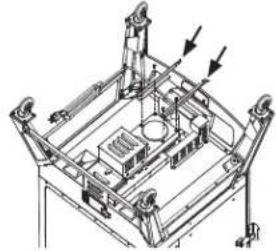
natural_image
Technical line drawing of a mechanical assembly with no visible text or symbols3 REMOVE WIRE COMPONENTS HOUSING FROM UNDERSIDE OF UNIT.
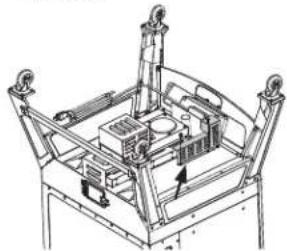
natural_image
Technical line drawing of a mechanical assembly with no visible text or symbols4 ACCESS WIRING COMPONENTS LOCATED IN GRILL PROBE HOUSING.
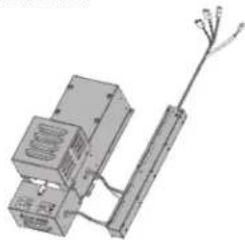
natural_image
Technical illustration of a mechanical or electrical component with wires and connectors (no visible text or symbols)FUEL INPUT RATING:
1.1 KG/H
(2.4 LB/H)
INDEX
W:WHITE
Y: YELLOW
P : PURPLE
R:RED
K:BLACK
S: SILVER
flowchart
graph TD
    A["GROUNDED POWER CORD"] --> B["GROUND"]
    B --> C["K"]
    B --> D["W"]
    C --> E["K"]
    D --> F["W"]
    E --> G["FAST-BLOW FUSE"]
    F --> G
    G --> H["P"]
    H --> I["R"]
    I --> J["Y"]
    J --> K["W"]
    K --> L["Y"]
    L --> M["DRIFT FAN 110-120V, 60Hz, 1 PHASE"]
    M --> N["AUGER MOTOR & FEED SYSTEM 110-120V, 60Hz, 2 RPM MOTOR"]
    N --> O["IGNITER ASSEMBLY / HD CARTRIDGE HEATER 110-120V, 200W, 0.375" X 5.0"/9.5 X 127MM"]
    O --> P["BURN POT"]
    P --> Q["W"]
    Q --> R["Ground"]
    S["GRILL PROBE CONNECTORS"] --> T["S"]
    U["GRILL PROBE"] --> V["W"]
    W["CONTROL BOARD"] --> X["P"]
    X --> Y["Y"]
    Y --> Z["W"]
    Z --> AA["Y"]
    AA --> AB["DRIFT FAN 110-120V, 60Hz, 1 PHASE"]
REPLACEMENT PARTS
| Part# | Description |
| 1-A Cooking Grids (x6) | |
| 2-A Cooking Grid Support Brackets (x14) | |
| 3-A Chimney Cap (x1) | |
| 4-A Chimney Stack (x1) | |
| 5-A Back Handle (x1) | |
| 6-A Lid Stopper (x1) | |
| 7-A Main Cabinet (x1) | |
| 8-A Cabinet Door Handle (x1) | |
| 9-A Cabinet Door Latch Hook (x2) | |
| 10-A Cabinet Door Latch (x2) | |
| 11-A Power Cord Bracket (x1) | |
| 12-A Support Panel (x2) | |
| 13-A Support Bar (x1) | |
| 14-A Water Pan (x1) | |
| 15-A Flame Tamer (x1) | |
| 16-A Support Leg With Wheel (x4) | |
| 17-A Grease Tray (x1) | |
| 18-A Grease Tray Brackets (x2) | |
| 19-A Wire Components Housing (x1) | |
| 20-A Grease Exhaust Tube (x1) | |
| 21-A Heat Shield (x1) | |
| 22-A Meat Probe (x2) | |
| 23-A Door Knob (x1) | |
| 24-A 1⁄4-20x 12 " Stainless Steel Screw (x12) | |
| 25-A 1⁄4-20x 58 " Stainless Steel Screw (x4) | |
| 26-A #10-24x 12 " Screw (x12) | |
| 27-A #10-24x 12 " Stainless Steel Screw (x28) | |
| 28-A #10-24x 13 " Screw (x2) | |
NOTE: Due to ongoing product development, parts are subject to change without notice.
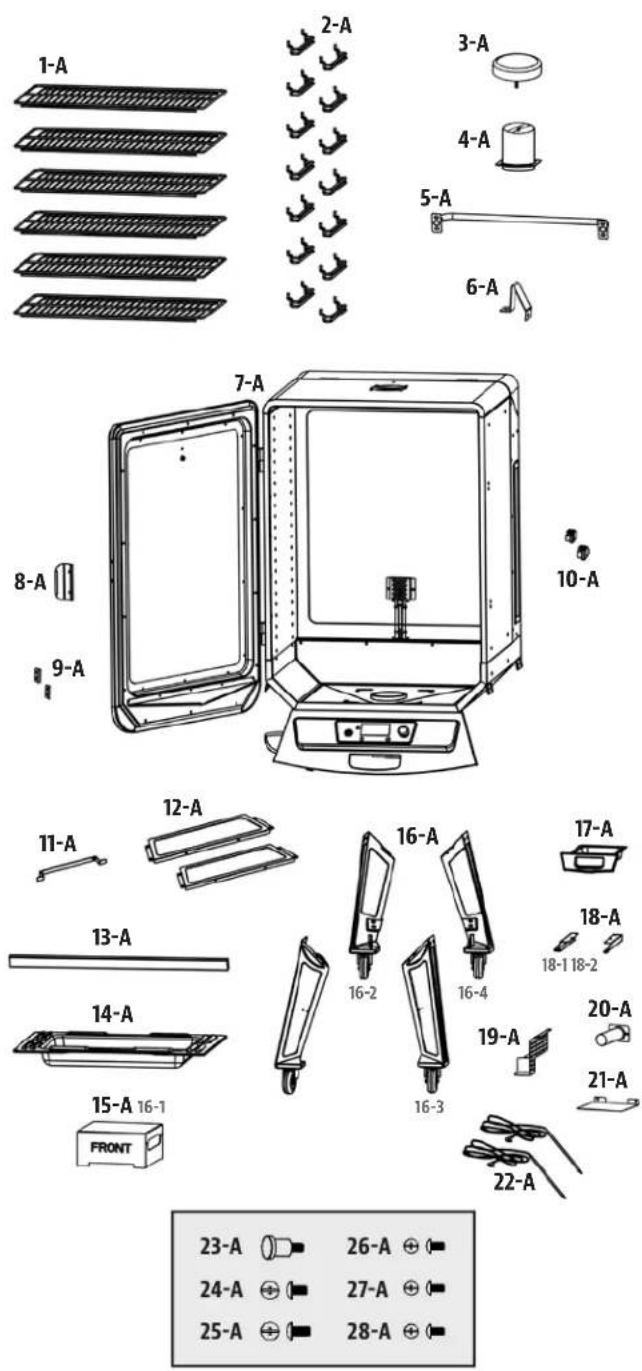
text_image
1-A 2-A 3-A 4-A 5-A 6-A 7-A 8-A 9-A 10-A 11-A 12-A 13-A 14-A 15-A 16-1 FRONT 16-2 16-4 16-3 17-A 18-A 18-1 18-2 19-A 20-A 21-A 22-A 23-A 26-A ⊕ 24-A ⊕ 27-A ⊕ 25-A ⊕ 28-A ⊕ELECTRICAL REPLACEMENT PARTS
| Part# | Description |
| 1-PVH | Burn Pot |
| 2-PVH | Igniter |
| 3-PVH | Auger Box Housing |
| 4-PVH | Auger Flighting Assembly |
| 5-PVH | Auger Motor Left Bracket |
| 6-PVH | Auger Motor |
| 7-PVH | Auger Motor Right Bracket |
| 8-PVH | Auger Motor Housing |
| 9-PVH | Combustion Fan Housing |
| 10-PVH | Combustion Fan |
| 11-PVH | Grill Probe Housing |
| 12-PVH | Control Board |
| 13-PVH | Grill Probe |
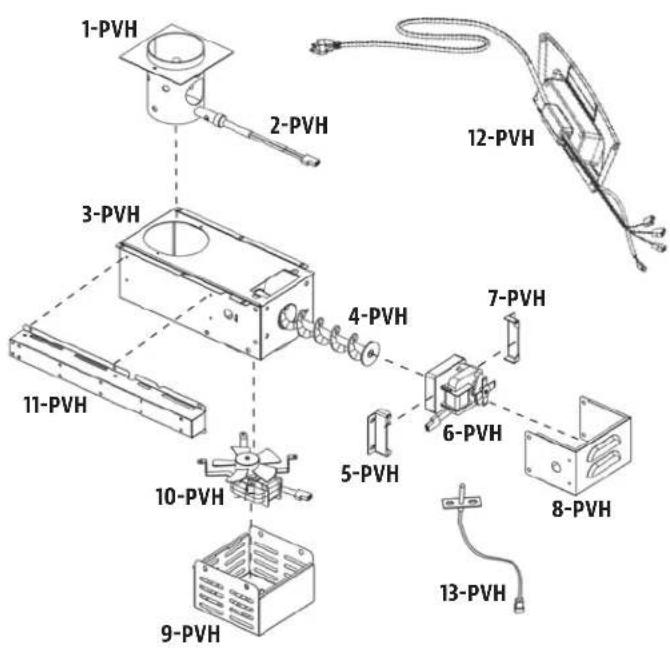
text_image
1-PVH 2-PVH 12-PVH 3-PVH 4-PVH 7-PVH 6-PVH 8-PVH 5-PVH 10-PVH 9-PVH 13-PVHWARRANTY
CONDITIONS
All wood pellet smokers by Louisiana Grills ^® , manufactured by Dansons, carry a limited warranty from the date of sale by the original owner. The warranty coverage begins on the original date of purchase and proof of date of purchase, or copy of original bill of sale, is required to validate the warranty. Customers will be subject to parts, shipping, and handling fees if unable to provide proof of the purchase or after the warranty has expired.
Dansons carries a five (5) year warranty against defects and workmanship on all parts, and five (5) years on electrical components. Dansons warrants that all part(s) are free of defects in material and workmanship, for the length of use and ownership of the original purchaser. Warranty does not cover damage from wear and tear, such as scratches, dents, dings, chips or minor cosmetic cracks. These aesthetic changes of the smoker do not affect its performance. Repair or replacement of any part does not extend past the limited warranty beyond the limited warranty.
During the term of the warranty, Dansons' obligation shall be limited to furnishing a replacement for defective and/or failed components. As long as it is within the warranty period, Dansons' will not charge for repair or replacement for parts returned, freight prepaid, if the part(s) are found by Dansons' to be defective upon examination. Dansons' shall not be liable for transportation charges, labor costs, or export duties. Except as provided in these conditions of warranty, repair or replacement of parts in the manner and for the period of time mentioned heretofore shall constitute the fulfillment of all direct and derivate liabilities and obligations from Dansons to you.
Dansons takes every precaution to utilize materials that retard rust. Even with these safeguards, the protective coatings can be compromised by various substances and conditions beyond Dansons' control. High temperatures, excessive humidity, chlorine, industrial fumes, fertilizers, lawn pesticides and salt are some of the substances that can affect metal coatings. For these reasons, the warranty does not cover rust or oxidization, unless there is loss of structural integrity on the smoker component. Should any of the above occur, kindly refer to the care and maintenance section to prolong the lifespan of your unit. Dansons recommends the use of a cover when the smoker is not in use.
This warranty is based on normal domestic use and service of the smoker and neither limited warranty coverage's apply for a smoker which is used in commercial applications.
AUSTRALIA: Our goods come with guarantees that cannot be excluded under the Australian Consumer Law. You are entitled to a replacement or refund for a major failure and for compensation for any other reasonably foreseeable loss or damage. You are also entitled to have the goods repaired or replaced if the goods fail to be of acceptable quality and the failure does not amount to a major failure.
EXCEPTIONS
There is no written or implied performance warranty on Louisiana Grills ^® smokers, as the manufacturer has no control over the installation, operation, cleaning, maintenance or the type of fuel burned. This warranty will not apply nor will Dansons assume responsibility if your appliance has not been installed, operated, cleaned and maintained in strict accordance with this owner's manual. Any use of gas not outlined in this manual may void the warranty. The warranty does not cover damage or breakage due to misuse, improper handling or modifications.
Neither Dansons, or authorized Louisiana Grills ^® dealer, accepts responsibility, legal or otherwise, for the incidental or consequential damage to the property or persons resulting from the use of this product. Whether a claim is made against Dansons based on the breach of this warranty or any other type of warranty expressed or implied by law, the manufacturer shall in no event be liable for any special, indirect, consequential or other damages of any nature whatsoever in excess of the original purchase of this product. All warranties by manufacturer are set forth herein and no claim shall be made against manufacturer on any warranty or representation.
Some states do not allow the exclusion or limitation of incidental or consequential damages, or limitations of implied warranties, so the limitations or exclusions set forth in this limited warranty may not apply to you. This limited warranty gives you specific legal rights and you may have other rights, which vary from state to state.
ORDERING REPLACEMENT PARTS
To order replacement parts, please contact your local Louisiana Grills® dealer or visit our online store at: www.louisiana-grills.com
CONTACT CUSTOMER SERVICE
If you have any questions or problems, contact Customer Service.
www.louisiana-grills.com | USA: (480) 923-9632 | canada (Toll Free): 1-877-942-2246
WARRANTY SERVICE
Contact your nearest Louisiana Grills ^® dealer for repair or replacement parts. Dansons requires proof of purchase to establish a warranty claim; therefore, retain your original sales receipt or invoice for future reference. The serial and model number of your Louisiana Grills ^® can be found on the back of the unit. Record numbers below as the label may become worn or illegible.
MODEL SERIAL NUMBER
DATE OF PURCHASE AUTHORIZED DEALER
ACCESSORIES SOLD SEPARATELY
Available for purchase separately by visiting our online store at: www.louisiana-grills.com
| ITEM DESCRIPTION ITEM DESCRIPTION | |
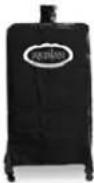 | COVERForm-fitting, full length cover. Heavy-duty polyester with PVC backing for long-term use. Weatherproof. Includes draw-string lock for easy tightening. |
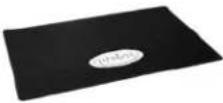 | BARBECUE FLOOR MATEasy clean, UV protected. Protection for your deck. 132cm x 86cm / 52" x 34" |
 | SIGNATURE SPICESA collection of gourmet seasonings to prepare and enhance the natural flavors of your food. |
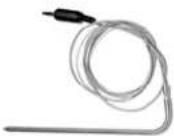 | MEAT PROBEStainless steel meat thermometer with adapter. When connected, the temperature of food is displayed by the control board. |
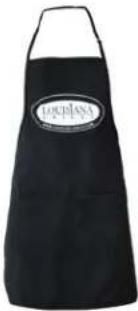 | GRILLING APRONAdjustable apron with double front pockets for grilling tools. One size. Machine washable. |
 | SIGNATURE SAUCESA collection of gourmet sauces to prepare and enhance the natural flavors of your food. |
RECIPES
SMOKED HALIBUT
Makes 4 Servings
Suggested Wood Pellet Flavor: Hickory / Cherry / Mesquite
Ingredients:
900g / 2 lbs Halibut Filets
125 ml / ½ c. Butter
15 ml / 1 tbsp Fresh Dill
Instructions:
-
Wash filet thoroughly in cold water and lay on paper towel until water is not visible.
-
Melt a whole stick of butter and sprinkle a liberal amount of fresh dill in the melted butter. Lay filets on aluminum foil and fold a lip around edges to contain the butter. With a basting brush, brush melted butter and dill mixture on both sides of the fish filet.
3. Preheat smoker, then adjust to 107^ C / 225^ F.
-
Place fish in the smoker. Check the filets every 15 minutes for visible moist look on filets. Brush with butter and dill mix when needed. Fish should start to flake in about 45 minutes.
-
When fish flakes very easily, take out of smoker and serve.
SMOKED CORNISH HENS
Makes 4 Servings
Suggested Wood Pellet Flavor: Mesquite / Hickory / Competition
Ingredients:
4 whole Cornish Game Hens
750 ml/ 3 c. Mandarin Rice
15 ml / 1 tbsp Olive Oil
5 ml / 1 tsp Smoked Paprika
250 ml / 1 c. Orange Marmalade
Instructions:
- Preheat smoker, then adjust to 135-177°C / 275-350°F.
- Rinse Cornish hens and pat dry with paper towel. Brush Cornish hens lightly with olive oil, and sprinkle with paprika.
- Place Cornish hens in smoker. Smoke for 45 to 60 minutes, until the drumstick meat is tender when pressed.
- Baste with orange marmalade during last 20 minutes of cooking time. Remove from smoker and arrange on serving platter.
How-to make: CHICKEN GRAVY
If you want to catch the drippings to make gravy, place the turkey on a rack inside a large aluminum foil roast pan. Add 0.6 cm / ¼" of water or broth and some seasoning into the bottom of the pan. Monitor the juices, as you may need to add more during the cooking period.
SMOKED BEEF BRISKET
Makes 4 - 6 Servings
Suggested Wood Pellet Flavor: Hickory / Competition
A whole beef brisket weighs 7.25-3.62 kg / 16-18 pounds and has three separate parts: the cap, the point, and the flat. Use the flat section, as it is lean, compact, and creates nice slices when carved.
Ingredients:
1 Beef Brisket
2.2-3.6 kg / 5-8 lbs,
Layer of fat is at least 0.6 cm / ¼" thick
1 bottle Prepared Yellow Mustard
75 ml / 5 tbsp Seasoning
1 bottle Chili Sauce
1 pack Dry Onion Soup Mix
375 ml / 1½ c. Beef Broth
40 ml / 8 tsp Black Pepper
Instructions:
3. Preheat smoker, then reduce to 82-107°C / 180-225°F.
- Lay out a large piece of plastic wrap on your working station. Large enough to encase the brisket. Using a sharp knife, cut a single cut on the underside of the brisket against the grain. This will aid in slicing the finished brisket, against the grain which results in a tender, melt-in-your-mouth cut. The underside is the non-fat cap side. Slather on a generous amount of prepared mustard. Rub lightly onto the entire area. Sprinkle a generous amount of seasoning onto the mustard, then again light rub into the meat. Flip the brisket over and repeat the process. Wrap the prepared brisket in the plastic wrap and refrigerate 2 to 4 hours, or overnight.
- Prepare the basting mixture. Mix the chili sauce, dry onion soup mix, beef broth, and black pepper. Set aside.
- Place the brisket, fat side up, in the center of the smoker. Close the cabinet door. Hot smoke until tender, about 10 to 12 hours. Baste the brisket with the basting mixture every half hour for the first 3 hours.
- Continue the slow smoking process until the internal temperature reaches 60-66°C / 140-150°F. Remove from smoker. Turn smoker up to 176°C / 350°F.
- Place the brisket into a pouch of double-layered aluminum foil. Pour 50 ml / ¼ cup of basting mixture over the brisket in the pouch. Close the pouch shut.
- Lay foil pouch carefully on the smoker. Steam for 1 to 1½ hours.
- Open the pouch, and use a meat thermometer; internal temperature should reach 91^ C / 195^ F. The brisket should be firm but be able to pull the meat apart with your fingers.
- Transfer the meat to a cutting board, and let it rest for 10 minutes. Thinly slice across the grain to serve.
SMOKED PRIME RIB ROAST
Makes 6 - 8 Servings
Suggested Wood Pellet Flavor: Hickory / Pecan / Competition
Ingredients:
2 lbs Beef Prime Rib Roast
0.9 kg / 2 lbs
10 cloves Garlic (minced)
45 ml / 2 tbsp Seasoning
10 ml / 2 tsp Salt
10 ml / 2 tsp Pepper
Instructions:
-
Preheat smoker, then adjust to 135^ C / 275^ F.
-
With the fat-side of the meat facing up, tie one end of string or twine firmly around one side of the roast. Continue to loop and tie the rest of the roast, making an attractive presentation.
- Thoroughly wash the roast and pat dry with paper towel.
- Liberally, season the entire roast with garlic, salt, pepper, and seasoning. Let the roast sit for 10 minutes so seasoning adheres.
- Place roast in smoker. Smoke for 45 to 60 minutes, until the internal temperature has reached 51^ C / 125^ F. Use a meat probe to best monitor the middle of the roast.
- Carefully, remove roast from smoker and cover with foil. The meat will continue to rise by another 3^ C / 5^ F to a final product of 54^ C / 125^ F to a perfect medium rare. Let the meat rest for 10 minutes before slicing.
SMOKED RIBS
Makes 4 - 6 Servings
Suggested Wood Pellet Flavor: Hickory / Apple / Competition
Ingredients:
1.3-1.8 kg / 3-4 lbs Ribs
Meaty pork spare ribs / loin back ribs
5 ml / 1 tsp Salt
5 ml / 1 tsp Pepper
Instructions:
-
Preheat smoker, then reduce to 82-107°C / 180-225°F.
-
Take ribs out of wrapper and drain all liquid off of the ribs and then wash in cold water.
- Place on cutting board and cut away any excess fat or skin from the bottom of ribs. Turn ribs with bone side up. Prepare ribs by peeling off the tough layer of skin (membrane) on the back side. Season the ribs with salt and pepper, to taste.
- Place rib bone side down in smoker.
- After one hour, turn the rib over with bone side up and cook for one hour. After 2 1/2 hours, depending on the color of the rib you like, pour a one inch wide strip of your favorite BBQ sauce down the length of the rib and wrap tightly in aluminum foil. Place back in smoker and check every 15 to 20 minutes to see if the rib bones separate by using your finger to pull them apart. If they
pull apart with ease your ribs are done; internal temperature of your ribs should be at 170^ F.
- Take out of smoker and let stand on serving platter until cool enough to eat.
Variation: MEMPHIS-DRY METHOD
Turn smoker up to maximum temperature (204°C / 400°F). Place ribs back on the smoker and season with a dry seasoning or rub for 5-8 minutes. Remove from smoker and serve.
SMOKED STUFFED PORK TENDERLOIN
Makes 4 - 8 Servings
Suggested Wood Pellet Flavor: Apple / Hickory / Cherry
Ingredients:
1 whole Pork Tenderloin
3.6 kg / 8 lbs
1 jar Salsa
15 ml / 1 tbsp Chili Powder
15 ml / 1 tbsp Brown Sugar
5 ml / 1 tsp Smoked Paprika
45 ml /3 tbsp Honey (warmed)
Pinch Ground Cinnamon
Instructions:
- Preheat smoker, then adjust to 107-135°C / 225-275°F.
- Remove the pork tenderloin from packaging, rinse with cold water and pat the exterior dry with paper towel.
- Place a piece of plastic wrap on a cutting board, then place the pork tenderloin on top and cut the meat 34 of the way through. Open the pork loin so it lays flat, and place a second piece of plastic wrap on top. Use a meat tenderizer or rolling pin to pound the meat until flattened.
- Arrange salsa down center of pork tenderloin. Fold in the sides and roll-up the pork tenderloin (like a cinnamon bun) carefully to distribute salsa evenly. Using twine, tie the pork tenderloin at both ends and the middle to secure.
- In a bowl, combine the chili powder, brown sugar, smoked paprika, and ground cinnamon. Mix well. Brush the pork tenderloin with the warmed honey. Sprinkle the mixture over the entire tenderloin.
- When the pork is fully coated, place inside the smoker. Smoke the tenderloin for 2 ½ to 3 hours, or until the internal temperature of pork has reached 62°C / 145°F.
- Take out of smoker, slice and serve immediately.
SMOKED CHICKEN
Makes 2 - 6 Servings
Suggested Wood Pellet Flavor: Hickory / Apple / Competition
Ingredients:
1 whole Chicken
1.8-2.7 kg / 4-6 lbs
45 ml /3 tbsp Seasoning or Rub
Instructions:
-
Preheat smoker, then adjust to 107-135°C / 225-275°F.
-
Take chicken parts out of package and wash thoroughly and place on paper towel to dry.
- Sprinkle seasoning or rub on both sides of chicken parts.
- Place chicken in smoker, breast side up. After 30 minutes, turn chicken over. With your meat probe, check the internal temperature by pushing Grill Probe into the meat nearest the bone. When internal temperature reaches 82^ C / 180^ F, the chicken is done.
TIP: You may brush your favorite BBQ sauce on the chicken during the last 15 minutes of your cooking process to heat it up.
- Using tongs, carefully remove the chicken from the smoker. Let rest for five minutes. Carve chicken and serve.
Variation: FLAVORED MARINADE IN WATER PAN
Use the same instructions as above, but substitute half the water in the water pan with a can of your favorite non-diet cola, fruit juice, or water with additional seasoning.
SMOKED SAUSAGE WITH MANGO CHUTNEY
Makes 4 - 6 Servings
Suggested Wood Pellet Flavor: Hickory / Apple / Competition
Ingredients:
0.9 kg / 2 lbs Italian Sausage (hot or mild)
2 whole Mangoes (finely chopped)
10 ml / 2 tsp Fresh Parsley (minced)
15 ml / 1 tbsp Red Pepper (diced)
10 ml / 2 tsp Honey
12 Red Onion (diced)
12 bulb Fennel (diced)
5 ml / 1 tsp Lime Juice
Pinch Salt
Instructions:
-
Preheat smoker, then reduce to 82-107°C / 180-225°F.
-
Place sausages on cooking grids, spaced evenly apart. Smoke for 25-30 minutes until cooked.
- Combine all remaining ingredients to make the chutney. Chill until ready to serve.
- Remove sausages from smoker. Slice sausage diagonally, then serve with side of chutney.
WHOLE SMOKED TURKEY
Feeds a small army - leftovers are great!
Suggested Wood Pellet Flavor: Hickory / Cherry / Competition
Ingredients:
1 whole Turkey (thawed)
9-11.3 kg / 20-25 lbs
60 ml /4 tbsp Seasoning or Rub
5 ml / 1 tsp Smoked Paprika
45 ml /3 tbsp Butter
Instructions:
-
Preheat smoker, then adjust to 135-177°C / 275-350°F.
-
Remove the turkey neck and giblets. Rinse turkey thoroughly and pat the exterior dry with paper towel.
- In a small bowl, mix butter, 14 of the seasoning and paprika together to form a paste. Gently insert your hand between the outer skin and the breast meat. Rub paste into the meat.
- With the remaining seasoning, rub the outer surface of the turkey.
- Place turkey, breast side up, in center of smoker, and smoke until turkey is tender and golden brown; internal temperature should reach 82^ C / 180^ F in the thickest part of the thigh and 77^ C / 170^ F in the breast.
- Remove turkey, cover with foil and let rest for 10 minutes before carving.
How-to make: TURKEY GRAVY
If you want to catch the drippings to make gravy, place the turkey on a rack inside a large aluminum foil roast pan. Add 0.6 cm / 14 " of water or broth and some seasoning into the bottom of the pan. Monitor the juices, as you may need to add more during the cooking period.
INFORMATIONS DE SÉCURITÉ
LES CAUSES MAJEURES DES INCENDIES D'APPAREILS SONT LE RÉSULTAT D'UN MAUVAIS ENTRETIEN ET D'UN DÉFAUT DE MAINTENIR LE DÉGAGEMENT REQUIS POUR LES MATÉRIAUX COMBUSTIBLES. IL EST D'UNE IMPORTANCE CRUCIALE QUE CE PRODUIT SOIT UTILISÉ SEULEMENT CONFORMÉMENT AUX INSTRUCTIONS SUIVANTES.
3411 North 5th Avenue, Suite 500, Phoenix, AZ, USA 85013
SERVICE CLIENTS
2 x Vis #10-24x ^1/2 " (#D)
Installation :
text_image
3 AVANT E 12 E E 12 E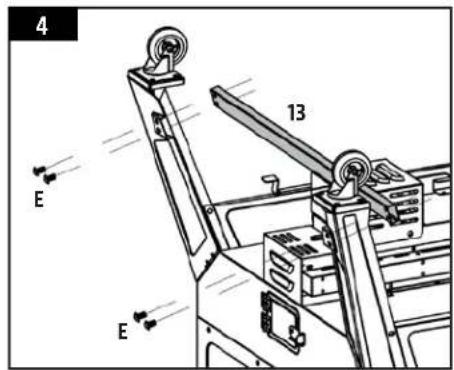
text_image
4 13 E E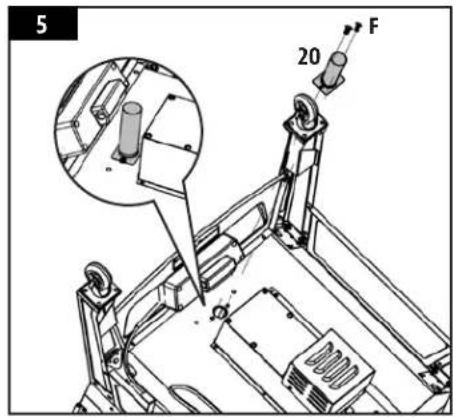
text_image
5 20 F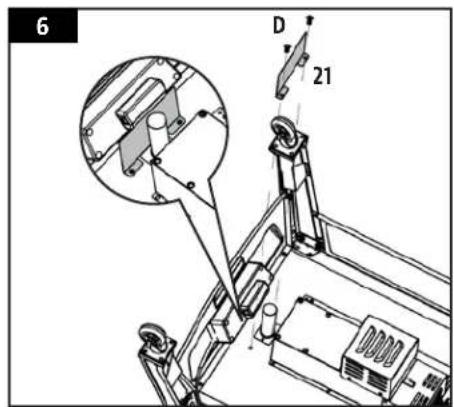
text_image
6 D 217. MONTAGE DU SUPPORT DU CORDON D'ALIMENTATION
natural_image
Mechanical assembly diagram showing a motor with wheels and a close-up view of the component (no text or symbols)natural_image
Technical line drawing of a mechanical assembly with no visible text or symbols4 ACCÉDEZ AUX COMPOSANTS DE CÂBLAGE SITUÉS DANS LE BOÎTIER DE LA SONDE DE TEMPRATURE.
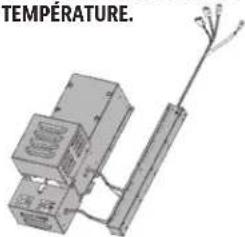
natural_image
Illustration of a temperature sensor module with wires and connectors (no text or symbols)INDICE DE
CONSOMMATION
DE CARBURANT:
1,1 KG/H
(2,4 LB/H)
INDICE
W: BLANC
Y:JAUNE
P: MAUVE
R: ROUGE
K: NOIR
S : ARGENT
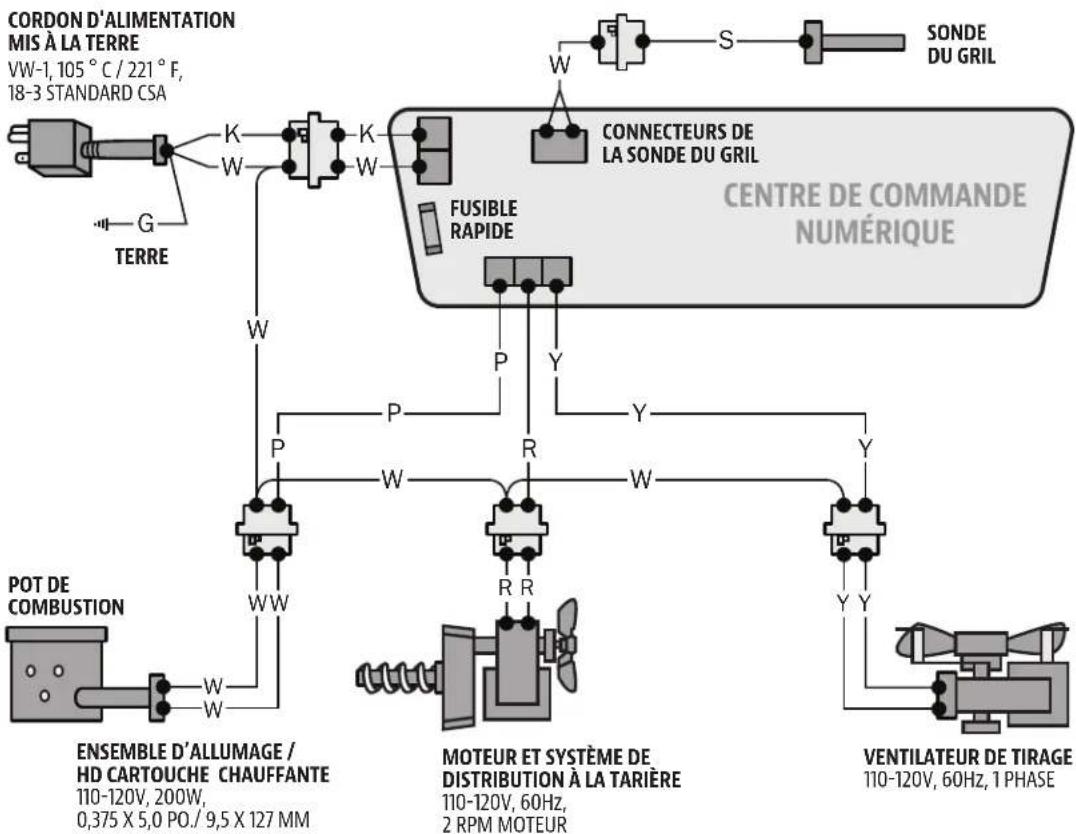
flowchart
graph TD
    A["CORDON D'ALIMENTATION MIS À LA TERRE"] --> B["VERIFIED CABLE"]
    B --> C["K"]
    B --> D["W"]
    B --> E["K"]
    B --> F["W"]
    B --> G["S"]
    G --> H["SONDE DU GRIL"]
    H --> I["CONNECTEURS DE LA SONDE DU GRIL"]
    I --> J["FUSIBLE RAPIDE"]
    J --> K["POT DE COMBUSTION"]
    K --> L["ENSEMBLE D'ALLUMAGE / HD CARTOUCHE CHAUFFANTE"]
    L --> M["110-120V, 200W, 0,375 X 5,0 PO./9,5 X 127 MM"]
    J --> N["MOTEUR ET SYSTÈME DE DISTRIBUTION À LA TARIÈRE"]
    N --> O["110-120V, 60Hz, 2 RPM MOTEUR"]
    J --> P["VENTILATEUR DE TIRAGE"]
    P --> Q["110-120V, 60Hz, 1 PHASE"]
PIÈCES DE RECHANGE
No. Description
text_image
1-A 2-A 3-A 4-A 5-A 6-A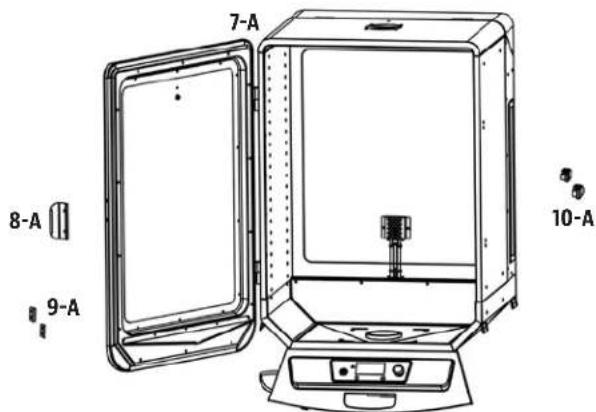
text_image
7-A 8-A 9-A 10-A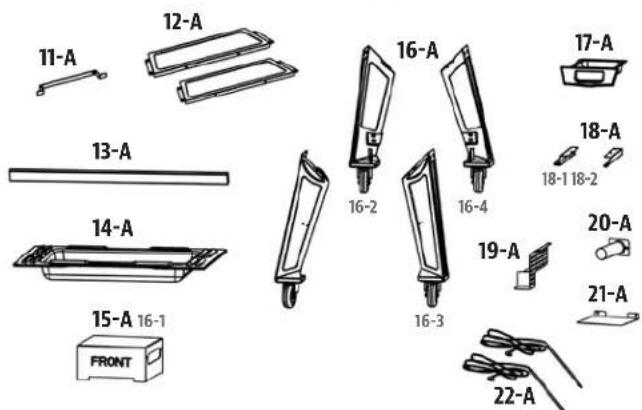
text_image
11-A 12-A 13-A 14-A 15-A 16-1 FRONT 16-A 16-2 16-3 16-4 16-A 17-A 18-A 18-1 18-2 19-A 20-A 21-A 22-A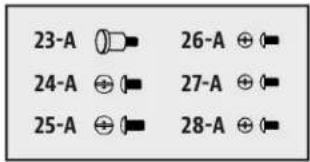
text_image
23-A 26-A 24-A 27-A 25-A 28-APIÈCES DE RECHANGE ÉLECTRIQUES
text_image
1-PVH 2-PVH 12-PVH 3-PVH 4-PVH 7-PVH 6-PVH 8-PVH 5-PVH 10-PVH 9-PVH 13-PVHGARANTIE
CONDITIONS
3411 North 5th Avenue, Suite 500, Phoenix, AZ, USA 85013
ATENCIÓN AL CLIENTE
EE.UU : (480) 923-9632 Canada (gratuita) : 1-877-942-2246 www.louisiana-grills.com
ÍNDICE
text_image
3 FRENTE 12 E E E 12 E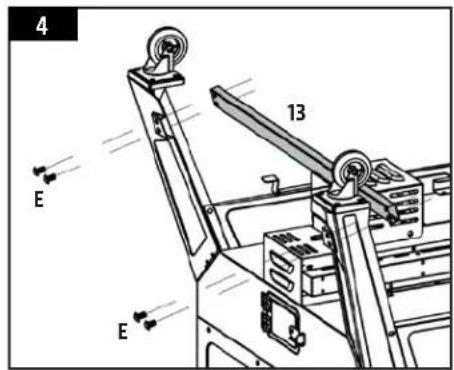
text_image
4 13 E E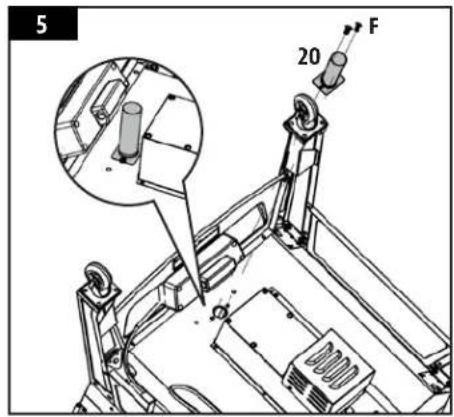
text_image
5 20 F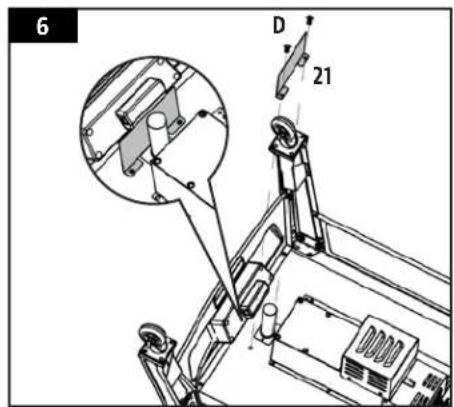
text_image
6 D 21natural_image
Diagram showing a mechanical assembly with an inset magnified view of a component (no text or symbols)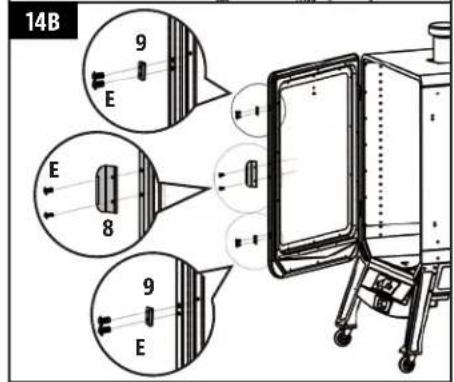
text_image
14B 9 E E 8 9 Enatural_image
Mechanical assembly diagram showing a motor with wheels and a close-up inset of the gear mechanism (no text or symbols)natural_image
Illustration of a temperature sensor module with wires and connectors (no text or symbols)text_image
1-PVH 2-PVH 12-PVH 3-PVH 4-PVH 7-PVH 6-PVH 8-PVH 5-PVH 10-PVH 9-PVH 13-PVHGARANTÍA
CONDICIONES (GARANTÍA NO VALIDO EN MEXICO, VEA GARANTÍA OFRECIDA POR EL IMPORTADOR):
Distributed by: Costco Wholesale Canada Ltd.* Importado por:
Costco Wholesale Corporation 415 W. Hunt Club Road Importadora Primex S.A. de C.V.
P.O. Box 34535 Ottawa, Ontario Blvd. Magnocentro No.4
Seattle, WA 98124-1535 K2E 1C5, Canada San Fernando La Herradura
USA
1-800-463-3783
1-800-774-2678
www.costco.ca
natural_image
Close-up of sliced meat on a dark surface, showing bone and texture (no text or symbols visible)
natural_image
Close-up of a layered dessert with caramel topping and purple herbs, served on a patterned plate (no text or symbols visible)
natural_image
Close-up of golden-brown chestnuts with textured skin (no text or symbols visible)
natural_image
Close-up of a cooked dish with sliced meat pieces, possibly pork or beef, in a dark sauce (no text or symbols visible)FREE RECIPES | RECETTES GRATUITES | RECETAS GRATUITAS WWW.LOUISIANA-GRILLS.COM
WARNING: THIS PRODUCT CAN EXPOSE YOU TO CHEMICALS INCLUDING WOOD DUST, WHICH IS KNOWN TO THE STATE OF CALIFORNIA TO CAUSE CANCER, AND CARBON MONOXIDE, WHICH IS KNOWN TO THE STATE OF CALIFORNIA TO CAUSE BIRTH DEFECTS OR OTHER REPRODUCTIVE HARM. FOR MORE INFORMATION GO TO WWW.P65WARNINGS.CA.GOV
AVERTISSEMENT : CE PRODUIT PEUT VOUS EXPOSER À DES AGENTS CHIVIQUES, Y COMPRIS LA POUSSIERE DE BOIS, IDENTIFÉS PAR L'ÉTAT DE CALIFORNIE COMME POUVANT CAUSER LE CANCER, ET LE MONOXYDE DE CARBONE, RECOINU PAR L'ÉTAT DE CALIFORIE COMME POUVANT CAUSER DES MALFORMATIONS CONGENTIALES OU AUTRES EFFETS NOCIFS SUR LA REPRODUCTION, POUR DE PLUS AMPLES INFORMATIONS, PRIÈRE DE CONSULTER WWW.P65WARNINGS.CA.GOV
DO NOT RETURN PRODUCT TO STORE
For all questions, comments, or inquiries, please contact Dansons directly.
USA: (480) 923-9632
CANADA (TOLL FREE): 1-877-942-2246
IMPORTANT
NE RETOURNEZ PAS L'ARTICLE AU MAGASIN