
EHC201w - Electric heating Essentiel B - Free user manual and instructions
Find the device manual for free EHC201w Essentiel B in PDF.

| Brand | Essentiel B |
| Model | EHC201w |
| Product type | Electric mobile convector |
| Maximum power | 2000 W |
| Heating power levels | 1250 W and 2000 W |
| Power supply | 220-240 V ~ 50-60 Hz |
| Recommended heating area | 20 m² |
| Thermostat | Mechanical, adjustable |
| Timer | 0 to 180 minutes, On/Off position |
| Box contents | 1 convector, 2 feet, 4 mounting screws, 1 mounting key, 1 instruction manual |
| Maintenance | Wipe with a damp cloth, vacuum the air grilles |
| Safety | Unplug before cleaning, do not immerse, do not use abrasive products |
| Repairability | Spare parts not specified, prioritize repair at end of life |
| Warranty | Valid from date of purchase on receipt, excluding improper installation or normal wear |
| Model reference | EHC201w / EHC201b |
Frequently Asked Questions - EHC201w Essentiel B
User questions about EHC201w Essentiel B
0 question about this device. Answer the ones you know or ask your own.
Ask a new question about this device
Download the instructions for your Electric heating in PDF format for free! Find your manual EHC201w - Essentiel B and take your electronic device back in hand. On this page are published all the documents necessary for the use of your device. EHC201w by Essentiel B.
USER MANUAL EHC201w Essentiel B
natural_image
White electric heater with control panel and display unit (no visible text or symbols)This product may only be used in well-insulated rooms or occasionally.
natural_image
Diagram showing a device being placed on a flat base, with an arrow indicating the process (no text or symbols present)natural_image
Diagram showing a device being processed into a box, with no visible text or symbols.utilisation
We thank you for purchasing an Essentiel b brand product. We pay special attention to the RELIABILITY, EASE OF USE and DESIGN of our products. We hope that you will be Fully satisfied with this mobile convector heater.
your product
Contents of the box
- 1 mobile convector heater
- 4 mounting screws
- 1 assembly key
- 1 x user guide
Technical features
- 220-240 V\~ 50-60 Hz
- Mechanical thermostat
• 2 heating powers: 1,250 W and 2,000 W - 2 carry handles
- 2 feet
- Timer
- For a 20 m ^2 surface area
• Power max. 2,000 W
datasheet
Information requirements for electric local space heaters (UE 2024/1103)
| Contact details Sourcing & CréationAvenue de la Motte 59810 LESQUIN - FRANCEcontact@sc-ub.com | ||||||
| Model(s) Identifi er 80116578011659 | EHC201wEHC201b | |||||
| Item Symbol Value Unit Item Unit | ||||||
| Heat output | Type of heat output / room temperature control (select one) | |||||
| Nominal heat output | Pnom 1.900 kW | Single stage heat output and no room temperature control | no | |||
| Minimum heat output (indicative) | Pmin 1.200 kW | Two or more manual stages, no room temperature control | no | |||
| Maximum continuous heat output | Pmax,c 1.900 kW | With mechanic thermostat room temperature control | yes | |||
| Power consumption | With electronic room temperature control | no | ||||
| In off mode | Po 0,00 W | Electronic room temperature control plus day timer | no | |||
| In standby mode | Psm 0,00 W | Electronic room temperature control plus week timer | no | |||
| In idle mode | Pidle 0,00 W | Other control options (multiple selections possible) | ||||
| In network standby | Pnsm | 0,00 W | Room temperature control, with presence detection | no | ||
| Standby mode with display of information or status | no | Room temperature control, with open window detection | no | |||
| Seasonal space heating energy effi ciency in active mode | Ns,on | 85,5 | % | Distance control option | no | |
| Adaptive start control | no | |||||
| Working time limitation | yes | |||||
| Black bulb sensor | no | |||||
| Self-learning functionality | no | |||||
| Control accuracy | no | |||||
installation
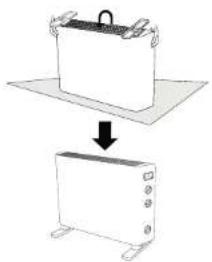
Fitting the feet
IMPORTANT: in order to install the item, the appliance must be unplugged from the mains socket.
Keep all plastic bags out of the reach of children and pets.
Before using your convector heater for the first time, it is essential to assemble the two feet.
- Remove the appliance and any spare parts from the packaging.
- Place it on a flat, horizontal surface.
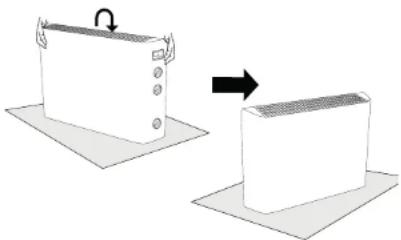
- Turn the appliance upside down, so that you have access to the base of it.
natural_image
Diagram showing a device being placed on a flat base, with an arrow indicating the process (no text or symbols present)- Position and secure each foot on each side of the appliance using the screws provided.

- Put the appliance back into its usual position.
- Your appliance is stable and ready for use.
Comments:
- Never use your convector heater if the feet have not been fitted.
• Always unplug the appliance from the mains after each use.
use
First use
On first use, your appliance may give off a slight odour. This is normal. Make sure there is plenty of ventilation. This odour is temporary and will disappear quickly.
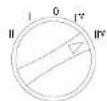
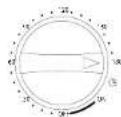
Power levels
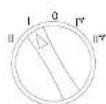
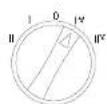
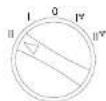
Your appliance is fitted with a power selector. Position the selector as required.
- Turn the selector to position I to select the 1,250W power output.
- Turn the selector to position II to select the 2,000W power output.
- Turn the selector to position I* to select the 1,250 W power output with turbo function.
- Turn the selector to position II* to select the 2,000 W power output with turbo function.
- Turn the selector to position 0 to switch it off.
1250W
1250W
2000W
2000W
STOP
natural_image
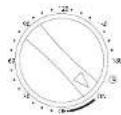
Diagram showing a device being processed into a box, with no visible text or symbols.Setting the thermostat
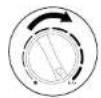
The temperature can be set using the thermostat.
Turn to the left or right to set the desired temperature.


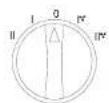
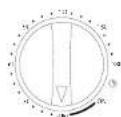
Setting the timer
Your appliance is fitted with a timer to regulate its running time.
- Set the button to the desired duration to program the appliance to operate for a period of between 0 and 180 minutes. The appliance switches off when the time has elapsed.
- Turn the knob to the ON position to activate the heater without a specific time (timer deactivated).
- Turn the knob to the OFF position to turn the heater off.

0\~3H


Use
- Place the appliance on a flat, stable and dry surface.
NOTE: do not move, tilt and/or tip over the appliance during operation.
- The thermostat must be in the minimum position.
- Fully unwind the power cord.
- Plug the power cord into a mains socket.
- Turn the power selector to the position of your choice to start heating (I, II, I* etc. II*).
- Set the timer knob to ON or to the duration of your choice.
- Set the desired temperature by turning the thermostat control knob.
- To switch off the heater, set the power selector to 0 and the timer button to OFF.
- Wait for the appliance to cool down and unplug it before storing it.
cleaning and maintenance
IMPORTANT:
- Always unplug the power cord from the mains outlet and allow the appliance to cool before cleaning or maintenance.
- Never immerse the appliance in water or any other liquid.
- Never use abrasive cleaning products on this appliance (e.g. alcohol, solvent).
- Use a slightly damp cloth to wipe the outside of the heater and remove dust and dirt. Never use abrasive cleaning products on this appliance (e.g. alcohol, solvent).
- Use a vacuum cleaner to remove dust from the air vents.
- Make sure that the heater is dry before plugging it in again.
- To avoid the risk of fire and/or electric shock, do not spill water or any other liquid inside the appliance.
- Clean the appliance's air vents regularly.
- Make sure water never gets inside the appliance through the air vents.
- If you are not going to be using the appliance for a long time, unplug it from the mains socket.
- 1 Montageschlüssel
natural_image
Diagram showing a device being placed on a flat base, with an arrow indicating the process (no text or symbols present)natural_image
Diagram showing a device being processed into a box, with no visible text or symbols.Verwendung
natural_image
Diagram showing a device being placed on a flat base, with an arrow indicating the process (no text or symbols present)natural_image
Diagram showing a device being processed into a box, with no visible text or symbols.All information, designs, drawings and pictures in this document are the property of SOURCING & CREATION. SOURCING & CREATION reserves all rights to its brands, designs and information. Any copy and reproduction through any means shall be deemed and considered as counterfeiting.
Protection of the environment
This symbol attached to the product means that it is an appliance whose disposal is subject to the directive on waste from electrical and electronic equipment (WEEE). This appliance may not in any way be treated as household waste and must be subject to a specific type of removal for this type of waste. Recycling and recovery systems are available in your area (waste removal) and by distributors. By taking your appliance at its end of life to a recycling facility, you will contribute to environmental conservation and prevent any harm to your health.

Umweltschutz
\* Tested in our laboratories
Warranty valid from the date of purchase (receipt as proof of purchase). This warranty does not cover defects or damage caused by improper set up, incorrect use, or normal wear and tear of this product.
\* In unseren Labors getestet
Customer Relations Department / Kundenservice / Klantenafdeling
Avenue de la Motte
CS 80137
59811 Lesquin cedex
Art. 8 011657/80116 59
Ref. EHC201w/EHC201b