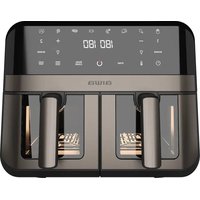
CHUKUMA AFR-7000 - Deep fryer AIWA - Free user manual and instructions
Find the device manual for free CHUKUMA AFR-7000 AIWA in PDF.

User questions about CHUKUMA AFR-7000 AIWA
0 question about this device. Answer the ones you know or ask your own.
Ask a new question about this device
Download the instructions for your Deep fryer in PDF format for free! Find your manual CHUKUMA AFR-7000 - AIWA and take your electronic device back in hand. On this page are published all the documents necessary for the use of your device. CHUKUMA AFR-7000 by AIWA.
USER MANUAL CHUKUMA AFR-7000 AIWA
natural_image
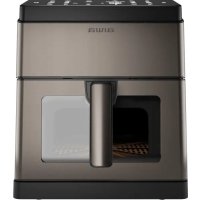
Line drawing of a rectangular device with two internal compartments and a central handle (no text or symbols)CHUNKUMA AFR-7000
| 220-240V\~ | 50-60Hz | 1800W | 7L | 80°C-200°C
(EN) Air fryer - Instruction Manual
(ES) Freidora de aire - Manual de instrucciones
| Capacity | 7 L |
| Power | 1800 W |
| Pre-sets | 8 |
| Body material | Plastic |
| Cavity type | Tray |
| Visible window | Yes |
| Auto clean | Yes |
CONTENT
Contenido, Contenuto, Contenu, Inhalt, Conteúdo, Inhoud, Съдържание, Периєхóμενο, Zawartość, Obsah, Continut, Tartalom, Садржај, йçerik, Содержание

text_image
Diagram showing five different packaging or packaging designs with corresponding icons and labels.MESURES
Measurements, Medidas, Misure, Mesures, Maße, Medidas, Afmetingen, Merki, Metrħσεις, Wymiary, Merania, Măsurători, Méretek, Mepe, Ölçümler, Измерения
text_image
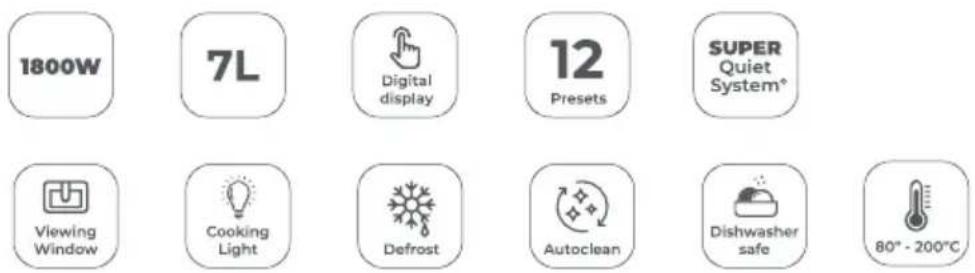
1800W 7L Digital display 12 Presets SUPER Quiet System* Viewing Window Cooking Light Defrost Autoclean Dishwasher safe 80° - 200°CGETTING TO KNOW YOUR AIR FRYER
text_image
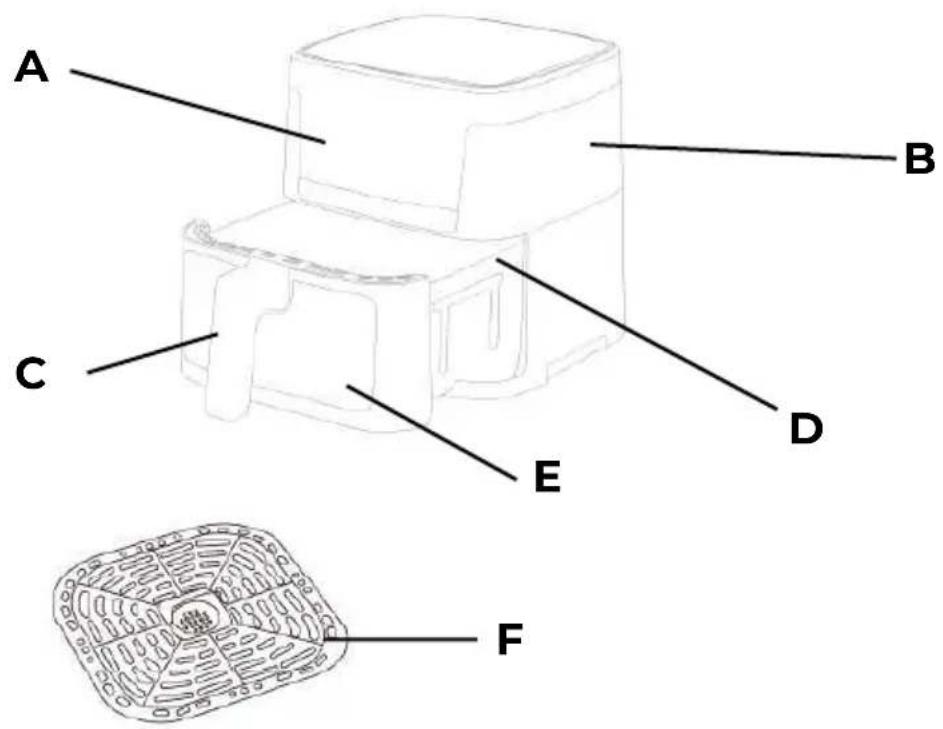
A B C D E FPARTS
(EN) GETTING TO KNOW YOUR AIR FRYER. PARTS.A Display panel B Air inlet C Handle D Basket E Window F Non-stick grid
(ES) CONOZCA SU FREIDORA DE AIRE. PARTES.A Panel de visualización B Entrada de aire C Mango D Cesta E Ventana F Rejilla antiadherente
(IT) CONOSCERE LA VOSTRA FRIGGITRICE AD ARIA. PARTI. A Pannello di visualizzazione B Presa d'aria C Maniglia D Cesto E Finestra F Griglia antiadherente
(FR) APPRENEZ À CONNAÎTRE VOTRE FRITEUSE À AIR. PIÈCES. A Panneau d'affichage B Entrée d'air C Poignée D Panier E Fenêtre F Grille antiadhesive (DE) LERNE DEINE HEIßLUFTFRITTEUSE KENNEN. TEILE. A Anzeigetafel B Lufteinlass C Griff D Korb E Fenster F Antihaft-Gitter
(PT) CONHECENDO SUA FRITADEIRA DE AR. PARTES.A Painel de exibição B Entrada de ar C Alça D Cesta E Janela F Grade antiadherente (NL) KENNISMAKING MET UW AIRFRYER. ONDERDELENA Displaypaneel B Luchtinlaat C Handvat D Mand E Raam F Antiaanbakrooster
(ВС) ЗАПОЗНАЙТЕ СЕ СЪС СВОЯТА ФРИТЮРНИЦА НА ВЪЗДУХ. ЧАСТИ. А
Панел за дисплей В Въздушен вход С Дръжка D Кошница Е Прозорец
F Нелепираща решетка
(EL) ΓΝΩΡΙΖΟΝΤΑΣ ΤΟΝ ΑΕΡΙΟΥ ΣΑΣ ΤΗΓΑΝΙΣΤΗ. ΜΕΡΗ • Α Πίνακας εμφάνισης Β Εισαγωγή αέρα Κ Χειρολαβή D Καλάθι Ε Παράθυρο F Αντικολλητική ράβδος
(PL) POZNAJ SWOJĄ FRITURKĘ POWIETRZNAĄ. CZĘŚCI A Panel wyświetlacza B Wlot powietrza C Uchwyt D Kosz E Okno F Ruszt nieprzywierający
(SK) ZÍSKANIE POZNANIA O VAŠOM FRITEZOVOM PRIETOČNÍ. ČASTI. A Displejový panel B Vstup vzduchu C Rukovát D Košík E Okno F Nepril'navá mriežka
(RO) CUNOAŞTEREA FRITEUZEI DUMNEAVOASTRĂ DE AER. PĂRȚI.A Panou de afișare B Intrare de aer C Mâner D Cos E Fereastră F Grilă antiaderentă
(HU) ISMERD MEG A LÉGFRITÖZÖDET. ALKATRÉSZEK. A Kijelző panel B Légtömeg bejárata C Fogantyú D Kosár E Ablak F Nem tapadós rács
(SR) UPOZNAVANJE VAŠEG VAZDUŠNOG FRITEZA. DELOVI.A Приказни панел В
Улаз за ваздух C Дршка D Кошара E Прозор
F Не лепећа решетка
(TR) HAVA FRITEZİNİ TANIYIN. PARÇALAR. A Ekran paneli B Hava girişi C Kulp D Sepet E Pencere F Yapışmaz ızgara
(RU) ЗНАКОМСТВО С ВАШИМ АЭРОФРИТЕЗОМ. ЧАСТИ. А Дисплейная панель
text_image
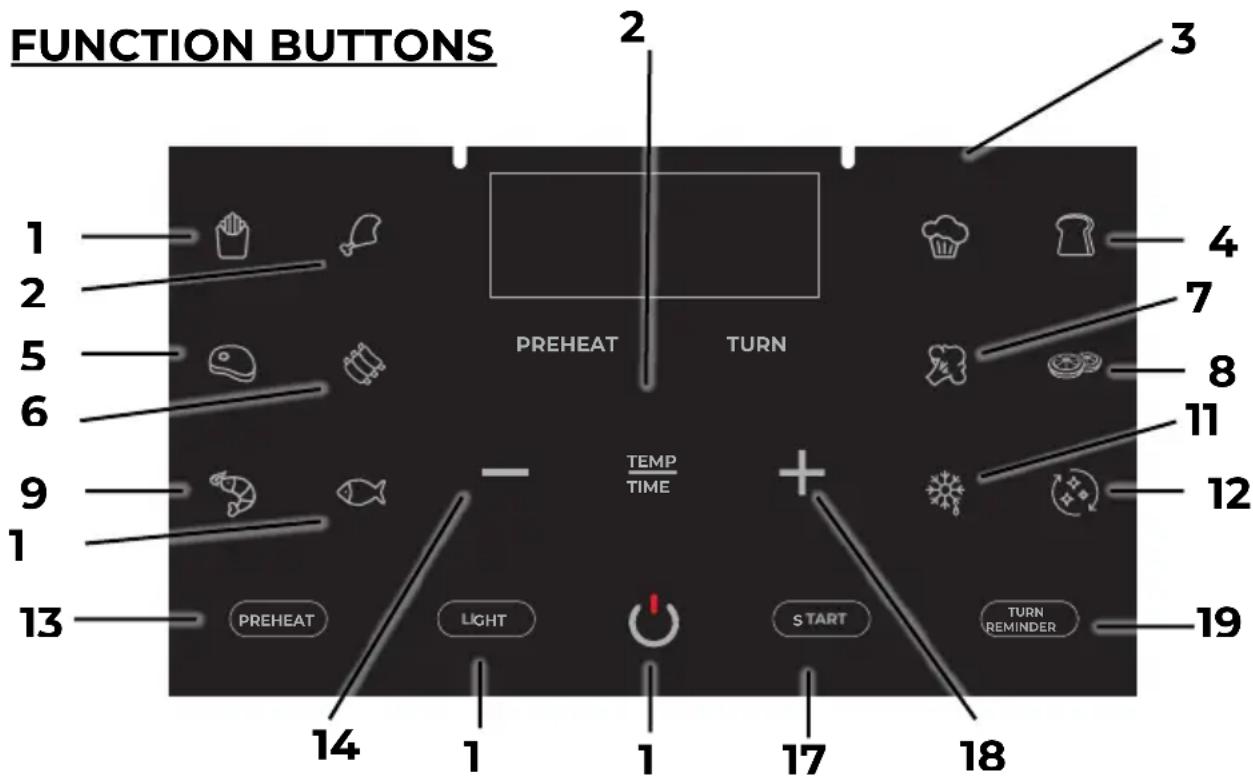
FUNCTION BUTTONS 1 2 5 6 9 1 13 PREHEAT TURN TEMP TIME 2 3 4 7 8 11 12 + LIGHT START TURN REMINDER 14 1 17 18 19(EN) FUNCTION BUTTONS 1. French fries 2. Chiken 3. Bake 4. Bread 5. Steak 6. Ribs 7. Vegetables 8. Dehydrate 9. Shrimp 10. Fish 11. Defrost 12. Auto clean 13. Preheat 14. Decrease temperature or time 15. Light 16. Power 17. Start 18. Increase temperature or time 19. Turn reminder 20. selector time or temperature.
(ES) BOTONES DE FUNCIÓN 1. Patatas fritas 2. Pollo 3. Hornear 4. Pan 5. Bistec 6. Costillas 7. Verduras 8. Deshidratar 9. Marisco 10. Pescado 11. Descongelar 12.
- Remove and discard any packaging material, promotional labels, and tape from the unit.
- Remove all accessories from the package and read this manual carefully. Please pay particular attention to operational instructions, warnings, and important safeguards to avoid any injury or property damage.
- Wash the baskets and crisper plates in hot, soapy water, then rinse and dry thoroughly.
- Clean the inside and outside of the product with warm wet cloth, then dry thoroughly.
- The air fryer uses the technology of hot air heating. Never pour oil or fat into the fryer.
- Leave a minimum of 13 cm of space between the back and top of the wall.
FUNCTION BUTTONS
- POWER BUTTON: The ⏻ button turns the unit on and off and stops all cooking functions. Once the Unit is plugged in, the Power Button will light up. Selecting the Power Button once (Press 1 second) will cause the full panel to be illuminated. Press 1 second the Power Button will shut down the Unit.
- START: START After selecting temperature and time, start cooking by pressing the START/STOP button. To pause cooking, first select the zone you would like to pause, then press the START/STOP button.
- Time/Temperature Select Icon: TEMP TIME Press this button to choose time and temperature, then press the + button or - button enable you to select exact cooking time/temperature.
- Preheat: Choose or cancel preheat function.
- Indicator Light: When you want to see the cooking process of food ingredients, press this button, the light inside of the unit will light up. You can turn off the light, and press this button again.
- Turn reminder: TURN REMINDER remind the turn the food to get a better crisper taste.
- Preset Button Cooking Chart (View at the section Functions buttons)
- NOTICE: Please remember that these Default Settings offer only a reference. For food ingredients differ in source, size, shape and brand, we can not guarantee to provide the best Settings for your food ingredients. As the fast air change technology can give renewed heating to the air inside the product immediately, so, to pull the basket out of the unit during the operation will hardly affect the process of cooking.
- NOTE: If the dual basket air fryer starts with cold boot, the cooking time should be 3 minutes longer.
USING YOUR AIR FRYER
- Pull the basket handle to remove it from the fryer gently.
- Place food on the inner rack inside the basket.
- Reinsert the basket with the food into the fryer.
Note: The appliance requires the basket to be fully closed for operation. Unwind the cord before plugging it in.
-
Plug the appliance into the power outlet. A beep will confirm the appliance is on, and the on/off button will light up.
-
Press the on/off button to activate the digital display.
MANUAL MODE
-
Once the ingredients are in the basket and the fryer is plugged in:
-
Adjust the time and temperature using the selector dial (20).
• Use the +/- buttons (18)(14) to increase or decrease the temperature and time. -
Press the start button (17) to start cooking.
-
During cooking:
-
Modify the time and temperature if needed.
• To pause cooking, press the power button (16) or open the basket. -
To stop the appliance completely:
-
Press the power button (16) again.
- The screen will turn off, and the appliance will enter standby mode.
MENU MODE
-
Once ingredients are in the basket and the fryer is on:
-
Select desired menu using the menu selector (1-10).
- Adjust temperature and time following manual steps.
-
Press start button (17) to begin cooking.
-
During cooking:
-
Modify time and temperature if needed.
• To stop the appliance completely: - Press power button (16). Screen turns off, appliance enters standby mode.
CLEANING YOUR AIR FRYER
The unit should be cleaned thoroughly after every use. The inside of the baskets, crisper plates and the product are all covered with non-sticking painted coat. Do not use metal kitchen wares or abrasive cleaning material to do the cleaning, for this will damage the non-sticking painted coat.
- Pull out the plug from the power socket, let the product cool down. (Note: Take out the baskets, thus to make the fat-free fryer cool down more quickly.)
- Use wet cloth to scrub the outside part of the product.
- Clean the baskets or the bottom of the baskets with hot water, detergent and non-abrasive sponge, please add hot water into the baskets together with some detergent. Put crisper plates into the baskets, and then soak the baskets and the crisper plates for 10 minutes.
- Clean the inside of the product with hot water and non-abrasive sponge.
- Use cleaning brush to clean the heating components, swept away remaining food residual.
- A timely manner with a clean brush to clean the air inlet opening and the air outlet opening, so as not to affect the air inlet and the outlet air flow.
Note: If food residue is stuck on the crisper plates or baskets, place them in a sink filled with warm, soapy water and allow to soak.
AUTO CLEAN FUNCTION
- Fill the air fryer with water up to the edge of the cooking rack.
- Add 5 ml of dishwashing detergent.
- Press the "Auto Clean" button(12).
- Empty the dirty water and clean any remaining residue. With
these simple steps, your air fryer will be ready for its next use.
STORAGE YOUR AIR FRYER
- Make sure the Air Fryer is unplugged and all parts are clean and dry before storing.
- Never store the Air Fryer while it is hot or wet.
- Put clean Crisper Plates into fryer basket, and insert fryer basket into the Air Fryer body.
- Store Air Fryer in its box or in a clean, dry place.
GUARANTEE AND SERVICES
If you require services or repairing, or have any doubt, you can communicate with the local Customer Center.
If there is no Customer Center near your location, you can communicate with your local dealer.
This symbol means that in case you wish to dispose of the product once its working life has ended, take it to an authorized waste agent for the selective collection of waste electrical and electronic equipment (WEEE). This appliance complies with Directive 2014/35/EU on Low Voltage, Directive 2014/30/EU on Electromagnetic Compatibility, Directive 2011/65 EU on the restrictions of the use of certain hazardous substances in
electrical and electronic equipment and Directive 2009/125/EC on the ecodesign requirements for energy-related products
www.aiwa-industries.com
All Pictures shown are for illustration purpose only.
All Rights Reserved. All other trademarks are property of their respective owners.
All specifications are subject to change without prior notice.
Aiwa Europe S.L., Av. Siglo XXI, 34, ES-08840.
REV. 02/02/2024 VI