HK 64 Cosy - Heated blanket/cushion BEURER - Free user manual and instructions
Find the device manual for free HK 64 Cosy BEURER in PDF.

| Product type | Heating pad/blanket |
| Brand | Beurer |
| Model | HK 64 Cosy |
| Power supply | Mains (230 V ~ 50 Hz, according to rating plate) |
| Temperature levels | 3 levels: 1 (low), 2 (medium), 3 (high) |
| Automatic shut-off | Yes, after approximately 90 minutes |
| Rapid heating | Yes, during the first 10 minutes |
| Safety system | Automatic shut-off in case of overheating (sensor) |
| Machine washable | Yes, machine washable at 30°C, wool cycle, dry flat |
| Textile certification | OEKO-TEX® Standard 100 |
| Fastening | Self-adhesive for neck and adjustable abdominal belt |
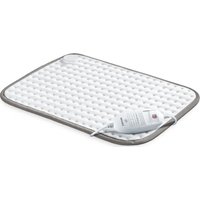
| Intended use | Warming the human body, back and neck |
| Not recommended for | Children 0-3 years, persons insensitive to heat, pacemaker wearers (consult a doctor) |
| Package contents | 1 heating element, 1 switch, 1 instruction manual |
| Warranty | See supplied warranty card |
Frequently Asked Questions - HK 64 Cosy BEURER
User questions about HK 64 Cosy BEURER
0 question about this device. Answer the ones you know or ask your own.
Ask a new question about this device
Download the instructions for your Heated blanket/cushion in PDF format for free! Find your manual HK 64 Cosy - BEURER and take your electronic device back in hand. On this page are published all the documents necessary for the use of your device. HK 64 Cosy by BEURER.
USER MANUAL HK 64 Cosy BEURER
natural_image
Medical or fitness device with a bandage and attached device on a textured mat (no visible text or symbols)DE Rücken-/Nacken-Heizkissen
Gebrauchsanweisung ....4
EN Back & neck heat pad
Instructions for use....9
FR Coussin chauffant pour le dos et la nuque
Mode d'emploi....14
ES Almohadilla eléctrica para la espalda y el cuello
Instrucciones de uso....19
IT Termoforo per schiena e c ervicale
Istruzioni per l'uso....24
TR Sirt/ense ısı yastığı
Kullanım kılavuzu....29
natural_image
Illustration of an open book with a geometric window and horizontal lines, no text or symbols presentEN Unfold page 3 before reading the instructions for use.
DEUTSCH

natural_image
Technical illustration of a mechanical component with a shaft and bearing assembly (no text or symbols)natural_image
Pure mechanical component diagram without any text, numbers, or symbols6.3 Einschalten
Read these instructions for use carefully. Observe the warnings and safety notes. Keep these instructions for use for future reference. Make the instructions for use accessible to other users. If the device is passed on, provide the next user with these instructions for use.
In this document, the heat pad together with the control is referred to simply as “device”. In this document, the heat pad without the control is referred to simply as “heating element”.
CONTENTS
- Included in delivery 9
- Signs and symbols....9
- Safety notes ....10
- Intended use....11
- Device description....11
- Operation....12
6.1 Safety....12
6.2 Initial use....12
6.3 Switching on 12
6.4 Setting the temperature 12
6.5 Automatic switch-off....12
6.6 Switching off....12
- Cleaning and maintenance ....12
- What if there are problems? 12
- Storage....13
- Disposal....13
- Technical specifications ....13
- Guarantee/service ....13
1. INCLUDED IN DELIVERY
Check that the exterior of the cardboard delivery packaging is intact and make sure that all contents are present. Before use, ensure that there is no visible damage to the device or accessories and that all packaging material has been removed. If you have any doubts, do not use the device and contact your retailer or the specified Customer Service address.
- 1 heating element
- 1 control
• 1 copy of instructions for use
2. SIGNS AND SYMBOLS
The following symbols are used on the device, in these instructions for use, on the packaging and on the type plate for the device:

DANO
Indicates an imminent danger. If it is not avoided, it will result in death or serious injury.

WARNING
Indicates a potentially impending danger. If it is not avoided, there is a risk of death or serious injury.

CAUTION
Indicates a potentially impending danger. If it is not avoided, slight or minor injuries may result.
NOTICE
Indicates a potentially harmful situation. If it is not avoided, the system or something in its vicinity may be damaged.

Product information
Note on important information

Read the instructions

Do not use folded or rucked

Do not insert pins

Not to be used by very young children (0 - 3 years)

Manufacturer

Protection class II device

This product satisfies the requirements of the applicable European and national directives.

United Kingdom Conformity Assessed Mark

The products demonstrably meet the requirements of the Technical Regulations of the EAEU.

The electronic device must not be disposed of with household waste

Marking to identify the packaging material.
A = Material code, B = Material number:
1-7 = Plastics, 20-22 = Paper and cardboard

Separate the product and packaging elements and dispose of them in accordance with local regulations.

This device meets the high requirements of OEKO-TEX® STANDARD 100 for human ecology as verified by the Hohenstein Research Institute.

Wash at a maximum temperature of 30 °C Very gentle wash

Do not bleach

Do not tumble dry

Do not iron

Do not dry clean
3. SAFETY NOTES
IMPORTANT INSTRUCTIONS – RETAIN FOR FUTURE USE
WARNING
- Non-observance of the following notes may result in personal injury or material damage (electric shock, skin burns, fire). The following safety and hazard information is not only intended to protect your health and the health of others, it should also protect the device. For this reason, pay attention to these safety notes and include these instructions when handing over the device to others.
- This device must not be used by persons who are not sensitive to heat or by other vulnerable persons who may not be able to react to overheating (e.g. diabetics, persons with skin alterations due to illness or scarred tissue in the application area, after taking pain relief medication or alcohol).
- This device must not be used by very young children (0-3 years old) as they are unable to respond to overheating.
-
The device can be used by children older than 3 and younger than 8 years of age provided they are supervised. For this, the control must always be set to the minimum temperature.
-
This device may be used by children over the age of 8 and by people with reduced physical, sensory or mental skills or a lack of experience or knowledge, provided that they are supervised or have been instructed on how to use the device safely, and are fully aware of the consequent risks of use.
- Children must not play with the device.
- Cleaning and user maintenance must not be performed by children unless supervised.
- This device is not designed for use in hospitals.
- The device is only intended for domestic/private use, not for commercial use.
- Do not insert pins.
- Do not use folded or rucked
- Do not use if wet.
- This device must only be used in conjunction with the control specified on the label.
- This device must only be connected to the mains voltage that is specified on the label.
-
If the device is being used over several hours, we recommend that you set the lowest temperature setting on the control to avoid overheating the body part being heated, which may lead to burns to the skin.
-
The electrical and magnetic fields emitted by this device may interfere with the function of your pacemaker. However, they are still well below the limits: electrical field strength: max. 5000 V/m, magnetic field strength: max. 80 A/m, magnetic flux density: max. 0.1 millitesla. Please therefore consult your doctor and the manufacturer of your pacemaker before using this device.
- Do not pull, twist or make sharp bends in the cables.
- If the cable and control of the device are not positioned properly, there may be a risk of becoming entangled in, being strangled by, tripping over, or stepping on the cable and control. The user must ensure that excess lengths of cable, and cables in general, are safely routed.
- Check this device frequently for signs of wear and tear or damage. If any such signs are evident, if the device has been used incorrectly or if it no longer heats up, it must be checked by the manufacturer before being switched on again.
- Under no circumstances should you open or repair the device (including the accessories) yourself, as faultless functionality can no longer be guaranteed thereafter. Failure to observe will invalidate the guarantee.
- If the mains connection cable of this device is damaged, it must be disposed of. If it cannot be removed, the device must be disposed of.
- Do not expose control and cables to direct sunlight.
- When this device is switched on:
- sharp-edged objects must not be placed on it,
- heat sources such as hot-water bottles or similar must not be placed on it.
- The electronic components in the control warm up when the device is in use. For this reason, the control must never be covered or placed on the heating element when it is in use.
- Allow the device to cool down before storing it away. Failure to observe this may result in damage to the device.
- To avoid severe creasing in the device, do not place any objects on top of it while it is being stored. Otherwise the device may get damaged.
- It is essential to observe the information relating to the following chapters: Operation, Cleaning and maintenance, Storage.
- If you should have any questions about using our devices, please contact our Customer Services department.
4. INTENDED USE

CAUTION
This device is only designed to warm up the human body.
5. DEVICE DESCRIPTION
The associated drawings are shown on page 3.
1 Power plug
2 Control
3 ON-OFF button
4 Button for setting temperature
5 Illuminated display for temperature settings
6 Plug-in coupling
7 Heating element
6. OPERATION
6.1 Safety
NOTICE
- The device is fitted with a SAFETY SYSTEM. This sensor technology provides protection against overheating across the entire surface of the heating element with an automatic switch-off in the event of a fault. If the SAFETY SYSTEM has switched off the device, the control will no longer light up in any way, even when switched on.
- Please note that for safety reasons, the device can no longer be operated after a fault has occurred and must either be disposed of or be sent to the specified service address.
- Do not under any circumstances connect the defective heating element with another control of the same type. This would also trigger a permanent switch-off by the safety system in the control.
6.2 Initial use
NOTICE
Ensure that the heating element will not bunch up or become folded during use.
-
First, connect the control 2 to the heating element by inserting the plug-in coupling 6.
-
Then plug the mains plug 1 into the socket.
natural_image
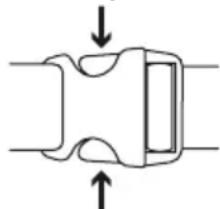
Diagram of a mechanical component with a spring and housing, showing directional arrows (no text or symbols)The special shape of this device was developed specifically for use on the back and neck. Position the device on the back so that the hook-and-loop fastener on the neck part is in line with your neck.
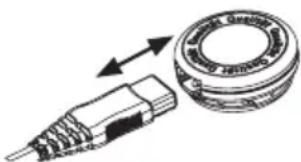
Then close the hook-and-loop fastener. Adjust the length of the abdominal belt so that you are comfortable and fasten the buckle by fitting one end into the other. To undo the buckle, push both sides of the clasp together as shown in the image.
natural_image
Pure mechanical component diagram without any text, numbers, or symbols6.3 Switching on
Press the ON-OFF button 3. When switched on, the temperature settings display 5 is lit up.

Switching sequence: 3-1-2-3-1...
6.4 Setting the temperature
To change the temperature, press the button for setting the temperature 4.
Setting 1: Minimum heat
Setting 2: Medium heat
Setting 3: Maximum heat

The fastest way to warm up the device is to initially set the highest temperature setting.

This device has a fast heating function, which allows the device to warm up quickly in the first 10 minutes.
6.5 Automatic switch-off
This device is equipped with an automatic switch-off function. This turns off the heat supply and the temperature settings display approx. 90 minutes after the initial use of the device. Press the ON-OFF button 3 to be able to restart the device. After about 5 seconds it is possible to switch it on again.
WARNING
If the device is being used over several hours, we recommend that you set the lowest temperature setting on the control to avoid overheating the body part being heated, which may lead to burns to the skin.
6.6 Switching off
Press the ON-OFF button 3 to switch off the device. The temperature settings display is no longer illuminated.

If the device is not in use, press the ON/OFF button 3 to switch off the device and pull the power plug out of the socket.
Then disconnect the control 2 from the heating element by unplugging the plug-in coupling 6.
7. CLEANING AND MAINTENANCE
WARNING
Before cleaning, always remove the power plug from the socket first. Then disconnect the control from the heating element by unplugging the plug-in coupling. Otherwise there is a risk of electric shock.
NOTICE
The control must never come into contact with water or other liquids, as this may cause damage.
- To clean the control, use a dry, lint-free cloth. Do not use any chemical or abrasive cleaning agents.
- Small marks on the heating element can be removed with a damp cloth and, if necessary, with a little liquid detergent for delicate laundry.
NOTICE
Please note that the heating element must not be chemically cleaned, wrung out, tumble dried, put through a mangle or ironed. Otherwise the heating element may get damaged.
- The heating element is machine-washable.
- Set the washing machine to a particularly gentle wash cycle at 30^ (wool cycle). Use a delicate laundry detergent and measure it out according to the manufacturer's instructions.
- Immediately after washing, reshape the heating element to its original dimensions while it is still damp and spread it out flat on a clothes horse to dry.
NOTICE
- Do not use pegs or similar items to attach the heating element to the clothes horse. Otherwise the heating element may get damaged.
- Do not reconnect the control to the heating element until the plug-in coupling and heating element are completely dry. Otherwise the device may get damaged.
WARNING
Never switch the device on to dry it! Otherwise there is a risk of electric shock.
8. WHAT IF THERE ARE PROBLEMS?
Problem
The temperature settings are not illuminated despite the fact that
- the control is properly connected to the heating element - the power plug is connected to a working socket - the ON/OFF button has been pressed.
| Possible cause | The safety system has switched the device off permanently. |
| Solution Send the | heating element and the control for servicing. |
9. STORAGE
If you do not plan to use the device for a long period of time, we recommend that you store it in the original packaging. For this purpose, disconnect the control from the heating element by unplugging the plug-in coupling.
10. DISPOSAL
For environmental reasons, do not dispose of the device in household waste at the end of its service life. Dispose of the device at a suitable local collection or recycling point in your country. Observe the local regulations for material disposal. Dispose of the device in accordance with EC Directive – WEEE (Waste Electrical and Electronic Equipment). If you have any questions, please contact the local authorities responsible for waste disposal. You can obtain the location of collection points for old devices from the local or municipal authorities, local waste disposal company or your dealer, for example.
11. TECHNICAL SPECIFICATIONS
See the type plate label on the heating element.
12. GUARANTEE/SERVICE
Further information on the guarantee and guarantee conditions can be found in the guarantee leaflet supplied.
FRANÇAIS

natural_image
Technical illustration of a mechanical component with directional arrows indicating motion (no text or symbols)natural_image
Pure mechanical component diagram without any text, numbers, or symbols6.3 Mise en marche
natural_image
Technical illustration of a mechanical component with directional arrows indicating motion (no text or symbols)natural_image
Pure mechanical component diagram without any text, numbers, or symbols6.3 Encendido
natural_image
Technical illustration of a mechanical component with a cylindrical housing and threaded shaft (no text or symbols)natural_image
Pure mechanical component diagram without any text, numbers, or symbols6.3 Accensione
natural_image
Technical illustration of a mechanical component with directional arrows indicating motion (no text or symbols)natural_image
Pure mechanical component diagram with no text, numbers, or symbols6.3 Açma
natural_image
Technical illustration of a mechanical component with a threaded connector and a circular housing (no text or symbols)natural_image
Pure mechanical component diagram without any text, numbers, or symbols6.3 Включение
natural_image
Technical illustration of a mechanical component with a threaded end and a circular housing (no text or symbols)natural_image
Pure mechanical component diagram without any text, numbers, or symbols6.3 Włączanie
12. GWARANCJA/SERWIS
5. BESCHRIJVING VAN HET APPARAAT
natural_image
Technical illustration of a mechanical component with a threaded connector and a circular housing (no text or symbols)natural_image
Pure mechanical component diagram without any text, numbers, or symbols6.3 Inschakelen
natural_image
Technical illustration of a mechanical component with a threaded connector and a bearing housing (no text or symbols)natural_image
Pure mechanical component diagram without any text, numbers, or symbolsnatural_image
Technical illustration of a mechanical component with a threaded end and circular housing (no text or symbols)natural_image
Pure mechanical component diagram without any text, numbers, or symbolsnatural_image
Technical illustration of a mechanical component with a cylindrical housing and threaded shaft (no text or symbols)natural_image
Pure mechanical component diagram without any text, numbers, or symbols6.3 Slå på
Trykk på PÅ/AV-knappen 3. Når produktet er på, lyser indikatoren for temperaturtrinn 5.