
ECELLAR150G2 - Wine cellar LA SOMMELIERE - Free user manual and instructions
Find the device manual for free ECELLAR150G2 LA SOMMELIERE in PDF.

| Product type | Wine cellar |
| Brand | La Sommelière |
| Model | ECELLAR150G2 |
| Storage capacity | 149 bottles (75cl format) |
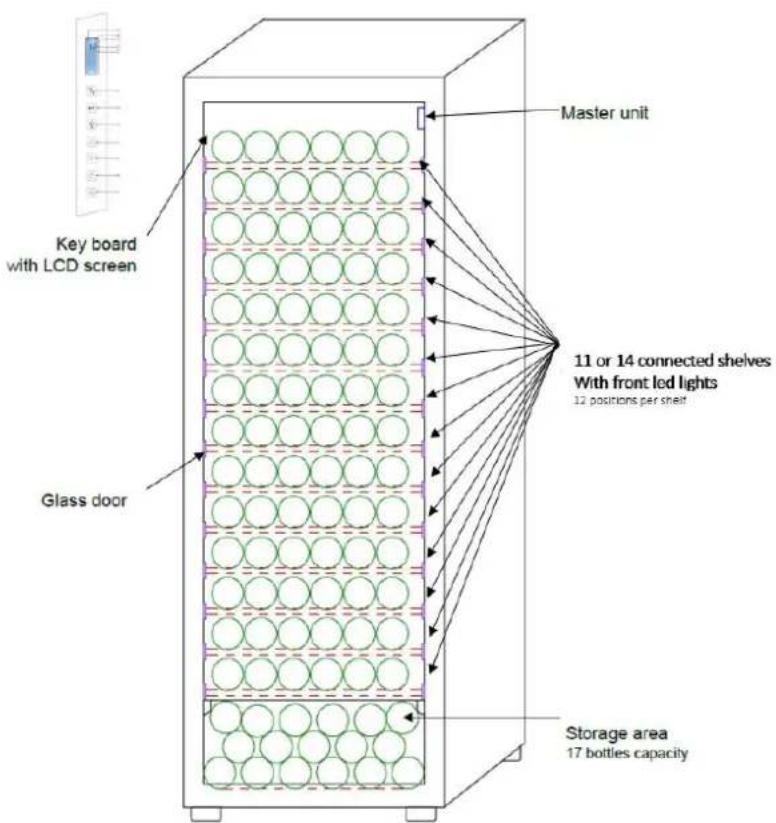
| Number of connected shelves | 11 |
| Additional storage area | 17 bottles (not connected) |
| Adjustable temperature range | 5°C to 20°C |
| Temperature modes | Mono-temperature (MONO) and Multi-temperature (AUTO) |
| Connectivity | WiFi (2.4 GHz band) and Bluetooth (initial pairing) |
| Mobile app | VINOTAG (iOS and Android) |
| Bottle detection | Sensors on shelves with LED indicators |
| Assisted placement function | ESOMMELIER (recommends ideal location) |
| Heating system | Automatic Winter system (heating element) |
| Alarms | High temperature (HH), low temperature (LL), fault codes |
| Defrost | Automatic |
| Charcoal filter | Yes (annual replacement recommended) |
| Power supply | 220-240V / 50Hz, single phase, grounded |
| Safety | Control panel lock, child lock |
| Maintenance | Clean with soft cloth and warm water; do not use solvents |
| Warranty | 1 year functional parts |
| Spare parts availability | 7 to 10 years according to EU regulations (via Interfroid Services) |
| Manufacturing | Shelves made in France |
Frequently Asked Questions - ECELLAR150G2 LA SOMMELIERE
User questions about ECELLAR150G2 LA SOMMELIERE
0 question about this device. Answer the ones you know or ask your own.
Ask a new question about this device
Download the instructions for your Wine cellar in PDF format for free! Find your manual ECELLAR150G2 - LA SOMMELIERE and take your electronic device back in hand. On this page are published all the documents necessary for the use of your device. ECELLAR150G2 by LA SOMMELIERE.
USER MANUAL ECELLAR150G2 LA SOMMELIERE
natural_image
Front view of a double-free wine refrigerator with multiple empty bottles on shelves (no visible text or labels)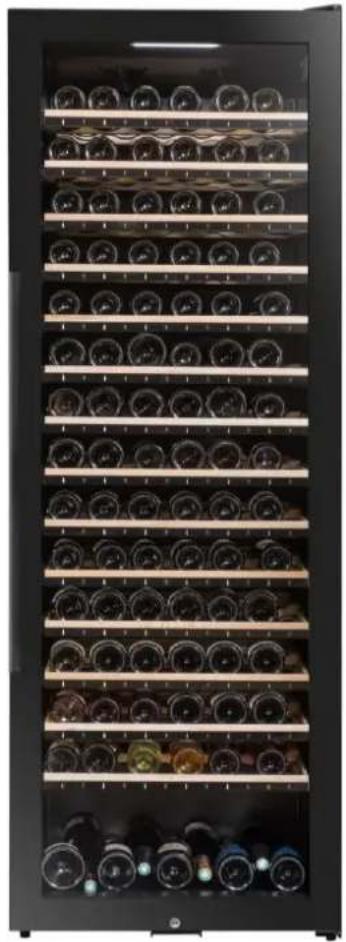
natural_image
Interior view of a double-b longevity wine refrigerator with multiple empty shelves filled with wine bottles (no visible text or labels)ECELLAR150G2 - ECELLAR185G2
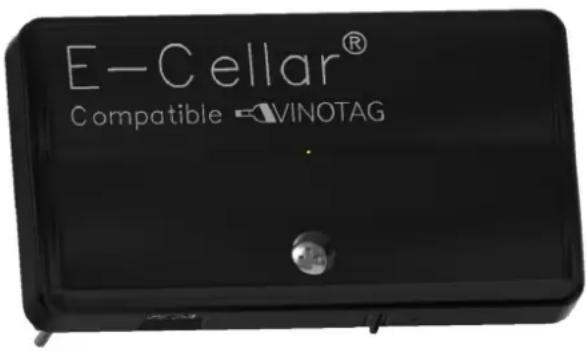
Cave à vin de vieillissement connectée / Ageing connected wine cellar / Smarter Weinklimaschrank / Verbonden oplegwijnkast / Vinoteca conectada para la conservación y envejecimiento
Compatible / Kompatibel mit / Compatibel met / Compatible con
VINOTAG

FR - MANUEL D'UTILISATION p. 9
GB - USE INSTRUCTIONS p. 43
DE - BENUTZERHANDBUCH p. 76
Wine Cellar Installation 52
Location 53
Handle installation 53
Wifi range 53
Hygrometry 54
- OPERATING INSTRUCTIONS....55
Control panel 55
Alarms 57
Master unit 57
Connected shelves 58
Modes of use 59
Winter mode 61
VINOTAG® application 61
VINOTAG® functions 61
How to create a VINOTAG® account....62
VINOTAG® Menus....62
Add a cellar....65
Share your cellar 66
Delete a cellar....66
Change the cellar configuration....67
Manage my Cellar 67
Add bottles....67
Premium account....69
Remove bottles....70
Consult a wine sheet 70
Create stock alerts....70
View the location of your bottles in your cellar 71
Cellar maintenance....71
- CARE AND MAINTENANCE 72
Automatic defrost....72
In the event of a power cut....72
If you go on vacation 73
-
IN THE EVENT OF A BREAKDOWN 73
-
TROUBLE SHOOTING 74
Errors codes 75
R600a
natural_image
Empty rectangular frame with black border (no text or symbols)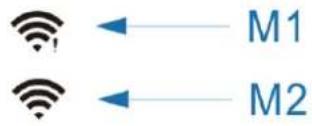
flowchart
graph LR
    A["Wireless Signal"] --> B["M1"]
    C["Wireless Signal"] --> D["M2"]
natural_image
Black cylindrical objects arranged in a grid, no visible text or symbols1.SAFETY INSTRUCTIONS
For your safety and for correct use of the device, before installing and using the device for the first time, carefully read this manual, including the warnings and useful tips it contains. In order to avoid damaging the device and / or injuring yourself unnecessarily, it is important that those who use this device are fully aware of its operation and its safety functions. Save these instructions for later and remember to store them next to the appliance so that they can be passed on with it in the event of a sale or move. This will ensure optimal operation of the system.
To avoid any risk of injury, keep this manual. The manufacturer cannot be held responsible in the event of incorrect handling of the system.
Safety of children and other vulnerable people
- This system can be used by children aged 8 and over and by people with reduced physical, sensory or mental capacities, or who have not learned to use the device, in the context where they are supervised. by an informed person who is aware of the risks involved. Children must not play with the device. Cleaning and user maintenance should not be made by children, unless they are over 8 years old and supervised.
- Keep all packaging out of the reach of children, as there is a risk of suffocation.
- If you decide to dispose of the appliance, unplug it from the wall outlet, cut the connection cable (as close to the appliance as you can) and remove the door to prevent children from playing with it. and being electrocuted or locked inside.
- If the appliance, fitted with a magnetic door seal, must be replaced by another appliance fitted with a latch on the door or on the seal, check that the latch is inoperable before proceeding. get rid of the old device. This will avoid turning this device into a trap for children.
- Keep the device and its cord out of the reach of children under 8 years old.
- Children should not load and unload bottles in the appliance.
General security
CAUTION - This appliance is designed to operate in a domestic household and in the following environments:
- kitchen rooms and equipment sold in commerce, work environments and offices;
- Bed and Breakfast type structures;
- farm buildings and hotels, motels and other organizations welcoming clients;
- industrial kitchen and other applications not intended for resale.
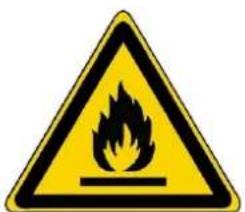
CAUTION - Never store flammable substances such as aerosols inside this appliance, as they may spill into it.
CAUTION - If the power cord is damaged, you must replace it immediately with your manufacturer, or a qualified dealer, to avoid any risk of electric shock.
CAUTION - Keep the vents fully open, and check that air can circulate through the openings.
CAUTION - Do not damage the refrigeration circuit.
CAUTION - Do not use electrical appliances inside the compartment, unless they are tolerated by the manufacturer.
CAUTION - The refrigerant and insulating system contain flammable gases. When you dispose of the system, do so at an authorized collection point. Never expose the device to flame.
Refrigerating fluid
The refrigerating circuit in the appliance uses refrigerating isobutene (R600a), which is a highly inflammable natural gas and is therefore dangerous for the environment. When transporting or installing the appliance, ensure that no element of the refrigerating circuit is damaged. The refrigerating fluid (R600a) is inflammable.
Caution: risk of fire
If the refrigerant circuit should be damaged:
- Avoid opening flames and sources of ignition.
- Thoroughly ventilate the room in which the appliance is situated. It is dangerous to alter the specifications or modify this product in any way.
Any damage to the cord may cause a short circuit, fire, and/or electric shock.
Electrical safety
• We decline any liability in respect of incidents caused by poor electrical installation.
- The power cord must not be lengthened. Do not use an extension cable, or adapter, or multi-way socket.
• Make sure that the power plug is not crushed or damaged. A crushed or damaged power plug may overheat and cause a fire.
- Make sure that you can access the main plug of the appliance.
- Do not pull the main cable.
- Ensure that the appliance is always electrically earthed.
- If the power plug socket is loose, do not insert the power plug. There is a risk of electric shock or fire.
- You must not operate the appliance without the interior lighting lamp cover.
- Disconnect the appliance before replacing the lighting bulb.
- The cellar is only applied with power supply of single phase alternating current of 220\~240V/50Hz.
- Do not attempt to replace a damaged power cable, contact your after-sales service.
• The power socket must be easily accessible but out of reach of children. In case of doubt, contact your installation technician.
- The device must not use an extension, adapter or multiple socket.
The device must be connected to an electrical outlet with a ground connection in accordance with the electrical standards in force.
Daily use
• This appliance is intended to be used exclusively for the storage of wine.
- Do not store flammable gas or liquids in the appliance. There is a risk of an explosion.
- Do not operate any electrical appliances in the appliance (electric ice cream makers, mixers etc.).
- When unplugging always pull the plug from the mains socket and do not pull on the cable.
- Do not place hot items near the plastic components of this appliance.
- The appliance manufactures storage recommendations should be strictly adhered to. Refer to relevant instructions for storage.
- Keep burning candles lamps and other items with naked flames away from the appliance so that do not set the appliance on fire.
- The appliance is intended for keeping beverages in normal
household as explained in this instruction booklet.
- The appliance is heavy. Care should be taken when moving it. If your appliance is equipped with castors, remember that these are only designed to facilitate minor movements. Do not move the appliance over long distances.
- Never use the shelves, drawers, doors etc. to stand on or as supports.
• To avoid items falling and causing injury or damage to the appliance, do not overload the shelves or put food into the appliance.
Caution: cleaning and servicing
- Before carrying out servicing, switch off the power supply and disconnect the appliance.
- When cleaning the appliance, do not use metal objects, steam systems, volatile fluids, organic solvents or abrasive substances.
- Never clean appliance parts with flammable fluids. The fumes can create a fire hazard or explosion.
- Do not use sharp or pointed objects to remove ice. Use a plastic scraper.
Important information about the installation!
- Warning! To prevent the wine cellar from tipping over, it is important to load the places located at the back of the cellar as a priority. The shelves must not be pulled out or left out at the same time. The weight of the bottles can cause the cellar to tip forwards, it is essential to distribute the weight of the bottles throughout the cellar and to handle it with care.
For the electrical connections to be correct, follow the instructions in this manual.
- Unpack the device and check that it is not visually damaged. Do not plug in the device if it is damaged. Report any damage to the point of sale where you purchased it. In this case, keep the packaging.
- It is recommended to wait at least 24 hours before connecting the appliance to the power supply, so that the compressor is supplied with oil.
- Good air circulation is necessary to avoid the risk of overheating. For sufficient ventilation, carefully follow the installation instructions provided. Warning ! This refrigeration appliance is not intended for use as built-in or integrated device.
- Avoid the appliance touching the walls and / or coming into contact with hot elements (compressor, condenser, radiators, cooking appliances,
dryer, etc.) in order to avoid the risk of fire and overheating. of the device. Always follow the installation instructions carefully.
- Check that the outlets are accessible once the appliance is installed.
- Be careful not to trap or damage the power cord when setting up the appliance.
Trouble shooting and spareparts
Any electrical work should be carried out by a qualified and skilled technician. The appliance should be repaired by an accredited repair centre, using only manufacturer's original spare parts.
Aesthetic and functional spare parts in accordance with REGULATION (EU) 2019/2019 (Annex II, point 3.), are made available to professional repairers and end users for a period of 7 years or 10 years (List in Annex II, point 3.a.1 and 3.a.2) from the time the last unit of the model is placed on the market. The list of spare parts and the procedure for ordering them (professional access / special access) are available on the following website:
www.interfroidservices.fr or by post at the following address: FRIO - Interfroid Services, 143 Bd Pierre Lefaucheux - 72230 ARNAGE
For other functional spare parts not specified in EU regulation 2019/2019, they are available for a period of 10 years. The manufacturer's warranty is 1 year for functional parts.
R600a Safety instructions
- Caution — Do not obstruct the ventilation grills on the appliance. Keep ventilation openings in the appliance enclosure or in the structure for building-in clear of obstruction.
- Caution — Do not store explosive substances, such as aerosol cans containing an inflammable propellant, in the appliance.
- Caution — Do not damage the refrigerating circuit in the appliance.
- Caution — The refrigerating units use isobutane (R600a), and should not be placed close to ignition sources (for example, electrical contacts that are exposed or open contacts that could be closed by the refrigerating fluid in the event of a leak). The refrigerating fluid type is specified on the rating plate of the appliance.
- Caution — Do not use electrical equipment in the compartments of the appliance, unless they are of the type recommended by the manufacturer.
This appliance meets the requirements of all applicable European directives and their amendments.

2. RATING PLATE
The nameplate attached to the inside or rear of the appliance (depending on the model) includes the entire information specific to your appliance.
We recommend that you make a note of its serial number in this booklet prior to installation, so that you can refer to it later (technical work, request for assistance, etc.).

natural_image
Empty rectangular frame with no text, symbols, or content insideOnce the appliance is installed and loaded, access to it is not so easy.
CAUTION: no assistance can be provided without this information.
3. DESCRIPTION OF THE APPLIANCE
To find out more about your product, consult the online EPREL database. As defined in Commission Delegated Regulation (EU) 2019/2016, all information relating to this refrigeration appliance is available on the EPREL Base (European Product Database for energy labeling). This database enables you to consult the information and technical documentation of your refrigeration appliance. You can access the EPREL Database by scanning the QR code on the energy label of your appliance or by going directly to: www.ec.europa.eu and searching the reference of your refrigeration appliance.
Find all the information on the ECELLAR and their instructions downloadable from the website www.lasommeliere.com
Announced capacity
| REFERENCE | BOTTLES CAPACITY | NUMBER OF SHELVES |
| ECELLAR150G2 | 149 | 11 |
| ECELLAR185G2 | 185 | 14 |
• Each shelf can store 12 bottles
- The cellar has a storage area that can accommodate 17 bottles
The announced capacity is the maximum capacity calculated with the number of shelves sold with the cabinet. The connected shelves of the ECELLAR have been sized to accommodate a champagne-size bottle. This particularity makes it possible to store any type of 75cl bottle, such as: Bordelaise, Champenoise, Burgundy, Alsace, as well as atypical formats Prosecco, Sachetto, Mateus etc ...
Warning ! The maximum diameter of the bottles, placed on the shelves, must be 9 cm.
If you want to age bottles of different sizes, we recommend that you alternate a standard 75cl type bottle between your larger size bottles, this recommendation will allow you to avoid any storage problems.
It is indeed possible that the juxtaposition of atypical or imposing format bottles forces you to only partially use the locations of your shelf. Alternating a standard bottle (bordeaux 75cl) with an atypical or imposing bottle will allow you to use all the available spaces of your shelf.
If, despite our best efforts, certain bottle sizes are not detected by the shelves of the ECELLAR, please follow the following instructions:
If a bottle is too large and does not fit between two shelves, we recommend that you put it down:
- On the first shelf of your cellar (from top to bottom)
- In the storage area located at the bottom of the cellar
Layout recommendations
The initial arrangement of your appliance's equipment (shelves, etc.) is recommended so that the energy is used as rationally as possible by the refrigeration appliance. Any change to this arrangement may impact the energy consumption of the device.
Radiofrequency characteristics
Hereby, La Sommelière declares that the ECELLAR radio equipment is in compliance with Directive 2014/53 / EU and all applicable European directives. Guideline available on: https://eur-lex.europa.eu/legal-content/FR/TXT/?uri=CELEX%3A32014L0053&qid=1617885639187
• Radio band : 2400MHz to 2483.5MHz
• Maximum power :100mW
The CE certificate can be accessed and downloaded from the La Sommelière site: https://www.lasommeliere.com/fr-FR/content/19-notices-et-documents-techniques
4. INSTALLATION INSTRUCTIONS
Before using this appliance
- Remove the outer and inner packaging.
- Leave your device in an upright position at rest for about 24 hours before putting it into service. This will reduce the possibility of cooling system malfunction due to transportation.
- Clean the inside with a soft cloth and lukewarm water.
- When installing your device, please choose an authorized location.
- Please adjust the feet of your appliance in order to level your cellar. Warning! your cellar should be tilted slightly backwards to ensure good drainage of condensation water and a good seal on the door seal. This inclination will also keeps the drawers or shelves in place despite the weight of the bottles. Adequate ventilation is necessary, do not obstruct any air outlet.
- This appliance is a freestanding type and cannot be installed in a recessed manner. Follow the installation instructions.
- Connect the cellar to a single outlet, leave a space of 15cm between the back of the cellar and the wall. Make sure to wedge it perfectly and adjust the horizontality of your wine cellar (the use of a spirit level is recommended). Warning ! your cellar should be tilted slightly backwards ; this will prevent any movement due to instability, which generates noise and vibration, and will ensure the door is completely airtight.
- The freestanding wine cellar is not intended to be used as a built-in or built-in appliance. Leave a minimum space of 15 cm between the wall and the back of the wine cellar and between any furniture and/or appliances that may surround the cellar. Nothing should be placed on top of the wine cellar.
- This device is only used for storing wines.
- This appliance uses flammable refrigerant gas, so please never damage the cooling pipe during transportation.
Attention
- Store wine in sealed bottles.
- Do not overload the cabinet.
- Do not open the door unless necessary.
- Do not cover shelves with aluminum foil or any other shelf material which may prevent air circulation.
- Should the wine cooler be left empty for long periods it is suggested that the appliance is unplugged, and after careful cleaning, leave the door ajar to allow air to circulate inside the cabinet in order to avoid possible condensation, mold or smell.
CAUTION: please keep the appliance away from substance, which can cause ignition.
Wine Cellar Installation
Warning! To prevent the wine cellar from tipping over, it is important to load the rear bottle positions first. The shelves must not be pulled out or left out at the same time. The weight of the bottles can cause the cellar to tip forwards, it is essential to distribute the weight of the bottles throughout the cellar and to handle it with care.
Power supply
Connect the wine cellar to a single, wall-mounted type E socket.
The cellar must be plugged into a single, easily accessible socket.
All questions relating to power and / or earthing must be handled by qualified personnel (electrician, authorized service).
Location
- Warning! The cellar must be placed in a clean environment (not dusty), frost-free, away from a heat source, type: radiator, oven, sunlight, etc ... it must not be installed outdoors.
- Place the cellar in a location strong enough to support the full load weight.
- To level it adjust the height of the adjustable feet below the cellar.
This device is suitable for operation in rooms with a very specific ambient temperature, this climatic class is indicated on the rating label.
When selecting a location for your appliance you should make sure the floor is flat and firm, and the room is well ventilated. This device is suitable for operation in rooms with a very specific ambient temperature, this climatic class is indicated on the nameplate. The ambient temperature affects the interior temperature and humidity of your cellar. For optimal operation, your cellar settings are made for ambient temperatures of 23^ C to 25^ C.
The temperature of the device is adjustable between 5^ C to 20^ C. The temperature is regulated by a thermostat. Changing the temperature generates higher energy consumption.
The device ensures that the temperature is maintained as long as it is in operation and is used under normal conditions of use. The temperature inside the appliance and its energy consumption can be influenced by many factors: ambient temperature, exposure to the sun, number of door openings and quantity stored... Slight changes in temperature are perfectly normal and correspond to cooling cycles of the device. But these variations in no way affect the storage temperature of the wines, these variations being too short for heat exchange with the bottles.
Handle installation
When fitting the handle of your cellar, proceed carefully so as not to break the glass of the door. Install the handle only with a manual screwdriver. Do not use power tools that could break the glass. Gently tighten the screws starting with the top one, do not tighten it all the way. Then install the bottom screw, once the 2 screws are positioned, adjust the tightening to fix the handle correctly, but without screwing too hard.
CAUTION do not tighten to the limit. Over-screwing can break the glass.
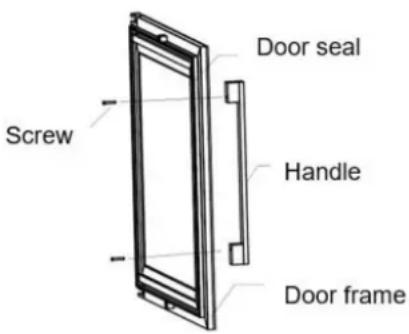
- Remove the handle and its two screws from the plastic bag inside the cellar.
- Before installing the handle, you must remove the door seal on a part. This does not affect the seal of the gasket if you take care to remove it correctly.
- Peel off the seal from the corner of the door to the necessary level then insert the two screws into the handle holes.
- Screw the handle and put the gasket back into the slot in the door to finish with the corner.
Wifi range
Warning ! The ECELLAR cellar works with a Wifi connection.
Warning ! It is the user's responsibility to ensure that the wifi network is sufficient (signal speed / strength) for the proper functioning of the connected cellar.
- The use of a wifi amplifier / repeater may be required for a low speed connection.
In the event of a loss of internet connection from the ECELLAR, it saves up to 100 events, once the connection is restored.
The information and a stock update will be sent to the server.
Beyond 100 events, the oldest are deleted by the new ones.
The user can see them in the "Alerts" section of their application.
In case of power break the wine cellar cannot detect or register any modification of its content, and lose also the event memory awaiting for synchronisation with the cloud.
When restarting, the last version registered by the cloud will be used to represent the wine cellar actual content. Therefore it is important to avoid any content modification during the power break to avoid anomalies between your digital register and the real content of the wine cellar.
Scope of the cellar bluetooth
Warning ! The ECELLAR cellar works with bluetooth during the phase of pairing the cellar to the Wifi network. During its daily use, the cellar communicates only through the Wifi network.
The cellar's Bluetooth range is 3m maximum with the door closed.
Hygrometry
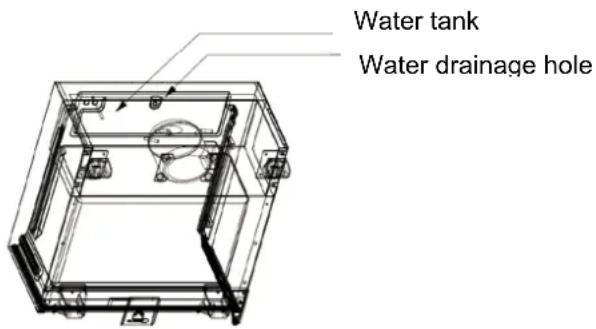
A water collection tray has been designed inside your cellar on top of the compressor step, you can regularly see water inside in order to help maintaining the humidity level in your cellar.
- If too much water is present in this tank, then the excess is discharged through the condensation water drainage hole to a collection tank located above the compressor.
- Remember to tilt your cellar slightly backwards by unscrewing the two front feet to keep a proper water draining.
- The drain hole must not be blocked.
5. OPERATING INSTRUCTIONS
Control panel
The ECELLAR cellar is equipped with an electronic control panel with LCD screen. The control panel is located inside the cellar on its left side. By default the control panel is not locked. Depending on the year of production of your wine cellar, the design of the control panel buttons may be different from those presented in this user manual (production before March 1, 2025).
flowchart
graph LR
    A["Wireless Signal"] --> B["M1"]
    C["Wireless Signal"] --> D["M2"]
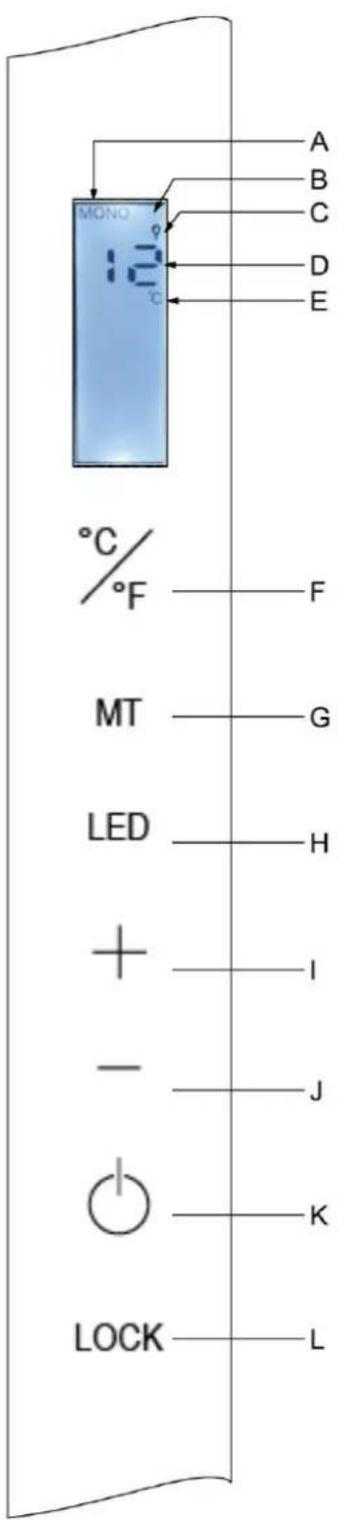
| LANDMARK | DESCRIPTION |
| A | Indicates the cellar mode: MONO (single-temperature) or AUTO (multi-temperature) |
| B | Lock indicator light, it indicates that the keyboard is locked |
| C | Light indicator, it indicates if the light is on |
| D | Temperature programmed inside the cellar. By default, the ECELLAR displays the set temperature on the digital screen, however you can consult the actual temperature present in your cellar by holding the I + J keys for 3 seconds, then the actual temperature read by the probe will be displayed on the screen and flash. Release the keys and the screen will return to displaying the set temperature. The cellar benefits from a backup of the settings, the programmed temperature is memorized in the event of a power failure, the programmed setting will be restored after the power returns. |
| E | Temperature unit indicator light indicated in degrees Celsius by the °C symbol or in Fahrenheit by the °F symbol. |
| F | Temperature unit of measure button:- Degree Celsius indicated by the symbol "°C" or- Fahrenheit indicated by the symbol "F" |
| G | Selection of cellar mode; By default, the cellar is in MONO mode, press once to put the cellar in AUTO mode (multi-temperature use). The choice of mode can be selected from the Vinotag application. |
| H | Button to turn on / off light |
| I | Temperature adjustment button. Press this button to increase the temperature until the desired temperature is reached. The cellar temperature is adjustable between 5°C and 20°C in MONO mode (mono-temperature). In AUTO (multi-temperature) mode, the cellar manages the interior temperature of the cellar alone; these buttons do not work in this mode. The temperature can also be adjusted from the Vinotag application for MONO temperature mode. |
| J | Temperature adjustment button. Press this button to decrease the temperature until the desired temperature is reached.The cellar temperature is adjustable between 5°C and 20°C in MONO mode (mono-temperature). In AUTO (multi-temperature) mode, the cellar manages the interior temperature of the cellar alone; these buttons do not work in this mode. The temperature can also be adjusted from the Vinotag application for MONO temperature mode. |
| K | Press this button to turn the cellar on or off without unplugging it. |
| L | By default the control panel is unlocked. Press this button to unlock - lock the control panel. Press the button for 3 seconds to lock or unlock the screen. A padlock icon (B) appears when the control panel is locked. Without action on your part and automatically after 15 seconds, the screen darkens to go into standby / ECO mode (only if the control panel has been locked with the padlock icon displayed on the screen). The control panel keys can only be used when the panel is unlocked. |
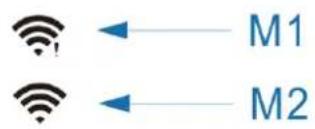
| M1 | Hold the K+L keys for 3 seconds to activate or deactivate the wine cellar's wifi. The M1 icon appears when WiFi is off, the M2 icon appears when WiFi is on. |
| M2 | Hold the F+G keys for 6 seconds to reset the WiFi. When the Wifi icon disappears for seconds then reappears flashing, this means that the Wifi reset has been successfully completed. |
The display screen backlight will automatically turn off after 15 seconds of inactivity after the display is locked, it will turn back on as soon as you press any key again. When an error code or alarm is present, the screen is automatically unlocked. Saving mode (backlight in standby) is only available if the screen is locked, otherwise the screen always remains on.
Alarms
To guarantee total safety of your wines; your cellar is equipped with an alarm system;
- High temperature alarm (HH code)
- Low temperature alarm (LL code)
- Error codes type E1/E2...
These alarms are pre-programmed. If after 12 hours of operation, the cellar detects a temperature difference of ±4^ compared to the set temperature, then the cellar will display an error code corresponding to the problem detected.
To deactivate the audible alarm, press one of the buttons on the control panel.
IMPORTANT: If one of these alarms is activated, unplug your device and contact after-sales service.
Master unit
Your cellar is equipped with a master unit. This unit control is placed inside the cellar, top right; it allows connectivity between the shelves and the VINOTAG® smartphone application via wifi data transmission.
Warning ! Under no circumstances should this unit control be handled, or damaged.
This unit control is equipped with an indicator light placed under the box which gives information on the condition of the cellar and a push button which is used to reset the wifi connection from the cellar to the network. When the indicator light flashes continuously, this indicates that the cellar is not connected to wifi network or has lost its connection to a WiFi network. This box is also equipped with a QR code located under its lower edge (QR code also accessible on the quality sheet provided when purchasing your cellar or at the bottom left side of the cellar next to the nameplate).
- First use

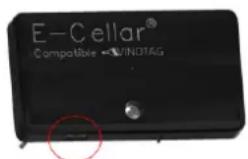
The QR code is used for pairing the cellar (in Bluetooth). You will need to scan this QR code during the first use to connect your cellar to the wifi network.
Warning ! scanning the QR code and the pairing procedure only need to be carried out once! If you do this operation on a cellar already associated with a user, you
become the new owner of it and overwrite all the data previously associated with the cellar. You will thus have access to an empty cellar and the former owner will no longer have any access to the cellar. Please note, this action is irreversible and overwritten data cannot be recovered.
Warning ! When the indicator light flashes continuously, this indicates that the cellar is not connected or has lost its connection to a WiFi network
Warning ! Do not remove the various QR codes present in the ECELLAR, these are useful in case of pairing with the cellar or maintenance.
Warning ! To ensure the correct use of your cellar, you must place it in a place that guarantees good quality wifi reception.
- Reset of the connection to the wifi network or change of operator
To perform a Wifi reset, 2 actions are necessary. Firstly, press the push button located under the master box for 5 seconds, using one hand, please hold the plastic box firmly from above and press the small button using your thumb from below. The red LED located under the box starts flashing quickly. Then on the cellar control panel, press the MT and C/F buttons on the control panel (unlocked) for 5 seconds, the wifi icon flashes and searches for the new wifi network.
This operation is useful in the event of a change of internet box or abnormal loss of connection.
Connected shelves
The ECELLAR150G2 cellar is equipped with 11 connected shelves.
The ECELLAR185G2 cellar is equipped with 14 connected shelves.
These shelves were developed, manufactured and assembled in France.
The shelves communicate with the master unit of your cellar. Storage of bottles on the shelves is done head to tail, on the 12 defined locations.
- The necks of the bottles must rest on the central bar, at the predefined locations. The corresponding indicator light flashes twice to indicate the correct detection of your bottle. If the bottle is incorrectly placed, it is possible that the neck is not detected by the cellar, replace the bottle correctly on the shelf to ensure correct detection. Validation of an operation is confirmed by double flashing of the front indicator light
- The bottles resting on the shelves will be tilted 4^ (four degrees) on the central bar, this is normal and facilitates the detection of bottlenecks by the sensors. It is important that the bottle necks rest straight on the central bar, the necks must not be raised or positioned at an angle on the central bar, otherwise it may impact the detection of the bottles.

natural_image
Black wine bottles arranged in a grid, no visible text or labels- Warning! To prevent the wine cellar from tipping over, it is important to load the rear positions first. The shelves must not be pulled out or left out at the same time. The weight of the bottles can cause the cellar to tilt forwards, it is essential to distribute the weight of the bottles throughout the cellar and to handle it with care.
- Warning! Do not pull out the 11 connected shelves at the same time once loaded.
- Warning! If bottles are placed on a shelf, perform the operation delicately so as not to damage the central support.
- Warning! The shelves are not made to accommodate bottles with a diameter greater than 9 cm.
- Warning! In the event of a bottle breakage, it is important to remove the bottles and clean the holes in the central bar of the shelves where the sensors are placed, using a soft, dry cloth. Be sure to rescan your bottles before placing them back in your cellar.
- Warning! During the first use, the user must remove the protective plastic film placed on the front of each shelf.
The shelves have indicator lights (LED) which indicate to the user:
- Desired bottle(s)
- Recommended location (refer to the paragraph on the ESOMMELIER® function)
- Detection of bottles by the cellar when removing or adding bottles
Warning: in a particular case, the front led lights may remain on, they will turn off automatically after 5 minutes.
Modes of use
Your cellar has two temperature modes:
- The "mono-temperature" mode is activated by default. It allows the choice of a single temperature throughout the cellar between +5 and +20 °C. In this mode the fans are activated to ensure the circulation of air in the cellar. The temperature displayed on the digital screen corresponds to the set temperature and the message "MONO" is displayed.
- The "multi-temperature" mode makes it possible to obtain different temperatures inside the cellar, in the form of a gradient ranging from a warmer temperature at the top of the cellar, temperate in the middle and colder at the bottom of the cellar. In this mode the fans are disabled. The setpoint temperature is fixed automatically and cannot be changed, the screen displays "AUTO"; the device automatically manages the temperature. No adjustment is necessary.
Here are the temperatures that can be reached in multi-temperature mode under normal conditions of use, i.e. an ambient temperature of 25 ^ maximum (refer to the section "Installing your wine cabinet"). The temperature distribution indicated in the table is given as an indication, as variations may occur between the different levels depending on the cooling cycles, the number of bottles loaded in the cellar and the outside ambient temperature. The air flows inside the cavity will be influenced by these different factors.
ECELLAR185G2 :
| Shelf(from top to bottom) | Temperature range | |
| 1 | 14^ to 18^ | Suitable for storing red wines for tasting. |
| 2 | ||
| 3 | ||
| 4 | 10^ to 14^ | Suitable for aging your wines and champagnes. |
| 5 | ||
| 6 | ||
| 7 | ||
| 8 | ||
| 9 | ||
| 10 | ||
| 11 | 5^ to 10^ | Suitable for storing white or Rosé wines and champagne for tasting temperature. |
| 12 | ||
| 13 | ||
| 14 |
ECELLAR150G2 :
| Shelf(from top to bottom) | Temperature range | |
| 1 | 14^ to 18^ | Suitable for storing red wines for tasting. |
| 2 | ||
| 3 | ||
| 4 | 10^ to 14^ | Suitable for aging your wines and champagnes. |
| 5 | ||
| 6 | ||
| 7 | ||
| 8 | ||
| 9 | 5^ to 10^ | Suitable for storing white or Rosé wines and champagne for tasting temperature. |
| 10 | ||
| 11 |
The device ensures that the temperature is maintained as long as it is in operation and is used under normal conditions of use. The temperature inside the appliance and its energy consumption can be influenced by many factors: ambient temperature, exposure to the sun, number of door openings and quantity stored... Slight changes in temperature are perfectly normal.
- Demo mode
A demo mode is present on your device, when this mode is activated, the compressor, the fans and the alarms are deactivated, however the cellar keeps its display and light functions.
To activate this mode you must keep pressing the light (H) + C / F (F) keys for 3 seconds, then the displayed temperature or the AUTO icon will flash 5 times.
To exit the demo mode, repeat the same operation.
- The “ESOMMELIER®” mode
ESOMMELIER® mode is an assisted placement function for your bottles that can only be used if you have a connected LA SOMMELIERE cellar and an active VINOTAG® account.
This feature recommends the ideal location to store your wine.
When you scan a bottle, VINOTAG® identifies the type of wine; storage temperatures are recommended for each type of wine for optimal conservation.
Certain locations in your cellar are therefore more suitable depending on the type of wine.
By using this mode, the cellar offers you available and suitable locations for the scanned bottle of wine; indicator lights light up in the cellar to show you these locations up to a maximum of 12 simultaneous locations.
Winter mode
Your cellar is equipped with an automatic heating system also called “winter system”. When the temperature measured by the cellar probe is too cold (-4°C) for a period of 10 minutes compared to the set point, then the cellar resistance is activated to allow the temperature to heat up.
This system is activated and deactivated automatically and without user intervention. The automatic activation or deactivation of the Winter system has no impact on the conservation of your wine.
VINOTAG® application
The ECELLAR cellars are compatible with the VINOTAG® wine cellar management application.
To use your cellar in a connected way, it is necessary to have:
- An electrical power source to power the cellar
- Have downloaded the VINOTAG® application from the App Store or Google Play Store and created a user account
• A stable internet connection (Wifi)
• An ECELLAR cellar model
VINOTAG® functions
The VINOTAG® application allows you to:
- Create, customize and manage your wine cellars
- Add / remove bottles
- Consult your wine inventory (bottles of wine in your cellar) and create your own wine description sheets. VINOTAG® is associated with VIVINO®, as part of its Premium option, to allow you to export detailed wine sheets from the VIVINO® database.
- Create and consult your wine library. The exclusive VINOTAG® - VIVINO® partnership allows you to save and consult detailed wine files from the VIVINO® database
- Share the visualization of your cellar / s with your loved ones
- Be alerted of the peak date of your wines, the need to change the filter in your cellar or of a low stock level of your favorite wine
- Find easily your favorite bottle thanks to the front led light indicator.
- Find easily the free positions thanks to the front led light indicator.
- Remotely control the parameters of your cellar (lighting, temperature)
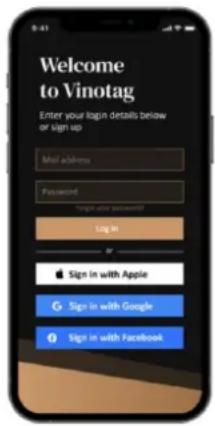
- Download the VINOTAG® application from the App Store or Google Play Store depending on your phone type.
- Create an account manually or via Facebook or via Apple / Google Play account
- Complete the mandatory fields: First name; Last name ; Date of Birth ; Country; region
- Check the box "I accept the general conditions of use"
- Click on "Finalize my registration"
You now have a VINOTAG® account, remember to save your username and password.
VINOTAG® Menus
When the application is open, the following menu is visible:

natural_image
Four simple line icons on a dark background: a group icon, a bottle, a bell, and a person silhouette (no text or symbols)My cellar
My wines
Alerts
Profile
• MY CELLAR: Allows you to view your wine cellar (s).
• MY WINES: Allows you to consult your wine library.
- ALERTS: Allows you to consult your cellar's alerts.
- PROFILE: Allows you to complete-view the information related to your account.
« MY CELLAR» page
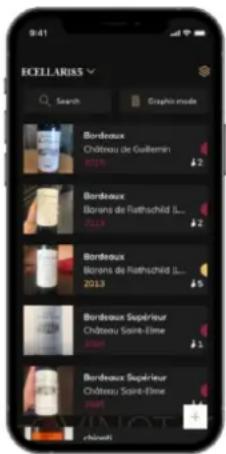
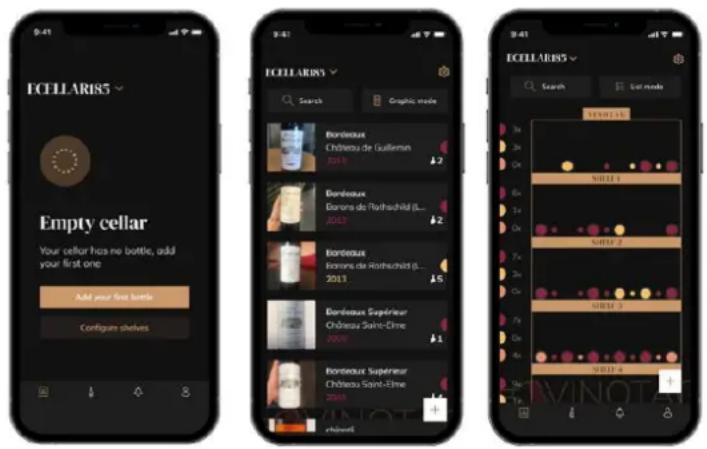
This page allows you to view the content of your wine cellar (s). Warning ! if your cellar is empty, you will not be able to view it; it is necessary to add bottles to access the view of your cellar.
The cellar can be visible in list mode or in graphic mode. The mode setting is accessible via the icon at the top right of your screen. This icon allows you to switch from one viewing mode to another. By default, the cellars in the "connected cellar" category are displayed in list mode.
Details of the "cellar view" icon:

List mode or

Graphic mode
- The search icon 📄 at the top left of your screen allows you to search for a bottle of wine in your cellar; all you need to do is write information about the bottle you are looking for (domain name, type of wine, year, etc)
- The icon at the bottom right of your screen allows you to add bottles of wine. (see the "Add a bottle of wine" section for more information)
- Warning! If you have more than one cellar, you can switch from one cellar to another using the name of your cellar located at the top left of your screen. When you click on the name of your cellar a pop-up asks you to select the cellar you want to view. Click in the list of your cellars on the model to view.
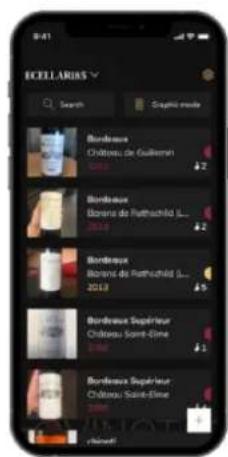
List mode:
- Simplified display mode. A list allows you to consult the wines kept in your cellar. The wines are listed in alphabetical order.
- List mode indicates for each wine: the name of the wine, its domain, its date, its color, its type and finally the picture of the bottle.
- Pressing a wine allows you to access its wine sheet.
○ An indicator is present on the right of your screen. It indicates for each wine the type of wine. The types of wine are identified by a colored icon. (Red disc: indicates a red wine / Yellow disc: indicates a white wine / Salmon disc: indicates a rose wine).
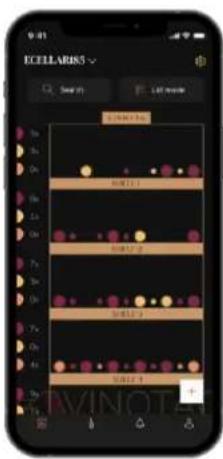
○ A graphical view of the cellar makes it possible to visualize the filling of the cellar by indicating the stored bottles represented by colored rounds.
- The wines are classified by shelf.
- User can view bottles
- Press on a bottle to access its wine sheet
- An indicator is present on the left of your screen. It indicates for each shelf the number of bottles per type of wine. The types of wine are identified by a colored round.
Red dot: indicates a red wine
Yellow dot : indicates a white wine
Pink dot: indicates a rosé wine
« MY WINES » page
This page allows you to view your wine library. The wine library area allows you to:
- Consult your wines consumed, all wines added (still present or not) in your cellar are
automatically added to your wine library area.
- Create a wishlist; you can save wines tasted at friends or you want to buy. The wine library area allows you to create a wish list.
- The search icon 📄 at the top left of your screen allows you to search for a bottle of wine in your wine store; all you need to do is write information about the bottle you are looking for (domain name, type of wine, year, etc.)
- To add a bottle to your wine library, follow the “Add bottles” procedure and click on “add to my wine library”
- Press on a wine to consult its wine file (for more information, follow the procedure "consult a wine sheet")
« ALERTS » page
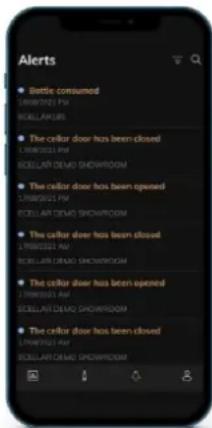
This page allows you to view the alerts related to your cellar; a red dot next to the icon indicates an unread alert.
The alerts are classified chronologically.
When you have several cellars, it is possible to filter by cellar (filter icon located at the top left of your screen).
A search field allows you to filter your alerts to find a specific event.
- Filter change alert: your cellar alerts you when it is necessary to change the filter. The filter change date is automatically established when you register a new cellar. Warning ! when you change your filter, do not forget to enter this action in your application profile so that the counter will reset to the current date. (by default a filter
change must be done every year)
- Stock alert: you have the possibility to program stock alerts for a specific wine and according to a defined quantity. The application alerts you that the wine in question is about to run out. (the "rupture" quantity is defined by you, the alert can be set to a number of bottles.)
- Technical alerts: these alerts indicate a technical problem or an action carried out in the cellar: bottle consumed; bottle added; cellar created; cellar joined; user X has joined your cellar ... In the event of a technical problem, contact an authorized technician. The alerts are presented in the form of a list indicating the type of alert, the date, the time, the number of the shelf concerned, the name of the cellar concerned.
« PROFILE » page
This page allows you to view, complete or modify the information related to your VINOTAG® account:
- Modify my information: to modify your registration information (last name, first name, birthday, country, department) or delete your account. To agree to receive news and other commercial information from VINOTAG.
- I become premium: to subscribe to the premium option of VINOTAG® and benefit from recharging scans. These scans allow you to directly save the VIVINO® files in your application and no longer have to complete the wine sheets manually (refer to the "premium account" process).
- Add cellar: allows you to add new cellars.
- Enter an invitation code: allows you to join cellars whose access has been shared with you.
Entering an invitation code is mandatory to join a cellar, this access code is generated and distributed by the owner of the shared cellar.
- Contact: allows you to contact VINOTAG® customer service a drop-down list allows you to select the subject of your request.
- General Conditions of Use: allows you to consult the VINOTAG® General Conditions of Use
- Legal notices: allows you to consult the VINOTAG® Legal notices
- Disconnect: allows you to disconnect
Add a cellar
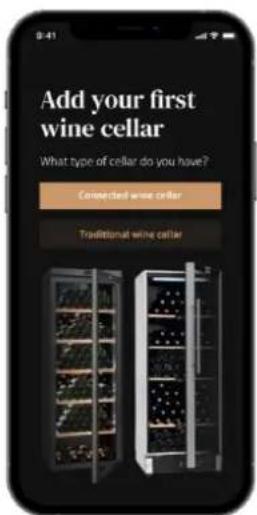
You now have a VINOTAG® account to add your first cellar or a new cellar (the application offers you the possibility of managing several cellars from a selection of models).
Warning ! Under no circumstances should you quit the application when adding a cellar.
- Adding a first cellar: the creation of your cellar is mandatory when creating your account, follow the different steps below.
- Adding a new cellar: you want to manage a new cellar from your application, go to the "profile" -> "my cellars" page and click on the "add a cellar" button; follow the different steps below.
Add a connected wine cellar
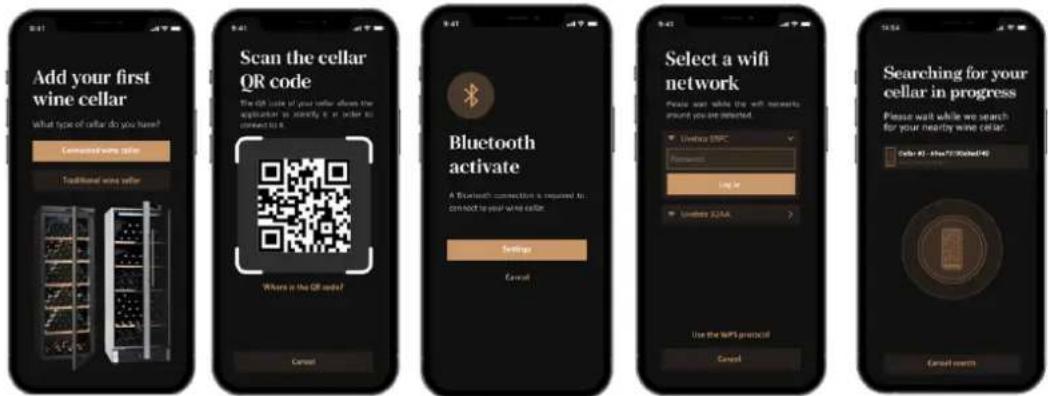
- Define the type of cellar "connected cellar" or "unconnected cellar". The ECELLAR models is part of the "connected cellar" category. Click on "connected cellar".
- Scan the QR code of your cellar to allow the application to identify it and connect to it. The QR code is located inside your cellar, under the master box placed at the top right of the cellar and at the bottom of the quality sheet supplied with your cellar when it was purchased. Prefer the scan of the latter, more accessible, to connect your cellar with ease.
- The application asks you to activate bluetooth; its activation is necessary to configure the cellar.
- Once your cellar is connected to bluetooth, the application asks you to select a Wifi network or to use a WPS protocol:
- In the case of a Wi-Fi network, the Wi-Fi router password is requested. If the Wi-Fi
connection fails, check the password and / or check the distance between your cellar and your Wi-Fi router. A large distance or thick walls can block the connection. Move the cellar closer to the Wi-Fi router to allow its connection.
☐ For WPS, a loading bar appears throughout the scan. If no WPS network was found after several seconds, an error banner will appear at the top of the screen, and the application will revert to the Wi-Fi / WPS choice.
- A screen is displayed after wifi connection. The wine cellars also have a remote control function (lighting, temperature). Select your winery to finalize the complete connection process.
Caution: Before connecting your device, check:
- That the red LED located under the master box flashes quickly
- The wifi icon on the cellar control panel is flashing
Otherwise, please reset the system as indicated in the chapter: Master Box / Reset the connection to the wifi network or change operator
Share your cellar
As a cellar owner, you can invite others to join your cellar. Consulting your cellar requires the guest to create a VINOTAG® account.
To invite someone:
- Go to the "my cellar" page and select the wine cellar you want to share, then go to "settings"
- Click on the "Share my cellar" button,
- Click on the "Create a code" button,
- You can transfer or communicate this code to the person(s) with whom you wish to share your cellar.
- You can create new access codes to share the contents of your cellar with other members.
When you share your cellar;
- The "Alerts" page tells you when a member has joined your cellar.
- You can remove this access at any time; select the cellar that you no longer wish to share and click on the "trash can" icon next to the name of the member for whom you wish to delete his access.
To access a cellar shared with you;
- When you are invited to join a cellar, go to the "my profile" page: "enter an invitation code". Enter the invitation code received and click on "join". You now have access to a shared cellar.
- You can leave a shared cellar at any time; select the cellar that you no longer wish to consult and click on the "Leave this cellar" button.
Delete a cellar
You want to delete one or more cellars.
- Go to the "my cellar" page
- The list of your cellars appears is accessible in the drop-down menu at the top right of the
page
- Select the cellar you want to delete: press delete.
- Repeat the operation on all the cellars you want to delete.
Warning ! if the cellar has at least one bottle, a pop-up will appear asking you to confirm this action. Once the cellar has been deleted, it is no longer possible to recover the related information.
Warning ! you cannot delete a cellar that does not belong to you. When a cellar is shared with you and therefore visible from the "my profile" page: "my cellars"; you can stop sharing. When you are not an owner, the "Remove" button is an "Exit" button. It allows you to leave the cellar. A pop-up appears to confirm the action.
Change the cellar configuration
You want to change the configuration of your cellar differently from its standard configuration.
Warning ! for a cellar in the “connected cellar” category; the standard configuration should not be changed. The shelves of “connected cellars” are intelligent shelves connected to the cellar. Electrically powered, their modification / removal must be carried out by an approved professional.
Manage my Cellar
In "Settings" mode you can control your cellar
- Adjust the temperature of your cellar
- Change measurement from Celsius to Fahrenheit
- Turn the interior lighting on or off
- Reset the charcoal filter when the change is necessary
- Stop or start operation your cellar
- Reset the WiFi in your cellar
- Share your cellar
- Delete your cellar
Add bottles
You have created your cellar in the VINOTAG® application; you can now add bottles.
NOTE: Synchronization: Each movement that takes place in a “connected cellar” is stored by the latter. This allows you to keep a history when the cellar is no longer connected to the internet. The next time you connect to wifi and cloud, if movements have taken place, a synchronization view appears on your smartphone, in order to retrieve them and save them in the database so that the displayed stock is up to date.
Create a cellar List mode Graphic mode
- Click on "add my first bottle" in the case of a new cellar or "+" Take a picture of the label of the bottle you want to add to your cellar. A completed wine sheet appears; this sheet comes
from the VIVINO® database. You can modify or complete this wine sheet.
- Warning ! If the scanned bottle of wine is not available on the VIVINO® database or if you do not have a premium subscription, you will have to manually complete the wine sheet associated with your bottle. If you wish, it is possible not to take a photo of the label; in this case, you will not be able to access the VIVINO® database, so you will have to manually complete the wine sheet associated with your bottle.
- When adding a bottle, you can complete / modify the associated wine sheet; enter a comment on the bottle of wine, save it as a favorite or give it a rating.
- Wine name
- Field
- Appellation
- Year
- Country / region
- Color
- Quantity of bottles
- An "advanced" mode allows you to provide additional information such as;
- Minimum guard (years)
- Maximum guard (years)
- Comment
- Switch to favorites
- Rate the bottle (0 to 5)
- Buying price
- Link to VIVINO® to find the complete sheet (Premium Option)
-
Link to VIVINO® to buy this wine
-
The scanned bottle is not recognized: if the bottle is not recognized, the application offers to restart the scan, to manually search for the bottle (if no bottle corresponds to its search) or to fill manually the sheet.
- It is mandatory to enter a minimum and maximum conservation time to receive peak date alerts. If the minimum and maximum conservation time fields are not completed, no peak date alert will be sent.
You add a bottle in a "Connected cellar"
Place the bottle / s in your cellar on the desired location / s;
- VINOTAG® informs you of the detection of your bottle / s and records its / their location / s on the digital version of your cellar.
- When the bottle is placed and detected, the corresponding front shelf indicator light flashes twice quickly. The location is remembered in your app. A success pop-up is then displayed with two buttons: "Add a bottle" or "Done".
- Attention! If you would like to place bottle (s) in the storage area at the bottom of your cellar, please note that this part of the cellar is not connected.
- Click on "+" to continue adding bottles to your cellar.
To note!
The storage area at the bottom of your cellar is not connected.
However, the application allows you to keep a digital register of the bottles that you placed at this location.
- The actual capacity of the storage area is 17 champagne-format bottles.
- The application nevertheless allows you to register a larger number of bottles, allowing you to keep a register of wines not stored in your cellar.
When adding a bottle to a "connected cellar"; you can use the ESOMMELIER® function. This feature recommends the ideal location to store your wine. When you scan a bottle, VINOTAG® identifies the type of wine; storage temperatures are recommended for each type of wine for optimal conservation.
Certain locations in your cellar are therefore more suitable depending on the type of wine.
The ESOMMELIER® function helps you to keep your wine in the best conditions. By clicking on this button, the cellar offers you available locations suitable for the scanned bottle of wine; indicator lights light up in the cellar to show you these locations.
When the bottle is placed and detected, the corresponding indicator light flashes twice quickly. The location is remembered in your app. A success pop-up is then displayed with two buttons: "Add a bottle" or "Done".
- Attention! In the event of a failure, where your cellar cannot detect the bottle, the indicator light will not flash. Carry out the manipulation again until the bottle is correctly detected and the indicator light flashes twice.
○ Warning ! If you do not come to pick up / drop off your bottle, the indicator light on the front of the shelf will remain on for 5 minutes, after which time the indicator light will go off automatically.
It is also possible to add a bottle via a wine sheet.
- Click on the button located at the bottom of the page "add one or more bottles"
- Enter the number of bottles to add and their format.
- Place the bottle / s in your cellar on the desired location / s;
- VINOTAG® informs you of the detection of your bottle / s and records its / their location / s on the digital version of your cellar.
PLEASE NOTE: creating a VINOTAG® account allows you to benefit from "50 free scans". When adding a connected cellar, 1,000 scans are offered to you. These scans allow you to benefit from pre-completed wine files thanks to the VINOTAG® - VIVINO® partnership. In the event that all of all scans offered have been used; it is possible to continue to add bottles by manually completing their wine sheet or to subscribe to the premium option to benefit from a scan refill (refer to the paragraph "Premium account").
Premium account
VINOTAG® partners with VIVINO® to facilitate the user experience. When creating a VINOTAG® account, a number of "free scans" are offered.
These "free scans" refer to the act of taking a picture of a bottle to directly access a detailed wine sheet extracted from the VIVINO® database. Warning ! unrecognized bottles are compatibilized as a "free scan" since the recognition request has been sent to VIVINO®. The photo capture must be of sufficient quality and sharpness for bottle recognition to be possible.
This wine sheet can be modified and saved directly in the digital version of your wine cellar, you no longer need to manually complete your wine sheet. A real time saver to fill your cellar and access a lot of information on your favorite wines.
In the event that all of the scans offered have been used; it is possible to continue to add bottles by manually completing their wine sheet or to subscribe to the premium option to benefit from a refill of scans. A pop-up alerts you when you have used up the “free scans”.
To switch to a premium account; the user must subscribe to the premium option which allows him to purchase scan refill.
- Refill 200 scans
- Refill 400 scans
- Refill 1000 scans
The "scans" purchased can be used without a time limit.
Subscription to the premium option and the pricing conditions are accessible via the VINOTAG® application in "my account" area by clicking on the "I become premium" button.
Remove bottles
You have created your cellar in the VINOTAG® application; you can now delete bottles from your cellar. The bottles will be kept in your wine library.
For a "connected" category cellar
- Remove the desired bottle from your cellar;
The connected cellar detects the withdrawal and informs the application; an alert indicates the withdrawal of the bottle on your application - Consult the "Alerts" page
or
○ Select a bottle of wine by using the "show in the cellar" function; the cellar will turn on the indicator light (s) corresponding to the locations where the different bottle (s) of wine are stored. Warning ! A maximum of 12 indicator lights can be lit simultaneously. Warning ! If you do not come to pick up / drop off your bottle, the indicator light on the front of the shelf will remain on for 5 minutes, after which time the indicator light will go off automatically.
○ The withdrawal is detected by the cellar, the indicator light corresponding to the previous location of your bottle will flash twice quickly to confirm the withdrawal
The connected cellar informs the application of the withdrawal; an alert indicates the withdrawal of the bottle on your application
- The view of your cellar is automatically updated
Warning ! to add or remove bottles in a connected cellar, it is necessary to be connected to a WiFi network to ensure good communication of information between your physical cellar and your digital cellar visible on VINOTAG
Consult a wine sheet
The consultation of wine sheets is accessible by your cellars or your wine library.
Consultation of wine sheet in my cellar - list mode or in my wine library
- Click on the bottle of your choice
- Consult the information related to your bottle
For more details, you can go to the site of our partner Vivino by clicking on "See on Vivino"
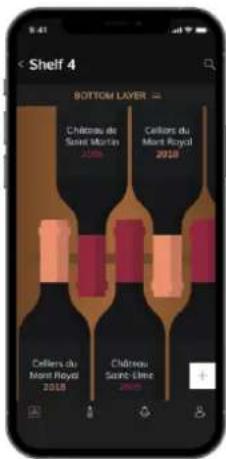
Consultation of wine sheet in my cellar - graphic mode
- Click on the shelf of your choice
- Click on the bottle of your choice
- Consult the information related to your bottle
- For more details, you can go to the site of our partner Vivino by clicking on "See on Vivino"
Create stock alerts
To better manage your cellar and your wines, VINOTAG® offers you to set up stock alerts:
- Via the view of your cellar on the application, click on the desired bottle to access the associated wine sheet
- Click on "schedule an alert"
○ Indicate from how many bottles remaining you wish to receive a stock alert
- Click on validate. The stock alert is now activated.
To deactivate a stock alert, click on "modify alert"; decrease the number of desired bottles until "deactivate". Click on validate. The stock alert is now deactivated.
Create peak date alerts
To create peak date alerts, it is mandatory to enter a minimum aging time (greater than 0) and a maximum aging time on the wine sheet. The conservation time is expressed in years. You will be sent an alert for the start and end of the peak date if your bottle has not been consumed. A wine from the year "X" with a minimum conservation time of 5 years and maximum of 10 years will alert you as follows:
- Year "X" + 5 years: Early peak date alert "Your bottle is ready to be tasted"
- Year "X" + 10 years: End of peak date alert "Your bottle is at the end of its peak date"
View the location of your bottles in your cellar
You are on view from your cellar; Use the search icon located at the top left of your screen Indicate the name of the desired wine and / or domain and / or other information related to the bottle The wine sheet of the desired bottle is displayed
Click on the button located at the bottom of the page "See my bottles" or on the button "Show in the cellar" located at the beginning of your wine sheet.
Indicator lights light up in your cellar, up to a limit of 12 simultaneously, to show you the location of the bottle (s) you are looking for.
Cellar maintenance
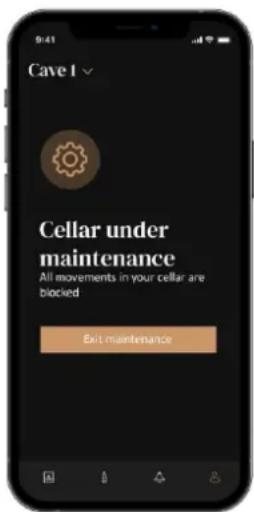
From the cellar configuration, it is possible to put your cellar in maintenance.
This manipulation blocks all movements that may take place in the cellar (addition, movement, deletion).
The reception view is therefore blocked by a "cellar under maintenance" view. To exit maintenance mode, click on the "Exit maintenance" button.
Warning! When you exit maintenance mode, you can:
- Reload the last registered layout
- Go back to an empty cellar. In that case you have to restart process from the beginning and scan your first bottle.
6. CARE AND MAINTENANCE
Before cleaning your appliance (something that should be done regularly), disconnect it by removing the plug or by pulling the fuse on the circuit.
Before using your appliance for the first time and regularly after that, we recommend that you clean the inside and outside (front, side and top) with warm mixed with a gentle cleaning product. Rinse with clean water and allow drying before reconnecting. Do not use solvents or abrasives.
When the appliance is switched on for the first time, there may be a residual smell. In that case, runt the appliance empty for a few hours at the coldest possible temperature. The cold will kill any smell.
Automatic defrost
An automatic defrost is programmed on your cellar. There is no impact for wines stored in the cellar during the defrosting phase.
During defrost; the compressor and the fans will be off. The digital display will show normal temperature, however if you want to display the actual temperature of your cellar, the display will show you the code "DD" which is normal.
Changing the carbon filter
Your wine cellar is equipped with a charcoal filter, which is positioned at the bottom right corner of your cellar. We recommend that you replace it once a year. To replace it, simply pull it out from inside the cellar and put a new filter back in.
If you use the app, a reminder notification will be sent to you when changing the filter is necessary.
In the event of a power cut
The majority of power outages are resolved within a short period of time.
A shutdown of 1 or 2 hours will not affect your cellar temperatures.
To protect your wines during power cuts, consider minimizing the number of door openings.
For very long power cuts, take the necessary measures to protect your wine.
If the device is unplugged, turned off or there is a power cut, you must wait 3 to 5 minutes before restarting it. If you try to restart it before this time, the compressor will start only after 3/5 minutes (if the temperature requires it).
At the first start-up and following a prolonged shutdown of the cellar, it is possible that when restarting the temperatures chosen and those displayed do not correspond. This is normal. It will then be necessary to wait a few hours before the temperatures regain their stability.
- In the event of a power cut, the device stores the set temperatures in memory. When the appliance is put back into service, it is therefore unnecessary to reprogram the cellar temperatures.
Warning ! During a power cut, the ECELLAR no longer records movements, so avoid modifying the wine stock.
When the power is turned on again, the cellar will update the stocks in order to detect the release or addition of a new bottle.
If an add or remove operation is performed via the app, it will save the changes, but if it is a free action (without going through the app) and a bottle is removed and replaced by a new one at the same location, the cellar will not make the distinction when it is restarted.
If you go on vacation
Short stays: let your cellar operate during your stay if it lasts less than 3 weeks.
Long stays: if your device is not to be used for several months, remove all bottles and accessories, turn off and unplug the device from the power outlet. Clean and dry the inside and outside of the appliance thoroughly. Also leave the door open, blocking it if necessary, to prevent the formation of condensate, odors and mold.
If you need to move your wine cellar
- Unplug your cellar before any operation.
- Remove all bottles from the cellar and secure the moving parts.
- To avoid damaging the leg leveling screws, screw them all the way into their base.
- Close the door completely.
- Move the device to a vertical position preferably or note from the inscriptions on the packaging, the direction in which the device can be laid. Also protect your device with a blanket or similar cloth.
7. IN THE EVENT OF A BREAKDOWN
Despite the care we take during production, a breakdown can never be totally excluded. Before contacting your retailer's after-sales department, please check that:
The appliance is properly plugged in
There is not a power cut in progress
The breakdown is not one of those described in the table at the end of this manual
IMPORTANT: if the power cable supplied is damaged, it must be replaced by the manufacturer, a service centre approved by the brand or the retailer. In all events, it must be replaced by qualified personnel in order to avoid any risk of injury.
IF THESE CHECKS REVEAL NOTHING, THEN CONTACT YOUR RETAILER'S AFTER-SALES DEPARTMENT.
CAUTION! Unplug the appliance before carrying out any maintenance or repair work.
8. TROUBLE SHOOTING
Many problems can be solved easily, saving you the cost of a phone call to service. Try to resolve your problem by following the suggestions below before calling for service.
TROUBLESHOOTING SOLUTION GUIDE
| PROBLEM | POSSIBLE CAUSE |
| The cellar is not working | The device is not plugged in.The device is turned off.The circuit breaker has tripped or a fuse has blown. |
| The wine cellar is not cold enough | Check the set temperature.The outdoor environment may require a higher setting.The door is opened too frequently.The door is not closed properly.The door seal does not adhere completely. |
| The device turns on and off frequently | The ambient temperature is higher than normal.Many bottles have been added to the wine cellar.The door is opened too frequently.The door is not closed properly.The temperature is not set correctly.The door seal does not adhere completely. |
| Interior lighting does not work | The device is not plugged in.The circuit breaker has tripped or a fuse has blown.The indicator light is off.The lighting activation key is OFF |
| Vibrations | Check and make sure the cellar is level. |
| The wine cellar seems to make too much noise | The "clicking" noise may come from flowing refrigerant, which is normal.At the end of each cooling cycle you may hear "gurgling" noises due to the flow of refrigerant in your wine cellar.The contraction and expansion of the internal walls can cause popping and crackling noises.The wine cellar is not level.In "mono" mode the cellar fans are activated to circulate the air flow inside the cellar. |
| The door does not close properly | The wine cellar is not level.The gasket is dirty or damaged.Some of the contents prevent the door from closingThe door hinges are looseThe shelves are not in their place. |
| Bottle placed but not detected | The size of the bottle does not match.The neck of the bottle is not in contact with the central bar of the shelf.The sensors on the central bar of the shelf are dirty => provide cleaning with a soft, dry cloth.The color of the neck is not detected by the sensor => carry out a test by adding an opaque label around the neck.The bottle does not have a seal at the neck => test by adding an opaque label around the neck.The cellar is off.The cellar is no longer connected to the internet (Wifi). |
| Bottle detected but not installed | The sensors on the central bar of the shelf are dirty => provide cleaning with a soft, dry cloth. |
| Pairing with the cellar does not work | The QR code of the master box was scanned incorrectly.The QR code is damaged.Wifi connection is insufficient.Bluetooth range is exceeded.The cellar is not connected.The phone's WiFi or Bluetooth is not activated. |
| Error code « EE » | Temperature probe fault. |
| Error code « HH » | High temperature alarm, unplug your appliance and call your after-sales service |
| Error code « LL » | Low temperature alarm, unplug your appliance and call your after-sale-service |
| Error code « DD » | Appliance in defrost phase => wait for the end of defrost |
| Water is flowing from my wine cellar | The drain hole inside your cellar is blocked.The cellar is not tilted back enough.The water tank behind the cellar is full. |
| A red LED flashes continuously under the master box | the cellar is not connected or has lost its connection to the Wifi network; |
| One or more LEDs remain on on the front of my shelves | You made a position call (s) (locate a bottle or ESommelier function) and you did not come to pick up / drop off the bottle (s) => wait 5 minutes for it (s) to go out on its own or open and close the wine cellar door |
| The buttons on the control panel do not work | Check that the control panel is not locked, padlock displayed on the screen. Unlock by pressing the key with the padlock symbol for 3 seconds to unlock the control panel |
| My digital register and my actual stock are different | Did you make any modification during a power break?Check in Vinotag application FAQ how to resolve your stock discrepancies. |
| I cannot scan the cellar QR code | Prefer the scan of the QR code present at the bottom of the quality sheet of your cellar. Place the quality sheet on a dry, flat support in the light to facilitate scanning of the QR code.if you have difficulty scanning the cellar QR code (under the masterbox), we advise you to turn on the LED light in the wine cellar, increasing the level brightness you will find it easier to detect the QR code with you phone. For phones that need a certain distance to focus, you can pull out the top shelf of your cellar to have a better distance between the lens of your phone and the cellar QR code. |
| The label of the wine I photograph is not recognized by the application | The photo taken via the application must be of good quality (not blurred), the photo must be taken so that the wine label fills in the white frame of the application. If that still doesn't work, try taking a close-up photo of just the name of the wine. |
Errors codes
| Error codes | Meaning |
| HH | High temperature alarm Stop the cellar and contact an approved technician |
| LL | Low temperature alarm Stop the cellar and contact an approved technician |
| DD | Appliance defrosting Normal operation |
| EE | Temperature probe fault Shut down the cellar and contact an approved technician |
| E0 | Malfunction alert. Stop the cellar and contact an authorized technician. |
| E1 | Malfunction alert. Stop the cellar and contact an authorized technician. |
| E2 | Malfunction alert. Stop the cellar and contact an authorized technician. |
| E3 | Malfunction alert. Stop the cellar and contact an authorized technician. |
If any other code, such as A, B, C, D, E, G, I, J, K, M, N, O is displayed on your screen, please contact customer service.
9. ENVIRONMENT
This appliance is marked according to the European directive 2019/290/EU on Waste Electrical and Electronic Equipment (WEEE). By ensuring this product is disposed of correctly, you will help prevent potential negative consequences for the environment and human health, which could otherwise be caused by inappropriate waste handling of this product.
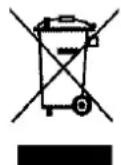
The symbol on the product, or on the documents accompanying the product, the Crossed Out Wheelie Bin, indicates that this appliance may not be treated as household waste. Instead it shall be handed over to the applicable collection point for the recycling of electrical and electronic equipment, or, if you are buying an equivalent product, to the retailer of the new product.
The user is responsible for taking the appliance to the appropriate collection center at the end of its useful life. Selective and appropriate collection for the recycling of no longer used appliances and their disposal and destruction in an environmentally friendly manner, helps to prevent potential negative effects on the environment and health, and encourages the recycling of materials used to make the product.
During disposal, or in the context of a resale, the user's personal data is protected, without action on his part. These data are not saved in the cellar but on an external server. No information transmitted during normal use of the cellar can be used after its disposal.
In the context of a resale of the device, the new user must scan the QR code of the master unit and follow the mandatory pairing procedure. This procedure overwrites data previously stored on the server. The new user will thus have a blank account. The former user will no longer be able to access or view their old information from the Vinotag application.
For more detailed information about treatment, recovery and recycling of this product, please contact your local authority, your household waste disposal service or the retailer where you purchased the product.
10. WARNING
As we continuously improve our products for the benefit of our customers, we reserve the right to modify technical characteristics without notice.
Warranties for LA SOMMELIERE brand products are offered exclusively by selected retailers. No part of these instructions may be considered as a supplementary guarantee.
FRIO ENTREPRISE cannot be held liable for errors or technical or editorial omissions in this document. Non-binding document.
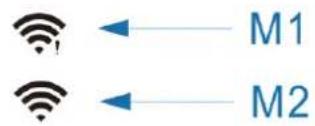
flowchart
graph LR
    A["Wireless Signal"] --> B["M1"]
    C["Wireless Signal"] --> D["M2"]
natural_image
Black cylindrical objects arranged in a grid, possibly bottles or containers, with no visible text or symbols.natural_image
Four simple line icons on a dark background: a box with three circles, a bottle, a bell, and a person silhouette (no text or symbols)natural_image
Empty rectangular frame with black border (no text or symbols)
flowchart
graph LR
    A["Wireless Signal"] --> B["M1"]
    C["Wireless Signal"] --> D["M2"]
natural_image
Black cylindrical objects arranged in a grid, possibly bottles or containers, with no visible text or symbols.Pagina "WAARSCHUWINGEN"
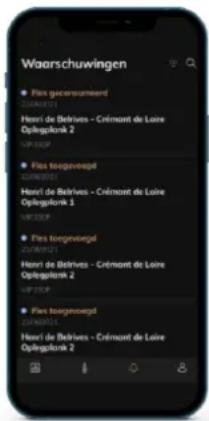
natural_image
Empty rectangular frame with black border (no text or symbols)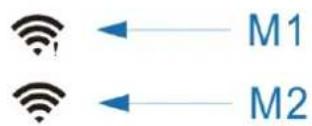
flowchart
graph LR
    A["Wireless Signal"] --> B["M1"]
    C["Wireless Signal"] --> D["M2"]
natural_image
Collection of dark green wine bottles arranged on a wooden rack (no text or symbols visible)natural_image
Four simple line icons on a dark background: a group photo, a bottle, a bell, and a person silhouette (no text or symbols)Mi vinoteca
Mis vinos
Alertas Perfil
natural_image
Empty rectangular frame with black border (no text or symbols)natural_image
Black cylindrical objects arranged in a grid, possibly bottles or containers, with no visible text or symbols.natural_image
Four simple icons on a dark background: a group photo, a bottle, a bell, and a person silhouette (no text or symbols)- ECELLAR150G2 - ECELLAR185G2
- 1.SAFETY INSTRUCTIONS
- Safety of children and other vulnerable people
- General security
- Refrigerating fluid
- Caution: risk of fire
- Electrical safety
- Daily use
- Caution: cleaning and servicing
- Important information about the installation!
- Trouble shooting and spareparts
- R600a Safety instructions
- This appliance meets the requirements of all applicable European directives and their amendments.
- RATING PLATE
- DESCRIPTION OF THE APPLIANCE
- Announced capacity
- Layout recommendations
- Radiofrequency characteristics
- INSTALLATION INSTRUCTIONS
- Before using this appliance
- Attention
- Wine Cellar Installation
- Power supply
- Location
- Handle installation
- Wifi range
- Scope of the cellar bluetooth
- Hygrometry
- OPERATING INSTRUCTIONS
- Control panel
- Alarms
- Master unit
- - Reset of the connection to the wifi network or change of operator
- Connected shelves
- Modes of use
- - Demo mode
- - The “ESOMMELIER®” mode
- Winter mode
- VINOTAG® application
- VINOTAG® functions
- VINOTAG® Menus
- List mode:
- « MY WINES » page
- Add a cellar
- Add a connected wine cellar
- Share your cellar
- To invite someone:
- Delete a cellar
- Change the cellar configuration
- Manage my Cellar
- Add bottles
- You add a bottle in a "Connected cellar"
- To note!
- Premium account
- Remove bottles
- Consult a wine sheet
- Create stock alerts
- Create peak date alerts
- View the location of your bottles in your cellar
- Cellar maintenance
- CARE AND MAINTENANCE
- Automatic defrost
- Changing the carbon filter
- In the event of a power cut
- If you go on vacation
- If you need to move your wine cellar
- IN THE EVENT OF A BREAKDOWN
- TROUBLE SHOOTING
- ENVIRONMENT
- WARNING
- Pagina "WAARSCHUWINGEN"
Brand : LA SOMMELIERE
Model : ECELLAR150G2
Category : Wine cellar