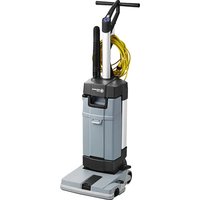
SC100 - Floor cleaner ADVANCE - Free user manual and instructions
Find the device manual for free SC100 ADVANCE in PDF.


| Product type | Floor scrubber for smooth floors |
| Brand | Advance |
| Model | SC100 |
| Dimensions (L x W x H) | 400 x 360 x 1150 mm |
| Empty weight | 12 kg |
| Operating weight | 15 kg |
| Power supply | 120 V, 50-60 Hz, 6.1 A |
| Protection class | Grounded |
| Solution tank capacity | 3 L |
| Recovery water tank capacity | 4 L |
| Cleaning width | 310 mm |
| Brush diameter | 66 mm |
| Brush rotation speed | 2100 rpm |
| Solution flow rate min/max | 0.2 / 0.6 L/min |
| Suction vacuum | 360 mm H₂O |
| Sound pressure level | 72 dB(A) |
| Maximum operating gradient | 2% |
| Operating temperature | 0 °C to 40 °C |
| Intended use | Commercial interior (hotels, schools, hospitals, factories, shops, offices) |
| Main functions | Washing and drying smooth floors; optional manual suction |
| Routine maintenance | Cleaning of nozzles, brush, tanks, filters (solution and air) |
| Safety | Unplug before maintenance; do not use on slopes >2%; avoid flammable products |
| Spare parts | Cylindrical brushes (PPL, microfiber, carpet), nozzles, kits (hose, mesh bag) |
| Optional accessories | Manual hose kit, carpet kit, two-handle kit |
| Repairability | Contact an authorized Advance after-sales service; use original parts |
Frequently Asked Questions - SC100 ADVANCE
User questions about SC100 ADVANCE
0 question about this device. Answer the ones you know or ask your own.
Ask a new question about this device
Download the instructions for your Floor cleaner in PDF format for free! Find your manual SC100 - ADVANCE and take your electronic device back in hand. On this page are published all the documents necessary for the use of your device. SC100 by ADVANCE.
USER MANUAL SC100 ADVANCE
natural_image
Line drawing of a vacuum cleaner with attached power outlet (no text or symbols)
Instructions for Use - Original Instructions
P100890
P100881
P100882
P100883
P100884a
P100886
9
natural_image
Technical line drawing of a mechanical component or bracket assembly (no text or symbols)A
natural_image
Pure technical line drawing of a mechanical component or bracket (no text or symbols)B
P100887
10
P100888
11

P100889
TABLE OF CONTENTS
INTRODUCTION......2
MANUAL PURPOSE AND CONTENTS 2
TARGET 2
IDENTIFICATION DATA....2
OTHER REFERENCE MANUALS....2
SPARE PARTS AND MAINTENANCE....2
CHANGES AND IMPROVEMENTS 2
MACHINE FUNCTIONS 2
CONVENTIONS 2
UNPACKING/DELIVERY 2
SAFETY 2
VISIBLE SYMBOLS ON THE MACHINE....2
SYMBOLS THAT APPEAR ON THIS MANUAL....3
GENERAL INSTRUCTIONS....3
120 VAC GROUNDING INSTRUCTIONS 4
MACHINE DESCRIPTION 4
MACHINE STRUCTURE 4
USE / OPERATION 5
SOLUTION TANK FILLING....5
MACHINE START OPERATION (SCRUBBING/DRYING) 5
MACHINE STOP OPERATION....5
VACUUM HOSE (optional) 5
TANK EMPTYING....5
MACHINE TRANSPORT/PARKING 5
AFTER USING THE MACHINE....5
MAINTENANCE....6
SCHEDULED MAINTENANCE TABLE 6
POWER SUPPLY CABLE CHECK....6
SQUEEGEE BAR CLEANING....6
BRUSH AND BRUSH COMPARTMENT CLEANING 6
INSPECTION COMPARTMENT CLEANING....6
RECOVERY TANK CLEANING 7
SOLUTION FILTER CLEANING....7
AIR FILTER CLEANING 7
TROUBLESHOOTING....7
DISPOSAL 7
TECHNICAL DATA 8
ACCESSORIES/OPTIONS 8
INTRODUCTION

NOTE
The numbers in brackets refer to the components shown in Machine Description chapter.
MANUAL PURPOSE AND CONTENTS
The purpose of this Manual is to provide the operator with all necessary information to use the machine properly, in a safe and autonomous way. It contains information about technical data, safety, operation, storage, maintenance, spare parts and disposal.
Before performing any procedure on the machine, read this Manual carefully. Contact Advance in case of doubts concerning the interpretation of the instructions and for any further information.
Keep the manual in the appropriate envelope for future use or in case of resale of the equipment.
TARGET
This Manual is intended for operators and technicians qualified to perform the machine maintenance.
Users must not perform procedures reserved for qualified technicians. Advance will not be answerable for damages coming from the non-observance of this prohibition.
IDENTIFICATION DATA
The machine serial number and model name are marked on the plate (28).
Product number and year of production are marked on the same plate.
This information is useful when requiring machine spare parts.
Use the following table to write down the machine identification data.
MACHINE model ....
PRODUCT code ....
MACHINE serial number ....
OTHER REFERENCE MANUALS
– Service Manual (that can be consulted at Advance Service Centers)
– Spare Parts List (supplied with the machine)
SPARE PARTS AND MAINTENANCE
Any repair procedure must be performed by qualified personnel or by Advance Service Centers.
Only original spare parts and accessories must be used. Contact Advance for service or to order spare parts and accessories, specifying the machine model, product code and serial number.
CHANGES AND IMPROVEMENTS
Advance constantly improves its products and reserves the right to make changes and improvements at its discretion without being obliged to apply such benefits to the machines that were previously sold.
Any change and/or addition of accessory must be approved and performed by Advance.
MACHINE FUNCTIONS
This scrubber-dryer has been designed and built for commercial use and for cleaning (scrubbing and drying) smooth and compact floors.
The scrubber-dryer can be used on carpet when carpet accessories are installed.
CONVENTIONS
Forward, backward, front, rear, left or right are intended with reference to the operator's position when in use.
UNPACKING/DELIVERY
When the machine is delivered, check that the packing and the machine were not damaged during transportation. In case of visible damages, keep the packing and have it checked by the carrier that delivered it. Call the carrier immediately to fill in a damage claim.

CAUTION!
After unpacking, carefully assemble the machine according to the instructions sheet inside the packaging.
Please check that the following items have been supplied with the machine:
– Technical documents:
- Scrubber-dryer Instructions for use Manual
- Scrubber-dryer Spare Parts List

WARNING!
The Products sold with this Manual contain or may contain chemicals that are known to certain governments (such as the State of California, as identified in its Proposition 65 Regulatory Warning Law) to cause cancer, birth defects or other reproductive harm. In certain locations (including the State of California) purchasers of these Products that place them in service at an employment job site or a publicly accessible space are required by regulation to make certain notices, warnings or disclosures regarding the chemicals that are or may be contained in the Products at or about such work sites. It is the purchaser's responsibility to know the content of, and to comply with, any laws and regulations relating to the use of these Products in such environments. The Manufacturer disclaims any responsibility to advise purchasers of any specific requirements that may be applicable to the use of the Products in such environments.
SAFETY
The following symbols indicate potentially dangerous situations. Always read this information carefully and take all necessary precautions to safeguard people and property.
The operator's cooperation is essential in order to prevent injury. No accident prevention program is effective without the total cooperation of the person responsible for the machine operation. Most of the accidents are caused by failure to comply with the simplest rules for exercising prudence.
VISIBLE SYMBOLS ON THE MACHINE
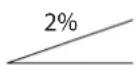
WARNING!
Do not use the machine on slopes with a gradient exceeding the specification.
SYMBOLS THAT APPEAR ON THIS MANUAL

DANGER!
It indicates a dangerous situation with risk of death for the operator.

WARNING!
It indicates a potential risk of injury for people.

CAUTION!
It indicates a caution or a remark related to important or useful functions.
Pay careful attention to the paragraphs marked by this symbol.

NOTE
It indicates a remark related to important or useful functions.

CONSULTATION
It indicates the necessity to refer to the Instructions for use Manual before performing any procedure.
GENERAL INSTRUCTIONS
Specific warnings and cautions to inform about potential damages to people and machine are shown below.

DANGER!
– Before performing any maintenance, repair, cleaning or replacement procedure disconnect the plug from the electrical mains.
- Do not wear jewels when working near electrical components.
- Do not operate the machine near toxic, dangerous, flammable and/or explosive powders, liquids or vapours: This machine is not suitable for collecting dangerous powders.

WARNING!
- This machine must be used by properly trained operators only.
- Carefully read all the instructions before performing any maintenance/repair procedure.
- Improper connection can cause electric shock. Connect the machine to a properly earthed mains supply.
- Do not tamper with the power supply cable plug. If the power supply cable plug cannot be connected to the outlet, have an outlet installed by a qualified technician, according to the law in force.
- Before connecting the power supply plug to the electrical mains, check that frequency and voltage, shown on the machine serial number plate, match the electrical mains voltage.
- Do not unplug the machine by pulling the supply cable. To unplug, grasp the plug, not the cable.
- Do not handle the plug or the machine with wet hands.
– Turn off all controls before unplugging. - Regularly check the power supply cable for damages, cuts, cracks and wear. If necessary, replace it.
- If the power supply cable is damaged, it must be replaced by the Manufacturer or by an authorised Service Centre.
- Do not pull or carry the machine by the power supply
cable and never use the power supply cable as a handle. Do not close a door on the power supply cable, or pull the power supply cable around sharp edges or corners. Do not run the machine on the power supply cable. The rotating brush must not come into contact with the power supply cable.
- Keep the supply cable away from heated surfaces.
- To reduce the risk of fire, electric shock, or injury, do not leave the machine unattended when it is plugged in. Disconnect the machine from the electrical mains when not in use and before performing maintenance procedures.
- This machine is for indoor use only. Not for outdoor use. Always protect the machine against the sun rays and wet conditions. This machine must be stored indoor.
– Before using the machine, close all doors and/or covers as shown in the Instructions for use Manual.
– EU countries: This appliance can be used by children aged from 8 years and above and persons with reduced physical, sensory or mental capabilities or lack of experience and knowledge if they have been given supervision or instruction concerning use of the appliance in a safe way and understand the hazards involved. Children shall not play with the appliance. Cleaning and user maintenance shall not be made by children without supervision.
– Non-EU countries: This machine is not intended for use by persons (including children) with reduced physical, sensory or mental capabilities, or lack of experience and knowledge.
- Close attention is necessary when used near children.
- Use only as shown in this Manual. Use only Advance's recommended accessories.
- Check the machine carefully before each use, always check that all the components have been assembled before use. If the machine is not perfectly assembled it can cause damages to people and properties.
- Take all necessary precautions to prevent hair, jewels and loose clothes from being caught by the machine moving parts.
- Do not use the machine on incline.
- Do not use the machine on slopes with a gradient exceeding the specification.
- Do not use the machine in particularly dusty areas.
- Use the machine only where a proper lighting is provided.
- While using this machine, take care not to cause damage to people or objects.
- Do not bump into shelves or scaffoldings, especially where there is a risk of falling objects.
- The machine working temperature must be between 32^ and 104^ (0 °C and +40 °C).
- The machine storage temperature must be between 32^ and 104^ (0 °C and +40 °C).
- The humidity must be between 30% and 95% .
- When using floor cleaning detergents, follow the instructions on the labels of the detergent bottles.
- To handle floor cleaning detergents, wear suitable gloves and protections.
- Do not allow the brush to operate while the machine is stationary to avoid damaging the floor.
– In case of fire, use a powder fire extinguisher, not a water extinguisher.
- Do not tamper with the machine safety guards and follow the ordinary maintenance instructions scrupulously.
- Do not allow any object to enter into the openings.
- Do not use the machine if the openings are clogged. Always keep the openings free from dust, hairs and any other foreign material which could reduce the air flow.
- Do not remove or modify the plates affixed to the machine.
- Pay attention during machine transportation when temperature is below freezing point. The water in the recovery tank or in the hoses could freeze and seriously damage the machine.
- Use brushes supplied with the machine or those specified in the Instructions for use Manual. Using other brushes could reduce safety.
- In case of machine malfunctions, ensure that these are not due to lack of maintenance. If necessary, request assistance from the authorised personnel or from an authorised Service Center.
- If the machine
• does not work properly
- is damaged
• has water or foam leaks
• has been left outdoors exposed to bad weather conditions
- is wet or has been dropped into water turn it off immediately and contact the Advance Service Center or a qualified technician.
– If parts must be replaced, require ORIGINAL spare parts from an Authorised Dealer or Retailer.
- To ensure machine proper and safe operation, follow the relevant scheduled maintenance table in this manual.
- Do not wash the machine with direct or pressurised water jets, or with corrosive substances.
- The machine must be disposed of properly, because of the presence of toxic-harmful materials (electronic components, etc.), which are subject to standards that require disposal in special centres (see the Disposal chapter).
- This machine is intended for COMMERCIAL USE, for example in hotels, schools, hospitals, factories, shops, offices and rental businesses.
120 VAC GROUNDING INSTRUCTIONS
This appliance shall be grounded while in use to protect the operator from electric shock. If it should electrically malfunction, grounding provides a path of least resistance for electric current to reduce the risk of electric shock. This appliance is equipped with a cord having an equipment grounding conductor and a three-contact grounding-type attachment plug to fit the proper grounding type receptacle. The plug must be plugged into an appropriate outlet that is properly installed and grounded in accordance with all local codes and ordinances.

WARNING!
The machine must be used with an extension power cord as follows:
- minimum length 15 feet
- type S, or ST, or SO, or STO, or STW
- minimum rate 300V 140/167°F (60/75°C)

DANGER!
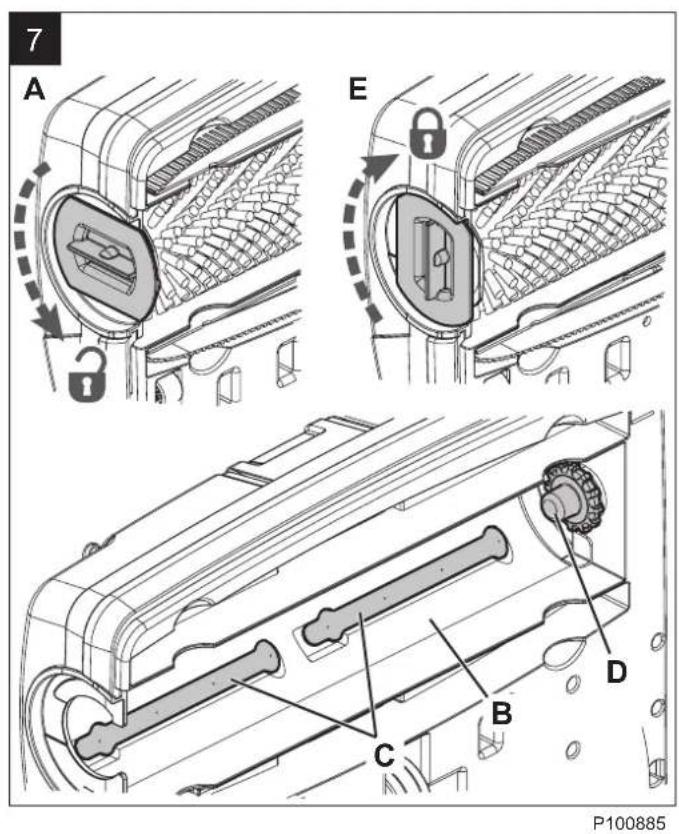
- Improper connection of the equipment-grounding conductor can result in a risk of electric shock. Check with a qualified electrician or service person if you are in doubt as to whether the outlet is properly grounded. Do not modify the plug provided with the appliance. If it will not fit the outlet, have a proper outlet installed by a qualified electrician.
- This appliance is for use on a nominal 120V circuit, and has a grounding plug that looks like the plug (B, Fig. 6). A temporary adapter (B and C) may be used to connect this plug to a 2-pole receptacle (B), if a properly grounded outlet is not available. The temporary adapter should be used only until a properly grounded outlet (A) can be installed by a qualified electrician. The green-colored rigid ear, tab, or the like extending from the adapter must be connected to a permanent ground such as a properly grounded outlet box cover. Whenever the adapter is used, it must be held in place by a metal screw. Grounding adapters are not approved for use in Canada.
- Replace the plug if the grounding pin is damaged or broken.
- The Green (or Green/Yellow) wire in the cord is the grounding wire. When replacing a plug, this wire must be attached to the grounding pin only.
Extension cords connected to this machine should be 12 gauge, three-wire cords with three-prong plugs and outlets. DO NOT use extension cords more than 50 feet (15 m) long.
MACHINE DESCRIPTION
MACHINE STRUCTURE
(Figure 1)
- Handle
- Main switch
- Start/stop push button
- Solution push button, level 1
- Solution push button, level 2
- Empty solution tank warning LED
- Pedal for release from parking position
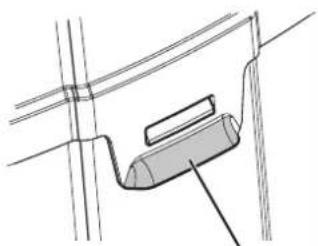
- Squeegee bar lifting/lowering pedal
- Tank coupling and transport handle
- Solution tank
- Solution tank filler plug
- Solution filter
- Recovery tank
- Cleaning deck
- Brush engagement/disengagement lever
- Cylindrical brush
- Squeegee bars
- Inspection lid
- Recovery water vacuum hose
- Air filter cover
- Recovery tank drain plug
- Vacuum inlet plug
- Brush/vacuum motor compartment
- Rear wheels
- Transport handle housing
- Power supply cable holder
- Power supply cable with connector
- Serial number plate/technical data/conformity certification
USE / OPERATION
SOLUTION TANK FILLING
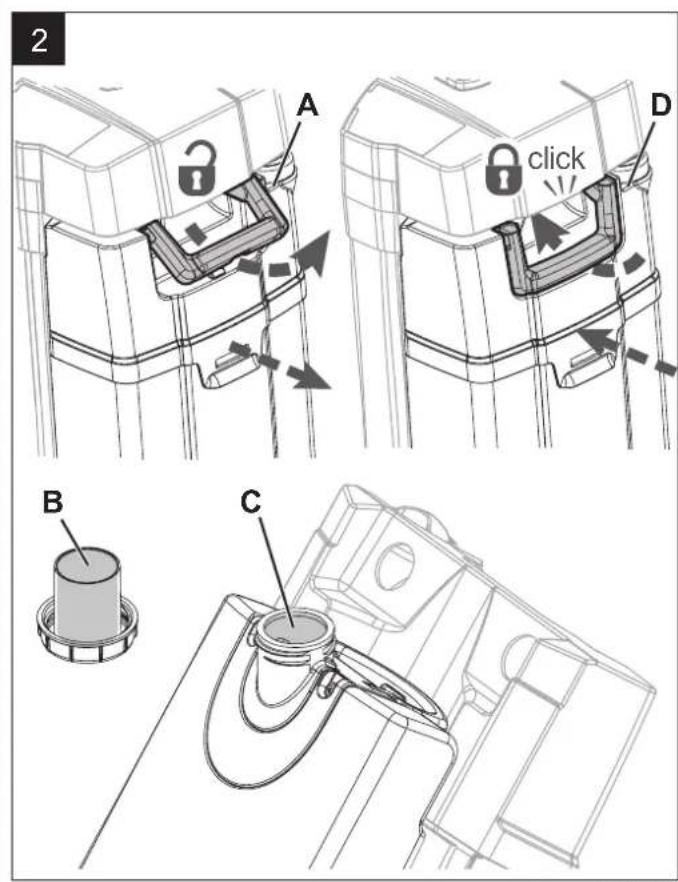
(Figure 2)

CAUTION!
Use only low-foam and non-flammable detergents, intended for automatic scrubber applications.

WARNING!
When using floor cleaning detergents, follow the instructions on the labels of the detergent bottles.
To handle floor cleaning detergents, wear suitable gloves and protections.
-
Release the handle (9) and remove the tank assembly (A) from the machine.
-
Remove the solution tank filler neck plug (B).
-
Fill the solution tank (C) with water and leave a few centimetres from the edge.
The water temperature must not exceed 40 °C.
- To compose the solution use the measuring cup of the tank plug (B).
The plug capacity is 30 ml, that is to say 1 % of solution diluted in the tank full of water. Always follow the dilution instructions on the label of the chemical product used to prepare the solution.
-
Install the solution tank plug.
-
Install the tank assembly on the machine body and engage it with the handle (D).

NOTE
Whenever the LED (6) turns on, stop the machine and fill the solution tank (10).

NOTE
Do not run the pump more than 1 minute without water in the solution tank (10).
MACHINE START OPERATION (SCRUBBING/DRYING)
-
Drive the machine to the working place by using the rear wheels and the handle (1).
-
Connect the power supply plug (27) to the electrical mains.
-
Turn on the machine with the main switch (2) to "I".

WARNING!
Before connecting the power supply plug to the electrical mains, check that frequency and voltage, shown on the machine serial number plate, match the electrical mains voltage.
-
Unlock the machine by using the pedal (7).
-
Lower the squeegee bars (17) with the pedal (8).
-
Press the push button (3) to start the machine.
-
Press one of the solution buttons, according to the type of cleaning to be performed:
- Level 1 push button (4), standard dirt.
- Level 2 push button (5), heavy dirt.
- Move the machine with the handle (1) and start scrubbing/drying the floor.

CAUTION!
To avoid any damage to the floor surface, turn off the brush when the machine stops in one place.
- Park the machine in upright position.
- Turn off the machine by pressing the push button (3).
- Press the main switch (2) to "0".
- Disconnect the power supply cable plug (27) from the electrical mains and place it on the holder (26).
- Lift the squeegee bars (17) with the pedal (8).
VACUUM HOSE (optional)
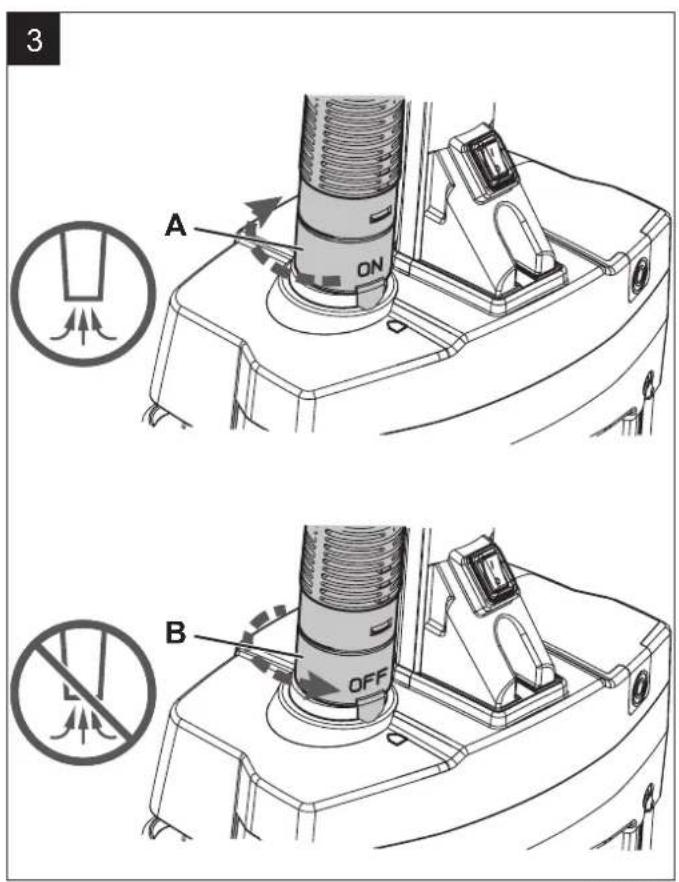
(Figure 3)
- Install the vacuum hose on the vacuum inlet (22).
- Connect the power supply plug (27) to the electrical mains.
- Turn on the machine with the main switch (2) to "I".
- Press the push button (3) to start the machine.
-
Turn the ring to ON (A) to start vacuuming with the supplied extension.
-
To stop vacuum and resume drying, turn the ring to OFF (B).
TANK EMPTYING
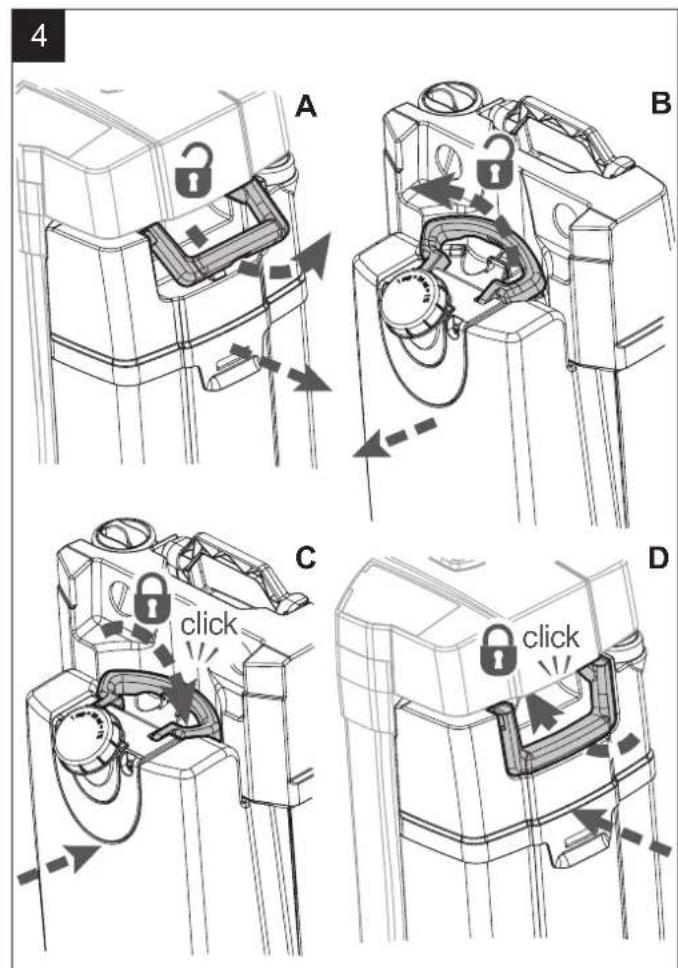
(Figure 4)
An automatic float shut-off system turns off the vacuum system when the recovery tank (13) is full.
The vacuum system deactivation is signalled by a sudden increase in the vacuum system motor noise frequency, and the floor is not dried.
When the recovery tank (13) is full, empty it according to the following procedure.
Recovery tank emptying
- Release the handle (9) and remove the tank assembly (A) from the machine.
- Release the solution tank handle (B).
- Remove the plug (21) and empty the recovery tank (13). Then, rinse the tank with clean water.
Solution tank emptying
- Remove the plug (11) and empty the solution tank (10). Then, rinse the tank with clean water.
- Engage the solution tank to the recovery tank (13) with the handle (C).
- Install the tank assembly on the machine body and engage it with the handle (D).
MACHINE TRANSPORT/PARKING
- Perform the procedures shown in "Machine stop operation" paragraph.
- Transport the machine in one of the following ways:
- Grasp the handle (1) and slightly lift the machine. While holding the machine in this position, drive it to the appointed parking area.
- Grasp the machine in the appropriate housing (25) and transport it to the appointed parking area.
- When finishing working, remove the brush (see the procedure in Maintenance chapter).
AFTER USING THE MACHINE
After working, before leaving the machine:
- Perform the procedures shown in "Machine stop operation" paragraph.
- Remove the brush as shown in Maintenance chapter.
- Empty the tanks (13) and (10).
- Perform the daily maintenance procedures (see the Maintenance chapter).
- Store the machine in a clean and dry place.
MAINTENANCE
The lifespan of the machine and its maximum operating safety are ensured by correct and regular maintenance. The following chart provides the scheduled maintenance. The intervals shown may vary according to particular working conditions.

WARNING!
Maintenance procedures must be performed with the machine switched off and the power supply cable plug disconnected from the electrical mains.
Moreover, carefully read the instructions in the Safety chapter.
SCHEDULED MAINTENANCE TABLE
| Procedure | Daily, after using the machine | Weekly Every six months |
| Squeegee bar cleaning | ||
| Brush Cleaning | ||
| Recovery tank cleaning | ||
| Brush compartment and inspection compartment cleaning | ||
| Power supply cable check | ||
| Inspection compartment cleaning | ||
| Squeegee bar check | ||
| Solution filter cleaning | ||
| Air filter cleaning | ||
| Solution tank cleaning | ||
| Squeegee bar replacement |
POWER SUPPLY CABLE CHECK
- Carefully check the power supply cable (27) and the relevant plug for wear, cuts, cracks or other damages. If the power supply cable or the relevant plug is damaged, contact the Advance Service Center before using the machine again.
SQUEEGEE BAR CLEANING
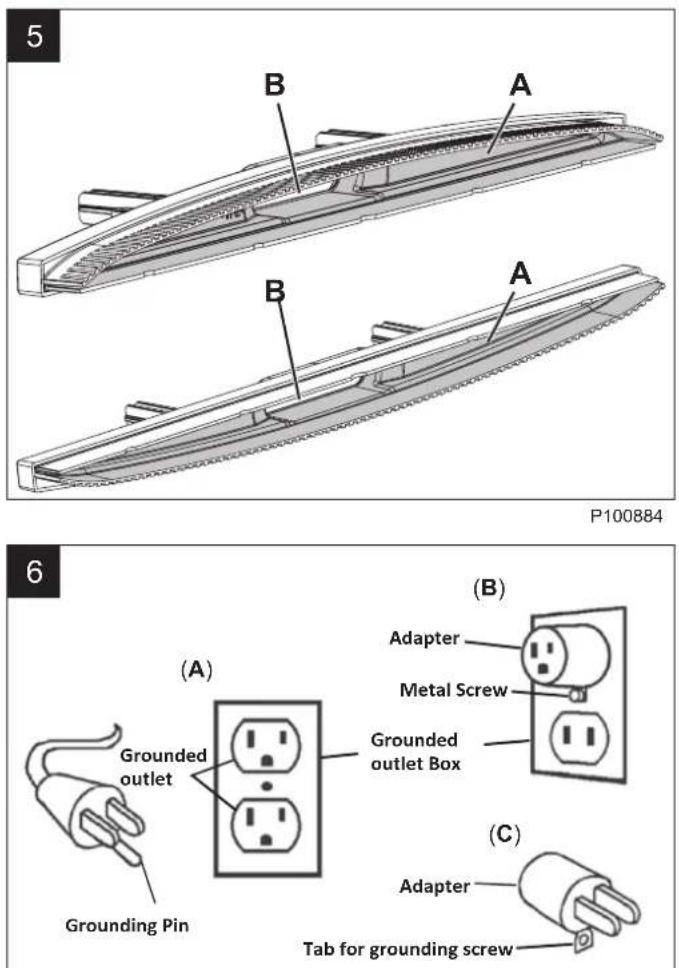
(Figure 5)

CAUTION!
It is advisable to wear protective gloves when cleaning the squeegee bars because there can be sharp debris.

NOTE
The squeegee bars must be clean and the blades must be in good conditions in order to get a good drying.

CAUTION!
The squeegee bars are fastened to the machine with a snap system and can be easily removed.
- Set the machine to stop position.
- Make sure that the power supply plug is disconnected from the electrical mains.
- Lower the squeegee bars (17) with the pedal (8).
- Lower the machine to reach the lower side of the cleaning deck (14).
- Remove the squeegee bars (17) by pulling outwards.
- Clean and wash the squeegee bars. In particular, clean the compartments (A) and the vacuum hole (B). Check the blades for integrity, cuts and tears; if necessary replace the squeegee bars.
- Install the squeegee bars (17) and make sure they are properly engaged.
BRUSH AND BRUSH COMPARTMENT CLEANING
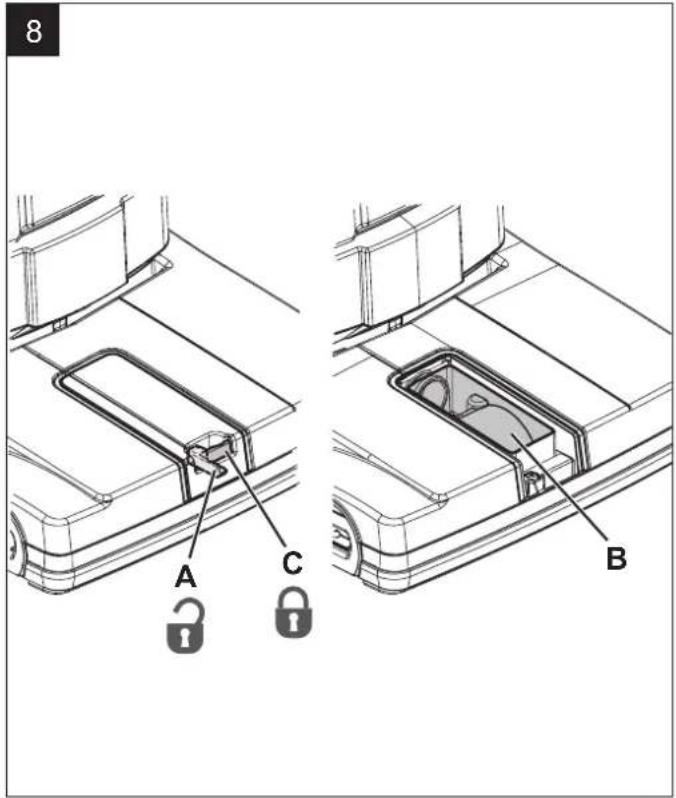
(Figure 7)
- Lower the machine to reach the lower side of the cleaning deck (14).
- Turn the lever (A) counter-clockwise and remove the brush.
- Clean and wash the brush (16) with water and detergent.
- Check the brush bristles for integrity and wear; if necessary, replace the brush.
- Carefully clean the brush compartment (B).
- Disassemble the solution dispensers (C) and clean them with water and detergent, then rinse and reassemble in the relevant housings.
- Install the brush (16) on the drive hub (D) and engage it by turning the lever (E) clockwise.
INSPECTION COMPARTMENT CLEANING
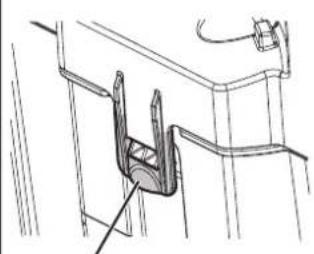
(Figure 8)
- Turn the lever (A) and remove the inspection compartment lid (18).
- Check and clean carefully the inspection compartment (B).
- Install the inspection compartment lid (18) and turn the lever (C) to fasten it to the deck.
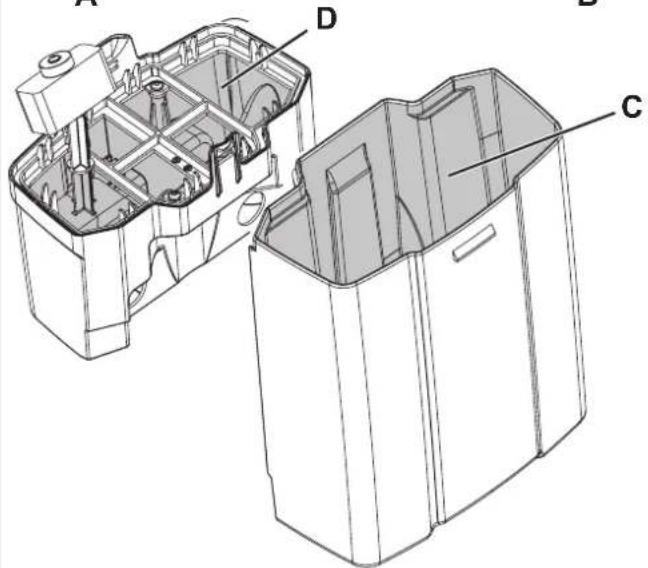
RECOVERY TANK CLEANING
(Figure 9)
- Remove the tank assembly from the machine body by using handle (9).
- Separate the solution tank (10) from the recovery tank (13).
- Open the recovery tank by prying on the hooks (A) and (B).
- Clean with water and detergent the lower (C) and upper (D) compartments of the tank, then rinse carefully.
- Reassemble the components.
- If necessary wash the solution tank (10) with clean water.
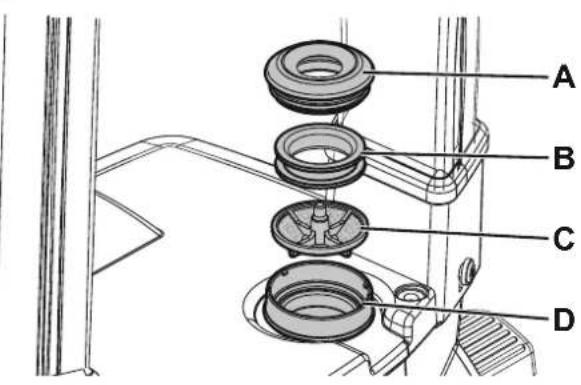
SOLUTION FILTER CLEANING
(Figure 10)
- Remove the tank assembly from the machine body.
- Remove the two rubber gasket (A and B), then remove the filter strainer (C).
- Clean and install them on the support (D).
AIR FILTER CLEANING
(Figure 11)
- Remove the cover (A), then remove the air filter (B).
- Clean the filter.
- Install the filter in the housing (C) and close with the cover (A).
TROUBLESHOOTING
| Trouble Possible Cause | Remedy | |
| The machine does not work. The power | supply cable or plug is broken. Replace the cable. | |
| The main switch is broken. Replace the main switch. (*) | ||
| The push button panel is broken. Replace the push button panel. (*) | ||
| The recovery water vacuuming is insufficient. | The recovery tank is full. Empty the tank. | |
| The squeegee bars are dirty or the blades are worn or damaged. | Clean and check the squeegee bars. | |
| The inspection compartment is dirty. Clean the compartment. | ||
| The recovery vacuum hose is disconnected or dirty. Connect or clean the hose. | ||
| The air filter is dirty. Clean the filter. | ||
| The solution flow to the brush is insufficient. | The solution filter is dirty. Clean the filter. | |
| The solution dispensers are clogged. | Clean the solution dispensers. | |
| The squeegees leave marks on the floor. | There is debris under the squeegee blades. Remove the debris. | |
| The squeegee blades are worn, chipped or torn. | Replace the blades. | |
(*) This maintenance procedure must be performed by an authorised Advance Service Center.
For further information refer to the Service Manual, available at any Advance Service Center.
DISPOSAL
Have the machine scrapped by a qualified scraper. Before disposal the machine, remove and separate the following materials, which must be disposed of properly according to the Law in force:
- Brush
- Plastic hoses and components
- Electrical and electronic components (*)
(*) Refer to the nearest Advance Center especially when disposal electrical and electronic components.
TECHNICAL DATA
| Model Advance SC100 | |
| Solution tank capacity 0.8 US gal (3 L) | |
| Recovery tank capacity 1.0 US gal (4 L) | |
| Machine size (length x width x height) 15.7 x 14.2 45.3 in (400 x 360 x 1,150 mm) | |
| Cleaning width 12.5 in (310 mm) | |
| Brush diameter 2.6 in (66 mm) | |
| Min/max solution flow 0.05 / 0.16 US gal/min (0.2 / 0.6 L/min) | |
| Sound pressure level at workstation (ISO 11201, ISO 4871, EN 60335-2-72) (LpA) 72 dB(A) ± 2 dB(A) | |
| Machine sound power level (ISO 3744, ISO 4871, EN 60335-2-72) (LwA) 83 dB(A) | |
| Vibration level at the operator's arms (ISO 5349-1, EN 60335-2-72) < 98.4 in/s | ^2 (< 2.5 m/s ^2 ) |
| Maximum gradient when working 2 % | |
| Protection class (electric) Grounded | |
| Vacuum system capacity | 0.512 psi (360 mm H _2 O) |
| Brush rotation speed | 2,100 rpm |
| Total absorbed power | 1 hp (0.73 kW) |
| Electrical system rating | 120 V, 50-60 Hz, 6.1A |
| Weight with empty tanks | 26.4 lb (12 kg) |
| Gross vehicle weight (GVW) | 33.0 lb (15 kg) |
| Shipping weight | 35.3 lb (16 kg) |
ACCESSORIES/OPTIONS
In addition to the standard components, the machine can be equipped with the following accessories/options, according to the machine specific use:
| 107411860 | Brush cyl 310 mm (12.5") Medium PPL (white) |
| 107411861 | Brush cyl 310 mm (12.5") Hard PPL (black) |
| 107411862 | Brush cyl 310 mm (12.5") Microfibre |
| 107411863 | Brush cyl 310 mm (12.5") Carpet |
| 107411864 | Manual suction hose kit |
| 107411865 | Carpet complete kit |
| 107411866 | Two hands working handle kit |
| 107414568 | Net kit |
| 107411867 | Squeegee 321 mm (13") kit |
| 107411868 | Squeegee 321 mm (13") carpet kit |
For further information concerning the optional accessories, contact an authorised Retailer.
ÍNDICE
INTRODUCCIÓN....2
FINALIDAD Y OBJETO DE ESTE MANUAL....2
DESTINATARIOS 2
FONCTIONS DE LA MACHINE....2
CONVENTIONS 2
DÉBALLAGE / LIVRAISON....2
SÉCURITÉ 2
SYMBOLES VISIBLES SUR LA MACHINE....2
SYMBOLES UTILISÉS DANS LE MANUEL....3
INSTRUCTIONS GÉNÉRALES....3
INSTRUCTIONS DE MISE A LA TERRE DE 120 V C.A. 4
DESCRIPTION DE LA MACHINE .... 4
STRUCTURE DE LA MACHINE....4
UTILISATION/FONCTIONNEMENT 5
REMLISSAGE DU RÉSERVOIR DE SOLUTION 5
DÉMARRAGE DE LA MACHINE (LAVAGE/SÉCHAGE) 5
ARRÊT DE LA MACHINE 5
TUYAU D'ASPIRATION (en option)....5
VIDANGE DES RÉSERVOIRS....5
TRANSPORT / STATIONNEMENT DE LA MACHINE....5
APRÈS L'UTILISATION DE LA MACHINE 6
ENTRETIEN 6
PLAN D'ENTRETIEN PROGRAMMÉ....6
CONTRÔLE DU CÂBLE D'ALIMENTATION 6
NETTOYAGE DES EMBOUCHURES 6
NETTOYAGE DE LA BROSSE ET DU LOGEMENT DE LA BROSSE....6
NETTOYAGE DU COMPARTIMENT DE CONTRÔLE 7
NETTOYAGE DU RÉSERVOIR DE L'EAU DE RÉCUPÉRATION ....7
NETTOYAGE DU FILTRE DE LA SOLUTION....7
NETTOYAGE DU FILTRE À AIR 7
DÉPISTAGE DES PANNES....7
MISE À LA FERRAILLE 7
CARACTÉRISTIQUES TECHNIQUES 8
ACCESSOIRES / OPTIONS....8
INTRODUCTION

REMARQUE
STRUCTURE DE LA MACHINE
(Figure 1)
ACCESSOIRES / OPTIONS
9435 Winnetka Avenue North
Brooklyn Park, MN 55445
www.advance-us.com
Phone: 800-989-2235
Fax: 800-989-6566
©2017 Nilfisk, Inc.
- TABLE OF CONTENTS
- INTRODUCTION......2
- UNPACKING/DELIVERY 2
- SAFETY 2
- MACHINE DESCRIPTION 4
- USE / OPERATION 5
- MAINTENANCE....6
- TROUBLESHOOTING....7
- DISPOSAL 7
- TECHNICAL DATA 8
- INTRODUCTION
- NOTE
- MANUAL PURPOSE AND CONTENTS
- TARGET
- IDENTIFICATION DATA
- OTHER REFERENCE MANUALS
- SPARE PARTS AND MAINTENANCE
- CHANGES AND IMPROVEMENTS
- MACHINE FUNCTIONS
- CONVENTIONS
- UNPACKING/DELIVERY
- CAUTION!
- WARNING!
- SAFETY
- VISIBLE SYMBOLS ON THE MACHINE
- SYMBOLS THAT APPEAR ON THIS MANUAL
- GENERAL INSTRUCTIONS
- VAC GROUNDING INSTRUCTIONS
- DANGER!
- MACHINE DESCRIPTION
- MACHINE STRUCTURE
- (Figure 1)
- USE / OPERATION
- SOLUTION TANK FILLING
- MACHINE START OPERATION (SCRUBBING/DRYING)
- VACUUM HOSE (optional)
- (Figure 3)
- TANK EMPTYING
- (Figure 4)
- Recovery tank emptying
- Solution tank emptying
- MACHINE TRANSPORT/PARKING
- AFTER USING THE MACHINE
- MAINTENANCE
- POWER SUPPLY CABLE CHECK
- SQUEEGEE BAR CLEANING
- BRUSH AND BRUSH COMPARTMENT CLEANING
- (Figure 7)
- INSPECTION COMPARTMENT CLEANING
- (Figure 8)
- RECOVERY TANK CLEANING
- (Figure 9)
- SOLUTION FILTER CLEANING
- (Figure 10)
- AIR FILTER CLEANING
- (Figure 11)
- TROUBLESHOOTING
- DISPOSAL
- ACCESSORIES/OPTIONS
- ÍNDICE
- INTRODUCCIÓN....2
- DÉBALLAGE / LIVRAISON....2
- SÉCURITÉ 2
- DESCRIPTION DE LA MACHINE .... 4
- UTILISATION/FONCTIONNEMENT 5
- ENTRETIEN 6
- DÉPISTAGE DES PANNES....7
- MISE À LA FERRAILLE 7
- CARACTÉRISTIQUES TECHNIQUES 8
- REMARQUE
- STRUCTURE DE LA MACHINE
- ACCESSOIRES / OPTIONS
Brand : ADVANCE
Model : SC100
Category : Floor cleaner