
BRYN - High chair Nuna - Free user manual and instructions
Find the device manual for free BRYN Nuna in PDF.


| Product Type | Convertible high chair |
| Brand | Nuna |
| Model | BRYN |
| Usage | Indoor |
| Recommended age | From 6 months to 6 years |
| Maximum supported weight | 27.2 kg (60 lb) |
| Usage modes | High chair (with armrest and tray) and youth chair (without accessories) |
| Materials | Plastic, foam, fabric (padded seat) |
| Restraint system | 5-point harness with magnetic buckle |
| Tray | Removable, lockable |
| Armrest | Removable, lockable |
| Footrest | Adjustable to 3 positions, removable |
| Backrest | Removable (can be removed for cleaning) |
| Seat cushion | Removable, washable (with inner booster) |
| Spare parts available | Yes, genuine Nuna |
| Care and cleaning | Clean with a damp cloth and mild cleaner; cushion machine washable (remove booster) |
| Safety | Harness mandatory, tray not designed to restrain child, adult supervision required, risk of fall and strangulation |
| Warranty | Limited warranty (see Nuna website) |
| Country of manufacture | Not specified in the manual |
Frequently Asked Questions - BRYN Nuna
User questions about BRYN Nuna
0 question about this device. Answer the ones you know or ask your own.
Ask a new question about this device
Download the instructions for your High chair in PDF format for free! Find your manual BRYN - Nuna and take your electronic device back in hand. On this page are published all the documents necessary for the use of your device. BRYN by Nuna.
USER MANUAL BRYN Nuna
natural_image
Illustration of a baby's high chair with blue outline and white seat, emitting sound waves (no text or symbols)
Thank you!
You've just purchased a Nuna product, and you can be sure that your child is getting the best there is. Our products are expertly engineered for safety, with luxury fabrics and sophisticated style. Whatever made you fall in love with Nuna, rest assured your adventures with your little one will be easier from now on, freeing you to enjoy more happy family moments together.
IMPORTANT! KEEP THESE
INSTRUCTIONS FOR FUTURE REFERENCE: READ CAREFULLY
Contents
Product Information 4
Product Registration (USA consumers only)
Limited Warranty
Contact
Child Usage Requirements 6
Warnings 6
Parts List 8
Product Setup 10
Product Use - High Chair Mode 20
Product Use - Youth Mode 22
Cleaning and Maintenance 24
Manufactured in (date):
Product Registration (Applicable for US residents only)
Please fill in the above information. The model number and the manufactured in date are located on a label on the bottom of the seat. Fill out the prepaid registration postcard attached to the product and mail it today.
To register your product, please visit:
www.nunababy.com/register-gear
Limited Warranty
We have purposely designed our high-quality products so that they can grow with both your child and your family. Because we stand by our product, our gear is covered by a custom limited warranty per product, starting from the day it was purchased. Please have the proof of purchase, model number and manufactured in date available when you contact us.
For warranty information please visit:
USA: www.nunababy.com/warranty
Canada: www.nunababy.ca/en/about-us/1143-warranty
Contact
For replacement parts, service, or additional warranty questions, please contact our customer service department.
In the USA:
infousa@nunababy.com
www.nunababy.com
1.855.NUNA.USA
In Canada:
Nuna Canada
2520 AV Marie-Curie
St-Laurent, QC, H4S 1N1
1-800-667-4111
www.nunababy.ca
Child Usage Requirements
This product is suitable for use with children who can sit upright unassisted (approximately 6 months old), up to 6 years old or 60 lb (27.2 kg) (whichever comes first).
High Chair Mode:
- With armbar and tray attached, or with armbar only
- With or without included upholstered seat pad
• ALWAYS use harness and backrest
Youth Mode:
- When child can climb in unassisted (approximately 3 years old)
- Without armbar, tray, harness, and seat pad
• ALWAYS use backrest
WARNING
Failure to follow these warnings and instructions could result in serious injury or death.
ALWAYS use BRYN on a level, stable surface.
- The child should be secured in the high chair at all times by the restraint system.
- The tray and armbar are not designed to hold the child in the chair.
- It is recommended that the high chair be used only by children capable of sitting upright unassisted.
FALL HAZARD: Children have suffered severe head injuries including skull fractures when falling from high chairs. Falls can happen suddenly if child is not restrained properly.
- Always use the restraints, and adjust to fit snugly.
- Tray is not designed to hold child in chair.
- Never leave child unattended.
- Stay near and watch child during use.
STRANGULATION HAZARD Do not place this product in any location where there are cords, such as window blind cords, drapes, phone cords, etc.
Discontinue use of this product when child reaches 6 years of age or 60 lb (27.2 kg), whichever comes first.
To avoid any danger of suffocation, remove all plastic covers before using this product and destroy or keep away from babies and children!
Discontinue using these products should they become damaged or broken.
Use original Nuna parts and accessories only. If refinishing, use a nontoxic finish specified for children's products.
Magnetic Harness Buckle
The buckle and buckle clips contain magnets. If your child has a medical condition that prohibits the use of magnets near the child, do not use the highchair. Contact Nuna to discuss a solution. Be mindful of the possible interaction of magnets in buckles and certain electronic devices.
Parts List
Check that you have all the parts for this product before assembling it. Adult assembly required.
1 Backrest
12 Harness
2 Seat
13 Magnetic Buckle
3 Armbar Release Buttons
14 Buckle Release Button
4 Rear Leg (x2)
15 Adjustment Straps
5 Front Leg (x2)
16 Front Leg Attachment
6 Footrest
17 Footrest Slot
7 Armbar
18 Footrest Release Button
8 Tray Release Button
19 Footrest Mount
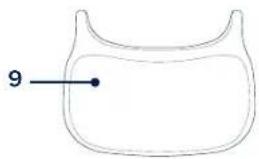
9 Tray
20 Backrest Mounts
10 Seat Pad
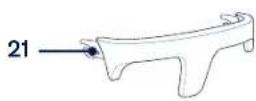
21 Armbar Mount
11 Insert (inside seat pad)
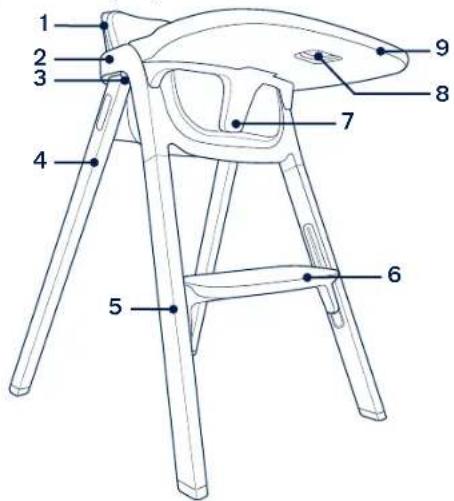
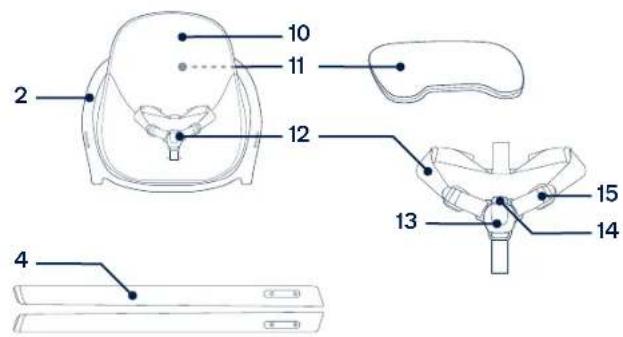
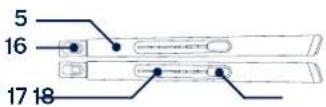
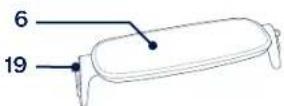

Product Setup
Rear Legs
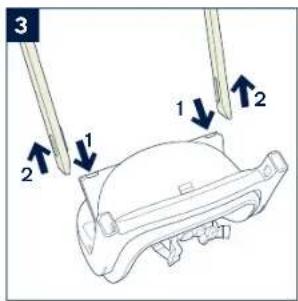
1 - With the bottom of the seat facing upwards, slide the rear leg into the slot on the side of the seat.
2 - A "click" indicates the leg is attached. Pull on the leg to check. If the leg is attached properly, the tab on the rear leg will be completely inside the slot.
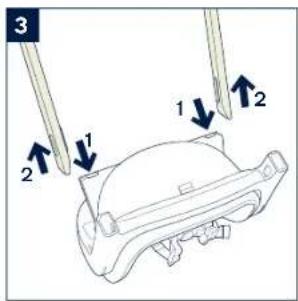
3 - To remove, press the rear leg release button on the bottom of the seat (1) and pull the rear leg out of the slot (2).
Front Legs
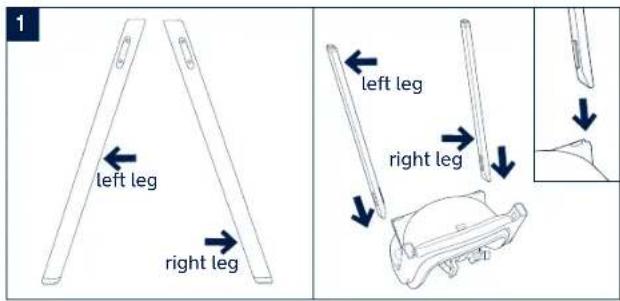
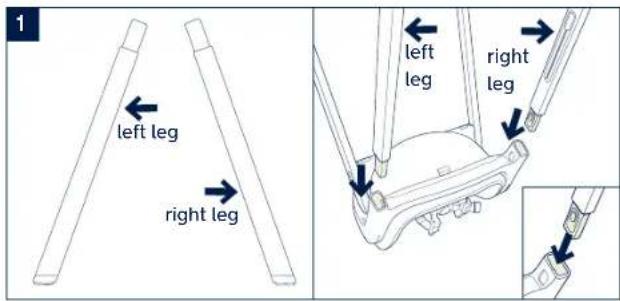
1 - With the bottom of the seat facing upwards, slide the front leg into the slot on the side of the seat.
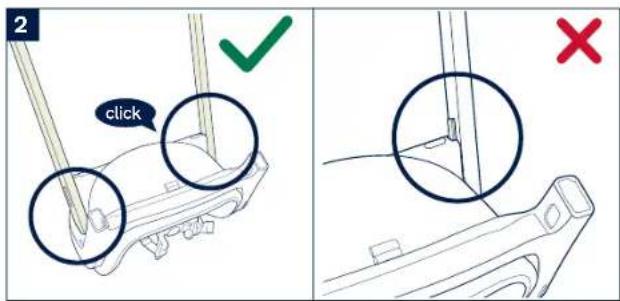
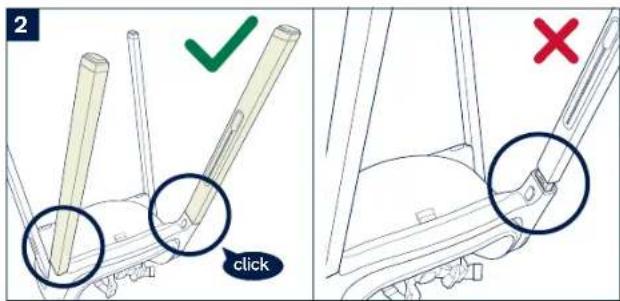
2 - A "click" indicates the leg is attached. Pull on the leg to check. If the leg is attached properly, the front leg attachment will be completely inside the slot.
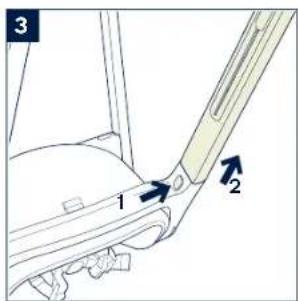
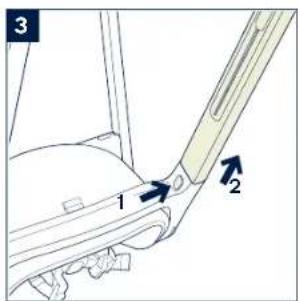
3 - To remove, press the front leg release button on the seat (1) and pull the front leg out of the slot (2).
Footrest
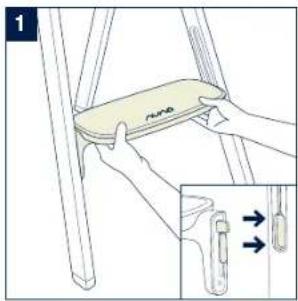
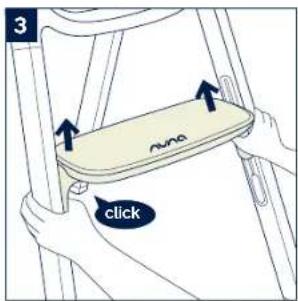
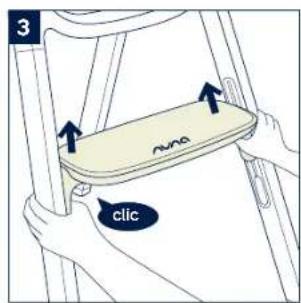
1 - With the Nuna logo facing out, align the footrest mounts on both sides with the footrest slots on the front legs.
2 - Push the footrest mounts out on both sides simultaneously, using them to press on the footrest release buttons.
3 - While pressing on the release buttons (step 2), slide the footrest mounts up into the footrest slots simultaneously.
A "click" indicates the footrest is attached. Push down on the footrest to check.
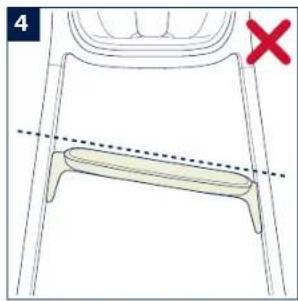
4 - The footrest must be level.
5 - The footrest has 3 positions. To adjust the position, squeeze and hold the footrest adjustment button on the bottom of the footrest (1), and slide the footrest up or down (2).
A "click" indicates the footrest is locked in position. Push down on the footrest to check.
The footrest must be level.
6 - To remove, simultaneously squeeze the footrest adjustment button (1) and press the footrest release button (2) on one side so the footrest is unlocked on that side. Repeat on the other side. Then slide the footrest down and out of the footrest slots (3).
natural_image
Diagram of a chair seat with a dashed line indicating a horizontal measurement, marked with a red X (no text or symbols present)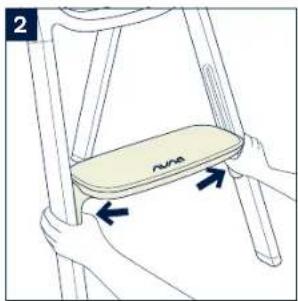
natural_image
Illustration of hands holding a chair with a cushion labeled 'Nune', showing motion arrows (no text or symbols beyond label)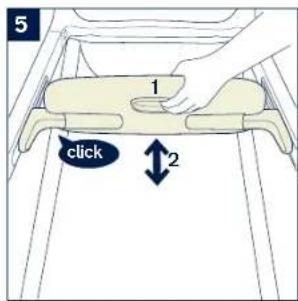

Backrest
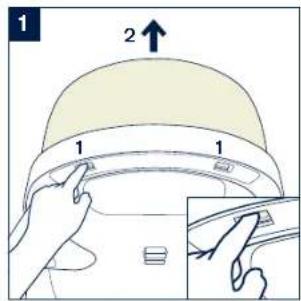
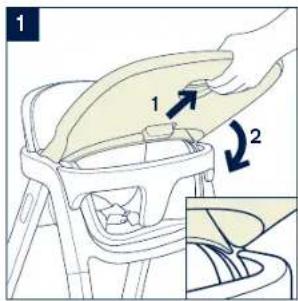
1 - To remove, press the backrest mounts forward towards the front of the chair (1), and pull the backrest up and out of the seat (2).
The backrest should only be removed for cleaning. Do not use the high chair without the backrest attached.
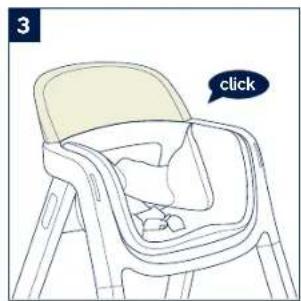
2 - To attach, slide the backrest mounts into the slots on the top of the seat.
3 - A "click" indicates that the backrest is attached. Pull up on the backrest to check.
Armbar
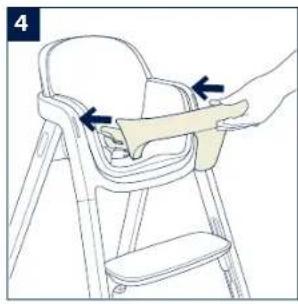
The armbar is not intended to restrain your child. ALWAYS secure your child with the harness restraint.
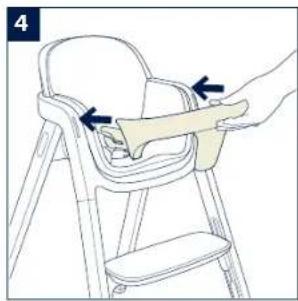
4 - Slide the armbar mounts into the slots on the front of the seat.
5 - A "click" indicates that the armbar is attached. Pull on the armbar to check.
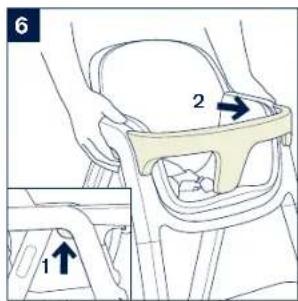
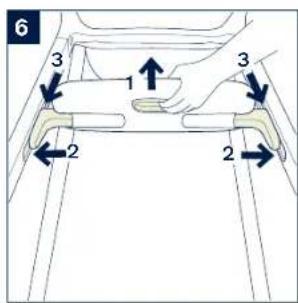
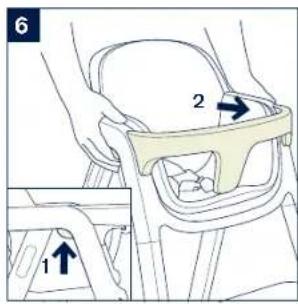
6 - To remove, press the armbar release buttons (1) and slide the armbar out of the seat (2).
natural_image
Illustration of a baby seat with hand placement and arrows indicating movement (no text or symbols)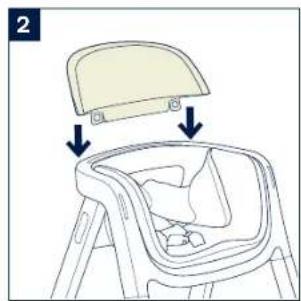
natural_image
Line drawing of a seatbelt with arrows indicating movement or change (no text or symbols)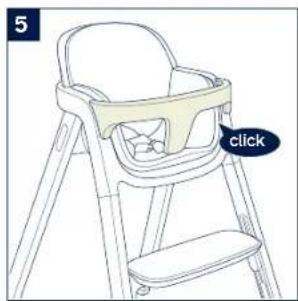
Tray
The tray and armbar are not intended to restrain your child. ALWAYS secure your child with the harness restraint.
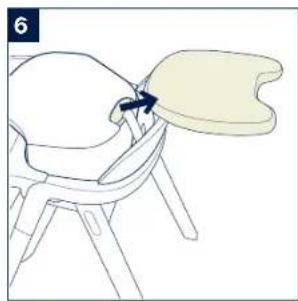
1 - To attach the tray to the armbar, align the open ends of the tray with the top of the armbar. Squeeze the tray release button (1) and pivot the tray down (2).
2 - A "click" indicates that the tray is attached. Pull up on the tray to check.
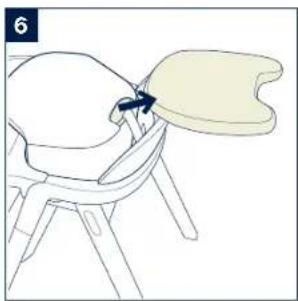
3 - To remove, squeeze the tray release button (1) and lift the tray off the armbar (2).
Seat Pad
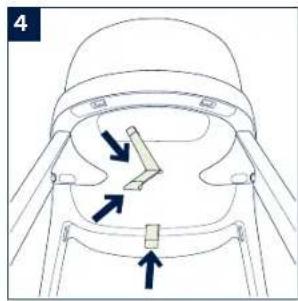
4 - To remove the seat pad, first slide the tabs of the harness crotch strap and waist straps out of the slots in the seat and seat pad.
High chair mode (p.20): Remove the seat pad from the high chair, then slide the tabs of the harness crotch strap and waist straps back through the slots in the seat. Youth mode (p.22): Remove the harness along with the seat pad.
5 - To assemble the seat pad, slide the tabs of the harness crotch strap and waist straps through the holes in the seat pad, then through the slots in the seat.
Insert
6 - Remove the insert before washing the seat pad. To remove, pull the insert through the hole in the seat pad.
natural_image
Diagram of a mechanical component with arrows indicating direction (no text or symbols)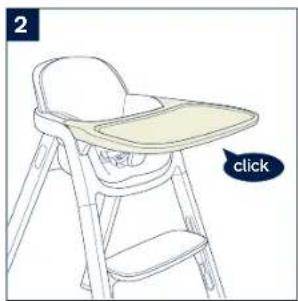
natural_image
Line drawing of a baby boom seat with a tray and a speech bubble labeled 'click' (no text or symbols on the diagram itself)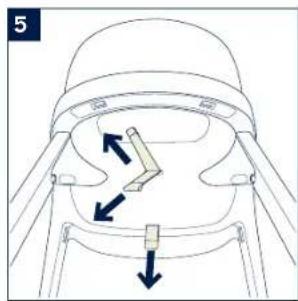
natural_image
Diagram of a mechanical component with arrows indicating direction (no text or symbols)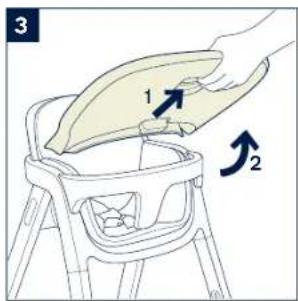
natural_image
Line drawing of a chair with a seatbelt and armrest, showing a hand placement on the seat (no text or symbols)Product Use - High Chair Mode
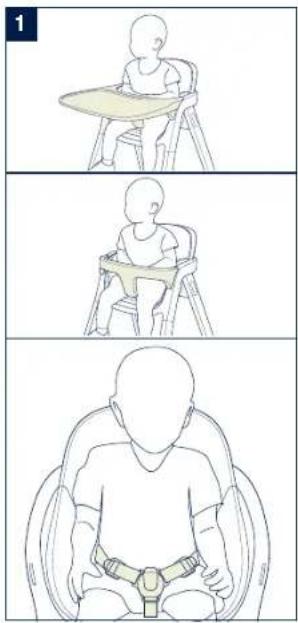
1 - This product can be used as a high chair with the armbar and tray attached, or with just the armbar. ALWAYS use the harness. Use of the seat pad is optional. For seat pad removal and assembly, see page 18.
Securing Child
When using this product as a high chair, the child must always wear the harness restraint correctly fitted and adjusted.
Belts must not be twisted.
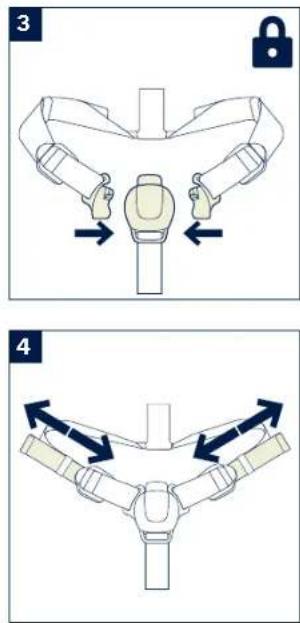
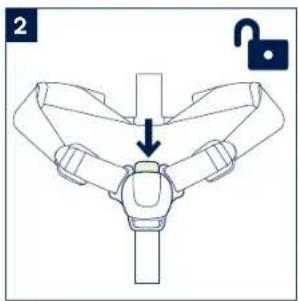
2 - Press the buckle release button and remove the magnetic clips. Place your child in the seat.
3 - Secure the waist buckles around your child with the magnetic clips.
4 - Slide the adjustment straps to tighten or loosen the waist belt as needed.
Product Use - Youth Mode
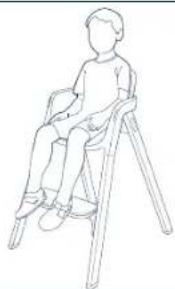
1 - This product can be used as a youth chair once the child can climb up unassisted (approximately 3 years old).
Discontinue use of this product when the child reaches 6 years of age or 60 lb (27.2 kg), whichever comes first.
When using this product in youth mode, the harness and seat pad must be removed (p.18).
1
natural_image
Line drawing of a person sitting on a four-legged chair (no text or symbols)Cleaning and Maintenance
Refer to the care label attached to the seat pad for washing and drying instructions.
Remove the insert before washing the seat pad.
Clean the high chair and accessories with a damp cloth or a neutral detergent, but do not use abrasive detergents or solvents which could damage the materials.
Continued and extended exposure to sunlight can change the color of many materials.
Inspect your high chair regularly in order to detect any damage.
Nuna Baby Essentials, Inc. Nuna and all associated logos are trademarks.

MERCI!
infousa@nunababy.com
www.nunababy.com
1.855.NUNA.USA
Au Canada:
Nuna Canada
2520 AV Marie-Curie
St-Laurent, QC, H4S 1N1
1-800-667-4111
www.nunababy.ca
Pattes avant
Appui-pieds
natural_image
Diagram of a seat with a dashed line indicating a horizontal measurement, marked with a red X (no text or symbols present)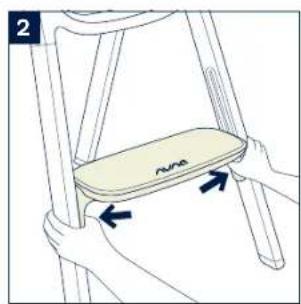
natural_image
Illustration of hands holding a chair with a flat seat, showing motion arrows (no text or symbols)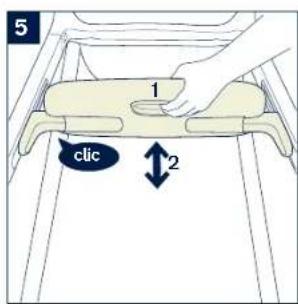
Dossier
natural_image
Line drawing of a baby seat with hand placement and arrows indicating movement (no text or symbols)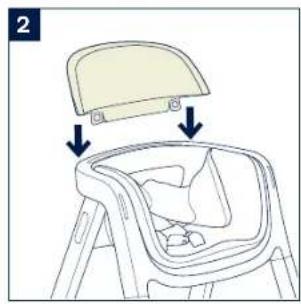
natural_image
Line drawing of a seat assembly with arrows indicating parts of the lid and seat (no text or symbols)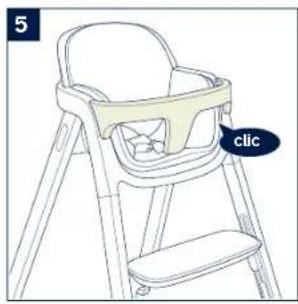
natural_image
Line drawing of a baby boom seat with a lunge, labeled 'clic' (no text or symbols on the diagram itself)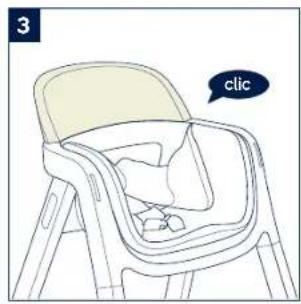
Plateau
natural_image
Diagram of a mechanical component with arrows indicating direction (no text or symbols)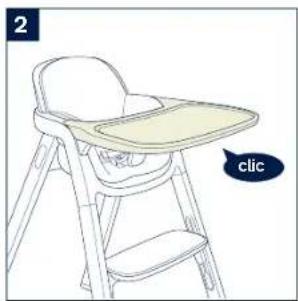
natural_image
Line drawing of a baby boom seat with a highlighted side panel and a speech bubble containing the word 'click' (no text or symbols on the diagram itself)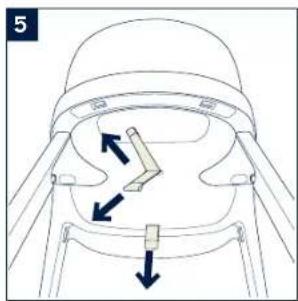
natural_image
Diagram of a mechanical component with arrows indicating direction (no text or symbols)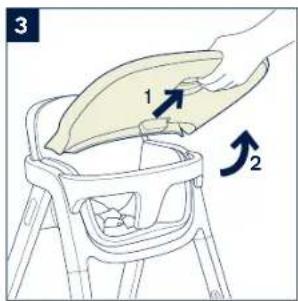
natural_image
Line drawing of a chair with a seatbelt and armrest, showing a hand placement (no text or symbols)natural_image
Line drawing of a baby sitting in a high chair on a saucer (no text or symbols)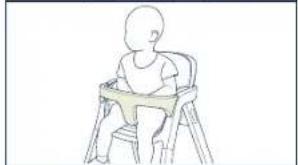
natural_image
Simple line drawing of a baby sitting in a high chair (no text or symbols)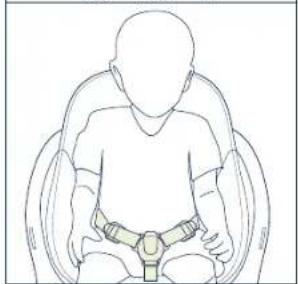
natural_image
Line drawing of a baby wearing a seatbelt (no text or symbols)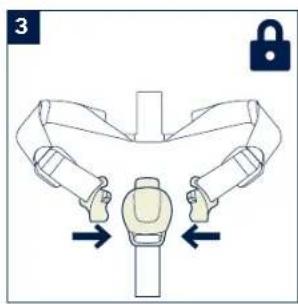
natural_image
Diagram of a pelvic device with directional arrows indicating movement or force (no text or symbols)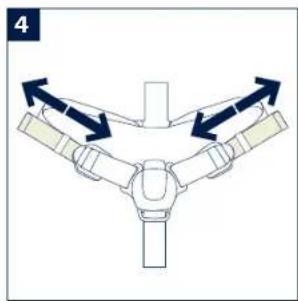
natural_image
Diagram of a mechanical or electrical component with directional arrows indicating flow or movement (no text or symbols)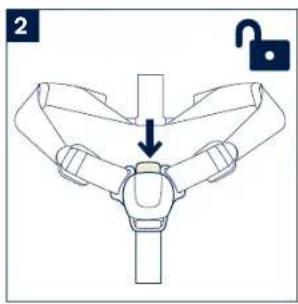
natural_image
Line drawing of a person sitting on a four-legged chair (no text or symbols)Nuna Baby Essentials, Inc.
Nuna Baby Essentials, Inc.
70 Thousand Oaks Blvd. | Morgantown, PA 19543
1.855.NUNA.USA|nunababy.com
Nuna Canada
2520 AV Marie-Curie | St-Laurent, QC, H4S 1N1
1-800-667-4111|www.nunababy.ca



- Thank you!
- IMPORTANT! KEEP THESE
- Contents
- Product Registration (Applicable for US residents only)
- Limited Warranty
- Contact
- Child Usage Requirements
- High Chair Mode:
- Youth Mode:
- WARNING
- Parts List
- Product Setup
- Rear Legs
- Front Legs
- Footrest
- Backrest
- Armbar
- Tray
- Seat Pad
- Insert
- Product Use - High Chair Mode
- Securing Child
- Product Use - Youth Mode
- Cleaning and Maintenance
- MERCI!
- Pattes avant
- Appui-pieds
- Dossier
- Plateau
Brand : Nuna
Model : BRYN
Category : High chair