
Pipa Klik - Baby product Nuna - Free user manual and instructions
Find the device manual for free Pipa Klik Nuna in PDF.


| Product Type | Infant Car Seat (Rear-Facing) |
| Brand | Nuna |
| Model | Pipa Klik |
| Dimensions (with handle down) | 700 mm (L) x 440 mm (W) x 480 mm (H) |
| Weight | Approx. 4.2 kg (carrier only, base not included) |
| Age Range | Up to approximately 6 months (when shoulders reach height marker) |
| Weight Capacity | Up to 13 kg (approx., as per typical infant seats) |
| Installation Methods | Vehicle Lap-Sash/Lap Belt or ISOFIX Low Anchorage + Top Tether |
| Harness Type | 5-point harness with adjustable shoulder strap height (3 slots) and crotch strap positions (2) |
| Carry Handle Positions | 3 positions (including carry, use in vehicle) |
| Canopy | Removable, includes Dream Drape (out-of-vehicle only) |
| Infant Insert | Removable, with extra foam pad for small babies |
| Base Features | Adjustable recline foot, bubble level indicator, lock-off for vehicle belt, tether storage |
| Stroller Compatibility | Attaches to Nuna strollers via adapters (sold separately) |
| Seat Cover Cleaning | Wash cold with mild detergent, hang dry in shade. Do not bleach, iron, or dry clean. |
| Harness & Buckle Cleaning | Buckle: rinse with warm water only. Harness straps: spot clean only, do not immerse. |
| Safety Warnings | Never use with front airbag; always use top tether; do not leave child unattended. |
| Certification | Complies with AS/NZS 1754 (Australian/New Zealand Standard) |
| Spare Parts & Repairs | Contact retailer or Babyhood (Australia). Replacements must be Nuna original parts. |
| Manual Storage | Located in base compartment under bubble level indicator |
Frequently Asked Questions - Pipa Klik Nuna
User questions about Pipa Klik Nuna
0 question about this device. Answer the ones you know or ask your own.
Ask a new question about this device
Download the instructions for your Baby product in PDF format for free! Find your manual Pipa Klik - Nuna and take your electronic device back in hand. On this page are published all the documents necessary for the use of your device. Pipa Klik by Nuna.
USER MANUAL Pipa Klik Nuna
natural_image
Illustration of a car seat assembly with purple and gray components (no text or symbols)pipa™ klik
instructions
IMPORTANT: KEEP THIS INSTRUCTION BOOKLET IN THE PLACE PROVIDED ON THE CHILD RESTRAINT
Smart Design
We like design.
And people who like design get us.
We will not embarrass your kids.
We cannot promise they will stay clean.
But we know it will all be okay. We are parents.
We are Nuna.
nuna®
Contents
Quick Reference 2-3
WARNINGS 4
Additional Warnings 5–7
Features 8-9
Securing Child in the Restraint 10–12
Shoulder Strap Height 13–15
Crotch Strap Position 16
Canopy Removal 16
Accessories 17–19
Infant Insert 20
Carry Handle 21
The Next Restraint 22
Installation - General 23-24
Installation – Vehicle Belts 25–26
Installation - ISOFIX Compatible Connectors 27-29
Storage – ISOFIX Compatible Connectors 30
Installation – Restraint to Base 31
WARNINGS – Top Tether 32
Tether Strap Use 33
Installation – Tether Anchorage 34–36
Use with Strollers 37
Cleaning and Maintenance 38–39
DO NOT USE THIS CHILD RESTRAINT UNTIL YOU HAVE READ AND UNDERSTOOD THE INSTRUCTIONS IN THIS USER GUIDE AND IN YOUR VEHICLE OWNERS MANUAL
Quick Reference — Use
IMPORTANT: After reading this Quick Reference read the following instructions carefully
Shoulder Straps
must always be at correct height and pulled tight.
See pages 13–15
Head Liners and Infant Insert
only use for smaller children who require more support.
See page 20
Shoulder Height
shoulders must
not be above
the marker line
See page 14
Harness Straps
must not be twisted.
See page 15
Harness Buckle
must always be securely fastened.
See page 11
Harness Tension
pull harness tight.
See page 11

Child Position
child must be in full contact with back of restraint.
See page 10
Suitable Clothing
child's clothing must not interfere with the harness
See page 12
This Child Restraint is suitable for children up to approximately 6 months of age. See page 5 for more detailed information.
Quick Reference — Restraint and Base
IMPORTANT: After reading this Quick Reference read the following instructions carefully
Tether Strap
must always be used when the restraint is installed in a vehicle. Store end of tether in bag.
See page 32
Carry Handle
must always be locked into position. See page 21
Secure Latching
restraint must be securely latched into base.
See page 31
Vehicle Belt (if used)
must always be secure and pulled tight.
See pages 24–26
Base Recline Adjustment
base must be reclined correctly
See pages 24 & 29
Read the whole of these instructions carefully and if there is any doubt about the method of installation, consult the child restraint manufacturer or agent, or a child restraint fitting station authorized by the relevant transport authority, or in New Zealand an agent for the vehicle.

WARNING
- Use the restraint exactly as shown in the instructions.
- Supervision of children is needed because they may be able to undo buckles.
- To ensure that baby's back is evenly supported, do not put more than one nappy on the baby and make sure the nappy is not folded thickly at the back.
- Do not allow the restraint to come into contact with polishes, oils, bleach and other chemicals.
- Destroy the restraint if it has been in a severe crash, even if no damage is visible.
• Repairs must only be done by the manufacturer or agent.
• Fit the harness firmly to the child. - A loose harness or restraint is dangerous.
• Fit the restraint firmly to the car seat. - Do not alter or modify this restraint.
- Do not harness an infant wrapped in a blanket or swaddled. Any blanket or wrap must only be placed over the harness and infant.
• DO NOT USE THIS RESTRAINT WITHOUT THE COVER. - DO NOT USE A REAR FACING CHILD RESTRAINT WHERE AN AIRBAG IS FITTED IN FRONT OF THE SEATING POSITION.

WARNING
DO NOT LEAVE CHILDREN UNATTENDED IN THE CAR

ADDITIONAL WARNINGS
This Child Restraint is:
To be used only in a rearward-facing position until the infant's shoulders reach the shoulder height marker (approximately 6 months of age).
Continue to use this infant restraint until the child reaches this limit.
Infants are at risk of serious injury if they face forward too early. TO BE USED WITH A LAP-SASH/LAP ONLY SEATBELT OR ISOFIX LOW ANCHORAGES IN THE BACK OF MOST CARS WITH FORWARD FACING SEATS.
This restraint is 700 mm long, 440 mm wide and 480 mm high (with the handle down). Check the measurement between the front of the seat back of the rear seat and all front seats in the car in which the restraint is intended to be used to ensure the space available is sufficient.
Ensure that children have adequate ventilation and shade when in the vehicle.
Seat belt extenders are not recommended if the car seat belt is too short to secure the child restraint.
If the car seat belt is too short get advice from a child restraint fitter regarding use of these.
Read carefully the whole of the instructions for the installation, and in the event of doubt about the method of installation, consult the child restraint manufacturer or agent, or a child restraint fitting station authorized by the relevant transport authority, or in New Zealand, consult the agent for the vehicle.
NOTE: The warnings on these two pages are those required by the Australian and New Zealand Standard AS/NZS 1754 for this type of child restraint. Other warnings specific to this particular child restraint will be found on the following pages and throughout these instructions.

ADDITIONAL WARNINGS
When baby is in the restraint, ALWAYS secure the harness and adjust to a firm fit.
Always check buckle and other parts for hot surfaces. A child restraint left uncovered in the sun could burn a child. Cover with blanket if leaving in car.
Do not use the child restraint if any harness straps are cut, frayed or damaged.
Do not use any products or accessories in conjunction with the child restraint not supplied with child restraint.
Fall hazard: Child's movement can slide carrier. NEVER place child restraint near edges of countertops, tables or other high surfaces. Always stay within arms reach whenever child restraint is not on floor/ground.
Suffocation hazard: child restraint can roll over on soft surfaces and suffocate child. Never place child restraint on beds, sofas, or other soft surfaces.
Strangulation hazard: Child can strangle in loose child restraint straps. Always use harness. Never leave child in the child restraint when straps are loose or undone.
Harness straps should be snug. A snug strap should not allow any slack. It lies in a relatively straight line without sagging. It does not press on the child's flesh or push the child's body into an unnatural position.
Never place the child restraint on top of a shopping cart. The child restraint will not be properly secured and could fall.
Do not use the child restraint if it is damaged or broken.
Only use with Nuna strollers or appropriate Nuna adapters designed for use with other strollers.

ADDITIONAL WARNINGS
Always check child restraint to base connection.

Only install child restraint in a forward facing vehicle seat. Never install in a seat that faces the rear or the side of the vehicle.

flowchart
graph TD
    A["Start"] --> B{Check}
    B -->|Yes| C["Process"]
    B -->|No| D["End"]
This is a rearward facing child restraint. Do not install facing side or forwards.
Never install the Child Restraint in a seat with a front airbag. DEATH or SERIOUS INJURY may occur. Refer to your vehicle Owners Manual for airbag warnings and information.

Features — Child Restraint
1 Carry Handle
8 Carry Handle Lock
2 Infant Insert
9 Harness Straps
3 Shoulder Pads
10 Seat Cover
4 Buckle and Crotch Belt
11 Stroller Release Handle
5 Harness Adjuster Button
12 Shoulder Strap Slots
6 Harness Adjuster Strap
13 Base Attachment Bars
7 Canopy
14 Splitter Plate
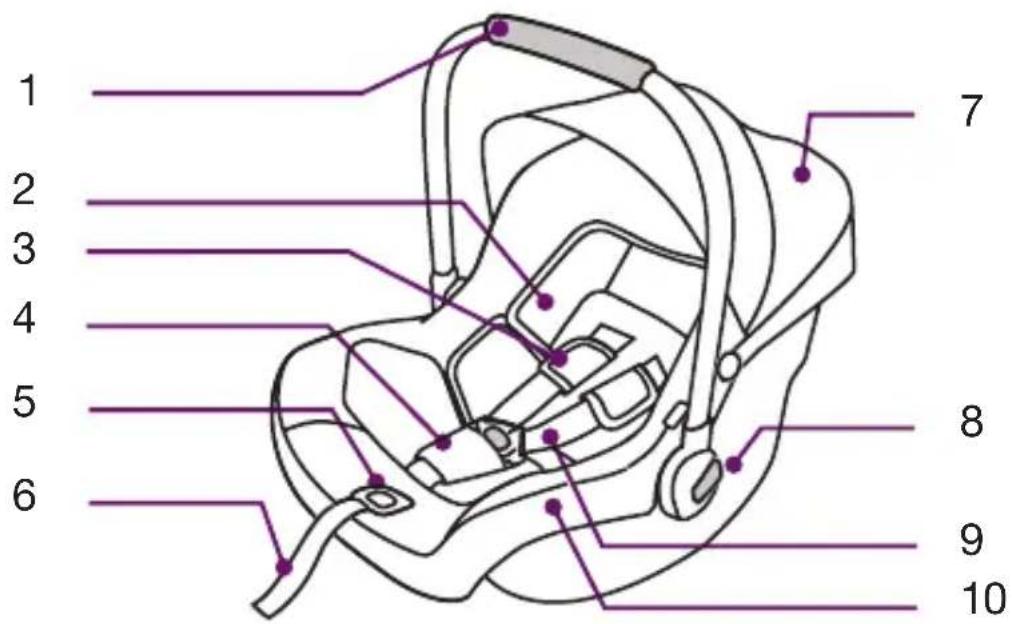
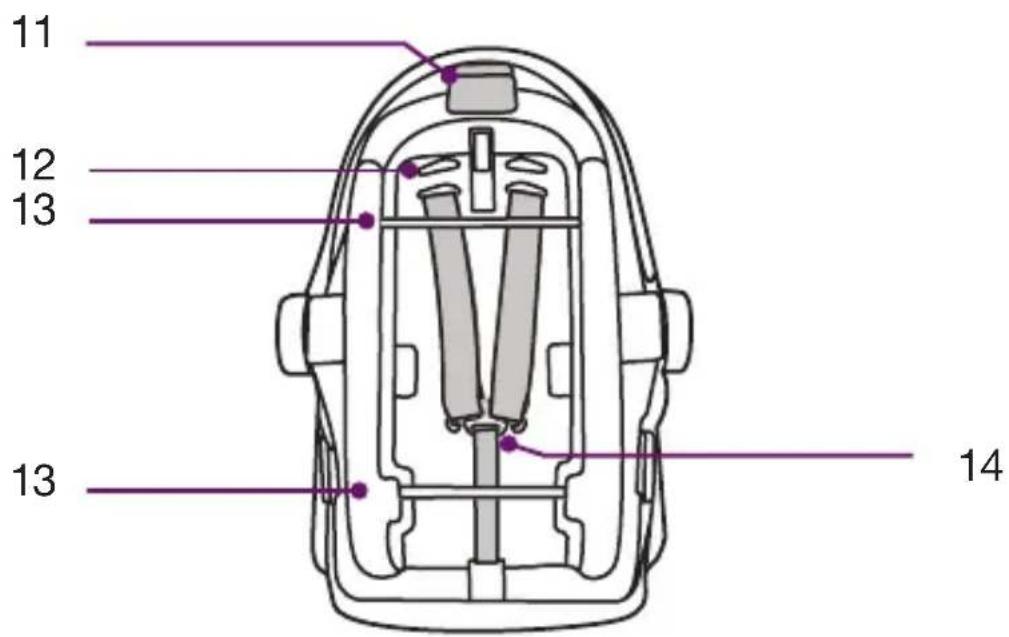
Features — Base
15 Tether Strap
16 Child Restraint Release Lever
17 Tether Strap Anchorage
18 Vehicle Belt Lock-Off
19 Bubble Level Indicator
20 Instruction Manual Storage
21 Recline Foot
22 ISOFIX connector
23 Recline Foot Fold Latch
24 ISOFIX connector fold latch


Securing Child in the Restraint
FIRST CHECK SHOULDER STRAP HEIGHT AND ADJUST IF NECESSARY. See page 13
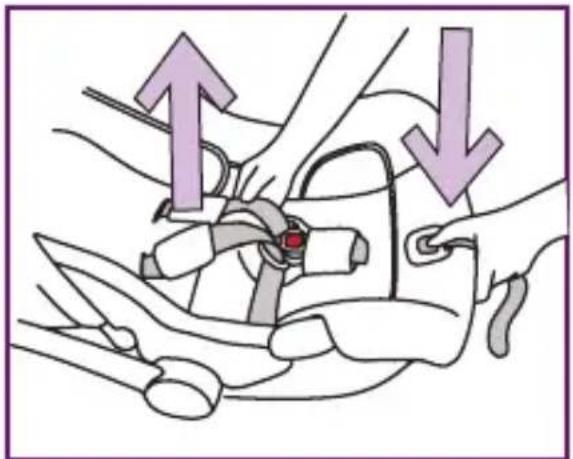
1 Loosen harness by pressing on adjuster button while pulling on the harness straps.
2 Press button to open the quick release buckle. Spread harness straps apart.
3 Place child in restraint in seated position, firmly against both the back and bottom of the restraint.
natural_image
Illustration of a medical procedure with two arrows indicating direction of movement or force (no text or symbols present)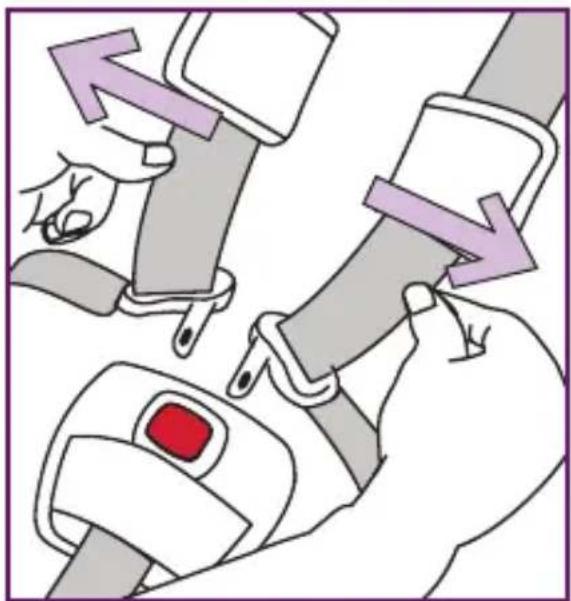
natural_image
Illustration of a hand using a seatbelt to lift a red button (no text or symbols present)
4 Place buckle tongues into the quick release buckle.
IMPORTANT: The buckle tongue pushed in last should "CLICK" when it locks into place. If it does not click, try again or try cleaning the buckle. See page 39.
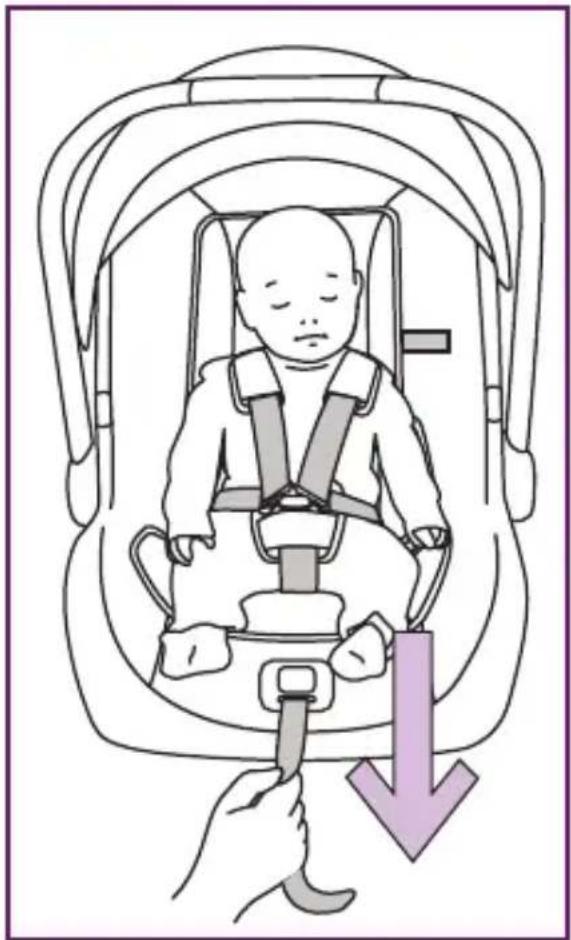
5 Tighten harness by pulling on the adjuster strap at the front of the restraint.
IMPORTANT: Shoulder Straps must be a firm or snug fit.
Note: you may need to pull excess shoulder strap webbing through the Quick Release Buckle Tongues upward towards the child's shoulder and then pull on the adjuster strap. This may need to be repeated several times to get the webbing fitting snugly.

natural_image
Illustration of a baby in a car seat being lifted by a hand, with a purple downward arrow indicating the load (no text or symbols present)
WARNING
DO NOT LEAVE CHILDREN UNATTENDED IN THE CAR
6 Check that the harness is snug around the child's waist and shoulders.
Blankets
Never use blankets or clothing that interfere with the harness as a poorly secured child can come out of the restraint during a crash. Only place blankets over child AFTER harness has been properly tightened.
Swaddling
Infants need to be securely held by the harness. An infant wrapped in a blanket or swaddled will not be securely held and may be ejected and killed in an accident
Do not bind or wrap the infants arms or legs together.

natural_image
Illustration of a child wearing a seatbelt with purple arrows indicating pressure points (no text or symbols)Shoulder Strap Height
Correct positioning of the shoulder straps is essential for your baby's safety.
Requirement
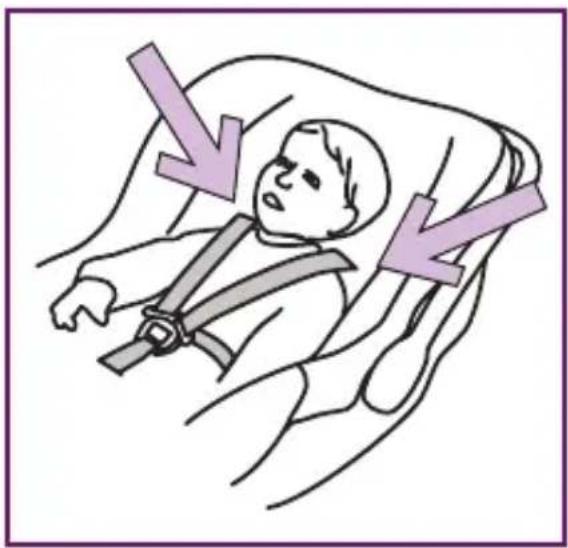
The shoulder straps must be in the slots that are nearest to the child's shoulders, but not lower than the child's shoulders.
The straps should be in the next available shoulder strap slots above your baby's shoulders.
To Check
1 With child placed in the restraint, note where the shoulder straps enter the slots in the backrest. If adjustment is needed follow the next steps.
natural_image
Illustration of a person in a seatbelt with arrows pointing to the seat area (no text or symbols)To Adjust
2 With child removed, loosen harness. Turn carrier over and remove one shoulder strap harness loop from the metal splitter plate.

natural_image
Illustration of hands assembling a mechanical component with a purple arrow indicating direction (no text or symbols)3 Pull loose end of harness loop out through slot and place in correct slot.

natural_image
Illustration of a hand adjusting a cylindrical object with motion lines, no text or symbols present4 Re-attach to splitter plate.
5 Repeat with the other shoulder strap.

natural_image
Illustration of hands assembling a mechanical component with no visible text or symbolsThis restraint has a shoulder height level label. Use this to gauge when your child is too big for the restraint. Once your child's shoulders reach the dotted line, it is time to move to a bigger restraint. See page 22.
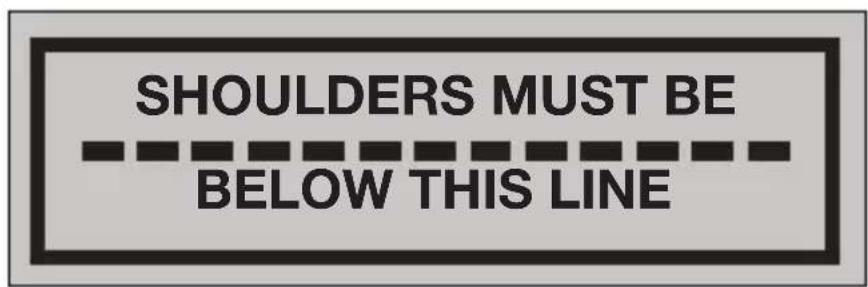
The shoulder straps must pass under the steel bars at the back of the restraint.
IMPORTANT:
Shoulder Straps must not be twisted.
Always adjust the height of the shoulder straps as the child grows,
They must not pass over the outside of the steel bars at the back of the restraint.

natural_image
Diagram of a car seatbelt mechanism with no text or symbols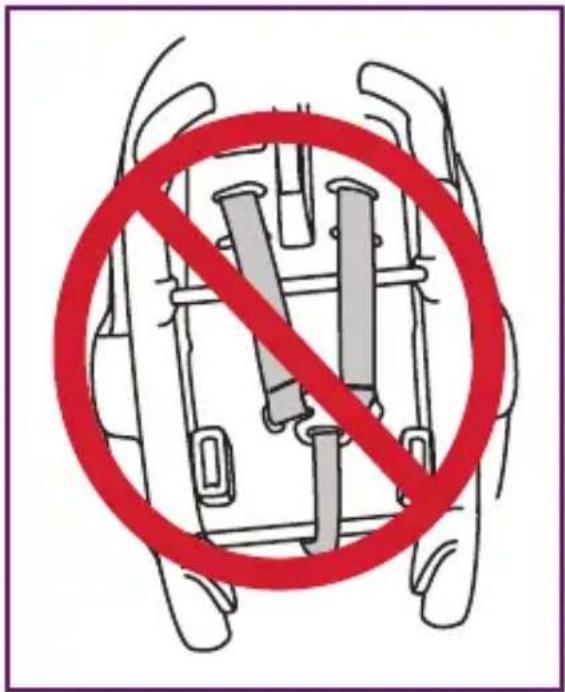
IMPORTANT: if the baby's neck muscles are unable to support their head, they should remain rear facing.
Crotch Strap Position
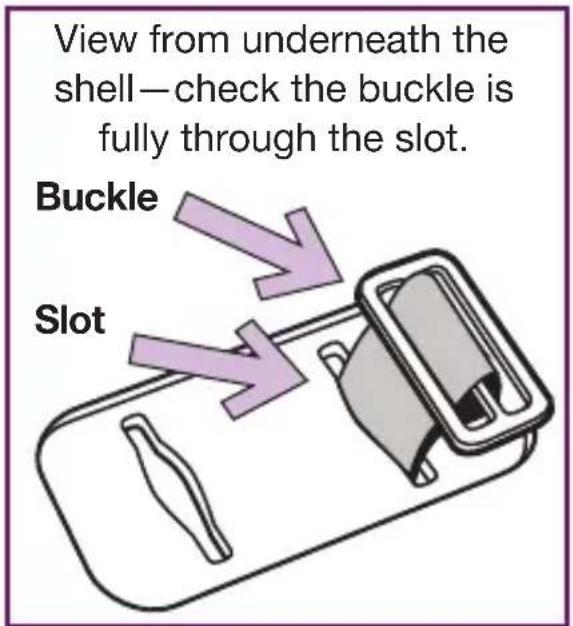
There are two positions available for the crotch strap.
The rear position is recommended for normal use and the front position with a bigger child.
The steel buckle must be fully through the slot.
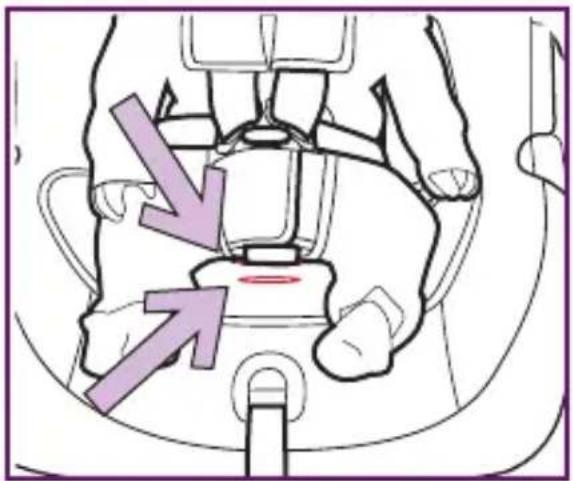
IMPORTANT: After changing the strap position pull firmly upward on the crotch strap to check the buckle is securely fitted.
Canopy
Canopy Removal
To remove the canopy, press the buttons in the canopy mounts and pull the canopy bow out.

natural_image
Illustration of a medical procedure showing a hand holding a tool and a purple arrow indicating direction (no text or symbols present)Accessories
DO NOT add accessories, toys, padding or other items to the child restraint unless provided by Nuna.
Aftermarket accessories (i.e. items not provided in the box with the child restraint), may not have been tested for use with this child restraint and if used, may lower the level of protection offered possibly leading to injury or death.
Any aftermarket accessory used should be compliant with AS/NZS 8005 (Accessories for child restraints for use in motor vehicles) and stated as suitable for use with this child restraint.
Dream Drape (out of vehicle use only)
1 Unzip the zipper behind the front canopy bow.
2 Pull the dream drape out of the compartment.
3 Attach the magnets on each corner to the corner to the front of the restraint.
IMPORTANT: Do not use the Dream Drape in a vehicle as it will interfere with the tether strap.

natural_image
Line drawing of a mechanical component with a purple arrow pointing to a specific part (no text or symbols present)
natural_image
Diagram of a portable air purifier with mesh insulation and cable, no text or symbols presentSeat Cover Removal
1 Pull the fastening pieces underneath the edge of the seat out.
2 Remove the harness from the splitter plate.
3 Remove the seat cover from the adjustment button as shown.

natural_image
Line drawing of a hand holding a small object, possibly a device or tool, with no visible text or symbols.
natural_image
Illustration of hands assembling a vehicle seat frame with a purple arrow indicating the motion (no text or symbols present)
natural_image
Illustration of a person using a belt buckle to adjust the seat (no text or symbols present)4 Remove the seat pad from the stroller release button as shown.

natural_image
Illustration of a hand performing a medical or therapeutic procedure on a patient's abdomen, with no visible text or symbols.VERY IMPORTANT: Only replace the cover with a Nuna supplied replacement cover with identical shoulder height markers or a replacement cover meeting AS/NZS 8005.
Shoulder Pads and Head Liner
Shoulder pads and head liner are removable and are not necessary for safety.

natural_image
Illustration of a child wearing a seatbelt with purple arrows indicating pressure points (no text or symbols)Infant Insert
The infant insert can be used to provide a snug fit for smaller babies.
In the back of the liner is an extra foam pad intended for use with low birth weight or very small babies. This should be removed when they are bigger.
Remove the infant insert from the child restraint once the baby is bigger.

Carry Handle
The carry handle can be adjusted to 3 positions.
1 To adjust the handle position, squeeze handle buttons on both sides and rotate.
2 Rotate handle until it clicks into any of the 3 positions.
The carry handle can be used in a vehicle in any locked position.
Be sure handle is locked in the carry position before lifting carrier by handle. An unlocked handle could move unexpectedly, causing injury to child.

natural_image
Illustration of a person using a tool to lift a cup (no text or symbols present)
natural_image
Three-step illustration of a dental implant procedure: head, jaw, and jaw with a tool inserted (no text or symbols)The Next Restraint
This restraint is suitable for a baby up to approximately 6 months of age. When the baby's shoulders are level with the shoulder height marker (see page 14) they should move to a bigger restraint.
NOTE: although children from approximately the age of 6 months can move to a forward facing restraint, it is preferable if they move first to a convertible style restraint which has been approved for use rearward facing up to the age of approximately 12 months.
Then when the child reaches that age they can change to a forward facing position
The next category of restraint is forward facing and has a six point harness and will be suitable for the child until they are approximately 4 years of age.

natural_image
Line drawing of a car seat assembly (no text or symbols)
natural_image
Line drawing of a car seat assembly (no text or symbols)Installation — General
Where to install the child restraint?
Only install child restraint in a forward facing vehicle seat. Never install in a seat that faces the rear or the side of the vehicle.
Install in the rear seat, the safest place is normally the centre.
This is a rearward facing child restraint. Do not install facing sideways or forward.
The base can be installed on vehicles seats fitted with either a lap belt or a lap/sash belt or ISOFIX anchorages.
To install correctly the vehicle must be on a level surface.
IMPORTANT: Correctly positioning the child restraint is important to ensure that in the event of a crash the restraint can offer maximum protection.


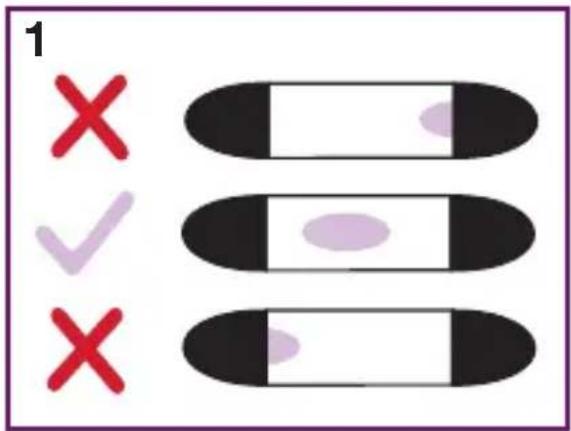
1 Position base on a forward facing vehicle seat. Use recline adjustment to position bubble in indicator.
Adjust base so bubble is between the black patches.
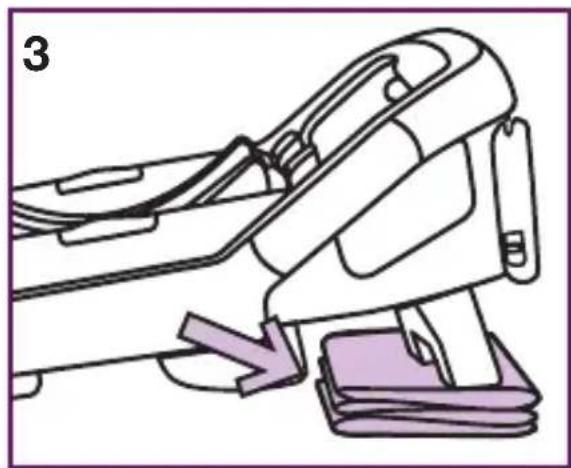
2 Use recline adjustment, if needed, to achieve correct angle for installation. Recline adjustment foot snaps into position.

natural_image
Line drawing of a mechanical device with a purple arrow indicating motion or force (no text or symbols)3 If the recline adjustment foot does not give sufficient recline, add a folded towel or similar.
natural_image
Line drawing of a mechanical device with a purple component inserted, showing a step and label '3' (no text or symbols on the device itself)IMPORTANT: Any extra padding placed under the base must be firmly folded so that when the vehicle belts are pulled up tight, the base is secure.
Installation — Vehicle Belts
Place the base on the vehicle seat and route the vehicle belt through the opening in the base labeled ‘Belt Path’ and buckle the vehicle belt. Both the shoulder and lap belt must be under the blue lock off.
Push the base into the vehicle seat firmly and pull the vehicle belts TIGHT before locking them in place.
REARWARD FACING
BELT PATH

Use the Belt Path labels as a guide for correct belt placement.

IMPORTANT: Always secure the base with a vehicle belt, even when the restraint is not fitted to it. An unsecured base may be dangerous in an accident or sudden stop.
Check
1 Vehicle belt is securely engaged in buckle.
2 Vehicle lap belt or lap/sash belts are correctly positioned in the lock-off.
3 Vehicle belt lock-off is securely engaged.
4 Level indicator bubble is fully in the clear area.
IMPORTANT: Vehicle Belts must be pulled tight. DO NOT have any slack in the belts.


natural_image
Illustration of a robotic arm gripping a blue object, with no visible text or symbols
natural_image
Diagram of a car gear shift lever mechanism (no text or symbols)
Installation — ISOFIX Compatible Connectors
IMPORTANT: ISOFIX compatible connectors are an option and may not be fitted to your product.
General
Some vehicles are fitted with low anchorage points specifically designed to allow connection by suitably equipped child restraints.
These are generally known as ISOFIX low anchorage points are found at the bottom of the back seat backrest.
If the ISOFIX low anchorage points are not clearly visible the vehicle seat will be marked with appropriate labels to show their location.
These vehicles are marked with symbols adjacent to the location of the anchorage points.
If in doubt that the vehicle is fitted with such points check the vehicle Owners Manual.
Some vehicles sourced from the USA may be marked LATCH.
ISOFIX and LATCH low anchorage points are identical.


See general installation instructions on page 23 & 24.
1 Some models come with guides for the ISOFIX compatible connectors. These are for use in cars where the anchorage bar is recessed a long way into the seats and once fitted will help guide the ISOFIX connector into place.
2 To use these:
- locate the position of the ISOFIX low anchorage,
• slide the guide in until it contacts the steel rod - allow the guide to push up until it is secure on the steel rod.
3 Swing the ISOFIX compatible connectors forward to their operating position.
4 Attach each connector to the vehicle ISOFIX low anchorages.

natural_image
Diagram showing a car interior with directional arrows and geometric shapes, no readable text or symbols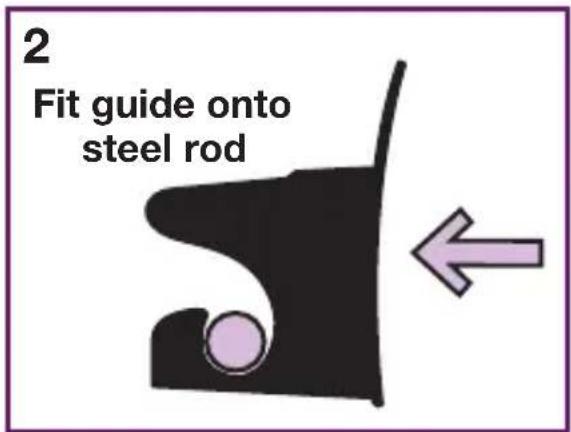


natural_image
Line drawing of a car seatbelt mechanism with a purple arrow indicating left motion (no text or symbols)5 Pull the restraint forward to ensure both lower connectors are engaged.

natural_image
Diagram of a car seatbelt with a directional arrow indicating left side (no text or symbols present)6 Check the bubble level indicator to see if recline level is still correct.
Adjust if necessary.


WARNING
IMPORTANT Do not attach the lower attachment connectors of two separate child restraints to the same ISOFIX low anchorage in your car.
Always attach the top tether strap to the child restraint upper anchorage in your car.
Child restraint lower attachment connectors and the ISOFIX low anchorages in your car are designed to withstand only those loads imposed by a correctly fitted child restraint.
Storage — ISOFIX Compatible Connectors
Store the ISOFIX compatible connectors by pressing the release button under the base and swinging them back until they are snugly alongside the base.


natural_image
Diagram of a mechanical device with a purple arrow pointing to a component (no text or symbols present)Installation — Restraint to Base
To Install
First make sure there is nothing in or on the base (blankets, toys etc). These may stop the restraint from latching in securely.
Lower the restraint down into the base. Listen for a "CLICK" from the latches in the base. Pull up on the restraint to ensure it is securely latched.
To Release
Lift the restraint with one hand while pulling up on the release latch at the back of the base.


natural_image
Line drawing of a baby car seat with hand and belt, no text or symbols present
WARNINGS – Top Tether
THIS RESTRAINT MUST BE ATTACHED TO A CHILD RESTRAINT UPPER ANCHORAGE POINT IN THE CAR.
REFER TO CAR OWNERS HANDBOOK FOR LOCATION OF ANCHORAGE POINTS.
REFER TO A CHILD RESTRAINT FITTING STATION IF NO ANCHORAGE POINTS ARE IN THE MOTOR CAR.
THIS RESTRAINT IS NOT SUITABLE FOR USE WHERE THE TOP TETHER STRAP MAY FALL INTO A SPLIT IN THE SEAT BACK OR OFF THE SIDE OF THE SEAT.
Always secure the loose end of the top tether strap to prevent it hanging out of the car or being accessible by the child.
It should be stored in the bag provided on the end of the strap.
Do not use the child restraint where this strap may fall into a split in the seat back or off the side of the seat.
ALWAYS ATTACH HOOK AND REMOVE SLACK.
CAUTION: CHILDREN CAN BE INJURED OR RESTRAINTS AND TOP TETHER STRAP DAMAGED BY UNSECURED CARGO IN A COLLISION.
SECURE OR REMOVE HAZARDOUS CARGO BEFORE USING THIS CHILD RESTRAINT.
In some vehicles without a fixed parcel shelf an extension tether strap may be required. These are available in several different lengths and can be obtained from child restraint retail outlets.
Tether Strap — Use
This child restraint has a fixed tether strap permanently attached to the restraint, and an adjustable tether strap that can be removed and left in the vehicle.
Always use this tether strap.
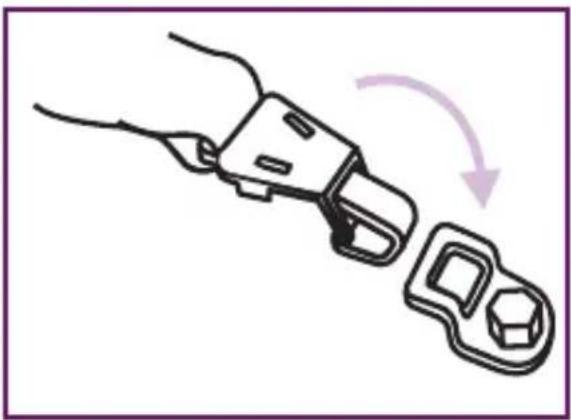
Connect the tether strap to the built-in anchorage fitting in the vehicle, or if there is not one available, install the anchor fitting supplied with this restraint by following these instructions.
Store the extra webbing in the bag attached to the end of the tether.

NOTE: the tether strap wraps around the sides of the restraint, not over the top.
Installation — Tether Anchorage
Always connect the snap hook securely to the anchorage fitting.
natural_image
Illustration of a hand holding a connector with a magnified inset showing the internal structure (no text or symbols)Adjust the tether tension until the webbing is pulled tight - but not so tight that it is lifting the child restraint off the vehicle seat.
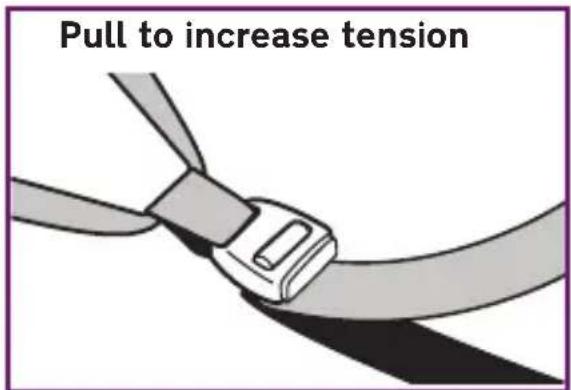
The anchor fitting must be aligned as shown unless stated otherwise in the vehicle owners handbook.

natural_image
Pure architectural line drawing of a roof structure with no text or symbolsIf drilling a new hole, select a position on the centre line of the seating position, and no closer than 100 mm from the front edge of the parcel shelf.
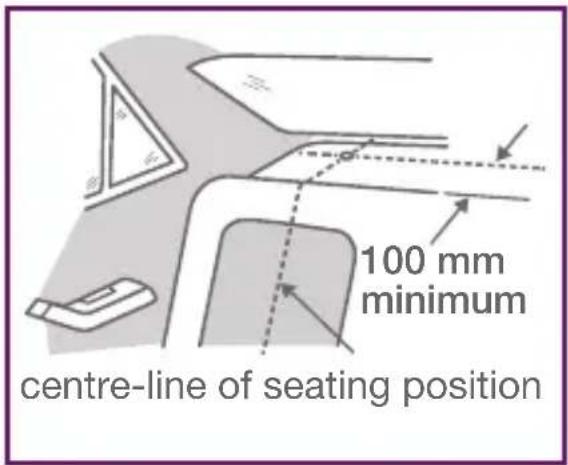
If the car is fitted with a child restraint anchorage point:
Locate the anchorage point behind the rear seating position (consult the vehicle owners handbook for location of the anchorage point). Remove the thread plug from the parcel shelf/floor/roof and install the attachment bolt as shown opposite.
CAUTION: DO NOT OVERTIGHTEN THE ATTACHMENT BOLT. MAXIMUM TORQUE 20Nm.


WARNING
CHILD RESTRAINTS MUST NOT BE ATTACHED TO UNSOUND METAL OR WOOD OR SYNTHETIC STRUCTURES. WHEN DRILLING THE 9 MM HOLE DO NOT DRILL THROUGH FUEL LINES, FUEL TANKS, ELECTRICAL WIRING, OR RADIO SPEAKERS. WEBBING STRAPS MUST BE PROTECTED FROM SHARP CORNERS AND EDGES.
THE ANCHOR FITTING MUST BE USED ONLY AS DESCRIBED ABOVE. IT MUST NOT BE HOOKED ONTO ANY OTHER OBJECT.
If the car is not fitted with a child restraint anchorage point:
For sedans only - drill a 9 mm hole in the parcel shelf on the centre line of the seating position as shown on page 27.
Install the anchor bolt as shown opposite.
For vehicles other than sedans - In Australia, consult your nearest child restraint fitting station or traffic authority for vehicle inspection to find the best, correct position for the placement of the anchorage point, and for the correct attachment bolt length and use of spacers.
In New Zealand, consult the agent for the vehicle.

Use with Strollers
PIPATM car seat can attach to Nuna strollers using adapters. Instructions are included with the adapters, which are sold separately.
Please visit www.babyhood.com.au for more information.
Cleaning and Maintenance
Seat Cover
Wash with cold water and mild detergent.
Do not iron.
Do not bleach or dry clean.
Do not twist the soft goods to dry with great force. It may leave the seat cover with wrinkles.
Hang dry the seat cover in the shade.
Plastic and Metal Parts
Use only mild detergent, water and a soft cloth to clean the car seat shell, handle and harness straps. Air dry.
Do not use undiluted detergent, or other solvents to clean - these may cause damage.
Harness Buckle
To clean the buckle: rinse using warm water. DO NOT use any soaps, solvents or lubricants. Using anything other than water can cause the buckle to malfunction. Air dry.
When the buckle is operating correctly the tongues will push in easily and the second tongue will CLICK when it latches into place.
If the buckle does not appear to be working correctly get it checked or replaced by contacting the retailer from where it was purchased, or by contacting Babyhood.
Harness Straps
Either spot clean or replace. DO NOT IMMERSE THE HAR-NESS STRAPS IN WATER. NEVER iron the harness straps, doing so may weaken the harness straps.
Storage
Remove the child restraint from the vehicle seat if not in use for a long period of time. Put the child restraint in a cool, dry place and somewhere your child cannot access it.

Babyhood
132 Compton Road, Woodridge, 4114
Brisbane, Australia
Tel: 07 3208 3555
Fax: 07 3208 8691
email: sales@babyhood.com.au
web: www.babyhood.com.au



- pipa™ klik
- Smart Design
- Contents
- Quick Reference — Use
- Shoulder Straps
- Head Liners and Infant Insert
- Shoulder Height
- Harness Straps
- Harness Buckle
- Harness Tension
- Child Position
- Suitable Clothing
- Quick Reference — Restraint and Base
- Tether Strap
- Carry Handle
- Secure Latching
- Vehicle Belt (if used)
- Base Recline Adjustment
- WARNING
- DO NOT LEAVE CHILDREN UNATTENDED IN THE CAR
- ADDITIONAL WARNINGS
- Features — Child Restraint
- Features — Base
- Securing Child in the Restraint
- Blankets
- Swaddling
- Shoulder Strap Height
- Requirement
- To Check
- To Adjust
- IMPORTANT:
- Crotch Strap Position
- Canopy
- Canopy Removal
- Accessories
- Dream Drape (out of vehicle use only)
- Seat Cover Removal
- Shoulder Pads and Head Liner
- Infant Insert
- The Next Restraint
- Installation — General
- Where to install the child restraint?
- Installation — Vehicle Belts
- Check
- Installation — ISOFIX Compatible Connectors
- General
- Storage — ISOFIX Compatible Connectors
- Installation — Restraint to Base
- To Install
- To Release
- WARNINGS – Top Tether
- Tether Strap — Use
- Installation — Tether Anchorage
- Use with Strollers
- Cleaning and Maintenance
- Seat Cover
- Plastic and Metal Parts
- Storage
- Babyhood
Brand : Nuna
Model : Pipa Klik
Category : Baby product